You should not perceive the message that you need to bring a craft made together with your child to kindergarten as another “strain” in life. At the first moment, such a thought may run through the parents’ ever-preoccupied head, but it won’t linger for long, that’s for sure.
Especially when you go online and look at what crafts you can make from the generous gifts of autumn. This is a whole fascinating world, you will definitely want to do something with your own hands together with your baby, and it will definitely be more than one craft.
This is a very correct tradition, organizing exhibitions of crafts in kindergarten on the theme of autumn with your own hands, going back to Soviet times. Psychologists have repeatedly noted the importance of this event and the active participation of parents and children in it.
We begin this most interesting work by preparing material for creativity. And where can you collect it in the fall, of course, on a walk! Together with mom and dad, on a day off, the child goes on a completely adult task, collecting the gifts of autumn.
A walk can be through the forest, or through a city park, or you can also take a walk on your property or dacha; everywhere will be incredibly interesting for both you and your child.
We definitely take bags for this important and pleasant event, because you will probably want to take as many natural gifts as possible and bring them into your home.
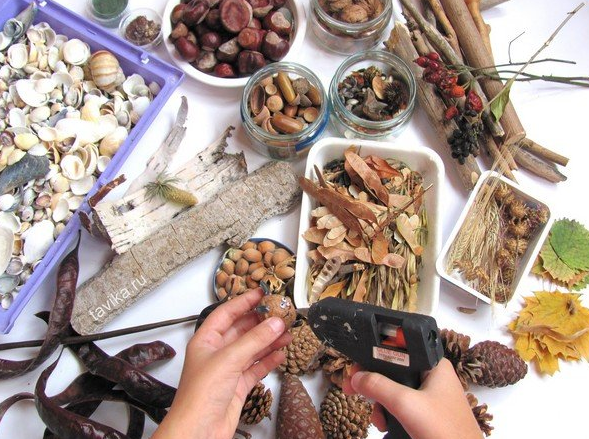
Don’t be afraid to add too much, from the remnants of the collected materials you can make something for yourself, this composition will delight your eye and warm your soul for a long time. If we briefly list what you need to collect for DIY crafts for kindergarten on the theme of autumn (photos), it will be something like this:
- leaves are bright, beautiful, fancy, of various sizes and colors;
- small pebbles as well different sizes and colors;
- cones, acorns, chestnuts, nuts;
- several tree branches of different thicknesses and shapes;
- twigs of shrubs, such as boxwood, gooseberries, currants;
- Collect branches of coniferous plants and thuja in a separate bunch;
- moss, several plates;
- bird feathers, there will probably be a sufficient number of them in a wide variety.
This short list You can also significantly supplement with attractive specimens that you like.
In addition, if you decide to make crafts for the kindergarten on the theme of autumn with your own hands from vegetables, then you should collect a small amount of them:
- apples, pears, quince;
- fruits of viburnum and chokeberry (not forgetting about the leaves), picking them along with the twigs.
- pumpkin and zucchini are also an excellent material for crafts, especially small ones and fancy shapes;
- cauliflower and broccoli;
- carrot.
You can also stock up seeds of various plants in advance; you already have some at home.

In addition, we prepare the materials at hand:
- a piece of cardboard from which you can then cut out the size you need;
- a couple of leaves of thick paper, maybe colored;
- braid of the thickness you need;
- threads;
- needle;
- scissors;
- PVA glue;
- cardboard box lid (where you can place the composition);
- pencils, felt-tip pens, paints with a brush.
We have provided the most basic set of tools; you can add or exclude something that does not correspond to your idea. Such basic lists are necessary for those who first decided to engage in such exciting creativity.

Materials
Crafts for kindergarten from natural materials
Surely, when you were walking with your child and discussing the topic of do-it-yourself autumn-themed kindergarten crafts (photo), you came up with more than one great idea. However, you can still use our advice, or take some details from the described process.
Composition with chestnuts
We put pieces of moss into a small cardboard box lid, or cover the bottom with beautiful leaves.
We carefully string large leaves onto wires and display them on the back wall of the composition. Decorate a wall of leaves by adding a dried autumn flower or a sprig of viburnum.
We make a Cheburashka figurine from chestnuts, for which we string them one by one on toothpicks.

On one of the chestnuts from below we draw the face of a Cheburashka, having first covered the surface with white paint.
We assemble the entire structure of the figurine, as shown in the photo.
In the same way, we construct a figurine of a cat and dumbbells, placing everything on the existing improvised platform. You can start working on crafts for kindergarten on the theme of autumn from natural material do it yourself more creatively and add something of your own.
Chestnut caterpillar
We prepare a stand for our craft, it can be just a piece of cardboard. Cover the stand with leaves.
We pierce the chestnuts one by one with wire, the length corresponding to the intended length of the caterpillar.
We lay our stylized caterpillar on the leaves, giving its body some bend characteristic of movement.

We decorate the caterpillar with multi-colored plasticine rings, placing them between the chestnuts.
On the first largest chestnut we depict the eyes, nose and mouth of the caterpillar using plasticine.
We stick bright horns on top, also made of toothpicks and plasticine.
Hedgehog made of plasticine and sticks
On the surface for the craft we lay out a randomly original autumn still life of leaves, thuja twigs, viburnum berries or rowan berries. The red color of these berries will add a special flavor to the autumn motif depicted on the surface.
We make roses from large leaves. To do this, we simply bend them in half and roll them into a tube characteristic of a rose. We secure the structure by making a stitch at the bottom with a needle and thread.

Having prepared a stylized fragment of the autumn forest, we begin to create the hedgehog itself, for which we sculpt it from plasticine.
Leaving the hedgehog's face untouched, we pierce the entire body with thin twigs; you can use toothpicks or matches, but with twigs it turns out more realistic.
You can place a small apple on the needles, real or made with your own hands, and you can also replace the apple with a mushroom, grape, or just a leaf, as you like.
Fragment of an autumn forest with inhabitants
On a cardboard for a DIY garden craft on the theme of autumn (photos) made from leaves, we lay out the autumn soil, as in the previous descriptions. You can create the composition simply on a blank sheet of paper.
We select beautiful leaves from various trees, place each leaf on a wire, which we wrap in brown plasticine, stylizing the tree itself.
On the prepared base, we randomly lay out the bases of the trees made of plasticine, into which we insert the trees. So it turned out to be an autumn forest easily and simply.

Now the most interesting part, from cones of various sizes and configurations, as well as multi-colored plasticine, we sculpt a variety of whimsical and bright characters of fairy-tale forest animals.
Your child’s delight will know no bounds, because modern children so lack communication with mom and dad, so this joint creativity will be a real holiday for them.
Vegetable crafts
If you don’t have enough time for a walk to collect nature’s gifts, then you can make autumn-themed crafts for the garden from fruits and vegetables. There is also a large field for the application of your creative potential with your child.
Forest pumpkin hut
We depict a forest clearing using vegetables on a surface for a garden craft on the theme of autumn with our own hands (photos). To do this, we show our imagination, lay out moss, leaves, add flowers for brightness.
We sculpt one or two hedgehogs from plasticine and seeds, choosing a place for them in the foreground of the composition.

We place a figurine of a forest scarecrow, made of carrots and parsley, a little to the side; making it, like the whole composition, is very simple and quick.
We place a pumpkin in the center of the composition, having previously carried out some preparation. First, a cut is made on the side surface of the pumpkin, then a window is cut out with a sharp knife.
We cover our forest hut on top with a bunch of straw, as shown in the photo.
Fruit bowl
Pumpkin is the most popular vegetable when making autumn crafts, it is a pleasure to work with it, and there is room for your imagination to run wild. What virtuoso carriages can be obtained using it is simply a fairy tale, but we offer the most simple crafts, for the busiest parents.
We will make a vase in the shape of a chicken, for which we first peel and seed the pumpkin, and then make artistic cuts. We cut with a slight asymmetry on one side, the height of which should be less.

We don’t throw away the trimmings, they will make a tail for a chicken, our own photos are provided for our kindergarten on the theme of autumn.
We fill our vase with various available fruits, preferably grapes and some berries.
Place a beautiful one on a small tray colored napkin and place the pumpkin with fruit, laying it on its side, long side down.
Stick in pumpkin scraps to create a beautiful tail.
On the short upper side of the pumpkin we attach a small white radish, peeled from the tails.
We stylize the radish as a chicken head with a scallop.
Place fruit on the remaining surface of the tray, our composition is ready.
Lamb with a bouquet of carrots
This is also an incredibly simple but very effective craft; you will need two heads of cauliflower, several carrots, and a pepper.
From one carrot we cut four legs, stick long toothpicks into each, and place the carrot parts on a stand ready to go.
On other carrots we make longitudinal notches in four places. Then cut part of the prepared carrots, up to about half, crosswise.

We string carrot circles onto long toothpicks to create stylized flowers. We stick the other end of the toothpick of each flower into the remaining part of the carrot, we have a vase of flowers.
Having prepared a stand for the lamb, crafts from vegetables for the garden on the theme of autumn with your own hands (photo), we proceed to its implementation. First, cut off the stalks of cauliflower heads.
We place the largest and, preferably, slightly oblong head of cabbage on toothpicks in carrots. Next, we connect the second head of cabbage to the first using toothpicks.
At the junction we strengthen the pepper of any color and decorate the eyes in any way. Two reinforced leaves will serve as our ears.
Cheburashka from potatoes
You can also submit just a cute Cheburashka for the competition; it’s very simple to do, but the result is a rather touching craft.
Take two of the largest potatoes of any color and make a cut on one side.
From another large potato we cut the head and ears, and connect everything with toothpicks. On one side of the head we make a muzzle by inserting buttons and a bead.

We make the mouth from potato scraps.
We cut two small potatoes into two unequal parts, these will be the “handles” and “legs” of the Cheburashka, attach them to the body with toothpicks.
On one side we attach a bouquet of flowers, it’s just a miracle, what a cute creature!
Zucchini and carrot machine
You choose the size of the machine yourself, depending on the size of this vegetable you have. By the way, you can make such a machine from zucchini.
We start with carrots, cut them into four wheels and the rear design of the car.
We secure the wheels with long nails with caps. We carve the rear wheel to decorate the car.

From another fruit we cut a ring, 5-6 cm wide, cut it in half, clean out the seeds, place it on the top of the car as a body, and secure it with toothpicks.
We cut out windows in the “body” at the front and back, and attach half a small potato to the top.
Great craft for boys younger age.
Cucumber caterpillar
This craft will turn out spectacular only from a long thin greenhouse cucumber.
Cut the cucumber and carrot into rings of equal thickness, then string everything one by one onto a thin wire.

We make eyes, a nose and a mouth, insert horns from green onion feathers. We place the caterpillar on a stand; you can also lay it out with leaves and moss.
Crafts from pine cones
Cones are also the most popular material for crafts; they are available and presented by nature in a wide variety. We recommend collecting pine cones on a walk in the fall as much as possible, because there are New Year, so they will still be very useful to us.
Hedgehog
From gray fabric we sew an oblong bag with one elongated end, which will be the face of a hedgehog. Turn the bag right side out and stuff it with cotton wool.
We decorate the hedgehog's face by sewing on the eyes - beads, the nose - a button, the mouth and antennae from scrap material.

Stepping back a little from the narrow part of the bag, we sew the pre-prepared cones to the hedgehog’s body one by one.
After the hedgehog is ready, we decorate it with autumn gifts, depending on what you have, so the hedgehog will be much brighter and more attractive.
You can leave the hedgehog as a completely self-sufficient craft for a garden of pine cones (photos) on the theme of autumn with your own hands. However, if you have the material and time, then it is better to additionally depict a fragment of a forest autumn landscape on the stand, where you can place our craft - a hedgehog made of cones.
Thematic composition
This craft is also very simple and quick to do, and is quite suitable for children in the younger group.
We cut out a circle from cardboard, you can lay out leaves and moss, put a sprig of rowan, make mushrooms from plasticine and distribute them in the clearing.
Stepping back 5 centimeters from the edge of the circle, we install a plasticine flagellum on our round stand, gluing it to the stand around the entire circle.

Glue the cones to the plasticine rope, pressing them tightly against each other. The result was a kind of fairy-tale forest clearing, surrounded by spruce trees. If you wish, you can also paint these spruce cones with green paint.
In the clearing you can place several large or small potato hedgehogs, which will not be difficult to prepare.
Forest inhabitants
Not only hedgehogs can be made from cones, although this is the most popular choice of authors in crafts. We offer a simple DIY craft made from pine cones (photos) for a kindergarten on the theme of autumn, a romantic scene in the forest.
The most the best option for the stand of this mise-en-scene there will be a wooden circle of any thickness, but if this is not available, just a piece of cardboard will do.
From 2 round-shaped cones and more massive ones we assemble a figurine of a forest hero, connecting them using plasticine.

From thinner and “slender” cones we assemble a figurine of a forest beauty, also using plasticine.
From twigs we select legs and arms for our forest inhabitants and attach them to the body, also using plasticine.
We attach the hero’s legs with an appropriate swing, symbolizing his kneeling state. The hands are sticks, they should be attached tightly to each other, between them we insert a beautiful autumn bouquet of flowers.
From clothes it is enough for him to attach a long leaf to the back and glue on the eyes.
You will have to work hard on the image of the beauty, choose slender stick legs, and attach them with plasticine. Hands should be open, but not for hugs, but out of surprise.
As much as our imagination allows, we dress up our beauty, and be sure to attach a rowan ornament strung on a thread to her neck.
We attach a cap to the head and set surprised eyes. What a beautiful romantic autumn scene in the forest!
Penguin family
An incredibly beautiful and very easy to do craft, it can very well decorate your home. It may seem that this topic is not exactly autumn, but this is only at first glance, nature gives us cones in the fall.
We select a beautiful stand for this craft, cut it out figuratively and decorate it at our discretion.
We paint two small cones with white paint, you can apply silver glitter. We paint two large cones and one small one with black paint.

After the paint has dried, apply white paint on one side - the chest of penguins.
On the stand we symmetrically strengthen two white cones - Christmas trees.
We attach arms, heads, eyes, beaks and mouths to the penguins, place them on a stand, add something fluffy and shiny, further decorating the picture.
Autumn is a very colorful time of the year. Knowing that cold weather is approaching, nature seems to be trying to demonstrate to people how bright and charming it can be. That is why in kindergartens and schools children are often asked to make autumn crafts.
Autumn composition
Crafts “Autumn” for kindergarten
You need to stock up on materials for making autumn crafts in advance - starting at the end of August. The collected “wealth” should be stored in a cardboard box, carefully laid in layers. If you plan to create paintings or panels from dry leaves, it is better to place them between the pages of books so that they become even and do not begin to crumble during work.

Autumn craft
For an autumn-themed creation you may need:
- cones;
- leaves different colors and sizes;
- pebbles, sand;
- shells;
- spruce or pine branches;
- dry branches of fruit trees;
- maple seeds;
- acorns;
- chestnuts;
- walnut shells;
- flowers;
- sunflower seeds, grains;
- feathers, etc.

Hedgehogs made of plasticine and seeds

Autumn forest
That is, almost everything that the surrounding nature can offer us.

Thorn hedgehogs
Vegetables and berries should not be written off either. They, of course, cannot be stored for as long as, for example, products made from wood, pine cones and dried grass, but they will be an excellent solution if you need to make an unusual craft for an exhibition in a kindergarten or school.

Butterfly made from leaves and shells

turtle house

Hedgehog made from chestnuts and rowan berries
DIY autumn crafts for kindergarten - interesting ideas
Before you start making the “Autumn” craft, you need to imagine what you should get in the end. If a child takes the initiative into his own hands, it is important for parents to hear him and understand how he wants to depict this or that animal or picture.
Autumn themed applications
Worthy of attention autumn applications. For the most part, they are produced quite quickly.

Leaf applications

Flower garden

Summer field
Collages-portraits from leaves
If parents are ready to spend more time on autumn crafts in kindergarten, they might like collages. When creating them you need not only to glue, but also to draw a little. Portraits prepared using dried leaves look especially great.

Portrait from leaves

Girl with flower hair

Original collage of dried leaves

Crafts from autumn flowers
If you really want to make a collage in the form of a portrait, but neither of your parents knows how to draw well, you can print out someone else’s sketch, decorate it with watercolors and decorate it with leaves, berries, and flowers on top. This work will also look very beautiful.
Paintings-prints
Pictures from prints of autumn leaves look unusual and, what’s important, are very easy to make. To complete them you need to prepare leaves different trees(they can be both dry and green), thick paper and watercolor.

How to make a painting from prints

colorful picture

Autumn forest

Painting "Birds fly away"

Sun from prints
The big advantage of such autumn crafts is that a small child can do them almost independently. An adult only needs to observe his actions and suggest where it is better to apply the next sheet covered with paint.
Autumn crafts for kindergarten from paper
It is not necessary to make crafts for the garden and school exclusively from natural materials. Suitable colored paper, cardboard.

Autumn leaf made of paper

Autumn tree
If these materials are not available in the house, you can also use plain white paper. And when the work is done, decorate it with pencils, watercolors or gouache.

Autumn forest
Autumn garlands
An excellent craft for both the garden and your own apartment will be garlands made of multi-colored paper leaves.

Preparing an autumn garland
They can be used to decorate walls, curtains, and lamps. The main thing is not to be afraid to include as much as possible into the overall composition. bright colors. After all, autumn is the time for yellow, red, orange, brown, beige, burgundy, green. All these colors need to be combined, then the garland will turn out incredibly bright and expressive.

Decorating your home with autumn garland

Autumn leaves made of paper

Window decoration in kindergarten

Paper leaves
How to store natural materials
If you properly store natural materials collected in the fall, they will be suitable for use until next summer. All fragile herbs and flowers should be placed in a hard-sided box. This way they will remain unharmed and no dust will appear on their surface.
You don’t have to stand on ceremony with snags and twigs - they can even lie on a shelf. Nice place there is also a storage room for them where they can be hung.

Storing flowers and plants
Chestnuts, acorns and cones should not be poured into a common container. They need to be placed in boxes or paper bags. IN plastic bags they will start to mold.
If you decide to prepare fruit seeds, you will need a paper bag. You can do it yourself - roll up an A4 sheet and secure its edges with a stapler. Pebbles and shells can be placed in a glass jar, which is tightly closed with a lid.
Autumn crafts for kindergarten become a real mirror in which the beauty of autumn is reflected. How to make autumn crafts for kindergarten with your own hands?
To create interesting autumn crafts with your own hands, you can use various materials.
Autumn crafts from leaves
For example, it is easy to make beautiful appliques from leaves. All you need is to select the leaves of the desired shape and color and pre-dry them under pressure. You can do without drying, especially if children will be working with the leaves - it is easier for them to handle durable and elastic material. It is enough to add eyes to the leaves and they transform into animals.

From leaves and paper plate you can make your favorite children's character - a hedgehog.

Applique of dried leaves “tree”. To create such an applique, glue a brown trunk with branches onto a white sheet of paper. Here is a wonderful example of a seabed leaf applique.

Application of leaves “sea bottom”
The base of the craft can be made from a leaf painted with watercolors.

Painting from leaves “sea bottom” You can make a real autumn fairy out of autumn leaves. We decorate the base with watercolor stains. We cut out the fairy's hands and head from paper. After the base has dried, glue the head. Around the head we draw a sketch of the future craft with a pencil.

From the head we begin to assemble the entire image of the fairy. The hair, crown, body and arms find their place. Gives immense scope for creativity fluffy dress fairies.

A touching autumn craft can be made from leaves and a child’s handprint.

And this is a charming turkey made from paper and maple leaves.

A video master class will help you make a rose from maple leaves:
Autumn crafts from salt dough and plasticine
The unique shape of autumn leaves can also be used to create original pendants. For example, cut out leaves from salt dough. To do this we paint salty dough in autumn colors.

We crush the multi-colored pieces into a single mass.

Using molds or a plastic clay spatula, cut out the leaves.

Dry and coat with clear varnish.

You can make an interesting herbarium from salt dough. We make a round base of the craft from salt dough. We leave an imprint on it with a real leaf.

First we paint the print itself with bright colors. Then we cover the rest of the craft with a thin layer of varnish or paint.

Autumn paintings from plasticine
A real masterpiece on the theme of autumn and study can be created from plasticine. First, we make a suitable sketch in pencil (or print it out from the Internet).

Sketch on the theme “start of school and autumn”
We make a background from a thin layer of purple plasticine. On this one we glue a globe and a book made of plasticine.

Glue letters, pencils, a pointer and a sprig of autumn maple on top. Autumn application made from plasticine - ready!

You can make a real “autumn in the forest” picture from plasticine on cardboard. We start work with the birch trunk.


Autumn crafts for kindergarten from pine cones
You can make a charming forest hedgehog from salt dough and fir cones. To make it you will need fir cone, which is then disassembled into individual flakes. These scales decorate the hedgehog's body. The body itself is molded from salted dough.

If you want to make a large hedgehog, then you can use a plastic bottle as a base. We color the top part of the bottle with a black marker - this is the future face of the hedgehog. Glue the fabric to the bottle, leaving the painted part free. We glue the cones onto the fabric, trying to position them as closely as possible to each other.

When the entire surface with the fabric is covered with cones, all that remains is to glue paper eyes and ears to the hedgehog. We attach apples, nuts, mountain ash and twigs to the back of the hedgehog. Autumn hedgehog made from cones - ready!

Look at the video on how to make a hedgehog from cones using a bottle and plasticine:
You can make a charming squirrel with an acorn from a pine cone and felt. Squirrels with acorns are real symbols of autumn.

You can make a proud autumn deer from a pine cone, twigs and an acorn. The parts of the craft are attached to each other using plasticine.

From natural materials you can make a very beautiful autumn craft “nest with birds”. We weave a nest from thin twigs. We weave leaves into the bottom, covering the gaps between the branches. From cones, chestnuts and leaves we make a bird family - a mother and two little chicks. All parts of the craft are attached with glue. We glue the birds' eyes and beaks and place them in the nest. A nest with birds made from natural materials - ready!


Using the same technique, you can make topiary from leaves.

You can make a very cozy one out of cones.

Autumn crafts from vegetables
You can build a real frigate from vegetables.

We make the sail from lightly boiled cabbage.

You can make paper sails for a boat - they will retain their beautiful appearance for a long time.

From zucchini and carrots experienced craftsmen with dad's help they will be able to design a real airplane.

You can make a funny penguin family out of zucchini.

You can make a funny cat from onions and carrots.

You can make a very funny hare from vegetables. Using toothpicks, we connect two heads of cabbage together - this is the head and body of the bunny. We cut the zucchini into two parts - these are the future bunny legs. We cut the second zucchini and attach it to another head of cabbage - these are bunny ears. We make bunny arms from peeled zucchini. We make a face for him and attach a carrot. Our bunny is ready. It will decorate any autumn exhibition in kindergarten!

Autumn craft - bunny made from vegetables
Another great fall craft is an apple caterpillar. We fasten the apples together with toothpicks. We also use toothpicks to attach halves of carrots to the apples - these are the future legs of our caterpillar.

Using a toothpick, attach the head to the caterpillar. We decorate the head itself with eyes, mouth and horns. The craft is ready!

You can make it from potatoes and carrots adorable pigs. All parts of the craft are attached to each other using toothpicks.


You can make an elephant out of beets. We connect two beets with tails together using toothpicks - we get the head and body of an elephant. Using toothpicks, we secure the two halves of the beets - these are the ears of the elephant.

We make him a pen from a cardboard box, put some paper grass and treat him with delicious nuts.

See what an amazing autumn zoo you can make from the gifts of autumn -.

You can use a pumpkin to make a luxurious vase for an autumn bouquet.

You can make a small festive bouquet from fruits and berries. Design - any, depending on the products available for sale.

Autumn crafts from needles, chestnuts, acorns and nuts
A wonderful autumn hedgehog is made from plasticine or salt dough. The hedgehog's coat is made from pine needles. Even the smallest children will find it interesting to decorate the hedgehog with needles, sticking them one after another into soft plasticine.

You can make a fast horse from acorns and matches.

Beautiful craft on the theme of autumn for kindergarten can be made from horse chestnuts and acorns - if you connect them with each other with a lump of plasticine, you get very natural mushrooms. Complement this composition with rowan berries and blades of grass - and you will get a real piece of autumn forest.

You can make a charming autumn squirrel from chestnuts and acorns. We make the squirrel's paws and tail from fluffy wire, its tummy from felt, and decorate its face with factory-made eyes. We attach all parts using a glue gun.

Chestnuts can be used to make a symbol of wisdom - an owl. We make the wings from chestnut shells.

You can make a very impressive deer from natural materials.

Autumn crafts from twigs
From cardboard box and hollow dry sticks you can make a house. The roof of the house is decorated with leaves, and the roof is made of dry straw.

You can make an autumn beauty from corn. The autumn dress is made from corn leaves and decorated with berries and flowers.

Craft "autumn" from corn
Foamiran is a type of foam rubber. This material is durable and pliable, and can be very bright and colorful. Many needlewomen and teachers have already fallen in love with it. We decided to make an autumn bouquet from foamiran. We cut out autumn leaves: birch, maple and oak. We paint them with paints, trying to emphasize the pattern of veins and edges.

To make veins, we heat the sheet with an iron and firmly press down the twig - we will be left with a characteristic pattern.

We make from plastic bottle and branches for an autumn vase. We attach the branches using double-sided adhesive tape.

Place the leaves in a vase. We complement the bouquet with natural materials: dry twigs and cones. An autumn bouquet made from foamiran is a small piece of art that will decorate a group or classroom for years to come!

Autumn applications for kindergarten
Easy to perform and beautiful applique made from pieces of colored paper. The child crumples pieces of paper and, one by one, glues them onto the base - the crown of a tree.

This application is a little more complicated than the previous one. The child crumples the paper for the leaves and rolls the brown paper for the trunk and branches of the tree.

A very bright and beautiful applique is made from colored paper and a real branch. The difference in the execution technique is that in this applique, not pieces of colored paper are glued, but tightly twisted balls.

In this applique we glue paper rings.

Very original idea make fall foliage from eggshells or pasta. Pasta or shells are colored in colored water and then dried. The material for the autumn applique is ready!

The “autumn tree” applique, made using painted pumpkin seeds.

You can use painted pumpkin seeds to make the pumpkin itself using the appliqué technique.

Pumpkin applique
If you use different ideas in your work, it is very easy to turn a group kindergarten to the real kingdom of autumn.
Autumn crafts for kindergarten from paper
Paper leaves glued to a string make a very beautiful autumn decoration.

You can make a spectacular autumn garland from paper leaves.

Beautiful themed products can also be obtained with the help of others. available funds– for example, using cardboard tubes from toilet paper: they easily transform into autumn tree trunks.

We insert autumn leaves, rowan branches and other gifts of autumn into the rolls. We place the trees on a thick sheet of cardboard and complement them with hedgehogs made of chestnut and plasticine. We will get a very simple but effective autumn composition.

You can make very cute hedgehogs out of paper.

DIY origami autumn leaf
Watch the video how to do it autumn leaf from paper:
Making some colorful autumn leaves.

These leaves can be used to make a very beautiful autumn decoration.


Autumn cards and gifts for teachers and educators
A very impressive postcard as a gift for a teacher or educator can be made using the scrapbooking technique.

Another very nice idea making cards for school autumn theme- “Postcard-apron.” Glue several layers onto the base. Before the last layer we glue the lace.

We decorate the card with an apron made of lace and ribbons.

As a gift to your favorite teacher or educator, you can make a stunning bouquet of sweets and corrugated paper.

Another example of an autumn bouquet of candies is a bouquet on a palette with pencils. All parts of the craft are inserted into a base of foam wrapped corrugated paper.

The palette is a cardboard base with lids filled with colored plasticine.

But we made such a beautiful stand for the office in the master class ““.

Autumn drawings for kindergarten
An original master class can be given to children, teaching them how to put stamps using... an ordinary apple. To do this, prepare sheets in advance with the outlines of tree trunks printed on them.

Invite the children to paint the trunk and wide branches with paints. While the paints are drying, make stamps: to do this, you need to cut a small apple into two even halves. Then we put red paint on one half and yellow paint on the other and put prints around the barrel. It turns out to be a real autumn apple tree.

You can use wax crayons to draw spectacular autumn leaves. Place the piece of paper on a regular landscape sheet. We color the junctions of the paper and album sheets.

We remove our paper sheet. We will be left with the outline of the sheet on the paper. We use leaves of different shapes and paint them in bright autumn colors. We will get a very unusual drawing “Autumn leaf fall”

One of the famous painting techniques is painting with autumn leaves.

The leaves are dipped in paint, then pressed against a sheet of paper - a beautiful imprint remains.

Stamps made from vegetables and fruits are well suited for creating autumn designs. Look what an amazing flower you can make from “vegetable” stamps.

Ideas for autumn drawings for schoolchildren

Drawing “Clear autumn day with houses and a stream”

You can paint late autumn with white trunks of birch trees.

Drawing "autumn" with birch trees
Autumn painting made from natural materials
An idea that many will love is an autumn painting made from natural materials. As usual, making crafts should begin by collecting materials: branches, flowers, moss, leaves. We also need buckwheat, some paper, a file and glue.


Autumn applications:
We paint with paints:
Autumn crafts from plasticine:
Autumn cutting templates


Autumn crafts for kindergarten reviews:
I really liked animals made from vegetables)) (alevita)
I want to make chestnut and acorn mushrooms for my child’s kindergarten. (wera)
I like the sunflower hedgehog, but it’s hard to find a sunflower))
In autumn, it’s time for competitions in kindergartens for crafts made from natural materials. Fortunately, there is such a variety of this material on the street, it’s like some kind of supermarket! Parks and squares are full of leaves of any color, take it - I don’t want it! And if you search more diligently, you can find cones with acorns, chestnuts, and also berries. So on a fine autumn day, stock up on bags with your child and go to the nearest park to stock up on materials for crafts! Such a walk will bring happiness, and you will also collect the materials from which you will make autumn crafts for the garden. Of course, you will find interesting new products. And these are the ideas we are ready to offer you for your consideration.
Ideas for crafts made from natural materials
Of course, creating crafts can be difficult in some cases. And this is all because there are a lot of ideas, but they are of little use. Indeed, in such diversity, the eyes are very wide open. To make very interesting autumn crafts with your child, use: acorns, chestnuts, cones, and leaves.
What can be created from acorns and chestnuts.
As a basis for various little men and other figures, chestnuts and acorns are irreplaceable things. To create such little men, of course, glue is useful for fixing certain parts. In general, everything is simple here. Turn on your imagination and then everything can work out.

In addition, acorns can be used to make excellent topiaries. To do this, you first need to crumple up the paper as a base. Then give the lump the shape of a ball using threads, napkins or paper towels. Then we attach our ball to the trunk, which is a straight branch, disguised with wound twine or corrugated paper, or just a ribbon. Any stable utensil will fit under the pot, and you can also decorate it with imagination.

We continue to show you crafts from autumn materials, which can be taken to kindergarten. Let's go back to the different figures. Additional elements for them can be made from anything - from plasticine, felt, fabric, paper, feathers, seeds and sunflower seeds. You can also use toothpicks. Young children mostly like to make toys from natural materials. With your help, they can easily do something interesting.


If you have an older child and he is no longer particularly interested in making little animals and people, you can suggest making an interior wreath from acorns. The basis for it is an intertwined vine, and the acorns are held on it using liquid nails or Moment glue.

Here are some beautiful autumn crafts for your kindergarten competition. Original candlesticks- also a good idea for a craft. Making them is extremely simple. Take an ordinary jar, pour acorns into it, and then place a candle in it. Of course, you shouldn't light a candle. At the crafts competition, it will be clear that everything is fine with your imagination.

Pine cones are the basis for autumn crafts.
From the cones you can make an original basket, which the child himself will then fill with rowan berries, rose hips or sea buckthorn, and mushrooms. It is made using wire, fishing line and pliers. Of course, this craft can be classified as complex. Therefore, the help of parents is very important here. But if you work hard, you will end up with a wonderful product that has every chance of winning first place in the competition. 
And if you simply paint the cones in different colors, you will get flowers, why not asters? Agree that this is very original. And besides, it’s very simple. The cones are simply painted using watercolors. Then they can be placed in some container. 
And of course, the classic pineapple version - figurines of animals and fairy tale characters. Look at all the fun things you can do. Of course, all these ideas deserve your attention.


Crafts from vegetables and fruits.
Don’t forget about the ornamental potential of vegetables and fruits (see selection of photos).


Autumn is harvest time, so we take advantage of the abundance of vegetables presented, from which we can also create something no less original. Pumpkin is the leader in ornamental production. It can be used as an independent item, such as a vase, or used as a blank for the image of a bird or animal.


Finally
Now you can find out what autumn-themed crafts you can make for kindergarten. Have fun making them! With their help, take first places at exhibitions and be proud of your creativity.
Photo gallery of autumn crafts:
Good afternoon, we continue to talk about autumn crafts. And today I have prepared a new batch of ideas for crafts on the theme of autumn. Here will be the most beautiful work, suitable for both children in kindergarten, and more serious art objects worthy of the hand of a master. The most various crafts you will find autumn themes in our other articles - And at the end of the article I will also give you a list of links to other children's crafts for this fall.
Well, let's get started, let's see what beautiful and simple crafts I have prepared for you today.
Origami
On the theme of autumn
Using the quilling technique.
Autumn means beautiful golden leaves. From narrow strips of paper you can transfer openwork beauty autumn leaves. In the photo below we see simple openwork twists using the quilling technique. For such airy leaves you don’t need a lot of paper. And such work is quite easy for children to do. school age.

Young children can fold simple leaves - where each element of the leaf is ONE single large quilling twist.

And more complex leaf crafts on the theme of autumn are made in several stages. First we draw outlines on a piece of paper maple leaf. Then we fill this silhouette with twist modules - starting from the center and gradually moving to the edges of the silhouette. After the entire interior of the sheet has been collected, all that remains is to paste one continuous strip of paper along the entire contour edge of the craft.

Or you can start making crafts with veins(as in the left photo below). First, stretch the veins from strips of paper - following the drawn contours of the veins on the paper - stick a pin into the end of the drawn vein, stretch a strip of paper, wrap it around the pin and glue the second half of the strip to the first half. After all the veins have been collected and secured with pins, we begin to lay out the twisted paper modules.

There are different quilling techniques for creating patterned twist modules. By alternating different patterns and shades of color, you can create real masterpieces-crafts on the theme of autumn (like these oak leaves with acorns in the picture below).

Quilling modules can be stacked in autumn painting-panel(as in the photo below). I explained in detail how to make such shaggy flowers and showed them in photographs in a special article.

Birds, rowan branches, squirrels, and hedgehogs may appear on quilling paintings and crafts on the theme of autumn. Everything that has to do with the autumn forest.


If you are just starting your first steps in the quilling technique, then it is better and easier to make an autumn theme Rowan craft.

This craft has simple berries - round twists. And simple leaves - twists in the shape of an eye (that is, the same circle-twist was first loosened and untwisted, and then squeezed with fingers on both sides, giving the shape of an eye).

Children of primary school age They already have dexterous and strong fingers enough to twist and flatten quilling modules themselves. Therefore, they will also be able to do simple crafts on the theme of autumn using the quilling technique.
For example, it’s easy to make a hedgehog like this and a round, relaxed, bull’s-eye cord.

There are many more ideas and ways to make an autumn hedgehog craft both using the quilling technique and from natural materials and from paper you will find in our article.
And when the child gets the hang of it, you can give him tasks-crafts with already Big amount quilling modules (as in the photo with autumn crafts below).

To make such children's crafts, it is better to use stencils. Many quilling stencils on the theme of autumn can be found on the Internet. I plan to write a separate article on autumn quilling and will publish it ready-made stencils full size. In the meantime, for starters, here’s an idea for an autumn tree made from rolled paper.

Autumn themed crafts
Made from corrugated paper.
Thin crepe paper(crumpled or corrugated) is suitable for very beautiful autumn-themed crafts for children. You can make a tree craft from a roll of toilet paper. Or an autumn flower craft on an ice cream stick leg.

The most important thing is to learn how to make multi-layered lush pom-pom flowers. In the article “” I give detailed explanations of how to make such lush flowers quickly and easily with children’s hands in kindergarten.
And here they post this sketchy photo instruction. And I give step by step description your actions.

Step 1– place colored sheets of paper on top of each other (crepe paper or colored table paper napkins)
Step 2– we fold this stack of colored bougie layers in the form of a regular accordion (as when making a paper fan)
Step 3– make a rounding at both ends of the folded fan with scissors (this is so that the edges of the flowers are oval)
Step 4– we pull the middle of the fan with wire or rope and tie it in a knot.
Step 5– we move the blades of our fan apart from both ends and in both directions – and we move the colored paper layers apart, peeling them apart from each other. We get a lush rainbow cloud.
And now we either partially insert this cloud into a tree trunk (a toilet paper roll) or attach it to the stem of a flower (an ice cream stick or a long skewer). And in the end we get a wood craft. Or craft an autumn flower.
Craft for autumn.
Newspaper wreath.
An ordinary newspaper can be a beautiful autumn gift or a craft for a school competition on the theme of autumn.

Newspaper sheets We paint with gouache in different autumn colors. Next, we fold each sheet in half several times and trace the silhouette of the blank for the future petal on it. The silhouette can be in the shape of a triangle (or a heart). We cut out such colored silhouettes. And now we twist each of them so that the point of the triangle (or heart) looks up.
We roll thin newspapers tube-bundles. From them we twist the body-base for the wreath. We fix it with wire or rope.

Autumn themed crafts
From ordinary cones.
Pine cones are a very versatile craft material. You can use them to make animals and birds and many other autumn-themed crafts for children. I have a separate article Crafts from pine cones and there is a whole menagerie on this topic. And in this article I want to show the other side of the bump. Her beautiful inner world.
Namely the world of cones in cross-section.
If you cut the pine cone in half with a knife. Then we see a flat center with scales similar to petals of a wooden flower. You can use tongs to pull out the excess petal scales. Or, on the contrary, glue it with glue and add petal scales to this cut of the cone.
And then decorate everything with gouache. Draw the colored edges of the petals, draw the middle, and even paint the fluffy stamens with thin brush strokes (as in the photo below). It turns out beautiful flowers from cones.

Children really like crafts for painting pine cones. You can make entire wall panels from flowerbed cones on the theme of autumn.

But below we see blanks for a cool craft - AUTUMN FLOWDER BED. Do you see the orange flowers that look so much like marigolds? Here, in the middle of a cut from a large cone, a small cone with lush open scales is inserted. Everything is beautiful in yellow. We paint the edges of the scales red. And it turns out to be the spitting image of a marigold flower. You can put together a realistic bouquet. Open the Internet and see what shape and coloring they have, and use gouache to repeat the same shades, stamens, stripes, specks - and you will get an autumn flowerbed that looks like a real one.
This is a very chic craft that is quite simple to make. With such a flowerbed you will win any school craft competition on the theme of autumn. Rest assured. Moreover, I will now reveal to you three little secrets, How to achieve perfection in this craft...

Little secret. How to beautifully reveal the scales of a cone. Soak the pine cones in hot water. They closed themselves off from the water. Remove from the water and place on a baking sheet in the oven. We fry them at a low temperature and they open up beautifully - spread out evenly in all directions.
And another little trick. To make your flowerbed of cones smell fragrant, you can use aromatic oils (sold at the pharmacy). We put the opened cones, even before coating them with gouache, in a tight cellophane bag - drop a few drops of aromatic oil into it - you can mix it, drop a drop of different things (it won’t spoil it). Close the bag tightly and shake so that the droplets are distributed throughout the bag. And let the cone lie there for a day and soak it properly.
And one more small nuance. How to make your flowerbed sparkle. After you have applied the main color and drawings, strokes, specks, etc. with gouache. You need to spray hairspray on top. This will fix the paint, it will not stain your hands, and the color itself will become two tones richer and brighter.
The middle of each cone flower can be decorated with a round acorn cap - also painted with colored gouache (as in the photo below). From such chic flower cones you can make entire wreaths-crafts on the theme of autumn.

You can not decorate the decorated cones in the form of flowers, but simply stick them on a cardboard donut ring cut from a large pizza box.

Autumn themed crafts
Made from natural material
Using mosaic technique.
All children love bulk cereal applications. And this is good. Because it's useful. Autumn mosaic applications made from cereals and seeds greatly calm the psyche and develop fine motor skills.

You can add curly pasta to the cereals. We attach the material to plasticine or glue from a hot gun.
Young children can be given simple mozika crafts on the theme of autumn. For example, here’s a craft in form of an autumn tree All the kids in the younger group of kindergarten really like it.
We paint in advance watermelon seeds(or pumpkin seeds) in different gouache colors. And children use pva glue to lay out entire panels of these colored seeds.
And it’s even faster to make mosaic material on the theme of autumn from colored maple leaves. We simply cut them into cubes and pour them into bowls. Children choose the elements themselves and stick them on the crown of the drawn tree.

Here's another simple ideas crafts on the theme of autumn for children in school and kindergarten. An autumn leaf is divided into sectors and each sector can be filled with a material of different texture. If there are no seeds or cereals, each sector can be filled with chopped mosaics and maple leaves, but of different colors - a sector of yellow, a sector of green, burgundy, orange, red, etc.

And hedgehog crafts made from natural materials, beloved by all children. The spines of the hedgehog can be made from watermelon seeds and their winged maple seeds. And the apple on the side of the hedgehog can be made from a walnut shell.

A craft on an autumn theme may have an unattractive color, but the different textures of the bulk mosaic material will make it chic. The combination of rice, buckwheat and barley will give us a beautiful boletus mushroom.
Light oatmeal and maple seeds will help you make a wonderful squirrel with your own hands.

And here is my favorite combination of a mosaic of dry leaves and acorn caps.

You can make this beautiful craft with your own hands on the theme of autumn - a silhouette of a squirrel from acorn caps. We print the silhouette on the printer. Cover it with black gouache. And use a hot glue gun to attach the acorn caps. A beautiful craft as a gift for friends and family.


MOSAIC techniques
for crafts for autumn.
Mosaic of lumps . The lumps may be paper (crumpled balls of crepe or corrugated paper).

Or the lumps may be made of colored plasticine (as in the photo of the craft below).

Mosaic for adult art crafts on the theme of autumn may consist of more expensive material - buttons and beads. Autumn is rich in ideas for crafts made from buttons. These can be trees, pumpkins, and a red fox like autumn - the queen of the autumn forest.

But the child also loves to work with buttons. You can glue the buttons using a glue gun or plasticine. You can lay out a long sticky path with your own hand using a glue gun, and your child can quickly fill it with bright buttons and sequins (as in the photo of the autumn craft below)

Autumn mosaic made of paper. This is a children's craft. When a sheet of colored paper is cut into squares. Each color is poured into separate bowls and the child begins to post a picture. It looks beautiful when everything is laid out on a black background, that is, black cardboard will do.

How smaller child the simpler the mosaic task should be for him. The outlines of the future drawing should be drawn in advance on the background and serve as guides for the child as to the boundaries of the layout of the elements.

You can cut mosaic material different sizes. In order to fill each sector of the painting with a different texture - small or large, cubic or triangular.

Can be cut from thick cardboard uneven pieces of the future mosaic. First, cut the cardboard into jagged strips with curved edges. And then cut these long strips into short pieces, also very diagonally and moving unevenly with scissors.

Assemble a craft from such crooked cardboard elements. And then cover up the cracks. Apply PVA glue to the gaps between the cardboard and fill these places with fine sifted river sand or sifted barley grits. Dry and top coat with hairspray so that everything shines with gloss. The result will be the effect of a real ceramic mosaic. An excellent, quite simple and chic craft on the theme of autumn. Suitable for both children and parents - everyone will find their own portion of work in both cutting and display.
Crafts from autumn leaves
using the print technique.
This is not the first article on the topic of autumn that we talk about the technique of imprinting maple leaves. Because a properly made print is very beautiful. Children really enjoy these art activities where they can make stamps and prints. Against the background of such a sheet of paper stamped with leaves, you can make autumn applications with a squirrel or a hedgehog.

Children's crafts from leaves
On the theme of autumn.
Children love to make elegant crafts from autumn leaves. On our website there is a large article on a variety of techniques for this. children's creativity Leaf crafts
In this article I will show you some more ideas for children. These cute flowers with eyes are suitable for school and kindergarten age.

We cut out a round piece of cardboard, glue white eyes on it and draw a smile and eyelashes with a marker. Turn the cardboard disk over and reverse side We attach the leaves to glue or plasticine so that they look like half a leaf over the edge of the cardboard round. On the back side of the flower, attach a tube-leg to plasticine or tape and place the flower in a vase made from a toilet paper roll.
Here is a beautiful applique of round aspen leaves. Or maple leaves cut with scissors in the shape of a circle. We glue them onto a sheet of paper, add sticks at the top, and glue the silhouette of the bowl in which they lie at the bottom. A simple craft for young children on the theme of autumn.

You can take a sheet of paper and stick autumn leaves on it in a chaotic manner. And cover this sheet of paper on top with a sheet of cardboard with a silhouette hole cut out in it in the shape of a maple leaf.

You can also make a carpet from deciduous fabric. Cut out an even circle from it. And we can laminate the round paper on a laminating machine useful craft stand for table setting.

You will find even more interesting techniques for working with autumn foliage in the article.
Crafts for autumn
from leaves and paints.
Leaves can be painted with paints. And they will have new craft opportunities. The painted leaf takes on a new creative life. Here's how it happens.
We took a long willow leaf and covered it with a pattern. We look at it and understand that it resembles the long feather of a marvelous bird.

Then we draw a new leaf feather and another, each time changing the pattern. Then we lay out the feather leaves on the table and now we see the silhouette of the future craft. A beautiful firebird.

It is not easy for children to draw neat patterns with a thin brush. And it is not necessary. Let the children's decorated leaves be brightly spotted, not necessarily with an even symmetrical pattern. All the same, these works will be beautiful.

In adulthood, entire mini-paintings can be painted on large leaves. I will not talk in detail about the technique of such painting on autumn leaves; I have already talked about this in the article

DIY lamps
The theme is autumn.
This craft requires working with a sharp paper knife or blade, so children should not try it on their own. Let an adult cut out the inner parts of the sheet. A clear master class below will show all the steps. They are simple and understandable.

We cut out a long strip of cardboard - fold it into 4 parts - flaps, plus on one side there should be a small overlap - reserve for gluing. In one of the halves of the sides we cut a hole in the form of a sheet with a knife. Glue parchment on the inside. Glue the flaps together to form a hollow cube. And inside we put a glass jar with a candle with a tablet at the bottom.

By the same principle you can do candle holders made of thick packaging paper and rolled into a tube. We cut out the silhouette of a maple leaf on it, and glue transparent parchment paper painted with watercolors in a delicate color onto the back side. We roll this two-layer sheet into a roll and fasten it with a stapler. We place a candle or a garland of LEDs inside.

And here are some more jars-candlesticks, The simplest crafts on the theme of autumn. The jars are coated with gouache blots, or pasted over with pieces of colored napkins and onto this blotted background we paste the silhouette of a tree trunk with branches. And you're done.

You can paint the jars like this with a hole in the shape of an autumn leaf. Cut out a sheet of paper. We glue it onto regular soap on the side of the jar. Cover the jar with acrylic paint. We wet the paper sticker with water - the soap gets wet and the sheet peels off. It turns out to be a candlestick. Pour grain inside and place a candle.

You can also white Christmas LED garland decorate with autumn leaves - tie foxes to each diode with tape and get a glowing autumn garland. A beautiful craft on an autumn theme to decorate your autumn holiday.

Crafts-embroidery
on the theme of autumn.
If you loved to embroider as a child, then this fall you can make an embroidered craft with an autumn theme. It can be a beautiful yellow-green-red leaf, made in different techniques embroidery stitch (as in the photo below).

This could be a landscape painting on the theme of autumn, made using the satin stitch technique.

You can aim for a large canvas with many elements. Or you can make a simple autumn tree.

You can decorate with embroidery useful thing- for example, a pillow. A great DIY gift with a fall theme. Pattern for this embroidery you can draw it yourself watercolor paints on paper in small squares- This kind of paper is sold in the drawing department.

Bead crafts
on the theme of autumn.
And autumn leaves look beautiful if made from bright beads. There are a great variety of beading techniques, so there are many ways to make an autumn leaf out of beads. Here I offer the simplest one - accessible to children, the one that is taught in children's creativity clubs. We make the outer frame of the sheet with a central vein from thick wire. And we braid this frame with thin wire, stringing rows of beads onto it as we weave.