Christmas tree made of corrugated paper
Master class "Here it is, our Christmas tree ...". Paper plastics.
Here it is, our Christmas tree,
In the blaze of radiant lights!
She seems to be the most beautiful
All greener and more lush.
A fairy tale is hidden in the green:
The white swan swims
Bunny slides on a sleigh
The squirrel gnaws nuts.
Here it is, our Christmas tree,
In the blaze of radiant lights!
We all dance for joy
On New Year's Day under it!
(V. Donnikova)
The master class is presented for teachers and children up to school age.
To make crafts you will need:
1. Green corrugated paper
2. A4 cardboard
3. Scissors
4. PVA glue
5. For decoration: bow and beads
6. Pencil

Step-by-step process of making a Christmas tree:
1. We make a cone from a sheet of cardboard.
We draw a circle of arbitrary radius on the sheet, cut it out and fold it.

2. Then, it is necessary to wrap our cone with corrugated paper, grease the edges with glue.

3. The next step is to make "needles" for our Christmas tree.
We need to cut strips from corrugated paper and on the long side of the strips we make a fringe.

4. Now we wrap our fringed stripes on a pencil - these peculiar rolls will be the needles for our Christmas tree.


6. Here is our Christmas tree and it's ready! It remains to decorate it. We attach a bow to the top of the head and wrap it with beads. To decorate such a Christmas tree, you can use whatever your heart desires: beads, buttons, ribbons, confetti ... ..


A corrugated paper Christmas tree is lush and beautiful. On the eve of the New Year, be sure to make such a Christmas tree with your child, or maybe several, to decorate each room. This craft is the main symbol of the most beloved children's holiday so it will be great. New Year's decor dwellings, decoration of any surface, the pride of the child.
Materials for a homemade Christmas tree:
- Corrugated paper. Any will do. I have thin paper, the Christmas tree turned out to be fluffy, at least a little disheveled. From thick corrugated paper - a more perfect version of spruce, with even, beautiful branches.
- A kebab stick to which all layers of the Christmas tree are attached;
- Double sided tape;
- Chenille fluffy wire yellow or golden for a star;
- Scissors, pencil, ruler, thread, glue stick;
- Sequins to decorate the Christmas tree.

How to make a Christmas tree from corrugated paper: step by step instructions
The Christmas tree consists of tiers-skirts, the more of them, the higher and fluffier the forest beauty. I made a Christmas tree from 7 layers, they needed rectangular pieces of corrugated paper of different sizes:
- 40:20 cm
- 35:18 cm
- 30:16 cm
- 25:14 cm
- 20:12 cm
- 15:10 cm
- 10:8 cm
If desired, you can add a couple of large layers a few centimeters more than the first, or add one small one to the top, less than the last, seventh. But small ones are harder to make.
Important: you need to cut off the strip from the side of the wide part of the corrugated paper, that is, across the longitudinal stripes on it, and then the branches will be even. I cut off two parts incorrectly, as a result, the ends of the Christmas tree curled up.

Layer preparation
When all the segments are ready, they need to be turned into “layer skirts”. To do this, take one rectangular segment, turn the narrow side towards you and fold it into an accordion, about 2 cm wide. That is, bend the strip in one direction, and then in the other.

Press the harmonica into one solid strip and cut off the corners at the ends to make peaks.

In the same place in the middle, fasten this accordion with a thread. Just tie it, but you don't need to pull it tight. The main thing is to tighten the knot so that the part does not come loose at the most inopportune moment.

Now the sides need to be glued to make a round spruce skirt. You can do this with a stapler, perhaps with glue, but I like to work with double-sided thin tape the most. Glues everything together with lightning speed and thoroughly. I glued a strip of adhesive tape on one side of the accordion and on the other side, removed the top film and connected it to the opposite side of the accordion.

I also did it with the other side to get a round part - the lower tier of the Christmas tree made of corrugated paper.


Make 6 more such tiers according to the indicated sizes (or your desired ones), but the width of the accordion can be decreasing, a little less than 2 cm.

Christmas tree assembly
Fold the fluffy chenille wire in a zigzag pattern to make 5 peaks, and there is also some wire left to attach to the kebab stick.

Complete the asterisk by connecting the lower parts.

Attach the star to the blunt end of the skewers with a small piece double sided tape.

On the sharp tip, put on all the layers of the Christmas tree. Only since the top is already ready, you need to start with the smallest tier and finish with the largest.
Well, the fluffy corrugated paper Christmas tree is ready. For stability, I stuck it in a piece of foam. But you can think of some other support. For example, cut a plastic cup, put plasticine on its bottom, stick a Christmas tree, and put cotton wool on top. Or there are small wax containers that can also be a good support for the Christmas tree.

Hang toys on the Christmas tree, that is, glue, using a glue stick, multi-colored sequins.

I also recommend doing another one. fluffy beauty — .
Green beauty. Christmas tree making master class crepe paper with step by step photos.
teacher additional education Novichkova Tamara Alexandrovna MBOU DOD Lesnovsky House children's creativity.
Purpose: The master class is designed for children of primary school age, teachers, educators and parents who find time to communicate with their child. Nothing brings children and parents closer than a joint creative process. A green beauty made with your own hands will bring a lot of pleasure and great joy. The Christmas tree will be a wonderful gift for the holiday and will decorate the interior of the room.
Target: Making a Christmas tree from crepe paper for the New Year holiday.
Tasks:
- to interest and involve in the work of making a Christmas tree;
- to teach the technology of working with crepe paper;
- improve the skills of working with scissors, wire, observing the rules of safety;
- develop fine motor skills hands, eye;
- educate diligence, accuracy, respect for nature;
- create a festive mood.
Materials and tools:
Green crepe paper;
- thin wire, rod for the barrel (thick wire);
-glue pencil, scissors, ruler;
- a pot, polystyrene;
- green tape.
- decorations for the Christmas tree (toys, snowflakes, tinsel).


On the eve of the New Year holiday, mass cutting of Christmas trees begins. According to a long tradition, people go to the forest, to the Christmas tree markets and bring home live Christmas tree. The unique smell of spruce needles fills the whole house. A Christmas tree decorated with toys, sparkling in garlands, pleases the eye. The tree becomes the center of everything new year holiday. Gifts are hung on her, round dances are danced around her. But let's think! How many green beauties were cut down, so that in a week, or even earlier, they were thrown into the trash. Entire landfills lie yellowed, no longer needed Christmas trees. Sorry sight! I would like to tell people: “Do not cut the Christmas trees! Let them live and delight us not only in winter, but also in summer.” It is good that in our time the environmental problem was paid attention. Since the beginning of the 20th century, fashion has been artificial Christmas trees. And this, in my opinion, is an excellent way to save spruce on Earth. And children need to be told more often that cutting down a living tree is a crime for our Planet. Cutting down a tree will take several minutes and in order for a tree to grow, it will take several years.
Today I want to offer a master class on making Christmas tree from crepe paper. Having made it with our own hands, and even together with the children, we will save live spruces.

Step by step manufacturing Christmas trees.
Cut pieces of 6 cm from a roll of green paper.

We straighten the rolls and cut them into strips 25 cm, 15 cm and 10 cm long. We will need 9 long strips, 12 medium strips, and 13 short strips.


We take each strip, fold it with an accordion and cut into narrow “needles”, not reaching the edge of 2 cm.


Lubricate the edge of the strip with glue, attach the wire and begin to twist. Fingers tightly press the paper to the wire, gradually lowering down.


It turned out here is such a branch. We make them according to the number of stripes.


We do the same with the other stripes.


Now we have these branches.

Let's make a magnificent crown for our Christmas tree. Take two long strips at once and carefully twist onto the wire.


Let's form branches in tiers. The first tier will be made up of single small branches. There will be 5 of them.

For the second tier, we will connect a branch of medium length with two short ones.

There should be four branches.

We make branches for the third tier. We twist a long branch with two medium ones in length.


We will also make four such branches.

We form branches of the fourth tier. We will need one long, two medium in length and two short ones. We twist them together.


We got such fluffy branches of the fourth tier. If you wish, you can make the fifth tier. And your beautiful Christmas tree will become even taller.

Twigs for each tier are ready.


Let's start assembling. To the "trunk", with the help of electrical tape, we fasten the crown, then we attach the branches of the first tier.


We also do with the branches of the second and third tiers. Our Christmas tree is growing before our eyes.


We wrap the trunk with a strip of green crepe paper to match the needles.


We insert the foam into the pot, make a hole.
We put the Christmas tree, well lubricating the end of the trunk with Titan glue. We admire.


We'll dress up. There are many options. We use toys, tinsel.


Could be so. Blue balloons and next to it is the symbol of 2015.

I want something light and clean. Snow of course! And the real Santa Claus! If you really want, there will be snow, there will be Santa Claus!
Hello!
Today, on the eve of the New Year, I would like to offer you another wonderful craft that we will make out of paper. This voluminous Christmas tree, which you can easily do with your own hands right now. Because you will have everything you need, these are diagrams and the necessary templates. The forest beauty will turn out lush and fluffy.
Well, if you want to do the work more complicated, you can look in, there we created products from various improvised means, and even made a stomp.
Do not forget to decorate your apartment with others.
Well, let's start looking at and choosing the works you like and roll up your sleeves to create and surprise everyone. I wish you all good luck and patience.
You always want to make such an ornament yourself, because it will look original and at the same time beautiful. All you need is a sheet of paper from which you can easily fold an amazing craft in the form of a Christmas tree.
In addition, such work can captivate your child and he will be happy to sit and bother. Well, take a white sheet or possibly colored green, but then double-sided. Bend it in half with its short side. And draw a Christmas tree symbol. Here are examples of templates that can be used.

Then start cutting along the lines, and then make cuts and fold them in the way shown in these pictures. You need to make a blank in triplicate, and then glue them together. It will come out stylishly and very openwork, but also of course voluminous, which will undoubtedly please everyone.

The next option is no less interesting and charming in its simplicity. Take these stencils and print on the printer, and then you will get a work in the form of ZD.


Where you see the main contour, take it and cut it out with scissors, but in the recesses, make only notches so that you can turn it out afterwards, as shown in the photo. Two blanks of the same shape are further glued together.

And if you really want to surprise or slay everyone, then make a whole composition, that is, a forest beauty, and not just one, but with a deer.


And another version of 3D crafts, which I propose to cut out on a simple landscape or office sheet, and then paint with gouache paints to make a real masterpiece.
You can use a can of glow-in-the-dark spray paint to create a shimmery effect.

Look at the zeal and desire with which a child does such work.

And here is what we end up with. The beauty is indescribable.

The next option, also quite interesting, is a Christmas tree made of green paper in the form of eyelets, read this instruction and create with me. This year we made such a charm with my son. It came out great.


Well, if you still have some questions, then I will be happy to share with you this video, which shows this master class.
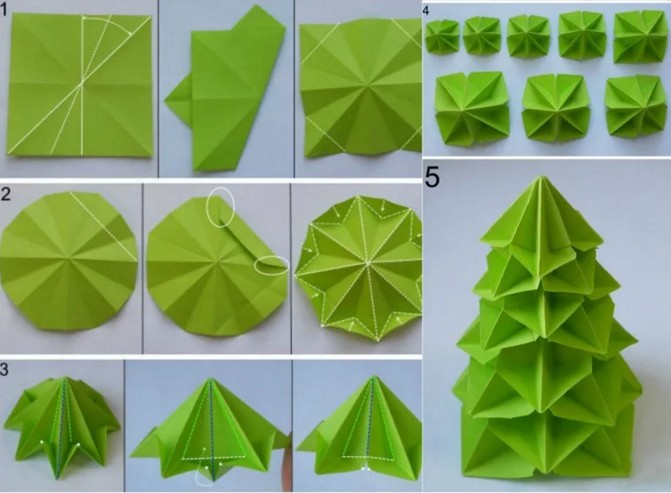
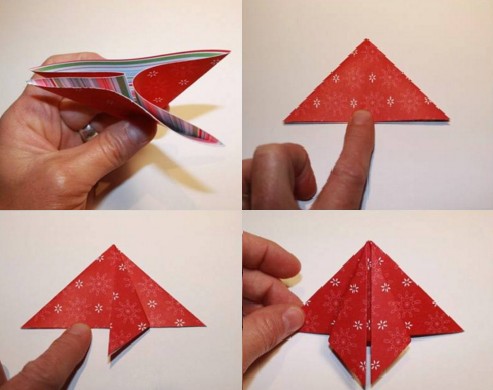
Christmas tree in origami technique (a simple diagram for children with a description)
I think that in childhood everyone was fond of such an activity as origami. All because, it would seem from an ordinary sheet, once an amazing result comes out. Preparing for this article, I did not even suspect that such an ornament as a Christmas tree can also be made using this technique. Imagine, and that's what I was lucky to find.

Any old book without a thick cover or a notebook will do. And the sequence of actions for folding will be as follows. Fold all the pages of the book from the left corner to the middle.

And then complete the bag, that is, one more fold.

Cut off all excess, do it carefully and efficiently, take your time.

After unfold the product on the table, and sprinkle with tinsel or sparkles.

If you decide to make the work a little more difficult, for example, if your children are already going to school, then you can offer them to create such a forest beauty.


The next work that is done in labor lessons in primary school or classes in kindergarten. The description and all folding steps are shown in this illustration. Get on with the job.

If you love modular origami, and own this technique, then make such a souvenir.

How to make a voluminous Christmas tree from corrugated paper for the New Year 2020

We will need:
- cardboard or thick paper
- green crepe paper
- any glue
- scissors;
- bows, red paper, beads
Stages:
1. Make a cone out of ordinary cardboard, then glue it with corrugated paper.

2. Now it remains to build branches, like needles for a future product. To do this, cut the corrugated paper into strips, cut the edges to make a fringe and twist each one onto a wooden stick into a reel. You get something that looks like a flower.

3. And glue the workpieces to the cone using the facing method. For spruce with a height of 15 cm, you will need 120 small blanks in the form of lush flowers. You can take a ready-made bow for decoration, or make it yourself from the same corrugated paper. Use also cotton wool with sparkles, this will give the tree a chic and elegant look.

The next option is no less intriguing, as if the Christmas tree is made in a spiral, an ordinary paper cone is also taken as a basis.

Make a base for the tree to make the following. Use glue, scissors and thick paper or cardboard.

2. Take corrugated paper 18 cm wide, but the length should be about 2 m. Fold the strip in half with the long side. Apply glue from the edge, leaving a gap of 1 cm.

3. And start to tighten a little to get a skirt.

4. Wrap the product with such a prepared strip, drip glue in some places so that everything sticks tightly.
Wind it only in a spiral to make the work voluminous.

Here's another amazing option.

Forest beauty from colored paper and cardboard
The next beauty will be made of colored cardboard, but make decorations from colored paper. The Christmas tree is folded in such a simple technique that you can create this one in a couple of minutes. great gift or a souvenir that can be stored for a long time on a shelf.

You will need three blanks in the form of semicircles of different diameters, on which make such a fringe. Then fold and glue each sample to form a cone. Then, on the largest cone, put a little less on top and then smaller.


There is another option, which is made from one paper cone and covered with circles. He looks amazing, you can't take your eyes off him.

By the way, I found a similar work in this story, who needs to dare. There, the author came up with the idea of making mugs with the help of one little thing, in general, see everything for yourself.
In addition, you can still completely fold the Christmas tree in this way, using circles as a basis, and use wooden caps instead of a stand.


If you are overwhelmed wrapping, then twist a bag out of it, cut off the edges so that they become round at the base and decorate.

Moreover, you can make a huge craft in this way, while gluing several cardboard sheets.

Then decorate the cone with packaging and glue the edges to the base.

Trim everything you don't need and decorate with stars or balls.

Now let's do the craft using cardboard, which we will fold.

To create such a product, print out this stencil.

After attach to the cardboard and circle the stencil, cut it out. And fold it in half. Make 8 pieces of such products.

Pass the edges of each Christmas tree with a hole punch, and then, where the middle is, the fold line that you made before, walk along it with double-sided tape.

Now it remains to sew the edges, where the holes are.


Apply glitter or artificial snow from an aerosol and put a star on top.

Next work, take a cardboard base and stick a stick into it and secure with glue. And then cut out circles from old postcards different sizes and stick on a stick.

Something similar can also be done from wrappers or just newspaper or magazine sheets.

Or you can create a souvenir from children's hands. It also looks good, especially since schoolchildren or preschoolers are always happy with such work.

By the way, here is another idea from a newspaper or magazine.


Can you make a green tree out of an accordion? Fold a salad-colored office sheet in the shape of an accordion and pierce the middle with a hole punch. Insert a stick into the resulting hole.


Among other things, on the Internet, I saw such a lovely composition.

Who is much for what, there are so many ideas, take it and do it, friends.

A simple toy can even be obtained from ordinary ribbons, which you cut, and then roll up with a snake and connect.

Here are a couple more ideas, write your suggestions or corrections, how and from what else you make such pretty Christmas trees.


Even from the leaves for recording, and then, they managed to create a real masterpiece.

For children kindergarten such a work is suitable, take a thick cardboard and cut it in the shape of a triangle. A base will come out, on which ask the child to stick the strips.

Well, in conclusion to this chapter, here is another invention, this is a quilling herringbone.

Master class on making a New Year's tree from napkins
It turns out that you can also quickly build a Christmas tree from ordinary napkins, and if you fantasize with color, it will turn out to be absolutely unique.

Such a masterpiece is made in such a way that circles are drawn on a napkin, and after that the middle of each figure is connected with a stapler. Then cut along the contours of the workpiece.

And straight to the middle, begin to crumple the edges, lifting them up. To make a flower. And then glue to the conical base, which you make in advance. You can even decorate in the form of a topiary. Here, decide for yourself.

In more detail, if you are interested in this work, you can also use this step by step instructions in pictures:


Tree stencils for cutting and printing
For those who love vytynanok-style masterpieces, they will take these stencils as a basis. Using a regular clerical knife, cut a Christmas tree, or you can take a special tool that the masters of this business have.

Cut out two blanks at once, cut a strip on top of one, and cut a strip on the bottom of the other.


Here are a couple more ideas, what beauty can appear, see for yourself. Delicate and white forest beauties that are so attractive.

Take a leaf and crush it in half, draw patterns and outline the spruce. Cut out all the pieces with a cutter.

Take your time, this job does not require fuss.

You can print the template, and do not fold and draw a tree yourself. Don't forget to leave gaps on the bottom of the paper as well so that you can roll them up and glue them later.

That's what I mean. As soon as you make these two blanks, connect them together.


And I suggest downloading stencils right now from my blog:


 . Here I propose to arrange them unexpectedly, namely, use the origami technique. This can be done using ordinary triangles, which are obtained by folding ordinary squares.

The next work, for its implementation you will need two sheets. On one, you print out a Christmas tree and make cuts along the dotted lines, and then glue this blank to the background.


Whoever does not understand the stages of work in this picture, he may well use the video hint.
Another masterpiece, using the same origami technique, you will get a cool little thing that you can give to your mother or loved one. Watch the instruction and repeat step by step.


Here are some work ideas you can take as a basis.


Paper Christmas tree on the wall
For a long time I could not find suitable option but then I came across these ideas. It turns out that there is nothing difficult in creating such a huge and huge Christmas tree. See everything for yourself, and wonder, because it's so great when you and your family are together.

In addition, I also found an awesome paper beauty that can be glued to any wall.
This decor can decorate any children's room or a room in the garden. I was struck by this idea and I share it with you. You need to download the templates (you can ask me for them, I send them to your email address for free). And voila, let your imagination run wild, color with your children. The file will contain 22 stencils that need to be printed on a large A4 sheet and then decorated.

Here's what you can do, keep it up. By the way, there are other options for coloring for the New Year for children, go ahead and take note.


Tadam, that's all, the article has come to an end. It was a pleasure for me to share everything that I found. I hope you enjoyed scrolling through this page.
Have a nice day and sunny mood everyone. Bye!
Best regards, Ekaterina


