
Buttons, of course, are an absolutely universal thing.
Just look how much New Year's beauty you can create from them.
Like this original postcard possibleo give as a gift to New Year to family and friends. Buy as many buttons as you can in different shades of green and different sizes from a craft store, or grab some from your old supplies, and get to work.
This DIY New Year's card is an example of how buttons can be used in an original way to make crafts from scrap materials.
To make it you will need:
- buttons
- cardboard
- scissors
- dense colored paper
Craft making process:
1. Cut out a blank for a postcard from white cardboard.
2. Draw the outline of the Christmas tree on the blank. Then start gluing buttons according to the template. Alternate different sizes and shades of buttons to create a beautiful color effect. Glue beads here and there for decoration.
3. Where would we be without gifts for the New Year! They can be cut out from pieces of thick colored paper, wrapped in threads (they will serve as ribbons) and also glued small buttons on them.
4. Glue the gifts onto the card as well.
5. Let the finished composition dry, after which you can give the New Year's card to friends and relatives.
Children's creativity - very important for the development of a harmonious personality. It shapes taste and influences the development of a child’s creative abilities. Do-it-yourself crafts are necessary to develop qualities such as accuracy, perseverance, and hard work.


Over the years, any housewife accumulates a large number of tailor's buttons. All this colorful and varied wealth can be put into action right now, in preparation for the New Year. Motherhood.ru shares ideas for making Christmas tree decorations and New Year's cards made from ordinary buttons!
Snowflakes made from buttons
Bright multi-colored snowflakes made from pieces of felt or other dense fabric with button decor are original decoration for a New Year tree, an element for making a garland or design gift packaging, letters to Santa Claus or New Year's cards for loved ones and relatives. These snowflakes can be made at home with your mother or at school during a craft lesson.A button snowflake can be made “truly” snow-white and constructed using a few popsicle sticks. We glue them together and decorate them with buttons. We attach a cute funny pompom to the middle.

A snowflake can be made from sticks and spruce branches. In this case, the spruce branch can be “snowed”. For example, using correction fluid. We attach bright red buttons to the center. We make a rope fastening. Happened unusual decoration in ethnic style.

You can cut out a patterned snowflake from white felt and decorate it with a soft blue button and light embroidery.

Using silver wire and colored buttons, we assemble a frame snowflake.

Christmas balls and other Christmas tree decorations made from buttons
Try making exclusive Christmas tree balls. To do this, select the necessary buttons and glue them to ordinary Christmas tree balls. We decorate with ribbons and rhinestones, beads. These balls can be given as gifts!Large bright balls with button decor can be additionally decorated with small “snow” crumbs - made of beads, polystyrene foam or beads. It looks very wintery and will help cover up button holes.

Exclusive designer balloons can be created using original buttons and a base made of soft fabric, wire or Christmas tree plastic ball. We decorate satin fabric, ribbons, feathers. Agree, these are real works of art!


But you can decorate the New Year’s beauty not only with Christmas balls. There are other interesting toys. For example, flat wireframe images of balls, hearts and stars.


Felt toys with button decorations are easy to make and look stylish!


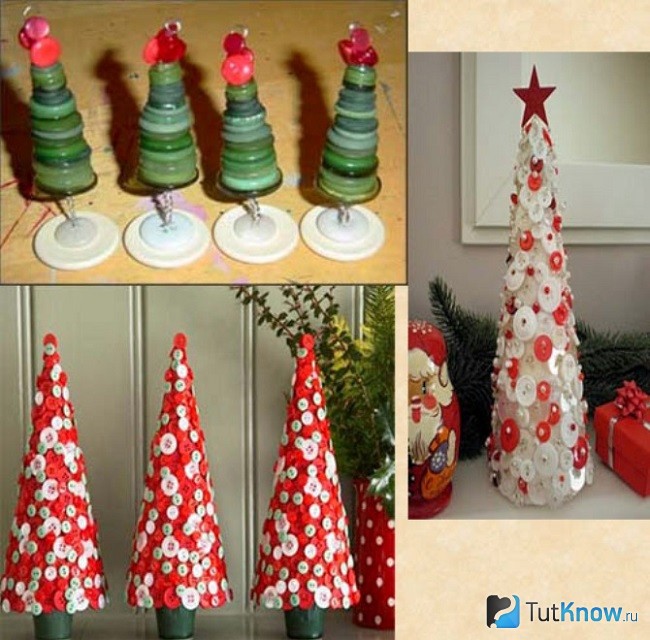
Together with your child, you can make special small Christmas tree decorations from buttons. For example, collect green buttons of different diameters in the shape of a pyramid - a Christmas tree.


Cute funny snowmen made from buttons may appear on the Christmas tree. They can also be attached to gift wrapping or postcards.

Or you can put together a whole collection of buttons and make a decoration for the Christmas tree - easy and simple!

Souvenir Christmas trees made of buttons
Button decor can be used to decorate voluminous Christmas trees. They can be green, with bright decorations or "in the snow." Such a tree may well become a gift from your children to their beloved grandmother.


New Year cards and gift wrapping with buttons
If you are going to write a letter to Santa Claus, do Greeting Cards self made or decorate gift boxes yourself, the idea of decorating with buttons is for you.Draw a Christmas tree on a gift box or card and glue colored button balls to it. It turns out fresh and unusual! Even a child can do this.


With the help of bright buttons it is easy to create the image of Christmas tree balls or glowing lights of a garland.

If such a work is placed in beautiful frame, you will get an excellent handmade gift. Show this idea to your kids, they might want to give this painting to their grandparents. like this New Year's craft Kindergarten teachers can “take it into service” so that preschoolers pre-holiday days prepared beautiful gift relatives.


You can decorate packaging and cards with tubes of colored paper and large bright buttons. It is also convenient to make such an application during a lesson in kindergarten or at school.

More experienced craftsmen they can go further and create a whole New Year's composition. This winter appliqué painting would make a great gift, an exhibit for a school exhibition, or even be sold at a Christmas charity fair!


Using colored paper, colorful cord and large quantity buttons you can depict a fluffy Christmas tree with a pile of gifts under it!

You can decorate gift tags or small cards with wishes with buttons.

Garlands with buttons
Large buttons can be used to make garlands for decorating fir trees, interior items and New Year's costumes. You can use a chain, as in the photo, or you can knit or put large buttons on threads.

Garlands with toys and New Year's decorations can be hung in the gift area, on the Christmas tree or on the wall. We cut out the figure from the fabric, sew it along the edge, and stuff it with cotton wool or fabric. Decorate with buttons. The toys for the garland are ready!


New Year's interior design made of buttons
According to the previous scenario, you can create Christmas trees on a stick. They can be placed in the interior or on the holiday table.
The Maternity.ru portal has already talked about how to make
2011-11-25 1
Contents
You can make New Year's decorations for your home with your own hands from the most ordinary household items, the main thing is to show your imagination! Today we're going to take out our colorful collections again and see how we can use these little beauties while preparing for the holidays.
Creating compositions from buttons, like putting together a puzzle, is not a quick, but very exciting activity. Involve children in the process - crafts made from buttons develop creative abilities, sometimes it is enough to put in very little effort to get good result, would be suitable ideas. Well, for inspiration, I suggest using my today’s examples of creating New Year’s decorations, gifts and Christmas decorations from buttons.
New Year's wreaths made of buttons. There are several options for creating such wreaths. You can, as in the first example, make a cover from fabric to cover the finished shape and embroider it with bright buttons. If you make a wreath from green woolen threads, you will get something like a pine branch, and the buttons attached to the top will become a replacement for Christmas tree balls. A small wreath on a wire frame is suitable for decorating a Christmas tree. 


Christmas trees made of buttons. For creating New Year's beauty we need a ready-made foam base or dense paper cone. There are plenty of examples on the Internet on how to make it, so let’s move straight to the buttons. We glue them and pin them for strength, and if the workpiece is hollow, then we secure it from the inside with wire. It turns out very beautiful and uncomplicated Christmas decoration for the home, which can be done with children. 

New Year's balls made of buttons. A ball made of buttons can become both a Christmas tree decoration and an element of New Year's decoration for an apartment; it is not difficult to make, especially if you have a special foam blank in stock. We glue the buttons to the ball, securing them with pins with different colored heads. If the ball is multi-colored, it is better to slightly tint the base. 

The buttons make very cute New Year's compositions, the plots themselves are simple: a decorated Christmas tree, a snowflake, a Christmas wreath. Notice how good this picture looks if you give it a good frame. 


It’s a pleasure to create Christmas tree decorations from buttons with children, and the scope for imagination is very wide. Even one single large red button can become a stand-alone decoration. Probably the most popular craft in this area is a Christmas tree made of buttons, assembled in a pyramid, but there are other equally worthy options. 


Gifts made from buttons. The ideas from the previous section are suitable not only for decorating a Christmas tree, but also as an additional souvenir, made with your own hands and pinned to the festive packaging of a New Year's gift. Here are a couple more similar ideas. 

New Year cards with buttons. If you and your child are going to make New Year cards with your own hands, don’t forget about buttons! These little helpers will come in handy here. A button can successfully replace a painted Christmas ball, a flower, or even a whole snowman. 


If you have accumulated buttons, use them to make paintings, panels, and decorations for clothes with your own hands.
Making paintings from buttons with your own hands
Lots of ideas. They will help create artistic masterpieces for children and adults. For it use:
- buttons of different colors;
- glue;
- thick cardboard or thin plywood;
- simple pencil.

Paint the plywood or cardboard in the desired color and let the canvas dry. Redraw the outlines of the future masterpiece on it. As you can see, the vase is lined with bronze-colored buttons. To frame it, small pieces of fittings are used, while larger ones are located inside.
Place cheerful colored buttons on the fabric to form flowers. Lay out the green stems and leaves. If you have a lot of white buttons, decorate the background with them. This will help the picture become more voluminous and original.
Even if you have a few buttons, it won’t hurt to make a panel.

Children will certainly like this idea. But first, cook with them:
- white cardboard;
- paints;
- buttons;
- glue;
- brush;
- a bath of water;
- white paper.
Have your child fold a strip of white paper in half and draw the right side of a butterfly on it. When he unrolls the leaf, it reveals a white-winged insect. All that remains is to paint the body of the insect with black paint with a thin brush, apply a design to the wings and, after the paint has dried, glue the butterfly to a flowering tree.
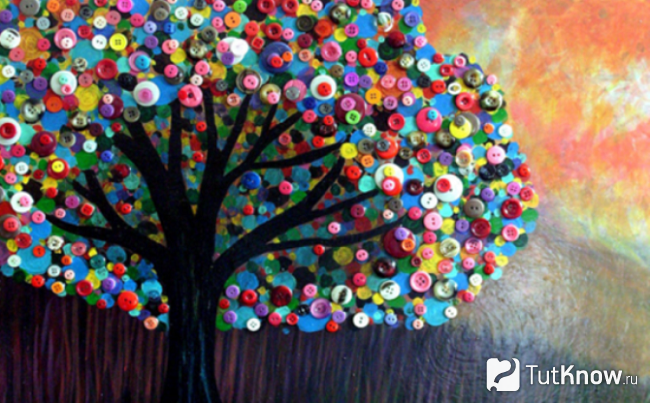
Using buttons, you can create another tree with your own hands.

To reproduce this idea, take:
- buttons in brown, red and yellow;
- blue, white and yellow watercolor paints;
- glue;
- sheet of cardboard;
- photo frame;
- pencil.
- First, the cardboard is coated with watercolors. Draw the sky blue, to do this, add a little blue to the white, mix with a brush. The ground area can be green if there is grass growing there, but if there is sand, then make that part of the background yellow.
- After the paint has completely dried, draw the contours of the tree on the canvas with a pencil.
- Fill the trunk with brown and black buttons. Attach red and yellow ones to the crown. You can use other tones.
- Place the picture in a frame and you can hang the masterpiece on the wall.
After painting the background with paints, you need to give them time to dry. On blue or green colored paper, draw a tree crown and glue it to the canvas. On the back of black or brown paper, draw its trunk, which also needs to be glued in place.
Now let the children give free rein to their imagination by gluing buttons of different colors to the crown.

Hang a picture like this in your living room with large, medium and small buttons on it.
First draw the sea, it is bordered by a coastline consisting of sand. So make it yellow. Next comes a darker coastal spit; in the background it is green.
Now you need to stick buttons on the sea white so that they add extra shine to the water. Shells on the sand can be either light or darker tones.
The following picture of buttons will also help you relax after a hard day.

First, the blue background of the sky and the green one, which will become the stems of the flowers, are drawn in gouache. Buttons are glued above them. If they have legs, then you need to sew them to the cardboard with a thread and a needle.
It will not be difficult for children, under the guidance of adults, to make such a basket with flowers.

To make a panel in the form of an eagle owl, take:
- wooden plank;
- two metal loops;
- rope;
- buttons;
- a twig.
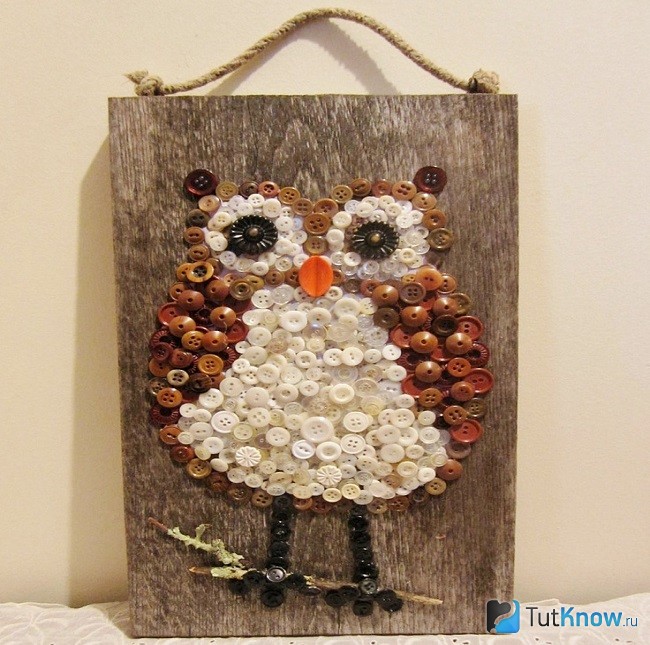
Draw the outline of a bird on the board. Place buttons around the eyes, body and wings Brown, and make the tummy, the outline around the pupils from white buttons, the pupils from black. Instead of a beak, attach a red one.
Glue a wooden stick down the panel. Attach the eagle owl's paws to it and near it.
This fittings will help bring your wildest ideas to life. To make a New Year's tree, take:
- green, light green buttons different sizes, brown;
- green thread;
- a needle with a large eye;
- scissors.
The star can be made from fittings of this shape or cut out of cardboard, also stitched with a needle and thread. We hang our Christmas tree and admire the beautiful creation.

If you want to make button flowers, take:
- buttons;
- thin wire;
- scissors;
- vase.
Interesting crafts made from buttons include a clock and a wall calendar. For it, you need to cut out circles from cardboard, draw a number on them and glue them to the center of the buttons.
These blanks are sewn or glued to the base and the original calendar is hung on the wall or placed on a table near it.
If you have a lot of such accessories, you can use it to decorate a mirror, a wall in the bathroom, and even a toilet cistern.

But first the surface must be washed and wiped dry. After this, it is degreased and the accessories are glued in two rows, closing the gaps between the buttons so that the surface to be decorated is not visible.
If you liked making a Christmas tree, look at what other New Year crafts you can make from buttons.

Degrease the surface of the ball, add matching buttons to it. If you are celebrating the New Year outdoors at the dacha, there are no toys there, then make them from the same sewing accessories.
Don’t hold back your imagination; if you wish, arrange buttons according to height or large ones in the middle, small ones at the edges. The color scheme can also be varied.
What are they not made from? New Year's snowflakes, from: napkins; yarn; paper. But few people know that they can be created even from buttons.

To make one, take:
- white buttons;
- Super glue;
- rope;
- metal hangers;
- pliers.

On the face this blank will look like this.

Glue the remaining buttons to the metal wire.

These New Year's snowflakes can be hung on the Christmas tree or on the wall. To do this, you need to glue a string to the end of the snowflake and tie a loop.
Here's another idea that will tell you how to make a Christmas tree out of buttons.
String the green ones onto the wire, thread both ends through two large buttons, which will become the leg of the product and give it strength. For the second Christmas tree, you need to make a cone out of cardboard and cover it with buttons. Such accessories will help you make Christmas wreaths.
If you want to make a napkin ring to serve this way festive table, take:
- flexible transparent plastic kitchen board;
- buttons;
- glue;
- scissors.
A flower made from sewing accessories also looks great. And you will make original candles from old shoes or ones that are too small for a child. Glue the buttons on the shoes, tie new laces, place fireproof glass jars inside the shoes and place candles in them.

Look what wonderful helpers buttons are in terms of room decor. Sew them onto the pillow, making a pattern or creating the first letter of the name of the person you want to give it to.
Embroider buttons on a dark bag and it will become unique.

Decorate your curtains with this fittings by sewing them here. Remember how fashionable bamboo curtains used to be? Someone made similar ones from paper clips and beads wrapped in pieces of postcards. You will make these from accessories.

For this you will need:
- buttons;
- fishing line;
- needle;
- rail;
- scissors.
Using this technique, you can make not only curtains for the doorway, but also an analogue of blinds for the windows.
DIY button jewelry: photo and description
You will make them from the same material. Look what an unusual belt you can make from buttons. It goes great with jeans. It will require a strong thread so that it does not break during wear. You can replace it with a thin white elastic band.
Thread a needle and tie both ends with a knot. Move it a little to the side, twist the thread in this place, making a loop. Thread on the first button, then the second and all the others.

Fasten such a belt with a button, throwing it over the loop that you made at the beginning.
If you have a masculine shirt, add some femininity to it by sewing beautiful buttons on the collar.

They will help create your unique image. Make a rainbow bracelet using step-by-step photos. This is how wonderful it will turn out.

To make a decoration for your hand, take:
- buttons;
- threads;
- a needle;
- scissors.

To work you will need flat buttons with four holes. Take a needle with such an eye that it fits well into them.
Pass a needle and thread through two opposite holes of one button on the wrong side. On the face, remove the needle from the second hole and thread it into the first hole of the second button. Return the needle to the second hole of the first button on the wrong side. On the face, thread the thread and needle again into the second hole.
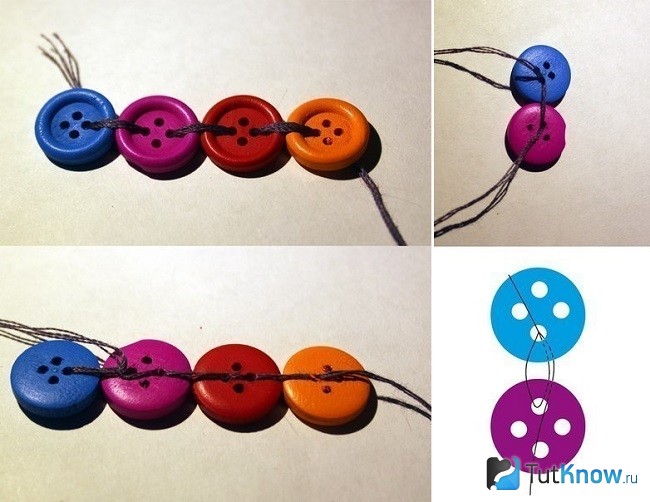
Having created the first row, complete the second, simultaneously connecting these rows. Do the same for the third one.

Tie the free ends of the threads into a pigtail. Trim off the excess.

Tie a loop from the braid, which you will put over the button and fasten the bracelet.
If you have metal buttons on the leg, make a bracelet like this. You can attach them to the chain using wire or metal rings.

For amateurs volumetric jewelry I can recommend another necklace for your neck. The fittings are attached using metal rings or regular paper clips.

If you want to make multi-tiered beads from buttons, then pay attention to the following idea. The main thing is to take a very strong thread or fishing line so that at the most inopportune moment it does not break and the beads do not fall apart.

If you have a broken automatic hairpin, but its mechanism is still good, update the item. To do this, take:
- three flat buttons;
- Super glue;
- two beads;
- cord;
- scissors.

Use super glue to attach the buttons.
Lubricate the surface of the metal hairpin well with glue, attach a structure of buttons and beads here. After which you need to let the accessory dry and you can try on a new accessory.
Attach a piece of lace to it, after which you will have an amazing hairpin made by yourself.

If you glue three buttons onto regular black bobby pins, see how the hairpins immediately transform.

If you have an elastic band and a matching button, you can turn it into a new hair accessory in 2 minutes. To do this, you need to slip the edge of the elastic under the leg of the button, thread the free end under it, and tie it in a knot.

Crafts from buttons for yourself are not only decorations, hairpins, but also decorating shoes in an unusual way. Beach slippers will be transformed in half an hour if you sew bright buttons on them.

If you want the decorated surface to increase, then first sew buttons to two triangles of fabric, and then attach them to the slippers.
Buttons will transform other shoes too. If your favorite shoes are scuffed, hide them behind these accessories and everyone will think you should buy another pair of shoes.

The same applies to sports shoes- slippers, sneakers, sneakers. Why buy new ones if you can transform the old ones in an hour?

Even if there are only 6 buttons, they will allow you to decorate your shoes. Sew them onto ballet shoes to add some flair.

Attach buttons to leggings or a hat to create your own original and playful look.

As you can see, crafts made from buttons can be very diverse and unexpected. With their help you will add new interesting shades to your home, create accessories, update your shoes and be fashionable and confident.
To better remember what you can make from buttons and get inspired by new ideas, watch 2 educational videos.
From buttons you can make a variety of Christmas tree toys in the form of figures of Santa Claus, a snowman, Christmas trees, snowflakes, wreaths, as well as balls that can be used both to decorate the Christmas tree and for holiday decor interior
To make a button ball, you will need:
— a ball made of polystyrene foam, polystyrene, polyurethane foam or floral sponge;
- pins with bead-shaped heads (optional - glue);
- regular buttons with holes;
- ribbon 
The ball itself can be purchased from polystyrene or foam plastic in online stores, from a floral sponge - in flower shops, and you can even make a ball from polyurethane foam yourself, although the process is not easy, so it will be easier to buy. Alternatively, you can use a fabric ball tightly filled with padding polyester. If, for the safety of children, you plan to use glue rather than pins, then you can take any ball - plastic, rubber, tennis, to which you can glue buttons.
Depending on what buttons you will use, the ball will need to be pre-dyed or left in its original color. For example, if you want to do New Year's toy from white and beige buttons, then leave the ball white, but if you want to make it bright red with a green ornament, then it’s better to paint the foam from a spray can.

Attach with pins or glue a loop of ribbon or string, by which the ball can be hung on the Christmas tree. Then carefully pin button by button to the ball. You can combine colors and sizes of buttons, attach buttons to one another. You can fill the space between the buttons with pins. 
More options for Christmas tree balls made of buttons:


Buttons can be strung on thread or wire in a certain order to create figures of snowmen, men or small Christmas trees.
Here small master class how to assemble a little snowman on a string. 


You can also glue buttons onto some kind of base, such as sticks to create a snowflake, a cardboard circle to make a wreath, and the like.


More examples of Christmas tree decorations made from buttons:


Decorative Christmas wreaths made from buttons
Christmas wreath on the door - popular holiday decoration in Western countries. Most often, wreaths are hung on the outside of the doors of the house. Nothing stops us from inheriting the tradition and decorating the interior with wreaths for the holidays. A button wreath can be made in several ways.
Buttons can be glued onto a cardboard circle, like this:


To make a voluminous wreath from buttons, you can sew a cover, fill it with padding poly, and sew buttons on top.


Small Christmas trees made of buttons
Small cone-shaped Christmas trees look great in the interior.
In order to make such a Christmas tree, you will need:
- a cone made of polystyrene foam, polystyrene or thick cardboard;
- buttons;
— fabric or colored paper (optional);
- pins (or glue, wire, thread and needle).

The process is identical to creating Christmas balls with buttons. If you are using a cone made of polystyrene foam or other foamy material, you can attach the buttons to the base using pins. If you have cardboard cone, then you can sew on the buttons with thread or fasten with wire. You can also use glue in both cases. It is better to pre-paint the base in green color or cover with green cloth or paper.


Button garlands
It's very easy to make a long button garland. It will take some time, but such an unusual decoration on the Christmas tree or indoors will look very interesting.


