Holy Easter is one of the most anticipated holidays of the year. Both adults and children look forward to it. And the main reason for this is not only the religious significance of this day, but also the delicious treats that every family prepares on this important day.
We would like to offer you a master class on making dough crafts for Easter with your own hands.
Easter basket
To make an Easter basket from yeast dough, you need to take the following baking ingredients:
- fresh yeast – 2.5g
- warm water – 1/2 cup
- milk – 1/2 cup
- eggs – 1-2 pcs (one for dough, one for greasing)
- sugar – 1/4 cup
- salt – 1/2 tsp.
- olive oil – 1/4 cup
- flour - 4 cups
By using step by step photos make this for Easter interesting craft from the dough will not be difficult.
Let's start:
1. In a glass bowl (preferably with deep edges), you need to combine milk with water. Mix two tablespoons of water with milk and add yeast. Stir thoroughly and leave to brew for a few minutes.

2. Beat the egg, add the resulting mixture of milk, water and yeast, then add olive oil, salt and sugar. Mix thoroughly until smooth.

3. Add flour to the resulting mass. First you need to add half a glass, mix, then gradually add the remaining amount of flour.


5. The next step is to roll the finished dough into rolls. You should use a heat-resistant glass dish or cake pan as the braiding mold. And before you start applying the dough, you need to wrap it in foil.
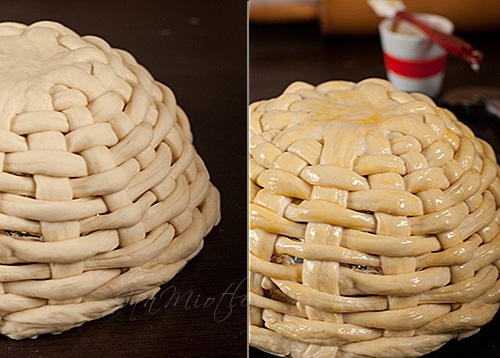

7. Apply the resulting strips evenly to the mold, connecting at the top. On average, there are 14-15 flagella per form. Now you need to put something heavy and round on top of the strands to make the bottom (you can take a glass bowl)


9. In a separate bowl, mix one egg, a tablespoon of milk and a little olive oil. Lubricate the entire dough basket with this mixture.
10. Place the basket on a baking sheet covered with parchment paper in the oven, preheated to 180-190 degrees. Bake for 20 minutes. The dough should take on a golden brownish appearance.

11. When you remove the basket from the oven and remove it from the baking sheet, there will be a mark of dough and utensils on the paper. You should make a braid of the same size along it. This will be the edging for our Easter basket. To make a handle you will need wire. We measure the required length, wrap the wire with foil, and wrap the dough on top.

12. We don’t wait for the dough to rise, but immediately put it in the oven.
13. We attach the finished edging with toothpicks, and insert the handle in the same way.

The Easter basket is ready! Now you can decorate it with a napkin, ribbons and put Easter cakes and other Easter treats in it.
Easter craft made from salt dough: painted eggs
To prepare these crafts you need to take the following ingredients:

- flour – 2 cups
- salt – 1 glass
- water – 1 glass
- acrylic paints or gouache
- egg-shaped mold
- tassels for decorating with ornaments
- hanging tape
If you don't have a suitable mold, you can easily make it yourself. You need to cut off the strip plastic bottle and secure with tape, giving it an egg shape.

Let's start making crafts from dough, photos will help us with this:
1. In a deep dish (bowl), mix salt, water and flour, knead the dough.
2. Received salty dough roll out 1-1.5 cm thick.
3. Using egg-shaped molds, “squeeze” eggs out of our dough.
4. Using a rod from an old felt-tip pen or pen, we make holes for the ribbon in the resulting molds.
5. Place the resulting eggs from the dough on a baking sheet covered with parchment paper for quick drying. Place in the oven over very low heat, remember to leave it slightly open so that the pieces do not bubble.
6. After the crafts have dried and cooled, we decorate them as desired. Leave to dry.
7. Take a long ribbon of red or white flowers- symbols of Easter, and we pierce them through the holes in our colored eggs.

We did it wonderful craft from salt dough for Easter in the form of a garland.
Angelika Smolnikova
Easter is coming soon, I suggest making a souvenir
Look what a miracle
Did mom put it in the dish?
There is an egg, but not a simple one:
Golden painted,
Like a bright toy!
There are stripes, curls,
Lots of little rings
Stars, circles and hearts.
What are all these colors for?
Like in a good old fairy tale?
Mom gave everyone the answers:
Easter is the brightest holiday!
And the egg, I know,
Symbol of life on earth!(
We will need:
salt dough (can be colored, water, brush No. 3, stack, gouache, rolling pin, plungers, chicken egg.
The plunger is an object consisting of two parts made of plastic - internal and external. A spring is connected between these parts, on which the entire operating principle is based. Place the plunger on the rolled out salt dough, press on it and release the pressure. A spring is triggered and a cut-out silhouette remains on your piece of dough, or a traced image of a flower, heart, star, or something else. And then it’s a matter of imagination and artistic ideas for future work. Buying them is not difficult; you can order them in the online store. Plungers are used by confectioners to decorate culinary products.

My kids, who are involved in circle work on testoplasty, really like working with plungers and decorating their crafts. Try it too.
Completing of the work:
1. To make a blank you need a whole eggshell. We make two small holes in the chicken egg and blow out the contents.
2. Roll out long sausages from the salt dough and roll them into flat strips with a rolling pin. We wrap these strips around the egg, as shown in the photo. Here, of course, the child will need your help so that when wrapping it in a layer of dough, the egg does not crack. You can completely cover the shell with dough; I decided to make it hollow inside. Using the second option, we leave the foreground of the shell unfilled.


3. Place the egg on a sculpted platform - a stand. Our preparation is ready.


4. Using plungers, we prepare flowers and place them on the workpiece (to prevent small parts from deforming when attaching them to the base, moisten the gluing areas with a brush dipped in water). We supplement the composition with leaves, it all depends on your imagination.


5. Now you need to make a small figure that will be located inside the egg. It could be a chicken, a candle, etc.

6. Dry the product. Best at room temperature, or in the oven at about 80 degrees.
7. After the craft has dried, you need to carefully remove the shell from the foreground
8. Place a small figurine in the inner part.
9. If you sculpted from unpainted dough, then paint the craft with gouache paints.
10. You can decorate your work with beads, satin ribbons, coat with varnish.

The work is very interesting and not very difficult for children. Create, imagine.
Easter is a great and bright holiday, personifying the triumph of the Christian spirit, repentance coupled with hope and faith. In anticipation of the bright day of the Resurrection of Christ, everyone carefully prepares their monasteries for the meeting, cleaning and decorating everything around. I want my soul and body to be clean and renewed. And the house pleased the eye with its freshness.
Current jewelry
Every year more and more decorations appear in stores on the eve of the Holy Day. Housewives enjoy decorating their “family nests,” but there is nothing more valuable than DIY crafts. The inhabitants of the house put their own special mood, a certain message and energy into the most ordinary decorative element.
Joint creation of decorations for Easter is especially valuable where there are small children. For example, DIY Easter crafts made from salt dough will be a fun adventure for them and new knowledge of the upcoming holiday. This moment brings the family together, helps to unite and create a sweet family tradition.
Do-it-yourself Easter crafts made from salt dough are especially loved by folk craftsmen and handmade lovers. This type of creativity is just beginning to conquer with its unsurpassed style and interesting technique, but it appeared a long time ago. This is an original Slavic custom, evidence of which can be seen even in folk tales. Remember, for example, Kolobok, which the grandmother created, not at all thinking that the fate of this stucco would be so difficult. This fairy tale hero You can remember this in a conversation with the youngest family members. Easter crafts made from salt dough for children will be an unusual experience and immersion in a fairy tale.

This type of creativity attracts with its technological simplicity combined with limitless possibilities for realizing your fantasies. It's hard to imagine more a budget option for crafts. In order to acquire material for creativity, you don’t need much.
Several recipes for high-quality puff pastry
Recipe No. 1:
- Flour (preferably wheat) - 1.5 cups;
- Salt - 0.5 cups;
- Water - 0.5 cups
- Vegetable oil (preferably olive, to give special elasticity to the dough) - 1 tsp.
Recipe No. 2:
- Wheat flour - 2 cups;
- Glue (you can use any glue you have on the farm) - 1.5 tbsp;
- Salt - 3 cups;
- Water - a little less than 2 glasses.
Recipe No. 3:
- Flour - 2 cups;
- Water - about 1 glass;
- Starch (will give a special texture to the future material) - 1 - 2 tbsp. l.;
- Extra salt (pre-grind in a coffee grinder or any other convenient way) - 1 cup;
- Gouache (you can add it right away, and then refresh the finished product with new paint).

What can you make from salt dough for Easter?
Pleasant to the touch, pliable and accessible material allows you to bring any idea to life. Easter themes are unusually extensive. Time, inspiration, material and an idea for a future craft: that’s all you need.
You can create a whole picture with your own voluminous plot, decorate it with bright colors or leave it in minimalist pastels. Various themed figures (angels, cute little animals, futuristic flowers, etc.) will decorate and festive table, and a shelf in the house. On the eve of Easter, the creation of unusual eggs with volumetric pattern, stands for traditional paints, Christian symbols.

Easter crafts made from salt dough for children should be thematic and accessible in execution. They allow your imagination to run wild with special force. Parents can allow their child to come up with their own image and translate it into the test themselves. It is worth helping a child when he wants to receive help. Such activities will stimulate the development of creative abilities, enrich the child’s tactile sensations, and improve fine motor skills fingers.
Where to start
Perhaps it is best to start with the simplest crafts in order to get used to working with salt dough. And this applies not only to children but also to adults. The most simple craft made from salted dough for Easter, which does not require any skills at all - these are Easter eggs, which can be decorated either in the form of a long garland or each separately.
Example No. 1 Garland of Easter eggs
Prepare the salt dough and roll it out into a large layer. Next, cut out an egg-shaped stencil from cardboard - apply it to the rolled out dough, and cut out the shapes we need from the dough. Make a hole in the top of each testicle using a pen or pencil. We send the dough to dry.

After the dough has dried, decorate it and thread a ribbon through the hole. Can be tied beautiful bow and leave the product like this, or you can tie several eggs into a long garland.

Example No. 2: A simple product - a basket
You can also try making a simple basket with eggs. Ideal for introducing children to sculpting.
The estimated size of the basket is 15 by 15 cm. The work algorithm is as follows:
- We take about 100 grams. dough and form the box of the future basket at our discretion.
- To add texture to the weave, you can use a regular fork. The ornament will not only enliven the future product, but also give it an optimal shape;
- From two pieces of 50 g. roll two thin long sausages. Approximate length 14 - 16 cm.
- You need to intertwine the pieces together and attach the formed handle to the body of the basket. Moisten the joints with water.
- To make eggs, simply roll out smooth balls of similar size.
- It is convenient to sculpt leaves and flowers from pieces of 5 by 2 cm. Texture can be added with the blunt side of a knife or a fork, depending on the type of leaves you intend to use.
- Place the eggs in the basket and add other decorative elements.
- When attaching each structural element, it is important to moisten the surface of the dough with water for better adhesion.

Example No. 3: Angel with an egg in his hands
- First we create a special stencil for the future angel.
- Using a stencil we cut out the base of the angel. The thickness of the dough is about 5 mm. Any ragged or sharp edges that form must be smoothed out with your hands.
- To be sure of the strength of the future figurine, you can use toothpicks to create a reinforcement effect. To do this, just place several toothpicks along the body of the angel, in the direction of the wings and future legs.
- We create the legs that will look out from the mantle. You can make your fingers into a stack.
- Now you can start decorating the wings. Separate pieces of dough are used to form wing segments and attach them to the base. Patterns can be formed using a fork, pen refill and any other accessories.
- The hem of the robe can be made more realistic and voluminous. To do this, a ribbon is formed from a piece of dough and figuratively attached to the base.
- The angel's body should also be voluminous. This effect can be achieved by using several balls of dough to create a robe for the figurine;
- We form sleeves from two pieces of stucco molding. Where the palms should appear, we make a small indentation;
- For realistic hands, we form two “drops” and make fingers with a stack, sculpting them to the recesses in the sleeves.
- We roll out the cake for the collar, create a pattern and attach it to the overall structure.
- We form a small Easter egg and “hand” it into the hands of the angel.
- We create the head and face absolutely symbolic. It should be appropriate and neat. Credibility fades into the background.
- Hair can be created quite believable. For this we use a garlic press.
- We send it to dry. Possibly for the battery. 3 hours is enough;
- To emphasize the relief, the finished figurine is treated with a solution of coffee. Special attention attention should be paid to braid and places with intense ornamentation. The finished figurine can be placed as decoration on a shelf or table.

What makes this craft attractive is the absence of any strict technological rules and conventions. The recipe according to which the salt dough will be formed, crafts for Easter, their size, specificity, decor - all this can be created at your own discretion, without adhering to particularly strict technology or requirements.
- stack or small knife;
- comb for giving specific patterns to the dough;
- rolling pin;
- pen or pencil (in fact, any object with a rod);
- shaped devices (for cutting cookies, for example);
- any stencils where you can make prints (lace, beads, children's toys, ready-made figures of something, etc.).
You can experiment with the composition of the dough, tools, colorful materials, shades and method of processing stucco molding. Making Easter crafts from salt dough with children is a great alternative to playing computer games or mindlessly watching TV. This activity can become a great hobby for the whole family and can unite family members around you.
Easter crafts made from salt dough.Equipment:
- oil for lubricating the bowl
- rolling pin for dough

1. Mix flour and salt, gradually adding water. The dough must be kneaded until it resembles a dense butter dough. Then turn the bowl over and lightly coat the bottom with oil. Place the container itself on some object so that its edges rise above the table. Roll the dough into a small ball, form it into a flat cake (the base of the basket) and place it in the bottom of an inverted bowl
 2. Make long flagella with a diameter of 5 mm from the dough. Wet the outer edge of the dough ball - this will act as glue. Fasten one end of the flagellum to the edge of the cake, arrange the flagellum itself in the form of a loop and then fasten the second end to the cake. Lightly press both ends for better attachment to the base.
  3. Moisten the outer surface of the loop and attach another flagellum to it. Make a second double loop. The ends of each loop should be located in the middle of adjacent loops
  4. After attaching the loops, moisten the base with water and use a knife to make cuts on it, so that the ends of the loops will stick better to the base of the basket, and its bottom will be flatter.
  5. Roll another ball of dough and make a flat cake out of it. Place it on top of the first basket base with the ends of the loops attached to it. Lightly press the cake so that it sticks more firmly to the first base
  6. Preheat the oven to 120°C. Bake the basket in the oven (the basket is placed there along with the bowl) until the salt dough becomes hard and turns white. Remove the basket from the oven, let it cool, and then carefully remove it from the bowl.


