DIY baby book for kindergarten. Master class with step-by-step photos
Making a “baby book” on the topic: “Professions”
Joint activities of a teacher and a child of a preparatory group.
This master class will be useful to parents and preschool teachers.
Target: Creation of an unusual and attractive “baby book” for children on the topic of profession.
Tasks:
Improve appliqué techniques;
Strengthen the skill of accurate coloring;
Develop aesthetic perception and imagination.
Enrich the child’s vocabulary;
Teach analysis, generalization, develop the ability to independently draw conclusions and conclusions when solving riddles.
Equipment: Double-sided and craft cardboard, ruler, scissors, glue pencil, simple and colored pencils, satin ribbon, compass, paper clips or clips, printout with riddles, coloring books on the topic of the profession and a set of necessary items for work.
Preliminary work:
Working with the speech therapy album “Speech therapy homework” In 4 parts. Part 4 Album by N.E. Teremkov
Examination of pictures, illustrations, conversation on this topic;
Preparation of equipment and materials for creating a “baby book”.
Manufacturing:
We sketch the base of the “baby book” on cardboard.

We cut out the blank - template.

We take double-sided cardboard of different colors and cut out the required number of pages from it. Each subsequent page, which should be slightly smaller than the previous one by a few millimeters. We've rounded the corners, but it's up to your taste. Using a compass needle and a ruler, we trim the fold line a little so that our cardboard bends in the right place without creases.

Glue the base of the “baby book” and press it.

Now we are making a lid for the book, since we have it in the form of a box.
We sketch the lid on cardboard.

Cut out a square. Using a compass needle, draw along the fold lines.

Glue and secure with clamps or paper clips, leave to dry.

We glue a satin ribbon onto the lid of the “baby book” for better strength.

It's time for registration.
We will need: scraps of squares left over from cutting out the base of the baby book, printouts, scissors, colored pencils and glue.

Color and cut out all the details.
On multi-colored squares we glue the items needed to work in a particular profession.

We glue the riddles onto the front side of the pages of the book, and from them we select pictures of the riddle.
P.S. The child really enjoyed matching the pictures to the riddles.

We design the “cover” of our “baby book”.
So our unusual “baby book” on the topic “Professions” is ready.

Our preliminary work on the album by Teremkova N.E. “Speech therapy homework”: draw a picture of a profession and retell the story.

We welcome your comments!
Little children love soft educational books, on the pages of which great discoveries await them. They get acquainted with animals, plants, develop color perception, imagination, fine motor skills, solve funny problems that test attention and intelligence. This is perfect tutorial- it cannot be dented or torn and you will not want to part with it.
An educational soft book can be devoted to a single topic, or it can be a collection of various game stories. The more such books a child has, the better. If you know how to sew at least a little, you can easily create several of these books with your own hands.
If you have no idea where to start and how to sew an educational book, a master class will help you. To do this, you will have to put in a lot of time, labor and effort, but how much joy the baby will receive when he picks up your wonderful creation! And how much pleasure you will get from creating stories, games and interesting ideas!
Materials and tools
You will need a lot of materials for a DIY educational book. Some you can find in your supplies, and some you will have to buy in the store. Sample list of tools and materials:
- Sewing machine, sewing threads, wool and floss, sewing needles.
- Pieces of fabric different sizes, colors and types.
- Sintepon for stuffing soft parts.
- Braid, ribbons, laces, beads, beads, buttons, bells, clasps and other trimmings.

Operating procedure
The principle of sewing soft books with your own hands is always the same. Only the creation of plots and design differ. The general algorithm is:
We cut out double or single pages from fabric, sew them on three sides, insert padding polyester and sew up the fourth side.
On the pages, depending on the topic, we sew plot applications in the form of animals, flowers, vegetables, berries or fruits. It can also be trees, numbers, cars, houses and anything else that you plan to display in your book.
We supplement the plots with bells, butterflies, small soft toys and other finishing that helps in various gaming situations.
We sew the finished double pages in the middle of the product, and fasten the single pages together using loops, ribbons or laces.
Useful tips
There are several secrets that will help you sew a book with your own hands:
- Try to choose only natural fabrics for your baby.
Fill the small parts of the book with rustling material. Children love rustling toys. - The characters, flowers, fruits that you want to place on the pages can be cut out of fabric with a cartoon plot, or you can buy ready-made appliqués in the store.
- To make it interesting for your child to play with your book, try to make the educational elements interesting. Let them unfasten, take out or untie.
- We present to your attention interesting master classes on sewing educational books with your own hands. We prepare everything necessary materials and let's start creating!
Soft educational book - master class
A soft bunny with a cute bow settled on the first page. In one of his ears there is a rustling material, in the other there is a small bead.

On the second page there is a bunny's garden with a basket. The baby can collect crops in a basket, and when he grows up a little, he will learn to count carrots.
On the third page there is a flower growing in which there lives a bee with buckwheat inside and a caterpillar. When the baby pulls out the bee, the caterpillar attached to it crawls into the flower.
There is a butterfly on the fourth page. Her body is tucked under the elastic band. This is a doll that, when placed in place under the rubber band, turns into a butterfly.
The fifth page is dedicated to toys. The pyramid consists of blocks different lengths Velcro. The child will develop motor skills by disassembling and assembling the pyramid. On the sixth page there is a bear sleeping. You can put him to bed, covering him with a blanket.

On the covers, on one side, the sun shines, pleasant to the touch, and on the other, a velvety moon with an inserted cord and stars hanging on it. They can be pulled in one direction or another.
We will need: cotton fabric, padding polyester, threads, ribbon, braid, lace, buttons, beads, small toys and accessories.
Operating procedure
Step one: for a two-page spread, cut out two rectangles measuring 15 cm by 30 cm from fabric. We fold the rectangles with their front sides facing each other and stitch them on three sides. Turn it inside out and insert the padding polyester rectangle. Sew the fourth side with a hidden seam. We sew the part around the perimeter using a machine or by hand. We make two such turns in total.

We make a bunny from fleece. Cut out the circle (head) and sew it with a hidden seam. For the ears, we cut out four parts, sew them together two at a time, turn them inside out, fill them with rustling material, add a bead and sew them to the head. We embroider the eyes, mouth, sew on a bow and buttons.
We make a sleeping bear in the same way as a bunny. We sew him a nightgown. Using velvet fabric, sew a blanket to the bottom edge of the page. We attach Velcro to the top of the blanket.

Step two: make the cover. We sew loops of braid as shown in the figure. Crochet We twist the lace into a spiral and sew it on top of the loops with a hidden seam. It turned out to be sunshine. For the back cover, cut out a month from the fleece, cut a hole in it and sew two loops. We sew the month to the cover with a hidden seam and thread a cord with stars through the loops.
Then we make a page with carrots. We cut the orange fabric into cones and sew five carrots, filling them with padding polyester. We sew up the top part of the carrots together with the tops made of green fleece. We sew an elastic band and a brown fabric basket onto the page. For a pyramid on the page in the center we place sticky tape. We sew small blocks to which we attach Velcro on the bottom side.

Step three: make a flower meadow. Cut out a flower, a twig and a leaf from fleece and sew it on with a hidden seam. We do not sew up the top of the flower; a bee will live there. At the bottom of the flower we leave a small hole for the lace with the caterpillar. At the bottom of the page we sew grass from braid. We cut out the butterfly and sew it on as shown in the diagram.
We sew a bee from yellow velor, decorate it with black braid, sew a cord with a caterpillar to it and place it in a flower, pulling the caterpillar through bottom part flower out. We sew a butterfly doll from white fleece, embroider its eyes and attach it to the page with an elastic band. We decorate the clearing with flower-shaped buttons and a ribbon bow.
Educational book page - master class

We will need: red fabric, colored threads, buttons, snaps.
Operating procedure:
![]()
- Cut out a page measuring 20 cm by 20 cm from fabric.
- We draw a sketch on paper, then transfer it to tracing paper and cut out templates from it to transfer to fabric.
- Using the templates, we cut out a vase, an apple, a tomato and a strawberry from fabric. We make loops on the apple and tomato. We crochet the cherries and sew buttons to them. We also attach a button to the strawberry.
- We sew a vase, buttons and snaps onto the page. Then we connect the finished page with the back half of the page, sew them on three sides, turn them inside out and fill them with padding polyester.
- Sew the fourth side with a hidden seam. We punch two rivets on the side for lacing the pages.

DIY educational book for girls - master class
We will need: colored fabric, multi-colored threads, buttons, beads, a lock, wax pencils.

We sew page spreads, as shown in the first lesson. We make an applique of a cat on the cover and cut out the letters of your child’s name. We sew it all together as shown on the cover. On the first page we place a ladybug applique. In the middle of it we make a pocket with a lock in which her children will live.
![]()
On the second spread we sew on an applique of a girl with a long braid, which the baby will braid while playing. On the second half of the spread we sew a handbag with a pocket. On the next spread we have an applique of a laundry basin with a pocket and a clothesline stretched between the trees.

We make clothes with Velcro so that the child can take off and hang up clothes. On the next spreads we sew on the remaining appliqués, as shown in the pictures.
DIY educational book for a boy - master class
We will need: colored fabric, small sponges, buttons, felt-tip pens.
Operating procedure:


- We sew the pages of the book using the same pattern as in the first lesson. The book size will be in A3 format.
- We cut out cars from sponges, glue button wheels to them and paint them.
- At each turn, we alternately sew a highway with pedestrian crossings in the form of numbers 1, 2, 3, 4 and 5, as shown in the diagram. For cars, we use Velcro to mark a parking space.
- We glue three rows of adhesive tape on the back cover. This will be a garage.
- We design the book at our discretion.
Several ideas for interesting and educational pages of an educational book
On this page, your child will be interested in learning how animals are treated.

A little boy will really enjoy playing fireman.

Very good idea for educational books - home farm.

Having mastered your first master class and gained experience, you can easily sew a soft book with a handle like the one in the photo above.
Some more great options for developing pages.

Sewing educational books with your own hands is a huge field for your imagination and creativity. We hope that after completing our master class and being inspired by our ideas, you will be able to create bright, fun and educational books for your baby.
Toys for children should not only be beautiful, but educational and safe. Fabric books are just such toys. They help children acquire useful skills, since the pages of such a book contain many individual developmental elements.
To make a book you will need:
- Cardboard;
- Scissors;
- Needle;
- Threads;
- Buttons;
- Beads;
- Colored fabric.

As a base, you can use cardboard folded like an accordion. This way you won’t be afraid that the pages will come off and fall out. We will give an example of a master class on creating a cover for a fabric book with your own hands.
First you will need to cut out two rectangles from construction paper that will be the outer covers for your book. They need to be covered with suitable fabric or felt, decorated according to your taste and idea.
For the pages you will also need to choose thick cardboard, but it should be thinner than the cardboard for the cover. The height of the pages should be the same as for the cover, and the width can be calculated by multiplying the width of the cover by the number of pages you need, plus two more pages to glue them to the cover. Cardboard pages can also be covered with felt or covered with fabric, as you wish. After the cover is ready, you can start decorating the pages of the felt book with your hands.
DIY educational book for a child. How to make.
What colors to choose for decorating a fabric book

Educational books made of fabric are created in order to teach a child important and necessary skills, so choose clean and simple colors. Let it be red, blue, green, yellow, pink, orange, purple. Based on these colors, you will teach your child to recognize them, so it is better to make sure that the baby does not get confused.
You can sew one page in a book or stick multi-colored geometric shapes on Velcro, then you can teach your baby how to recognize shapes and learn colors at the same time.
What ideas to use to decorate a fabric book

We will give a master class on creating pages for a book from felt. Of course, it will be interesting for kids if you use buttons, buttons, snakes, ribbons and other things that...
On one of the pages you can sew or attach snakes, buttons, snaps, carabiners, Velcro, and laces. Let your child practice fastening and unfastening these useful devices. You can use the pocket making tutorial and make the pockets fasten with buttons, press studs and Velcro.
You can fasten circles on buttons, not just one, but several, the kids will really like this opportunity. On the page you can sew an improvised sketchy sneaker and try to teach children lacing.
On another page you can use a master class on creating balls and pyramid puzzles from felt with your own hands. For example, to make a puzzle ball, you will first need to start with a pattern. Cut out a circle of paper that suits your diameter and cut it into 4. Take colored felt and cut out each piece from it. Sew Velcro to the place where the circle is attached to the page, also sew the corresponding part of the Velcro to each piece and your puzzle is ready.
A master class on creating a pyramid will be very similar to a master class on creating a circle puzzle. You will need to cut out the details of the pyramid, let there be 3-5 of them. Each piece will need to be made in the form of a rectangle; you can sew felt pads and stuff them with cotton wool. Then you will get a beautiful one, you will need to sew Velcro onto each part. On the page of the book you also need to sew the velcro backing.
A good idea would be to use ribbons to decorate a fabric book with your own hands. For educational fabric books to be useful, they must teach something. This way you can sew three ribbons onto the page of the book. You can show your child how to braid a hair and he can repeat this training with his own hands.

On a felt page you can make a sign in which your child will learn to count. The simplest master class is to cut out numbers from felt and sew them to a page. Stretch a ribbon near each number and put the number of beads corresponding to the number on each ribbon. This handmade educational book will be very convenient to use when teaching your child to count.
On one page you can make a small garden with fruits and vegetables. You can sew vegetables and fruits from felt with your own hands, or you can stick a photo of these fruits and vegetables on Velcro. This page will be very useful for children, as they can easily remember the names of vegetables and fruits.
Instead of a vegetable garden, you can make roads with cars or a sea with boats. the master class on creating such pages will be the same as the others - you will only need felt and Velcro, as well as a little of your own imagination.
Patterning a boat or bus is very simple. You can find a photo of the object you need and simply print it, cutting it into important components. If this is a boat, then these will be the sails, anchor and sides.
You can make an educational game of hide and seek with your baby on some page. For example, you might find this master class useful. Cut out a cap or hat from felt. Sew it so that the hat can be raised. You can hide your eyes, smiling mouth and hair under the hat. You can use photos of eyes and other ideas. If you use this master class, you will delight the children and they will be delighted.
Educational book made of fabric and felt. Handmade
From the very first days, the child studies the world around him. The task of adults is to help him in this difficult matter. However, you can only engage with a small child in a playful way. Therefore, various aids and educational toys are invented for very young children. Teachers know this very well. They all note that a soft children's book is convenient for early learning. DIY for kindergarten it's easy to do.
Where to begin?
From the very beginning, you need to understand for what age the baby book will be intended. For very young children (up to 1 year), tactile sensations are important. Therefore, a homemade book should contain materials with different textures and shapes. Those who are older (from one to 3-4 years old) are already eagerly studying the world. For them, the book can focus on various details, come up with Interesting games and so on. Preschoolers will already appreciate a story book in which they need to complete tasks to help the main character.
Next you need to think about what will be in the book. Depending on the age of the child, a do-it-yourself children's book for kindergarten can be made as a collection of riddles and tasks, an illustrated fairy tale, a family history, etc. It can be dedicated to developing someone one skill or several. The main thing is that the soft book is bright and attracts the child’s attention. Older children can even be involved in its creation.
Necessary materials
So, after it has become clear how to make a baby book with your own hands for kindergarten, you can collect everything you need to create it. Namely:
- felt and fleece different colors for the basis of future pages;
- padding polyester for filling them, if you need to make voluminous pages;
- scraps of materials of various textures (fleece, linen, wool, silk, velvet, etc.);
- various fasteners (laces, Velcro, braid, zippers, clasps, buttons, hooks, buttons, etc.);
- ready-made applications of animal figures;
- objects of various geometric shapes;
- fillers for figurines (buckwheat, cellophane, beans, seeds, pebbles, beads, etc.);
- various bells, bells, squeakers and rustles;
- threads;
- needle.
Procedure
First of all, you need to cut the required number of pages from felt and fleece. They should all be bright and different colors. They need to be made 2 times more than the intended number of sheets for the book.

You need to think about the cover right away. If a do-it-yourself children's book for kindergarten will be assembled on rings (assembly methods will be discussed later), then it can be made the same as the pages. If not, then it is better to postpone its creation until later, when the size of the spine is clear.
Now you need to lay out all future pages and, according to the plan, prepare the details. What you can do with them:
- String large beads onto a cord. These will be improvised scores.
- On one side make a house with apartments of different colors, and on the other - butterflies of the same color. The task is to sort them by color. Fastening is done using Velcro or buttons.
- You can invite your child to decorate christmas tree, putting toys on buttons by color.
- Make a sun, the rays of which are made of various materials - braid, zipper, lace, etc.
- You can offer to find a pair, for example a sock, or pick up a mother for her baby, saying his name, arrange items on shelves, etc. Fastening can be done with Velcro, buttons and folded into small pockets.
- Fill animal figures with various squeakers and fillers to develop tactile sensations.
After all the parts are laid out, you can begin assembly. If possible, then, of course, it is better to sew a book on a typewriter. However, no one forbids flashing it manually. By the way, the stitching can also be contrasting.
In order for a do-it-yourself children's book for kindergarten to be made, it needs to be put together. The easiest way is to sew loops along one edge and assemble them on a lace. You can also punch holes and thread rings. In both cases, it can be supplemented with new pages as the child develops.
If you are creating a fairy tale book with your own hands for kindergarten, then it is better to collect it under a common cover. It should be spread as 2 pages plus spine size. For the assembly to be successful, you need to sew small strips of thin fabric from one edge of the fleece blanks. With their help, you can fix the pages on the cover.

Finally
For those who are making a book like this for the first time, many things may seem complicated and impossible. The first thing to remember is that it was made loving mother for your child. Therefore, even with crooked stitching and sloppy finishing, it will still be the best for the child.
DIY baby book for kindergarten made from paper- an educational game for the little know-it-alls who really want to learn, but it’s too early for them to read and write, but looking at pictures and learning a lot of new things is the time. Every mother knows that creativity has a positive effect on the development of a small child, which is why in kindergarten teachers work with children, and parents at home work with their children to create an appliqué book.
DIY children's book baby for kindergarten
Interesting DIY baby book for kindergarten- this is educational material for a little kindergarten student, which a mother can create on her own. The main thing is to come up with an interesting topic for educational crafts, design the composition and choose the material to use. For a child of every age, you can choose an interesting topic for a book and suitable material For example, for children from the younger group, textile crafts are best suited, and for pupils in the older group, you can choose cardboard and paper.
The baby book for the little ones is aimed primarily at developing fine motor skills of the fingers, so they are made from fabric and felt, adding various volumetric elements- zippers, buttons, felt figures, large beads, etc. For children who are learning or have already learned to read syllables, such an educational book can be a mini-primer with letters, syllables and pictures corresponding to the theme.

The simplest paper options are made in the manner of a transformer, where the sheets are folded and glued together, and then the pages can be unfolded into a long strip with tasks and pictures. This is the easiest way to make a book using creative process children. This option is suitable if the teacher asked the children and parents to do it together. You can choose the most simple and interesting topics for children - “Seasons”, “Animals”, “Favorite cartoons”.
Moms who decide to make a developmental book can stitch the spine with thread, you can also make holes on each page with a hole punch, and then tie all the pages with a ribbon or connect them with rings, following the example of plastic office document folders. If you connect the book with rings, you can add another page at any time. In addition, for such a book you can choose not only cardboard, but also felt and fleece, which allows you to make the educational craft colorful and multifunctional.

Interesting DIY baby book for kindergarten
DIY children's book baby for kindergarten for a child three years old can be made of felt. And this material was not chosen by chance, but for practical reasons, because felt pages will last longer. A child may accidentally wet them, but the book will remain intact. appearance will not be harmed. The felt book can even be washed if necessary.
To promote the development of tactile sensations, when developing a booklet, it is advisable to use different texture materials. In fact, it is not at all necessary that the child reach kindergarten age; his first acquaintance with such a developmental book can take place as early as the age of one year.

A book for young children should not contain small, easily detachable parts that can be easily torn off and, as is traditional, put in the mouth. This may lead to undesirable consequences. It is best to use different textures of materials, different fabrics to the touch, and other materials, for example, films and dense polyethylene.
There must be applications on the pages of children's educational books, but for the little ones you need to choose simple figures that are well known to them from a very early age. You can make an applique of the sun and a tree, a house and a car, flowers and butterflies.

This applique is perfect for girls: kitchen furniture and attributes with opening cabinet doors, images of products and kitchen appliances. Plates and teapots sewn from felt can be made with Velcro so that they can be separated from the pages if desired. This book can also be used in games with dolls.
If you designed it yourself, then you probably still have felt figures that can now be used to decorate the book.

DIY baby book for kindergarten
Growing up, a child can not only play with a book, but also take part in its creation. Now the content of the pages can be movable and easily separated. For a child who is studying in the middle and senior groups, you can add small and large buttons, braids of thread, ribbons and laces to the pages. Now, in addition to scenes and pictures, you can add letters and numbers.

A moving picture can also become an element of the plot. Boys will love this theme, because you can play with the rules of the road with cars and traffic lights.
4 years old is the time for a child to learn to tie his own shoelaces, and the learning process will arouse great interest in the child if done in a game form. That is why one page can be made in the form of a shoe with laces. For such a page you will need iron rings bigger size than shoelaces so that children can get into them easily. In the same way, sometimes one wall is functionally decorated: locks with keys, latches and hooks are attached.

An original ladybug can teach you how to carefully fasten a zipper; it will have a small zipper located between its two wings. We know very well the love of children for “adult activities”; they will show great interest in lightning and will tinker with it for a long time. You can also make secret pockets on the zipper, inside which prizes or other items will be hidden. DIY baby book for kindergarten with various tasks the child will be interested in every day, and for several years he will be happy to play with it both in kindergarten and at home.

Girls love to play with dolls, but they always get lost, as do their outfits and accessories, and you can put everything together in one book, where the pages will have doll appliqués, and dresses and outfits for them can be changed with Velcro. And you can make hair from threads, and if you wish, you can make different hairstyles - make curls or braid hair.

DIY baby book for kindergarten for a 3 year old child
DIY baby book for children development can be done in the simplest way - from paper with stitched pages. Children can work on such a craft on their own, and parents will always come to their aid. The most interesting topics for children are, of course, cartoons and fairy tales, any cartoon characters.
You can make a book together with a 6-year-old child; all you need to do is prepare sheets of colored paper and glue. When the blank is ready, you can glue a paper applique to each page. In addition, joint creativity between parents and children is an exciting and fun process, and educators often give tasks for such joint creative time.
Choose a topic that is interesting to children and at the same time educational. If you read fairy tales to your children at night, and they already know various fairy-tale characters, then your book may be called “A Journey Through Fairy Tales.”
You need to prepare in advance multi-colored sheets of cardboard, scissors and glue, and also a thin ribbon to connect the pages. Double-sided tape, which can be used instead of glue, can also come in handy during the work process. It will be easier to glue paper applications to double-sided tape without worrying that the glue will protrude beyond the boundaries of the paper elements.
You will also need a color printer that will help you print selected fairy-tale landscapes, pictures and scenes. If you don't have a printer, you can use children's magazines. Sheets of cardboard must be folded in half and the edges trimmed in a semicircle using curly scissors. Cutting out the cardboard will fall on the shoulders of the parents, but cutting out the paper elements with curly scissors can be entrusted to the children. They will be happy to do this simple activity.

Along the fold line of all paper pages, approximately in the middle, two holes should be made into which you can thread a ribbon to connect all the pages. The ribbon on the outside must be tied into a bow.
When the blank for the book is ready, it can be decorated with fairy-tale motifs and landscapes; your favorites will be located on the pages fairy tale characters your child. Separately, you can print out riddles based on fairy tales or excerpts from your favorite fairy tales, which can be glued next to the pictures. Be sure to make a beautiful cover with an inscription.
![]()
DIY baby book for kindergarten made from paper
DIY baby book for kindergarten for a 3 year old child is a unique educational toy that combines many different functions. This includes education, the development of fine motor skills, and the development of imagination. In English, such a felt toy is called a quiet book, because while the baby is captivated by this educational game, the house is very quiet and calm, and the mother has time to relax. But first, you need to start creating such an educational game yourself, and you don’t even need sewing skills for this. Felt can be sewn with hand stitches, so it is not necessary to use a sewing machine.
First you need to think about the theme and arrangement of elements on the pages. For the first time, you can take any of the proposed examples, and very soon you will be able to develop your own felt book design.
For letters and figures, you should select templates in advance and print them on paper, only then transfer them to felt and cut them out. It is not at all necessary to sew all the additional elements of the felt applique tightly; they can be attached with fasteners and Velcro, attached with ribbons and elastic bands.
It is not surprising that working with felt will captivate the craftswoman, and you will definitely want to make other crafts, toys and decorations. For example, for a matinee, you can make felt as an accessory to a fancy dress costume.
Once again I am glad to welcome you to my blog! Do you have fresh ideas for enjoyable leisure time with your child? Let's talk today about how to make a book for children with your own hands! Full of enthusiasm and ideas? Share them in the comments, and I will tell you about my discoveries and crafts.
I’ll start with books for babies, namely, how to make a soft educational book for your baby.
I’ll tell you why, from what and how now. Even the smallest baby, a baby from 3-4 months old, will have fun playing with such a book. Create using what you have at hand: felt, paper, fabric, cardboard. What are they needed for:
- The soft baby book can be washed or new pages added at any time.
- With its help, the natural development of the baby occurs: sensory - the baby gets acquainted with shapes, learns to recognize them; fine motor skills improve - promotes faster speech development, improves finger coordination.
- A baby can learn to count and explore the world and nature in a playful way.
I don’t know how to sew, what should I do?
You don’t need any special sewing skills and you can even do without a machine:
- Use felt, it does not require finishing the edges.
- Use simple shapes - geometric shapes, chamomile, rainbow, fish, lake, all this does not require sewing or drawing skills.
- There is no machine - you can simply sew it with a needle, the main thing is to secure it well so that the baby does not swallow it
- Use store-bought appliqués, ribbons, buttons, all of these are now easy to find in a wide variety of shapes
- Use simple scripts. To begin with, it is not necessary to set the task of sewing a doll and dressing it in different outfits. It is enough to sew ribbons of different colors and study the colors, shapes, etc.
Of course, if you sew for sale, and the demand for such books is very high, then you need some experience, which, in principle, is gained after sewing 3-5 books.


To the point
To make it you will need:
- main fabric for book pages;
- felt fabric (you can buy it separately or buy a ready-made set in the store);
- scissors;
- lightning;
- ribbons;
- Velcro;
- laces;
- pieces of filler, it can be padding polyester/holofiber or small shreds, for filling pages;
- buttons/beads/beads (for those children who have already stopped tasting everything);
- cardboard (for making templates);
- lightning;
- buttons.
Do you want to know how to make a book beautifully and with a twist? It doesn't take much. Use satin ribbons, buttons, beautiful beads and multi-colored beads, buttons.
In addition, you will need to have your personal time, for the manufacture of. Don't sew in front of your baby. He can pick up a needle or scissors, because the baby is interested in everything. Best time for creativity - pregnancy, give a book for birth.
First, calculate the length of the material you will need. Then use cardboard or paper to make templates for the main pages if they involve a complex scenario. Cut out the required number of squares. Do not forget that one page will require 2 blanks. If your book has 5 pages, that means you will need 10 squares of fabric.
Sew 2 blanks on 3 sides, put filler inside (sintepon, for example). This is necessary so that the pages do not wrinkle. Then sew up the remaining 4th side. The first page is ready. For the cover, use a coarser material, or add a little more filler. Everything that happens next depends on your imagination, perseverance and, of course, the age of the baby.
Mom's first experience
How to make applications
Transfer the design you like to paper, cut it out, then outline it on the fabric, do not forget to leave a small indentation (allowance) for the internal seams. Remember to sew 3 sides inside out. Then you need to turn the product inside out and carefully sew it on the front side. This also applies to the pages of a book. To make it look beautiful and neat.
Prepare in advance the applications that you will use to describe the plot in the picture.
When creating a homemade book for blind children, try to use different material: soft and dense, rustling. After all, through tactile perception, a visually impaired baby learns to understand the world.
Developing fine motor skills
We combine something pleasant - a game - with something useful - developing little fingers. What will be interesting to the child? After all, it will be wonderful if the baby learns to lace shoes, tie shoelaces, fasten and unfasten buttons on his own.
To do this, include pages where you can weave a lace. For example, glue a boot applique, make small holes, finish them, stitching well around the edges. First, thread the lace together with the baby, then he will begin to do it himself. After 2 years, the baby can master this skill on his own. After 3-3.5, learn to tie a knot and knit a bow.
Consider pockets with buttons. For example, a leaf on a button under which a small caterpillar will hide.
Firmly sew several small colored snakes. Your baby will have fun opening and closing them again and again.
Study of shapes
Thanks to a small book, the child will learn to distinguish between large and small objects. Make 2 baskets on the page, one for small objects (circles/squares/triangles), the other for large ones.
You can make simple and complex applications from small and larger ones geometric shapes. Snowman: place the largest circle at the base, glue a smaller one on top of it. We build a Christmas tree using the same type. You can build a large/small house with windows from rectangles and squares, and use the triangle as a roof.
Developing thinking
Put together simple puzzles: images of a car, the sun, animals, a ship. Study vegetables and fruits. You can use the same baskets for this. We put fruits in one, vegetables in the other.
Study natural phenomena. You can attach leaves to the tree with Velcro; when they fall, autumn comes. Create snow with your own hands, fill the space with snowflakes, build a snowman. When the sun comes out, it’s day, and when it hides, it’s night. Everything is simple and easy.
Study animals. For example, domestic animals live near the house, and wild animals live in the forest. Soon the baby will figure it out on his own and begin to complete this simple task without mistakes.
Create a children's book fairy tale with your own hands, using ready-made templates Velcro heroes.
Studying colors
Book made of paper or cardboard
Paper books are suitable for older children; I started making such books for my son when he was 10 months old, but everything is individual.
Why do you need a paper book, if there is now a huge selection of books in stores, many will ask. Firstly, not all books contain adequate pictures. In modern books you can find disproportionate people, inadequate images, distorted fairy tales that teach in a completely different way than we would like.


We have a big beautiful book “Geese-Swans”, the pictures in it are beautiful, good, kind faces, human, but the content of the fairy tale is distorted. The girl helped the apple tree not out of the kindness of her heart, but because the apple tree would hide her. We all remember the fairy tale, how a girl ran looking for her brother, met an apple tree that was groaning under the weight of apples and helped her, took pity on her, although she was in a hurry. And on the way back, the apple tree stole them from the swans. And the stove not only hid it, but then also treated it to a pie. And in our new book, what is brought up? This is a photo of the described scene from our book: 
- adequate pictures, not oversaturated with colors or distorted faces
- the scenario of the fairy tale, what it teaches: goodness without selfishness, or do me a favor, and I will help you for it...
Of course, it’s very difficult to look for tricks in fairy tales and it’s not always possible to see everything in the store; many of the books that we bought or were given as gifts were burned at the stake))
Now about what you can come up with
 Print the book yourself and paste it there nice pictures. It's not difficult, you just need to have basic Word skills. The second option is to cut pictures from books, magazines and glue them into an album and sign them. This is how you can make educational cards and therapeutic tales, and just our old ones good fairy tales. You can even make voluminous fairy tales.
You can involve older brothers or sisters, or you can hang out with your baby. From the age of 1, kids love to make appliqués. And the most important thing is that after 4 years you won’t get tired of the book, since the child himself took part. And after 5 years, the child, already an adult, can open it himself, read it, finish drawing something, write something down. This is something more than just a book, these are your pleasant memories together, such fairy tales will be remembered much longer and will lay much stronger bonds in your personality. good programs than such books as our “Geese-Swans in Modern Processing”
It's a matter of little things - desire, imagination, time and lack of laziness.


For older children
Older children need more complex and interesting stories. You can make books about planet earth, about space, about production, about countries, and mathematical problems.
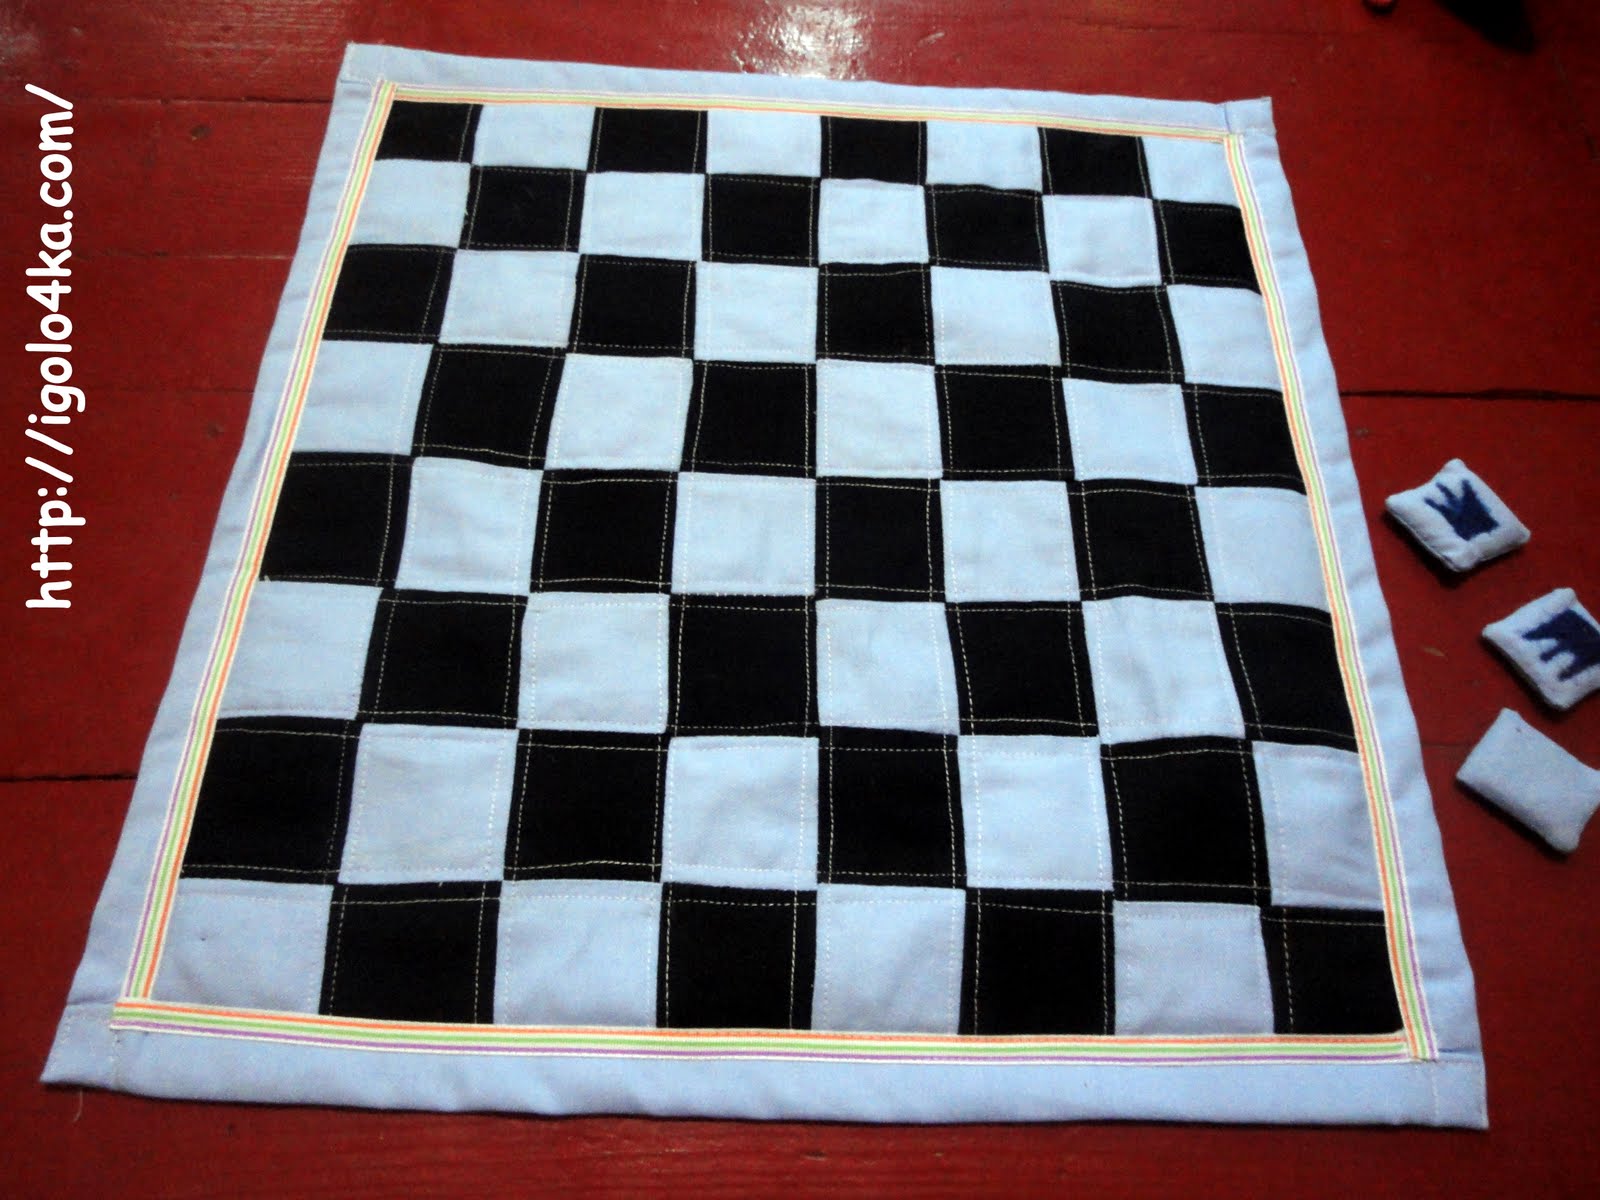
It’s easier for older children to make paper books, but soft books with tic-tac-toe games or action games that you can take on the road will be interesting and practical. Even chess and checkers can be made from fabric, they do not take up space, and are much brighter and more original than ordinary ones.


If you're looking to keep yourself and your child entertained, here's a great activity! You can make a baby book with your own hands for a child of any age, even one who is over 20.
After all, the meaning of this book depends on the material and content. The tips are also suitable for those who were asked to make a book with their own hands as homework.
The materials for a homemade book can be completely different. Only your imagination or financial component can limit you. The simplest options are a book made of paper and fabric. First, we are faced with the main task of coming up with a plot and composition.
In contact with
Classmates
Baby book made of fabric
 This book is made even for the little ones, because it develops fine motor skills hands But if you want to make a book with riddles and tasks, it is better if your baby is already five years old. Pages can be connected to each other in two ways:
- Sew thread on the spine.
- Make small holes in the leaves and tie them with string or rings.
Thanks to this method, you can add new pages. The best fabrics for this type of book are colored fleece and felt. This fabric can be purchased at an art store.
For children under 3 years old
 It is for children of this age that it is better to make a book from fabrics, not paper. After all, it is difficult for a child to understand and realize that tearing a book is bad. In addition, the use of materials of different textures develops tactile Feel. Try not to make small parts that are easy to tear off and put in your mouth.
Better do it appliqués from different fabrics that can be easily sewn on tightly, for example, plastic bags or oilcloth.
 If you are thinking about an idea appliqués, There are a few simple options: cups, sun, flowers, houses, cars.
You can do something fun by playing up everyday activities. There's still one interesting idea: sew large figures from fabric and attach Velcro to them so that you can tear them off and stick them in a book. Such things can be purchased at a sewing store.
For children over 3 years old
 In this age category, the scope of your capabilities increases significantly. You can even try to make this fake together with your child if the child is already in third grade.
The book filling can be glued together using safe glue. You can use different materials, for example:
- Buttons.
- Ribbons.
- Laces.
- Threads.
 Next you can start creating mobile with a picture, with the help of such a thing you can teach a child the rules traffic, teach how to tie shoelaces and place objects correctly.
If you want to teach this to a child, do alphabet, sun and planets, as well as traffic lights and road signs.
To do the lacing task, you will need:
- Regular lace.
- A ring that is slightly larger than a lace.
- Strip of fabric.
- Threads, needle, scissors.
Beginning of work.
 Cut the fabric into pieces 2–2.5 cm in length, trim the edges. Then thread one piece into one ring, fold it in half and sew it to the book. You need to sew it so that two columns emerge from all the segments.
If you can insert the grommets, you won't have to worry so much. Plus, you can add a zipper that will be interesting to unfasten and fasten, as well as pockets in which to hide surprises.
 Next, start creating a machine that will move along the lace. For the rest of the items, it will be enough to make two holes and thread a ribbon through them, and sew the ends to the book.
For little girls, a picture with dolls is more suitable, on which you can stick outfits, hairstyles, and jewelry.
So we've sorted out a few ways creating a book with your own hands. Don’t be lazy and do this, you will please your child, and he can also boast about it in kindergarten or at school in his class.
DIY paper baby book
 Suitable for a child over three years old paper book. This book can be made in different ways, let’s look at several options.
Book from leaves and string.
We take the required amount of paper and punch the stack with a hole punch. Next we get beautiful lace or tape, and then thread it through the holes. Then we do beautiful bow. This is one of the lightest paper book options. This option has one significant drawback: this paper book is very difficult to leaf through.
Transformation from paper.
For this job you will need:
- Multi-colored and square leaves.
- Glue.
- 12 minutes.
Step-by-step creation of a fake:

Conclusion
So we have looked at simple and easy ways to create a children's book. The main differences and features of such fakes depend on the age of the child.
Shibanova Irina
Master Class
Working on the creation of a baby book is a very exciting activity that has a comprehensive effect on the development of the child:
Promotes the development of creativity in preschoolers;
Increases sensory sensitivity, that is, promotes a subtle perception of shape, texture, color;
Develops imagination, spatial thinking, general manual skill, fine motor skills;
Synchronizes the work of both hands;
Forms perseverance, the ability to plan work to implement a plan, anticipate the result and achieve it, and, if necessary, make adjustments to the original plan;
In the course of creative activity, children make many discoveries and achieve personal achievements. The result obtained is the first and very important stage of children's creativity.
Material: colored cardboard, sheets of A4 paper (can be of different colors), old coloring books or children's magazines, glue stick, scissors.
Description of the process of making a baby book:
1. First we make the pages. To do this, take colored sheets of A4 paper, fold them in half (lengthwise) and cut along the fold line.


2. Coat the edge of the sheet with glue and glue it together. Depending on the thickness of the book, there may be 2-3-4 such leaves.


3. We fold a long sheet of paper like an accordion.


5. Coat the edges of the cover with glue and glue in the pre-prepared pages.


6. Now let's start designing the book. We come up with a name and write it or paste it on the cover.


8. The baby book is ready!

Other options for baby books in which the pages can be fastened with braid.


I wish you good luck and creative success!
When a child begins to explore the world, he is interested in everything. The best way for a child to come into contact with the outside world is through a baby book, which you can either buy or create with your own hands. Such a book must be issued in the first year upon admission to any modern kindergarten.
Parents involve their children in creating a baby book - this is its main idea. At the same time, the kid will be incredibly proud that he put his soul into the common cause, participating in the process. When creating a book together with parents, the baby develops skills in working with small parts and with scissors. At this time, the child develops speech and communication skills, and there is a desire to further participate in teamwork. In addition, the child becomes even closer spiritually to his parents.
The theme of a baby book, as a rule, is set by kindergarten teachers, while parents can only choose materials for production and make it in a short time. It makes sense to include fairy tales in homemade crafts and use a variety of colors and animal images. The plot and design of the book depends solely on the imagination of its creators.
Material selection
What the material will be depends mainly on the age of the child and the imagination of the parents. Recommended materials Regarding the baby's age:

The most suitable fabric for decorating a DIY baby book for kindergarten is thick cotton. This material is easier to design and iron; moreover, it interacts best with starch, which will greatly facilitate the manufacturing process for parents. You can also add fleece, then the book will be softer, but also voluminous.
Design ideas
Little naughty creatures love everything soft, voluminous, rustling, everything that can be unscrewed, pulled, removed. Plus it's incredibly useful for fine motor skills of a child's hands. That is why, if you make a lot of removable elements on the pages of a baby book, this will be the most advantageous option. It’s good if these are heroes of your favorite cartoons and fairy tales. You can buy them at any craft store. If there are no such stores in the city, you will have to sew it yourself. It is advisable to additionally secure all elements, small and large, with ropes, since these parts can get lost and will not be easy to find among children. There are many ideas in the master class videos.
Children are also interested in construction toys. You can make a house in which the doors, windows, and roof will be on Velcro, or a car with removable wheels on the same Velcro. Multi-colored puzzles with each piece on Velcro are also popular. For older children, you can play a game of tic-tac-toe.
It is advantageous to make pages from fabric to which Velcro adheres well and each detail will be separate. This way the child will be able to create new paintings every day.
Would be a good idea add pockets to the book, into which removable parts can be folded, as shown in the master classes.
Little children love to find some new hidden details under the elements, for example, a bug under the petals of a flower or a bird’s nest behind a leaf on a tree.
If the elements can be iterated, this will be optional fun activity for the baby almost from the first year of life. Such details can be colored pebbles on a rope or beads under a transparent fabric. Children are also interested in labyrinths. To create a labyrinth in a baby book, you need to take transparent fabric and machine stitch the passages. Throw a few beads inside. The child will roll beads through the maze, thereby developing fine motor skills for the future.
Not a bad idea for a baby book - this is lacing. In every kindergarten, children learn to tie their shoelaces. A baby book can help your child in this difficult task. A small applique of a shoe, rings and other details of your choice are sewn onto the page. Either laces or strips of fabric stylized as them are threaded into the rings. The simulator is ready!
All girls are crazy about felt dolls, especially if they can comb their hair and change their clothes. Aerobatics if the doll has her own house with interior items. In this style and with such an idea, you can design the entire book. On each page there is a room with corresponding furniture and interior items on Velcro.
Fastening
You can pin pages in several ways:

Today, in big cities, master classes are held on making baby books with your own hands. Residents of small towns can watch the video on the Internet.
Despite the fact that the fabric book has a very large volume, the pages should not fall apart. It is necessary to sew fastex or tape to the cover. The most suitable size baby book for kindergarten is A5 format. With a large number of elements, it will be almost impossible to bind together more than six or seven pages. If six pages do not accommodate the wild imagination of the handicraft parent, you can create additional pages that will periodically replace each other.
The first cardboard book
 When a child reaches a certain age, he can make a baby book on his own. This is usually allowed in older groups of kindergarten, when children learn to make appliqués on their own, skillfully using glue and children's scissors. Such a book will be something like “profiles for friends” for children of the 90s. You can paste clippings from magazines or just pictures from the Internet, printed on a color printer, into an album or a beautiful notebook.
If the parent has drawing skills, you can safely use them to design a baby book. Anything can be used: various paints, pencils, felt-tip pens, markers and even women's eye shadow and blush. You can also buy ready-made stickers in stores and supermarkets, which are usually collected by type and theme. Stickers come in volume and with glitter. The latter are especially popular among little fashionistas. Gluing some elements of the book can be entrusted to the child (of course, under the supervision of a parent), but it is important to remember that the glue that the child will deal with should not be toxic.
The most pleasant content of a baby book, from the point of view of a small child, will be photographs. When not just unfamiliar objects appear on the pages, but beloved and dear people and toys, this pleases not only the baby’s eyes, but also the happy parents.
Attaching the paper baby book:

Very beautiful examples books are made from scrapbooking paper. Already applied to such sheets beautiful pattern, all that remains is to add pictures and photographs and other elements at your discretion, to create a story.
Options for creating a baby book for kindergarten a large number of. You just need to be patient and imaginative. It would be useful to throw away all adult problems and return to your sunny childhood, then anyone, even the most serious and strict parent, will be able to create a real fairy tale for their little miracle.


