Sometimes, in a handicraft impulse, you want to make something beautiful with your own hands, but as luck would have it, nothing comes to mind, and so as not to suffer again, I decided to put together a selection of examples of how to make a postcard with your own hands. Here different examples postcards and small descriptions of how to make this or that postcard.
I tried to select as many different images as possible, both in style and theme, so that there was plenty to choose from. Of course, each postcard is just an example of how you can make postcards with your own hands.
To mom
How to make a card for mom? It’s clear that it should be the most beautiful and touching, but I want some specifics, right? The first thing you need to do is focus on the reason, it could be:- an unplanned card for no reason;
- Mother's Day or March 8;
- New Year and Christmas;
- birthday or name day;
- professional holidays.
Of course, no one can stop you from making and giving your mom a postcard dedicated to the first snow or even the release of your favorite TV series, but in general, the main reasons are indicated quite clearly.


A New Year's card for mom can be ordinary (from the point of view New Year's greetings, naturally), it is not necessary to emphasize in any way special relationship. But a birthday or Mother's Day are special holidays on which it is worth presenting a personal card with the signature “To my beloved mother.”
How to make a birthday card for mom? Sketch with a simple pencil, add a little color to help guide you color scheme and understand what shades you will need as you work. So, you need to buy or find in the bins:
- a blank for your needlework (thick and thin cardboard is suitable);
- background image - it can be scrap paper, colored paper, any sheet that you like for the ornament, or you can simply artistically spray paint on the sheet with white thick paper or even use monotype and marbling techniques;
- chipboard for inscription - it is better to purchase a ready-made one or use a special stapler to decorate the edge;
- pair decorative elements- flowers, butterflies, beads and leaves;
- one or two large decorative elements - flowers or bows;
- decorative tape;
- good glue;
- scalloped ribbon or lace.
First you need to glue the background image to the blank, then arrange large flowers, and only then complement the resulting composition with small decor and lace. Dry the finished work well, decorate it with small decorations and sparkles, and then sign it - mom will be happy with such a sign of attention.
Now you know how to make a card for Mother's Day, and you can easily figure out what a card for an anniversary or angel's day should be like.
Another original version: the essence is that you need to cut out circles from colored paper, and then cut each circle in a spiral and twist it into a bud, you will get cute flowers with which you can decorate a card.


To dad
A DIY birthday card for dad is always very touching and sweet. Choosing a particular "papal" theme is not too easy, but there is a wonderful straw to grab onto - style. If you make a stylish card, then the father will undoubtedly be happy to receive it, even if it does not contain the usual symbols of “masculinity,” which in our country often include cars, weapons and fishing.
Naturally, if the father is celebrating the anniversary of his driving experience, then a car on a postcard is quite appropriate, but on dad’s birthday it is better to present a neutral and beautiful greeting card.

What kind of cards do men like:
- not too colorful;
- in a calm, slightly muted palette;
- with clean lines;
- in which a lot of effort has been visually invested.
Men admire the process, so before you make a nice card using the scrapbooking technique, think about how you can put your work into the card? This can be working with threads or embroidery, spirography and paper cutting, pyrography and much more.
Incorporate a few elements of hard work and love into your work and your dad's birthday card will be stunning.

So, we make paper cards with our own hands for our beloved daddy. Start by choosing a subject - this could be some element of a male portrait - a stylish beard and glasses in the spirit of hipsters, or the silhouette of dad's favorite pipe, you can also make some kind of heraldic flag or symbol.
Choose colors - they should be calm and beautiful, and also look good in harmony with each other.
Make a pattern for the future postcard and get to work - if this is a regular applique, then cut out all the elements and carefully lay out the future composition. And in the case of artistic cutting, it is better to spend time on the pattern and drawing. By the way, for this work you will need a good breadboard knife.
After all the main elements have been cut out, assemble the card - if you planned it using the scrapbooking technique, then you can simply glue the composition, and if you are trying to create a thin openwork product made of cardboard and paper, then select shading colors for each layer - to make the work look really openwork, you will need to choose shades that highlight all the cuts.
Make a central element on your card, and then put it under a press - this will help prevent the paper from deforming from the moisture contained in the glue.
In honor of the wedding
Do beautiful cards doing it yourself for a wedding is not an easy task, and here it is better to watch master classes.

A wedding is one of the most important events in the life of a young family, and therefore it is not enough just to draw a card, you need to carefully design and package it, and perhaps supplement it with some other elements.


How to make a beautiful card for congratulations on your wedding day:
- come up with an idea;
- find out from the bride and groom the main color of the wedding, or the main theme of the celebration;
- look various options postcards - using scrapbooking techniques, with embroidery, ribbons, and so on;
- choose several interesting lessons;
- make a rough postcard from paper and cardboard (and if you are not sure of your result, then it is better to do this step several times);
- do original postcards with your own hands;
- choose packaging and make it a little more unique;
- label the envelope and postcard.
Other occasions and recipients
Rest assured, handmade birthday cards will delight the recipients - after all, this is not just a DIY postcard made in a master class, it is a real man-made miracle that keeps a piece of the soul.


You can make cards for mom and dad with your own hands, or you can delight your friends before every holiday with a custom greeting - all you need is free time, good master classes and a little patience.
3D postcards look especially impressive. How to make a three-dimensional postcard? Come up with (or look at experienced authors) an idea on how you can shape it so that you get voluminous postcards. You may want to use more decorative elements, or you may decide to make a simple DIY birthday card with 3D elements.

By the way, if you are wondering how to make a postcard for your mother or friend with voluminous paper elements, take a closer look at children's books. Surely you still have several copies, when opened, carriages and castles, trees and horses appeared between the pages.
Take a close look at how these elements are made and glued together - you may be able to reproduce this in your sketch.

Or try to do something in the shabby chic style and scrapbooking with your own hands - it’s not as difficult as it seems, the entire main volume effect is created by layering elements. By the way, flat cards are also good. :)
I think now you have enough ideas for creating greeting cards, postcards and tags - craft for your own pleasure and bring joy to your loved ones!

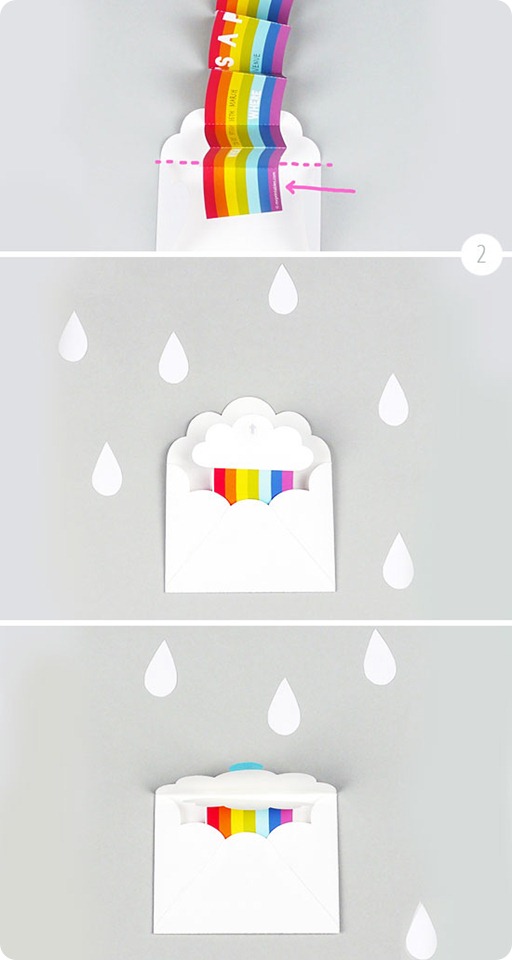
Moving card - “Waterfall of Hearts”:
Some more ideas for inspiration:


An ordinary postcard will not surprise anyone. That's why I had the idea to make a 3D card with flowers. It’s not difficult to make, but it looks unusual and interesting. This card will be remembered for a long time.
To make a postcard we will need:
- a sheet of double-sided colored cardboard (card base) of any color;
- double-sided colored paper (for flowers) of any color;
- pencil glue;
- scissors;
- pencil;
- felt-tip pens.
Step 1. Cut out 7 10x10 cm squares from double-sided colored paper.

Step 2. Fold the square 3 times to form a triangle.

Step 3. Draw a petal.

Step 4. Cut and open.


Step 5. In this way we make all 7 flowers.

Step 7. Using a blue and blue felt-tip pen, draw small strokes from the middle, also along the edges of the flower. We leave two petals uncolored!

Step 8. Also color the remaining 7 flowers.

Step 9. Cut out one of the unpainted petals. We do the same with the rest of the flowers.

Step 10. Coat the remaining unpainted petal with glue and connect it to the adjacent petal. It should be voluminous. We do all the other flowers the same way.


Step 11. Take 3 flowers. We bend each flower in half. We mark crosses on one of the flowers. We coat the places marked with a cross with glue and glue the other 2 flowers bent in half there.


Step 12. Coat the places marked with a cross with glue and glue another flower bent in half.

Step 13. Place the crosses again, coat these places with glue and glue 2 more flowers, bent in half.

Step 14. Place the crosses again, coat with glue and glue one flower bent in half.

A voluminous postcard, which is made by hand, will be an unexpected and very pleasant surprise for your loved one and to a loved one. There are a huge number of beautiful cards for any event, so you can easily find the right holiday gift.
This is an original postcard, despite its apparent intricacy.
It is wonderful for every person close to you. The occasion could be Women's Day, New Year, or even Valentine's Day.
To make a postcard you will need:
- cardboard or paper thick enough
- knife
- First of all, you need to make a printout of the postcard template located here. There are several copies there.
You can try to sketch a drawing with a heart yourself. For this you need a ruler and a simple pencil. - Take a knife and use it to make special cuts on the resulting template.
- Try to fold the card as carefully as possible so as not to wrinkle it. First of all, you need to make the folds; in the picture they are drawn with a yellow pencil. Then slowly fold the card where you want it.
The remaining parts will form themselves. Iron each curve on the card well to ensure each individual element works smoothly.
To make it more convenient, you can attach the card with tape to the table. - Now it's time to decorate the card. Cover the edges with colored paper.
Almost everything is ready, you just need to add pleasant and good words.


Volumetric postcard Volcano of Hearts
This postcard consists of several parts that need to be connected using glue.

To create a postcard you will need:
- cardboard and colored paper
- scissors
- white glue.
- Download the template in a suitable format.
Templates for a three-dimensional postcard, which is made with your own hands.
Knowing some rules, you can draw hearts yourself. You will find the rules below. - Take out a huge heart from the middle. It is located on the fold.
- When cutting out the hearts, try not to touch the places where they bend (see picture).
- On the hearts shown in this figure, you need to make cuts to connect them together.
In order for the three-dimensional card to be closed as tightly as possible, you need to cut the paper on the middle fold to glue individual hearts to the base in the form of red cardboard. This cardboard is the background of the postcard. - After you have glued the halves to the base, you need to fasten the hearts using the cuts previously made on them.
The size of the hearts should be the same on all sides.
The line on the diagram, which is drawn in blue, indicates the same distance that there is from the center fold to the beginning of the cut, and the lines in red indicate that there is exactly the same distance between the hearts that are located closer to the middle of the card.


Ideas to note


Elizaveta Sklyarova
Beautiful and original postcard 3-D will be a great gift for the upcoming holiday on March 8th. like this postcard It will be useful to do with children over 6 years old. Of course, children will need the help of an adult, but they will be able to do all the preparation of the parts on their own. The manufacturing process is like this postcards develops fine motor skills hands, spatial thinking, logic, and also teaches children perseverance and accuracy.
Do three-dimensional 3-D postcard incredibly interesting, because in the process of making it, real miracles happen to paper.
Required materials:
- colored printer paper
Glue stick, PVA or double-sided tape
Scissors
- felt-tip pens or markers
Bird pattern
Openwork napkin
Printed congratulations for mom

Move work:
1. On sheets of paper of any kind colors measure out 10*10 squares. You need 7 such squares.


2. Fold our squares into triangles three times.

3. Cut out the petals.


4. Unfold the petals and get flowers.

5. One segment cut off the flower.

6. Let's start coloring our colors(I have a black marker)

7. Leave one petal unpainted, glue it with tape or apply glue and glue it to the adjacent petal, creating volume.

8. Fold flowers in half and start assembling the bouquet. To the first flower We glue the blanks on the right and left sides, leaving the central petal free.

9. Place one blank on the three central petals.

10. Again we apply two petals on the left and right sides.

11. Glue the last piece onto the three central petals.

Important: glue only the edges of the petals!
12. I decided to make leaves.


13. Let's start with the design postcards.

Fold a sheet of thick paper in half, glue the leaves and attach the bouquet to postcard as shown in the photo.


14. We design the title page at our discretion. I glued it openwork napkin, on top there is a cardboard bird, a wing and in the right corner a congratulation to mom.


At first glance it seems that postcard very difficult to do, but it's not. It’s worth trying and everything becomes clear. My seven year old son squealed with delight as he helped me glue and saw the magical results. Good luck to everyone!
Publications on the topic:
Second group teacher early age: Neklyudova Darina Sergeevna Purpose of the master class: Formation of teachers’ skills to create a product.
Here he enters the clearing Straight to the ocean-sea; Lying across it is Chudo-Yudo the Whale Fish. Which fairy tale did you learn these lines from? That’s right, from the fairy tale.
Master Class " Volumetric snowflake» New Year is approaching! This means that it’s time to think about decoration, which few people can do without.
Master class "Volume snowflake". After the autumn slush, dampness and rain, winter has come - the most fabulous time of all seasons. AND.
Soon, very soon, the long-awaited and beloved holiday, New Year! Time New Year's holidays, beautiful time, good fairy tale, which.
Volumetric snowflake made of paper. New Year is a time of magic and fairy tales, when each of us hopes for small miracle. Therefore, preparation for...
For many, postcards have long become a relic of the past. People started using electronic greetings, forgetting how symbolic and meaningful original handmade cards can be for the recipient.
However, no matter how advanced the technology, beautiful postcards made with love and attention will always remain an original symbolic gift for any person, because they, like old photos, are custodians of memories and emotions, which is priceless.
Today, especially for you, the 1001 Advice team has prepared a unique review of ideas on the topic “The most original do-it-yourself postcards.”
It presents unusual and interesting postcards, which even schoolchildren can do.
We also presented for you ideas for DIY cards using more complex techniques, namely scrapbooking, quilling, with the help of which you will realize extraordinary ideas for greeting cards and invitations for birthdays, New Years, weddings, etc.
About ideas and beautiful examples, what kind of postcards to make with your own hands, further...
DIY postcards made from simple materials: ideas, techniques, methods of implementation
To create cards with your own hands, especially if you are creating in the company of little toddlers, for whom this activity is very important and responsible, stock up on pieces of ribbons, fabric, burlap, colored paper and cardboard, buttons, beads and pebbles and many other materials that can be used to create a postcard.
Glue in our home art kit, tape, scissors and thread should also be present.
The simplest DIY greeting cards
 Undoubtedly, we do not strive to make something unique right away, especially if children create cards with their own hands.
It is clear that children, as a rule, do Greeting Cards with your own hands for mothers, grandmothers, teachers.
To create a postcard with your own hands it is very important good idea, which will determine our further actions.
Taking multi-colored sheets of cardboard, you can cut out a blank for a postcard. Next, using a stencil, we cut out cute and colorful flowers, butterflies, and certain figures from colored paper, which will be located on our greeting card.
Having cut out the parts, glue them onto the surface of the cardboard, and your homemade masterpiece is ready. Be sure to leave space for a signature, or print out the congratulations on a printer in advance.
Of course, we talked about this process quite simply. View more interesting ideas You can make postcards by looking through our selection of examples.
In it you will see what kind of postcards you make with your own hands in a simple way can be made for a birthday, New Year, March 8, Defenders of the Motherland Day, christenings, etc.
Original do-it-yourself cards using quilling technique
 The quilling technique has long grown into an art that involves the creation of entire masterpieces from twisted pieces of colored paper.
You can also make your own cards using the quilling technique. Using this original technique, you can make magnificent cards with your own hands in the form of flowers, curls, leaves, twigs, bouquets, which will very appropriately complement sincere words congratulations written by hand or prepared in advance in printed form.
Do-it-yourself quilling cards can be supplemented with rhinestones, beads, beads, fabric inserts, openwork, or ribbons, which will look just great.
In addition to the usual components of a set for labor with paper products, to realize quilling masterpieces you will need a special awl, tweezers, pins, a paper knife, a comb to create unusual elements, and, of course, multi-colored paper with which the quilling elements will be performed.
Unusual DIY cards using scrapbooking technique
 Another wonderful technique that deserves special attention- scrapbooking. Using this method, you can design not only postcards, but also family albums and notebooks.
You can create your own postcards using the scrapbooking technique not only on paper, but also on cardboard and wood.
To implement this technique, you must prepare some materials in advance, namely cardboard, colored paper, glue, ribbons, lace and fabric pieces, dry leaves and decorative flowers, beads, etc.
As you can see, our list includes diverse elements that allow you to create your own postcards according to your unique idea. The idea is very important not only for the process itself, but also for choosing the appropriate decor.
If the card is made on thick cardboard, even coffee beans and cereals can be used.
DIY postcards: product styling
 Choosing the best idea is very important so that your own postcards turn out successful and exclusive. This is especially true for types such as wedding invitations.
Sometimes future spouses want everything to be perfect and unique at their wedding, so they are not too lazy to make invitation cards with their own hands for all the guests.
Below, look at the ideas for such cards, after viewing which you will immediately understand how to make these wonderful invitations.
How about a postcard for dad in the form of a man whose suit is made of fabric, or a postcard with a fabric insert that creates an imitation of a girl’s dress. Very creative!
In our review you will see ideas for postcards of different styles, which your family and friends will undoubtedly appreciate.
DIY postcards: amazing variations of homemade postcards


