Probably every woman discovers new talents in herself after giving birth to a child. More often modern mothers They make with their own hands various educational toys from fabric for their little ones. For some, this is just a hobby, but a great opportunity to give your baby the best, made with love and warmth. If you still doubt your abilities and have never done anything like this, be sure to try it. Our selection of master classes will help you with this.
DIY soft educational toys for children
So, we invite you to create educational soft toys with your own hands, the production of which will not take much time.
Educational soft cube
This toy is simple to use, but at the same time useful for development. With its help, the child will be able to develop fine motor skills hands, coordination of movements. The cube is also suitable for small children, but in this case small elements cannot be used in its manufacture. Then it will be really safe for the baby. 
What is needed to make a cube?
- Fabric (cotton or felt).
- Ruler.
- Pencil.
- A piece of soap.
- Scissors.
- Needle.
- Threads.
- Non-woven fabric.
- Filler.
- Beanbag.
- Decorative elements (pieces of fabric of various textures, buttons, zippers, ribbons, lace, etc.)
Sequence of work.
- Prepare the fabric for work. To do this, wash it, because it may shrink a little, then iron it after drying.
- Make a pattern for the future toy. Using a ruler and pencil, draw a square of the required size on paper.
- Place the resulting pattern on the fabric and cut out 6 of these squares, remembering to leave seam allowances.
- Cut squares from non-woven fabric that are slightly smaller in size than from the main fabric. Attach them to the cotton blanks so that there are equal edges on each side of the square. Press the seams.
- Get decorating. Give free rein to your imagination. You can sew onto the squares not only pieces of fabric, buttons, braid, lace, but also a small felt toy made by yourself, embroidery, etc.
PECULIARITIES! To make a developing soft cube, choose fabrics with bright prints and designs. This will help the baby develop color perception.
- Sew 4 squares together in one strip. Sew the remaining two blanks to any of them. After this, sew all the elements together, thereby forming a cube. Don't forget to leave a small hole. At the junction of the parts, sew ribbons, laces, and ribbons.
- Fill the product with a filler of your choice: cotton wool, pieces of fabric, padding polyester, etc.
- Insert a rattle inside.
The educational soft cube is ready.
If you are afraid that you may not be able to make such a toy, do not despair, you can try to make simpler children's soft educational toys, for example, an educational rug. To do this, sew 2 pieces of fabric together, add filler inside the product for softness. Place various developmental details on the mat: buttons of different shapes, zippers, felt toys, pieces of fabric of different textures, etc.
Soft train
What will be needed for production?

Sequence of work.
- Make a pattern for the future train. Cut out blanks from fabric. Cover each trailer with non-woven material.
- From felt, cut out future wheels in the shape of a circle and windows in the form of squares.
- Each trailer will be connected to the next one using certain elements. In our case, we use a button, lace, Velcro, and hook.
- Sew the pieces together with the right sides facing in, leaving a small hole. Before you do this, do not forget to sew on the sides of the trailers the necessary parts with which they will be connected.
- Turn the elements right side out, fill with filling, and sew up the hole.
- Sew wheels and windows to the trailers.
In the same way you can sew a crocodile, a dog, a cat and many other animals. Activity with such a toy perfectly develops sensory perception, fine motor skills, logical thinking. The baby will be able to learn colors and independently connect the trailers, thereby developing finger dexterity and coordination of movement.
DIY sewn textile educational toys
Felt alphabet
Many needlewomen like felt, because this material is durable, natural, holds its shape well, has a pleasant texture, and its edges do not unravel when cut. It's a pleasure to work with him.
PECULIARITIES! Use for making children's toys natural fabrics and fillers. Choose bright colors and different textures. Do not use too small parts, they can be dangerous for the baby.
You can sew countless children's educational products from felt. These include mobile toys, finger puppets, books and much more. Today we will talk about one useful toy- felt alphabet. Any mother can do it. To do this, we will need a letter pattern, multi-colored felt, scissors, and a piece of soap. 
Work order.
- Download ready-made patterns letters If you are confident that you will get even and beautiful letters, try making the template yourself.
- Attach the pattern to the felt, trace with soap and carefully cut out the letters. In difficult places you can use a utility knife.
The letters are ready.
You can cut out not only the alphabet, but also numbers, as well as various vegetables, fruits and berries. The baby will surely appreciate your creation.
If you want more volumetric letters, use filler. In this case, cut out 2 parts for each letter. You can connect them at the edges using a buttonhole stitch. Use contrasting color threads; they will beautifully frame the edges of the product. If desired, make a fabric “board” for the alphabet with pockets and arrange the letters in order.
Such products will not only develop fine motor skills, but will also perfectly help to gain useful knowledge and prepare the child for school.
Comforter with cherry pits
Now we are sewing a comforter with our own hands - a very convenient thing that will be useful not only for infants, but also for older children. The product will help the baby sleep soundly all night, warm the tummy during colic, and will become a great friend for older children and help develop fine motor skills. After all, you can put various fillings inside the toy: rice, buckwheat, cherry pits, coarse salt, etc. Touching such comfort with your hands is not only pleasant, but also useful. 
What will be required for production?
- Pattern.
- Textile.
- Non-woven fabric.
- Chalk or soap.
- Needle.
- Threads.
- Scissors.
- Filler.
Work order.
- So, how to sew an educational toy? Decide what kind of squishy toy you will make. It could be a bunny, a baby elephant, a fox, a bear cub, etc. On the Internet you will find many patterns and ideas for inspiration.
- Attach the pattern pieces to the fabric and trace with a bar of soap, leaving seam allowances. Cut out the elements.
- If you are using thin material, but want the toy to keep its shape well, glue the parts with non-woven material.
- Sew the elements of the toy, folding them right sides inward. Leave a small hole. Iron the seams and turn the product inside out.
- Before using any natural filler (buckwheat, cherry pits, rice, etc.), rinse it thoroughly and dry it in the oven or in a frying pan. Fill the toy with stuffing. Sew up the hole.
- Fill the head and tail of the future toy with soft filler (cotton wool, pieces of fabric, etc.). Sew these parts to the body of the toy. Don't forget about the ears and paws.
- Using thread, embroider eyes, nose and mouth on the head.
PECULIARITIES! Do you want to please your baby with a personalized toy? Embroider your little one's name on it.
If you wish, you can make a toy with a removable bag of filling. To do this, use a zipper or buttons on the front part of the body.
As you can see, there is nothing difficult in sewing educational toys for your baby from fabric with your own hands. Such products are special, because they are made with love and filled with the warmth of mother’s hands.
We sew educational toys: useful video
Do you want to sew an educational toy for kids? Look detailed master class for making a soft developmental cube:
You can buy kits for making toys in the World of Embroidery ->
In this article:
The main purpose of toys is to develop the baby's game form certain skills, abilities or acquisition of knowledge. Today educational toys are very popular. Famous manufacturers They offer a variety of educational options to suit every taste. But buying them is not always rational, because educational toys are not difficult to make with your own hands. Making them will not take much time and will not require any expenses.
What types of educational toys are there?
The topic of educational toys that you can make yourself is at the peak of popularity today. Therefore, there is plenty of information about them. If desired, you can easily make various children's rugs, special books, cubes that develop fine motor skills, animal figurines and much more.
Toys for developing skills and abilities are divided into those with which the baby can play independently, and those that require the presence of an adult. No help will be needed when your child masters simple patterns to develop fine motor skills. But it’s better to study letters, counting, sides, body parts, shapes with your mother.
Materials for manufacturing
To create educational toys at home you will need the most different materials, which, as a rule, are always at hand. These are scraps of fabric, ribbons, zippers, buttons of various shapes and sizes, furniture fittings, foil, bags, old unnecessary things.
Paper
From plain and colored paper you can make geometric shapes, lacing games, inserts for sorters, etc. Leftover multi-colored corrugated paper will also come in handy.
Tree
Wood makes wonderful toys for child development, for example, sorters. With their help, a baby aged 1-2 years learns figures, shapes of objects, colors. Therefore, wooden blocks and boards will become indispensable assistants in making toys for your baby.
Cardboard
You can make a construction set from pieces of regular and colored cardboard. To do this, cut out different shapes from it and show the baby which pictures can be put together. To make an educational toy, you don’t have to buy cardboard. Available options are quite suitable - cardboard from boxes, onto which pages from bright magazines are pasted.
Threads
The remains of colored yarn will become best helpers mother in making educational beads, rugs, balls or soft cubes. Not only different colors are welcome, but also different thicknesses and textures of yarn.

Socks
Old socks will get a second life in new toys for your baby. You can use them to make a soft caterpillar, with different fillings for each link, or a hand sock toy with a funny face.
Pompoms
For people with creative thinking, making a lot of toys from pompoms is a mere trifle. They make cute bunnies, frogs, piglets, chickens, snowmen. The list can be endless. The main thing is to allow yourself to fantasize.
Textile
Remnants of fabric that any needlewoman can find in stock will become an indispensable material for sewing educational toys. Suitable scraps of fleece, felt, knitwear, silk, calico. The combination of materials of different textures in such toys is welcome.
Toy options
Let's take a closer look at what can be made from all this wealth.
Rattle bracelet
It's not at all difficult to do it yourself. To sew this toy, you need to stock up on a strip of soft fabric measuring 20x6 cm, a piece of elastic, a small plastic container, some kind of rattling filler and colored scraps for decorating the toy.
First they make the base. To do this, sew a strip, turn it inside out and insert an elastic band into it. The base should not squeeze the baby's hand. Then any filler is poured into a plastic container so that the rattle makes a sound. After this, the tightly closed container is lined soft cloth and decorate with additional decorative elements. This part is attached to the base.

Beads
Special beads will be relevant for babies, with the help of which tactile skills are formed and unobtrusive learning of colors occurs.

To do this you will need beads of different sizes and nylon thread. Beads are tied with multi-colored yarn or trimmed with scraps of fabric different color and textures. After this, they are strung on a thread and the ends are tightly fastened. A child can look at them, study individual beads, and touch them with his hands.
Pillow with buttons
It’s not difficult to sew such a pillow yourself. It is useful for a baby from 3 months to 3 years. To make a tactile pillow you will need some fabric, buttons, lacing, Velcro and other elements. The main condition is that you must carefully attach all the elements to the surface of the pillow so that they do not come off if the baby pulls them into his mouth.

The easiest way is to sew a pillowcase on a finished pillow. You can sew fabric figures, buttons, zippers, ropes and other elements onto it.
Book
It can be made in different sizes and colors. This toy is very useful for the baby. It helps develop fine motor skills, study colors and shapes, and become familiar with different textures.

There are many ideas for a soft book. It all depends on the mother’s imagination. You can watch ready-made toys or master classes on the Internet. For example, the pages of a book can be made in different colors, the pictures in it can be connected with Velcro or buttons, and lacing and snakes can be added. The book can contain a soft puzzle, numbers, and animal figures.
Educational board or stand
Such a stand can free up some free time for the mother, while the baby will actively study the world and improve your skills. You can buy a ready-made version. But it’s not at all difficult or expensive to do it yourself. At the same time, a homemade board will be of no less interest to the little one than one bought in a store.

At home, you need to attach a non-working socket, switch, handles, door chain, and telephone dial to a regular board. These can be any items that are interesting to the baby.
Rug
If you make educational rugs for children with your own hands, they will become real helpers for mothers. Such a rug will keep the baby busy for a while and free him up for his mother. It develops imagination, speech, hand motor skills and imagination of the baby.

It’s not difficult to sew a children’s educational rug with your own hands. To do this, you will need fabric for the base, material for the top layer and decoration, and additional accessories. Foam rubber, thick fabric, padding polyester are suitable as a base. Fabrics for the rug should be natural, bright, but not neon colors.
Educational cube
Helps develop fine motor skills and imagination of the child. This toy is suitable for little ones early age. You can make it from multi-colored scraps. It would be good if the fabric had different textures. For example, one side of a cube can be made of chintz, the second - from denim, on the third you can sew ribbons, ropes, buttons. The development cube needs to be filled with padding polyester or cotton wool.

Figures
Multi-colored figures made of fabric or felt will attract the attention of the little ones. To make the toy more interesting, it can be made as a noisemaker, rustler, or rattle. For example, it could be a butterfly figurine. It's quite simple to do. You need to draw a butterfly on paper, transfer the pattern to felt, and cut out the figure. You can sew two sides and fill the butterfly with rustling (cellophane bags), rattling (salt or cereal) filler. You can attach a bell to the finished figure, then the toy will ring, or sew on buttons and ribbons.
What are they developing?
These toys are active:
- develop the baby's vision and hearing (for example, a rattle bracelet for the little ones), tactile sensations (baby beads or a pillow with buttons);
- introduce the child to color, size, shape (book);
- help to study the world around us (animal figures);
- develop speech and imagination of the baby (play mat).
Manufacturing Precautions
The main requirement for children's toys is safety. To do this, it is important to make sure that all materials are non-toxic and safe for children. The parts of the toy must be firmly attached to it. It is necessary to examine whether the toy contains sharp parts that can injure the baby, or objects that can injure him (a latch on the board, a zipper).
What skills can be developed in children of different ages with the help of toys?
The choice of educational toy depends on the age of the baby and his characteristics.
Up to a year
During this period, the baby develops grasping reflexes, coordination of movements, fine motor skills, speech and physical activity. Up to six months, bright rattles, beads, soft balls, cubes, and rugs are relevant. For babies over 6 months old, sorters, nesting dolls, soft books, and soft puzzles are suitable.

1-2 years
During this period of life, the baby can play independently. Of interest are toys that can be disassembled and assembled. For example, a pyramid or a sorter. They help develop logical thinking, motor skills, and attentiveness. By the age of two, a child may also be interested in story-based games.
3-5 years
At this age, the child’s fine motor skills improve and movements become coordinated. Story games interested him more. During this game, the child’s speech, imagination, skills and knowledge are improved.
Finger figurines, numbers, letters, clocks, books, board games are relevant.
Master Class
Let's look at the simplest way to make a toy - a tactile caterpillar from a sock. The baby will definitely like it. To make it, you need to prepare a long bright sock, a thick strong thread and various fillings (acorns, rice, buckwheat, salt, padding polyester, etc.), and buttons for the eyes.

First you need to pour one filler into the sock, tie the resulting ball with thread, then several times further in the same order. The end of the caterpillar must be tightly tied with thread. Sew button eyes to the head. The tactile caterpillar is ready in 5 minutes!
It is not difficult to make educational toys with your own hands. You can view ready-made samples in the store or at master classes on the Internet. To do this, you will need inexpensive materials at hand, basic skills, mother's patience and love.
Useful video about educational toys made by yourself
Modern parents begin to engage in the development of their child literally from the first days of his life. Pediatricians and psychologists recommend paying Special attention fine motor skills, as it is directly related to the formation of speech. Toy manufacturers have long picked up this idea and brought it to life, producing numerous educational toys. But many of them can be done with your own hands.
Why you need to develop fine motor skills
Many people know about the need to develop children's fine motor skills from an early age. However, not everyone understands why this is needed and what such activities are.
Fine motor skills are the ability to perform precise movements with the hands and fingers. It is coordinated by the work of the nervous, muscular, skeletal and visual systems. Its development begins in the first months of a child’s life with looking at his own fingers and hands. Then the baby gradually learns to master them by picking up toys. Motor skills have a positive effect on manual dexterity, the formation of a student’s future handwriting, and reaction speed.
It has been established that the level of development of a child’s speech directly depends on the degree of formation of finger movements. In the human brain, the centers responsible for speech and motor skills are located nearby. Thus, when one area is stimulated, the other is also activated.
DIY toys for developing fine motor skills in children
The shelves of children's stores offer a wide range of educational aids. It's no secret that their cost is quite high. For interested moms, making your own fine motor toys is a no-brainer. And the main thing will remain uniqueness - after all, they will be made with great tenderness.
Sensory bags
Sewing sensory bags with your own hands is not difficult at all. You will need thick fabric of different colors and textures and filler, which can be used as:
- pasta (spirals, shells, bows, tubes);
- cereals (millet, buckwheat, pearl barley, rice, oats);
- flour and starch;
- legumes (beans, peas, soybeans, beans, corn);
- sweets;
- nuts;
- natural materials (acorns, chestnuts, shells, pebbles);
- erasers of different shapes;
- cotton wool or padding polyester;
- buttons and beads.
Safety regulations
Natural materials must be washed and dried thoroughly before use, and toys with food products must be stored in a dry place - pasta and cereals are afraid of moisture. The bags must be sewn or tied in such a way that the baby cannot, under any circumstances, reach their contents.
Video: how to make sensory pads with your own hands
Photo gallery: homemade sensory bags
These bags are easy to make yourself, even without a sewing machine.  Filling can be placed not only in fabric: dense Balloons Tactile perception can be developed not only with the help of filler, but also by using fabrics of different textures
  Bags can be of different colors and sizes
Touch Cube
This toy is a cube, on the sides of which there are three-dimensional objects of different shapes and shades or applications made of various materials.
How to make a cube to develop fine motor skills
To make a sensory cube with your own hands, you will need:
- small pieces of fabric of different textures and colors;
- synthetic winterizer or foam rubber as filler;
- interlining;
- decorative elements (buttons, ribbons, ropes, rings, remnants of fabric, iron-on stickers);
- threads;
- iron;
- sewing machine.
From scraps of fabric (it can be cotton, silk, velvet and others) you need to cut out 6 squares with edges of the same size.
You need to cut out squares from non-woven fabric with a side 1–1.5 cm smaller than from fabric. Non-woven blanks are placed on fabric ones and ironed - both parts will stick together, receive a rigid structure and will keep their shape well.
Each square is designed in accordance with an idea: these can be figurines of animals and birds, geometric shapes made of fur or felt, iron-on stickers, buttons, clasps and much more.
When the design is finished, you need to sew 4 squares into one strip.
The two remaining blanks are sewn to one of the squares at the top and bottom.
The seams are made along the contour of the non-woven edges and then secured. Next, the development is sewn together to form a cube.
On the last edge in the corner you need to leave a small hole and carefully turn the cube out through it. The toy is filled with foam rubber or padding polyester and sewn with a hidden seam. You can also place rustling paper or a bell in the cube along with the filler.
Video: how to make a developing cube with your own hands
Tactile pillow
Sensory (tactile) pillows are suitable for babies from 2–3 months to 3 years. It all depends on the set of elements that are placed on it. A small amount is suitable for the little ones simple materials. Before giving such a toy to a child, you need to make sure that all the elements are firmly attached: if the baby pulls one of them into his mouth, it should not come off.
For children from 1 year old, you can select and sew on more diverse and complex educational items: zippers, buttons, lacing, Velcro, bows and ropes that can be tied and pulled. You can make such a toy by using a ready-made pillow and sewing a pillowcase with decorative elements for it.
Photo gallery: sensory pillows of different shapes
 This pillow is suitable for babies from 2-3 months. For the image on each of the squares, you can use a fabric of different texture
  This pillow is suitable for children from 1 year. It presents more complex elements: buttons, ribbons, bows, Velcro, clasp
  This turtle has several sides, each of which contains different developmental elements: carabiner, lacing, buttons. It is suitable for children from two years old
DIY pillow for developing fine motor skills
You can sew such a pillow at home.
To make it you will need:
- fabric - green (53x30 cm) and blue (83x20 cm);
- non-woven fabric (53×50 cm);
- fabric for the back side (50×55 cm);
- felt of different colors and floss threads to match;
- zipper 50 cm long;
- Velcro, buttons, braid, ribbons, hat elastic;
- Whatman paper, pencil;
- scissors;
- threads, needles and pins for sewing;
- pillow 45x50 cm.
Before you start sewing, you need to make a life-size sketch of the future pillow. You can use stencils for this.
Blue fabric is cut into two strips (the first - 30x20 cm for the pocket, the second - 53x20 cm for the base). A piece of green fabric and a blue flap prepared for the base are duplicated in size by non-woven fabric. The cutout for the pocket is folded in half.
A sun is made from yellow felt and ribbons: a circle with a diameter of 10 cm and 7–8 strips, each 10 cm long.
A felt sun with ribbon rays folded in half is pinned to the blue fabric prepared for the pocket.
The parts are sewn together sewing machine or by hand with small, neat stitches.
The elements of the main part (blue and green) and the pocket are connected together.
The base made of green fabric is located at the bottom, and the base made of blue fabric is located at the top. A pocket with a sun is placed in the upper left corner
Then the base and non-woven backing are pinned together and then stitched together.
Elements from the drawn sketch are cut out of felt.
“Felt waves” connect with each other. For each fish you need two parts (can be of different colors) and an elastic band 10–15 cm long
Elastic bands with knots tied at the ends are placed between the elements of the fish and sewn together. The waves are laid out on the base (1–1.5 cm away from the edges for seam allowances).
Multi-colored fish are placed between the waves and fixed. The river elements are stitched first at the bottom, then along the entire perimeter.
The next element is wood. For each of them you need two crown blanks, one trunk and several apples or pears. The parts are sewn together, while the fruit is located inside between two crowns, and the trunk remains on top.
The blank for the railway is made of gray felt. Its size is 53x5 cm.
The railway is placed on a green clearing, which already has a river and trees.
To make a steam locomotive and a trailer, you will also need two elements each. The front parts are decorated using felt of different colors (wheels, windows, pipe). The parts are sewn at the top. A small button is attached to the rear edge of the train, and a small loop of ribbon is attached to the trailer. A 50 cm long ribbon is threaded through the unsewn edge, and knots are tied at the ends. The structure is located on railway and is fixed.
Clouds are made from blue felt - also two elements each. Through them, like through a train, a braid is passed, the ends of which are sewn to the blue part of the base.
Flowers are cut out of felt of different colors, Velcro is used for the middle, and placed in a green clearing next to the river. The seam is made along the edge of the Velcro, and the petals remain free.
Following the example of fish, a butterfly and a bee are made. Velcro is sewn onto the back of each figure so that insects can land on the flowers.
A lock is sewn into the middle of the piece of fabric that was chosen for the back of the pillowcase.
The front and back parts of the pillowcase are folded with the right sides inward and sewn around the perimeter, leaving seam allowances (1-1.5 cm on each side).
If you wish, you can make figurines of animals that will ride on the train. You can draw faces on them with a marker.
The pillowcase is ready. The baby can play with it, placing animals in a carriage, rolling a train along the rails, planting insects on flowers, looking for fruits on trees.
Testoplasty
Effectively promotes the development of motor ability of fingers. Plasticine, which all parents are familiar with since childhood, should be given one year old baby dangerous, because he tastes everything. Ordinary dough comes to the rescue. You can prepare it yourself from safe ingredients.
Play dough recipe
For it you will need finely ground salt and water (one part each), flour (2 parts).
- Combine salt and flour in a deep bowl, add water.
- Mix well.
- Knead the mixture to the consistency of soft plasticine.
If after cooking the dough sticks to your hands, you can add salt and flour to it (observing the proportion). If you get a crumbly texture, just increase the amount of water.
If your baby loves to sculpt, you can make a lot of dough at once. You need to store it in the refrigerator, pinching off the “working” pieces as needed. But such material should not be stored for a long time - over time, the dough loses its elasticity. For older children, you can add food coloring during the cooking process. After drying, the dough figures become hard and durable. They can be colored and used for games.
Photo gallery: do-it-yourself dough figurines
 You can make such a basket together with your baby - it’s a fun, creative and useful activity.
  You can make figures of your child’s favorite animals from the dough.
  Dried crafts can be painted acrylic paints
  From the figures you can create whole pictures and use them to decorate a child’s room.
Collapsible elements
Playing with small details develops motor skills very well.
Felt coats
All large parts on such samples (pockets, sleeves and even the collar) are removable. The child himself will be able to create interesting models by combining colors. Such toys are suitable for children from two years old.
Math strings
When your baby begins to show interest in numbers, you can offer him math strings. They not only develop fine motor skills well, but also help to learn counting.
Video: didactic games with shurkas
Lacing
Such devices are great for improving motor activity fingers and arms. After all, you don’t just need to take a multi-colored rope - it must fall into a small hole.
Simple lacing can be made from any safe surface: a wooden plank, a plastic lid or regular thick cardboard. On them, using a screwdriver heated on a candle or an awl, you need to make holes with a diameter of 5 mm in a random order.
An even easier way to keep your child busy with lacing is to use a colander.
More complex lacing can be made in any shape. This will require a little more time, imagination and material.
Sorters
Sorters, in addition to fine motor skills, allow you to develop perseverance, attentiveness and intelligence in your baby. Making them yourself is also possible, although a little more difficult than lacing or mathematical laces.
For the sorter you will need cardboard box and several small toys different shapes. On one side of the box you need to cut holes corresponding to the shapes of the selected items, only a little larger in size.
Photo gallery: DIY sorters
 Round holes are cut slightly larger than the plastic caps
  This original large sorter is suitable for babies who can already walk.
  For the most simple option for a homemade sorter you will need a box and cardboard blanks
Educational stands - universal didactic devices
An educational stand can combine elements of all the described items and games.
To make such a board, you can attach any objects that you find in the house to a sheet of fiberboard or an unnecessary tabletop:
- bolts,
- locks,
- sockets with plugs attached to them,
- switches different sizes and forms,
- door hooks,
- bolts,
- coat hooks,
- old rotary telephone
- bell on a string,
- glockenspiel.
Over time, existing items can be replaced with new ones, maintaining the child’s interest in the game.
Educational books
Educational books are a great pleasure for children of any age, starting from the moment when the child can sit independently.
You can make a book based on your child’s favorite fairy tale
Video: handmade educational books
Foot massage mat
Fine motor skills are the development of not only hands, but also toes. Orthopedists talk about the positive effect of a child walking barefoot on different surfaces. In summer it is easier to do this - you can walk on sand, grass, pebbles. And in other seasons, miracle rugs will come in handy: small flat stones are sewn or glued onto thick fabric, plastic lids from bottles, buttons and much more.
Photo gallery: homemade massage mats
 This rug combines materials that give different sensations to children's feet.
  Pebbles are glued to a carpet base
  You can make a massage mat from many materials, including plastic covers.
The development of fine motor skills in a child is possible without expensive store-bought toys. There are always many objects in the house that are interesting to children. Joint family creativity gives an amazing feeling of closeness, and the child’s delight and success are even more pleasing.
Today in children's stores you can find a huge number of different educational toys. However, not all parents are satisfied with either their price or quality. Yes, and I want such a toy to serve longer and not get boring for the baby.
There is an alternative to purchased toys - things made with your own hands.
First option
Such toys have many advantages that their commercial counterparts do not have. Firstly, similar thing can be modified as many times as desired. Your toy will grow with your child. Secondly, it will be cheaper than constantly buying new things for your baby. And also, in such an item you can put a piece of your soul, your love for the baby. While playing, he will be surrounded by your care for him.
What educational toy can be offered for a child so that it is interesting, useful, and can change as the baby grows? Sew him a developmental active book. If you make it of a special design, where the leaves can be taken out and new ones put in, then your idea will last a very long time and will teach the young researcher a lot.
What do you need to prepare for your homemade product?
We will need fabrics of various textures and colors, thermal applications, padding polyester, non-woven fabric, rustling materials (cellophane bags), Velcro, buttons, cardboard and colored paper, laces, elastic bands, in general, everything that will help us with a creative idea will be useful.
Look in your closets and stashes - most likely, you won’t have to buy anything else in order to sew a book.
First, think over a sketch of your book, draw what you have planned on paper, and then start working with the fabric. Also decide on its size.
In order for the book to be taken apart and new pages added, sew loops on each leaf or make holes in them. Now the entire structure can be assembled onto a ribbon or curtain rings.
You will need to put a layer of synthetic padding into the pages to make them soft, and you can put cardboard in the cover and one will be dense. Glue small parts with non-woven fabric and stitch them to the background with a zigzag. For large designs, simply cut them out of the fabric and sew them with the same seam. If you want the individual elements to be convex, then leave a small hole and fill them with padding polyester.
In order to build “movable” elements, you need a cut-out glued with non-woven fabric, stitched to a piece of fabric, filled with padding polyester, cut along the contour, and attached with Velcro. Thus, you can make a page with elements that can be moved (starry sky, sun with clouds, numbers, letters...).
You can make an active page by attaching the cut-outs to the page with a string and sewing a string that you can use to pull and release the pictures. Using this technology, you can make an aquarium page with “swimming” fish, or a flower field where butterflies will “flutter”.
To develop fine motor skills, make a lacing page. To do this, attach a picture of shoes with holes through which you can thread a lace.
Make a page with a pocket or purse with a button - let your baby learn how to button and unbutton it. You can put a key on a string in the pocket.
On some pages, sew rustling elements, or you can put cellophane into the sheets themselves. You can make any picture three-dimensional and fill it with cellophane. Using this method, you can make a grass clipping that rises, and a bug sits behind it. Such a game will attract the child’s attention and help develop fine motor skills.
You can make a house page in which everything will open and close, and the figures behind the windows and doors can visit each other (elements with Velcro). You can also attach a cut from the top with plastic bottle with a neck on which you can screw the cap.
Make a page with geometric shapes of different colors (circle, square, triangle).
The page on which the zipper is sewn will teach the baby how to use it.

To make figures that can be moved and moved, it is better to use non-flowing fabrics such as fleece or felt.
Sewn on various buttons will help your baby become familiar with sizes and colors.
Elements made from fabrics with different textures will develop fine motor skills and attentiveness.

It is worth keeping in mind that children really like various hidden figures, for example, you lift a leaf and there is a bug under it, you open a window and a bunny sits behind it.
So we ended up with an assorted book. However, you can come up with a toy with a certain plot: seasons, clothes, going to visit, the animal world, numbers and letters. Although such a craft requires time, patience and effort from you, it will be an excellent gift for your child.
Such a book will develop the child's development and will also become very useful on a walk or, for example, in a clinic, when, while waiting for an appointment, you need to keep the child occupied with something.
Second option
This is such a voluminous book. Inside the pages there is 10 cm foam rubber.
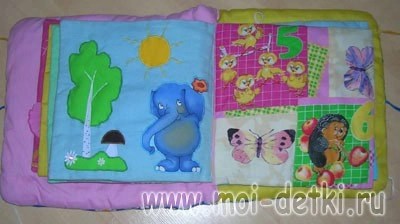
A rustling tree with fruit buttons and berries hidden in grass pockets; 2 – a rustling apple, the leaves also rustle and are attached to buttons...
The sun is soft with rustling rays and a three-dimensional ribbon rainbow sewn on one side (Every Hunter Wants to Know Where the Pheasant Sits - to study the colors of the rainbow); a house made of soft fabrics, the door opens with Velcro and a Cheburashka peeks out.
Butterfly with voluminous wings with Velcro on the edges and with different squares; ladybug - a pocket with a zipper, you can hide something in it.
A flower with petals made from ribbons of different colors; soft shiny volumetric star, with buttons around.
A ship with smooth rustling sails, you turn them aside, there is a duckling captain; denim locomotive - buckwheat inside, for fingers
The fish rustles with voluminous fins and a Velcro tail, the tape is thin like seaweed, buttons are like pebbles; whale - thick fabric, soft cotton fin and tail, fountain from a bag.
The back cover of the book is a side feeder. You can not sew the book, but cut out the loops and tie them with ribbon, so the book will turn out to be a transformer, and you can add or change pages.
Third option
Sew a developmental one yourself soft toy the book is simple: sheets of pages - double material with a layer of padding polyester - are sewn together, forming the most ordinary book, it is unusual only in that everything in it is made of fabric, and therefore is easily washed, does not tear, and you can play with it from the moment the child began to grab something with his small hands.


The theme of the applications can be absolutely anything - animals, berries and fruits, cars. I made my book from what I found at home, and I found a piece of calico from a sheet. It showed a cheerful score. A number and a picture for it. Three kittens, five hedgehogs and so on. This is what I took as a basis.
I sewed cut-out appliqués in a zigzag pattern, sewed on beautiful baby buttons in some places, and added Velcro and bows in others.
If you don’t have beautiful material with different pictures at home, then you can buy thermal appliqués, their only drawback is the price.
 DIY toys photo. DIY soft book. How to sew a soft educational book for a child." />
The main goal is to make the book bright, interesting for the child, with clear drawings, use different materials to develop fine motor skills, it would be nice to insert a squeaker or a fishing bell somewhere, if possible, of course.
Page 1 – an elephant, the sun can be pulled by its rays, flowers can be put on a button with a ladybug.
Page 2 – a bear with a pocket; in the pocket you can hide small toys, cookies and candies for the bear.
Page 3 – example 2-1=1 I made it in the form of flowers, one flower with Velcro, the second with a button. It is clearly visible that there were 2 flowers, one was removed. How much is left? Simple and clear teaching of counting
 DIY toys photo. DIY soft book. How to sew a soft educational book for a child." />
Page 4 – a pocket with two bunnies, and in the pocket there are 2 carrots. The carrots are soft, sewn on with an elastic band. The tail of the carrot is “grass” thread, the carrot itself is made of orange knitwear. It is very useful for little children's fingers to feel fabrics of different textures, so rest assured that all your efforts will not be in vain! You can pull the carrots, the rubber band stretches and, if you let go, the carrots fly apart.
Page 5 – example 5-2=3 made on the basis of bows. Of the five bows, two are untied, the rest are simply sewn on.
 DIY toys photo. DIY soft book. How to sew a soft educational book for a child." />
Page 6 – three kittens and three cherries. Cherries are bright and develop color perception in a child. Cute kittens generally evoke a lot of positive emotions in children. Well, besides, we again repeat the count and how pussies meow.
Page 7 – 4 ducklings and 4 pears. We count ducklings and pears, touch small button pears with our fingers. And at the same time we teach that pears grow on trees, and ducklings quack, “Quack, quack.”
 DIY toys photo. DIY soft book. How to sew a soft educational book for a child." />
Page 8 – applique: elephant (cut from fabric (calico) and sewn in a zigzag along the contour to a flannel base), again developing fine motor skills and the sense of touch. The birch tree and the mushroom are simply cut from fabrics of different textures. I embroidered black dots on a birch trunk with black thread.
Page 9 – just 5 chickens and 6 apples.
 DIY toys photo. DIY soft book. How to sew a soft educational book for a child." />
Page 10 – pocket with a bone for a dog. A bone made of white knitwear, stuffed with padding polyester. The bone is sewn on with an elastic band so it doesn't get lost. In general, I made a conclusion for myself - as for the book, it is better to sew on all small and potentially lost objects (carrots, seeds, butterflies, flowers). Everything that is not sewn then has to be collected throughout the apartment. When I was sewing this book, such a thought did not occur to me, and therefore when my daughter began to play with the book (chew it, sit on it, try to tear it in every possible way, etc., etc. - well, everything that a child of six months or a year can do), I I had to urgently revise and complete the book. This is how carrots on an elastic band and a butterfly on a string appeared.
Page 11 – a boat and 4 fish of different colors (children’s buttons)
 DIY toys photo. DIY soft book. How to sew a soft educational book for a child." />
Page 12 – 8 butterflies, one of which has Velcro, you can tear it off and tug. As I already wrote above, initially the butterfly was not sewn on a string. This is a modified version, so to speak, corrected by circumstances. Yes, yes, after each reading of a book, try playing hide and seek with carrots and butterflies throughout the apartment. This is a fun game for “bored” mom and dad.
Page 13 – pocket with carrots for the bunny. There is a fishing bell inside one of the carrots; the carrot rattles loudly, delights the baby and develops sound perception.
 DIY toys photo. DIY soft book. How to sew a soft educational book for a child." />
Page 14 – bright fruits and berries, cut from fabrics that feel different to the touch.
I made the cover for the book from delicate chintz with daisies, glued a cute Dalmatian dog onto the cover and quilted it with padding polyester.
The book turned out to be voluminous and soft, you can cuddle with it, sleep, and play with it. You can also play interesting game. For example, hide candy or small toy books in one of the pockets and ask the child to find them.
Fourth option

For ages 0.5-1.5 years. The book is made from fabrics of different textures and colors, with buttons and beads; plastic napkins are placed between the pages so that it does not bend and keeps its shape. Everything can be crushed, chewed, washed.
First spread:

The cat, the dog's ear and tongue are knitted, the mouse is fluffy, all the eyes/noses/claws are beads/beads, the whiskers, ear, and mouse tail can be pulled, sewn on only one side. The bone is made from a tube of Blend-a-honey :)
Second spread:

The petals of the flower are also not fully sewn, in addition, they have beads sewn into them, so you can knock on them, but they will rattle a little. The stem and leaf are also beads of different textures. You can pull the rays of the sun. Clouds - terry towel.
Third spread:
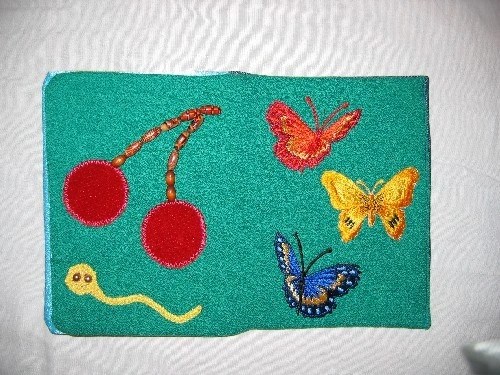
Knitted caterpillar, velvet cherries, bead cuttings. Butterflies, I confess, are purchased appliqués, but they are beautiful and bright.
Fifth option. Educational book – Numbers

The number of flowers on each page corresponds to the number. Each page contains rustling cellophane. Thanks to this book, a 2-year-old child learned all the numbers!

Sixth option
The book consists of 12 pages and a cover.
The total size of the book is about 25x25 centimeters. The edges of each page are finished with colored satin bias tape. The cover of the book is fastened with a loop and button. Inside the pages and cover there is padding polyester.
Cover (front side) – the bunny is made in the form of an applique (I cut out a design from printed chintz), the inside of the cover – an applique with a bear cub.
Page 1 A girl in the form of an appliqué made of colored pieces of fabric, embroidered parts of the face, a voluminous nose, filled with synthetic padding, and bead earrings sewn on the ears. The hair is made of yellow braid, sewn to fly away so that you can braid, you can learn to weave a ribbon. A button in the shape of a shiny handbag or wallet is sewn onto the palm, and a thermal replica of a kitten is glued next to it.
Page 2 Lilac page with elements for counting - beads, buckle, ribbon and cord clip for training finger muscles.
Page 3 The shoe is made in the form of an appliqué, so you can learn to lace.
Page 4 blue flower made in the form of an appliqué, the leaves are made of satin ribbon. You can count and study colors.
Page 5 Tulip with a bee. On this page, the tulip is sewn so that it is empty inside and you can hide a bumblebee there. The bumblebee is sewn to the braid. The sun is made of yellow fleece, the clouds are made of white fleece with Velcro, they can be detached. A small butterfly, white flowers and strawberries are embroidered iron-on appliques.
Page 6 Penguin page. All details of the page are appliqués. Penguin - embroidered thermal appliqué.
Page 7 Sea. The boat is made in the form of a pocket - you can “carry” your favorite toys, it moves left and right along satin ribbon on the "horizon of the sea". The sea is made in the form of a pocket in which there are fish - separately sewn parts, 2 shells, in the middle of one there is a pearl - a large mother-of-pearl bead. Shell on the button.
A seahorse button is sewn on the foreground.
Page 8 Tree. A padding polyester is inserted into the tree crown for volume. There are apple buttons sewn onto the tree. (from can be counted), there are flower buttons on the grass. The butterfly is a separately sewn piece with Velcro.
Page 9 Christmas tree with padding polyester inside for volume. There is a star button sewn onto the top of the tree. Toys – colored plastic sparkles. Next to the tree there is a bunny - a separate detail on the button and an applique gift.
Page 10 Snowman. All parts of the snowman are made of white fleece with Velcro. You can build a snowman. Month --yellow fleece.snowballs - thermal application.
Page 11 Present. Gift applique with zipper, satin yellow ribbon can be tied in the form of a bow. Put something inside the pocket.
Page 12 Seven-flowered flower. Petals made from multi-colored pieces of fabric. with Velcro. You can learn colors, or you can play a game: make a wish and tear off a petal.
The inside cover has a pocket with a button. The back cover has an apple appliqué.
Seventh option


Eighth option
Pages 30X20, inside there is batting.
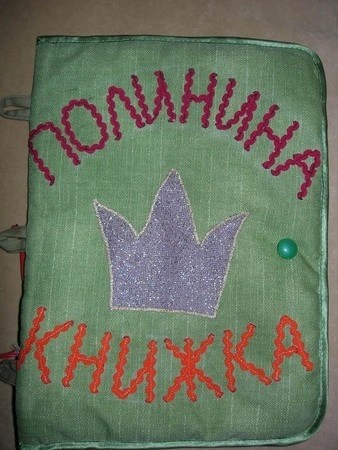
1. COVER. The words BOOK and FOR are braid, the name is embroidered with beads. And I embroidered a little with ribbons, I decided to try it for the first time.

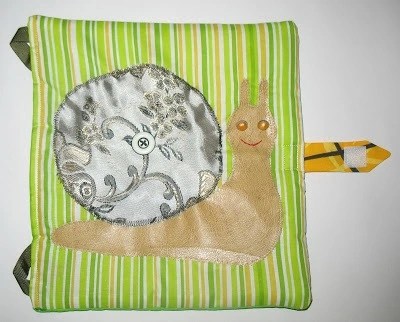
2. SNAIL– there are beads inside the shell, you need to roll them with your fingers.
3. FLOWER- a bee is hiding, a butterfly and a spider are hiding under the leaves. The leaves are rustling.


4. BUTTERFLY– turns into an impudent caterpillar or vice versa. The wings are rustling, there is a package inside.


6. 7. GIRL and BOY We study the fasteners and braid the girl’s hair.


8. LADYBUG AND BUTTERFLY. A butterfly flies from flower to flower, a ladybug also tries to fly away.
9. HEDGEHOG. Carries supplies - on Velcro.


10. GILT. We put our hands in and hide little differences. Raccoon – applique.
11.BOOTE there must be lacing, the workshop is closed on weekends and did not install eyelets.

12 POCKET. The last page is for varieties, sweets. Learning to deal with lightning.

Ninth option

I made this soft educational book as a gift for my friend's son. The book is made of individual pages with loops, you can play with each page separately. All pages are soft - padding polyester inside.
On the first page there is a pocket with a zipper. The base is chintz, the pocket is calico.

The next page is the house. The smoke from the chimney is soft fluffy threads for knitting. The windows and door are closed with Velcro. Materials: calico and chintz.

There is a bear hiding behind the window, and a monkey behind the door.

The next page is a flower. Petals - different fillings - buckwheat, rustling bag, beans, holofiber. Material – calico, flower – satin of different colors.

The next page is a butterfly. The butterfly has a soft body (holofiber inside), sewn to the page only with the back, the head is not sewn, the horns are ropes, the wings are sewn only on the back, they bend, buttons of 3 colors are symmetrically sewn on the wings - learn the colors, look for the same ones. Material: butterfly body – satin, wings – chintz, back side wings - teak. The calico base is blue with flowers and butterflies. On this page you can count butterflies, count buttons on wings, look for identical buttons, get acquainted with the concepts of big-small, symmetrically (buttons on wings)

Next to the butterfly is a Velcro flower.

Next page – Christmas tree. The base is chintz, the Christmas tree is calico, the gift bag is knitwear, the appliqués are flannel.
There are multi-colored buttons sewn onto the tree, on the top there is a button with a star, a string with buttons and beads - you can finger them, on the branches there are rings (small ones for curtains, sold at hardware stores), and you can learn how to lace. Another fluffy sparkler. A bag with gifts on a drawstring. Velcro applications of a cat, a mouse and a dog dance in a circle under the Christmas tree. On this site you can search for identical buttons by color, shape, and learn how to lace.


The last page is a snail. The base is calico, the snail's body is leatherette, the eyes are buttons, the mouth is embroidered, the shell is material for curtains, smooth, inside the shell there are beads of different sizes (two circles), in the middle there is a button. You can move the beads around with your fingers.
The cover is calico with a drawing from the cartoon “38 Parrots”.
The book closes with Velcro.

When studying with a book, you need to pay the child’s attention to the color of the parts, their position (top, bottom, right, left, inside, outside, etc.), the properties of the material (smooth, rough, soft, etc.).
While playing with a book, the child will gain ideas about color, develop fine motor skills, tactile perception (the toy parts are made of fabrics of different textures), attention, speech, imagination, and all this, of course, with the help of a loving mother.
Educational toys for children have long been in fashion. Some of them are quite possible for a mother to do on her own. We bring to your attention a developmental cube that will surely interest a child aged 1 to 3 years. Yes, you will have to tinker with sewing, but the result is worth it!
The edge of this cube is 15 cm in size.
First you need to make a dense base: ideally it is a cube of foam rubber. If you do not find large pieces of foam rubber, you can glue a cube from small pieces. Holofiber, synthetic wool, etc. are also suitable as fillers. But in this case, the cube will be softer and will hold its shape less well.
The base can be additionally covered with a fabric cover for strength.
Now you need to cut 6 squares measuring 17x17 cm (including 1 cm allowances) from thick fabric - in this case it is gabardine.

Glue the fabric with non-woven fabric for greater density.
That's it, you can start creating each side of the cube.
Ladybug Side
Such a plot will certainly interest the baby: you can unfasten the ladybug - a bear button is hidden inside, and you can also pull the paws and count the spots on the back.Cut out 4 pieces from red fleece (or other suitable fabric), 6 legs and spots from black felt, and a head and eyes from felt. Sew the eyes to the head, spots to 2 red parts. Carefully sew (or machine stitch) the zipper, placing each edge between two red pieces. Cut off the excess part of the zipper and sew the head to the back.
Baste the legs, placing their ends between the parts of the body, and sew the ladybug to the base fabric. Sew the button tightly inside.


"Cloud" side
Your child will love petting these fluffy clouds, and this design also features a lace-up design with a bird button.Cut clouds from white synthetic fur and sew to the base fabric. Baste small pieces of golden cord along the sides of each cloud (then, when sewing the sides of the cube together, they will be securely fastened). At the bottom, secure the cord with a tied button at the end with a few stitches.


Beads side
Bright beads strung on an elastic cord will allow your child to move and tug with enthusiasm. There are 5 rows in total, with the number of beads from 1 to 5. It is better to take beads of different colors and from different materials.Cut the elastic into 17 cm long pieces, baste each piece to the base one by one, string the beads, then baste to the opposite side.

Side "Geometric Shapes"
Thanks to this side of the cube, your baby will become familiar with simple geometric shapes. They are multi-colored and attached with Velcro. Each figure has its own “place” on the base fabric, embroidered with threads of the same color.First, cross-sew a zigzag braid to the base fabric.
Cut out a square, a circle (4.5 cm in diameter), a triangle and a rectangle from dense material (felt, felt).
Then cut out “covers” for them from felt - 2 pieces each with seam allowances (0.5 cm each). Sew Velcro onto one of the two sides (the soft side).
Sew felt “covers” in pairs by hand, placing a thick piece inside.
On the base fabric, sew with a narrow zigzag (or embroider by hand) the outlines of each shape using threads of the same color. Sew the hard sides of the Velcro into the centers.


Side "Flower-seven-flowered"
The petals of this bright flower are made from fabrics with different textures, each petal has its own filling, which will undoubtedly interest the child.Cut petals approximately 6 cm long from fabrics of different colors, adding 0.5 cm seam allowances, 2 pieces each. Sew them from the wrong side, leaving a hole at the base of the petal, turn them right side out and stuff them. Fillings can be the following: beads and seed beads of different sizes, rustling cellophane, small ringing bells, padding polyester, etc.
Sew up the hole left in each petal and sew it onto the base fabric. On top, sew the middle of a flower made of shiny or simply bright material.


Butterfly Side
A child will surely enjoy playing with a caterpillar on a string: it eats grass and then turns into a butterfly. Bright flower buttons are also hidden in the grass.For this plot you will need felt, a thick elastic band and a piece of strong thin cord.
Cut out parts from felt - a caterpillar (2 parts), butterfly wings and grass. Embroider eyes and a mouth on one part of the caterpillar. Pin the grass on the bottom of the base fabric and stitch it. In the large wing piece, make 2 holes for threading the elastic. Sew the end of the elastic onto the base, thread the second one through the holes in the wings and secure it to the fabric. The wings can be decorated with contrasting pieces of felt.
Sew the caterpillar by stuffing it with synthetic wool and securing the cord inside. Sew the other end of the cord to the base fabric. Sew the flower buttons tightly into the “grass.”


