Factory Christmas decorations found in almost every home. They are certainly very beautiful and good combination with other decorations in the house they can cause a decent aesthetic effect. But just buying New Year's balls is boring. Uniqueness can only be achieved by decorating New Year's balls with your own hands.
Christmas balls made of threads
The method of making balls from threads has long been used. The products are spectacular and lend themselves to additional decoration. It is possible to vary the size.
For production you will need: threads (with a large percentage of natural fibers in the composition for good impregnation with glue), PVA glue, disposable glass, Balloons round shape.
Manufacturing steps:
- Prepare glue for work. Dilute very thick mixture to the consistency of sour cream.
- Inflate the balloon to the desired size of the toy.
- Soak 1 meter pieces of thread in glue.
- Wrap using the “gossamer” method so that the free holes do not exceed a diameter of 1 cm.
- Allow the glue to dry (12 to 24 hours).
- Remove the ball from the product by carefully bursting it and removing it through the hole of the ball.
- Decorate the product. For this purpose use: glitter, paper cuttings different shapes, sequins, beads, half beads, etc. Products made from threads can also be painted with paint from a can or acrylic. Watercolor and gouache are not suitable, as they can soak the product and lead to its spoiled appearance.
Having made New Year's balls of different diameters, you can decorate any corner of the house with them: a Christmas tree, candlesticks, compositions in a vase, on a windowsill, etc. Balloon decor can be done like this: place a light garland on a tray and place it on top of the product different sizes, but of the same color. When the garland is turned on, they will be illuminated and create an interesting effect.
From beads
Balls made of beads will look very beautiful and impressive on the Christmas tree. In this case, the foam spheres of the blanks will be decorated. In addition to the foam blank, you will need beads, pins (sewing needles with heads like those on nails), and ribbon.
The manufacturing method is very simple:
- Thread one bead onto one pin.
- Attach a pin to the foam base.
- Repeat until there is no free space left on the base.
- At the end, attach a ribbon loop for hanging the decoration.
It is advisable to take beads of the same size to avoid empty spaces on the base. The color scheme is chosen both in one tone and in different ones. It all depends on individual preferences and the overall style of decorating the room.
Instead of a foam base, you can use plastic factory balls. Only in this case the beads will be attached not with pins, but with hot-melt glue.
From buttons
Balls made of buttons will look no less original and unique on the Christmas tree. Old unnecessary buttons do not have to be picked up in one color scheme. After all, you can always repaint them and achieve the desired shade. They look impressive in gold, bronze, silver shades, as well as all colors with metallic coating.
To make this decor for New Year's balls, you will need: buttons (can be with through fastening or hidden), hot melt adhesive, foam or plastic blank, ribbon.
- Apply a small amount of hot glue to the inside of the button.
- Attach the button to the base.
- Carry out the steps in step 2 until the entire surface is covered with buttons.
- Attach a ribbon so that the ball can be hung.
When placing them on the tree, you need to make sure that there are not too many of them concentrated in one place. It is better to dilute such decorations with others.
From paper
Original New Year's balls can be made simply from paper, without using any base.
Ball of colored paper
To do this you will need thick (approximately 120 g/m2) paper, scissors, pins, and tape. Making the blank yourself is very simple.
- Cut 12 strips of paper measuring 15 mm x 100 mm
- Fasten all the strips on one side and the other with pins, retreating from the edge by 5-10 mm.
- Spread the strips in a circle, forming a sphere.
- Attach the ribbon to the base of the ball.
The strips can be cut not straight, but with other uneven lines. You can use curly scissors.
Corrugated paper
Corrugated paper will also come in handy. Pom-pom balls are created from it. For this you will need: corrugated paper, glue, scissors, tape.
- If the paper is new and packaged, then measure 5 cm from the edge and cut it off. Then measure 5 cm again and cut off.
- Cut two blanks into a “scallop” with an interval of strips of 1 cm without cutting to the base 1.5 cm.
- Unravel one piece and begin to twist it into a “flower” in a circle, gradually gluing it together. You will get a fluffy pompom. Repeat the same steps with the second workpiece.
- Connect two pompom blanks with glue at the gluing site. You will get a fluffy ball. Attach a loop tape to the gluing area. Fluff the resulting pompom.
Made from double-sided colored paper
You can also make a ball from double-sided colored paper. To do this you need: colored paper, scissors, glue, round object (cup, for example), tape.
- Trace the cup on paper 8 times. You will get 8 equal circles. Cut them out.
- Fold each circle into quarters.
- Cut an additional circle with a smaller diameter.
- Glue the blanks to it with the corners to the center on one side (4 pieces will fit), and on the other side the same.
- Open each fold and glue it together at the joint. You will get a ball with “petals”.
- Attach the ribbon.
Paper balls, as a rule, do not last long and are used for one season. Place them in large quantities It’s not worth it on the Christmas tree; it’s better to “dilute” it with other decorations.
From fabric
If there is an old blouse in the closet that is a pity to throw away, then the refusal to dispose of it was the right decision. You can make her look cute Christmas tree toy. For production you need: knitted fabric, scissors, sewing needle and thread, cardboard, tape.
- Cut the longest strips of fabric 1 cm wide. Stretch each strip so that it curls the edges.
- Cut cardboard measuring 10 cm x 20 cm.
- Wind the resulting strips onto the cardboard along the width.
- In the center on one side and the other, connect the strips with a needle and thread. Pull out the cardboard.
- Cut the resulting loops along the edges.
- Fluff and attach the ribbon.
There is another method that involves decorating a foam or plastic blank with cloth. You need any fabric (can be of different colors), hot glue, scissors.
- Cut the fabric into rectangular pieces measuring 3 cm x 4 cm.
- Fold them like this: fold the two top corners towards the center of the bottom.
- Glue to the workpiece in rows, with curves inward, starting from the bottom.
- Cover the entire ball. Attach the ribbon.
Fabric appliqués can be made in a variety of ways, using additional improvised means - beads, braid, rhinestones, ribbon.
With embroidery
Decorating New Year's balls with your own hands is also possible in this way. Decorating Christmas tree decorations with embroidery has become a new trend. To do this, use a pre-embroidered image. You also need fabric, a piece of foam or plastic, and hot glue.
- Attach the embroidered image using glue.
- Decorate the remaining area of the ball with a fabric appliqué.
Instead of appliques, you can use the same fabric on which the embroidery was made. Alternatively, you can make a pattern from fabric, where one of the parts will be embroidery. You can also decorate each part of the pattern with separate embroidered images and secure them. After these steps, you can additionally add beads, rhinestones, sparkles, and sequins as decoration.
With filling
Such specimens will look spectacular both on the Christmas tree and as part of balloon compositions. To make unusual balls, you need to stock up on transparent plastic blanks.
By opening the cap holder, you can create various compositions inside:
- Pour acrylic paint inside different colors, shake the ball so that all the inner walls are painted, let it dry. The pigment will color the inside of the workpiece and it will acquire a unique color.
- Fill the inside with small colored feathers and beads.
- You can also pour confetti of different colors inside.
- Pieces of old tinsel are used for filling.
- Favorite photos are also placed inside. To do this, you need to twist a small photo into a tube (look at the diameter of the ball) and straighten it inside. Add confetti or sequins.
- The interior is filled with colored cotton wool and complemented with beads. You can choose different colors. It is better to paint with acrylic paint. Fill after the cotton wool has completely dried.
- Multi-colored sisal can be placed inside and enjoy the color and originality of the decoration.
Fantasies about filling a transparent ball can be different. They all relate to personal preferences and mood during needlework.

Olesya Tulinova
New Year one of the most beloved and anticipated holidays, it is loved equally by both adults and children. And when the New Year comes to our home, we gladly surrender to the power of children's habits and traditions. One of these habits and traditions for all of us is decoration. Christmas tree. We also started decorating our Christmas tree in class. While decorating our beauty, we became interested and asked where the first Christmas tree decorations and balls? Why have they been the main Christmas tree decorations for so many years?
The first sacred tree that was decorated and arranged around funny songs and the apple tree danced. Later, spruce became a ritual tree, because ancient people endowed wildlife beyond strength and in order to receive favor and help, it was necessary to make sacrifices.
Decorated "Christmas tree"according to special canonical rules: the top was crowned " Star of Bethlehem", the apples personified the forbidden fruit that the ancestors Adam and Eve tasted. Burning candles are the essence of Christ’s sacrifice.
The first Christmas tree decorations were edible. These were: apples, tangerines, oranges, carrots, potatoes, eggs, nuts, waffles, gingerbreads, figured sugar, candies.
But still, out of all the abundance, apples occupied the most honorable place among the whole variety of first decorations. In the fall, the most beautiful apples were selected, evenly large and strong. They were carefully stored until winter. And it was apples that became the prototype of glass balls.
According to legend, one day there was a bad apple harvest. Then the believers came to the glassblowers with a request to make glass apples for the holiday. And in 1848 In Thuringia, in the town of Lausta, glassblowers proposed a replacement for the apple, a glass ball made of transparent and colored glass, which was coated on the inside with a layer of lead and decorated on the outside with sparkles.
Such balls immediately won the hearts of people and their production became widespread.
Glass decorations were expensive for a long time (one ball cost as much as a car, so home crafts continued to be a favorite and useful activity. These were toys made of shells, colored paper, cardboard, cotton wool, etc. Now they are made of glass balls are gradually becoming a thing of the past - after all, they are fragile and short-lived. Plastic ones are taking their place. balls.
And for you I offer a manufacturing option DIY Christmas balls made of polystyrene foam. Balls from foam plasticcan be decorated using: pieces of felt, sequins, beads, threads, etc.
We decorated our balls with sequins. To decorate the balls we needed:
Foam ball-shaped workpiece;
Sequins different kind and colors;
Multi-colored beads;
stud pins

The sequins are attached to the base using nail pins in a spiral from the center.

By attaching all the sequins you get a very beautiful ball.


When decorating a ball, you can use a wide variety of sequins and colors, which will give you the opportunity to make many different balls.


Thank you for your attention!
Publications on the topic:
 The book is not just a book, but something dear from childhood. The importance of books for a child is very great, because books broaden children’s horizons and develop them.
Summary of GCD for drawing “New Year's balls” Municipal preschool educational autonomous institution kindergarten No. 3 general developmental view of the city of Zeya Lesson notes.
 Hello everybody. I want to offer you a simple method of making New Year's decorations, together with the child. I found this idea on the Internet.
 Warm greetings to you, my dears! Recently, I have been very fond of and close to me the rustic style in decoration and design of crafts, for this reason.
 The wonderful and fabulous New Year holiday is just around the corner, and of course everyone is preparing gifts for their family and friends. But it has long been customary to give.
 The most beloved and most long-awaited holiday of the year is coming - New Year. Many people love the winter season because of the New Year holidays, everyone is waiting.

Before new year holidays The store shelves amaze with a scattering of bright Christmas tree decorations. Therefore, you can choose decor for your Christmas tree in absolutely any style and for different budgets. New Year's balls delight the eye and delight with original solutions.
And only true connoisseurs of the exclusive pass by, because they know the real holiday decoration for the most magical holiday It's better to create it yourself. Only then do we get unique toys that convey the warmth of hands, creativity and respect for traditions.
Variety of material, wealth of ideas
Working on Christmas balls pleasantly surprises you from the very beginning. To implement the most daring options you will not need much money. And almost all technologies allow for the active participation of all family members, including the youngest. You can trust them not only with painting or sprinkling - let them make their own, children's balls. These masterpieces will be the beginning of a family collection.
The custom of decorating the house, and later - Christmas tree, came to us from antiquity. To celebrate the change of times, branches of evergreens were hung on the walls as a symbol of the continuity of life. Gifts to good spirits were placed on them. Most often it was . What remains from this tradition is the rounded shape of the most popular Christmas tree decoration. Only other materials were used - glass, porcelain, wood,... Then various polymers were used, which made it possible to obtain unbreakable balls. Many factories churned out inexpensive and colorful balloons.
Interesting! But at all times there were special Christmas tree decorations. Those that were produced in a single version, self made. We are not talking about designer items, expensive and luxurious. Far more expensive are often not the most perfect toys, but those made by the united efforts of the whole family or prepared as gifts for friends.
There are many ideas for realizing such an idea. You can choose a technology that is available, or you can aim for something more complex and impressive. There are plenty to choose from! Christmas balls are made from:
- thread;
- paper;
- wool;
- polystyrene;
- fabrics;
- satin threads;
- silk and polymer laces;
- chocolate and much more.
Passionate craftsmen are ready to work in decoupage, artichoke, shabby chic style or use origami ideas. A few ideas are worth exploring in more detail.
Foam, fabric and fantasy
Such balls are attractive because all the scraps of fabric that can be found in the house will be used. The kimekomi technique is somewhat reminiscent of patchwork or patchwork. If you plan to make balloons as a gift, you can come up with several patterns that have the same color and texture, then it is better to look for a suitable fabric in the store.
The base is a foam ball. The larger it is, the easier it is to work; for the first experiment, a ball of at least 8 cm in diameter is better suited. These balls are sold in craft stores. You will also need:
- fabric of several patterns and textures. It’s good if at least one piece is brocade or velvet;
- decorative braid;
- safety sewing pins;
- fabric ripper or stationery knife;
- skewers or nail scissors;
- decorative elements (beads, sequins, buttons, etc.).
Foam blanks can be solid or with ready-made grooves. The smooth ball must be marked using a marker or rubber bands, after which the slits are made with a stationery knife. Cutting depth up to 7 mm. Beginners should hardly attempt a complex drawing; a simple division “into slices” is enough. The cuts are slightly widened and sealed with a steam ripper, its blunt side.
Shreds of tissue are cut out slightly larger than the resulting segments. To avoid mistakes, it is better to pin the fabric directly onto the ball using needles and trim it with an allowance using nail scissors. Then the edges of the flap are carefully tucked into the cut, holding it with a finger. The more carefully this step is completed, the more magnificent the DIY foam ball will be; not even everyone will understand that it was not bought in a store. The decor completes the work. The slits are masked with braid or a thin shiny cord, beads or sequins are sewn on, and charming bows are made from lace.
A much simpler way is to use sequins and tailor's pins with bead heads. It is enough to place a shiny circle on each pin and stick it into the ball. We place the pins close to each other, randomly, until all the foam is hidden under the sequins. Some pins can be additionally decorated with long glass beads, turning the ball into something like a hedgehog.
Idea! Polystyrene foam can be beautifully wrapped with braid or cord. The coils are glued from the top, close to each other, then decorated with beads or sequins.
Well, the easiest option is to cover the ball with buttons or paint it. Entrust this to the children and admire the result. To add a New Year's touch, you can apply mother-of-pearl or glitter.
Artichoke is not only a vegetable
This technique is becoming increasingly popular. It got its name for its obvious resemblance to an artichoke. The work requires fabric or braid, a base (foam blanks or ping-pong balls). Fabric or braid is cut into squares. One is glued to the base. The following pieces are glued in layers, gradually covering the base, arranging the elements in a checkerboard pattern. In this case, the pieces are glued either in folded triangles or rolled into a cone (petal). Transparent dewdrop beads look very impressive on the “petals”.
The smaller the elements, the more luxurious the final version turns out to be. The top is decorated with beads. Step by step instructions quite simple, they can easily be found on the pages of thematic portals on handicrafts and decor.
Old becomes vintage
There will probably be old ones in a box of Christmas decorations. glass balls. They are no longer so elegant, they have scratches or even cracks. This is ideal for decoupage. It’s not difficult to choose a picture on the topic; fortunately, there are a lot of postcards or napkins with New Year’s ornaments. Now you need to prepare glue, brushes, glitter, paint.
Old balls being cleaned sandpaper and apply acrylic primer. It’s more convenient to do this with a sponge: this creates an interesting textured layer. Remove the fastening loop and put the ball on the pencil to make it more convenient to work. Separate the napkins by removing the layer with the pattern. The selected fragment of the picture is glued to the ball. The rest of the space is painted with a suitable color paint. After drying, the ball is covered with a layer of varnish. Then New Year's notes are added. To do this, PVA glue is mixed with semolina and “drifts” or snowflakes are drawn with a brush. After drying, all that remains is to insert the fastening loop into place.
Decoupage of New Year's balls in vintage style is easy to work with, but its advantage is that pictures can be selected specifically - cute bunnies and kittens for children, travel photos for friends, beautiful landscapes for nature lovers. Such gifts touch the soul much more than the most luxurious store items. This is also a great idea for a corporate gift, because you can make a ball with the company logo. Colleagues will also like the idea of their portraits on Christmas tree balls next to the brand name. Portraits and logo are pre-printed on a color printer.
Thread, wool, paper... and a little mischief
PVA glue, threads and balloon- everything you need for such decoration. The ball is inflated, coated with glue, and the threads are arranged in random turns. Then the rubber base is blown away, and what remains is a cute ball of thread, which can be decorated with pearls, beads, and bows.
Styrofoam balls are also wrapped with threads, completing the decoration. decorative elements. But in this case, the turns are placed without gaps, achieving this by winding in several layers.
Those who are familiar with the felting technique can be offered to make an original ball. You can even play with them, and little felting skills are required. The basis is a foam ball, on which the wool is strengthened using a felting needle. The entire structure is hidden in a stocking and... launched into washing machine on boiling mode. Afterwards, the balls are taken out, dried and decorated to your liking. If such a ball is intended to be given to children, you can simply use multi-colored wool.
Paper provides a huge field for creativity. These can be openwork paper balls (they are cut out according to templates in the form of a garland of petals, which are slightly twisted on a stick and pulled together by the tops at the bottom and top).
Christmas balls glued together from many cut out cones or bells look no less original. You can fold the sheet according to the origami pattern, however, the ball is already faceted. And if you ask the children to cut out a mountain of snowflakes or flowers, then you can attach them to the foam base with pins and beads.
Attention! There is another way to make an unbreakable Christmas ball made of paper, and even newspapers are suitable for this.
The paper is cut into thin strips, which are twisted into flagella. The harnesses can be glued to a foam base. They do this in a spiral, intertwining the strands like willow twigs in a basket, or placing them vertically or horizontally. Then such balls are decorated with pictures, decor, and lace.
The first New Year's balls appeared in Germany in the 18th century. In those days they decorated with apples and hand-made decorations, but 1848 turned out to be a lean year, glassblowers urgently made the first apples from glass, and they were liked by the local population. Thus, they gradually replaced natural and artificial jewelry. But time does not stand still, and now everything is returning to . Handmade may not be perfect, but the soul is put into it, and nothing can replace the warmth of products made by . Today in this review of the site we will tell you and show several master classes on how unusual it is to decorate New Year’s balls yourself.
| Illustration | Description of action |
 | Make a square out of a sheet of white A4 paper, fold it in half into a triangle, fold the edges so that it forms a square again. |
 | Unfold the edges and smooth out the middle. |
 | Bend the tips of the protruding triangles, and then their edges inward, so that the figure again takes the shape of a square. Roll the workpiece into a cone and glue the sides with tape. For one flower you will need 5 blanks. |
 | Connect the two pieces with tape, first along the top edge, then at the bottom. In the same way, fasten all the parts together. |
 | Using this technique, collect 10 flowers from paper of different shades. |
 | Glue the flower petals one by one using double-sided tape. You can use a stapler or PVA glue. |


Beautiful felt decorations for Christmas balls
Soft has long been loved by needlewomen. The material is easy to work with, it does not fray, is easy to drape, and bright colors can be chosen for any occasion.
How to make felt roses to decorate Christmas balls
First prepare different colors, a foam ball blank, scissors and a set of safety pins with beads. The order of work is the following.
- Glue a decorative loop-loop to the workpiece.
- Prepare circles from felt, then cut in a spiral no more than 1 cm thick.
- Fold the strip in the form of a snail and secure the base with a thread. You can take a ribbon of two shades and roll it together to create a more voluminous and colorful flower.
- Make blanks from different colors.
- Attach to the styrofoam ball with safety pins.

This is interesting! You can make multi-colored felt blanks, place 2-3 pieces on top of each other and connect them with a safety pin.

Soft Christmas decorations made of felt
To make it we will need felt, a little padding polyester or any stuffing, rhinestones, decorative ribbon and a needle and thread.
Description of work.
- Cut 2 circles from felt.
- Glue rhinestones or any decor to the front side of both parts.
- Connect the two circles together and sew with a buttonhole stitch around the perimeter. Shortly before finishing work, put the padding polyester inside and sew on a loop.

How to make a New Year's ball with fabric decor
Decorated with fabric, they look fascinating. They can be made in general and in any color scheme.
Master class on decorating Christmas balls with ribbons
Before you make a New Year's ball with your own hands, you need to prepare:
- satin ribbons with a width of 2 cm in two colors;
- glue gun;
- decor from beads or rhinestones;
- foam ball;
- decorative cord for loop.
Consider decorating in more detail.
| Illustration | Description of action |
 | Cut ribbons into squares. Apply a little glue to the top of the ball and glue one element. |
 | Make a triangle out of a square of the second color, then bend it in half and secure the edges with a drop of glue. Make several of these. |
 | Apply glue to the long side of the triangle and glue it to the corner of the square with an angle to its middle. Glue 3 more elements in the same way to close the square completely. |
 | Glue the next row of triangles with corners to the center of the ball. |
 | Scorch the edges a little with a lighter so that they do not bloom. |
 | Then all rows are glued in the same way. Alternate pink and blue. |
 | Glue one square of blue color on the bottom of the toy and fasten the triangles almost to the end. |
 | Take the tape Pink colour 15 cm long, singe the edges and stitch along the edge with a needle and red thread. |
 | Gather the bow, secure the edges and glue it to the base. |
 | Glue a special fastener or a satin decorative loop to the top. |
In more detail, the master class can be viewed on the video:


DIY decoration of New Year's balls using patchwork or kinusaiga techniques
There are two ways to decorate New Year's balls:
- pre-sew a blank from scraps;
- decorate the ball without using a needle.
Simpler and interesting idea– performed using the kinusaiga technique. Using this principle, you can create whole ones not only for the New Year. For work we need:
- foam blank;
- pieces of fabric;
- glue stick;
- thick darning needle, awl or stack needle;
- decor.
The order of the work is as follows.
| Illustration | Description of action |
 | Make markings on the foam piece and cut the lines with a stationery knife. |
 | Apply glue to one area of the workpiece, attach a piece of fabric and use a thick needle to press the edges inward. |
 | Trim off excess fabric. |
 | Gently tuck all edges of the fabric inside. Process the entire workpiece in the same way. |
More details about this technique can be found on the video:
Additionally, you can decorate the New Year's ball with ribbons, beads and rhinestones, and also perform more complex patterns


How to decorate New Year's balls with hand embroidery
Looks beautiful and unusual as a decoration for New Year's balls. To do this, you need to do it on a pre-prepared fabric or canvas, and then cut it out and glue it to the workpiece. The rest of the surface must be decorated from a suitable material. You can embroider several pictures separately for each side of the toy, and then glue them onto the foam, then complete the decoration with rhinestones, sequins or beads.


Master classes on unusual decoration of New Year's balls
You can also use unusual objects to decorate Christmas balls. The result is a completely unique product that will not leave anyone indifferent.
How beautifully you can decorate Christmas balls with your own hands using cords and beads
New Year's balls decorated with beads look very beautiful. To do this, you can disassemble an old necklace or buy elements from. In addition, we will need a foam blank.
1 option
String the beads on a cord and cover the entire ball with them. A selection of different shades will look beautiful.
Option 2
String the beads onto safety pins and attach them to the workpiece. Repeat similar steps until the ball is completely closed. The finishing should be completed with a loop for fastening.


Buttons, coins and pasta for unusual decoration of Christmas balls
Looks unique on the Christmas tree New Year's balls, decorated or buttons. Buttons can be selected in different colors and sizes, this makes the decorations more unusual.
This is interesting! You can replace buttons with pasta or coins. You must first wrap the workpiece in foil so that the base does not show through. Additionally, the entire ball can be painted with spray paint, covered with glue and applied with glitter powder.


Fabulous patterns made of threads and beads for decorating Christmas balls
New Year's balls can be used not only to decorate the Christmas tree, but also as a decoration element. For work we will need PVA glue, threads and decorative braid. You can decorate an old Christmas tree decoration in this way, which over time has begun to look unpresentable.
The order of work is the following.
- Inflate the balloon and coat it completely with glue.
- Wrap it in random order with threads, then coat it with glue again.
- After the glue has dried, puncture the balloon and carefully pull it out through any hole.


New Year's ball beading is a painstaking task that requires professional skills. You can simply string beads onto a fishing line in a certain order and glue them to the base. Experienced people use complex schemes to create a real masterpiece, which you can always figure out on your own if you wish.


Magic painting of New Year's Christmas balls
Another option for decorating New Year's balls is decorative. You can draw whatever you want, and additionally the balls are decorated with shiny powder, semolina or sequins.
Creativity for the little ones: handprints and fingerprints on balls
Even kids will like this kind of creativity, and you can make the decoration in game form. To work, you need to prepare the ball, first degrease it. You will also need acrylic paints and thin brushes. There is a lot of room for imagination here.
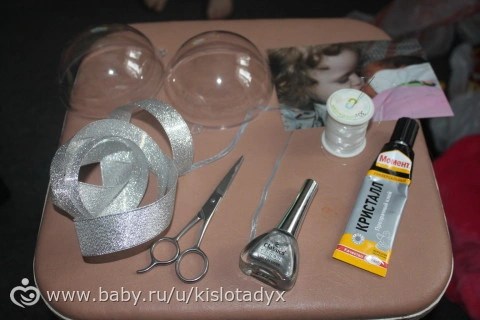
As they say, “at the request of the workers,” I am posting a master class on making balloons with photos.
girls, I’m telling you the way I did it. I hope you will have your own ideas (I like to be an inspiration)))))) for the ball we will need
Preparation of a plastic ball (for Lipetsk, I bought it in the “Your Hobi” store, the size was 10 cm in diameter, it cost 75 rubles, but they also have a smaller size)
Glue (I have a “crystal moment TRANSPARENT” (important, when it dries it is not visible)
Ribbon for framing
Ribbon for later hanging
Fishing line (you can use threads that match the color of the ribbon)
Nail polish
First of all, I painted the part of the ball that is INSERTED from the inside. To do this, I poured nail polish directly into the half and swirled it so that it spread evenly

At the same time, the varnish slightly melted the plastic and the effect was very cool. I let it all dry thoroughly. in the end it turned out like this half

While it was drying, I cut out the photo along the contour of the other half (I did it a little larger, a couple of mm, so that it would be easier to glue later)


when the painted half of the ball had dried, I carefully coated its edge with glue

And actually it wasn’t him that I pasted the photo on. then I “forgot” about it for at least half an hour so that everything would stick well

The edges that I left in reserve were carefully trimmed with scissors (so that they were completely “to zero”). For this, it’s probably more convenient to use a stationery knife, but in the absence of one, I managed with scissors).
Actually, when everything was cut off, I put on the other half.

In principle, the ball is already ready. but I wanted to decorate it more. so then it's up to the tape. I measured the length required for the tape (with a margin), threaded it through the existing hole on the ball, but did not tighten it yet. so that it was fixed in place, I smeared the ribs of the ball at the junction with glue and actually glued the tape tightly.

After that, I tied the ends of the ribbon into a knot, cut off what was not needed and burned it with fire so that the edges did not fray.
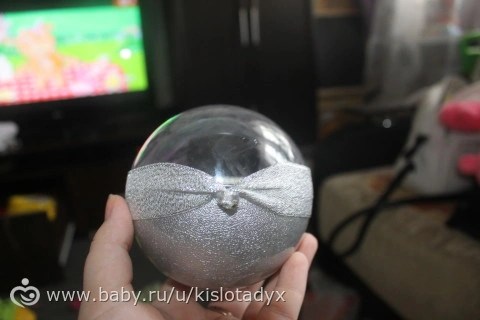
The next step I had was making a bow. actually everything is in the photo

then I sewed this bow to the derrick (knot) of the ball, while grabbing the ribbon that would hold the ball on the tree. Enough stitches were made so that everything would hold together well. In principle, if you have a hot glue gun, then all this could be glued to it.

OK it's all over Now. the ball is ready))))

In general, you don’t have to worry about it and paint half the ball. you can make a double-sided ball. just glue the photos together (for example, with double-sided tape), insert them into a ball and wow

In general, fantasize girls!!! good luck!!!


