Good afternoon, dear readers and guests of the blog! On the eve of the rather significant day that we celebrate in May, I want to offer you a selection of ideas and master classes on crafts for Victory Day.
We all treat May 9 with pride and respect, go to the memorial and lay flowers at the monuments. But in schools and kindergartens all kinds of exhibitions on this topic are organized. Plus there are events and, of course, competitions for the best work.
Therefore, I certainly wanted to help you with such a difficult task ahead, and in order for you to complete it beautifully and quickly, I went through the Internet and collected a lot of magnificent and creative gifts, which I am happy to share with you.
We have already made various kinds of souvenirs, because there are a lot of holidays a year. By the way, some ideas can be taken and dedicated to this topic, I mean mine for Defenders of the Fatherland Day. Why not, after all, we made tanks, military equipment and the like in it; if you haven’t seen it, please come and visit).
Very beautiful DIY crafts for May 9th
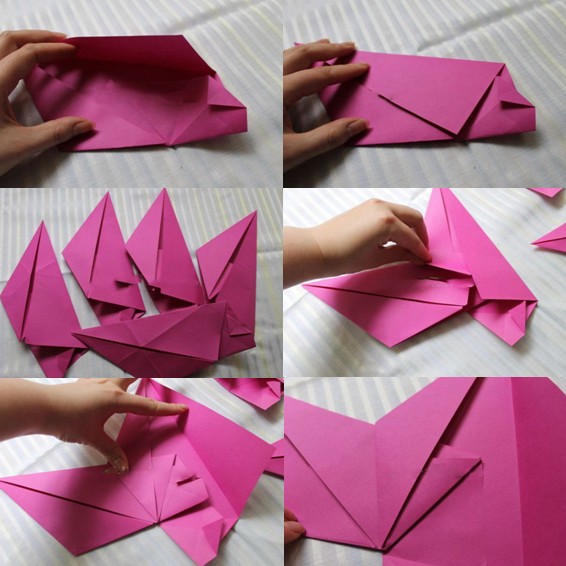
I’ll start with perhaps the simplest, but at the same time popular and super nice option. After all, on this day the symbol will definitely be the red star and the St. George ribbon. I propose to make such a masterpiece out of paper.
Take a look at this layout and template. It is made from thick paper, or rather, from an A4 sheet, you can also take photo paper and then it will turn out even brighter and more saturated.

To build this, you need to print the blank that you see now on your screen. I have it in large format, so if anyone needs it, write to me, I’ll send it to your email.


The next option is plasticine fantasies.


You can add something else to the plasticine, for example flowers, namely carnations, but see how to make them and from what.
This is such a wonderful work with birds and symbolism.

And this is more complicated, a whole composition that could even be exhibited at an exhibition. Instead of plasticine, you can use special modeling dough.

Look, here are some other options made from salt dough.

Badges and medals are presented here.

This work deserves applause, made of dough in the shape of a photo frame. Bravo to the author! It was taken from the Country of Masters.

You can make holiday surprises in the quilling style, and origami can also be used here.

The method of trimming from ordinary napkins will also work well here. Look at the torch, the fire of glory is made in exactly this way.

Let me remind you that to do this you need to cut out a square and wrap it around a rod or pencil, and then glue it.

Or this dove, well, it looks great, and most importantly, it’s simply simple and accessible to anyone.

The main thing is a little patience and you will certainly succeed.

First, draw the plot with a pencil, and then cut out squares from a napkin, and using a pencil and glue, glue all the details.

The star and flowers also look cute together. And most importantly, the background you need is orange and black.

You can also post the date. And then continue the thought and create something unique and inimitable.

Of course, you can’t do without fireworks. Tadam, there's a roar in the sky!

Regular discs are very popular among preschoolers, junior and senior schoolchildren. But what if you turn them upside down, it will be brilliant and original.

Place any symbols of Victory Day on it, and then show everyone your work.

You can specify the date or how many years have passed since that day.

I also propose to dwell on such a funny product, namely a tank. Cut strips of corrugated cardboard paper, and then follow the step-by-step instructions.


You can even assemble it from matches, imagine, and this video from the YouTube channel will help you with this.
It turned out nice, but it’s not enough to complete the star, isn’t it? Let's make it using the origami technique and it will serve as a stand.


It turned out great, what do you think of this charming idea? And then it will only get more interesting.
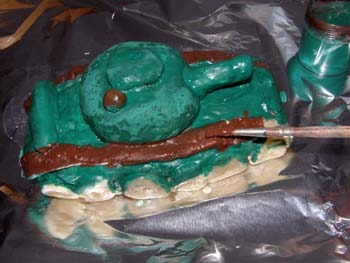
You can also make such military equipment from dough; for this, make a stiff dough from water (1 tbsp), vegetable oil(0.5 tsp) salt (1 tbsp), flour (1 tbsp).

Then start creating. It is best to do it from a picture or from a ready-made toy tank.
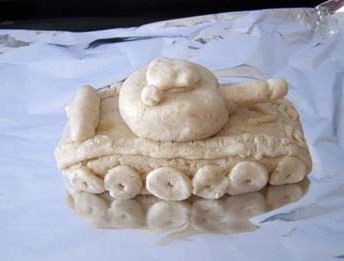
Then paint it the color you want.

Craft in the form of the Eternal Flame with a template
The easiest thing that comes to mind is this applique; schoolchildren and preschoolers always really like this idea. After all, they all love to work with paper and glue.

To begin, draw a fire, or use ready-made blanks, then a star and symbols, cut it out and glue it onto the postcard.

I also liked this model, but based on this star template. The dotted lines are the fold lines.

Transfer this to a piece of cardboard and draw clear outlines on the back side.

Start folding along these lines.


All that remains is to add the missing note, the red fiery flame.

Here is a similar idea, I have a sample of a large star, write at the bottom of the article, I will send it.
By the way, this craft can be made from plasticine balls.

The main thing is to outline the contours for the child and tell him what is required of him. You can also paint the background with watercolors.

Well, make a small applique, in general, come up with it, take this idea for inspiration.

Well, I couldn’t pass by this creative work.

We will need:
- cardboard candy box
- colored paper or colored cardboard (red, orange, gray, yellow)
- PVA glue or double-sided tape
- blue wire
- paper cupcake pans
- full length photograph of a soldier

Stages of work:
1. Cut out stars of different sizes from cardboard.

2. Cover the candy box in the desired color.
3. Saddle up from corrugated paper fire from different colors so that it seems to be on fire.

4. Now make triangle stands from strips of cardboard and place the soldiers on them.

5. Plus these semicircular columns behind them.

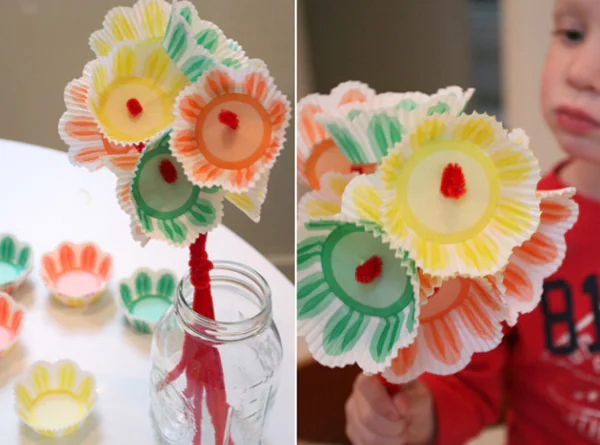
6. Well, all that remains is to make flowers, you can make any flowers, I have one for this case, because you can make roses and tulips. In this version, it is supposed to be made from cups and decorated with paints, and chenille wire will act as stems.

7. And here’s the result: it turns out it’s not all that complicated.

Here's another model.

Postcard made of paper and cardboard for Victory Day for students in grades 1-4
Probably the most common, and also very charming, miracle is, of course, flowers. There are so many of them, it’s simply not honorable, I’ve already given you ideas, but I didn’t show you how to make a carnation. Therefore, I am correcting myself, because most of them are given to veterans on postcards on this day.
Fold a piece of paper in half, then again and again. A red paper napkin is best suited for this purpose. You should have 6 rectangles.
Works well from corrugated paper. Afterwards, put all the rectangles in one stack and fold them like an accordion, and then tie them with wire, as shown in this picture.

Make the ends in the form of triangles and fluff the flower. But that's not all, you can experiment and take, for example, white color and outline the ends with a felt-tip pen.
There are many options, and they are all similar to each other.

Now you can take and decorate holiday cards with them.
Let's do this again. Fold the sheet in half and on one side draw what you want to impress.

Roll them into balls.

But that's not all, you also need long strips, roll them into flagella.

Now, using glue, start decorating the product.
It will turn out great, don’t you think so?

Looks pretty cool and very stylish.
Here's another nice job.

Master classes of work for kindergarten (preschoolers)
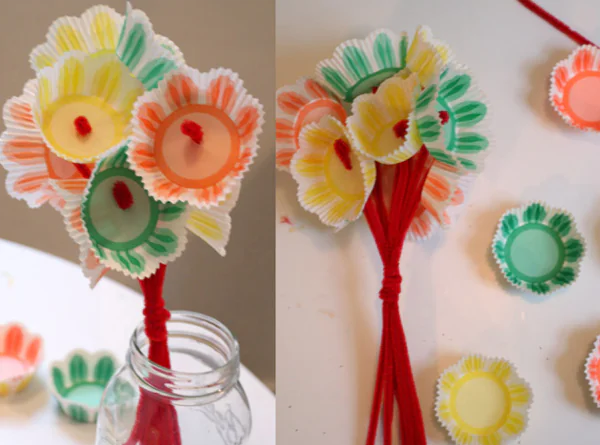
For the little ones, I can suggest making flowers from ordinary cupcake molds. They will cope with this type of activity with a bang.
We will need:
- cups
- chenille wire
- paints
- tassel
Stages of work:
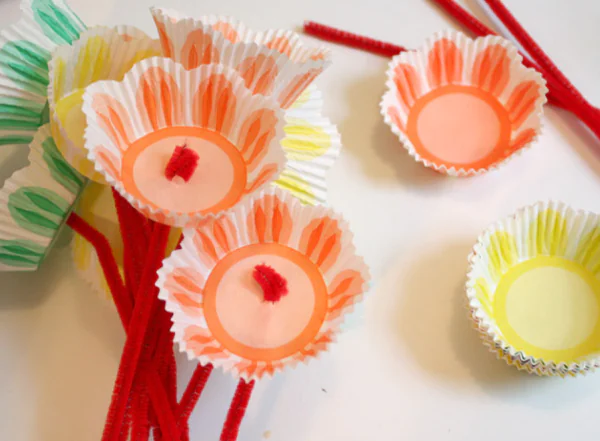
1. Take multi-colored paper molds, if you have them white, then color them any color you like. bright color brush and let dry.
Make a hole with a pen or an awl.
2. Carefully insert the wire and bend its end into the base.

3. This is such an elegant bouquet.

Or fun craft in the shape of a fireworks, using the blowing method, drop a drop of paint on the sheet, and then let your child blow into the tube.
The air will cause splashes and splashes in different directions.

You can draw an entire city this way.
Or use more bushings.
And the same molds only in a different role.

You can invite the kids to make an airplane out of ordinary plasticine.


Of course, they will need help, but they will clearly cope with this task.

You can organize collective activities together with your parents.

The main thing is to convey the symbolism of the upcoming holiday.

Pupils of the senior, middle and preparatory groups even made postcards.

Well, here is another masterpiece, very stylish and beautiful.

You can, if you want something more serious, create a machine from bushings toilet paper. Of course they will need to be painted in the desired color, black.

Then tie it off with masking tape.
And cover it with colored or wrapping paper.


Then all that remains is to complete the gun and cockpit.

We make crafts very quickly for the school competition on May 9
The first thing that came to my mind was a stand newspaper. In my time they were very popular, we did them for every event, why not resume this tradition again.


You might find this video useful.
I would like to present to your attention these small blanks in the form of coloring books, take pencils and markers and start working on these posters, it will turn out really super and cool.


In general, if you want to somehow stand out from the whole crowd of your peers, then make a hanger from foamiran. Look at these flowers on ribbons.

I suggest small master class about this theme.
We will need:
- foamiran
- glue gun
- a pin or better yet a brooch with a pin
- St. George Ribbon
- wire
Stages of work:
1. Take the ribbon and carefully cut it with scissors, about 25 cm long. The edges can be scorched with a candle or lighter so that they do not fringe.
2. The next step is to glue the blank like this.

3. Mark the parts on a regular sheet of paper. Since this is a clove, it means they will be as follows:

4. Make these blanks from foamiran. That is, these will be petals and leaves.


7. Glue in some places, use a gun.

8. Secure the finished flower to a ribbon.

9. C reverse side glue the brooch.

This craft using the quilling technique also looks original and excellent. You will need to first make the triangular parts, and then insert them into each other in a certain sequence.

I hope you are familiar with this technique, here is some hint for you.


You can create any shape yourself.


These pictures are taken from the country of masters. What a hand, a torch of victory.


Well, and of course, decorate it with symbols to your taste, for example, write the Patriotic War.

Here's another creative masterpiece in the trimming style.

It is impossible to do without vytynankas on this day.

This sample looks lovely and very cute.
Fantasize and you will definitely succeed.


Here are some samples for this purpose.


Here we have a Memorial of Glory made of birch trees. The main thing is that he also added living branches.

You can paint pictures with stained glass paints.

Or decorate it with threads.

And if you know how to embroider, then go ahead and make such a product.

And finally great idea, this is beading.

Of course, if you don’t understand this, then it will be difficult for you to disassemble this circuit. But the result will be a very delicate red rose. And the orange and black ribbon will go perfectly with this masterpiece.


Souvenirs and gifts for veterans on this day
For children kindergarten I propose the simplest option, in my opinion, to make badges and orders.

You must first find and print the template.
Well, then get to work, color them as it should be.
First, paint the surface with white paint and let dry. Apply PVA glue to the purchased badge.

And stick them on the badge. Paint with acrylic paint.


Then continue working and make the St. George ribbon.

From the opposite side it looks like this.

You can also make such a holiday note from paper in the form of a triangular letter.

Of course, all sorts of Victory cards!
For example, you can arrange it like this.

Or place flowers on them.

Here are more works, take your pick.

This kind of voluminous work deserves attention; light fabric is used here.

In the next article I will show this one step by step to make it easier to recreate. In the meantime, you can subscribe to my group in contact or add the site to your browser bookmarks.

Here's another super masterpiece.

Or take this one as a basis.

Write wishes and congratulations inside; veterans will be very pleased to receive such a letter.

You can make and give a book that you wrap in a special way.

Scrapbooking style, as you may have already noticed.

You can also bake a delicious cake.

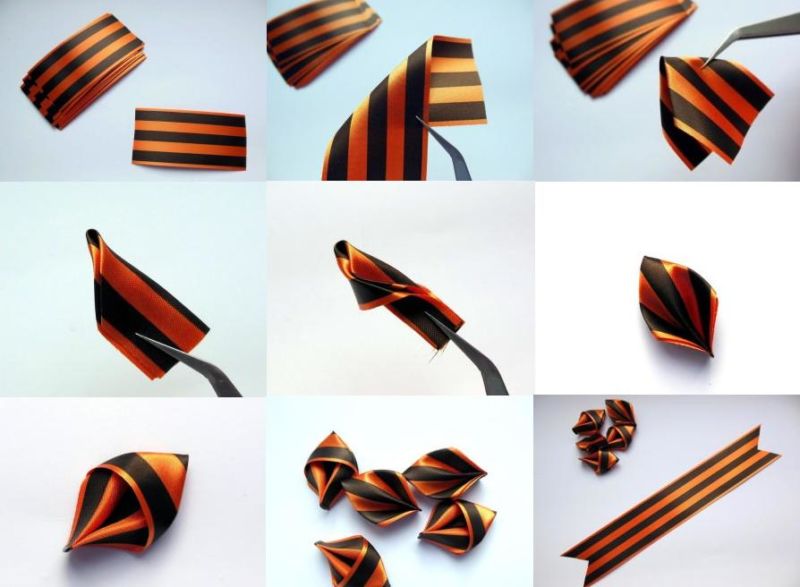
Making a St. George ribbon from satin ribbons with children
This year, as usual, you and I will decorate our clothes with St. George’s ribbons, which will symbolize and remind us of this important event in history (this is one of the main attributes of this celebration). If you look at it, these two colors mean the eternal flame of fire (orange) and smoke (black), which arose when the cities and towns of the Russian population of the country were burning.
All of you have probably seen brooches from satin ribbons glasses and now it has become fashionable to decorate them with flowers in the kanzashi style.

Do you want to learn this skill? Then look at these instructions from left to right and repeat step by step, you will succeed, use a glue gun.

Choose any option and act.

All these masterpieces are fantastic and very attractive.

How gentle and cool it looks.

Here are more ideas on this.


For those who find these schemes complicated, I have selected a video with detailed instructions for you. Thanks to him, you will definitely learn this work of art.
Competition works from the Country of Masters
Well, now, as promised, the works that I saw from this famous site. You can use them to recreate such wonderful images.

Craft Dove of Peace from paper
Another symbol is doves. You can also do them using improvised means that you have in your apartment.
To make them look voluminous, make a lot of feathers, and then connect them with glue, or you can also use foam rubber.
Also take threads and make a base from them, this will be the body, and all other parts of the body will be made of another material, as in this photo.
Templates can be obtained on the Internet or requested from me.

Look, you can also create a composition on sticks.
I also liked this dove, it looks like it’s real.
In principle, you just need to print it on paper and cut it out, and then bend it along the fold lines.
And then enjoy the craft. Cool.
Or maybe you’ll like this one, the traditional version.
From plastic utensils, namely plates, look what happened.
Who would have thought, but this is also an imitation of real bird wings, if you have a cup with such ribbed rims.
And finally, does a bird in the style of vytynanok, or kirigami, really look great?
How can you make a three-dimensional star?
In principle, in this article at the very beginning, we have already seen various kinds of stars. But, here I also want to offer one more video for viewing.
Plus such handmade products.
You can try first using the origami folding technique.
Well, this one will simply shock you; it will turn out to be such a magical star.
Use cardboard, corrugated paper and glue to work. Do preparatory work, cut out all the necessary parts.
Glue all the parts together, and then decorate with simulated leaves.
Fold the roses out of corrugated paper, twist them in a spiral, then secure them.
Holiday cards for the Great Victory Day
I would like to touch upon this topic a little more, although soon I will write a separate note on this subject. Now I suggest you watch the video, and maybe you will make just such a charm for this Victory Day.
Even more ideas
Or take it and follow this example. It turns out voluminous and not at all difficult.
Or I offer a simple master class for viewing. Cut a circle out of corrugated paper and fold it like this.
Then cut the ends.
There should be at least 3-4 such blanks per flower. Lubricate the center with glue.
And then put it on a postcard.
And add stems and leaves, as well as inscriptions and ribbon.
If you don’t like this option, then take this one or the next one.
They both look really good live.
That's all friends, this is where I end this post. I hope you liked these ideas and ideas and you will definitely take something to note. Bye everyone and see you soon! Good luck and have a great sunny mood. Bye!
Sincerely, Ekaterina Mantsurova
A grandiose date is approaching - the celebration of the 70th anniversary of the Victory over fascism and the end of the Second World War. The task before us is to convey to our children the history of that war, not to let them forget the horrors of fascism and the heroism of our grandfathers and great-grandfathers.
In addition to stories about the war, reading books and watching movies, making postcards and crafts for Victory Day will help instill in children a historical memory. Motherhood.ru offers a selection of crafts for May 9 that you can do with your children.
Simple postcards-applications for Victory Day
Flat cards using the appliqué technique can be made even with younger preschoolers. The subject can be different: a festive fireworks display over the Kremlin, a soldier’s helmet under a branch of a blossoming apple tree, a poster composition with a St. George ribbon, a star and young foliage. Depending on the age of the child, he can be tasked with cutting out parts from colored paper or just gluing them onto a sheet.


Volumetric postcards with applique
You can include interesting details in the plot of the postcard: voluminous carnations, they are made according to the principle, or unusual clouds and sun.


Not a flat, but a voluminous red star - a symbol of the victorious army - looks very advantageous.


You can make such a star according to the following scheme:

The basis for crafts for Victory Day can be not only a landscape sheet. The circular composition made on an old CD looks interesting. The disk holds its shape perfectly, and such a craft can be hung, for example, from a lamp in a room or from a mirror in a car.

Multilayer cards and compositions
A three-dimensional picture can be made from several flat images arranged in several layers with indentation. To create space between the layers, use pieces of thick corrugated cardboard or foam board, and an ordinary candy box can become the frame for the composition.

Straw applique
If you know the technique of applique from straw or birch bark, then you may decide to take on such a serious work as the triptych shown in the photo below. It will take a lot of work and artistic taste, but the result is worth it.

Decorating a postcard with embroidery
Embroidery on paper or cardboard looks very original. For example, the famous fireworks display on Red Square can be decorated in this way. It is better to embroider not on white, but on colored cardboard - this will make the craft for Victory Day more elegant.


A bright craft for Victory Day, embroidered with sequins, perfectly conveys the festive mood.

Stained glass is a complex technique, but the result is very elegant and festive, so it’s worth a try! We select an image for the future stained glass window or draw a sketch. We place it under the glass, degrease the glass surface (you can use a cotton pad with nail polish remover) and outline it with contour paint. Let it dry and gradually apply colors to the glass.

Vytynanka - silhouette paper cutting
Loved by many, it can be used not only in New Year’s decorations, but also in crafts for Victory Day.
You can start with a simpler craft. Here large shapes are cut out of colored paper.

More painstaking work will require cutting out a thematic postcard-panel with inserts of colored paper. First, the main design is applied to the paper and slots are cut out, then carefully glued on the bottom side colored paper. Depending on the background color, the panel will look different!


You can make a postcard from individual silhouette clippings and stick to the base.


Volumetric crafts made from colored paper
By modeling from colored paper and cardboard, you can create interesting volumetric compositions. An excellent themed craft for the holiday would be the Order of the Patriotic War or the Order of Victory.


Kids can be asked to make a very simple plot: Eternal flame made of red and yellow paper, St. George's ribbon and inscription.

Older kids or a group of children can take on making a tank out of cardboard.

Well, for those who feel empowered, we offer an even more complex composition. The subject could be, for example, a monument to fallen soldiers, with an eternal flame, flowers and steps of a staircase leading to the monument.

Crafts for May 9 from plasticine
A real memorial can be made from plasticine. You can complement the sculptural image with a St. George ribbon and inscriptions cut out from last year’s postcard.

Plasticine is a very rewarding material. You can use it to make almost anything you imagine: tanks and planes, monuments to fallen soldiers, paintings and posters with slogans. It can be wrapped in foil or spray painted.


Battle reconstructions
Reconstructions of battles can be performed from the most different materials: clay, plasticine, cardboard and paper and even dough. Working on such compositions helps children to deeply experience the stories they read about the war and the films they saw.

Drawings about war
Drawings about the war speak volumes: sad ones, with hope for Victory, and joyful ones - with a return home.


Wall newspapers, collages and posters
It is imperative to publish a school wall newspaper for Victory Day. Look at some striking examples of thematic wall newspapers for May 9 and get inspired by ideas!


Making a collage of old historical photographs and letters, reviving them with poems and flowers is a great idea that conveys the atmosphere of the Great Patriotic War to the generation of our children.


A collage postcard is suitable for decorating an assembly hall or stand. Check out two decorating ideas using the same pattern:


You can make your own special military composition on the printed map of military operations. For example, with the famous “Katyusha”.

The article uses photos from the sites:
Victory Day is a wonderful holiday! The population of our country celebrates this day with special pride. In schools and other educational institutions, as a rule, creativity lessons are held, where children get acquainted with the history of this holiday and make crafts. Such products can be an excellent gift for a veteran or they can be entered into a competition. In general, in this article we will list for you various crafts for May 9 that you can bring to school. You should like our ideas.
Crafts for Victory Day
Order
To make your first craft, you will need a minimum of materials and a little effort. So, the materials you should prepare are:

- Cardboard white,
- Yellow colored paper
- Corrugated paper, blue and white,
- St. George's ribbon,
- Scissors and glue.
Progress:
- First of all, cut out a circle from white cardboard.
- Into this circle with a simple pencil write in the outline of the dove.
- Cut out squares from blue crepe paper. Roll them between your palms into small but dense balls. You need to do the same with white corrugated paper.
- First, fill the shape of a dove around the office with white balls.
- When the dove is filled with blue balls, you need to fill the remaining space.
- A star is cut out from yellow colored paper. Bend it and iron it along the edges.
- Now start assembling the craft. Glue a circle with a dove to the star. Now all that remains is to glue the St. George ribbon.


Craft using the cutting technique.

- Cardboard or paper
- Corrugated paper.
- Ruler and pencil
- PVA glue and scissors.
Progress:

Spring star.
The symbol of May 9 is a spring star. Indeed, this symbol is used to decorate all cards and leaflets that are dedicated to this holiday. Now we will tell you how to do beautiful star quickly out step-by-step materials. To create a craft you need to use: 
- Cardboard or paper
- Pencil, scissors, ruler and PVA glue.
Progress:


Paper composition.
If you don’t know how to make a craft for May 9, then use the ideas in this publication. We suggest you make the next craft from paper. This material is considered the most accessible. Therefore, it is used quite often to create various kinds of products. To create the product you need to prepare:
- Colored cardboard,
- Colored paper: red, white and yellow,
- Scissors, pencil and PVA glue.
Progress:
- Crumple the red paper, tear off pieces from it and roll them into balls.
- Fold a sheet of cardboard in half. You need to draw a star on the outside, and the number 9 on the inside. Also, inside, draw the word “May.”
- Glue red balls along the outline of the picture.
- To make apple blossoms, use white paper. Circles with a diameter of 3.5 cm are cut out of it.
- Fold the circles in half, bend the corner at the bottom, glue it and open the petal.
- Cut out 20 more white circles, which will have a diameter of 2.5 cm. Fold in half and glue another 4 petals overlapping each other.
- For the core of the flower we use balls of yellow paper.
- Spread the petals and glue the flowers themselves to the composition.

Tank made using quilling technique.
Quilling technique - allows you to create compositions from twisted elements of cardboard or paper. Making a model of a tank will not be difficult even for a schoolchild. To work you may need the following items:
- Green corrugated cardboard,
- colored paper,
- Pencil, ruler, scissors, glue,
- Quilling tool.
Progress:
- Cut strips from cardboard. One should be 2 cm wide, and 10 pieces should be 1 cm wide.
- Twist the strips. The edges must be treated with glue. As a result, you get wheels.
- Then start forming the caterpillars. One row will consist of 5 wheels. Glue them together and wrap them in paper.
- To make a barrel, roll the paper into a tube.
- A wide striped wheel will serve as the tank's hatch.
- All parts are glued to a cardboard square.
- Now all that's left to do is add the star and the flag. These elements need to be cut out of colored paper.

Craft - carnation.
Carnations are considered a traditional symbol of the Victory Day holiday. Schoolchildren will be able to easily make this flower on their own. To make a festive carnation, you need to prepare:
- Napkins or corrugated paper,
- Chenille wire.
Progress:
- The paper must be cut into pieces of 15x30 cm. You will need 6 pieces of such squares per flower.
- These squares are put into a stack and into an accordion.
- Secure them in the middle with wire.
- Cut the ends of the paper into a triangular shape.
- Straighten the paper and separate the petals.
- Using a felt-tip pen, tint the edges of the petals.

Craft “Eternal Flame”.
In this article we continue to list crafts for Victory Day that you can make with your own hands. The “Eternal Flame” craft looks very interesting. Moreover, it corresponds to the theme of the holiday. To create a craft you should prepare:
- Colored cardboard,
- PVA glue,
- A carnation that was made from napkins, wire and colored paper,
- Cocktail straws.

Progress:
- First make a clove. To make it, just pay attention to the master class, which is located above.
- To work, you will need silver or gray cardboard, from which you must make a star with five ends.
- In order to make a flame, the tubes are cut into pieces, the length of which is 2 cm. It is also worth leaving one piece of the tube 4 cm long.
- The edges of each tube are cut. In this case, the base must remain intact. As a result, your workpiece will not fall apart.
- An incision is made along the long tube, approximately to the middle. Now you can put the blanks on the tube. The “rays” of the blanks should be located at the top.
- A small hole is cut in the center of the star. A flame is inserted into this hole.
- Now the eternal flame is glued onto the base sheet. Glue 3 stems a little lower.
Finally
Have fun creating a variety of themed crafts for May 9th. Get a good mood and positive mood from this activity!
Paper crafts for May 9
With the approach of the great holiday of Victory Day in the Great Patriotic War, a number of preschool and school educational institutions, as well as many young mothers, for educational and educational purposes, begin making themed children's crafts for May 9th.
Children's crafts for May 9 are not only a way to instill in the younger generation respect and love for veterans, patriotism and deep gratitude for the exploits of our grandfathers and great-grandfathers, who gave each of us the opportunity to live under a peaceful sky above our heads. But these are also amazing, touching little masterpieces of decorative and applied art that can be an excellent gift for war veterans.
In this article, the News Portal “site” has prepared especially for you several simple master classes on making themed crafts for May 9th from paper, cardboard and other available materials.
So let's get creative...
DIY carnations made of paper
 Traditional flowers, which are customary to give to our dear veterans, are, of course, bright red carnations. Try making paper bouquets of carnations with your children that will delight veterans for more than one day or even a week; such flowers can last for years.
 To make paper carnations you will need corrugated paper in two colors (green and red), wire, glue and scissors.
 To drape the stem of the carnation, you can use green duct tape.
 If your child is too young to make such flowers, then you can try making a simpler paper bouquet.
 To make it you will need paper baskets for cupcakes, you can buy them at any supermarket and decorative wire.
 In the middle of the cupcake basket paper, make a small hole through which you thread decorative wire.
 Tie one knot inside the future flower, and the other outside.
DIY eternal flame made from paper
 Such a paper craft for May 9 can become the decoration of a concert hall, exhibition or school class for Victory Day.


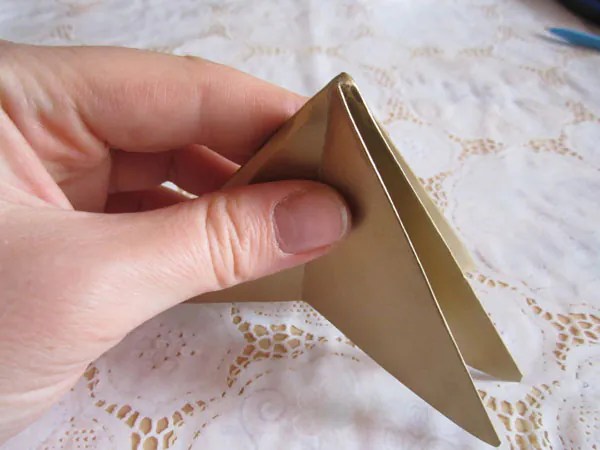 From a thick sheet of colored paper (you can use colored cardboard), fold volumetric star.

 Make a small hole in the center of the star and place a piece of red paper in it.
DIY airplane
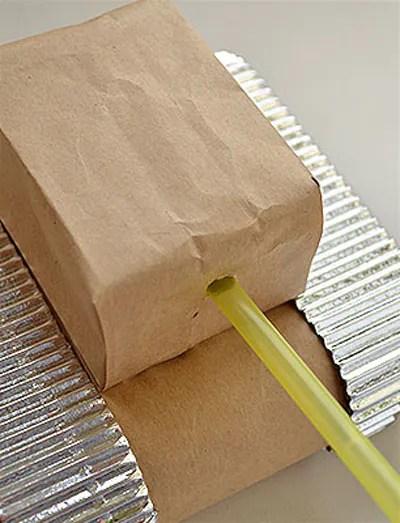
DIY paper tank
 To make a paper tanka, you will need cardboard toilet paper rolls, any paper (you can use colored paper), silver decorative paper (if you don't have that, you can make a tanka caterpillar out of foil), and a cocktail straw.


DIY tank made from dishwashing sponges
 Young children will definitely like this craft, because it is easy to do and looks very colorful. To make a washcloth tank you will need washcloths, glue, scissors and a baby juice straw.


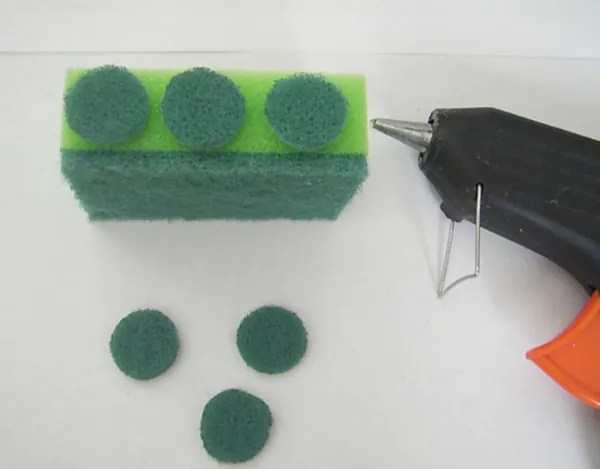


 Depending on which washcloths you choose as a material, the color and size you will get tanks.
 Be sure to decorate the finished tank with a red star.
Vytynanka
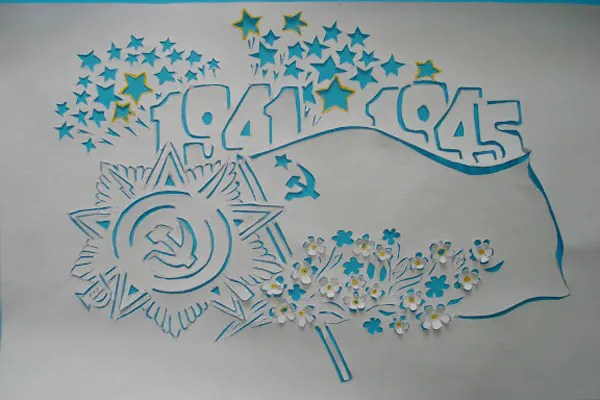 Another amazingly beautiful and interesting craft By May 9, Victory Day, paintings made using the embossing technique can be considered.
 Choose any card or picture you like on the holiday theme, transfer it using tracing paper onto a white sheet of paper and cut out some details with a sharp knife or nail scissors. Place the finished white composition on a sheet of colored paper, then the drawing will be visible more clearly.
DIY Orders of Military Glory
 This craft is made using the applique technique. You can make a wide variety of medals, of any shape and shade.
Victory Day - grand celebration, especially for our citizens. The task of the older generation is to ensure that children understand the essence of the holiday itself, know the history of the war and prevent such fascism in the future.
On the eve of this great holiday of Victory Day, schools and kindergartens practice stories about the war, reading books on military topics and watching documentaries. Along with this, they make all kinds of crafts, cards and applications for May 9th. The most simple applications for children on May 9 - this is an image of the corresponding symbols from colored paper - stars, doves, carnations, St. George ribbons. More complex applications for Victory Day are already voluminous postcards with the same symbolism.
To work you will need:
- scissors;
- colored paper;
- corrugated paper for making complex applications;
- PVA glue (or pencil);
- cardboard (white or colored depending on the theme).
Simple applications for May 9 for children
The simplest applications for children for May 9 are flat pictures with the symbols of the holiday. Postcards for Victory Day usually depict:- pigeons;
- sprigs of greenery;
- St. George ribbon;
- a star (or many stars);
- outlines of the Kremlin;
- fireworks;
- carnations;
- bouquets of flowers;
- flowering tree branches;
- images associated with war: soldiers’ helmets, machine guns, tanks, airplanes.
All these images can be placed on A4 sheets or on colored paper, for example, blue, which acts as the sky. We have selected several applique templates that you can print for free, then cut out and stick with your child.


The dove on postcards for the Victory Day always means peace, which means it must be white. And, therefore, the background can be colored.
The next symbol of victory is the St. George ribbon. Templates for the St. George ribbon can also be downloaded and printed on a color printer, or you can cut out strips from orange and black colored paper yourself and glue them together.
Pay attention to St. George's ribbon 3 black stripes and 2 orange, black - along the edges of the tape and in the center.


In addition to doves and ribbons, postcards for May 9 or Victory Day for children may include a sprig of young greenery, a laurel bush, or a flowering branch carried in the beak of a dove. To make a twig, just cut out the leaves and stem and glue them onto paper. You can download the application templates for May 9 below and print them on a color printer:

Another symbol of our people’s victory over fascism is the five-pointed star. The star can be cut out simply from red colored paper, or it can be made multi-layered or voluminous (but more on that later). The star templates can also be printed:

Using one of the templates presented above, you can already make an application with a child for May 9:

You can download the archive with the diagram and templates for this application for Victory Day here: (3.2 MB).
You can also use Kremlin templates:

and arrange colorful fireworks over the Kremlin.
The next symbol of victory is the eternal flame (templates):


Download the archive with templates for this application: (2.7 MB).

Volumetric applications for children for May 9
Volumetric applications look quite impressive, since older children can do them. The technique for making three-dimensional details is simple; you can even make carnations, fireworks, clouds or the sun from napkins. For volumetric applique by May 9, you can use any elements of scrapbooking, quilling and origami techniques, real St. George ribbons:


A voluminous five-pointed star made of colored paper looks very impressive:

A template for such a star can be downloaded and executed according to the following scheme:

The star needs to be bent along the dotted lines and glued to the base with the white sections.
The star looks no less original using the quilling technique:

How to make voluminous paper carnations
Volumetric flowers always look original on a flat surface. A similar technique can be used for both postcards and appliqués with children. Carnations are always chosen as flowers on cards or applications for May 9th.How to make voluminous paper carnations with your own hands? To make such flowers, you can use corrugated paper or origami techniques.
For paper napkin cloves we will need:
- three-layer paper napkins Red;
- scissors;
- threads;
- glue for gluing to the base.
If you use paper napkins, then one will yield 8 flowers with a diameter of 6-7 cm.
Operating procedure:
- Tear 1 cm from each edge of the napkin around the perimeter.
- Tear each napkin in half to make 8 identical rectangles with torn edges.
- Fold each rectangle like an accordion and tie it in the center with thread (or secure with wire).
- Now you can start decorating the flower: carefully separate each layer of the napkin and fold it into the center, forming a carnation.

Volumetric carnations can also be made from corrugated paper:

Operating procedure:
- Cut 4-6 circles with a diameter of 7-8 cm from red corrugated paper;
- Cut each circle along the edge in a zigzag pattern;
- Place a toothpick on each circle through the center and form a flower.
Similar carnations can be glued to an applique for May 9, February 23, or Russian Independence Day.
Also, a voluminous carnation for applique can be made using the origami technique:


