An integral accessory when celebrating Victory Day is the St. George ribbon. Regardless of age, status and political persuasion, every sane person strives to express his love and gratitude to the Motherland by decorating his image with a symbol of victory.
How to properly make and beautifully decorate a St. George’s ribbon with your own hands: photo

 St. George's ribbon decorated with a handmade brooch
 St. George's ribbon decorated with a handmade brooch
 St. George's ribbon decorated with a self-made spikelet
 St. George's ribbon decorated with a handmade brooch
 St. George's ribbon decorated with a handmade brooch
 St. George's ribbon decorated with a handmade brooch
 St. George's ribbon decorated with a handmade brooch
 St. George's ribbon decorated with a handmade brooch
  St. George's ribbon decorated with a handmade brooch
  St. George's ribbon decorated with a handmade brooch
 Handmade beaded St. George ribbon
  Handmade St. George ribbon in the form of a bow
 DIY tricolor ribbon of St. George
DIY St. George ribbon with tricolor
To work you will need:
- blue, red and white ribbons
- matches
- scissors
- tweezers
- pin
- for decorating brooches - accessories
Cut three squares from each color of ribbon

Fold the square diagonally to make a triangle.


Bend in half.

Using tweezers, clamp the folded triangle for the third time. We process the edges with flame. Then make sure that the bottom of the ends stick together.


The first petal is ready.


This is how we make subsequent preparations. Three pieces of each color.
Remove uneven edges with scissors.


We form the first branch of the tricolor. We attach the petals to each other using glue, so that each subsequent one is slightly higher than the previous one.

Between the first and second white petals we fix the blue one.


And the third - to the center.


In the same sequence we glue the red petals between the blue ones.


The first branch is formed.


We duplicate the production of the second branch in the same way.
- We take out the St. George ribbon. We put it in a loop. Fix it in the center with glue
- Attach a small pin to the back side
- On both sides of the tapes we glue the resulting blanks of tricolor branches


- Add additional petals made from red ribbon to the center. From which we form a flower


St. George's ribbon with a tricolor flower is ready!
DIY St. George ribbon for kindergarten
It will be very interesting for children to make a simple fake for the Victory Day with their own hands.
- Prepare blank sheets of white, black and orange paper
- On a white sheet we measure strips 1 cm wide
- Line black and orange sheets into strips of the same width
- Depending on the age of the children: either we give scissors and they cut them out on their own, or the teacher cuts out strips of orange and black paper himself.
- Glue alternately cut strips onto the drawn strips on white paper, alternating colors
DIY crochet St. George ribbon


The crocheted ribbon is very original.
- Take cotton bobbin threads
- We collect a number of air loops, Brown according to the selected tape length
- We start each row with three chain stitches up.
- We make 6-9 rows with single crochets or half crochets
- Then we knit 6-9 rows with orange thread
- Then again a brown stripe, orange
- Finishing with brown
- When changing colors, do not break the thread, stretch it along the edge
- If desired, you can tie the edges
An impressive ribbon that can’t be distinguished from a factory from afar
DIY St. George ribbon made from ribbons


- Take a satin brown or orange ribbon
- Cut out two identical strips from cardboard. Wider than tape
- On cardboard stencils make cuts with a knife according to the width of the desired strip
- We place the tape between the stencils. Hold it tightly so that it does not move
- Spray paint on brown tape in orange. If the tape is orange, then the paint is brown
- Paint the other side in the same way.
Beautiful DIY beaded St. George ribbon


To work you will need:
- arbitrary amount of beads, but not less than 40 grams, brown and orange colors
- orange iris threads
- brown Camtex Dandy threads;
- hook No. 1-1,2;
- wire for beading.
Knitting:
- We start knitting according to the selected length
- In the 1st row: we tie the collected chain of air loops with orange threads with connecting loops.
- From the next row we knit with beads in single crochets, alternately stripes of black and orange.
- We seal the edge of the ribbon with single crochets, orange thread with beads, and adding beading wire. Thus, we will avoid folding the tapes during operation.
- We pass around the tape with orange closing loops
An ideal decoration option for both clothes and handbags
Video: Knitting with beads. Master class “St. George’s Ribbon”
Original do-it-yourself St. George ribbon


Prepares materials and tools:
- St. George Ribbon
- Satin ribbons black and orange
- Tweezers
- Scissors
- Pin
- Matches or lighter
Let's get started:
- Cut seven black and fourteen squares from satin ribbon five centimeters each
- We burn the edging with a flame
- Using tweezers, fold the square into a triangle, which folds again.
- To get a petal, bend the triangle again
- We cut off the irregularities
- We process the edges with flame
- Cut off the resulting excess tail
- Passage of flame sawn-off shotgun
- Fold the black square twice diagonally
- Attaches to orange ribbon
- We get three petals, in which black is in the center, orange at the edges
- We cut off the extra corners of the petal
- We burn with a flame to process and connect the ends.
- Making seven three-layer petals
- Connectable blanks in the form of a spike
- Attach black or white beads in a row in the center
- We fold the guards ribbon into a loop
- Secures with glue
- Glue the resulting spikelet on top
- Secure the brooch with a pin
Video: Kanzashi rose for May 9
How to make a St. George ribbon with your own hands from paper?

 St. George's ribbon made of paper. A very quick and easy way.
We purchase quilling paper:
- Black and orange, 5 mm wide
- Orange 1.5 mm wide
1 way
- Take A4 paper size
- Adhesive applied to strips
- Glue starting from the center of the sheet, alternately: orange - 1.5 mm, black - 5 mm, orange - 5 mm, black - 5 mm, orange - 5 mm, black - 5 mm, orange - 1.5 mm
- Glue the required number of finished products in this way
- Cut out the resulting ribbons
Method 2
- Take wide tape
- Attach to surface with sticky side up
- Hanging down the tape from the surface
- Glue the pre-prepared strips in the same sequence as in the first method
- Cutting off
- Place it on the table and smooth the surface, removing all unevenness.
Option 3
- Take orange double-sided paper
- Draw black stripes in Word
- Printing
- Cut it out
How to make a kanzashi ribbon of St. George with your own hands?
Required materials and tools:
- 60 cm tape
- some beads or rhinestones
- pin for fastening
- centimeter
- scissors and tweezers
- lighter
- glue gun

Cut out squares 7 cm long.

Use tweezers to fold a square, as in the photo


Glue the prepared petals in the shape of a flower. Decorate with rhinestones or beads.


Ribbon in home conditions Even a small child can do it.
If you want some special option, a little effort, and your tape will be the only copy.
Video: Kanzashi carnation. Brooch for May 9
Hello, dear readers of the site! , this is not only a decoration, it is a bright memory of the Great Victory of our people, it is an expression of respect for the veterans of the Great Patriotic War, who gave everything for the front and victory during the difficult years of World War II! We propose to decorate the traditional St. George ribbon with patriotic flowers using the colors of the Russian flag, made using the kanzashi technique. to his detailed master class on production original brooch Our needlewoman Alena shares with us a tricolor flower from the St. George ribbon for Victory Day. Also be sure to watch another master class on making an original
Materials:
- Satin ribbons 5 cm wide, red
- Satin ribbons 5 cm wide blue
- Satin ribbons 5 cm wide white
- Satin St. George Ribbon
- Narrow green ribbon
- Lighter or candle
- Tweezers
- Large bead
- Fastener accessories
- Glue gun and sticks for it
How to make a St. George ribbon with your own hands:
Materials that we will need to make the St. George ribbon - brooches with a tricolor flower 
Be very careful when working with fire!
For the flower we will make a round petal, you will need 9 pieces, 3 pieces of each color. For each petal, cut out a 5*5 cm square. Fold the square in half, with the sharp corner down. 
Pull each corner of the triangle towards the center, as shown in the photo. 
Fold the resulting piece in half with the corners facing backwards. 
Cut off the corner. Burn the bottom edge with a lighter. 
Burn the side sections separately with a lighter, as shown in the photo. 
You will get a round petal like this. Complete the remaining petals in the same way. Glue the petals together with a glue gun along the bottom edges. Alternate colors - white, blue, red petal. Glue a green ribbon bow and a large bead into the middle. 
Cut the St. George ribbon to a length of 30 cm, trim the sections with a tick. Fold the tape like a figure eight and glue it in the middle with glue. Glue a tricolor flower onto the tape. Glue the clasp to the back of the brooch.
St. George's ribbon - a brooch with a tricolor flower is ready!
Happy upcoming Victory Day!
For viewing, I offer a master class on making a St. George ribbon with a flower from Victoria
Kanzashi craftswomen can make wonderful decorations for any holiday. And the recipients of their creative imagination are not only girls and women, but also men. By February 23 or May 9, it is customary to congratulate men and veterans, and you can give them hand-made brooches of a suitable theme. The master class provides a lesson on how to create such a decoration that can be made for Defender of the Fatherland Day or the great and revered Victory Day by all of us. DIY kanzashi brooch made from St. George's ribbon comprises simple bouquet white flowers tied with a red ribbon, and the base is a loop of St. George's ribbon, which is relevant for May Day. To make the same gift or a similar one, for example, with flowers of a different color, study and repeat all the steps.
Materials for making a St. George kanzashi brooch with your own hands:
For the central bouquet we will need:
- 9 pieces of white satin – width 2.5 cm and length 3 cm;
- 5 pieces of green satin - width 2.5 cm and length 10 cm (during the process, these strips, bent in half, are cut diagonally with a soldering iron. To model the sepals, only cups will be needed);
- 3 pieces of gold-colored brocade – width 0.5 cm and length 10 cm;
- 1 piece of green satin – width 0.5 cm and length 5 cm (for a droplet leaf);
- 2 pieces of red satin – width 1 cm and length 6 cm;
- 2 pieces of red satin – width 1 cm and length 5 cm;
- 2 pieces of gold-colored brocade – width 0.5 cm and length 5 cm;
- 9 double-sided yellow stamens;
- golden hugger and red half bead;
- 1 piece of green felt - width 3 cm and length 1.5 cm (for the base for the composition).
DIY kanzashi brooch made from St. George's ribbon step by step:
Green stripes are intended to make the sepals of delicate white flowers. To do this, use a 2.5 cm wide ribbon. Bend the strips across exactly in the center, perfectly aligning both sides. Next, heat up the soldering iron and move it diagonally across the two-layer rectangle. A hot, sharp knife will also work (just place the blade along the line of interest and press firmly). Hot metal is designed to clearly cut two-layer rectangles into two parts and simultaneously solder the tape at the cut site. You won't be able to do this with scissors. A little advice: while working, place an old towel under the pieces of fittings so as not to spoil the surface of the table.

Of the five green strips cut lengthwise, take only the part that is a pointed bag. Prepare 9 white pieces of ribbon (3 pieces for each flower). The strips on one side need to be rounded with scissors and scorched (but use the flame as quickly as possible and once). At the lower smooth edge, the petals are collected and soldered. Stamens with yellow heads will also look beautiful on a white background. Get them ready for work.

Modeling a flower, glue three white petals, open the sepal, gather together three double-sided stamens, bend them and glue them. Glue the center to the white petals, twist the flower, glue it, insert it into a green bag.

Make 3 identical flowers.

Since 5 green sepals were initially prepared, and only 3 were used to model the flowers, there will still be 2 parts left. They will be needed for additional decoration of the bouquet. Make loops from golden brocade 0.5 cm wide and 10 cm long.

Prepare red stripes: 2 pieces 1 cm wide and 6 cm long, 2 pieces 1 cm wide and 5 cm long; brocade ribbon - 2 stripes 0.5 cm wide and 5 cm long, as well as a shiny red half-bead.

Make a bow with double red and gold loops and a shiny center - a half bead inserted into the hug.

You can also make it from ribbons:
Glue the bouquet together. Gather the flowers together, glue the two remaining sepals and three gold loops to the bottom, and glue a bow in the center in front.

Stick the composition on the St. George piece or use any other ribbon, for example, red.

A do-it-yourself kanzashi brooch made from St. George's ribbon for a man is ready. The accessory can be given separately or pinned to a gift box - it will be a great decoration. Using the example of such a wonderful brooch, you can learn how to create delicate bouquets of kanzashi, which will be useful for further creative lessons.
One of the symbols of Victory is the St. George Ribbon. It is customary to pin a braid of an unusual orange and black color on the chest and go to the parade dedicated to May 9th. But a traditional ribbon can be folded into a flower, add colorful elements like flowers, and get a whole decoration for the holiday. In this master class with step-by-step photographs you will learn how to make a flower using the kanzashi technique from the St. George ribbon for Victory Day.
For a flower using the kanzashi technique for Victory Day you will need:
- The St. George ribbon is 3 cm wide, as a rule, it is made of rep.
- Satin ribbons 2.5 cm wide, orange and black.
- Hot melt adhesive.
- Sharp scissors.
- Lighter and metal tweezers.
- Black bead for the middle.

Master class “Flower using the kanzashi technique from the St. George ribbon for Victory Day”
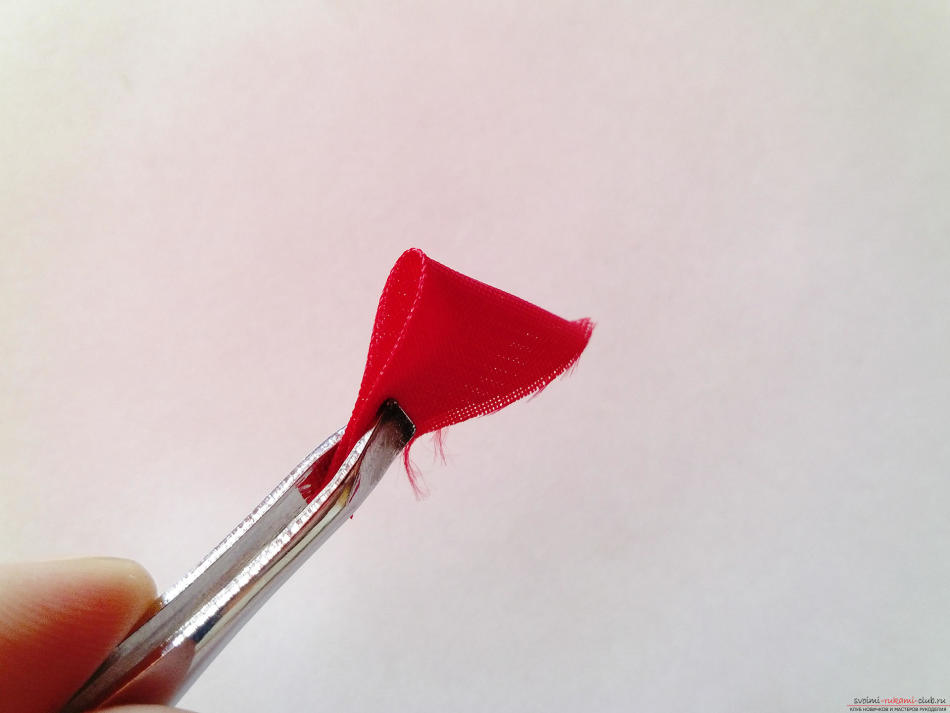
1) Cut a 15 cm strip of ribbon and fold it at an acute angle to form the basis for the St. George flower. To make the tape less likely to fray, you only need to use sharp scissors. The edges of the tape are cut at an angle and melted over a flame.

2) The St. George ribbon must be cut into 6 sections 7 cm long.

3) Each element is bent at a right angle in the center and forms this shape.

4) Then the workpiece is bent again to get this shape with a sharp top.

5) At the base of the petal, two symmetrical folds are created in a direction away from each other. Next, hold the bottom of the leaf with tweezers and burn it with a flame from a lighter. The melted tape easily sticks together and takes on the desired shape.

6) It is necessary to create 6 petals of the same shape, they will make up the bottom layer. Due to the fact that rep is denser than satin, the shape of the flower will hold perfectly and not bend even from the wind.

7) The next stage is the assembly of the lower flower from the St. George ribbon. Each element is glued to the base and together the blanks form a six-pointed flower. You don’t need to stick the elements closely in the center, but leave more space.

8) Create similar petals from black ribbon, but use 6 cm sections.

9) All blanks made of black satin are glued into the slots of the petals of the first tier.

10) Next you need to create five blanks from orange satin ribbon. Each element will require a 5 cm cut.

11) By reducing the length of each color cut, smaller petals are created. And in this case, when assembling the flower, all layers are visible.

12) Orange elements are glued in the shape of a star, that is, one petal is directed straight up, and the others look sideways in pairs.

13) The middle of the flower is decorated with a strictly black bead to emphasize the contrast of colors.

14) Cut 25 cm from the St. George ribbon and create a loop-shaped element. Glue the previously created flower on top of it.

15) To make it convenient to attach the product to the jacket, you need to turn the work over and back side glue on a brooch base or a large pin.
A worthy decoration for anyone national holiday in our country, undoubtedly, is the St. George's ribbon. This respect and patriotism is worn by both adults and children. The decoration is sold in many stores, and for needlewomen, a hand-made St. George's ribbon will become a real source of pride.
Preparing for work
Before you go to the store for necessary materials or look for the necessary blanks in the bins, it is recommended to decide on the type of decoration and the technique in which it will be made. The simplest, but at the same time original option would be a do-it-yourself kanzashi style ribbon of St. George. This technique allows you to realize any fantasy of the craftswoman and make an exquisite patriotic brooch, hair clip and even a bracelet from scrap materials. But we will consider the option of making a classic kanzashi style brooch.

To create a unique decoration you will need the following tools:
- scissors;
- ruler;
- needle and thread;
- candle or lighter;
- pencil or marker;
- tweezers;
- glue gun
If all the tools are available, then there will be no problems making a St. George ribbon with your own hands. But if the craftswoman doesn’t have a glue gun in her home arsenal, you can use any polymer glue.
Material purchase
Before you go to the store for materials, you should think about how to decorate the middle of your brooch. If you don’t have the skills to make kanzashi jewelry, it’s better to opt for a beautiful bead and half-bead. But experienced craftswomen who like handicrafts can decorate the St. George’s ribbon professionally with their own hands: make a flower, a spikelet or other decorative element from satin ribbons.
So, to make jewelry you will need:
- satin St. George ribbon 2.5-6 cm wide;
- large bead (half bead) or decorative center;
- metal base for a brooch.
For those who want to turn their product into a real masterpiece, you can purchase beads in matching colors. You can weave it from original decor for the center or decorate the edges of the ribbon.
Let's get started
At the first stage of creating a kanzashi St. George ribbon with your own hands, you should prepare 5 pieces of ribbon, 7 cm each. To do this, carefully measure the pieces and cut them very evenly. Otherwise, the material will begin to crumble, and the flower petals will not be the same. Light a candle or lighter and singe the edges of the blanks. In this case, it is better to use tweezers to avoid injuries and burns.
We take the segment with the wrong side facing us, forming a right angle. Then we lower the second edge, clearly overlapping it with the first. The result is a petal with a sharp upper edge. Next, fold it in half to the wrong side, aligning the edges. At the bottom we fix the resulting fold with tweezers and turn the edges inside out. Bottom part We solder the finished petal over the fire. We make 4 more blanks in the same way.

Assembling the decoration
We take the remaining piece of tape 25 cm long, fold it and process the edges. Each side should be sealed with fire, after cutting off the middle part to form a so-called “flag”. Even for those who do not know how to make a St. George ribbon, this operation will not cause problems.
We lay the ribbon on the table with the wrong side up, fold the side edges, laying them crosswise. In this case, the edges of the tape can be aligned to the same length or you can opt for an asymmetrical arrangement. We sew the resulting ribbon loop in the center and immediately sew on the metal base for the brooch. After the thread we glue it in order to avoid unforeseen situations when wearing it.
We're reaching the finish line
At this stage of work, we have already prepared two main elements of decoration: a flower and a base with fasteners. We connect them with glue and press them at the junction until dry. Thus, a self-made St. George ribbon only needs decoration. Glue a bead or any beautiful center in the center of the flower and enjoy the beauty of your creation.

Even for novice needlewomen, the process of creating a St. George ribbon with your own hands will take no more than 20 minutes. And an unusual, strict decoration will become not only a symbol of patriotism, but also a source of pride for its owner.

")