Green beauty. Master class on making a Christmas tree from crepe paper with step-by-step photographic material.
Teacher additional education Novichkova Tamara Aleksandrovna MBOU DOD Lesnovsky Dom children's creativity.
Purpose: The master class is designed for younger children school age, teachers, educators and parents who find time to communicate with their child. Nothing brings children and parents closer together than a joint creative process. A green beauty made with your own hands will bring a lot of pleasure and great joy. The Christmas tree will be a wonderful holiday gift and will decorate the interior of the room.
Target: making a Christmas tree from crepe paper for the New Year holiday.
Tasks:
- to interest and involve in the work of making a Christmas tree;
- teach technology for working with crepe paper;
- improve skills in working with scissors and wire, observing safety rules;
- develop fine motor skills hand, eye;
- cultivate hard work, accuracy, and respect for nature;
- create a festive mood.
Materials and tools:
Green crepe paper;
- thin wire, rod for the barrel (thick wire);
-glue pencil, scissors, ruler;
- pot, polystyrene foam;
-green electrical tape.
-decorations for the Christmas tree (toys, snowflakes, tinsel).


On the eve of the New Year holiday, a massive cutting down of Christmas trees begins. According to a long tradition, people go to the forest, to Christmas tree markets and bring them home live Christmas tree. The unique smell of spruce needles fills the entire house. A Christmas tree decorated with toys, sparkling with garlands, pleases the eye. The Christmas tree becomes the center of everything New Year's holiday. Gifts are hung on her, round dances are performed around her. But let's think about it! How many green beauties were cut down, only to be thrown into the trash in a week, or even earlier. Entire landfills are filled with yellowed, useless Christmas trees. Sorry sight! I would like to tell people: “Don’t cut down the trees! Let them live and delight us not only in winter, but also in summer.” It’s good that attention has been paid to the environmental problem in our time. Since the beginning of the 20th century, they have come into fashion artificial trees. And this, in my opinion, is an excellent way to preserve spruce on Earth. And children need to be told more often that cutting down a living tree is a crime for our Planet. Cutting down a tree will take several minutes, and for a tree to grow, it will take several years.
Today I want to offer a master class on making a New Year tree from crepe paper. By making it with our own hands, and even together with the children, we will preserve living spruce trees.

Step-by-step making of a Christmas tree.
Cut 6 cm pieces from a roll of green paper.

We straighten the rolls and cut them into strips 25 cm, 15 cm and 10 cm long. We will need 9 pieces of long strips, 12 medium ones, and 13 short ones.


We take each strip, fold it like an accordion and cut into narrow “needles”, not reaching the edge 2cm.


Lubricate the edge of the strip with glue, attach the wire and begin to twist it. Using your fingers, press the paper tightly against the wire, gradually moving down.


The result is a branch like this. We make them according to the number of stripes.


We do the same with other strips.


Now we have these branches.

Let's make a lush top for our Christmas tree. Let's take two long strips at once and carefully twist them onto the wire.


Let's form the branches in tiers. The first tier will consist of single small branches. There will be 5 of them.

For the second tier, we connect a medium-length branch with two short ones.

There should be four branches.

We make branches for the third tier. We twist a long branch with two medium ones.


We will also make four such branches.

We form branches of the fourth tier. We will need one long, two medium in length and two short. We twist them together.


We got these fluffy branches of the fourth tier. If you wish, you can make a fifth tier. And your beautiful Christmas tree will become even taller.

The branches for each tier are ready.


Let's start assembling. We screw the crown to the “trunk” using electrical tape, then attach the branches of the first tier.


We do the same with the branches of the second and third tiers. Our Christmas tree is “growing” before our eyes.


Wrap the trunk with a strip of green crepe paper to match the needles.


We insert foam into the pot and make a hole.
We put up the Christmas tree, lubricating the end of the barrel well with Titan glue. We admire it.


We'll dress up. There are many options. We use toys and tinsel.


Could be so. Blue balloons and the symbol of 2015 nearby.

I want something light and clean. Snow of course! And the real Santa Claus! If you really want it, there will be snow, and there will be Santa Claus!
Do you want to make a New Year's green beauty from available materials? Souvenirs made from packaging sheets, which are used to decorate bouquets, look very original. Christmas tree from corrugated paper Do it yourself in several ways. Choose the option you like. Create original jewelry for a festive interior.
Green beauty: flat or voluminous
A DIY Christmas tree made of corrugated paper can be made either in the form of a relief or a three-dimensional object. For each decor option, choose the appropriate manufacturing method. A flat Christmas tree is good to use on a postcard, gift box, as a magnet, an element of a garland. Although all these details are easy to make in the form of three-dimensional Christmas trees, a voluminous souvenir is most suitable as a table or floor holiday decoration.
Cone base for a three-dimensional Christmas tree
Have you decided to find out how to make a Christmas tree from corrugated paper? The master class will teach you how to do this in several ways. Whatever you choose, the decor is always glued to the frame in the form of a cone. If you don't know what to use as a base, pay attention to one of the following options:
- buy a foam blank;
- roll a paper “ball”, trim the bottom and glue the base in the form of a circle;
- make a cone according to a template from a sector of a circle;
- make it out of papier-mâché with a frame.
The choice depends on the available materials, the amount of time and the size of the tree.
Manufacturing methods
It doesn’t matter what kind of Christmas tree you are going to make - flat or three-dimensional, the algorithm of actions will be the same, just in the first case the paper or elements made from it are glued onto a flat plane, for example, a postcard, and in the second - onto the surface of a prepared cone.
A DIY corrugated paper Christmas tree can be made from:
- stripes glued in tiers;
- the same ribbons, but cut into thin strips in the form of a fringe;
- a large number of blanks rolled into fluffy “balls” from the previous paragraph;
- fringe elements twisted in the form of needles.
Choose the method you like, but keep in mind that the final impression of the souvenir depends on the additional decor chosen and the color of the paper. It can be not only green, but also any other, as well as metallic with sparkles, etc.

How to make a Christmas tree from corrugated paper with your own hands (easy way)
The manufacturing technology is as follows:
- Cut the paper into strips. The width of the blanks depends on the size of your product. You can make wider tiers at the base, and then, moving towards the top, reduce them. The length of the elements should correspond to the circumference of the cone or be longer if you fold the parts.
- Form the elements into accordions or neat folds of different or equal widths.
- Glue the prepared parts sequentially onto the Christmas tree blank, starting from the bottom tier, covering the upper edge of the previous one with the next one.
- Decorate the product at your discretion.
You have learned that you can quickly and easily make a wonderful craft with your own hands. This method is suitable for children's creativity - both in the family and in a circle.
DIY Christmas tree: master class "Christmas trees made from wrapping paper"
A very impressive and elegant product can be made in another way, however, compared to the previous one, this one will require more time. Work like this:
- Cut the paper into strips.
- Fold each strip into a small rectangle and make several cuts on one side.
- Unroll the workpiece back into the tape. The result was a fringe along one edge.
- Roll the element into a tight roll, secure the edge so that it does not unwind, and “fluff” the fringe.
- Make the required number of elements for your product. The parts can be made the same or decreasing in size towards the top tier.
- Now, in order to get an elegant and fluffy Christmas tree made of corrugated paper, you need to glue the completed blanks onto the base. If you have a bulk one, you can use pins with multi-colored heads instead of glue. By sticking them into the middle of the part, you will receive not only a fastening element, but also an imitation Christmas decorations- decoration of your souvenir.
- Decorate the product with beads, bows, sparkles.

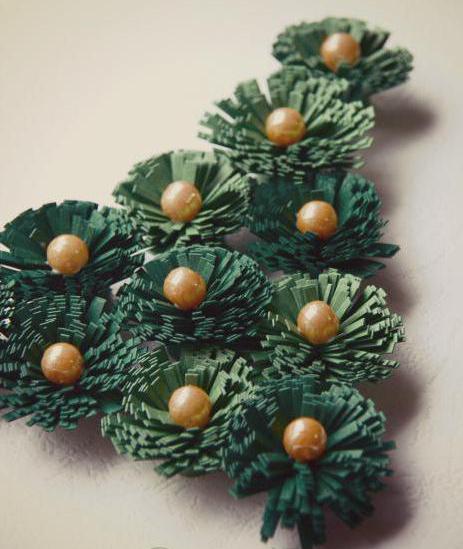
Christmas tree with thin needles
The next photo shows another very elegant crepe paper tree. A master class in the form of simple instructions will help you make the same decoration.

The work is carried out as follows:
- As in the previous methods, prepare strips of paper.
- Cut a “fringe” along one of the long sides. To do this faster, you can first roll the workpiece, make a few cuts, and then unroll the paper tape again.
- Now each small rectangle of tape will have to be turned into a thin stick - a Christmas tree needle. To do this, take a toothpick, sewing needle or pin and wind each rectangle onto the tool, and then, pulling it out of the first twisted needle, use it to create a second one, etc.
- Take a piece of wire for the branch frame and wrap it in a spiral with the resulting workpiece in the form of a ribbon with “needles”. For convenience, secure in several places with glue so that the paper does not unwind.
- Make the required number of branches and secure them to a strong stem frame.
So, you have learned how to make a Christmas tree from corrugated paper with your own hands. Choose the appropriate method. Create holiday decorations and gifts yourself and with your children.
The first frosts arrived and people began to think about the New Year. This family celebration loved by adults and children. Parents remember that they were once little. Children these days live in anticipation of gifts from Santa Claus. During the holidays, in order to decorate your home in an original way or make a gift for a loved one, you need to find time to make a gift together with your child. It will be volumetric Christmas tree from corrugated paper.
Master class “Snowy forest beauty”
What you will need to make a New Year's snow tree:
- three-color corrugated paper - lilac, white, light lilac;
- scissors;
- wooden kebab stick;
- white and blue threads;
- stapler;
- ruler no shorter than 25 cm;
- vase;
- filler in a vase.
Progress:
1. We make two identical rectangles.

2. Fold the rectangle like an accordion.

3. Remove the corners.

4. Connect the edges, find the middle and fold in half.

5. Using a stapler, fix the middle.

6. We do the same actions with the second rectangle.

7. Using a stapler, we connect the blanks along the edges.

8. Fix the middle of the blanks with thread.

9. There are 12 such blanks, four of each color. The largest size is 25 cm, and the small one is 4 cm.

10. Fill the vase with red beans, cereals, and colored pebbles. The main thing here is to fix the kebab stick well.

11. We string the largest lilac blank.


13. The next blank is snow-colored.


15. A three-dimensional paper Christmas tree made of corrugated paper is ready.

The final version looks like a fairy-tale snow beauty that will complement holiday decoration at home or will be creative gift for loved ones. It will take a little time to make, but the main thing is that the productive result is a three-dimensional Christmas tree made of corrugated paper.
Master class “Green Beauty”
Volumetric Christmas tree made from corrugated paper, made by yourself, will delight people if its base is made correctly. To do this you will need to make a cone from whatman paper. This material is dense, holds its shape well, and is easy to glue. It will be convenient for the child to work with him.
What you will need to make a green Christmas tree:
- album sheet or whatman paper;
- stapler;
- corrugated, green paper;
- PVA or paper glue;
- scissors.

Manufacturing progress:
1. To make a Christmas tree trunk, we roll up a cone using the bag method. We glue it with glue or fasten it with a stapler. If the base is not level, then trim it with scissors.


3. If the width of the cut strip is 6 cm, then apply glue in a circle to the base from the bottom at the same distance. Pay attention to the trunk, it should not be visible. Glue a strip of green paper to the trunk and immediately make folds. The more of them there are, the more magnificent the tree will be.

4. Using this method, we glue the entire Christmas tree to the top. This operation can be performed in two ways: paste the strip in a spiral or in rows.


5. The voluminous corrugated paper Christmas tree is ready. All that remains is to add additional volume. To do this, carefully stretch the edges of the paper along its entire length.

6. It turns out to be a real forest beauty. Additionally, we will add decor in the form of stars.


When decorating the Christmas tree, you can show your imagination, use small balls, rain, sparkles, light garlands.
Other Christmas tree options
Idea No. 1. New Year's beauty.
To make it you will need:
- whatman;
- office glue or PVA;
- corrugated paper of the color of the Christmas tree;
- scissors;
- stapler
Progress:
1. We make a conical base for the future Christmas tree from whatman paper.

2. Cut strips 3 cm wide and 10 cm long, fold them in half and turn them a couple of times at the fold. This is how you get a blank for the Christmas tree. Their number depends on the size of the tree.


3. Take the blanks, coat the straight double edge with glue and glue it onto the whip so that the cone does not show through.
The result is a voluminous and beautiful Christmas tree made of corrugated paper.
Idea No. 2. Snowy Christmas tree.
To complete this you will need:
- whatman;
- white corrugated paper;
- scissors;
- sewing machine;
- glue.
Progress:
1. We make a base for the fake from a sheet of whatman paper - a cone.

2. Cut the corrugation into strips 6 cm wide, sew on a machine with large stitches or a needle and thread. After we assemble it, we make it look like a ruffle.
You can make a creative and unusual Christmas tree from colored, double-sided paper with patterns.
What you will need for this:
- special paper;
- scissors;
- stick from sushi set;
- stapler;
- glue;
- a piece of foam.
Progress:
1. The blanks for our elegant Christmas tree are made similarly to the one described above: a snowy, forest beauty. There is no need to register a second time.


2. Let's focus on making a frame for it. Take a stick from a sushi set and a piece of foam. The foam should be about 1 cm thick and made in the shape of a square 10 x 10 cm. Place a wooden stick in the middle of the base.

3. We string the pieces onto the finished frame, starting with large ones and ending with small ones. If the top of the stick is visible, it is masked with an asterisk or snowflake.
Volumetric Christmas trees made of corrugated paper will decorate your home and lift your spirits, and most importantly, during production you will become even closer to your children.
Of course, you can’t do without a Christmas tree. Someone will install the real one forest beauty, someone will install an artificial one. But besides the big hero of the occasion, you can also make several small Christmas trees and place them in the rooms. Let the holiday be felt throughout the house!
You can make a Christmas tree at home from any material, from sweets to books. Today we will talk about how to make a New Year's symbol from paper. Simply put, take scissors, glue, paints... and get started.
Using colored paper You can make a Christmas tree of various modifications, from flat to voluminous. Yes, even a whole forest of spruce!)

This beauty is very easy to make! We will need a sheet of colored paper or cardboard and scissors. Cut out a square and bend it as shown in the picture.


And the final stage:

New Year's decor is ready!

And the simplest option is to cut out two identical blanks from colored paper. After that, we bend them lengthwise and glue them together. The result is a tree like this. Decorate it to your liking.

Another easy option. We make a cone out of colored paper, decorate it and get a stylized Christmas tree.

Another simple option for making a stylized Christmas tree. Cut out a triangle from paper. We take a suitable wooden stick, it will be a tree trunk.

We attach a base to the trunk so that the future tree stands vertically, for example, a cork or a piece of plasticine. Now we string the paper onto a stick, like a sail on a ship. And here is the result.


Is it truly original and wonderful?
Making a Christmas tree from corrugated paper with your own hands step by step
For this craft you will need corrugated paper and cardboard. You can choose paper of any color to make New Year's decor unusual and compatible with your interior.

Watch in this video a master class of 5 options step-by-step production Christmas trees made of corrugated paper for the New Year 2020:
Now let’s describe the manufacturing process in a few words and photographs.
We cut out a sector from cardboard - two quarters of a circle and glue it into a cone.

The cone will serve as the trunk of the future Christmas tree.
Now let's start creating an analogue of branches and needles. There are several ways you can go here. You can make Christmas tree branches in the form of a belt around a cone. To do this, cut a strip of paper about five centimeters wide and long enough to completely go around the cone. We thread a thread along the inner edge of the strip that will be adjacent to the cone, stepping back half a centimeter from the edge. After this, roll the strip into a circle.

We make several such circles, and they should all be different in size - one smaller than the other. After all, they will fit on a cone like rings on a pyramid: first a large ring, then a smaller one, etc. So we put them on the cone. It turns out something like a “skirt”.

To prevent the rings from falling off, glue them to the cone. As a result, we get such a beautiful Christmas tree.

Instead of a cone, you can use a wooden rod on which we string circles made of paper.

We make the circles ourselves as follows. Take a strip of paper and fold it into an accordion shape. We fix it in the middle with a thread.
After that, we fan it out.

Now take the two halves and glue them together to make a circle. We also make circles of different sizes.

We string them onto the rod, starting with the largest and ending with the smallest. The result is a Christmas tree.
The process is more labor intensive than previous options, but the result is wonderful.
DIY paper Christmas tree: step-by-step instructions for a modular Christmas tree
You can easily make such a beautiful Christmas tree out of paper. No glue needed, just use colored paper. scissors and repeat after the author according to the instructions in the video:
New Year's mood is guaranteed!
How to make a Christmas tree from paper napkins
Christmas tree from paper napkins looks very nice. Here, just as in the version described above, a cone is used as a basis. However, roses made from napkins are glued onto it. As a result we get:


We take the napkins, put them in a pile and fasten them in the center with a stapler. After that, cut out a circle from them.

The first layer is crumpled towards the middle. Then we do the same with the next layer.
And in this way we make all the layers so that the result is a rose.

You will need to make a lot of these roses. How much is difficult to say. It all depends on the size of the base - the cone.

Now we glue the finished roses to the cone, starting from the base to the top. We decorate with beads and as a result we get a beautiful Christmas tree.
Christmas tree made of paper - options for making a paper tree
Here is an option for making a paper Christmas tree that is suitable for small children. The fact is that the Christmas tree is made from the contours of a child’s palm.
Roll a cone out of cardboard. Next, take a green sheet of paper and a child. He applies his palm, outlines it and cuts it out. You will need a lot of such palms. Now we take the cut out palms and glue them to the cone. It turned out to be a wonderful Christmas tree.

Continuing with the cone options:

As you can see, the cone is good in any form).

You can use wrapping paper.

How do you like this stylish little thing from old glossy magazines?

It is made easier than steamed turnips).

Another very simple option in the applique style that a child can easily make. Take a sheet of colored paper as a background. Next, we need several sheets different color. We cut strips of paper from them about half a centimeter wide. Their lengths are different: the first one is long, each subsequent one is slightly shorter than the previous one. We cut them, now we glue them onto the background sheet. Glue a star on top. The craft is ready.

Below is a video that shows how to do Christmas trees from paper.
Christmas tree made from newspaper tubes
The Christmas tree can be made from any material. One of the simplest is a newspaper (although they are already disappearing from our lives). Tubes are rolled from it and then intertwined with each other. As a result, we get the following craft.

You can’t immediately tell that it was made from newspaper. The tubes can be painted in any color and the Christmas tree will be colored.
It all starts with what we do a large number of tubes. To do this, take a wooden stick and use it to twist a sheet of newspaper. Lubricate the edge with glue so that the tube does not unravel. We make a cone out of cardboard. We put it on a sheet of paper and start weaving. We glue the first row in the form of a pentagon.

Now we take the bottom tube and place it on top of the other. We take the next bottom one and put it on top again, and so on.

Thus, intertwining the tubes, we raise the “braid” to the very top.

We cut off the remaining long tubes at the end and attach a separately made star top.

The Christmas tree is ready. You can leave it white, or you can paint it.
There is another way of weaving:

And another model of the Christmas tree:

Making a Christmas tree from origami modules according to the diagram
One of the options for making a Christmas tree is to make it using the origami technique. Of course, this option is somewhat more complicated than all those described earlier, but the result is very impressive.

First you need to make modules. To do this, use the following diagram.

Approximately 650 such modules need to be made for a Christmas tree 20 cm high. Done. Now we collect the branches of the Christmas tree. We fasten the modules as follows: In the first row - 2 modules, in the second - 1 module.

We assemble the third row by attaching two more modules to the corners of the second row module. We insert it into the pockets located nearby, as a result the outer corners will stick out to the sides.
We assemble the twig, alternating first one, then two modules in each row.

We make either five or ten such branches. The splendor of the Christmas tree depends on their number. Now we glue the branches together, forming a circle.
Christmas tree made of corrugated paper
Master class “Here it is, our Christmas tree...”. Paper plastics.
Here it is, our Christmas tree,
In the brilliance of radiant lights!
She seems more beautiful than everyone else
Everything is greener and lush.
A fairy tale hides in the greenery:
The white swan is swimming
The bunny slides on a sled
The squirrel gnaws nuts.
Here it is, our Christmas tree,
In the brilliance of radiant lights!
We are all dancing for joy
On New Year's Day under it!
(V. Donnikova)
The master class is presented for teachers and preschool children.
To make this craft you will need:
1. Green corrugated paper
2. A4 cardboard
3. Scissors
4. PVA glue
5. For decoration: bow and beads
6. Pencil

Step-by-step process for making a Christmas tree:
1. Make a cone from a sheet of cardboard.
Draw a circle of arbitrary radius on the sheet, cut it out and fold it.

2. Then, you need to wrap our cone with corrugated paper, grease the edges with glue.

3. The next stage is to make “needles” for our Christmas tree.
We need to cut strips of corrugated paper and make fringe along the long side of the strips.

4. Now we wrap our stripes with fringe on a pencil - these peculiar rolls will be the needles for our Christmas tree.


6. Our Christmas tree is ready! All that remains is to decorate it. We attach a bow to the top of the head and wrap it with beads. To decorate such a Christmas tree, you can use whatever your heart desires: beads, buttons, ribbons, confetti.....


