The pre-New Year bustle with gifts and preparing a festive menu also applies to decorating the home interior and office. Decorating the room creates festive mood and helps you forget about fatigue and the annual report.
New Year-themed crafts provide an opportunity to awaken the dreamer and inventor in your soul. Involving children of any age in the process helps strengthen family traditions and values.
Any material at hand is suitable for crafts; if you wish, you can buy something in handicraft stores. Don’t be afraid of experiments: it is non-standard solutions that attract attention and deserve admiration.
It will complement the exclusive interior made of cardboard boxes, which we have already talked about earlier.
New Year's figures: Santa Claus, Snow Maiden, Snowman
Well, what's the New Year without the main characters? Flat or voluminous, made of paper or plastic, simple or complex - there are plenty of options for every taste. It all depends on the time you are willing to spend on the craft and patience.
Santa Claus made of cardboard and felt
To make a cheerful and cute Santa Claus you will need: a sleeve from toilet paper(or a cylinder of the desired size made of cardboard), small scraps of red, white, black and yellow felt, glue, cardboard and 2 beads or buttons for the eyes.

Manufacturing process:
- cover the sleeve with red felt;
- cut out felt and glue a black “belt” and “plaque”;
- from white felt we make a “face”, “beard”, “mustache” and “nose”;
- We make a cap from red felt, glue it, and cover the seam with a white felt ribbon, like a real hat;
- from cardboard and black felt we make a flat base for a figure in the form of boots;
- We make handles in mittens from red and white felt and glue them to the “body”;
- At the tip of the cap we make a white pom-pom (glue two felt disks together);
- glue on bead eyes and a red mouth.

The craft can be placed or hung on the Christmas tree. In the second case, when making a pompom, they glue between the disks beautiful ribbon or shiny lace.
Santa Claus from a plastic bottle
For the craft you need to prepare: a plastic bottle (volume 0.5-1 liter), acrylic paints of red and white, glue, scissors, black marker and white thread.

Manufacturing process:
- paint the bottle red or cover it with paper;
- we draw the eyes with a marker (here you can improvise: “sly squint”, “mischievous wink”, “delight”);
- for the beard and hat we glue the material and paint it with white paint;
- Glue a thread pompom onto the bottle cap;
- draw snowflakes and mittens;
- Cut out a snowflake from felt and glue it to the hat.
The finished figure of Santa Claus can be decorated with sparkles or tinsel.
Clay Snow Maiden
An interesting version of crafts made from modeling clay, suitable for both kindergarten and home decor. The Snow Maiden figurine turns out to be hollow.

The sculpting technique includes the following steps:
- from “sausages” of medium thickness we make a pyramid (smoothing the seams to get a solid, even figure);
- for the head we roll a ball, which we secure with a match;
- we braid a braid from thin flagella, make a “fur” frill and a collar for a fur coat, a kokoshnik and sleeves with mittens;
- When the figure hardens, we begin to paint (mix the paint with glue).
You can make other New Year's characters in a similar way.
Paper Snow Maiden
To make a cheerful Snow Maiden from paper you will need cardboard, colored paper, glue and pencils.

We roll a sheet of cardboard into a cone and get a base, which we then cover with blue paper. We also make sleeves from cardboard.
On thick white paper we draw the Snow Maiden’s face with pigtails and carefully cut it out. From white paper we cut out the openwork trim of the “fur coat”.
Glue all the parts together and paint on them if desired. decorative elements marker. Instead of blue colored paper, you can take white paper and color it with a pencil.
Snowman made from white plastic cups

The craft can be of different sizes, but it will be equally easy to work with due to its light weight. You need to prepare: several packages of disposable cups, a stationery stapler, glue, colored cardboard for a cap, a marker and an old scarf.
Manufacturing process:
- we connect the cups around the circle using a stapler (orient the bottom towards the center of the circle);
- adding rows, we get the first hemisphere;
- we make the second hemisphere unfinished (without a top) so that the sphere stands stably on a flat surface;
- we connect the parts with a stapler and get a “lump”;
- in the same way we make a second “lump” of smaller radius;
- glue two spheres together;
- We make a cap from cardboard (you can sew it from fabric or take a ready-made one);
- we make eyes, nose and mouth;
- we decorate the buttons (you can put tinsel, a wad of foil or colored paper in the required cups).

Come up with original decoration The snowman is quite simple.
Snowman made of thread and glue

For this craft you will need: white threads (preferably thick ones for knitting), PVA glue, 4 balloons, colored paper and felt-tip pens.
Manufacturing process:
- inflate balloons of the required sizes (torso, head and arms);
- wrap each ball with thread dipped in glue and leave to dry;
- after a day, we pierce the balls with a needle and remove the scraps;
- from the resulting white balls we collect and glue the figure of a Snowman;
- we make eyes, a nose and a smile from paper or draw with felt-tip pens;
- create a headdress - a paper bucket;
- tie a wide ribbon, a children's scarf or tinsel.

To complete the composition, you can make a broom from a wooden kebab skewer and wide ribbons of colored paper.
Decorative Christmas tree
The Christmas tree, which is usually decorated, is recognized as the indisputable and permanent symbol of the New Year. But the Christmas tree itself can become a decoration. Introducing 5 best options decorative New Year tree.
Christmas tree from pine cone

A small but cute Christmas tree will be made from a beautiful pine cone (fir cones are smaller and more elongated). Various coloring and decoration options are possible.
To make the Christmas tree look more realistic, “plant” it in a small plastic flower pot (flowers are sold in stores in them, but after transplanting into a ceramic pot they often do not find use at home). You can also make a pot from puff pastry or plasticine.
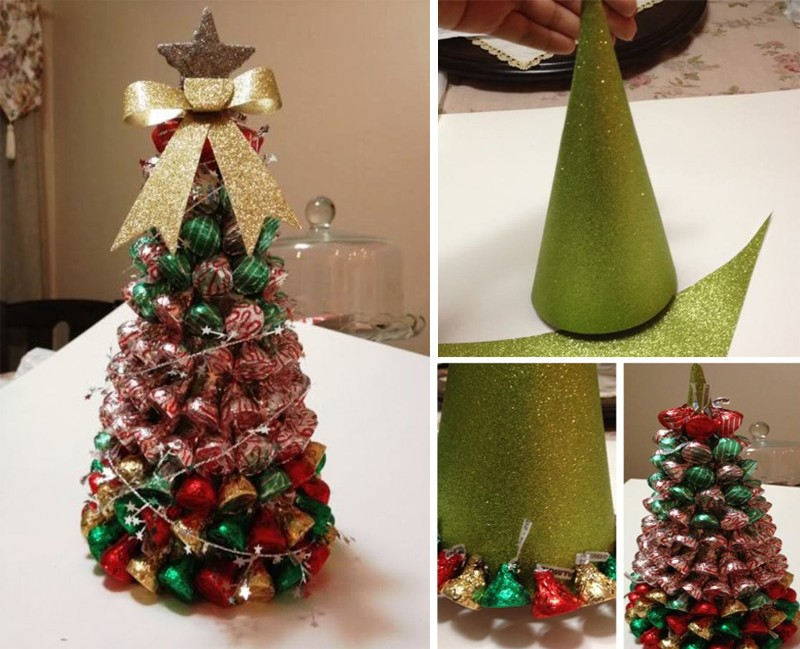
Fluffy Christmas tree with sweets

New Year's holidays were remembered from childhood by the aroma of chocolates. It will be great if a New Year's harbinger, strewn with sweets, appears on your desktop. We make a cone from white cardboard. Starting from the bottom, glue green tinsel in a circle, alternating each row with a row of candies. The top of the Christmas tree can be decorated with a star made of colored paper or candy. Instead of chocolates, you can use different sweets.
Vegetable tree

For registration festive table You can make a Christmas tree out of cauliflower. Small or chopped carrots, pomegranate seeds, and tangerine skin clippings are suitable as decorations. You can hold the cabbage florets together with puff pastry.
Christmas tree made of threads “with lights”

Fills the house with comfort simple herringbone made of threads with the light of a tea candle flickering inside. To make it, we wind any threads soaked in glue onto a cone of the required size.
After 24 hours, when the glue has dried, take out the cone and decorate the craft with beads or other small and light decor.
Natural mini-Christmas tree made from spruce branches

When there is no room in the apartment for a real spruce, but you really want a resinous smell, you should think about creating a mini version from small branches. To do this, place an elongated piece of floral sponge in a decorative bowl or clay pot.
At the next stage, the branches are evenly stuck into the sponge, repeating the silhouette of a real Christmas tree. You can decorate the finished composition with physalis, dried flowers or dried orange slices (natural fir branches goes better with natural materials).
DIY Christmas tree toys
Toys self made unique designs are more popular and create a special atmosphere in the interior.
Gnomes made of fir cones and felt

Cute toys with pendants will be a great decoration. There are many different variations and room for creativity.
Felt Snow Maiden

The Snow Maiden can be made using finished pattern or prepare your own version on paper. In the pattern you need to take into account all the elements. We decorate the finished figurine with beads or sparkles.
Garland of woven paper balls

Eat different techniques weaving 3D figures from paper. The simplest of them is: cut colored paper into strips, take one strip and glue it into a ring, intertwine two more strips and also glue them into a ring.
For balls of small diameter you need to take strips of 8-10 cm. bigger ball, the more strips will be required. We string the finished balls onto a ribbon or decorative rope and get a bright multi-colored garland.
Northern penguins from plastic bottles

All you need for the craft is an even number of bottles (if they are of different sizes, you will get a funny family), threads for pompoms, scraps for cutting scarves and multi-colored acrylic paints. Coloring does not require artist skills - just desire and a festive mood.
Plastic snowflakes

A wonderful decoration in the form of multi-colored snowflakes can be made from the bottoms of plastic bottles of any size: cut off the bottom, use a hot nail to make a hole for the ribbon and paint with felt-tip pens or draw patterns.
Button decoration

Buttons are actively used in needlework to decorate any crafts. Both decorative buttons of the same color and old unnecessary buttons can be used to create a Christmas tree decoration. The elements are strung on copper wire, and the junction of the two ends is decorated with a bright ribbon bow. A similar version of the craft is a vertical decoration in the form of an icicle.
The symbol of the coming 2018 is the Earth Dog
When decorating the interior, you cannot ignore the “mistress” of 2018 - the Earth Dog. In 2019, the relay race eastern calendar The Yellow Pig will continue, and in 2020 - the White Rat.
White dog made from cotton balls

For the craft, first a cardboard frame is made, which is pasted over cotton balls or pieces of cotton swabs.
Pompom dog

A cute puppy will be made from pompoms. For the craft, take two pom-poms of the same size (head and torso) and one small one (nose).

We tie the pompoms together with thread and glue the felt ears. For the eyes, you can take black beads, and for the nose, sew a lump of black material.
Cute felt puppies

A great idea would be to hang funny felt puppies on the Christmas tree. The pattern for the craft is easy to make yourself.
Funny puppy made from socks

To create such a dog, you will need basic cutting and sewing skills. Initially, the future body and head are formed from one sock, which are filled with padding polyester and then separated by tightening them with threads. Afterwards the head is completed with eyes, a mustache and eyebrows are embroidered.

From the other two socks, a pattern is made for the ears, paws and tail, which are also filled with padding polyester and secured to the body.
Selected ideas for crafts for the New Year 2018 will help make the interior not boring and magical in a festive way. More ideas on New Year's decoration V .
Hello, friends! Our great and long-awaited holiday will come very soon. All of Russia is resting on these New Year's days. Every person, be it an adult or a child, congratulates all their loved ones and acquaintances. But before this long-awaited year comes, we will all have to work hard in terms of choice and...
Also, in addition to all this, children in kindergarten or school begin to be asked to make various gizmos and trinkets. And adults make all sorts of different decorations for themselves, including for the Christmas tree. It is in this article that I would like to tell you how to make simple and uncomplicated crafts that everyone will be happy with.
In addition, if you have unnecessary things lying around the house, then you can come up with a bunch of different ideas from them that will appeal to you. Well, now let's move on to the main thing and see what can be done. I think you will really like them.
In this chapter I wanted to tell you in detail how to make a pig. After all, it is considered a symbol of the coming 2019. The pig will serve as an excellent craft for kindergarten, school, or as a souvenir gift for loved ones or friends. It can also be a decoration for Christmas tree. The materials will be simple and there will be no difficulty in manufacturing. This is interesting fun for children.

To make a pig we will need:
- Glue moment;
- Medium sized pine cone;
- Pink button Ø 2 cm;
- Black beads Ø 4 mm;
- Brush;
- Scissors;
- White and red paint;
- A small piece of felt.
1. Since we decided to make a pig Pink colour, then we need to mix white and red paint together.
The symbol of the year is a yellow pig, so if desired, our souvenir can be painted in this color. But this is at your discretion.
2. We begin to cover the bump with the resulting paint. This must be done so that there are no black spots left.

3. We set aside the future body of the piglet to dry, and at this time we make ears from a piece of felt. Fold it in half so that when cutting out there are 2 ears.

4. After the cone has dried, glue a patch (button) to its back using glue.

5. In the same way, applying glue to the ears, glue them to the body.

6. Well, the last thing is to glue the beads onto the head of our souvenir.
Since they are very small and it is inconvenient to take them with your hands, you can do this with tweezers.

7. If desired, you can attach a tail from wire to the back of the body, having first rolled it into a small spiral. But this is at your request.
Well, the pig is ready, as you can see, it’s not at all difficult and a great activity for children.
Craft - New Year's toy made from acorn caps
I bring to your attention an interesting master class for mothers and children. A beautiful toy for the New Year tree. The kids will be very interested in making it. And it looks just great. But there is one difficulty - finding the main material from acorns.

For the toy you will need:
- Christmas tree decoration;
- Sequins;
- Caps of acorns;
- Glue gun or moment;
- Sequins;
- Rhinestones;
- Gouache paint;
- Brush;
- PVA glue.
1. Using a glue gun, glue the acorn caps onto the Christmas tree decoration. Of course, it will take a lot of time, but it's worth it.
By the way, for this craft you can take a foam ball if you feel sorry for the toy.
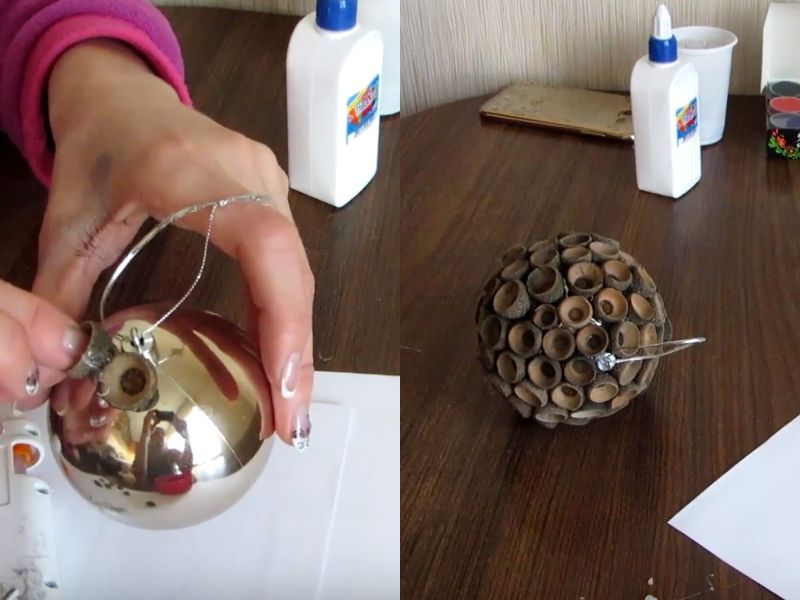
2. Now after the sticker, you need to color the outside of the ball blue and white inside.

3. Take glitter and mix with PVA glue. We paint the entire craft with this mixture. After drying, I can tell you, it looks much more interesting.

4. Now we glue rhinestones into the middle of the hats to make the toy shine better.

5. Well, to close the hanger thread, for beauty we glue a flower bow. If it’s not there, then you don’t have to do it and everything looks beautiful.

That's it, the toy is ready.
How to make crafts from pine cones for the New Year
In this chapter, I want to show simple ideas decor. Here we will make not one, but 3 interesting crafts, which will each have its own purpose (for a festive evening, a souvenir gift and a New Year tree). If you're ready, then let's go:
For three ideas we will need:
- Cones;
- Hot melt adhesive;
- Glitter (colorless and gold);
- Jar;
- Semolina;
- Rope (tape);
- Beads (red and white);
- Satin ribbon;
- Paint (white);
- Brush;
- A piece of bark.
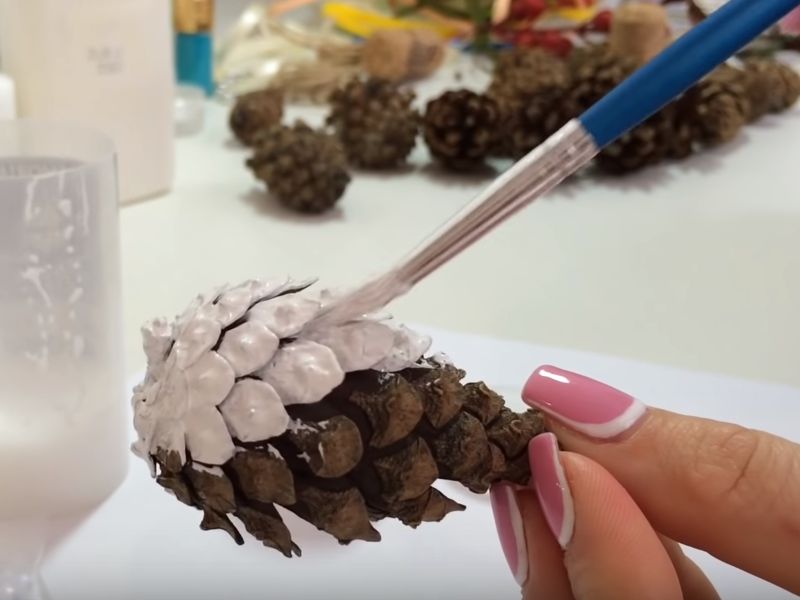
Beautiful New Year's candlestick:
1. We need to make white snow. To do this, use chalk to color the semolina.


3. We leave our workpiece to harden, and in the meantime mix the glitter and semolina together. Squeeze out some glue next to this mixture.
4. Take a cone and alternately dip it in glue and in our mixture, paint a couple of cones. That is, it looks as if it was covered with snow.


6. As soon as the craft dries, tie any thread or ribbon around the neck.
7. Using a heat gun, glue our decorated pine cones to the twine.

8. Pour the snow that you have left into the bottom of the jar, and insert a candle into it.

That's it with the first one, let's move on to the second one.
New Year figurine:
1. Pour gold glitter onto separate paper, and pour a little PVA glue there side by side. We take a cone and, one by one, dip it in our mixtures on paper and paint the entire cone.

2. For the figurine, you can choose tree bark or any other material that you like. Using hot glue, glue a pine branch to the side of the bark.

3. In the same way, but glue a pine cone at the top of the figurine, and a twig at the bottom.

4. Make a bow from a satin ribbon and attach it to the craft.

5. Decorate the top of the figurine with beads. We do the same with the bark.

Like this interesting craft we succeeded.
Christmas tree toy:
1. Take white acrylic paint and paint the bump with it
2. Using hot glue, we glue white and red beads to the bottom of our craft.


4. Add glitter to the pine cone using glue. Just like in the crafts above, dipping into them one by one.

These are the 3 beautiful crafts we made. Now let's move on to the next product.
DIY New Year's fairy house
Here I decided to show you how easy it is to make a fabulous New Year or Christmas house out of paper. After all, the more fairy tale items will surround us, the stronger will be the feeling of the upcoming holidays. Because the older we get, the less we look forward to the holiday. And with such small ones, but bright accessories my soul becomes warmer.

Materials for work:
- Colored paper;
- Glue;
- Simple pencil;
- Ruler;
- Compass.
1. First of all we make the walls. This is probably the easiest part. We take a sheet and draw a strip along the length along which we will make a cut. One should be larger than the other, since the height of the walls depends on this. About 15 cm and roll it into a tube, sealing the ends.

2. Now let's move on to the roof. We need half a circle. We won’t be able to make the circle itself, since the sheet of paper is smaller. Its diameter is approximately 23 - 24 cm. Therefore, we extend the compass to a width of 12 cm and draw a semicircle. We roll it into a cone and fix the edges.

3. Let's make more tiles. For beauty, it’s better to take paper different colors. I used blue (roof color) and pink. We cut out circles from them. Their size can be any. I have a radius of 2 cm.
How smaller size circles - the more you will need.

4. Glue them, alternating the color of the row. Since I sculpt them randomly, no one can name the number. I even have these blanks left, which will probably be useful for another craft.

5. To prevent the roof from moving, it is necessary to fix it. To do this, lubricate one edge of the wall with glue and put on the roof. Hold it for a while until it sets and the glue sets.
6. Then cut out a window and snowflakes from the circle. We also need a door. We adapt all this to the house and that’s it.

Our work is finished. Let's find him a place in the house.
Master class on easy crafts for a school competition
Now I’ll show you what you can quickly create for children at school. New Year. After all, in anticipation of this have a wonderful holiday, teachers begin to assign their students various tasks to create all sorts of interesting products.

We will need:
- PVA glue;
- Toilet paper;
- Vata;
- Acrylic paint;
- Foil;
- Toothpicks.
1. Make 2 balls from food foil, consider the diameter at your discretion. We wrap them on top with toilet paper.

2. In a separate bowl, dilute the glue with water, just a little. Using a brush, apply the resulting mixture onto our products.

4. Surely everyone has some kind of face or hand cream at home. We spread it on a regular small plastic cup and paper on top. Apply glue again.

5. We apply cotton wool to our headdress made of a cup and paper.

6. Blow dry again. And we begin to make the nose. Roll a piece of cotton wool into a tube and coat it with glue.

7. We also make buttons.

8. Using hot glue and toothpicks, we make hands with fingers.

9. Take a glue gun and connect all the parts in the form of a snowman. To insert the arms, you need to poke a hole with scissors and also glue it with a gun.

10. Use black paint to paint the eyebrows, eyes, mouth, hat and hands with fingers. Red carrots, and buttons of your choice. The body and head itself are naturally white.

That's it, the craft is ready, if you're interested, let's move on to the next chapter.
New Year's craft for kindergarten for an exhibition (fairytale house of Santa Claus)
Well, friends, since we already came up with the idea for school, why not come up with it in kindergarten. Agree, often when you go to kindergarten to pick up your child, in the locker room there are various crafts that parents make. Therefore, it was decided to dedicate this chapter to the upcoming holiday. You and I will be making a New Year's house for Santa Claus.

From the materials we will need:
- Packaging of ceiling tiles;
- Scissors;
- Scotch;
- Glue gun;
- Wire cutters;
- Decorative strip;
- Ruler (square);
- Tinsel;
- Stationery knife.
1. On the tiles we mark the walls of Santa Claus’s home. We make the height and width 15 cm each. The roof, if you look from the middle of the drawn house, is raised by 7 cm.

2. Now we need to make windows. In the middle of the wall 6 x 6 cm.

3. Now we begin to draw the side. Width 20 cm, height 15 cm. Draw the windows.
To make the house look aesthetically pleasing, try to draw the window at the same height as the first one.
4. We make the door by retreating 1 cm from the bottom and 2.5 cm from the side. Its height and width can be taken arbitrarily. I got it 6 x 12 cm. We draw only on three sides.

5. We cut out our blanks with simple scissors.

6. Using a utility knife, cut out windows and doors (on three sides).
7. Take the plastic decor and cut it to the size of our cut niches with wire cutters. We glue them, making the finishing.

8. C reverse side We glue the door with tape so that it can open and close easily.
9. Glue all sides of the home using a heat gun.


11. For beauty, to hide all the cracks in the seams, we cover it with regular tinsel.

12. All that remains is to make the bottom and yard of our house. In the house, the floor can be decorated with paper printed on a printer in the form of a carpet. We make chairs and a table from the leftover material. We put them inside the house and glue them.

13. The yard can also be decorated with tinsel. Also, if desired, we can print out Santa Claus from the Internet and glue it together.

14. And at the end of our house we glue a Christmas tree and Santa Claus in the yard.

New Year's crafts from felt with patterns
It is very pleasant to work with such soft material. And it makes simply beautiful souvenirs. But before starting the craft itself, let's first look at several patterns, then a video will be shown on how to make one of them.
Since this is the year of the pig, let's start with the symbol of the year.
Piglet:

Christmas tree pattern:

Father Frost:

Well, let’s watch a detailed video on how to make a Snow Maiden, where the author will tell and show everything in detail. And all we have to do is get the materials and make such a wonderful granddaughter of Santa Claus. The most important thing is that children participate in the process, then this craft will acquire its real value!
Thus, from watching you will learn how to quickly and easily make a souvenir (craft) using patterns for a holiday, be it New Year, Christmas or another celebration. By the way, there are many detailed felt toys on the Internet, if you wish, you can look. In general, there is nothing complicated, cut, sew and decorate the Christmas tree!
How to make a Christmas tree with your own hands?
But what is a holiday without a Christmas tree, you ask? So it was decided to make and decorate it for everyone’s fun. An interesting and fun idea that will not leave you indifferent, isn’t it?
We will need:
- Chenille wire;
- Half a wooden skewer.
1. First you need to cut the wire. That is, 4 sticks 15cm, 4 x 13cm, 6 pcs. 11 cm each, 8 x 7.5, 8 x 6.5, 44 x 4, 2 x 30 cm.

2. On a skewer (barrel), slightly larger than the palm of your hand, we begin to wind the longest wire, that is, which is 30 cm long.

3. We retreat 3 cm from below and begin to wrap the 15 cm tinsel around the trunk.


5. We also do the second row along the trunk, only we retreat from the first by about 1 - 1.5 cm. We already take the strips, which are 13 cm each. We do it in the same way as the first row. Thus this row is also ready.
6. The third row requires 11 cm sticks, 3 pieces each.

There is a slight difference in the third row. We screw one wire at a time onto the tree branch from the edge.

7. For the fourth row, we take tinsel, which is 7.5 cm long, and begin to screw it onto the trunk. There is no need to twist anything onto the branches anymore. We twist the last row 6.5 cm.
So in an interesting way we collect the tree until the very end.

We have such a beauty. At first glance, this seems complicated and confusing. But in fact, it is not just easy, but also interesting. I always involve children in creativity. They immediately have so much energy! And now I say goodbye to you, until we meet again!
Today, handmade gifts are popular. The souvenirs look luxurious, they High Quality, the crafts are unique, and their creation is incredibly exciting. You can create gifts using different materials. The main thing is imagination, a little patience and sincerity with which souvenirs will be created.
It’s especially nice to receive and make crafts for the New Year. This holiday is loved by adults and children. We invite you to familiarize yourself with the gifts that you can make with your own hands. Each craft is indicated necessary list materials. Create an exclusive and original gift very simple. Crafts can be used as decorations for a Christmas tree, apartment, or as souvenirs for friends and family.
New Year's paper crafts
It's easy to make crafts out of paper. Lanterns, garlands and snowflakes, as well as other products, are made from it. Paper is a simple and affordable material, so it is widely used to create New Year's crafts. When asked “What to make from paper for the New Year,” the first thing that comes to mind is a snowflake that will decorate a Christmas tree, a window, or become a pleasant souvenir. Well, that's what we'll do. But we won't do it a simple snowflake, but voluminous! To do this you will need materials: paper, scissors, stapler or glue.
Find more paper crafts in the article:
New Year's crafts from pine cones
Most best material for creating New Year's crafts - cones. There is practically nothing you need to do with the pine cones. They are already an excellent decorative material in themselves. You can decorate the Christmas tree with cones or put them in a vase and put them on the table to create festive atmosphere. We suggest making a garland of pine cones. For this we will need: cones, glue, glitter, ribbon.

We have other crafts made from pine cones for the New Year:
New Year's crafts from dough
Everything is clear with cones! But what should those who don’t have the opportunity to look for bumps do? We'll have to improvise. Don't worry, we know you still have plenty of craft materials at home that you don't even know you need. For example, many gifts for the New Year can be made from salt dough. To prepare it you will need only three ingredients: flour - 1 cup; salt – 0.5 cups; water – 0.5 cups. You can also add sunflower oil (2 tablespoons) and dye (a few drops). We suggest making a “knitted” heart from the dough.

You will find more dough crafts in a separate article:
New Year's crafts made from felt
In your search for improvised materials for New Year's crafts, you may well come across felt scraps. In fact, felt is a type of felt, so if felt is not available, you can use a similar material. We suggest making a penguin from felt. We will need: felt, thread, needle, cotton wool or padding polyester, buttons.
New Year's crafts are created with pleasure using felt. The souvenirs are colorful, touching and delightful.
See also other ideas for felt crafts:
New Year's crafts from disks
Surely everyone has unnecessary CDs; they can be used to create original New Year's crafts. The simplest craft option is a snowman. For this we will need materials: CD, felt, scissors, glue, felt-tip pens, buttons or beads, ribbons.

A child can make such a snowman; he will be captivated by this activity. The craft can be hung on the Christmas tree or given as a gift.
For more ideas on New Year's crafts from old CDs, see the article:
New Year's crafts from bottles
Ordinary plastic bottles can be used as a material for crafts for the New Year. We suggest doing original craft– feathers that will look great on Christmas tree, window or as a keychain. We will need: a plastic bottle, scissors, felt-tip pens or markers. Plastic feathers will be a wonderful New Year's decoration.

New Year's crafts from tubes
For creativity with children, cocktail straws are suitable as a material for New Year's crafts. Surely on the eve of the New Year holidays you have already managed to purchase several sets. Great! Then let's get started!

New Year's crafts from cotton pads
So, what else can you find at home as material for New Year's crafts? Of course, cotton pads. By the way, if there are no disks, ordinary cotton wool will do. It makes an excellent imitation of snow. Options for crafts from cotton pads or cotton wool, there is a huge variety, but we suggest making a New Year's ball. You will need: cotton pads (a lot), a stapler, a needle, thread and a small ribbon. Process of creation New Year's ball will take no more than 15 minutes, but it looks like this Christmas tree decoration truly winter!

New Year's crafts made from cardboard
You can use cardboard as a material at hand for New Year's crafts. Don't know where to find cardboard? But what about old postcards, which are probably gathering dust without use. Of course, you should not use memorial cards, for example from dear and close people. But postcards that mean nothing can be used for a good cause. We suggest trying out a pine cone as a trial craft!

New Year's crafts from threads
What else can be used as improvised material for crafts for the New Year? Threads. These can be thin threads or thick yarn, depending on what exactly you want to do. We propose to build New Year's star. We will need: threads, PVA glue, matches or safety pins, disposable container.

New Year's crafts made from fabric
A very cool New Year's craft can be made from fabric. If you are comfortable with a needle and thread, then you should start with something simple, for example, sew a nice Christmas tree using materials: fabric (you can take calico, cotton, chintz, silk, linen, satin); strong threads; needle; safety pins; scissors; filler (sintepon, holofiber, cotton wool); wooden stick; decorative elements (optional).


You can decorate a fabric Christmas tree with different objects, snowflakes. Crafts, ribbons.
In addition to the Christmas tree, you can make other New Year's toys from fabric:
New Year's crafts from candies
IN new year holidays Every house is full of all sorts of sweets, mostly sweets. Well, let’s not let the goodness go to waste, let’s make an excellent New Year’s craft that will be an excellent gift for friends and acquaintances. We suggest starting with the Christmas tree. For this we need: thick paper, candies, double-sided tape, ribbons and tinsel.
By the way, if you need to add other candies, we have ideas for this:
New Year's crafts from cups
They will also use plastic cups. If there is a lot of plastic containers, you can make a big snowman. By the way, if there is no snow outside, and the little one really wants to blind snow woman, plastic cups will come to the rescue. By the way, you can also attract neighbors. In any case, crafting with a large group is more fun! We will need: plastic cups, stapler, glue, decorative elements.

New Year's crafts from disposable tableware
You can create real New Year's masterpieces from disposable plastic tableware. Suitable materials include plates, spoons, forks, and knives. There can be a lot of ideas, but we suggest making a Christmas wreath from plastic spoons. For this you will need: 201 spoons, glue, wreath blank ∅45 cm, red paint (preferably spray), white ribbon. Break off the handle of each spoon. Then glue the round parts of the spoon to the wreath blank in four circular layers. It is better if the workpiece is made of MDF, but if not, then thick cardboard will do. After this, paint the wreath and let it dry completely. Now all that’s left to do is thread the ribbon and you’re ready to hang!

New Year's crafts from sticks
Passed the nursery new Year party With big amount ice cream eaten? Great! We urgently collect sticks and get ready to create a New Year's craft. Let's make a snowflake. For this you will need: sticks, paints, glue, buttons. The craft can decorate the refrigerator or become a toy for the Christmas tree, or it can also be given as a gift.

By the way, snowflakes can be made from other materials:
New Year's crafts from cotton swabs
When all the obvious options have been considered, it's time to use the magic cotton swabs! We will use them to make a magical winter applique! For this we use: cotton swabs, glue, cardboard, paper!

New Year's crafts from pasta
So, what else do you have at home that can be used for New Year’s crafts? Pasta would be an excellent option. Yes, yes, regular pasta for cooking. True, you don’t need to cook them for this. By the way, pasta of any shape is suitable: horns, spirals, shells, bows. We suggest using pasta to create New Year's cards. For this we need: pasta, paints, glue, glitter.

For more ideas on New Year’s pasta crafts, see the article:
New Year's crafts from buttons
Absolutely any materials that you can find at home are suitable for New Year crafts. Surely everyone has such a box in which spare buttons from clothes are stored. The shirt has long been thrown away, but the buttons are still there. Great! You can usefully get rid of this goodness by making cute New Year cards. In addition to buttons, you will need thick paper, glue and various decorative elements for this craft. You can decorate a card with buttons in the shape of a snowman, a New Year's garland, or a wreath.

Need more postcards? We have!
New Year's crafts from toilet paper rolls
Go ahead. In search of scrap materials, you should literally look around the entire apartment. You especially shouldn’t bypass the place where everyone likes to think! Yes, yes, you can also find materials for New Year’s crafts in the toilet. Don't be alarmed. They're just toilet paper rolls. Let's make owls! For this we will need: toilet paper rolls, paint, brush, colored paper, scissors, glue.

Don't rush to throw away the bushings! We have over 100 more craft ideas!
New Year's crafts from napkins
I think there are napkins in every home. Moreover, before the New Year, they are bought without fail for the festive feast. You can make incredibly cool crafts from ordinary napkins. We suggest choosing a Christmas tree. For this we will need: thick paper, napkins, a stapler, glue or double-sided tape, beads, rhinestones.

Another cute Christmas tree made from napkins will be a wonderful holiday decoration.
New Year's crafts from boxes
What else can be used as improvised material for New Year's crafts? Boxes, friends, boxes! And absolutely any: from under shoes, milk, oatmeal, cereal, etc. The first thing that comes to mind when looking at cardboard box- house. Cardboard houses you can decorate the windowsill or hang them on the Christmas tree. And if you put an electric candle inside the house, you will get a magic lantern!

By the way, we have other ideas for houses:
New Year's crafts from satin ribbons
If you have some satin ribbons, get them urgently! You can’t even imagine what valuable material you have in your hands. True kanzashi professionals (this is the name for the technique of making crafts from ribbons) work wonders. Well, beginners should try something easier, for example, making a Christmas tree. For this craft we will need: thick paper, satin ribbons, scissors, glue, beads.

Are there any more ribbons left? Try other crafts too!
New Year's crafts from old light bulbs
Well, do you think all the ideas are over? Nope! We are urgently looking for old light bulbs. Of course, both incandescent and energy-saving lamps are suitable. But we suggest using the good old Ilyich light bulb. Let's do “winter in a jar”! You will need: old light bulb, glitter, mini Christmas tree, glue, ribbon.

Looking for more Christmas decoration ideas using old light bulbs? We have!
New Year's crafts from corks
Well, for those who like to drink a glass of another wine after a hard day, a craft made from wine corks would be an excellent option. If there is little traffic, you can make a small craft, for example, a deer or a gnome. But if more than a dozen traffic jams have accumulated over the year, you can make an excellent New Year’s wreath.

By the way, if you need more wreath ideas, we have them!
Help us improve: if you notice an error, select a fragment and click Ctrl+Enter.
Agree, everyone creates the atmosphere for the holiday themselves :)
Moreover, you can do it yourself.
NEW YEAR'S IDEAS. PANTRY OF IDEAS FOR THE NEW YEAR. NEW YEAR'S DECORATIONS WITH YOUR OWN HANDS.
SIMPLE NEW YEAR'S DECORATIONS WITH YOUR HANDS.
New Year's toys made from peanuts.
DIY bottle penguins.

Apple wreath and apple cup for the New Year.

Apples may not be a New Year's fruit, but an apple wreath and an apple cup look very festive.
DIY scarf mugs.

If the scarves are decorative, then the sweater cuffs will keep the mug warm and prevent you from getting burned.
DIY portrait ball.
NEW YEAR'S SURPRISE.

For such beauty, it is better to take an unbreakable ball. Because you will want to keep it.
Balloon. NEW YEAR'S BALL WITH YOUR OWN HANDS. OWN CHRISTMAS DECORATIONS.


Plastic ball, coin for weight in a basket.
NEW YEAR'S GIFT. HOLIDAY SHOES WITH YOUR HANDS FOR THE NEW YEAR.


Brilliant reincarnation. How many shoes didn't live up to their mark?
finest hour and was thrown out after walking on the paving stones.
DIY snowflakes from plastic bottles.


Cut off the bottom of the bottle, make a hole with an awl, and draw a snowflake.
They probably don’t even need a ring if you take a thin thread instead of a ribbon.
DIY NEW YEAR'S balls from bottles.

Cut the bottle into thin rings, fasten and decorate.
DIY NEW YEAR'S DECORATIONS FROM GLUE.

Glue, dark beads for eyes, long orange bead for carrots,
Instead of a headdress, you can make a paper bag.
DIY tin Christmas tree.

If you are the happy owner of a barn full of scrap metal, then it’s easy for you to do
such an art object. But, as a rule, such lucky people do not understand how lucky they are.
New Year's toys: DIY lace ball. 
Lace, glue and ball. It is better to take light laces.
DIY Christmas tree made from push pins. We make a Christmas tree with our own hands.

DIY Christmas tree on sticks.

New Year's background for photos.

Cinnamon ball

You will need a foam ball, glue and cinnamon sticks.
WE MAKE NEW YEAR'S TOYS WITH OUR OWN HANDS. NEW YEAR'S TOYS WITH YOUR OWN HANDS.
MASTER CLASS on New Year's toys.

You can make postcards in the same way.
DIY New Year's decoration. New Year decoration with your own hands.

DIY wreath made from baking molds.

Secure with wire or ribbons.
Master class: wreath made from toilet paper rolls


DIY crown for a little princess.
Master class: New Year's crown for a girl.

Master class: DIY angels. 
DIY retro decorations.

The most vivid and colorful memories, of course, come from childhood. Remember how we waited with trembling anticipation for the most fabulous holiday of the year? We decorated the Christmas tree, decorated the room with garlands and, of course, waited for a miracle! But isn’t waiting for a holiday a miracle? Do you remember how magical garlands made of colored paper seemed, and how sweets in shiny wrappers seemed like the best Christmas tree decorations?
Let's plunge into the pre-holiday atmosphere and create a miracle with our own hands. Christmas decorations, decorations for the room, and just DIY crafts, what could be cuter and warmer? homemade gifts or souvenirs.

The best thing about creating New Year's crafts is that you don't need any extraordinary skills or any special materials. After all, an unusual thing can be created from ordinary materials.

Paper Kingdom
Paper is perhaps one of the simplest and available funds for creativity. Paper crafts can be either simple, something kids can easily handle, or they can be complex designs.


A snowflake is an openwork carved figure familiar to everyone from childhood. Cutting it out is very easy, especially since there are many templates.

A beautiful decoration made of snowflakes will refresh a forgotten candlestick and breathe into it the anticipation of the holiday. A snowflake can be not only flat, but also three-dimensional, made using the quilling technique.

Vytynanka is a direction of needlework when working with paper, it is beautiful patterns and entire scenes cut out from ordinary sheets. Very often, this technique is used to create beautiful New Year’s window decorations.

Christmas tree - can be made in various ways, but the simplest one, which even a child can handle, is as follows. Roll the green paper into a cone shape, trim the bottom and decorate with bright sequins and beads.

And if you want a larger Christmas tree, make several cones different sizes, secure it in the form of a pyramid, and make a fringe on the edges of the levels of the pyramid using scissors.

Balls for the Christmas tree - technically, making such a ball is very simple. We cut strips of the same length, color and texture (it’s better to use different ones), then glue each strip from opposite ends. Next, we assemble a ball from these multi-colored rings.

There are a huge number of options for crafts and methods of making paper. Lanterns and garlands made of colored paper, which come from our childhood, are still relevant today. Having this simple material available and letting your imagination fly, the question of how to decorate a room for the New Year will not arise.

Unusual from the usual
Often, designer items are made not from expensive materials brought to order, but from ordinary improvised materials that either lay around on the mezzanine or simply forgot to throw away.


Buttons
Beautiful decorations for the New Year are made from ordinary buttons. You can make a creative New Year's beauty with your own hands, thereby preserving live Christmas tree from cutting down. We will need green cardboard, thread and buttons.

Make a cone out of cardboard, wrap it in a chaotic manner with woolen thread and use glue or pins to decorate it with multi-colored buttons. In the same way you can arrange Christmas decorations, just take a foam ball for this and also decorate with buttons.

Beads
A Christmas tree toy made from beads, made with soul, will be a wonderful gift for friends and relatives. Even a novice craftswoman can successfully master the beadwork technique, and a wonderful idea for crafts of this kind can be offered in the form of a symbol of the coming year. This is a wonderful souvenir and a kind of talisman.

Light bulbs
If you still use incandescent light bulbs, then do not rush to throw away the burnt ones, you can give them a second, and no less radiant life. Arm yourself with acrylic or gouache paints, and don’t contradict yourself in any creative impulses!


Funny snowmen, just a light bulb painted white with eyes and a hat, how cute. Touching symbols of the year: bunnies, chickens, or just a string of garlands.

Threads
Unusual Christmas ball can be made from simple knitting threads. inflate balloon diameter you need, lubricate it with PVA glue and wind the threads in any order. Set aside until completely dry.


When the glue has dried and the threads have become stiff, carefully remove the balloon after puncturing it. Next, you can decorate the finished ball with contrasting bows, beads or ribbons, or you can not decorate it, because the decoration is self-sufficient.

From several balls made in this way you can make a snowman, a headdress and a carrot and your unique character is ready.

Modeling
Funny and unique crafts You can make them from plasticine, and to make cute figures happy for as long as possible, make them from polymer clay. After drying polymer clay hardens and holds its shape perfectly.

Can also be used for modeling salty dough, though you must remember to thoroughly dry the finished product in the oven. What figures to make depends only on your imagination, or pay attention to the photos of New Year crafts made from polymer clay.


Cones
A special material that I would like to highlight from all others is cones. She herself is her own appearance looks like a small Christmas tree, so we won’t go far - it’s elementary New Year's craft almost ready. You just need to paint our mini “Christmas tree” with paint and stick on beads or sequins.

If you have accumulated a lot of these natural material, then you can make forest beauty quite impressive in size and indescribable beauty. Roll a cone out of thick cardboard, fill it with either old newspapers or any other sealant.

Fix it on a round stand with a diameter slightly larger than the base of the cone. Then, using a glue gun, we attach the cones to the base.

The finishing touch is, of course, the outfit for our Christmas tree. If the tree is not small, you can decorate it with a garland, and for a small craft, beads, tinsel, in a word, everything that you use to decorate a classic spruce is suitable.

Using pine cones, you can use the same principle to assemble a Christmas wreath for room decor. Almost any round plastic material that can be shaped into a ring is suitable for the base. Next, according to the proven scheme: we cover the ring with cones, beads, bows - everything that your imagination whispers to you.


Pine cones and felt make endlessly cute Christmas tree animal toys: bunnies, foxes, birds, very funny gnomes and much more.

Postcards
A great idea for a souvenir for family and friends is a handmade postcard. If you imagined a homemade postcard in the form of a folded album leaf with the inscription “Happy New Year”, then this is no longer the case.

DIY postcards are a whole direction in needlework and are called scrapbooking. Yes, of course, the basis remains the same, in the form of a small book where you congratulate your loved ones and wish something nice. But the decor has truly become a work of art, especially since the material for this type of creativity is amazing in its diversity.

It’s so nice to spend a quiet pre-holiday evening with your family doing a pleasant creative activity. It doesn’t matter at all which craft you choose, the main thing is that the process itself brings pleasure.

Photos of crafts for the New Year


