Who said it was original and beautiful gift Can I only buy one for my mother or grandmother on March 8th? In fact, the most expensive, touching and pleasant gift can only be made independently and often from simple materials at hand. For example, an excellent gift for March 8th with your own hands for your mother, grandmother, sister or friend can be made from colored paper, fabric, felt or even candy. Of course, the complexity of such step-by-step master classes largely depends on the age of children they are intended for. It’s clear that for kids in kindergarten, crafts and gifts for March 8th will be much simpler and easier to make than for the same students primary school. However, as practice shows, in our country the main attention for mothers and grandmothers on International Women’s Day is not an expensive or complex gift. Therefore, in our article today, we tried to put together for you simple but original master classes of gifts with photos and videos on March 8th with your own hands for little craftsmen. We hope that they will definitely please your beloved women!
How to quickly make a gift for March 8th with your own hands from paper, master class for kindergarten
For the first quick DIY gift option for March 8th for kindergarten You will need paper and a little patience. In general, paper, no matter whether it’s colored or plain white, is one of the most affordable and versatile materials for children’s crafts. That is why it is most often used for creativity and holiday gifts in kindergarten. You will learn more about how to quickly make a gift for March 8th with your own hands from paper in the next master class for kindergarten.

Necessary materials for a paper gift for March 8th in kindergarten
- sheet of white paper
- sheet of yellow paper
- wooden skewer
- scissors
- decorative ribbon
Instructions on how to quickly make a gift for March 8 from paper with your own hands for the garden

An original do-it-yourself gift for mom on March 8th “Bracelet” for kindergarten
Another option for an original gift for March 8th with your own hands for kindergarten can be made for your mother in the form of a beautiful bracelet from ordinary... pasta! This bracelet is made quickly and easily, but requires a preliminary preparation stage. In addition, according to the scheme of an original gift for mom on March 8, you can make beads or a multi-level necklace with your own hands “Bracelet” for kindergarten.

Materials for an original DIY gift “Bracelet” for mom on March 8
- pasta of different shapes
- acrylic paints or food coloring
- thick thread or lace
- packages
Instructions for a DIY gift for mom on March 8th in kindergarten “Bracelet”

DIY gift for March 8th for mom “Bouquet of candies”, step-by-step master class with photos for school
The bouquet and sweets can be called one of the traditional gifts on March 8, which can be quite successfully combined as part of a step-by-step master class on a DIY gift for mom for school students. Making such a candy bouquet is not at all difficult, and in terms of originality and effectiveness, it is much higher than its traditional counterparts individually. Learn how to make a gift for March 8th with your own hands for your mother “Bouquet of candies” from a step-by-step master class with photos for school.

Necessary materials for a March 8 gift “Bouquet of candies” for school
- candies
- colored paper
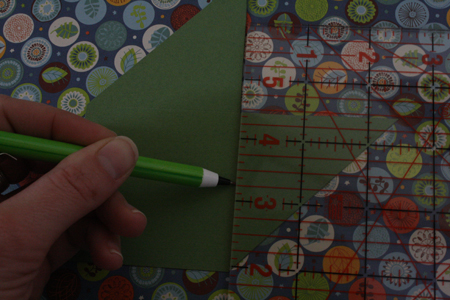
- simple pencil
- green paper tape
- wooden long skewers
- cellophane or cling film
- straws for drinks
- gift paper
Instructions on how to make a bouquet of sweets for mom on March 8 for school students
- Sweets are best suited for this master class. triangular shape, for example, truffles. But you can also take flat chocolates, which are easy to put together.

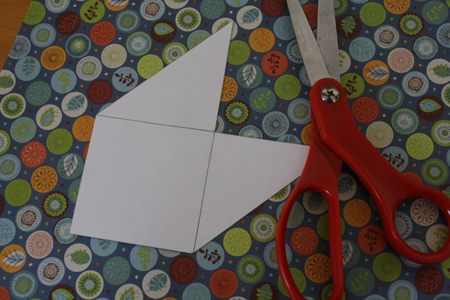
- We cut out a template from cardboard - a three-leaf flower with a small hole in the middle. This will be a preparation for tulips that we will give to mom on March 8th. Using the template, we transfer this drawing to colored paper. For example, you can take pink, red, white or with beautiful patterns.

- We take each candy and wrap it in cellophane or cling film. Roll the free edge into a rope.

- Then take a drinking straw and cut it into small pieces 3-4 cm each. The tube will help fix the candy that will be in the middle of the tulip. We take the candy and insert the skewer into the flagellum, insert the tube and fix it. We wrap the skewer with green paper tape on top.

- Cut out blanks for tulips. We also cut out oblong blanks for leaves from green paper.

- We turn each piece over and carefully bend each petal a little inward to create an imitation of a living flower.

- Thread the candy on a skewer through the hole in the middle. Carefully connect the petals together and lightly glue their edges.


- We thread the second petal blank through the top.

- We attach the leaf blank to the skewer and secure it with tape.

- We arrange the finished tulips into a bouquet using gift paper.

Touching gift for grandmother on March 8th with your own hands with a photo, step-by-step master class for kindergarten
Not only mothers, but also grandmothers deserve the most touching gifts for March 8, made by the caring hands of their grandchildren. Our next master class is perfect for kindergarten students and will help you make a very sincere and memorable present for your beloved grandmother. Find out how to make a touching gift for your grandmother on March 8th with your own hands from the following master class for kindergarten.

Necessary materials for a touching gift for your grandmother on March 8th with your own hands
- ice cream sticks - 8-9 pcs.
- paints
- photo card
- cardboard
- jar, glass or pot for indoor plants
- textile
Instructions on how to make a gift for your grandmother on March 8 with your own hands for kindergarten
- With these simple materials we will make a flower in a pot. But not an ordinary one, but with a photograph of a child - which is why such a gift will be very touching and memorable for any grandmother. So, first of all, we paint the ice cream sticks with paints.

- Take a photo of the child and cut out the head. We make a blank from cardboard that completely replicates the size of the photograph. Glue both parts together.

- After the sticks are completely dry, break each one in half. Glue the resulting pieces to the cardboard base of the photo card.

- We continue to glue the stick blanks, moving in a circle and forming flower petals.

- We paint one long stick in green color and glue it to the flower blank.

- We take a container, for example, a beautiful jar and fill it with thick fabric.

- We secure our flower in a makeshift pot and decorate the gift with a ribbon. Also, instead of fabric, you can take paper or fill the container with multi-colored decorative pebbles and sand. The main thing is that the resulting base holds our flower-photo card well.
A beautiful gift for your mother or grandmother on March 8th with your own hands from the Country of Masters, video
The next video tutorial on a beautiful gift for your mother or grandmother on March 8 with your own hands from a needlewoman from the Country of Masters will teach you how to make a very cool souvenir from ordinary wire and felt napkins - a festive bouquet tree. Even schoolchildren can give such a beautiful gift for March 8th from the Country of Masters to their beloved mother or grandmother. For more information on how to create an original gift from simple scrap materials, watch the video below.
DIY gift for March 8th - best gift for mom and grandma on International Women's Day. And it doesn’t matter so much whether it is made of colored paper, felt or candy. The main thing is that he will do it with love and care, and preferably quickly. We really hope that what we have collected in today’s article step-by-step master classes with photos and videos of March 8 gifts for kindergarten and school will help you please your loved ones with cute souvenirs. And remember that you don’t have to be a needlewoman from the Country of Masters to please your loved ones original gifts with your own hands.
We will repeat once again: a gift that you make with your own hands, for loved one will be priceless. After all, at a minimum, you put the warmth of your hands and a small part of your soul into it. And even though a million ready-made surprises are sold in stores today, we offer to make your mother, grandmother or sister truly pleasant. You've probably already appreciated our ideas for making chic cards with your own hands. Now let's get to the gift!
- several coffee filters;
- some flower wire;
- small pliers;
- high quality watercolor.
On a note! Not everyone has coffee filters, which means you need to know what you can use to replace them. Beautiful crafts for March 8th can also be made from corrugated paper(or any other thin paper). The shape is more important here: the paper should be round.

- So, if you are using coffee filters, then prepare four to eight of them. In this case, you will get one flower. The splendor of our flower depends on the number of sheets of paper or filters.
- We put all the filters or sheets of paper in a pile and bend them in half, then again, and again.
- Now you need to cut off the edges so that the future petals take shape. Use a wavy shape or experiment with different patterns.
- Now half of the filters need to be put aside, and the other part should be cut off a little more (by four to five centimeters). If there are fewer filters in the center of our future flower, it will look more realistic.
- Now place all the filters unfolded on the table. Small parts should lie on top of large ones (as in the photo below). Now we draw a wire through the center of all the blanks, bend it and pierce the paper again. The distance between the two holes should be at least five millimeters. To secure the wire, twist it with reverse side flower.
- Now squeeze the paper and lift it up, without stopping twisting it a little. This should be done with each filter. See how this is done in our photo instructions. Now the base of our bud needs to be wrapped with wire.
- Now, using green adhesive tape, you need to wrap the flower, starting from the bud and ending with the tip of the wire. It is advisable to give the filters a pleasant tint. They are easy to paint: use watercolor, which can be diluted with water, then the colors will be more delicate. You can use not just one color, but several at once. Ready! This is how quickly and easily unique ones can be created beautiful crafts on March 8th with your own hands.


You will need:
- several sheets of thin colored paper (can be replaced with corrugated paper);
- some wire; sharp scissors.

- You need to cut out circles from paper of the selected color. There should be three of them, use different tones. The diameter of the parts should be on average six centimeters.
- Now let's take the wire. You need to cut a piece and bend it into a circle shape (as in the photo below). The length of the wire should be about twenty centimeters.
- Now take yellow paper and cut out a couple of small circles. They need to be glued to the lower and upper parts of our bud.
- All the circles now need to be folded and a small hole made in the middle of them through which you can thread the wire. As for the top of the flower, you can make a small loop from the tip of the wire. Our stylish flower is ready! Such crafts in the form of flowers on March 8 will perfectly decorate festive table, so do several at once.


You will need:
- sharp scissors;
- green adhesive tape;
- several skewers;
- glue;
- several old magazines.

- Not all magazine pages are suitable for our work, but only the most colorful and bright ones. We tear them out and fold them in half. Then we fold all the halves towards the fold in the center, as in the photo below.
- On the side where the folds are, carefully cut the fringe. There should be at least one centimeter left to the base.
- The paper blank is wrapped around our skewer, as a result we should get a bud. Now, using adhesive tape, you need to secure the bud at the base. A green ribbon is used to turn the skewer into a stem.
- We spread the fringe so that our bud turns out to be as lush as possible. It’s nice to give one such flower, but the bouquet will look much more impressive. The DIY craft for mom on March 8 is ready!


An original DIY craft: making a rose in a waffle cone
You will need:
- several waffle cones (you can buy them at any place that sells ice cream);
- stationery knife;
- a little hot glue (you can also use standard PVA glue);
- sharp scissors; a couple of sheets of colored paper.

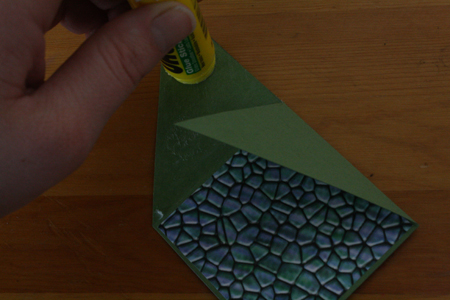
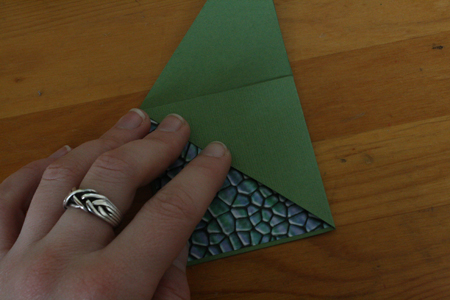
- We take colored paper from which we need to cut out a quarter circle. Using this blank we wrap our waffle cone. The ends are carefully secured with glue.
- Now, using colored paper, we make a rose of the appropriate size. However, it doesn’t have to be a rose - go according to your taste. As for the rose, it is made simply: take paper, cut out a couple of types of petals. Please note that the petals should be in the shape of a quarter circle or heart. We glue them all together (see instructions below).
- Glue the petals around the skewer in a checkerboard pattern. Now add a little glue to the edge of the cone and attach the bud.
- Now you will need green colored paper. Carefully cut out the leaves and attach them to the cone using glue. By the way, you don’t have to make a flower with your own hands; you can use beautiful fresh or artificial flowers.


You will need:
- several sheets of thick cardboard (the thickness should be about three millimeters);
- several thinner cardboards - about two millimeters;
- glue (you can use hot glue or standard “Moment”, the main thing is that it holds very well);
- tube of PVA glue;
- sharp stationery knife;
- some masking tape; glue brush;
- a couple of pieces of fabric. Choose colors at your discretion, however, we recommend using dark fabric with a floral print for the top, and light fabric in delicate shades for finishing the inside of the box.
- scissors;
- stack;
- white paper (one sheet).

- So, first we need to cut out the blanks. To do this we use a stationery knife. We have indicated all the required sizes in the photo below. If you don’t want to make the base of the box with your own hands, then just buy a ready-made box. It is only important that it is made of durable cardboard.
- If you are working according to our blanks, we assemble the lid and walls of the future product and carefully glue it together with glue (as in the photo). The corners inside and outside should be covered with masking tape for strength.
- Let's start working with the fabric. To decorate the walls of the box, you need a piece measuring approximately 46 by 9 centimeters. As for the lid, cut out a piece measuring 21 by 26 centimeters.
- We cover the box with pieces of fabric. To do this, you need to smear the lid with glue (now PVA) and attach a cloth. Take a look at the photo to see how to properly arrange the corners to make it look aesthetically pleasing. The corners are leveled using a stack.
- We can start designing the side parts. The corners need to be turned inward. If there is too much fabric, feel free to cut off the excess.
- To decorate the lid, you also need to grease it with glue, apply a cloth and carefully glue the corners.
- White paper is cut out the same size as the bottom of our box. The piece should be the same size light fabric. The corners are cut, everything is neatly glued. Glue the blank to the bottom with the paper facing down. You can align all this with a stack. We use the same principle to work with the edges of the lid and side walls. The box is ready! Of course, this is much more complicated than, for example, crafts made from napkins for March 8th. However, the one to whom such a gift is presented will definitely be delighted. And it's worth the effort! And finally: if you wish, decorate the lid of the box with beautiful rhinestones or large beads. Large pearls will look especially elegant.


You will need:
- several standard nails;
- thick thread;
- photos of you and your mother together;
- paper clips or stylish clothespins;
- simple pencil.

- First, you need to carefully mark the places where the nails will be driven. We recommend that you first mark on a piece of paper a diagram of how the threads and nails will be located. It is much easier and faster to prepare a craft if you use arrows to indicate the direction in which you will wind the threads.
- Now carefully drive in the nails and wrap the thread around them. It is best to choose the color of the thread based on the tone of your walls. If the walls are light, then the thread should be as dark as possible, but if the walls are dark, then choose a lighter thread. In general, play with contrast: our gift self made should stand out as much as possible. As for nails, it is still better to take smaller and thinner options: they will not be so noticeable. The thread does not have to be the same color - our original wall frame can be multi-colored.
- Print out the cutest and most beautiful family photos that include your mom. The size of the photo should not be very large; be guided by the size of the frame. You can attach them to the threads using decorative clothespins - these are often sold in stores with souvenirs and all sorts of small items for decorating gifts. Ready! Everything ingenious is simple.


Do-it-yourself postcard for March 8th: making an original drawing. A super simple idea that even a child can handle (it’s probably easier to just make crafts from dough for March 8th). Custom postcard printing is created almost instantly - check it out.
You will need:
- one head of plain cabbage (can be replaced with Chinese cabbage);
- a small piece of foam rubber; paint of the selected color (it is better to choose richer tones: red, orange, blue, burgundy);
- sharp knife;
- rag or piece of paper.

- So, part of the cabbage is cut with a knife.
- Now we take the foam rubber and thoroughly saturate it with paint of the chosen color.
- The cut cabbage is dipped into foam rubber and tightly fixed in the form of a seal (see photo below). Now you can create any original postcard!


Below are some more photo ideas for inspiration.

With my own hands - as far as I can remember as a child, it has always been this way! A drawing of a rabbit on a cutting board, a postcard on a matchstick base or intricately folded paper. Such children's crafts are imbued with love and tenderness, thoughts and desires to make something pleasant. Each of them brings warmth and comfort to the mother’s heart, I now know that for sure!
Today we offer you new selection ideas for crafts magical holiday spring!
Original DIY decorations
Keychain
A child's handprint, glitter... Beauty!

Original beads and bracelets
Here little jewelers will need the help of adults. And you can be absolutely sure that his gift is exclusive.

How to do salty dough and decorations made from it, read
Necklace
An original DIY necklace in the color of the azure sky and gold of the Sun.

You will be surprised how easy it is to make such a gift for your mother. More details
Pendant
I associate this unusual pendant in the shape of a nest with family, comfort, care, warmth: everything that each of us needs!

Unusual beautiful bouquets for March 8
There are never too many flowers for a woman. We have already shown by and,. Today creation ideas creative bouquets from scrap materials.
Wonderful bouquet of poppies

Beautiful bouquet of daffodils

Read how to make daffodils with your own hands
Original fluffy bouquet of pompoms


Paper applique - a huge layer of children's creativity. Add buttons, beads or ribbons to the paper and now you’ve got something unique. voluminous postcards as a gift for mom or grandma!


Master class on creating a postcard
Interior items
Homemade interior items bring warmth and positive emotions. They will decorate any home!
Original flower vase

Unusual flower pot

Funny pendant as a gift

Original do-it-yourself postcards for March 8
Here, children's imagination is limitless: from simple drawings with cute inscriptions from a still fragile hand, to beautiful scrapbooking works.
Beautiful postcards from prints
Hearts made from palms - cute, touching, tender!

A beautiful postcard - a butterfly fluttered out on palm wings. 🙂

Wonderful cake with a hearty cherry!

Warm embrace
Idea for postcards - mom's tender hugs!

Volumetric postcards in the “Pop-up” style
When I was a child, I really loved making voluminous cards like these.

Paintings, drawings, panels made by children
We decided to highlight these interior elements in a separate section, they are too unique and original.


A decorative panel can even be made from an egg carton! You can make sure
Children draw
Flower drawings can even be made from foot prints! 🙂

Bugs and ducklings - unusual ideas for drawings.


Original photo frames for the wall

DIY gifts for the beauty and health of your beloved mother
Now on sale big choice soap making kits. Why not take advantage and make an original fragrant gift for your mother on March 8th?!
International Women's Day on March 8th is approaching, I would like to express my love, respect and gratitude to my mother. The best way to please your mother on this day is to give good gift made from the heart with your own hands. In this article we have selected best ideas gifts for mom on March 8th.
You will need: colored paper, scissors, glue.
Master Class

creative indoor flower

You will need: pot, foam, skewers, artificial grass, glue gun, candy bars, chewing gum, gift cards, etc...
Master Class

The creative indoor flower is ready!
Coffee mug

You will need: mug, coffee beans, cotton pads, thick white thread, acrylic paint Brown, Super glue.

Master Class

Coffee heart

You will need: coffee beans, paper, wire, thread, glue, cardboard, jute thread, sponge, iron can, brown paint, ice cream sticks, decorative elements - flowers, ribbons...
Master Class

The coffee heart is ready!
Ship made of money

You will need: 7 sheets of A4 format with images of different banknotes (euro, dollars, hryvnia, rubles), white sheets of A4 format, silicate glue, scissors, glue gun, thick cotton threads, skewers 20-30 cm long, polystyrene foam, a flat box of half as wide as the bottom of the ship.

Master Class
- Fold a boat from a sheet of paper as shown in the photo.

- Carefully turn the boat inside out so as not to tear it.
- Fold and iron the boat.
- Trace the outline of the boat on another sheet, then draw a dividing line and cut out 2 parts.

- Coat them well with glue and glue them to the inside of the boat to make two-layer sides.
- Cut the money sheets into 1.5 cm wide strips.

- Cover the boat with money stripes.
- Carefully coat the entire boat with glue for strength and leave for 2 hours to dry completely.
- Place identical bills side by side and glue them together. Make 3 of these - from five, from three, and from four bills. These will be the sails.

- Carefully thread the sails onto skewers and secure the joints with glue so that they do not slip.
- Take the boat and glue 3 pieces of foam inside.
- Insert skewers into the foam for the front and back yard. The front yard should be 1/3 longer than the back. Make sure the lines are level, then secure with a glue gun.
- Insert skewers with sails, placing them at the same distance. It is worth noting that the deck should be smaller than the stern.

- Fold the threads in 2-3 layers along the length of the sail and additional centimeters for the ties.
- Tie the threads to the skewers as shown in the photo.
- Cut 2 bills diagonally and fold the edges 0.4 cm.
- Glue the bills (sails) to the raking threads.

- Make sails on the stern in this way: do not twist the bill into a tube too much, bend the edge, then glue it.
- Fold 3 bills in half, shape them into flags, then glue them.
- Cover the deck with bills.

- Make a stand for the ship from a flat box.
- Glue the desired background onto the box.
- Glue the ship.
Vase from a bottle

You will need: glass or plastic bottle, magazine, PVA glue, decoration elements (beads, buttons, sparkles...).
Master Class


You will need: a transparent glass, a ball, scissors, markers, a sheet of white paper, glue.
Master Class
- Cut the ball in half along the wide side.
- Pull the ball onto the glass so that the hole is centered and pointing down.
- Draw a cute picture, cut it out and stick it on the glass.

You will need: tin can, wooden clothespins, flowers, water, hearts for decoration.
Master Class


You will need: a sheet of paper 100x15 cm or glue A4 sheets together, 2 thick sticks, felt-tip pens, tape.
Master Class

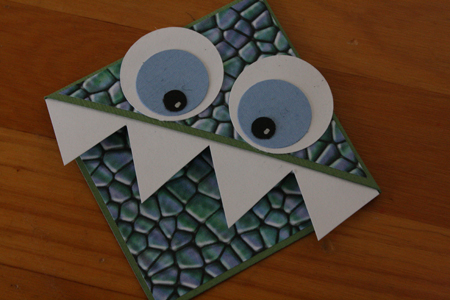
Bookmark "Nibbler"

You will need: cardboard template, scissors, glue, decorative elements - felt-tip pens, paints, buttons, beads, glitter...
Master Class

We present to your attention original and creative gift packaging! You can put sweets, magnets, jewelry, money and other small gifts inside them.
Candy tulips

You will need: corrugated paper in your favorite colors for buds, green corrugated paper for leaves, Raffaello candies, double-sided thin tape, green tape, satin ribbon, packaging material for a bouquet, scissors, wire, pliers, wooden stick, optional transparent beads to create dew, glue gun, tweezers.
Master Class
- Prepare the wire by making the required number of stems of equal length.

- Cut long strips of corrugated paper, cut the long strip of corrugated paper into 2 pieces, then cut into 4 pieces. You should get 8 strips, 6 of them will be needed for the tulip bud.
- Turn each strip over the center, folding it so that the right sides of the strip are pointing in the same direction.

- Make 6 blanks in the same way.
- Attach double-sided tape to the tip of the wire.

- Attach the candy to the tip of the wire.
- Assemble a tulip bud in this way: take the first petal and attach it to tape. Place the second and third petals near the candy and, holding them with your fingers, secure with tape.

- Attach the remaining petals in the same way, forming a tulip bud and securing with tape.
- Trim the excess ends of the crepe paper at an angle at the base of the bud.
- Wrap the stem with tape.

- Cut a strip of green crepe paper.
- Cut into two almost equal parts.
- Fold each part 4 times and cut out the leaves.
- Pull each leaf out in a spiral using a wooden stick.

- Place a short leaf and a longer one below. Secure each leaf with tape. The tulip is ready! Make the required number of tulips of different colors.
- Assemble tulips into a bouquet in this way: connect 2 tulips and tie them with tape, then add one tulip at a time, placing the colors in a checkerboard pattern.

- Cut 20 leaves and place them around the perimeter of the bouquet, securing with tape.
- Wrap the bouquet in wrapping paper and tie with ribbon.

- Create dew drops on tulip buds by gluing clear beads using tweezers and hot glue.
Spectacular bracelet made of ribbon and beads
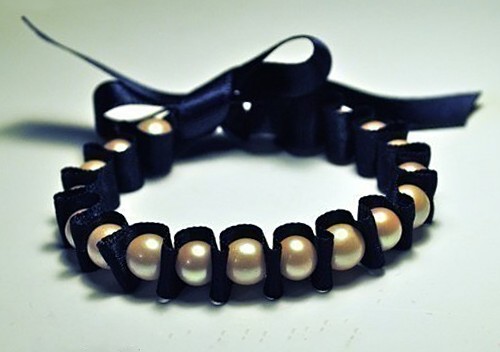
You will need: ribbon, beads, thread and needle.
Master Class


You will need: a cardboard template, scissors, decorative elements - felt-tip pens, paints, buttons, beads, glitter, ribbons...
Master Class


You will need: a printed bag template (listed below) or a redrawn one, scissors, decorative elements - felt-tip pens, paints, buttons, beads, ribbons, glitter...
Master Class

Paper shoes

You will need: a printed shoe template (listed below) or a redrawn one, scissors, glue, decorative elements - felt-tip pens, paints, buttons, beads, glitter...
Master Class

Paper cake

You will need: cardboard template, scissors, decorative elements - felt-tip pens, paints, buttons, beads, glitter...
Master Class

Head wreath made of foamiran

You will need: foamiran 0.5 cm thick (orange, yellow, cream, light green, dark green and red), scissors, toothpick, curly scissors, oil paint in autumn shades, sponge, sheet of paper, iron, floral wire, ruler, super glue, lighter, lilac clay (for blueberries) or beads, tape, foil, wire at least 2 mm thick and 60 cm long, ribbon or string, mold (leaf shape).
Master Class
- Print or draw leaf templates, then cut them out.

- Trace the templates onto foamiran with a toothpick, then cut them out.
- Make a sufficient number of multi-colored leaves, for example 60, remember, the more there are, the more magnificent and beautiful the wreath will look.

- Add realism to some of the leaves by trimming the edges with scissors.
- Scratch a small part of the leaves with a toothpick.
- Tint the leaves in this way: apply a little oil paint to the sponge, blot a sheet of foamiran, then remove the excess with a piece of paper.

- Combining colors: color the yellow foamiran leaf with light green and brown paint. Also, color some yellow leaves with orange, red and light green paint. Protonate the red leaves brown, green leaves - burgundy, brown and dark green.

- Preheat the iron on the second setting, apply the sheet for 2 seconds, remove it and press it onto the mold to make an impression of the sheet. Repeat this process with all the leaves. Please note that this should be done quickly and very carefully, as foamiran is highly flammable. If you are new to this business, it is better to skip this point and proceed further.

- Cut the floral wire into 7 cm long pieces and make a loop at the end.
- Glue the floral wire to the front side of each leaf using super glue.

- Treat the edges of the leaf with fire using a lighter. The edges should be realistically curved. Repeat this process with all the leaves. Do this carefully, I remind you that foamiran is highly flammable.

- Roll a clay ball purple with the size of a blueberry. Make 15 berries, put them on a greased wire with a loop super glue every blueberry. Using the tips of a pair of scissors, score the tops of the blueberries and set aside to dry. Beads can be used as blueberries.

- Start assembling the wreath in this way: form small bouquets of leaves and berries, secure them with tape.
- Cut rose petals in the shape of a drop from red foamiran. One bud will require 10-15 petals. The number of buds depends on your desire; you can make from 3 to 7.

- Tint the edges of the petals with brown oil paint.
- Make the petals thinner in this way: heat the petal on the iron for 2 seconds, then fold it into an accordion and rub the petal with your fingers. Open the petal and create an indentation and curl the edge of the petal outward. Repeat this process with all the petals.

- Finish the edges of the petals using a lighter.
- Roll up a foil drop, make a loop on the wire, apply super glue and put on the foil drop.
- Glue 2 petals opposite each other and form a bud by gluing the petals in a checkerboard pattern, opening the flower slightly. Form the desired number of roses in the same way.
- Make the base for the wreath by cutting 60 cm of wire. Make loops at the ends.

- Cut the tape into 15 cm long pieces, fold each piece with the sticky side inward and cut lengthwise into 2 halves.
- Open the end of the tape, apply it to the base 10 cm from the edge and wrap the wire around it.
- Attach bouquets of leaves and berries, securing with tape.

- Weave them in the order you like best.
- Don't forget to insert roses in the spaces between the leaves.
- Attach a string or ribbon to the ends of the wreath.
Book safe

You will need: book with hard cover, pva glue, water, stationery knife, brush, pencil, ruler.

Master Class

Salt dough pendant

You will need: salt dough, glass, acrylic paints, glitter, brush, ribbon for hanging, cocktail straw, a dog's paw for imprinting on the dough or your fingers, transparent glue, a rolling pin.
Master Class

Cup made using papier-mâché technique

You will need: cardboard, scissors, newspaper sheets, tape, PVA glue, brush, paints, clear manicure polish.
Master Class

- Idea No. 1 – Paper flowers
- Idea No. 2. DIY vase made from bottles
- Idea No. 3. Making a vase with your own hands.
- Idea No. 4. DIY paper crafts – butterfly
- Idea No. 5. DIY crafts - fan
- Idea No. 6. Fan made from disposable forks
- Idea No. 7. DIY paper bag
- Idea No. 8. DIY paper shoes
- Idea No. 9. Paper cake with a surprise inside
- Idea No. 10. Gift wrapping box
- Idea No. 11. Tab for books
With the approaching holiday of March 8, all children of preschool and school age are thinking about what they can do with their own hands to congratulate their mothers and grandmothers. There are a great many options for such surprises; all the child has to do is spend a little time and perseverance to create a real masterpiece for your mom.
IDEA #1 – PAPER FLOWERS
March 8 is a holiday of spring and beauty, so it’s hard to imagine it without flowers. While the husband presents his wife with fresh roses or tulips, the child can make such a bouquet with his own hands from paper.
To make paper tulips you need to prepare colored paper, scissors and glue.
To begin with, even squares are cut out of paper, and small cuts are made on different sides.

In the places of the cuts, the paper will be folded and glued so that the future flower will have petals.

Thus, it is necessary to glue all four cuts on different sides of the square. You will get a tulip bud. After this, you can begin making the stem.

To do this, a sheet of green paper is rolled into a tube. Cuts are made at one of its ends, and the edges of the paper are unbent so that the stem can be glued to the bud. The flower is ready.

IDEA #2. DIY VASE MADE FROM BOTTLES
A good option for decorating any glass bottle or even a jar is to paste it with colorful magazine clippings. To do this, you need to cut bright magazine pages into small pieces, prepare PVA glue or special glue for decoupage, add buttons or other decoration elements that your imagination comes up with.
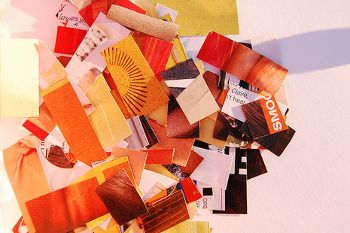
Gluing one piece of paper to the glass surface, gradually fill the entire bottle with cutouts.
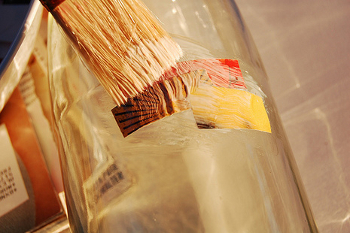
After this, you can add other decorative elements and decorate the resulting vase.

IDEA #3. MAKING A VASE WITH YOUR OWN HANDS.
You can not only decorate a flower vase, but make it completely yourself. Such a vase is ideal for one flower and will hold it securely, preventing it from falling. And for this you only need to prepare one regular glass and balloon any color.

The ball is cut in half along its wide side. The half that has a hole must be pulled over the glass so that the hole itself is approximately in the middle of the glass and looks inward. You can stick any decoration on the glass - a flower, a heart, a sun. It looks original and beautiful.
Another option small vase or a flower pot can be made using an old tin can and wooden clothespins.
If you don’t want to plant a living flower inside such a vase, but want to put small bouquet cut, you can do this in a glass. Then a vase made of clothespins will simply be a beautiful and original decor.
IDEA #4. DIY PAPER CRAFTS – BUTTERFLY
A butterfly made of paper can become beautiful decoration a bouquet of flowers or a houseplant in a pot. And it’s absolutely easy to make, even for a child.

To make it, it is best to take special thin paper intended for creativity, as well as a piece of wire.
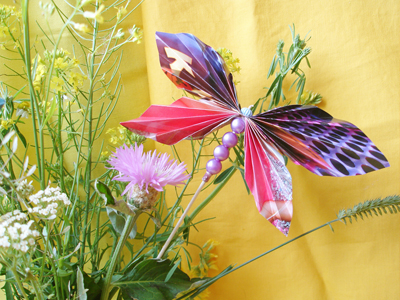
First of all, you need to cut out several squares of paper. Their size depends on the child’s imagination and how large the resulting butterfly should be. For squares, you need to carefully round off the two sides with scissors. After which a piece of paper is folded like an accordion. The thinner the accordion strip is, and accordingly, the large quantity Once the paper is folded, the more beautiful the butterfly will turn out.

Having made 2-3 turns, you need to insert an accordion made of paper - butterfly wings - between the tendrils of the wire, and then twist the wire a few more times. The butterfly is ready!
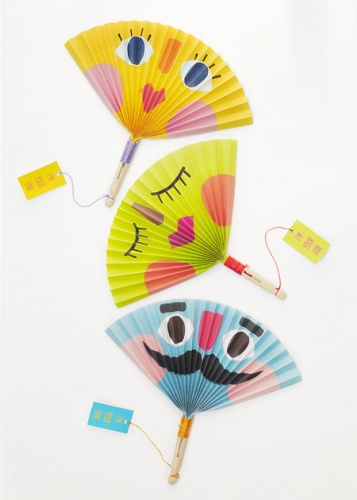
IDEA #5. DIY CRAFTS – FAN
After spring, summer will definitely come - hot and sunny. Therefore, a fan would be a great gift idea for mom on March 8th, which she can then for a long time use.
Making a paper fan with your own hands is not at all difficult. To do this you need to prepare: a large sheet of paper measuring 100cm x 15cm, ice cream sticks, pencils, paints or markers, tape.
If you don’t have such a large sheet of paper, you can glue it together from several A4 sheets. The excess width can be trimmed to leave the desired length and width. Then the fun part begins - the white sheet needs to be painted. A child can let his imagination run wild and draw absolutely whatever he wants.
The finished drawing is folded like an accordion. This is not an easy task, because the sheet is long, but if you do everything carefully and do not rush, the accordion will turn out smooth and beautiful.

Wooden sticks are glued on both sides of the sheet, so that their edge protrudes a few centimeters, and on the other side, accordingly, there remains a part of the paper that will not be covered by the sticks.

This edge of the paper must be carefully wrapped with tape. The fan is ready!

There are several more variations of fans that can be made from paper. The principle of their manufacture is approximately the same, and the child’s imagination can complement his craft with various decorations or manufacturing nuances.
IDEA #6. FAN MADE FROM DISPOSABLE FORKS
There are no limits to creativity, and the most beautiful things are sometimes made from the most unexpected materials at hand. For example, a fan made from ordinary disposable forks, after a little decoration, will look elegant and elegant.
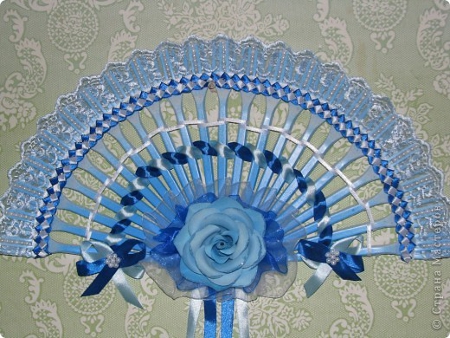
To make such a fan you will need: cardboard, forks, glue gun, lace or ribbons, flowers, beads, etc. First you need to cut out a semicircle from cardboard, onto which all the forks are carefully glued using glue. A lace ribbon or braid is passed through the teeth and secured on both sides of the fan. In the center where the fork handles connect, glue volumetric decoration which is in stock. Further decoration of the fan is carried out at the request of the child; you can stick on beads or buttons of a suitable color.
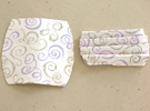
IDEA #7. DIY PAPER BAG
A small paper bag made by a child’s hands will give mom a lot of positive emotions, because it looks very original and beautiful. To make it, you need to prepare a sheet of thick cardboard, glue, pencils or markers and decor as desired.
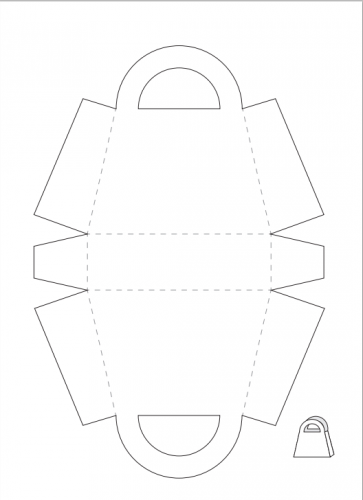
To make a handbag, you first need to print out the pattern template unfolded.

If you want to add some other decorations, this can be done on a ready-made handbag. These can be ribbons, buttons, beads, etc.

Another option for making a paper handbag without a template could be simply a rectangle cut from thick paper, on the sides of which there are corrugated inserts. It can be made in contrasting colors, or it can be made in a single color.


IDEA #8. DIY PAPER SHOES
To make beautiful paper shoes for your mother, you also need to prepare a template according to which they will be cut out. It is printed on thick paper and cut out along the contours.

After all the parts are cut out, they need to be folded along the dotted lines and glued in the places marked with red lines.
After this, the shoes can be decorated as desired. Of course, no one will be able to dress them, but you can fill them with candies or beads, then they will decorate any shelf in the house.
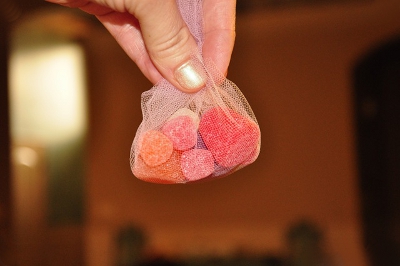
To make candies or pebbles inside a shoe look beautiful, you can put them in a piece of organza fabric and tie it with a thin ribbon.

IDEA #9. PAPER CAKE WITH A SURPRISE INSIDE
A cake made from paper can be an excellent package for a small gift. It is not difficult to make, but it looks beautiful and unusual.

To make such a piece of cake you will also need a cardboard template that needs to be printed and cut out.

If you want to make a larger piece of cake, you can enlarge the diagram or try to draw it by hand yourself. You can make so many pieces that you end up with a full cake. And if everyone is different and decorated differently, the cake will look very beautiful and original.

For a full cake you will need 10 different pieces.
This number of pieces is made so that it can be given to several women on March 8th. For example, boys can make such a “cake” for the girls in the class. And inside each piece put a small surprise or congratulation.
There are a great many options for decorating each piece; you can give free rein to your imagination. For example, make a flower using the quilling technique and glue it to a piece of cake.

Or make a simple flower from colored paper.

You can cut out a lot of small simple flowers from colored cardboard and stick them around the perimeter of the piece. If the cake and pieces are being made for girls in the class, you can write a woman’s name on each of them so that the piece is addressed to a specific girl.

Or add one large, contrasting shade to small flowers.

IDEA No. 10. GIFT PACKAGING BOX
A gift for March 8 can be hidden in a regular gift box, which is best made with your own hands from cardboard. It is not difficult to do, but it looks beautiful and original.
To make the box you will also need a template, printed and cut out of cardboard.

The heart, thanks to which the box will close, will help the child express his love for his mother.
IDEA #11. TAB FOR BOOKS
Such a bookmark in the shape of a funny little tooth will always remind the mother of how the child tried to please her, and will definitely bring a smile to her face.
The bookmark can be made from thick paper. To do this, you need to print a template of all the components of the future bookmark and cut them out.

Bookmarks can be made in absolutely any color and size, and you can decorate and decorate them as you wish. The brighter and more varied they are, the better.

So, you need to prepare the cut out pieces of cardboard and glue.

This piece of cardboard should eventually form a glued pocket.

The paper is folded according to the printed pattern.

And it is glued in those places where the parts of the paper will be connected.
It is necessary to glue both parts of the corners to connect them together.
By ready-made template you need to cut out a similar one on a contrasting sheet of paper, preferably white. To do this, its contours are transferred to another sheet.
After transferring one template to another sheet, it needs to be cut out.

As a result, you need to get two identical figures.
As a result of all the work, you should get a toothbrush in the form of a square pocket, which can be easily placed on the page in the book on which the reader stopped.