Approaching New Year with its indescribable atmosphere of all-encompassing goodness, which shines in the eyes of passers-by, and at this time the children are especially joyful and happy. Of course, on the eve of the holidays, almost every person thinks about gifts for family and friends, about decorating their home or apartment.
DIY New Year's crafts 2017 will fit perfectly into the role of both pleasant and stylish decoration homes for the New Year and Christmas holidays.
Such crafts are not too expensive in material terms, they will not take much time to make, except for some you will have to “sweat a little”, but the feelings and emotions that they will give to your friends, loved ones, relatives, colleagues are worth it, rest assured.
Excellent hand-made gifts can serve well for many years, causing a genuine smile every time the eye catches on this thing lovingly made by your caring hands.
DIY crafts for the New Year from buttons
Using multi-colored buttons you can create most interesting crafts for the New Year holidays.
Christmas tree made of buttons
To make a Christmas tree from buttons you will need:
- cardboard or thick paper;
- buttons;
- tailor's pins;
- polyurethane foam (in the absence of foam, you can use soft paper or fabric);
- scissors;
- glue;
- decorations and decor.
Step 1. Roll a cone out of cardboard and glue the edges. The excess at the base needs to be cut off.
Step 2. Polyurethane foam is ideal for filling the cavity of the cone, but if it is not possible to use polyurethane foam, you can get by with ordinary pieces of soft paper or fabric that need to be pushed into the cone (this is done so that the pins “sit” firmly and do not pop out).

Step 3. It's time to start making buttons and pins. In a random order, pin the buttons to the cone so that there is no empty space left. It is best to start from the bottom, gradually moving to the top of the tree. Buttons will look more beautiful not only different color, but also different in size. Buttons will hold tighter if, when pinning them, the points of the needles are directed slightly downward at an angle.
Step 4. When the buttons completely cover the cone, you can start decorating the tree. To do this, you need to attach all kinds of beads, decorative snowflakes, etc. using a glue gun or the same pins. It would be nice to put a star or a ribbon bow on top.
Christmas ball made of buttons

In the same way you can make a toy for the Christmas tree. Only instead of a cone, the pins will need to be pinned to a foam ball, to which you will first pin a loop of thin tape. This decoration looks amazing, and in the year of the Rooster it becomes especially relevant, since the owner of 2017 simply loves everything colorful and catchy.
From buttons, by stringing them on a thread, you can build funny snowmen, Christmas trees, and you can also get beautiful licorice sticks, Christmas wreaths, snowflakes and much, much more.
Crafts from pine cones
By using your imagination and armed with the gifts of nature, you can make very cute crafts from pine cones that can be used as Christmas tree decorations, New Year's decor or a souvenir for the holidays.
If you paint a beautiful cone in some color, cover it with glue in some places and sprinkle sparkles on top, you will get original decoration on the Christmas tree, to which all that remains is to attach a loop.
Beaded or dyed green color the cone can be “planted” in a pot, and an amazing little Christmas tree will appear in front of you, on the top of which you can attach a small star or other small decor.
Large Christmas tree made of pine cones

This Christmas tree is most suitable for the New Year, because it is made from natural materials, and by decorating it with rhinestones, sparkles and all kinds of small decorations, the beauty of pine cones will create an amazing atmosphere of festive New Year's magic around itself.
To make a Christmas tree from cones you will need:
- cones (as many as possible);
- scissors;
- cone and circle made of brown or green cardboard;
- glue gun;
- various decor and decorations.
Step 1. To begin with, the cones need to be cleared of debris and washed. Then dry them and paint each cone with a spray bottle (this is purely optional).
Step 2. Glue the cardboard circle to the cone for greater stability of the structure.
Step 3. Gently glue the pine cones with a glue gun, starting at the base and working towards the top. It is more beautiful to start with the largest cones, gradually moving to the smallest cones. It is important to try not to leave gaps.
Step 4. The Christmas tree made of cones is ready! All that remains is to decorate it to your taste.
Pine cone party ball

Such a ball can be hung on a chandelier or directly under the ceiling. Covered with sparkles, beads or even in its “pure form”, a ball of pine cones will give a New Year’s mood to both you and your guests.
To make a ball of pine cones you will need:
- balloon;
- PVA glue;
- toilet paper;
- glue gun;
- brown paint;
- cones (a lot);
- ribbon;
- decorations.
Step 1. Of course, you can buy a ready-made ball for creating crafts in specialized stores, but making the base with your own hands is much more enjoyable and less financially expensive. So, inflate a balloon and wrap it with toilet paper, which has been previously moistened in a mixture of water and PVA glue (two parts water to one part glue). After the entire ball is covered with paper, you need to leave it to dry for 24 hours.

Step 2. When the ball is dry, paint it with brown paint (this is necessary so that the color toilet paper did not show through between the cones).
Step 3. It's time to glue the cones onto the ball, trying not to leave any gaps.
Step 4. The loop can be made from a beautiful satin wide ribbon.
DIY candy crafts

Every housewife wants to surprise and please her dear guests with something unusual. Christmas trees made from candies are the most best gift for those with a sweet tooth! And if you attach sweets to it, you will get a solid present for the New Year.
Colleagues, relatives and friends will deservedly appreciate your attention to them by receiving a “sweet” Christmas tree as a gift for your favorite winter holiday. It would be a good idea to find out in advance what kind of sweets the person you are gifting prefers to eat.
To make crafts from candies you will need:
- candies;
- base (cardboard or foam cone, champagne bottle);
- glue gun;
- ribbons, tinsel, Christmas tree beads, various decor.
Step 1. Glue the candies onto the base using a glue gun, starting from the bottom.
Step 2. When the bottle or cone is “strewn” with candies at your discretion, the Christmas tree can be decorated with New Year’s tinsel, beads for the Christmas tree and other suitable decorations.
A “sweet” Christmas tree can even be made from marmalades, marshmallows, Turkish delight, etc. Only to attach sweets without wrapper to the base you need to use toothpicks or skewers rather than glue. The bottle can no longer be used here; a cone made of foam plastic or other material, washed with soap, is best suited.
Necessary materials:
Scissors
- a set of colored paper
- box
- PVA glue
Stages of work:
Prepare boxes of various sizes. Cut off the part that covers the box from the box, make cuts along the fold lines (they should be ½ the height of the box itself). Bend the parts of the box along the cuts. The two opposite parts will be the wings, and the rest will be the tail and head. Round the wings. Cut the tail down to the very base. Cut the head, moving from the top to the very base, to create a triangle shape. Decorate the craft: make earrings and a comb.
DIY cockerel craft
You will need:Plastic bottle – 3 pcs.
- ball yellow color from a dry pool
- red and yellow plates
- red and yellow disposable cups
- black marker
- stapler
- simple tape
- double sided tape
Work process:
Cut off the top parts of 3 bottles and fasten them together with tape. Cut disposable cups along the edge. They must be attached to the rooster's neck using tape. Colors must be alternated. Cut off the edge of disposable plates and make cuts on the inside. As a result, you have feathers. Gather the tail and feathers with a stapler. Insert the tail into the cut. Cover the connection area with wrapping paper. The wings also need to be cut from disposable plates. Attach the head with double-sided tape. Cut out the comb, beak and beard from red disposable plates. Insert the cut pieces into the cuts on the head. Eyes are also created from disposable plates.
DIY Cockerel 2017
You will need:Beads for eyes
- hot glue
- egg cartons
- primer
- acrylic paints
- balloon
- old newspapers
- scissors
- 2 beads
- PVA glue
How to do:
Cut two cones from the egg tray and cut one side of each cone. Connect the cut cones with the cuts facing down. You will end up with one large cone with 4 petals. To create the neck and head, connect 5 cones together. Towards the top they will expand and become larger in size. Cut a comb from the side of the tray. Cut out a beak from the lid, which will consist of two parts. Feathers are also created from cones. They are fixed on top of the cardboard with hot glue. The length of one wing is 15 cm. Make blanks for the tail in a similar way.
The next stage is creating the paws. Bend the shape of the legs from copper wire. In order to give the desired effect, twist the corrugated tube. Insert the remaining tail between the corrugated and metal tube. For durability bottom part fill with glue. Cut the claws from the bottom. They should be long and narrow. They need to be secured with glue. Paint the legs and torso with spray paint.

Prepare a utility knife and construction foam. All cuts should be neat and even. You can cut out the parts separately. Finally, glue them together with glue. You can bring it to the desired shape sandpaper. Additionally, treat with acrylic putty, wait until it dries completely, plaster again and treat with PVA glue. This will allow the paint to adhere better.
Start coloring from the head. Glue the eyes on the head. To create a beautiful scallop, make a pattern on paper, transfer it to polystyrene foam, cut it out, and glue it to a suitable place. Start preparing the mold for the wings. Leave the back open. Cover the upper part of the wings with feathers made from corrugated bottles. Fold the last row inside the wing. Paint over it, leave to dry, attach with perforated tape and a self-tapping screw. Make a tail. Take the mesh and bend it. Cut feathers from bottles. Paint them separately on both sides. Apply black first, and then a little blue. Attach the feathers with wire to the mesh. Once the paint has dried, cut the feathers into two more pieces to make the tail appear even fuller.

You will like it too.
For the back, cut feathers from a clear bottle. The width of one feather should be approximately 2-2.5 cm. Attach them to the back, 3-4 pieces at a time. Use self-tapping screws for fastening. When you fix the feathers on the neck, cut off the top part. Glue the last row of feathers to hide the screw heads. Glue smaller feathers in the back of the head and on the side of the crest. Cover all parts that you painted with construction tape and bags. First apply the yellow paint and let it dry. Add a few orange stripes.
The finishing touch is blinders. Cut 2 strips, make a cut with a stationery knife. Insert them between the metal-plastic and corrugated pipe. Paint the craft with yacht varnish.
How to sew a cockerel with your own hands
You will need:Cardboard
- threads, scissors
- orange, blue-green, black and white fabric
- tweezers
- cotton wool
- scotch
- glue
- colored paper

Draw a sample of the toy on a piece of cardboard and cut it out. Draw the wing separately, cut it out, and see how they look. Cut the sample into separate parts so that it is more convenient for you to work further. Match each piece of the sample with a separate piece of fabric, cut out each piece in turn from the fabric. There should be 2 of each part. Cut the head from white fabric, the upper part of the wing and body from blue-green fabric, and the lower part of the wing and tail from black fabric. Make the beard, paw, beak, comb and eyes from colored paper. Sew all the details for the head. Sewing the comb can be a little difficult. The fact is that it is wider than the head. It is better to sew it on the outside. Glue the eyes from colored paper.
DIY cockerel costume:
For the body, make allowances of 1.5 cm. Connect the parts from the inside. Sew the tip of the foot inside. Sew the wings on the outside, put soft filling inside. If you don't have it on hand, regular cardboard will do. Sew the bottom half from the outside, sew it to the body, and connect it through the cardboard with a seam. Try the torso to the head. Sew the neck to the body. Fill the connected parts with cotton wool. You need to fill it through the hole in the tail. The hole is very small, so you need to fill the craft with cotton wool in small portions. You may need to use tweezers. Sew the tail parts using an outer seam and fill it with cotton wool.
The paws can be made from cardboard or a piece of fabric. Select the fabric of the desired size and color, and make several square pieces. Trim the ends and sew the oblong legs. Fill with cotton wool. Sew the legs, wings, and tail to the body. Cut without touching the seams. The do-it-yourself cockerel toy is ready.


This is the easiest way to create crafts. There are several ways. You can use the technique of origami, quilling, cutting with scissors, etc. Paper craft can be placed or hung on the Christmas tree, glued to the window, decorated festive table. An excellent solution is the decor of napkins. It will look quite restrained and at the same time original. If you use origami, then the napkin can be immediately folded into the shape of a cockerel. We will provide you with the diagrams.
DIY cockerel patterns.
The eve of the holiday is one of the brightest periods of the year. The days before the celebration are always full of pleasant chores: you need to choose gifts, create a luxurious menu, decorate your home or office. After all, nice decor creates an atmosphere winter's tale, even when it’s +5 outside and raining. Of course, you can find tons of stamped jewelry on supermarket shelves. But you must admit: it’s much more fun to make them with your own hands! Your crafts become one of a kind, and creative process gives a lot of positive emotions. We have compiled a review of the most interesting ideas For New Year's crafts. Which one will you choose?
Idea No. 1: Wall-mounted spruce
Wall mounted Christmas tree with mint green paper fringePossibility to install a two-meter forest beauty there is not always. But this is not a reason to do without the symbol of the New Year! After all, a live spruce can be replaced with an unusual paper craft and made into an original backdrop for holiday photos. To “grow” a tree at home, you will need the following materials:
- 5 sheets of A2 paper or cardboard.
- 1 sheet of thick A4 paper.
- 30-35 sheets of paper in quiet green color.
- 1 sheet of kraft paper or brown cardstock.
- colored and white tape.
- PVA glue.
- stationery knife
- marker and hook from a photo frame.
- thick colored thread.
- 20-25 large beads (or small balls) for decoration.
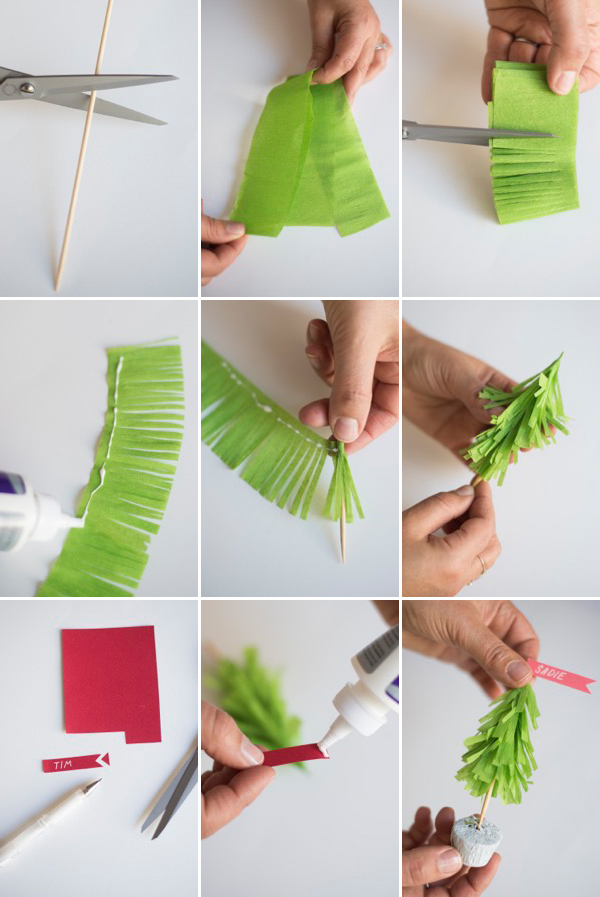
 Step by step diagram making a wall-mounted fir tree with your own hands
 Place four sheets of paper on the floor so that they form a rectangle. Place the remaining sheet above the figure, in the center and at right angles to it. Use tape to glue all the sheets together. The photo shows black adhesive tape, but in practice it is better to use white. Outline the outline of the future spruce and mark it with colored tape. Cut out a triangle along the outline. The model of the tree is ready - it's time to start adding needles!
Quietly cut each sheet of paper into two parts and fold each one three times lengthwise. Using scissors, make a fringe along the edges of the sheet, starting to cut 2-3 centimeters from the fold line. This is a fairly monotonous task, so you should stock up on delicious tea and a lot of patience. When all the branches are ready, you can start gluing them to the frame.
 Wall Christmas trees can be made without paper fringe - just stock up on Christmas tree decorations, beads and brushwood
 Apply glue to the base of each leaf and attach it to the tree, starting from its base. Move up until the entire frame is decorated with green pine needles. Let the glue dry. Attach a hook to the clean side of the frame and hang the tree from the wall. All that remains is to make a trunk for our spruce. To do this, take a sheet of A4 size and brown paper.
Cut the latter into strips and glue them to the base. Attach the finished trunk to the tree using tape. The construction of the spruce tree can be completed with this, but a craft decorated with a garland looks much more interesting. Even a child can do it. All you need to do is choose a thick thread, string decorative beads on it and secure it to the tree.
Ideas #2: Snowflakes made from transparent glue
 Glue snowflakes are suitable for window decoration and gift wrapping.
 Do you want to update your Christmas tree decoration? The most beautiful toys You can make it in literally five minutes! Snowflakes twinkling in the spruce branches will give the whole family a festive mood. The following materials will be useful for this craft:
- transparent glue (silicone sealant).
- parchment paper.
- snowflake stencil.
- glitter, brush.
- thin wire.
- acrylic paints.
Start by looking for a template for your future snowflake. You can download it on our website (see article with templates) or draw it yourself. Creative kids will happily take on this task. In this article we also offer several drawings that can be used in your work:

Transfer the selected stencil onto paper. To prevent the snowflake from sticking to the parchment, cover it with film. The next step is the formation of the frame. To avoid injury, it is better not to trust this task to children. Apply a continuous stream of glue along the lines of the design. If the snowflake is not voluminous enough, apply another layer of glue and give the craft 1-2 hours to dry.
 Making a snowflake from hot glue step by step
 After this, coat the snowflake with a thin layer of PVA glue and sprinkle with glitter. Any will fit decorative elements: beads, stones, ribbons. Dry your creation a second time. Using the same silicone glue, attach a wire loop to one of the rays of the snowflake. Now the craft can be hung on the Christmas tree.
Idea No. 3: Volumetric stars
 Entire compositions can be made from voluminous paper stars
 Stars of all colors and shapes remind us of the winter holidays. So simple and at the same time beautiful craft can be made from ordinary colored paper or cardboard of any size. A voluminous star will perfectly decorate the top of a spruce tree. It can also be hung on a ribbon or placed on the wall as part of a whole constellation - all options are good.
 Making a five-beam volumetric star step by step
 To make the frame of the craft, print out a five- or six-pointed star template (or hand transfer it onto two sheets of paper). Cut out both shapes. Using a ruler or pencil, you can decorate the rays of the star with geometric patterns and cut them out with a utility knife. Even the simplest ornament looks very impressive.
 Scheme for creating a six-rayed volumetric star
 Use a blunt object (such as a non-writing pen) to press down the dotted lines. Bend the places for gluing back, bend the paper along the dotted line and glue two stars. Make a small hole at the top of one of the rays and thread a thread through it. The craft is ready to decorate your home!
Idea #4: Snowman made from a sock
 Sock snowmen will look great under your tree!
 Surely you have a couple of unnecessary socks and buttons in your apartment? These little things are worth giving new life, turning them into a cute toy. You can make this craft together with your child. For creativity you will need the following materials:
- white sock with a long top.
- a glass of rice.
- 2 small buttons.
- pins with colorful balls.
- a piece of colored fabric.
- PVA glue.
- needle, white thread.
 Step-by-step instruction for making snowmen from socks and rice
 Iron the sock and cut it along the line shown in the photo. Sew up the upper part or tie it tightly on the side of the cut. Turn the bag inside out and fill it with cereal. Secure the sock at the top with a thread to prevent the rice from spilling out. Bandage the snowman again so that the head is separated from the body by a narrow jumper.
Tie a piece of fabric or ribbon like a scarf, stick pins into the places of the eyes and nose. Sew buttons to the snowman's body. Wear the bottom half of the sock like a hat (or sew it separately). To decorate the toy, you can use ribbons, decorative stones and whatever comes to your mind. You won't find such snowmen in any store!
Idea #5: Salt dough decorations
 You can create Christmas tree decorations and even garlands from salt dough!
 Salty dough- an excellent material for modeling, which is prepared at home. From it you can build the most various crafts, from simple Christmas tree decorations to complex compositions (use our and). Salt dough is great for creativity with children. But before you start sculpting, be sure to convince the kids that the material is inedible. To make salt dough you will need:
- wheat flour - 500 g
- table salt - 250 g
- water - 250 g
Mix flour and salt thoroughly, add water and knead the dough. To check the readiness of the material, roll it into a ball and make two or three indentations in it. If the dough is elastic and does not stick to your hands, then it is ready. You can also add 1-2 tablespoons of oil to the mixture. Thanks to it, the dough will dry out more slowly and will become easier to work with.
 Crafts made from salt dough have an unlimited shelf life
 Do you want to receive colorful toys? Use craft soap dye or gouache. Crafts can be decorated after baking using gel pens, felt-tip pens or paints. So, the dough is ready. All that remains is to let it brew a little, roll it out and cut out the shapes. The easiest way to do this is with iron template molds.
You can also draw the desired shape on a sheet of cardboard, cut it out and use it as a stencil. Salty cookies can be perfectly decorated with various pebbles, beads, and grain patterns. To give it a lace effect, poke a lot of holes in the dough using cocktail straw or use special stamps for decoration. At the top of each craft, make a hole for attaching with thread.
 Scheme for making salt dough stars step by step
 Now all that remains is to dry the cookies. This can be done in a natural way: leave the products outdoors for several days. However, most needlewomen prefer to dry their creations in the oven at a temperature of approximately 150 degrees. The duration of this procedure depends on the thickness of the craft, but, as a rule, ranges from 30 minutes to 3 hours. Remove baked goods from the oven only after it has cooled down.
Sometimes, in order for a holiday to become special, the presence of traditional attributes is not enough. Yes, you can’t live without a Christmas tree and the capital’s salad in the New Year, but it’s time to introduce fresh ideas into the traditional celebration. Do-it-yourself New Year's crafts for the new 2020 Year of the Rat will help us implement this idea.
Many of us carefully keep real rarities from our childhood in the form of now rare Christmas tree decorations, others every year in modern shopping centers purchase something new, trendy from the latest collection of some designer brand... All this, of course, is good, but if add to holiday decor a couple of crafts, it will immediately become clear that in this house they love and look forward to the New Year.
Variegated balls
I want to completely transform a boring set Christmas balls, but don’t want to buy new ones? Then you will like the next craft. To implement this idea, we offer a fairly simple master class:
- take the balls and wrap them in bright scraps of fabric,
- tie with satin ribbon, braid,
- add spruce branches or an artificial flower to the knot.
Such christmas balls, designed in a single color scheme in graphic solutions that are consonant with each other, they will become an excellent decoration for the Christmas tree. And if desired, the craft can sparkle with all the colors of the rainbow. You can simply put the balls in a vase or put them on a bookshelf, or you can assign them the role of cards for guests, providing each decoration with a sign with the name of the guest. 
New Year's installation in a frame
An object for inspiration can be the most ordinary photo frame. Paint the frame red - traditional color winter holidays and place it (hang it, lean it against the wall, against books) in a visible place. The souvenir will look organic with the same balls or snowflakes. Any New Year's decorations dear to your heart will do. It doesn’t matter whether there are many toys or just one - an advantageous frame will give any content a wonderful sound. Don’t forget about the bow, which can crown the top of the frame, be located on the side, or take on the democratic appearance of a ribbon that secures the craft to the wall. 
With new happiness!
What do you think of the New Year's craft for 2020 with a horseshoe? This accessory can be purchased at a specialized souvenir store, or you can use one that was inherited from your grandmother. The effect in both cases will be amazing. The transformation of an ordinary horseshoe into a bright New Year's souvenir can be voiced in 2 options.
Option one:
- Having placed the horseshoe with its “horns” up (this is the only way it will work to attract good luck and happiness), decorate its base with tinsel, spruce branches, cones, ribbons, in other words, whatever you have on hand.
- Attach wire, ribbon, braid to the horseshoe horns, as shown in the photo, to fix the impromptu Christmas wreath on the wall or door.
Option two:
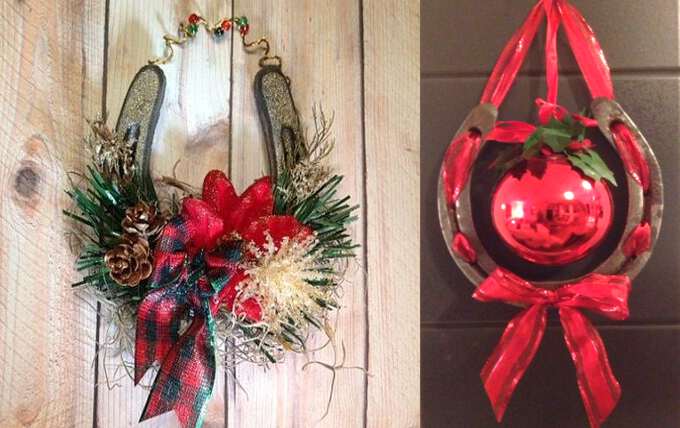
Hello Dedushka Moroz!
You have definitely never met such a Santa Claus as you see in the photo. Original lesson to transform the most ordinary object into a favorite of adults and children is simple and at the same time ingenious.
When you decide to decorate your home with funny New Year symbols, just follow these instructions:
- take a regular paint brush, paint the handle red and paint a few snowflakes on its surface,
- We cut out a rectangular strip from fluffy material and attach it to the handle. This will be Santa Claus's hat. Glue a contrasting star or snowflake to the side,
- glue on the eyes and nose, as shown in the photo. You can use black buttons as eyes, and a round piece will serve as the nose, which can be purchased at craft stores.
- We thread a coarse string through the hole in the handle and place the resulting work where we like.
A funny Santa Claus can also be made from a round brush. The face can be made from pink paper or fabric, placing eyes and a round nose there, on which we can safely place wire glasses. We make the hat more elegant - for the fur trim we choose fluffier fur, and we roll the cap out of red thick cardboard. Such New Year's souvenirs will look great on a Christmas tree or become the center of a decorative composition. 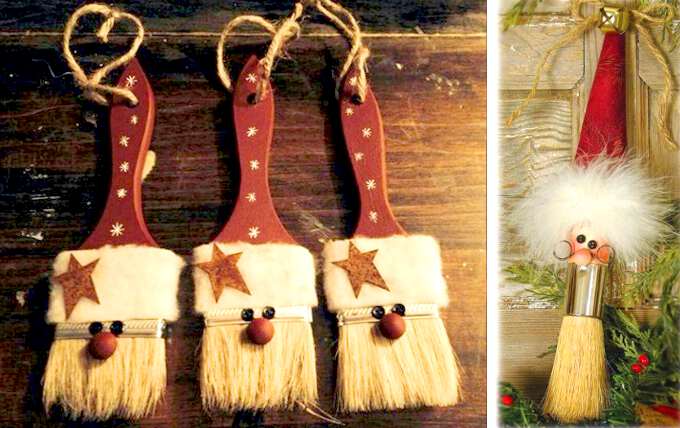
Christmas wreath holder for photo
Master class on creating a creative wreath that can simultaneously serve as a holder for memorable photos or greeting cards, consists of the following steps:

Funny snowmen
Making a whole family of funny snowmen and decorating your house with them is a great way to create festive mood. Using our master class, making a souvenir couldn’t be easier. So:

Christmas tree
Surprise your guests with an unusual version of place cards by making a small creative Christmas tree. The craft is easy to make, so take our lesson and get started:
For fans of minimalism
Try to “grow” a whole forest of Christmas trees from paper cones. This unusual craft requires thick paper, beads, braid, scissors and glue. Having rolled up a cone from paper of the desired color (not necessarily green, it all depends on your vision and preferences), decorate its top with a gold star - the main attribute of the New Year is ready! And if you want to create something special, decorate the Christmas tree with rhinestones, snowflakes, and placing a transparent ribbon on the top. The base of the craft is decorated with a braid of beads - it will be very beautiful! Place such decorations around your apartment, decorate a table, mantelpiece or dressing table with them and you will immediately feel that the New Year is just around the corner. 
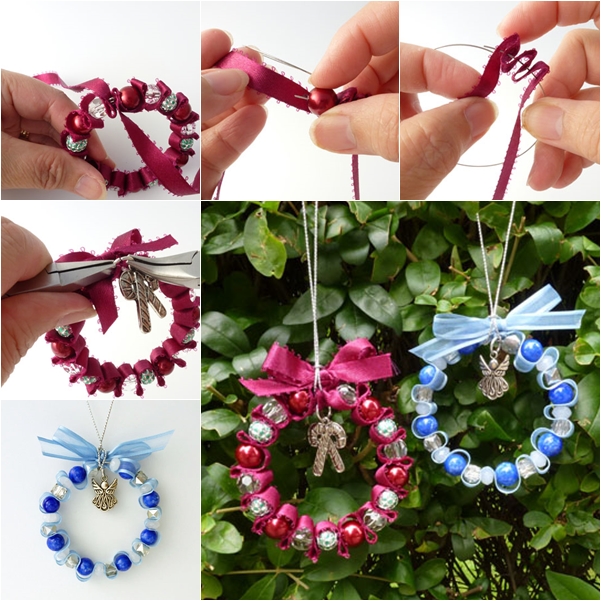
Charming wreaths
A very delicate and interesting Christmas wreath will be a wonderful element of New Year's decor. Making such decorations is quite easy; you need a minimum of materials and time. Prepare a thin wire satin ribbons desired color and matching beads, a strong thread for hanging and get to work, based on the following master class:
- form a ring from the wire and start stringing a ribbon on it,
- alternate one fold of ribbon with a bead until the end of the wire,
- when the wreath is ready, hang a decorative figurine on top and tie a bow,
- secure the thread on which you will hang the wreath.
And finally. The owner of the coming year, the White Rat, has great respect for handmade (English: hand made - made by hand), so what prevents us from conquering the proud bird with our creative abilities? Using the photos presented in the review from original ideas New Year's crafts, you will succeed in this, surprising not only the eastern ruler of the year, but also all your loved ones with New Year's crafts for the new 2020 rat.
The last days of December are full of troubles. Every housewife tries with all her might to create fabulous atmosphere in my house. But in order to make your home even more beautiful on New Year’s days, you don’t have to buy bulky items and a bunch of Chinese decorations. It is enough to arm yourself with scissors, glue, a sheet of cardboard and a pack of colored paper. From these materials you can make very unusual and cute crafts that will become a wonderful decoration for your home or office. Some products can be used as, while others can be used on their own. Several hours spent making paper decorations, are worth the joyful smiles of your family!
Paper Christmas tree
Original christmas tree with lacing at the edgesThe Christmas tree is the main decoration New Year's interior. creates a solemn mood and makes us all happy winter holidays. Well, a decorative paper tree that will decorate your windowsill can be stored for up to next year. To make this craft, prepare:
- 8 Christmas trees cut from thick paper or cardboard
- cutter
- scissors
- hole puncher
- Double-sided tape
- white thread or thin cord
- white glitter
- white acrylic spray
- ruler
- sheet of cardboard

Because it doesn't happen Christmas trees no stars on top, make the top first. Draw the outline of the figure on the cardboard. Then, using a ruler and cutter, carefully cut out the star. Assemble a Christmas tree from eight paper blanks. Connect it with double-sided tape. The edges of the product should be symmetrical, so it is better to fasten the corners with glue.
 Examples of cardboard Christmas trees design
 Punch holes along the edges of the craft with a hole punch and paint your product with white spray paint. Make the trunk of the tree 5 cm wide. Then stretch a white woolen thread or cord through the holes made earlier. To make stitching more convenient, take a needle with a large eye. Spray the star with white paint and attach it to the top with glue. Decorate the entire product with glitter. For this you can use golden rain, Christmas decorations or different colored paper, glued to the sides of the tree.
House for sweets
 Such houses will be an excellent packaging for New Year's cookies.
 This craft can be used to decorate your home, hang it on a Christmas tree, or use it as packaging for candy. To make it you will need:
- house template()
- scissors
- stationery knife
- ruler
- double tape

 Creating a development of a cardboard house
 First, print out the house template. You can also draw a similar sketch at your discretion. Then cut out the template. For particularly delicate elements, use a utility knife. Fold the piece along the dotted lines using a ruler or card folding tool.
 Step-by-step instructions for making crafts
 Glue the house together using double-sided tape. Decorate and decorate the product at your discretion. Fill the craft with your favorite sweets and you can delight your children with it! Well, if you print out the house templates on colored paper, you will end up with a colorful New Year’s town.
New Year's lantern
 Cardboard lantern is ideal for children's creativity
 Lanterns will create a fabulous atmosphere in the house. They can be made from colored paper in just a few minutes! Cut the ribbons to the same length and width (the dimensions depend on the size of the future product). To make one lantern, prepare about 15 strips of paper. Then stack them and use an awl to make holes at both ends of the pieces.
 Step-by-step instructions for making a lantern from paper strips
 Thread the thread on one side. Attach its end with tape to the strip. Then thread this thread through the second hole. Pull it so that the paper bends into an arc. Secure the thread with a knot. It should be large and not slip through the holes. At the final stage, straighten the strips so that a ball is formed. Our flashlight is ready! Several products of different colors and sizes, hung side by side, look very beautiful.
Volumetric snowflake
 A 3D snowflake looks impressive, and it’s not difficult to create.
 Traditionally, most families use it as New Year's decoration. They are made mainly from paper and decorate the whole house with “snowfall”: the Christmas tree, walls, windows. There are many techniques for making this craft. For example, you can make a spectacular three-dimensional snowflake. To do this you need to stock up:
- paper (white, colored and wrapping)
- scissors
- glue
- stapler
 Step-by-step instructions for creating a three-dimensional snowflake
 Cut out six square blanks. Fold each square diagonally and use scissors to make internal cuts. Open the square and place it on the table in front of you. Roll the first row of strips into a roller and secure its edges with a stapler or glue. Then turn the snowflake to the other side and similarly connect the two strips of paper that are closer to the center. Turn the product over each time and secure the remaining strips.
Fold the remaining five blanks using the same pattern. Connect the three parts of the snowflake with a stapler in the middle. Fasten the remaining three parts in the same way. Now glue these two halves together. In order for the shape to hold, it remains to connect the snowflake where each of the six parts comes into contact with the neighboring one. The decoration can be made from paper of any color.
Christmas angel

The magical spirit of Christmas will always be present in a house decorated with figurines of angels. They can be created using:
- colored paper
- PVA glue
- scissors
First make a patterned snowflake. To do this, prepare a sheet of white paper measuring 20 by 20 cm. Fold it in half, then in half again and fold two opposite corners together. Cut with sharp scissors. Instead of paper you can use openwork napkins. Glue half of the snowflake onto colored paper and cut out a semicircle from it.

Carefully coat its edges with glue and connect it into a cone. Cut wings out of paper and attach to the back of the product. Draw the face of the future angel: eyes, nose, mouth. Hair can be made from cotton wool. Attach a pendant to the toy so that a Christmas angel can decorate your Christmas tree.
paper star

You can use the origami technique to create New Year's decorations. From paper squares folded in a special order, you can easily make a star for New Year's table. Stock up on colored paper and patience.
- Fold the paper square in half.
- Bend the right corner of the resulting triangle upward.
- Then bend half of it down, and then up again.
- Unfold and smooth the top corner.
- Fold the top corner back as shown in the picture.
- Fold the left corner back in the same way.
- Make eight of these elements. Place their wide part into a small square.
- Turn over to the other side and bend part of the small square, hooking it onto the large square of the other piece.
Cardboard snowman

What's New Year without a snowman? However, it does not have to be made of snow. Instead, you can use cardboard or thick paper. This craft is suitable for home decoration and gift wrapping, or can be used as Christmas decorations. To make a snowman you will need:
- cardboard
- colored paper
- scissors
- black tissue paper

Glue a cylinder from white cardboard. Make clove-shaped cuts on one side and fold them inward. Cut out a circle of the appropriate diameter and glue it onto the cylinder. This will be his bottom. On the other side, attach a lid of the same size. Paint the top edges of the cylinder and the brim of the hat black. Cut out black eyes and buttons from colored paper, and a nose from red paper. Make snowman arms from strips of tissue paper.


