It's 2012 outside the window. New Year's holidays are over. But doesn't the symbol of 2011 look like the Easter bunny?
Soon New Year! And if you need to give a lot of gifts c, this article will be interesting to you.
because it contains the most diverse New Year's boxes))
You can put any little thing in these (like candy or cookies) to make a nice warm gift!
It seems like a little effort, but the gift is handmade and pleasant.
Find out what else you can put in a small box at the end of the article.
Let's see!
By the way. We recently printed several boxes here and I’ll tell you, a gift in a box looks much more interesting than one packed in paper.
Maybe just because it’s unusual))
Since 2011 is considered the year of the rabbit, let's start with rabbits!

Source ,
download printable box template
and here is another rabbit - a funny gift box with long ears:

Source ideem, download outline vector template
(to download, check the box next to "I have read and accepted" Ideam's Terms of use.")

Photos, templates can be downloaded in vector and jpeg
but here is a more complicated box:

Photo by ustamp4fun, download template


Photo donteatthepaste, download outline template or
* * *
and this is actually not quite a box...
But if you wish, you can use it exactly like this:
All! While the hares and rabbits are over, let's go through the rest of the characters))
Gift box "Snowman"!

Photo by dianaevans, download template
another one:
Christmas tree box:

Photo rubberstamping, download template
and now a small selection of pyramidal boxes.
Such boxes look very advantageous and can also serve Christmas tree decoration:

Photo accucut, you can download the template

Photo by polkadotprintsstudio, you can download the template


Photo mariestamps, you can download the template, watch the lesson

Photo rubberstamping, you can download the template
And in the year of the rabbit it’s good to give gifts in carrot boxes))
What's the main thing in the new year? So that there are enough carrots! And carrots are something different for everyone:
luck, happy occasions, romantic encounters, money or something else))
and here is another package, which (as Nastya suggested in the comment) is well suited for carrots
And finally, the funniest thing, otherwise we are all about rabbits and Christmas trees...
What do you think of the idea of giving a gift in a hat box?
Or number all the gifts, put leaves with numbers in a hat and invite guests to pull them out))
Or arrange a New Year's fortune telling, as described at the beginning of this article))
or make a hat and get gifts from it for everyone...
In general, what an idea! Rich!

The source was given in a jar, you can also give it in a box,
having previously poured it all into a transparent bag
and as always ( if you like surprises) photo of any large gift (along with instructions on where to look for it)
can be rolled up and hidden among candies small box!
Enjoy your gift-giving and have a good New Year's mood!
This bag box is very suitable for small gifts and souvenirs, for example, cosmetics or soap. self made. Also, this a good option for use as a bonbonniere at a wedding. Size in finished form including handles 120*80*40 mm.
For this box, I have prepared several files with templates, which you can download from the forum on our website (link at the end of the article). Once you have downloaded and unzipped the files, you will find 4 files in the folder that will help you make these cute boxes.
File called Package-bw.jpg can be used by owners of a black and white printer. This file contains a diagram of the box, which you can print on a regular A4 sheet, cut out and transfer to colored paper, from which you want to make a box. If possible, you can print this template directly on a sheet of colored paper from the wrong side (if the paper is A4 size).
For owners of a color printer and Photoshop, I have prepared special templates with which you can print ready-made color scans from the front and back sides, and then make boxes from them. Those. To do this, you only need thick paper for printing on a printer. I recommend using Lomond or Fora paper with a density of at least 180 g/m2. I use Lomond paper (matte single-sided with linen texture, 230g/m2). The files are called Package-layers-1.pdf, Package-layers-1.pdf, Package-layers-1.pdf, i.e. three developments for the boxes that you see in the photographs.
I’ll tell you in more detail how to print these scans correctly. Those who have color printers are well aware of the problem with refilling cartridges with color ink. And for those who do not have a CISS (continuous ink supply system), this becomes a whole problem. Therefore, you need to print in such a way as not to waste ink.
Thus, it is necessary to print the scan on one side and the other so that they coincide. It is very difficult to achieve an exact match, so I made the front side unfold a little wider than the back side.
So, I will describe step by step what needs to be done and how to do it for those who have never worked in Photoshop.
1.
Open any of the three files, for example Package-layers-1.pdf. If you don't have the Layers panel open, press F7. In the "Layers" panel you see two layers, in the "background" there is a scan for the wrong side, on "Layer 1" - for the front.
2. First, we print the front side of the scan by inserting a sheet of paper into the printer with the front side and selecting the “File-View and Print-Print” tab from the menu. Be sure to note which edge you inserted the paper (mark with a pencil on the edge).
3.
By clicking on the “eye” button, marked in the picture with a red circle, we make the layer with the front side inactive, and the layer with the back side becomes visible.


4. Now we print the wrong side of the development. But first you need to turn the paper over and insert it into the printer with the same edge. And you definitely need to display the picture horizontally. To do this, go to the menu “Image-Rotate canvas-Display canvas horizontally”.

5. We print the reverse side by clicking “File-View and Print-Print” in the menu. That's it, our scan is ready. All that remains is to cut it out, crease the dotted lines and bend them. Glue the box together and, if desired, make the holes marked on the template.
Despite the intensive growth in the use of polymers in packaging production, cardboard and corrugated cardboard continue to be one of the most widely used packaging materials. A variety of folding boxes and crates made from these materials are currently the most common types of packaging. Their advantages include:
- low cost;
- wide range of standard sizes and designs;
- high manufacturability using highly automated equipment;
- the possibility of high-quality design using various printing and finishing technologies;
- high technology of assembly and filling with products;
- high technological efficiency of transportation and storage both in a filled and empty state: boxes made of cardboard and corrugated cardboard are collapsible containers, which allows you to significantly save space when storing and transporting empty boxes.
Today, cardboard boxes are widely used for packaging food, tobacco products, medicines, perfumes, household chemicals (washing powders), household appliances, shoes and other types of consumer goods.
Cardboard is usually used to make the inner or outer packaging of a product. Corrugated cardboard is usually used for external and transport packaging.
Design of cardboard and corrugated cardboard boxes
When developing the design of boxes made of cardboard and corrugated cardboard, it is necessary to take into account the characteristics of the packaged products, physicochemical characteristics and the price of packaging material, as well as other factors.
The box design process usually includes the following stages:
- determination of the main characteristics of boxes: type and thickness of material, shape and overall dimensions;
- choice of printing and finishing methods;
- design of box development (cutting);
- testing of a sample box and its approval with the customer.
Material selection
When choosing a material, the following factors are taken into account:
- protective properties of the packaging material (mechanical strength, moisture, grease and gas resistance, etc.);
- technological properties of the packaging material (sealable properties of the material, manufacturability of processing in machines for the production of containers, for example, suitability for gluing and welding, manufacturability when packaging goods);
- material price.
The material of the box must ensure stability of its shape during operation, which determines the quality of the container’s protective and logistics functions, in particular the box’s ability to protect goods from damage and loss, its suitability for stacking
etc. The shape stability of a box depends on its design and the mechanical characteristics of the material from which it is made.
The mechanical characteristics of cardboard and corrugated cardboard are determined by the following factors:
- material thickness;
- fiber orientation for cardboard and direction of corrugations for corrugated cardboard;
- moisture content of the material.
The thickness of the material is selected depending on the volume of the box and the weight of the product that will be packaged in it. As the volume of the box and the weight of the product increase, the required thickness of the material increases.
When designing boxes, it is necessary to take into account that cardboard and corrugated cardboard differ in anisotropy of mechanical properties along the length and width of the sheet (web). In the machine direction, the strength and rigidity of the cardboard sheet (web) is higher than in the transverse direction. As the cardboard thickness increases, the difference between the mechanical properties of the material in the machine and transverse directions increases. The mechanical properties of corrugated cardboard similarly depend on the direction of the corrugations.
Ambient humidity has a significant influence on the properties of cardboard and corrugated cardboard. These materials are characterized by fairly high hygroscopicity, and when moisture is absorbed, their mechanical properties deteriorate significantly. To protect boxes from moisture, a protective coating can be applied to their surface.
Determining the shape and overall dimensions of the box
When determining the shape and overall dimensions of the box, the following requirements are taken into account:
- minimizing material consumption;
- compliance of the shape and size of the box with logistics requirements;
- manufacturability of the design of the box for assembling and packaging goods;
- convenience of the box for the consumer;
- attractive appearance.
When determining the shape and overall dimensions of the box, it is necessary to take into account the practice of their unification. The unification of cardboard containers by size and design serves to rationalize its production, transportation and storage. Unification of cardboard boxes helps reduce the costs of their development and production, and facilitates the organization of serial and continuous production on high-performance automated equipment. The costs associated with packaging goods in boxes, transporting, storing and selling packaged products are also significantly reduced.
The unification of containers by standard sizes is based on a modular system, which is based on the dimensions of group transport packaging (modular packaging) regulated by standards: pallets and containers. Currently, standard pallets for rail transport have dimensions of 800x1200 and 600x1200 mm; for sea transport, the ISO standard recommends pallets of 1000x1200 mm. The dimensions of modular packaging today are decisive when designing loading and unloading and transport vehicles, calculating the areas of warehouses, store shelving, etc.
To take advantage of the benefits of packaging unification, the overall dimensions of the boxes must be a multiple of the dimensions of the modular packaging.
An important requirement for cardboard boxes is their suitability for use with automated packaging equipment. The design of the box must provide for the possibility of its automatic assembly with subsequent packaging of goods into it and the formation of group modular packages.
Selecting printing and finishing method
High-quality printing design compensates for some monotony of standardized packaging, helps to attract the attention of buyers and thus stimulates the growth of product sales.
The choice of printing and finishing methods is determined by the properties of the box material and its purpose. Naturally, the design of consumer packaging is subject to much higher requirements than the design of transport packaging. However, due to the fact that recently in self-service stores goods are displayed on the shelves, including in transport containers, the quality of the packaging of the latter has also become of great importance.
* Symbols developed jointly by the European Federation of Corrugated Box Manufacturers (FEFCO) and the European Association of Corrugated Cardboard Manufacturers (ASSCO).
Test methods for corrugated cardboard boxesFEFCO has developed a series of tests to determine the important performance characteristics of corrugated packaging. Trial empty box from corrugated cardboard for compression resistance The test is carried out using a special test To perform the test, you need a device for determining the compression force, providing an error of no more than 2% of the measured value, as well as a measuring ruler with an error of ± 1 mm, or no more than 5% of the measured value. Before starting the test cardboard box is installed on the bottom plate and aligned with its center. The spatial orientation of the box is determined based on the test task. To accurately position the box on the plate, appropriate markings must be made. After turning on the mechanism for moving the plate(s), the box is subjected to compression. The test should be completed before the box is completely destroyed. The compressive resistance value (expressed in Newtons) is measured at three points. After the test is completed, a protocol is drawn up, which indicates information about the packaging, machines and devices used during testing, test conditions, and also records the results obtained. For boxes consisting of several parts (for example, telescopic), the test should be carried out for each part in turn, after which the results are summed.
Drop test of corrugated cardboard box The test is designed to test the strength of a box with goods packed in it to impact loads that occur, for example, when it falls. The test results also allow us to determine the quality of the box’s function of protecting the product. The test consists of simulating the free fall of a box with a product packed in it onto a horizontal surface. The drop height and spatial orientation of the box are determined based on the test task. The height of the fall is measured as shortest distance from the bottom of the box to the surface on which it falls. To describe the spatial orientation of a box, indicate which side, edge, or corner it hits. If the blow falls on a side face or corner, they are designated by the numbers of the sides that form them. The surface on which the box falls must be smooth and hard, its deformation as a result of the impact of the box must be negligible. To carry out the test, it is recommended to use a special installation that allows you to fix the box at the required height in a certain position and then ensure that it falls down without giving it acceleration or rotational impulse.
Corrugated cardboard box stability testto low frequency vibrations The test is designed to test the resistance of a box with a product packed in it to low-frequency vibrations that occur, for example, during transportation. The test can be carried out for either a single box or a stack of boxes. The amplitude and duration of the vibrations, as well as the spatial orientation of the box, are determined based on the test task. To describe the spatial orientation of the box, the same notation is used as in the drop impact test (see above). To carry out the test, it is necessary to use a vibration installation. The box is placed on the vibrating machine table, which must have a horizontal, smooth and hard surface. The drive mechanism of the vibration unit must provide table vibrations with the ability to adjust the frequency and amplitude in the range of 2-7 kHz and 5.0-12.5 mm, respectively. After the test is completed, the condition of the box and its contents are checked. Detected damage is measured and recorded in the protocol. Information about the packaging, equipment used in testing and test conditions is also provided. Impact resistance test of corrugated cardboard box The test is designed to test the strength of a box with a product packed in it to impact loads. The test results also make it possible to determine the quality of the box’s performance of the product protection function. The test consists of simulating the impact of a box with a product packed in it on an inclined surface.
To carry out the test, a setup is used that includes a trolley moving on rails on which the box is placed. The rails must be laid on a special platform at an angle of 10° to the horizontal. At the lowest point, the rail track ends with an inclined wall, forming an angle of 90° with its plane. After installing the box, the trolley, under the influence of gravity, descends down an inclined rail track. As the cart approaches the bottom point of the path, the box hits a plate mounted on the wall. The surface of the slab must be smooth and hard, its deformation as a result of the impact must be negligible. The test setup must be equipped with a device to secure the cart before starting the test at a predetermined distance from the wall, depending on the required speed of the cart with the box. The speed of the cart and the spatial orientation of the box are determined based on the test task. To describe the spatial orientation of the box, the same notation is used as in the drop impact test (see above). At the end of the test, the condition of the box and its contents are checked. Detected damage is measured and recorded in the protocol. Information about the packaging, equipment used in testing and test conditions is also provided. Determination of the strength of the hinge joints of the boxfrom corrugated cardboard The test is carried out on a rectangular test sample cut out of a box using a special test device, which is a mechanical or hydraulic press with a sample fastening device and a V-shaped pressing head. The pressing head must be driven to move at a speed of approximately 12.5 ± 2.5 mm/min. The test device must be equipped with an instrument to measure the force exerted by the head on the test piece. When testing, a test sample with a width of at least 150 mm is fixed in the installation so that its sides form an angle of 90°, and the hinge joint is located under the rib of the V-shaped head. Moving down, the head puts pressure on the hinge joint. The test allows you to determine the maximum tensile strength of a hinge joint. At the end of the test, a protocol is drawn up, which indicates information about the test sample and the hinge joint, the equipment used in testing, the test conditions, and also records the results obtained.
|


Design of box development (cutting)
After selecting the material, determining the overall dimensions and shape, a development is developed - a technological drawing of the workpiece from which the box will subsequently be assembled. The development should depict the outer (sealed) side of the box and reflect the features of the technological process of its manufacture and assembly.
Elements of the box layout can be divided into main and auxiliary elements. The main elements include the side walls, as well as the bottom and lid of the box. Graphic and text information can be applied to the main elements of the scan during its manufacturing process. Auxiliary elements of the development - various valves - are used to fasten the main elements when assembling the box.
The designations used in the box layout drawings are given in the table.
The layout must indicate the overall dimensions of the box. According to established practice, when describing a box, its overall dimensions are indicated as follows:
Length (L) x Width (B) x Height (H).
Dimension values are determined by measuring the dimensions of the main elements of the scan as the distance between the scoring lines. Measurements should be made under standard climatic conditions: temperature 23 °C and humidity 50%.
For telescopic boxes, which are widely used, for example, for packaging shoes, in addition to the three overall dimensions indicated above, it is necessary to provide the height of the upper part (removable lid). In this case, the designation of overall dimensions is as follows:
Length (L) x Width (B) x Body Height (H)/Lid Height (h).
The fourth size must also be specified for boxes with overlapping external flaps. In this case, the size of the overlap area is given:
Length (L) x Width (B) x Body height (H)/Overlapping area (o).
To facilitate the design and production process of boxes, their main types are standardized.
In Europe, the most widely used standards are those developed by the European Cardboard Manufacturers Association (ECMA) and the European Federation of Corrugated Box Manufacturers (FEFCO).
According to the ECMA classification, boxes are divided into the following groups:
- group A - boxes rectangular shape with adhesive bonding;
- group B - rectangular boxes secured with locks of various designs;
- group C - non-rectangular boxes with adhesive fastening;
- group D - non-rectangular boxes secured with locks of various designs;
- group E - boxes that are in direct contact with the product being packaged or intended for group packaging;
- group F - boxes whose designs are not included in others
groups.
According to the FEFCO classification, boxes are divided into six more groups:
- group 02 - boxes assembled from one development and closed with valves. When assembling such boxes, adhesive fastening, sewing with staples, and also fastening with adhesive tape can be used;
- group 03 - boxes of telescopic design, assembled from several parts;
- group 04 - boxes assembled from one pattern, fastened with locks of various designs;
- group 05 - boxes, as well as parts of boxes that are closed by mutual movement of structural elements;
- group 06 - boxes assembled from three blanks: a body and two side walls;
- group 07 - boxes assembled from one development, with adhesive fastening.
Group 09 combines internal liners, bottom sheets, partitions and other internal parts of boxes.
CAD systems have found widespread use in the design of developments.
Final design stages
After developing the blank drawing, a sample box is made, which is agreed upon with the customer. The sample can be subjected to tests during which the loads that arise during operation of the box are simulated. Based on the test results, the material may be changed or the box design may be adjusted.
After approval of the box design, another sample is made to coordinate the printing design of the box with the customer.
An important stage of the technological process is the development of an optimal layout of box blanks on a sheet of cardboard or corrugated cardboard. The sheet format depends on the characteristics of the printing and finishing equipment. Optimizing the layout allows you to reduce the cost of the box by reducing material waste and increasing process productivity. The quality of the layout is characterized by the material utilization coefficient, calculated as the ratio of the total area of the workpieces to the area of the sheet.
When positioning blanks on a sheet, it is necessary to take into account the orientation of the fibers or corrugations of the material, and also try to ensure uniform distribution of pressure during printing and stamping.
Technology for manufacturing boxes from cardboard and corrugated cardboard
The process of producing boxes from cardboard and corrugated cardboard includes the following technological operations:
- seal;
- finishing;
- dancing;
- assembly.
Seal
For printing on cardboard and corrugated cardboard, offset, flexographic and screen technologies are most often used. Sheet corrugated cardboard is typically printed on sheet-fed offset or flexo presses. Both sheet-fed offset and roll-fed flexographic machines are used for printing on cardboard. Screen printing is most often combined with offset or flexographic methods, expanding the technological capabilities of the printing process.
Decorative and protective finishing
Finishing of cardboard packaging allows you to diversify the design and improves its operational functions. The most popular finishing methods include: varnishing, film pressing (lamination) and hot foil stamping.
Varnishing- the process of applying varnish compositions to the surface of a material, which, when dry, form smooth transparent films that improve the appearance of the product and perform a protective function. Rotary printing machines are used to apply varnish; varnishing is performed in the non-printing section of the printing machine or on specialized equipment.
Pressing the film- the process of creating a transparent polymer coating on the surface of a material, which primarily performs a protective function. Film pressing can be done on sheet and roll laminators using different types of adhesives.
Hot foil stamping- the process of transferring to the impression under the influence of pressure and high temperature metallized or colored film. Hot foil stamping is an effective design technique and also helps to increase the degree of protection of products from counterfeiting. For hot foil stamping, crucible, flatbed and rotary presses are used. In practice, converted letterpress printing machines are often used for foil stamping.
Finishing operations are performed both on production printing and finishing lines and on operating equipment.
Dancing
Punching is a complex of technological operations that ensure the formation of structural elements of boxes. The quality of stamping determines the accuracy of the geometric dimensions of the box, their strength and durability. During the stamping process the following operations can be performed:
- cutting out the outline of the box;
- scoring of fold lines on the development;
- perforation;
- Ritsovka.
Die cutting designed to give box blanks the required configuration. Tools for cutting are flat or rotary die knives. Die-cutting is performed on crucible, flat-bed and rotary presses. In small-scale and individual production, so-called shuttle devices are widely used, in which a stamp with a workpiece laid on it is rolled through a rotary printing pair.
When producing boxes from corrugated cardboard with a rectangular layout, you can do without die cutting, since in this case the slots for forming the box flaps can be made on special cutting machines - slotters.
Creasing- applying fold lines to the material in the form of extruded grooves, along which folding will be carried out in the future. Creasing is designed to reduce the rigidity of the material along the lines of future folds. The scoring tools are a scoring knife and a scoring matrix. Creasing can be either flat or rotary.
Perforation- cutting a chain of small holes. It can serve to facilitate folding by removing excess material from the fold. Typically, perforation is performed with a serrated disk knife.
Ritsovka- an incision on the surface of the material. Ritzing is done in the places where the box parts are glued together. Thanks to the penetration of glue into the cut, an increase in the strength of the adhesive bond is achieved.
After stamping, the opening of the box remains connected to the sheet by jumpers, therefore, to completely separate it, the flash removal operation is performed automatically or manually.
Assembly
After removing the flash and separating the box blanks, they can either be packaged and sent to the customer, or they can be assembled.
Assembly consists of folding the box and fastening its parts, that is, folding a three-dimensional box from a flat blank and fixing its shape. For fastening box parts, the most widely used methods are the adhesive method, which can be easily automated, and mechanical fastening using locks of various designs.
Folder-gluer lines are currently used for automated box assembly.
As already noted, in the production of cardboard and corrugated cardboard boxes today, various automation tools are widely used. When designing boxes, CAD is used, at different stages of the technological process of manufacturing boxes, various production lines are used on which printing, finishing, stamping and assembly of boxes are performed. The use of highly automated lines can significantly increase productivity and reduce production costs. As a rule, such lines are highly flexible and allow the production of boxes in a wide range of standard sizes. The possibility of complex automation of the technological process of manufacturing boxes from cardboard and corrugated cardboard is an important advantage of this type of packaging and helps them maintain one of the leading positions in the packaging market.
On the eve New Year's holidays Shop windows are full of gift boxes, decorative bags, and wrapping paper for every taste. Smiling sellers helpfully offer to provide packaging services New Year's gifts. And it all seems great, because you must admit, it’s much nicer to receive a New Year’s trinket in a beautiful package. But on the other hand, the whole meaning of the gift is lost, the very gift that should be intended specifically for you.
The recipient of the gift will be doubly pleased if, in addition to choosing the gift, you spend a little more time on wrapping it. In this article we will teach you how to make gift boxes from paper or cardboard with your own hands. This is not at all difficult to do, because all the crafts presented with us are accompanied by ready-made diagrams, templates and step-by-step master classes. All you have to do is choose suitable option boxes, print the diagram and glue the paper box according to the instructions. By the way, some of the boxes we present are made using the origami technique, which means that you don’t even need glue!
So, before we get started, let's check if everything is ready. For the manufacture of gift box from paper with your own hands You will need: beautiful wrapping paper (you can get by with plain white paper and then decorate it), scissors, pencil, ruler, glue or double-sided tape, and a stationery knife. Everything is? Well then, let's create!
#1 Box “Herringbone”
A great way to pack a small trinket for friends or family is this New Year's themed box. By the way, it’s very easy to do. You'll need green paper and hole punchers (although you can do without). Well, any rhinestones, beads, sequins are suitable for decoration, in general, to your taste!
#2 Gift box “Mint Candy”
And here is another original version of a gift box, which you can very easily make with your own hands, especially with our step-by-step master class. You will need red construction paper (for the box itself), as well as white paper for decoration. You can make the upper part of the box with applique or simply color the white sheet with pencils or felt-tip pens. By the way, there doesn’t have to be a lollipop on top. You can dream up a New Year theme and decorate the top of the box, for example, with a snowflake, Christmas ball or angry red M&M's.

#3 Box with lid (diagram)
Well, if you don’t have the time or desire to tinker with the box for a long time, you can use a simple ready-made template. You need to download it, print it, cut it and glue it. Voila, the box is ready! Please note that we have prepared 2 diagrams for you: square (size 5x5) and rectangular (size 7x6x4).

#4 Cup with a gift
But here is a gift packaging option for those who want to surprise with originality - a gift box-cup. It's quite simple to do, but looks impressive! To create, you will need thick paper, scissors and glue. And of course our step-by-step instructions!
#5 New Year's box “Cake”
If new Year party planned in a large company, for example with a large family, it makes sense to pack gifts for everyone in one large composite box. The cake packaging box consists of 8-10 pieces, each of which is a separate paper gift box.

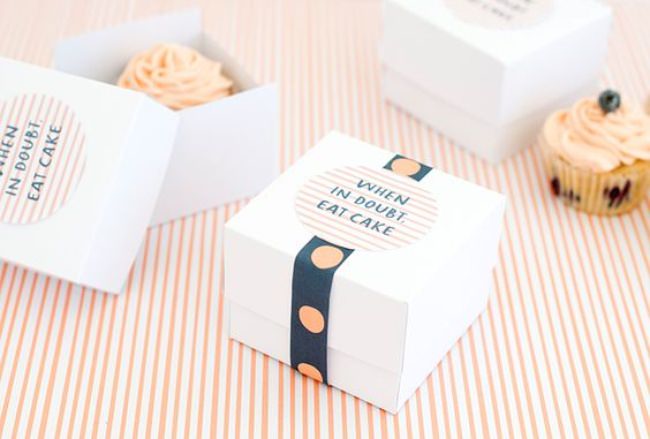
#6 Gift box with lid for muffins and other small items
Quite common on New Year's holidays edible gifts: various sweets and baked goods. An original gift will be a muffin prepared with your own hands in a designer gift box.
#7 New Year's box “Diamond”
You can pack a New Year's gift in a diamond-shaped gift box. With our scheme, making such intricate packaging will not be difficult. All you have to do is print out the box template, cut it out and glue it according to the instructions. It's simple!

#8 New Year's packaging "Santa"
Very cute New Year's packaging will come out of ordinary paper bag, decorated with paper Santa. Download the Santa pattern, cut it out and glue it onto the bag. New Year's packaging ready with your own hands!

#9 Boxes “Harry Potter”
Fans of stories about Harry Potter will be indescribably delighted when they receive a piece of their favorite hero as a gift. By the way, such a box with magic sweet beans can be a wonderful addition to a set of books about the adventures of a young wizard.

#10 Box “Gingerbread House”
The symbol of the Christmas and New Year holidays, well known to everyone from Hollywood films, is the gingerbread man. You can make a paper box in the shape of a gingerbread man's house. By the way, putting the gingerbread men themselves in such a house will be very symbolic, but if you also make them with your own hands, there is no price for such a gift at all! Box " Gingerbread house"is done according to a special scheme, which you can download below. Also below is a master class on making a box with your own hands.
New Year's time is coming - a time of miracles, when everyone can feel like a little helper...
#11 Box “Heart of four parts”
A cute package consisting of four boxes can be made using our pattern. Giving your loved one not one, but four New Year's gifts at once is a true manifestation of love. You can download the diagram with four boxes and the base for them below.

#12 Box made using origami technique
To make such a gift box you will not need a diagram or template. To make a paper box with a lid, you only need a sheet of paper. The main condition is that the sheet must be square. Strictly follow the instructions of the master class and in 10 minutes you will have the cutest origami gift box made by yourself.

#13 And another option for an origami box
This box is very similar in appearance to the previous one, but the manufacturing method is slightly different. To make this box you will need scissors, but you don’t need a diagram: just square sheet paper Follow the instructions of the master class and you will succeed!

#14 Box using origami technique “Volume Triangle”
If you want to get confused and ready-made templates are not for you, then be sure to pay attention to this complex and very impressive gift box. You will need paper and patience. Well, then follow the instructions and everything will work out!
If you like to make gift boxes without templates, glue and scissors, but only with the help of the correct folds of paper, then you will appreciate this box.
#16 Closing box using origami technique
Well, another version of the box using the origami technique. It's quite easy to do, especially if you follow the instructions. By the way, the steps of making the box are described below in the photo instructions.
#17 Box “Cupcake”
Original gift packaging For a New Year's gift there will be a box in the shape of a cupcake. It looks very impressive, but it will take a little work to create. In general, there is nothing complicated in creating this box; you just need patience and imagination! A step by step wizard see class below.

#18 And another "Cupcake"
And here is another variation on the theme of a gift box in the form of a cupcake. The manufacturing scheme is very similar to the previous one, but you might like it!
#19 Gift box for cookies
A ready-made diagram for making a cardboard box with your own hands. All you need is to use our ready-made diagram, which you need to print, cut out of cardboard, and then glue it together in accordance with the master class.

#20 Chinese style gift box
You can put anything you want in this handmade box. And most importantly, it is done quickly and simply. You can download the box diagram from the link below.
Download the diagram

#21 Gift box in the shape of a cup

Truly original packaged gifts are valued much more than conventional gifts. gift bag. Please pay Special attention for this charming paper box, which you can make with your own hands using our diagram.
How to make a cup

How to make a lid

#22 Box “New Year's Sweater”
This beautiful gift box can be made with your own hands. To do this you will need a diagram, which you can download on our website, scissors, glue and a little patience.

#23 Box with bow closure
Quite simple to make, but very original gift box. You will need a square sheet of wrapping paper, glue and instructions from the master class. 15 minutes - and your gift box is ready!

It’s very easy to make a cardboard box for a New Year’s gift, but for this you will need not only cardboard, but also scissors (a stationery knife) and glue or double-sided tape (for secure fixation). Below is a step-by-step manufacturing master class, following which you can quickly and easily make a cardboard box with your own hands.

If you want to give delicious gift in the form of cupcakes or muffins, then a paper egg tray would be the ideal packaging for such a gift. Cut the required number of compartments and decorate the top of the box decorative elements, tie with ribbon and Voila! The gift is ready!

You may be interested in:
#26 Original box “Milk package”
Another incredibly cool New Year's box that will amaze anyone. You can pack a simple trinket in such an unusual box. It’s quite simple to make it if you use a ready-made diagram, which you can download on our website.

#27 Box with lid
Using our simple pattern, you can easily make a gift box with a paper lid with your own hands in just a few minutes. You can put anything in such a box as a gift: from a cute trinket to handmade sweets. You can download the box diagram below.

#28 Packaging box with flower clasp
A simple design for a cute packaging box with a flower clasp. Fast, beautiful, original. Please your loved ones with a handmade gift. You can download the finished diagram from the link below.

#29 Gift box “Petals”
You can make a wonderful box for a New Year's gift with a petal-shaped lid with your own hands. In fact, making such a charm not only won’t take much time, but will also delight you with its cutest quality.
#30 Gift box for New Year's cupcake
You can make a very cute cardboard box with your own hands. It will turn out no worse than store bought. You can make a special bottom for the cake in the box. By placing your little delicious gift in a special stand, you don’t have to worry that all the cream will remain on the box. To make such a cardboard box with your own hands, you need to print the template and follow the instructions of the master class.

#31 Gift box for children “Ice cream”
A New Year's gift should be packed not just well, but with taste. In the “Ice Cream” gift box, your gift will be appreciated! With our scheme, making a delicious box will only bring pleasure!

#32 Packaging box “Candy”
Another option for “delicious” packaging would be a candy-shaped box. To create a New Year's atmosphere, the packaging can be slightly enlivened by adding eyes and a mouth. Download the diagram, print it and glue the box in the right places.

#33 Gift box “Cheerful Bunny”
You always want to give a special gift to your dear and close people. And it’s best when this gift is not only special, but also in special packaging that emphasizes the significance of a particular person. Making such a paper box with your own hands is not difficult if you download the diagram from the link below.
Download the diagram

#35 Box “Funny Frog”
Another very cheerful and positive box for New Year's gifts is “Cheerful Frog”. It’s done quickly and gives a lot of emotions! Download the diagram and please your loved ones with a merry New Year's box.

#36 Box with a face
You can also pack a gift in an original way in a box made of plain white paper, adding some details on it in the form of eyes and a mouth, thus bringing the gift to life. With our ready-made diagram, making such a box is not at all difficult. Just download the diagram, print and glue.

#37 Gift box “Birdhouse”
Let's start with, perhaps, the most unusual paper gift box. Making such a birdhouse is quite simple when you have a ready-made diagram. The diagram needs to be printed, transferred to suitable paper, cut out and glued in certain places. Complex and intricate at first glance, DIY boxes will be ready in 10-15 minutes. 
#38 Box “Apple”
A gift in a paper box in the shape of an apple will be original. With such a box, choosing a gift is quite easy - gelatin worms will come in handy. Making such a box with your own hands with the appropriate diagram is very simple; the manufacturing process will take no more than 10 minutes!

#39 Box “Christmas wreath”
There is no limit to your originality, we just give you direction, and then you create on your own. You can come up with a lot of boxes for the New Year theme, for example, in the form of a Christmas wreath. Very symbolic!
Well, what would a real New Year be without the Nutcracker and music from the famous ballet by P.I. Tchaikovsky? A great gift would be a bag of nuts with a nutcracker tag attached. himself fairy tale hero You can draw it yourself, but if you don’t have a penchant for drawing, you can find an image of the Nutcracker on the Internet and print it, then cut it out and attach it to the bag.

Do you like making gifts with your own hands? Looking for new ideas for packaging them? Now you will learn how to make a cardboard box with your own hands. The diagrams given in the text can be printed and used unchanged. If you like to add something of your own, modify them as desired.
Which form to choose
Perhaps you never realized how easy and quick it is to make a cardboard box with your own hands. Schemes and blanks can be very different, and accordingly, the final configuration of products is very different. They often say that beautiful packaging is already half the gift. If you want to surprise with your souvenir, come up with an unusual box shape. At the same time, even packaging that is not additionally decorated, but simply made from colored sheets, will look impressive.
In the case when you do not want attention to be distracted by the packaging, but it is simply needed for safety and ease of transportation, it will be enough regular form in the form of a cube or parallelepiped. However, it is worth considering that you are preparing for the holiday, so it is good to add beautiful decor to the usual configuration. Any of the options can be used, and the box can be completed according to ready-made template will not be difficult, even if you have never done it.
What you need
You need to prepare the following so that you can get a beautiful cardboard box with your own hands:
- Schemes, or, as they are also called, developments.
- Cardboard (white, colored, decorative).
- Printer or if you build the template yourself.
- Scissors or knife.
- A knitting needle, non-writing pen, or similar tool to trace invisible grooves along future fold lines.
- Glue or heat gun.
- Decorative elements ( satin ribbons, stickers, bows, flowers).
As you can see, the work to create beautiful packaging special troubles won't deliver. No complex devices are needed. If you don’t have a heat gun and a printer, you can completely do without them by using your own construction of the box layout using a pencil and ruler and gluing it with regular PVA or a quick fixing compound.

Manufacturing technology
Let's look at how a cardboard gift is made. The work flow will be like this:
- Find a template that suits your configuration.
- Print it on a printer either directly on a large cardboard format, if possible, or on paper sheets, which can then be glued together and the template transferred to a piece of cardboard. It is most convenient, of course, to work with boxes whose scans fit on A3 or even A4 format. This is usually the maximum capabilities of a standard home printer.
- So, here is a packaging template obtained by any method. Cut it out of the sheet along the contour and make cuts in the right places where gluing will occur.
- Take the knitting needle or the tool that you have prepared and draw it along all the lines where the folds will go. It's better to do this back side, and not on the front. In professional slang, this operation is called creasing, and in printing houses, of course, it is performed by a machine. Such grooves prevent the cardboard from creasing when folding, that is, bending. So don't neglect it, otherwise the box may turn out sloppy and deformed.
- Make folds along the appropriate guides.
- Glue volumetric form from a flat piece.
- Decorate the packaging with ties in the form satin ribbons, bow or anything else.
DIY cardboard box: diagrams
Square packaging is the most commonly used. There are different options, both solid and consisting of two parts - a base and a lid. It's easier to make boxes from one piece. Such packaging can be closed with ties or with the help of a cardboard “tab” that goes into a slot in the opposite part of the box. Below is a simple cube-shaped packaging option.

As you can see, the base of the scan is a square. The top of the product looks like a “roof” when assembled. You can use a pretty ribbon to hold the four pieces of the top together.
DIY cardboard box: simple but unusual patterns
If you want to do the packaging unusual shape, use one of the following models. The first photo shows simplest option. It is very easy to make as you only need to make four folds. At the top, the box is assembled due to the slot and the fastening element included in it.

If you have triangular shape souvenir, use the following packaging. Although the development looks quite complicated, assembly is easy and quick. The main thing is to carefully make the fold lines. The gluing elements are small, made in the form of triangles.

Using the following template, you can make a beautiful round cardboard box with your own hands. The scheme is also simple and clear. The most important thing is to draw the arcuate fold lines evenly. This determines how neatly the shape of the package will be formed.

How to decorate the box
You have figured out the technology for creating the base, but just white packaging is not suitable for a gift. It should complement and decorate your souvenir. You can turn an ordinary box into a masterpiece of artistic skill in the following ways:
- Choose a beautiful cardboard or thick paper(design or for children's creativity). Sheets can be metallized, mother-of-pearl with embossing, patterns and other decorative options.
- Cut out the second opening of the box from thin packaging or other paper used in arts and crafts, and glue it on top of the base. This option is suitable when you need to make a box from very thick cardboard, which cannot be found with a decorative surface.
- Apply drawings or patterns to the box using paints using a brush, stencils, stickers, or decoupage napkins.
- If you are proficient in computer graphics editors at a high level, you can come up with your own box design, adding any images to the selected outline before printing, including photorealistic ones, for example, even with the birthday boy himself. The one to whom you give such a gift will definitely be surprised. The only thing you should take into account is that if you are going to print on colored cardboard, all your pictures will acquire the appropriate shade, so you will either have to color correct the workpiece or not use colors that cannot be changed (portrait photos).
There are as many options for decorating a product as there are possible layouts. It's good to combine different ideas.
So, you have seen how easy it is to make a cardboard box with your own hands. The patterns above can be easily used to create beautiful souvenir packaging for any occasion. By scaling the templates, you can make boxes of the same shape different sizes. Create, decorate, surprise your friends and relatives with your skills.


