DIY quilling box: master class on crafts using the quilling technique
Making a box using the quilling technique Sometimes, the most interesting and unique ideas come to the minds of real craftsmen, which can then be implemented in various directions. Crafts in the quilling style will not be an exception to this list; there will also be items with which we can decorate the house, take advantage of their benefits, or make a gift for loved one. A box using the quilling technique is one of those items that you can make yourself and at the same time please yourself or your loved ones with a new thing in the house. The box will become a reliable storage for your belongings and can decorate any room. Wherein, this type decor will be convenient to store and at the same time easy to make. You will need special material and step by step instructions, which will tell you how this item can be implemented.
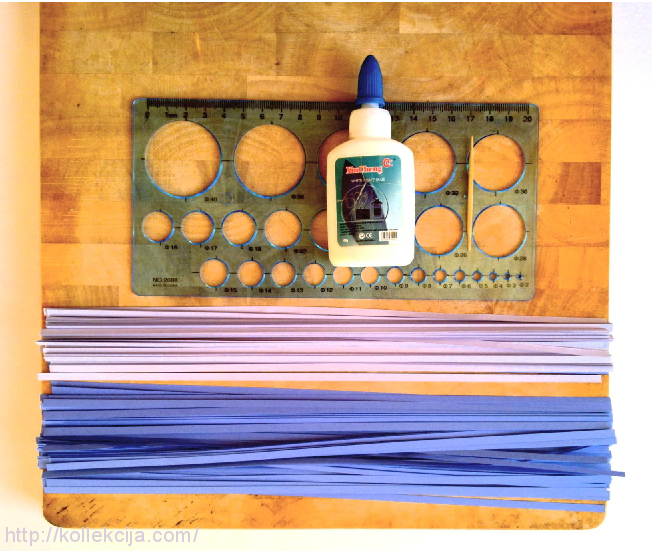
First of all, we will need the following items:

- Wooden board (smooth and soft, for pins)
- Ruler for quilling
- Deformation tweezers
- Knife (sharp)
- Pins
- Gel pen
- Paper for quilling (lilac color, dark and light)
This first set will help us do our own work. The work is performed on a special wooden board, preferably a soft wood type. This is necessary in order to stick pins into the object. You also need to use tweezers and a ruler.
Bottom of the box
 Making space for a rectangle. We fill it with a pattern using special elements. First of all, secure your range of work with pins. Next, start working. The first thing you do is the puck pattern. They will be located on the edge of our box. Next, we make the drops that will be located inside the installation. After this, we work on the pattern of the eyes, which are also fixed in the inner part of the range. then, rings are made in the central part and drops, which will be of a darker tone in the rims. After the materials are placed in place, they need to be secured with glue. We wait a while for the glue to dry, then remove the bottom from the board. If everything was glued together properly, use a sharp knife to cut off our installation from the board. Next, coat the bottom with glue and leave to dry.
The walls of the box
 Afterwards, we work on the walls of the box. The wall rectangle should be shorter than the one for the don. We glue the rows into parts using glue, aligning the materials with a ruler. It is necessary to make 11 modules of drops in dark tones, then make 10 eyes in light tones and complete them with a series of drops in dark tones. The pattern of the drawing is carried out in the sequence 6 by 5 by 6. Cover the walls with a diluted glue mixture and dry.
Fastening the walls
Next, we coat the lower levels of the drop with glue and place it on the edge of the bottom. We adjust the position so that they touch the adjacent walls only at the corners. You need to glue all sides to the bottom. Apply adhesive to the joints with a toothpick.
Headband
 We make the rim of the box using the shape of washers, which can be seen in the photo. Attach them to the top of the wall so that they border your work. One washer needs to be glued into each side of the box to secure it. Working on the lid of our box will be simple. It completely repeats the bottom of the box, only on top you need to come up with your own pattern. You can use ready-made ideas for module forms, or come up with your own solutions that will help realize your idea. Thus, our box is complete. Making a box using the quilling technique can be an excellent gift, or decorate your home as a wonderful decorative element!
Comments
Related posts:
DIY New Year's angel using a special quilling technique - master class Quilling a beautiful rose with your own hands - master class in quilling technique This master class will teach you how to make a postcard with your own hands using the quilling technique.
A box made using the quilling technique is a rectangular box consisting of separate multi-colored modules, the shape of which can be set according to personal preferences.


This step-by-step master class It has low level complexity and is intended for beginner quillers, which does not mean that it will not be of interest to experienced needlewomen.
From the instructions you will learn how to simply twist modules for future work without using special diagrams, and also how to lay out the walls and bottom of the box, without a cardboard or plastic base frame.
Required materials and tools: 
- double-sided colored paper;
- White paper;
- glue;
- scissors;
- stationery knife;
- ruler;
- pencil;
- an army ruler or a specialized template ruler for quilling;
- a tool for twisting strips or a toothpick.
Step-by-step instruction:
- Cut strips of the same width - 5 mm. Lay out the sheet and, applying the ruler to the cutting line, draw it with a stationery knife; it is important to use a backing so as not to spoil the surface of the table. You don’t have to bother with cutting paper and buy ready-made quilling strips at a craft store, which often come in a set with tools, glue, tweezers and a mat.

- Using a quilling tool or a toothpick, roll up tight rolls in the amount of one hundred green pieces and twenty-one white ones. To achieve the same dimensions, use a template ruler with holes.

- Roll 30 lightly fluffed rolls white and 22 – green. Attention! Be sure to secure the free edge with glue. Then, by squeezing with your fingers, give the green ones the shape of a curved drop, and the white ones - eyes.


- From the resulting modules, lay out two flower figures for the lid/bottom and four half-flower figures for the side walls of the box. Glue leaves to the base of the half-flowers, as in the photo.


- Lay out three frames from tight rolls (for the bottom, frame and lid). To ensure the evenness of the walls, it is better to use a pre-drawn sketch of a rectangle, the line of which should be oriented when laying out the modules.

- Fill the bottom frame with flower figures, as shown in the picture. Fix each element with glue and dry well on a flat surface.

- After the bottom has dried, lay out the supporting corner posts of the quilling box. Please note that the colors of the modules alternate. To make the columns even, you can use not individual modules, but tightly twisted tubes of the same length.

- Fill the side space of the box with floral elements. For these purposes, use any form of modules, not necessarily flowers and leaves.


- Glue a frame of green rolls on top.
 The base of the box is ready, all that remains is to make the lid and dry the craft thoroughly.
 - When making the lid, try to adhere to a single style, so make it according to the same principle as the bottom, only glue a roll-handle on top (in the center of the flower), and with reverse side– four roll legs.


The wonderful box is ready. For greater reliability, coat the product with acrylic spray varnish or wood varnish (thin layer)!
I suggest keeping your first experience with paper rolling at home, as a keepsake, and for a gift, make something similar according to the following step-by-step video tutorial.
Video: Master class “Box”
The “quilling” style is no longer new, but for some reason it is associated mainly with non-voluminous compositions. Paintings, postcards - yes, but did you know that this technique can also offer a three-dimensional object? The box made using the quilling technique is a clear confirmation. Moreover, it can be quite a durable thing if it is made correctly. Read a variety of step-by-step MKs that will be clear to beginners, improve your skills with each new job


. Moreover, what you made with your own hands carries your energy - take advantage of this by filling your home with objects that bring joy and positivity!
First steps - instructions for beginners
It will be simple, but long. Therefore, it is better to immediately strive for quality. The first thing you need to do is purchase paper and a ruler for quilling, because the box is already a serious product that requires precision in detail, and they all must be the same size.
For the next master class you need “rolls” with a diameter of 14 mm. Place each tight “roll” in the corresponding cell and fix the size with glue.
The finished craft looks like this.
Progress
- To work “Quilling: Box” you will need:
- 6 different colors of paper strips;
- twisting tool - you can use a toothpick or a long needle;
- the already mentioned ruler + a simple 30 cm ruler, if you make strips with your own hands;
- scissors and transparent glue;
- ordinary office paper and just a pencil;
- beads for decoration.
Detailed manufacturing instructions. As you can see from the photo, the frame consists of parts of two colors, but you can use only one, and even a different one. Please note that 230 “rolls” are needed for the entire frame, and 44 for the side parts. Lay the film on the table so as not to stain it with glue. Place the “rolls” next to each other, spreading glue between them. Prepare all the strips at once:
Roll the long sides separately from wide strips of white office paper using the same 14 mm measurement. Assemble long parts and dried glued strips together:


To make the leaves two-colored, you need to glue together 2 strips of different shades of green and roll them, starting with the dark one. Give each one an oval shape with sharp corners, 30 pieces in total, 23 mm in diameter:
Using the same principle, green-white leaves with a diameter of 25 mm are made, in the amount of 96 pieces.
With a diameter of 20 mm we make petals for 10 flowers (50 pieces). There will be orange ones various forms, but all 20 mm:


We take our frame and glue the elements inside according to the diagram, coat it with glue wherever the parts touch each other, and glue a half bead to the middle of the flower. There will be 2 such frames. Based on the size of the resulting frames, the other two should be 9x12 cm. Draw a rectangle with these dimensions on the paper under the film in order to lay out the “rolls” strictly to the lines. Start assembling the pattern in the frame step by step:


Where there are empty spaces, you can simply leave them as is, or fill them with “rolls” of any delicate color - the same light green or white will do. If you want to strengthen the quilling box when you assemble the frame, at the end glue each one onto a slightly smaller piece of colored cardboard. A bottom made of thick cardboard would be more relevant.


Gather all 4 sides together, when the glue dries, lay out the bottom. We make the lid from the same strips as the side ones. You need 6 short strips of 9 parts and 2 long strips of 13. For the lid, we also first draw a triangle on paper. But here it’s the other way around - first lay out the finished strips, and then draw a triangle on them. You should get two such details:


It turned out that the end triangles will be equilateral - 13 cm on each side. Let's decorate. We make the frame for the lid according to its dimensions, when all the triangles are already glued together. There will be a three-dimensional flower as the handle of the box - it is made from one whole and a half:
Finished cover:
The quilling box is ready – original, exclusive and cute!
Draw several sketches of boxes in advance and choose the one that suits your work. It is unlikely that you will find any specific templates, and this is not necessary - your imagination will help better!
Step-by-step descriptions are great to begin with, but later you need to try some new ideas yourself. How to make other figures, in addition to boxes, see the photo. The entire box may generally consist of the same elements:
Not only is the entire box assembled from quilling, but also individual elements are simply decorated.
Create works of art with my own hands always interesting. But it’s much nicer when these masterpieces are made from absolutely unnecessary things that have already served their purpose and are gathering dust somewhere in the attic. We propose to create an amazing box from completely unnecessary paper bags from the supermarket.

Quilling is an incredibly fun activity, but it requires a lot of paper. Very often the problem arises of where to get colored stripes for souvenirs made using this technique. Let's consider one option for creating a masterpiece, practically from waste paper, namely from brown paper bags from the supermarket. There are many of these in every home. Thrifty housewives put them in a pile and don’t want to throw them away. They can be given a second life. Although Brown color and not so bright, but in combination with white it looks great, as if the product was made of copper.
Step 1: Prepare the necessary materials

paper (you can use used paper)
scissors
white glue
quilling tools
ruler
brown and white paper (supermarket bags).

Cutting bags into strips is easier than you might think. You need to use the bags as if they were a regular sheet of paper, cutting the bottom and sides. Having prepared the bag, cut it into strips. To make white elements, you can also take paper that has already been used.
Step 2: Shaping the Heart

First of all, you need to make a “mold” that will help form the heart. You can draw and cut out a heart from paper, or you can create it using a computer, print it out and cut it out too. Approximate dimensions 10 x 8.5 cm.


Now twist a lot of white tight rolls with a quilling tool and glue them together along the contour of the prepared layout, but do not stick it on it.

We need to make 3 identical hearts using the same layout for them.


Then, we make 6 more white tight rolls. We glue 3 of them, placing them on top of each other, with the remaining 3 we do the same to get 2 “columns”. Glue both columns at the base of the heart (top and bottom), taking only one copy of the prepared heart. The heart with columns will be the base of the box.
Step 3: Decorating the Hearts


Now the brown stripes will come into play. There are a lot of free rolls and S-rolls to be made.


Glue them together inside the base of the heart and inside another blank. This will be the lid of the box. The rolls don't have to be the same. The more varied the rolls, the better the hearts look.

Make a few small rolls and a few larger ones. You can even make different elements if you want to experiment.
- Lyubov Rogachevskaya is a recognized quilling master, the author of numerous quilling manuals for beginners. Lyubov was happy to provide her detailed Master Class " - ".

- Photo 1. The box should be made on a wooden board, smooth, made of soft wood, so that pins can be easily inserted. You may also need tweezers, a regular ruler, a sharp knife, a pin, and a gel pen. In this case, paper is used in two shades of lilac: light and dark.
- Photo 2. Glue together dark-colored “washers”: 2 strips of 17 “washers” each and 2 strips of 11 “washers”. Glue the “washers” to each other, placing them against the ruler. Then connect the strips into a rectangle. These will be the boundaries of the bottom of the box.

- Photo 3. The space of the rectangle must be filled with a pattern. If necessary, secure the frame in several places with pins. Do this according to the diagram below:
- 1 - “washers”,
- 2 - “drops” No. 13 light tone,
- 3-4 - “eyes” No. 13 of a light tone,
- 5 - “rings” of a dark tone,
- 6-7 - “drops” No. 13 of a dark tone.
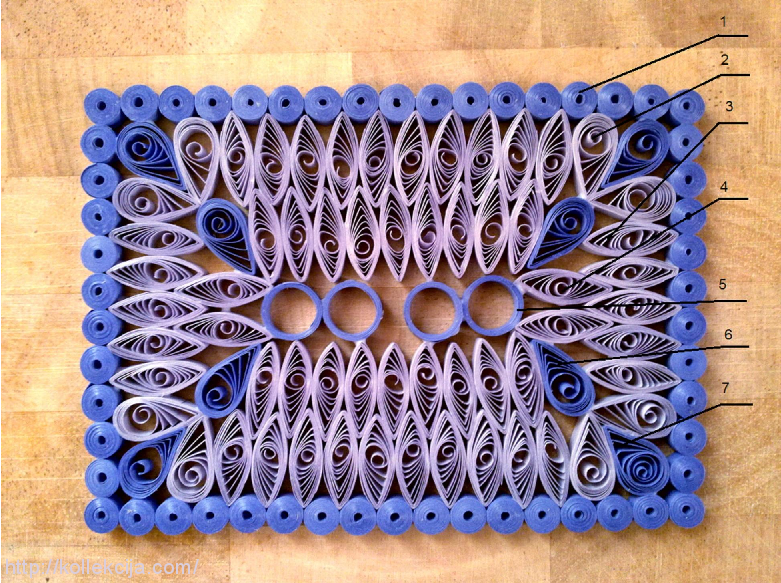
- After complete drying, remove the bottom from the board. If it does stick, cut it off the board with a sharp knife. Coat the bottom with diluted glue and leave to dry.
- Photo 4. The walls should be slightly shorter than the previously obtained rectangle. First, glue the parts in a row, aligning them with a ruler: 11 “drops” No. 13 of a dark tone. Glue 10 “eyes” No. 13 in a light tone inside and finish with another row of “drops” No. 13 in a dark tone.
- Make a short wall according to the 6*5*6 pattern. Cover the walls with diluted glue and dry.

- Photo 5. Spread the lower “drops” of the wall with glue and place it on the edge of the bottom. Adjust its position so that it touches the adjacent wall only at the corners. Glue the remaining parts sequentially, apply a drop of glue at the joint with a toothpick.

- Photo 6. Make strips of “washers” again, as in photo 2, and stick them on top of the walls, thereby completing the box. Glue one “washer” in the spaces between the walls.

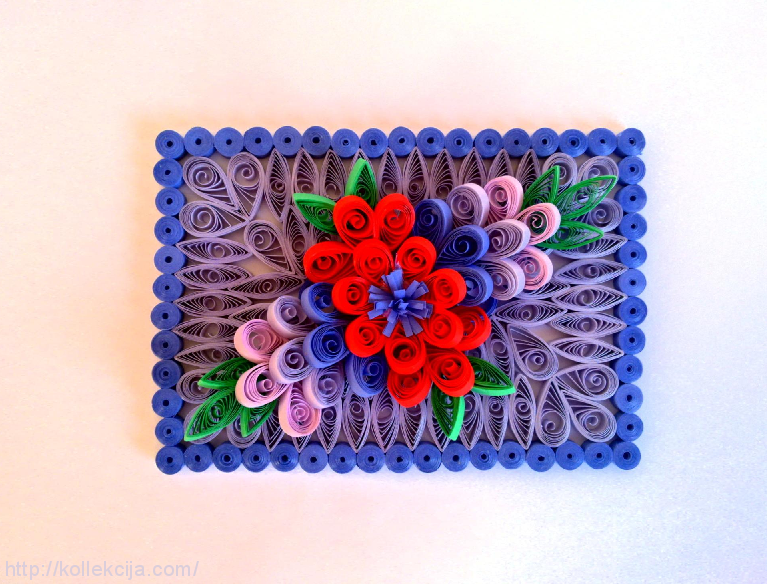
- Photo 7. Make the lid exactly the same as the bottom. they should be the same size. Decorate it with flowers of your choice. using the quilling technique is ready.
- To enlarge a photo, click on it.


