On children's party, to school, kindergarten or just for every day - for any of the occasions you can do original hairstyle based on the weaving technique. It is much more interesting to implement an unusual method: a spikelet, a basket, Jasmine style, a snake and many others. When choosing suitable option Not only your skills are taken into account, but also the length of the child’s hair.
Braiding for girls for beginners
If you don’t have much experience, but want to do unusual styling of strands from time to time, you can take as a basis one of the instructions, where the step-by-step execution of weaving is very accessible and simply described. To better understand how this or that technique is implemented, you should refer to the diagram or video. Basic rules for doing hairstyles for beginners:
- First you need to comb the girl’s hair, which will make further actions easier.
- The hair should not be pulled too tightly, because the child often walks around with braided strands all day long.
- You should try to remove any stray hairs, as not only originality is important, but also careful execution.
- To make braids as simple as possible, you often need to do it within a limited period of time, for example, before kindergarten or school. There is no need to strive to realize complex technology weaving, it is better to choose simpler, but not the most ordinary options.
Any technique involves the need to add new strands to the main ones. Depending on the hairstyle, hair can be added from the side, from the top of the head. The number of strands also differs: two, three, four or more. Weaving can begin after the ponytail has been made, but often beautiful braids for girls are created simply and without additional steps: they use the weaving method.
Braids for girls for long hair
It is more difficult to work with short strands; for this reason, not all techniques are suitable for babies. If your hair is long or medium, you can implement any option. Popular methods:
- spikelet;
- tourniquet;
- volumetric weaving based on the four-strand technique;
- french braid;
- spirals;
- waterfall;
- snake
Braids for little girls
You can simply weave the longest strands possible. The child will be pleased fashionable styling, but the number of options is limited:
- pigtails;
- waterfall;
- from the side with bangs picked up (if the hair is growing), it is implemented using the weaving technique around the head;
- fish tail.

Weaving braids for girls around the head
With the help of such technology it is possible to create festive mood. Often tape is added or bright accessories. This quick way creating braids for short and long hair. Step by step execution:
- If the task is how to weave beautiful braids in a circle, you should first collect the ponytail on the top of your head. When mom learns how to do her hair using this technique, you can skip this step.
- Weaving begins from any convenient area, but more often from the side, using the technique of creating a three-row braid. As your mother learns, you can try to implement a more complex technology, for example, the inside-out option.
- One strand is taken from the circumference of the head, the other from the crown. The braid can be thin or thick, it all depends on the amount of hair captured.
How to weave a spikelet
This is a universal hairstyle, it is realized in different variations: classic (top to bottom), bias weave, etc. Instructions for execution:
- It is necessary to select one main strand at the top of the head.
- It is divided into three equal parts.
- If the task is how to braid a girl’s hair beautifully and simply, you need to start with the technology of creating a three-row braid, alternately adding strands from the sides.

Braiding tourniquet
This is a stylish hairstyle variation. To implement it, you need to follow the following instructions:
- The hair is divided into two strands: one of them at the top of the head, the other at the base of the head. The one above is divided into two more.
- The main bundles are twisted (placed one on top of the other).
- When deciding how to make beautiful braids, you need to know that for reliability you should add strands from the sides.
- The process of alternating twisting should continue until all the hair at the base of the head is in the bundle.
- Simultaneously with weaving, you need to twist each of the strands, moving in a clockwise direction.
- How to braid girls’ hair without unraveling spontaneously? At the final stage, the flagella must be twisted counterclockwise.
This voluminous hairstyle. It is created both in the center of the head and on the sides. To learn how to do it, it is first recommended to familiarize yourself with the technique of performing a French braid, which is shown in the diagram:

The reverse technique begins in a similar way - the bun at the top of the head is divided into 3 parts. When solving the problem of how to braid a girl’s braid beautifully and simply, you need to remember that in this version, each subsequent strand must be laid under the previous one. In order not to confuse the actions, it is recommended to look at the photo:

How to braid a beautiful fishtail braid
Off the top of my head this is one of the complex options execution. In practice, you will get the hang of doing it quickly and easily, and the skill will be trained along with your hairstyles. The process can be seen in the photo:

- You need to divide your hair into two main strands at the base of your head.
- Thin side bundles are taken and intertwined, then they are pulled to the sides.
- Actions are repeated many times.
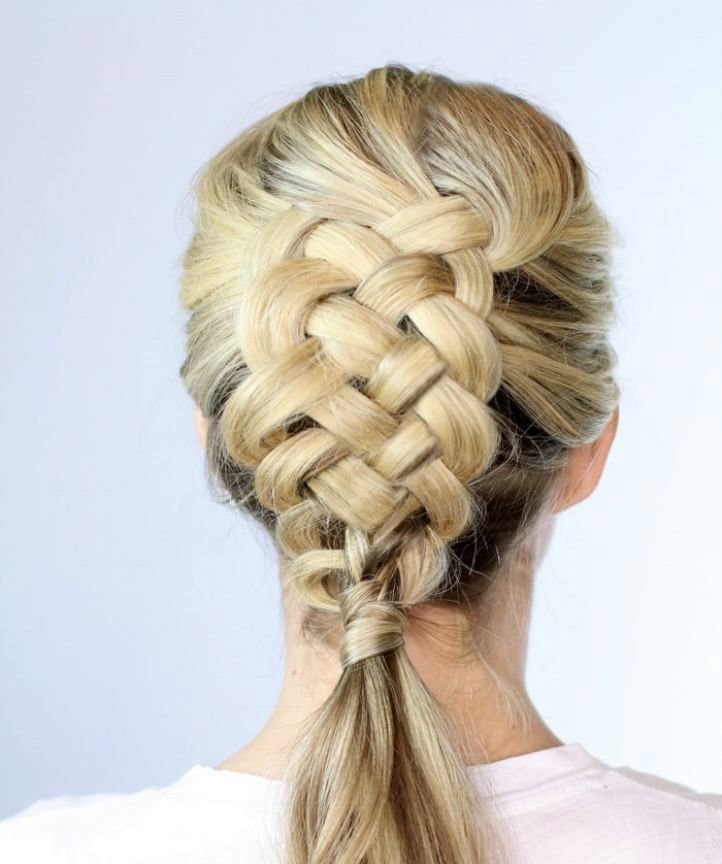
Braiding hair for girls with 4 strands
This option is based on high ponytail, but you can use frontal strands. In this case, actions begin from the area at the base of the head. When deciding how to braid a girl’s hair beautifully and as simply as possible, it is better to choose the first method:
- They make a tail.
- The bundle is divided into 4 strands.
- Further steps must be repeated according to the following scheme:

Find out from five strands.
Video: how to braid beautiful braids for girls
In addition to those discussed, there are other techniques: snake, Jasmine style. When deciding how to braid a girl’s hair beautifully and as simply as possible, you can choose one of these options. They are implemented in different ways: if in the first case you need to act using the principle of picking up and changing the direction of movement (from side to side), then the Jasmine style option is formed very simply - by creating many ponytails that are surrounded by strands, hiding the elastic bands.
How to beautifully braid a braid in the Jasmine style
How to make simple snake braids
Of all the existing hair styles, beautiful braids attract the most attention. Experienced craftsmen can create entire designs on their hair from braids. For everyday use, it is enough to understand how the main types are woven and you can create chic hairstyles yourself without leaving home.


Great variety of beautiful braids
Among the main types of braids are:
- Classic braid;
- French weaves;
- Fish tail;
- African braids;
- Spiral braid;
- Greek weaves;
- Waterfall;
- Danish braid;
- Openwork braid.


For everyday look Using one type of weaving is suitable, but for an evening event, different types are combined for hairstyles and the hairstyle becomes unique and inimitable.
The advantage of braids over other styles is simplicity and speed of execution, convenience and variability. They can be done on hair of any length.

Classic braid: braid it yourself or contact a specialist?
The classic braid is the most popular and simplest type of weaving. It is made from three equal strands. In addition to hair, you can use ribbons, wire, threads.


Before you start braiding, you need to comb your hair well, wet it a little and treat it with styling product. Then they make a tail in the place where the braid should be. It is divided into three equal-sized parts. The right outer strand is placed on top of the central one and brought under the left one so that it now becomes the middle one. Then the left curl is superimposed on the central one in front of the right one. This sequence of actions is repeated until the end of the tail and secured with an elastic band.


On the basis of a seemingly simple braid, magnificent hairstyles are created that amaze the artist’s imagination and attract everyone’s attention. The principle of all weaving begins from here.
Varieties of the classic braid - weaving from a larger number of strands. More hair is used, the product is thicker and more beautiful.
There are two ways to weave a multi-strand classic braid.

- The hair is divided into four strands of equal size. The third curl is placed on top of the second and brought under the first. The second goes on top of the fourth, which is then overlapped with the first so that they are between the second and third.
- The hair is divided into three parts and a multi-colored ribbon is attached between the second and third strands. The first is placed under the second and aimed at the tape. The third is placed on top of the first and placed under the tape, the second is brought under it and placed on the tape. The first strand is overlapped with the second and placed under the ribbon.
Advice!There is no need to tighten your hair too much while braiding. This can lead to hair loss and headaches. Slightly disheveled, it looks elegant and stylish.

French braids: simple and fast
The French braid is suitable for straight and wavy hair. It can be woven in the center or diagonally. To make the work easier, you need to use a small elastic band to secure the tail from which you will get a braid. It is divided into three zones. The right strand is placed in the center through the top, then the same is done with the left. Next, new strands are added to the main curls. Thus, by the end of the braiding, all the hair is woven into a beautiful braid.


Advantage french weave in convenience. All hair is included and does not interfere. The curls can be decorated with flowers and you will get an excellent wedding hairstyle.
A stylish solution for a braid is a headband of hair or a diagonal arrangement. You can complete the design not just with an elastic band, but twist the end into a lush flower, if, of course, the length of your hair allows it.


Advice! To make your hair look voluminous, it is recommended to backcomb the roots. To prevent it from standing out too much, lightly comb it on top.
The waterfall attracts with its lightness and grace
The French braid can easily be transformed into a beautiful waterfall. The effect is achieved thanks to flowing, falling strands.
The first stage of creating a hairstyle is combing the hair. Smooth strands are easier to work with. To help them hold better and not fray, they can be treated with fixing agents.


Next, a strand is separated near the temple, which is divided into three identical parts. The first braid begins as a standard classic braid with the first curl on the side. When the top strand is on the bottom, you should forget about it. The waterfall begins to flow. Replace this strand with a new one and continue weaving to the end of the head.
There are several types of waterfall. It can be flat or falling diagonally. A multi-stage waterfall looks original when long hair there are several of them.


The hairstyle gives the owner a romantic, feminine look, especially if the curls are curled at the bottom. Curves will be emphasized by highlighting or tinting.
Advice!You should not stop at one weave. Different types braids can be combined into one hairstyle.


The Dutch know the secrets of weaving
Dutch braiding also closely resembles the French version. The only difference is the location of the strands. Each outer strand is placed under the middle one, not above it. You can create it in just five consecutive steps.


- Step 1. A small bunch of hair is separated from the top and divided into three equal parts.
- Step 2. The rightmost curl is placed under the middle one. Then they do the same with the left one - the first link is ready.
- Step 3. New strands are woven into the structure on each side of the head, placing them under the central one.
- Step 4. The technique continues to the end of the hair, where it is secured with an elastic band or a beautiful hairpin.
- Step 5. You can add volume along the entire length by straightening the links.


Based on the Dutch braid, there are varieties of other hairstyles. For example, two weaves from different sides make a magnificent crown. Weaving can also be made fragmentary, that is, done only in the frontal area or above the bangs, like a headband.
Advice! Long hair can be left as is, but it is better to twist a short braid at the end and pin it with a hairpin.
Fish tail
A fishtail or spikelet hairstyle is created from just two strands and will decorate any look. Looks best on straight lines smooth hair, but also careless disheveled strands look impressive on long hair.

Before you start braiding, you need to treat your hair with fixatives, comb it well and moisten it. Next they are divided into two parts. A strand is separated from the first from the outer edge and brought from above to the center. The same manipulation is carried out with the second part. In the middle, the side strands are intertwined and the weaving continues.

It should be borne in mind that thin strands take more time, but create a complex, beautiful design. The hairstyle suits any style and becomes an excellent addition to a romantic, airy look. To create a playful look, you can braid two identical braids on the right and left sides, joining them into one.
Advice!A fishtail can be braided not only at the back of the head. If you place it on the side, combing it on the other side, you will get a spectacular evening hairstyle.

New bright style with African braids
The main difference between African weaves is that Kanekalon artificial fiber is added to natural hair. It helps create volume and thickness. In adults, their number reaches 120-400 pieces, in children no more than 100. Each braid is more than seven centimeters in length.

Stylists distinguish six types of Afro braids. The first is a corrugation, in which the strand is unusually twisted. The pony is also a twisted strand, but there is a loose curl at the tip. Kanekolon, which is shaped into a curl, is called curl. A ready-made braid called zizi is woven into the hair. Sinhala braids are twisted strands of natural hair, without adding additional components. Wide strands are called curls.
The originality of this type of braids is that Kanekol can be used different colors. Attach it to hair of any length.

Caring for your braids is simple: just wash the roots with shampoo once a week. This is done with a washcloth so as not to harm the hair. To avoid discomfort after braiding, you need to rinse your hair in a decoction with chamomile. Itching appears in the first days because some hairs are tightly pulled if they are short or caught in a neighboring braid.
Advice!You need to wear afro braids for no more than three months, then you need to make a correction or completely undo them so that your head can rest from the constant heaviness.

The best alternative to the classics is a spiral braid
A spiral of two strands is woven, much faster than other hairstyles and requires minimal physical effort. Very easy to do yourself.


Step-by-step instruction:
- The hair is divided into two equal parts and secured with an elastic band.
- Each strand twists in one direction, but when weaving them together, in the other. The design will fall apart if you twist the hair in one direction. During weaving, the strands unwind, so you need to remember to twist them tighter.
- The end is secured with an elastic band or a beautiful hairpin.


Advice!The plait can be styled in different hairstyles. For example, a bun looks impressive, especially if you decorate it with bobby pins with rhinestones or small flowers.
Goddess hairstyle
The favorite hairstyle of the Greek goddess Aphrodite is a braid. Its peculiarity is its location on the head. It weaves in a circle, forming a stylish headband. To create, you will need a comb, an elastic band, hairpins, jewelry and a hairpin for fastening.

First you need to comb your hair and treat it with a fixative. The parting can be left straight or made diagonally. The hair on the left side will not be needed for braiding, so it needs to be fixed separately so as not to interfere.
On the right side you should select the strand from which the masterpiece will be created. It is divided into three equal parts and classic weaving begins. After several links of a regular braid, an additional strand is taken from the side and woven into the main structure so that the outer strand becomes denser. Continue in this manner until the ear.

The right side of the hair can be left untreated, but simply combed well and also pulled into the main hairstyle. But Greek weaving looks more beautiful on both sides, completely framing the head.
Advice!Thin and sparse hair looks better if the braid is not tightened, but slightly loosened. The technique adds sexuality and charm to the image.

Openwork braids for long hair
The openwork version of weaving remains one of the main ones for several seasons. fashion trends. They can decorate holiday hairstyles and add originality to everyday ones.

Main secret openwork in luxurious hair lace. It falls out of the braid in thin loops. In fact, all you need is skill and you can quickly make an openwork braid with your own hands at home.

First, the hair needs to be combed well and treated with fixing agents. Next, you need to select a strand of hair in the place where the braid will be located. It is divided into three equal parts and begins to be braided using the classical method.


After several weaves, strands are pulled from the outer links so that they form small loops. The more hair stretches, the more lacy layers there will be. Continue until the end of the hair.
Advice! The loops should be symmetrical, then the braid will look neater.
Good afternoon, my dear readers!
I really love hairstyles with different types of braiding, and they should be fast, practical and, of course, beautiful. And today I want to share with you my favorite hairstyles. Many people associate braids with school years, but now on the Internet there are so many video lessons for beginners on weaving beautiful braids and various hairstyles with them, both daily and wedding, which delight both men and women.
So, my selection of photos and videos on the topic: weaving beautiful braids step by step. I post lessons that can be easily and simply applied in life.
I'll start with my favorite and simplest hairstyle. I do everything as in the video (braiding in the video lesson starts at 6 minutes 45 seconds).
I do the upper part of the hairstyle in exactly the same way, but at the bottom instead of “horns” I make a plait. I throw the hair to one side and twist it like a rope until it begins to curl into a donut, then I fold it in half and wrap the bottom of the strand around the top, pinning it with a small crab. I hope the photo makes it clearer...

Waterfall braid step by step, careless braid using elastic bands
The braid is made using rubber bands - it is very easy to braid, but there is a drawback - it takes a very long time to untangle it, you need to remove all these rubber bands. In principle, if you don’t feel sorry for them, then you can tear them apart.
It is better to braid hair with crimped hair. This gives volume to the braids and the hairstyle will last longer. Especially on thin, smooth hair, it is recommended to first make a crimp. You can crimp your hair with a styler or simply braid small braids at night. Comb your hair. And start braiding your hair. Below is a selection of photos of step-by-step waterfall braids. All pictures are clickable - on each you will wear detailed step by step instructions weaving.


Fishtail braid video tutorial for beginners
A fishtail looks best on straight, long hair. But it can be easily performed on medium, curly, thick or sparse hair.
This hairstyle will look especially beautiful on hair with highlights. It will successfully highlight the weave pattern.
Weaving beautiful wide braids step by step
It will turn out beautiful if it is woven from four, five or more strands. But there is an even simpler version of a wide braid - braid a thin braid from the hair on the top of the head and then thread strands of the rest of the hair into it one by one. I have attached a video on how to weave such a braid. The weaving is quite simple, I managed to do it myself the first time. The braid is really very voluminous and wide - it gives the impression that there is a mop of hair on the head.
Chic 5-strand braid step by step
It turns out that a 5-strand braid is not that difficult to make. Finally, I found a clear video tutorial on how to braid a 5-strand braid. I watched a lot of videos and couldn’t figure out where to weave what, where to get the strands from. This is the most clear and simple video I found
And there's more step by step photo braiding a braid of 5 strands.
Weaving a volumetric braid step by step
The simplest option, which was in the video, is a braid in the center, into which the strands are woven. The second option is to braid the braid, then pull out a little strand so that it appears voluminous.
Weaving voluminous braid on the side
Weaving a voluminous braid with a ribbon
Weaving a volumetric braid

Weaving a volumetric braid - weaving strands into the base braid

Masterful voluminous braid
Braiding photos step by step
Boxer braids
Boxer braids have become a trend in 2017; many beauty bloggers on YouTube and Instagram show photos with chic multi-colored braids. In fact, these are two ears of corn that mothers wove for little schoolgirls 50 years ago. But in modern world they were called boxing and added a twist - they are woven into them with ribbons, threads or artificial curls of rich bright colors: pink, lilac, blue are the most popular.
Video tutorial on how to braid boxer braids using artificial strands
Here, ordinary yarn was used to decorate the hair.
Hairstyles with braids
Very interesting voluminous hairstyles can be created with different braids, weaving ribbons and flowers into them. By clicking on the photo you can see a full tutorial on braided hairstyles.


Our ancient ancestors also braided their hair. Surprisingly, this type of hairstyle is still relevant today. The simple composition suits everyone: children and adults, girls and grandmothers. Braiding at home is an opportunity to create an individual look yourself. This hairstyle goes well with different clothing styles and looks great at any event. The modern choice of weaves is amazing. Learn to braid your hair in different ways different types simple, especially if you have a step-by-step diagram of this process at hand.
What types of braids can you braid at home?
Easy hairstyles at home are gaining popularity among large quantity women. Such experiments include braiding hair. You can come up with new hairstyles every day using different kinds weaving. A little time is spent on creating braids; with their help, you can create any look - from romantic to businesslike. Any girl or woman has an excellent chance to transform herself without visiting expensive beauty salons.
Classic three-strand braid
Braiding hair at home is a very simple process that any girl can learn. Description of a simple classic braiding method:
- Combing your hair.
- We divide them into three equal parts.
- Without pulling the strands too tightly, we cross the left part over the central one, and then the right one too.
- We braid to the ends and secure with a hairpin.
- For a more lasting effect, you can fix the braid with hairspray.
French braid
It is advisable to use this type of braiding at home for fine hair. The French technique of weaving strands visually adds volume to the hair. The scheme for creating a simple but beautiful hairstyle will be clear even for beginners:
- At the top of the head, select one strand of hair of medium volume and divide it into three identical parts.
- We weave these 3 parts together into a classic braid.
- Take a strand from right side, we attract it to the base, which is in the left hand. We weave a new strand with the central part of the main braid.
- We do the same with the strand taken from the left side, but the main braid should be in right hand.
- Using your left hand, select a new hair strand on the left.
- We repeat this process until we reach the back of the head. From now on the hair is braided in the classic way. We fix the end of the finished French braid with an elastic band, ribbon, or hairpin.

Simple braid tourniquet
Another simple option for braiding at home is a tourniquet. Thanks to this hair styling scheme, you can create a variety of unusual hairstyles. A braid made from two strands will be more impressive and voluminous than the same hairstyle with three or four parts. Braid hairstyles for medium hair and long curls, made using braided rope, are relevant for an outfit of any style. Description of the method:
- We collect the hair in a ponytail and secure it.
- We divide it into two parts. We twist the strands one by one tightly with a tourniquet in one direction.
- We intertwine the “harnesses” with each other, but do it on the opposite side from the initial twist.
- We fix the finished hairstyle.

Spikelet
The next type of hairstyle is a braid-spikelet. It’s not difficult to do, but the result will definitely please you. The spikelet is suitable young girls and older women. In any case, the hairstyle looks stylish and gentle. Weaving algorithm:
- We collect the hair in a bun and divide it into two equal halves.
- On the right side of the bun, separate a thin strand and place it under the main part of the hair on the left. After this, we take the hair on the left and place it down under the right base.
- We repeat the weaving process one by one until we reach the ends of the hair.
- Secure the hairstyle with a hairpin or elastic band.
- Tip: to get the perfect hairstyle, you need to separate very thin strands, tightening them as tightly as possible.

Fishtail braids look great on thick, straight hair. This original weaving technique creates a shimmering effect in the light. The hairstyle can be done for a special occasion, such as a graduation or wedding, by decorating the braid with beads, rhinestones or ribbon. It is also suitable for business negotiations or a walk with friends. Fishtail weaving pattern:
- Comb your hair well and treat it with any special styling product.
- Devide into two parts.
- We choose from what level the weaving will begin (from the back of the head or crown, in front from the level of the temples, at the bottom of the hair).
- Select a small strand on the left side, place it across the left side of the base, and combine it with the right main part.
- In the same way we combine the right strand with the left.
- To make the braid strong, it is better to tighten the strands a little when shaping the hairstyle.
- We braid the “fish tail” to the end, fix and slightly pull out thin strands to add volume to the hairstyle.

How to make an unusual weave for yourself
There are many unusual variations for those who prefer to create beauty on their own, without resorting to outside help. Hairstyles created using various types of braids take up a little time but produce amazing results. Every fashionista gets a chance to stand out thanks to unusual, fashionable and individual hair styling. Here are a few interesting ways braiding at home, which will help you create an image for any event.
Reverse French braid
A variation of the French braid, woven in reverse, is also called “dragon.” It works identically classic version, but with the only difference - the method of crossing the strands when weaving is slightly different. So, reverse French braid:
- Select the area from which weaving will begin.
- We take hair from this part of the head and divide it into three parts.
- We place the left part under the central strand, and then do the same with the right.
- Again, we separate a new strand to the left of the main body of hair, connect it to the left strand and place it under the middle part.
- We connect the new right strand with the right part and also transfer it under the central one.
- We create the braid further, braiding new parts to those strands that are located at the edges, placing them under the middle strand.
- When we get to the neck, we need to switch to a standard three-piece braided hair.
- We take out the strands from the sides to make the “tail” more voluminous.

4-strand square braid
A braid made of four strands always looks interesting and trendy, and it is very simple to do. This hairstyle goes well with many clothing styles and is suitable for women of all ages. Algorithm for weaving a “square” braid:
- You need to wash your hair, apply a volume fixing product to your hair, and dry it with a hairdryer.
- We comb our hair back, “hiding” the parting.
- We divide our mop into four equal parts.
- Take the outermost strand on the right side and transfer it to the adjacent part.
- We perform the same action in relation to the third strand, throwing it onto the left one from the edge.
- Cross the central strands.
- To securely fasten the weave, we cross the strands located along the edges (1 with 2, 3 with 4), as stated in paragraphs 5 and 6.
- We continue our work, focusing on alternating points 5, 6, 7.
- All that remains is to secure the hairstyle.

Volumetric braid of 5 strands
A unique braid, which is braided from 5 parts, will help you create an irresistible image. If you follow the instructions from the instructions exactly, you will get a beautiful and original hairstyle. The weaving pattern is as follows:
- Comb your hair well and lightly moisten with water.
- We will braid from the back, so you need to comb your hair to the back of your head and divide it into five parts.
- We start forming from the left side.
- The right strand from the edge (5th) must be drawn over the central (3rd) and fourth strands.
- Hold this section of hair tightly. We start braiding from the left side: we draw the outermost strand over the 3rd and lay it under the 2nd.
- You need to go back to the 5th strand to put it on the 4th and run it under the 3rd.
- We carry out the manipulations described above until the braid is completely ready.

How to braid an openwork braid on the side
A lace braid is created using different braids that are braided from the side. The hairstyle can be laced by pulling out individual tufts of hair. The lace weaving technique depends on the number of strands in the braid: the base consists of 3, 4, 5 parts. Here is the simplest and nice option, which will involve 3 strands:
- We divide the hair into a side parting.
- Separate the first strand next to the parting, the one located closer to the forehead. We divide it into three equal parts.
- We braid the braid using the reverse braid principle, placing strands of hair under the bottom.
- We take additional new strands from one side (along the hairline).
- When the braid is ready on the crown, we select new tie-ins from the free hair at the back of the head. Carefully weave in the strands that are located on that side of the parting.
- At the time of shaping the hairstyle, we pull out some strands, holding the braid loosely (do not pinch the ends).
- After all the loose hair is collected, we braid the openwork braid using the “under the bottom” method, not forgetting to sometimes pull out the strands.
- We secure the finished hairstyle with a hairpin or ribbon.

How to weave a braid around your head
The headband around the head, made with a neat braid, looks very gentle and elegant. It is also called the Greek braid. This type of weaving is always relevant and suitable for various appearances. Algorithm for creating a braid-rim:
- Wash your hair and dry your hair a little.
- Comb thoroughly.
- Creating a kind of wreath is similar to the pattern of weaving a spikelet. New strands are added exclusively from the side of the bangs, because otherwise the headband simply won’t work.
- Select three thin strands from the side near the temple.
- The first strand at the back of the head is laid on top of the second. You need to carefully separate them with your fingers and hold them, gradually adding a new portion of material to the braid.
- We repeat these movements until the second temple. The braid should be loose, there is no need to pull the hair too tightly.
- Starting from the second temple, we braid the braid down, adding strands on both sides.
- When you get a braid of the required length, fix it with a hairpin or hairpins. For a long-lasting effect, you can fix your hair with hairspray.

Scheme for weaving a waterfall braid with a ribbon
With the help of an extraordinary waterfall braid, every girl or woman can create a light, romantic look. This hairstyle is similar to a snake braid. Weaving with ribbon is done according to this simple pattern:
- We make a classic parting.
- Separate the “square” next to the parting and divide it into three equal parts.
- We tie the ribbon to the central strand, and its short end must be hidden in the process of creating the hairstyle.
- We begin to form a standard braid, placing the side strands under the middle one. The right strand and ribbon must be at the top.
- The main feature of this method is wrapping the central strand with tape. We leave the extreme lower part of the hair free, replacing it with a new strand and continuing the weaving process.
- So we move down to the other side of the head.
- After the waterfall braid reaches ear level on the other side, we finish the braiding with a classic braid without adding new strands.
Find out in more detail how simple weaving for long, medium and short hair.

Step-by-step video instructions for braiding hair at home
A simple, but stylish and original hairstyle can be done without visiting a beauty salon. Braiding at home is good chance create an interesting composition on your head using your own strength. Training with the help of accessible and detailed, free video lessons from YouTube posted below will help you learn how fast step by step weaving different types of long and short hair. As a bonus we offer detailed master class braiding afro braids.
For long hair
One can only envy mothers of daughters, because they have a real opportunity to improve their skills every day. But what to do if you don’t know how to do it yet? Today you have a real opportunity to learn how to braid beautiful and fashionable lightweight braids. Our article presents the 7 most simple ways weaving, thanks to which any girl can look different every day and stand out from her classmates.
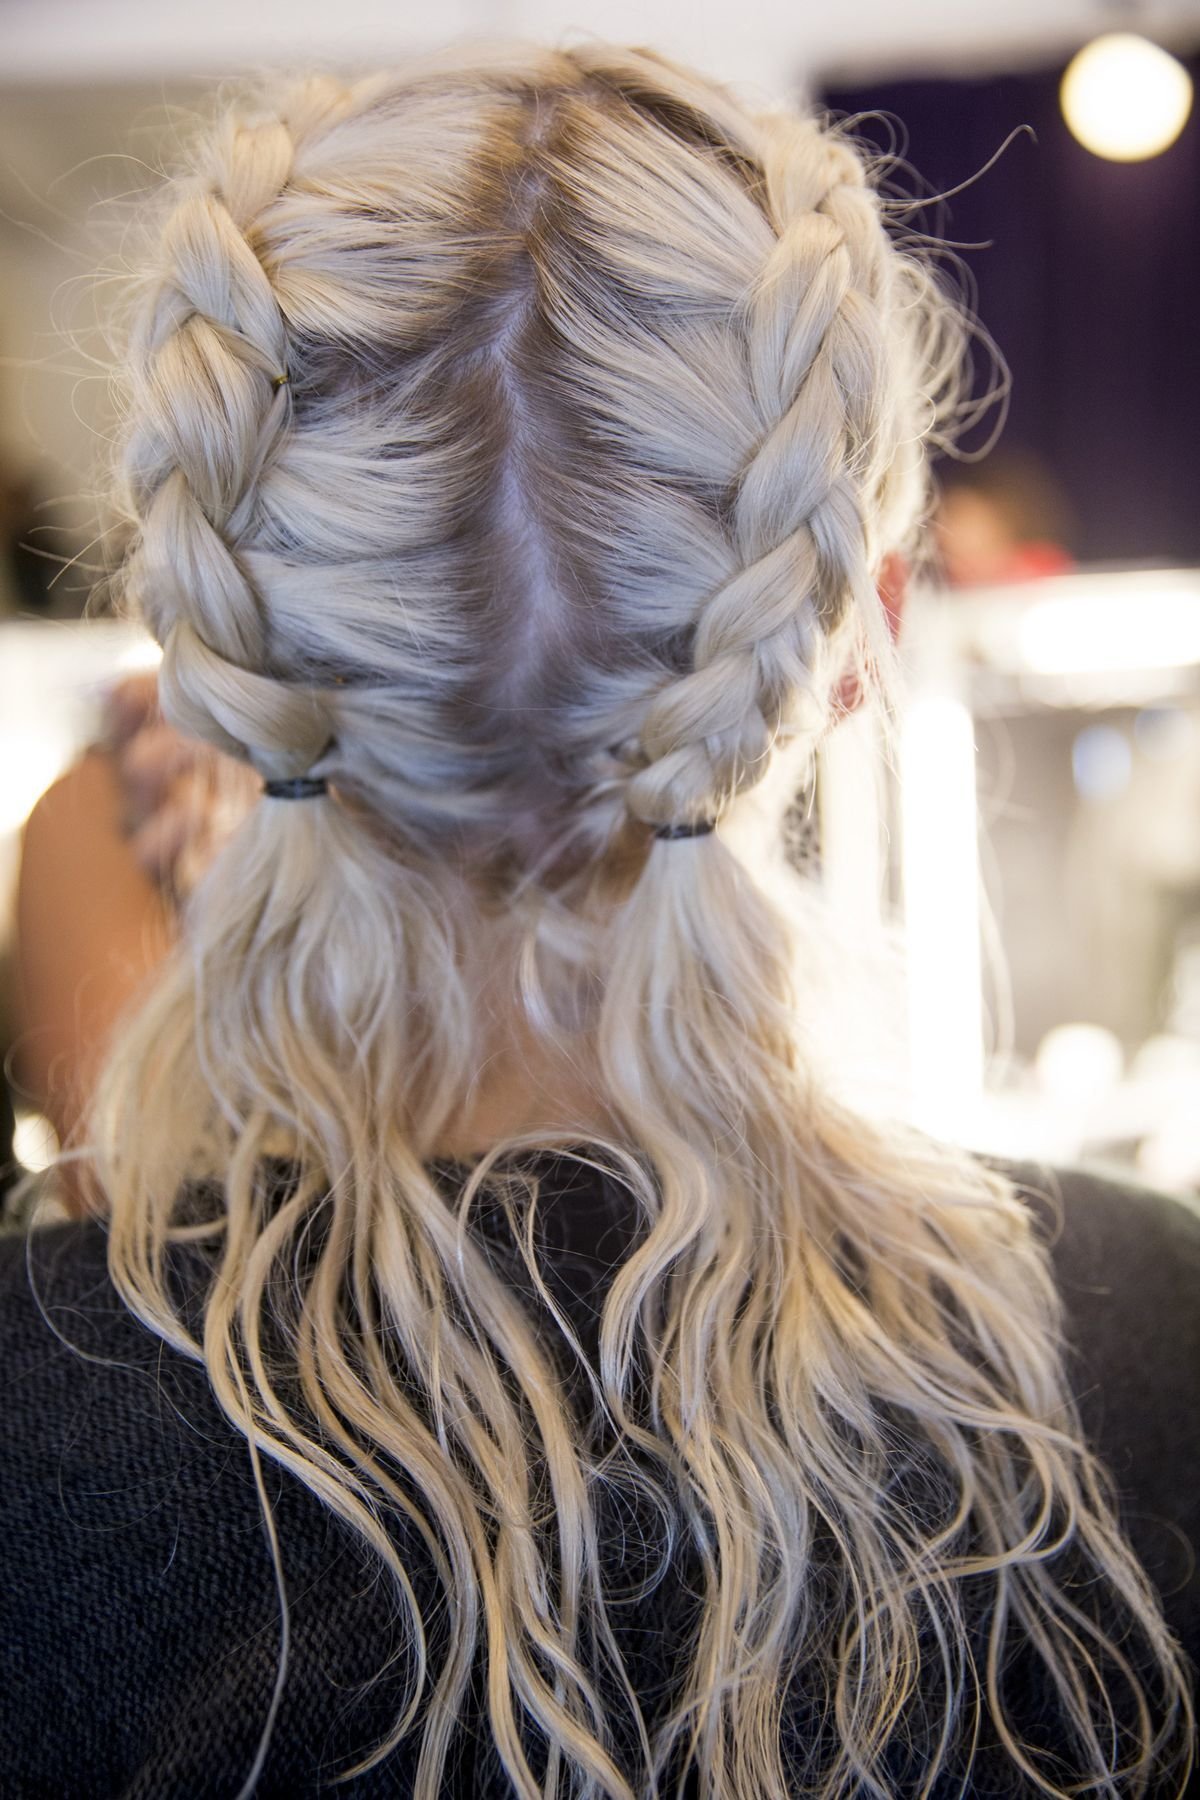
How to French Braid
Traditional French actually has absolutely nothing to do with France. On the contrary, the origin of this method of braiding dates back more likely to Africa, since it was here that rock paintings were discovered confirming this fact. According to scientists, the age of these images is 6 thousand years. Meanwhile, the French braid is also known as a spikelet.
For those who are just learning to braid their hair, it will be easier to first make two light braids in the French style. Then, having mastered the technique a little, you can begin to big amount hair.
Step-by-step consists of the following sequential actions:
- At the top of the head, select a small strand of hair and divide it into three parts.
- Weaving begins with the leftmost strand. It is the one that is superimposed on the one located in the center. After this manipulation, the leftmost strand becomes central. Now the one located on the right is superimposed on it, after which it also becomes central.
- Then all actions are performed in a similar sequence, but in addition to each strand a small part of hair is added on each side. First, a bunch of hair located on the left is taken and attached to the left strand, which is then applied to the central one. Weaving is done similarly on the right side.
- All further actions are performed in the same sequence, with gradual advancement lower and lower on the head. The width of the strands that are picked up on each side can be different, but it has been noticed that the thinner they are, the neater and more impressive the braids look.
- When all the hair on the head is involved, the braiding turns into the most ordinary three-strand braid, which is fixed at the end with an elastic band.
Reverse French braid: light weave
The traditional French braid is the basis of the braid. Having mastered this technique, you will be able to learn how to weave any braids easily and quickly. What sequence of actions to follow in this case?

Weaving a reverse or inverted French braid also begins by dividing the strands into three parts. After this, the left part does not overlap the central one, but is placed under it. Then a part of the hair on the right side is brought under the newly formed central strand. Then the curls are picked up alternately from each side, connected respectively with the right or left strand and transferred under central part.
The reverse French braid can be made either tight, loose or openwork. To do this, each strand begins to be pulled out, starting from the tip of the braid. By the way, you only need to pull them out along the edges, but not in the center, otherwise the entire weave will fall apart.
How to easily braid a waterfall braid
Braiding with the symbolic name “waterfall” is based on the French braid technique. Meanwhile, this hairstyle has its own distinctive features.

To begin with, a wide strand of hair is separated from the temporal zone, which is divided into three equal parts. Weaving a regular braid begins by moving first the top and then the bottom strand to the central part of the curls. Next time, the top strand is still overlapped with the central one. In the same time Bottom part is released down like a waterfall, and in its place a new bun is taken from the loose hair. The next time, the top strand is again superimposed on the central one, the bottom one is released into free fall, and another, unused part of the hair is taken in its place. At the very end of the braiding, the tail of the braid is hidden behind the ear and secured with a hairpin.
Easy fishtail braids
This hairstyle may seem too complicated at first glance. In fact, it is easy to weave such braids. A fishtail looks beautiful on both long and short hair. Braiding can be started from both the crown and the back of the head. You can also tie a tight ponytail with an elastic band and start weaving directly from it.

First, three strands of hair are separated from the top of the head and a French braid begins. Then the right and left parts are transferred through the central one. The result should be two strands, one slightly thicker than the other. Further, the essence of weaving is to separate, for example, from the left wide strand a small part of the hair (about 10 times smaller than the main one) and add to it a strand of free hair from the same side. Then a small part is also separated from the right side, placed on the central (left) side and the hair on the right is added to it. In a similar sequence, from left to right, all the hair is transferred.
Simple: braiding a braid in the form of a tourniquet
For this hairstyle, you need to make a tight ponytail at the back of your head. Then divide it into 2 parts. Then both halves of the hair are twisted in one direction, for example to the left. When the tails produce fairly tight flagella, they are twisted together again, but in the other direction, so that they do not unravel. The resulting braid is secured at the end with an elastic band.
You can weave two small light braids for girls at once in the form of a tourniquet, and then twist them together again. You will get an original double tourniquet.
Light braids with elastic bands
Even a child can braid this hairstyle. The only caveat is that it requires long hair.

To start, you need to gather your hair into a ponytail on the top of your head. Then it needs to be visually divided into two equal parts. Next, strands are separated from each side, which are brought forward and secured with a small elastic band. The resulting “heart” is immediately corrected and given volume, if necessary. The next time, two strands on each side are brought forward again and secured in the center with an elastic band. Then all actions are performed in a similar sequence until all the hair is gone.
How to easily braid a basket from a braid
Introducing another option. It will help you hone your acquired skills after you learn how to quickly weave the light braids suggested above.

At the very beginning of braiding, you need to tie a ponytail on the top of your head, so that approximately the same amount of hair remains around it. Now you need to select three parts from the freely falling hair and begin weaving, picking up the strands at the same time from above and below. Everything is done exactly as in the “waterfall” hairstyle, but without letting the strands go down. In this way, all the hair is braided in a circle. The tip of the braid is hidden under a hairpin or hairstyle, and then secured with a hairpin.
To do one of the hairstyles suggested above, you will need from 5 to 10 minutes. The following recommendations will help reduce this time.
- The key to a beautiful and easy to braid braid is well-combed hair.
- Beautiful and light braids are woven from hair of the same length. It is more difficult to work with graduated curls. In this case, you cannot do without additional hairpins and pins.
- If your hair is thin, experts recommend weaving ribbons into your braid. This will help add thickness to your hair.


