Liliya Radifovna Tashbulatova
Good day everyone!
In our garden, we prepared a fairy tale “A Bag of Apples” for children, and of course the question arose of where and how to make horns for the character of a goat with kids.
I think you will like and find my master class useful.
I am sharing with you a master class on how to make horns for a goat and kids with your own hands.
We have to:

Twine rope
Glue moment
Thermal glue gun
Scissors
We make a cone out of cardboard and be sure to glue the seams well.
For goats, the horns are 20 cm and for kids, 10 cm, and we wrap them with rope and glue each row. Press down each layer.
We make the bottom out of felt, cut out a circle and close the bottom of the horns. Make a hole for the rim and thread it through
We cut out ears from felt, cut out an oval at the edge, make a 2 cm cut, overlap each other and make a depression out of this. For goats there are more ears and for kids there are less.
This is how our costumes turned out for the fairy tale.


Publications on the topic:
 It's no secret that our beloved little inhabitants of the planet live in their own special world, where holidays, joy and fun are given a lot of time.
 Photo report on the theatrical performance “Bag of Apples”In these warm weather autumn days at MBDOU DS No. 38 in Kuznetsk in general developmental group No. 12.
 On autumn holiday Guys preparatory group presented a theatrical performance based on the fairy tale of the same name to invited parents.
Summary of GCD based on Suteev's fairy tale "Bag of Apples" Summary of GCD based on Suteev's fairy tale "BAG OF APPLES" Educational field of "communication" with integration into the field of "cognition". Prepared and carried out.
Summary of a lesson on speech development with a presentation based on the fairy tale by V. G. Suteev “Bag of Apples” open class on the development of speech based on the fairy tale “Sack of Apples” by V. G. Suteev Teachers: Morenkova M. B., Kulikova M. N. GBDOU Children’s.
Recently, deer antlers have become a popular accessory for photo shoots and boho weddings. This stylish detail is used with pleasure on postcards and in illustrations, in costumes and in interior design. If you urgently need antlers, but there is no deer nearby who will shed them for you, I will show you how to make antlers with your own hands.
In many cultures, the deer is identified with light and creation. The ability of this animal to shed and grow new antlers has always seemed miraculous, so deer have become a symbol of renewal and a new beginning.
The historical entry of horns into interiors as wall accessories was noted in the early 19th century and exclusively in the homes of aristocrats. And this detail began to be widely used in the so-called Alpine style.
How to make deer antlers - materials and toolsIt will take us about an hour to make deer antlers with our own hands. They are done in 2 stages. It takes about 30 minutes to prepare the workpiece and cover it with paper. After the glue dries, you need another 20 minutes to paint ready product. Length: 32 cm.
- Aluminum wire - 1 m
- Pliers
- Sintepon or other filler - cut approximately 25 x 10 cm
- 3 cm wide masking tape or foil
- PVA glue
- Paper or newspaper
- Brush
- Acrylic paints of different colors.

I'll show you how to make horns using papier mache technique. If you plan to paint them more dark colors, you can use newspaper, and if the antlers are light, it is better to take thin white paper. Usually thinner is the white paper that is sold for writing, not for printing. But if you don’t have one, a tighter one will also do. It just needs to be crushed longer to make it more pliable.
1. Take aluminum wire and shape it into deer antlers using pliers. To form horns, you can find a picture of real ones on the Internet, enlarge it and simply repeat the outline.

2. So far, it doesn't look much like deer antlers. To add volume, we tear off small strips of padding polyester, wrap them around the wire and secure with masking tape. If you don't have masking tape, you can use foil. There should be more synthetic padding at the base. The closer to the tip, the less filler is needed.


3. Now take the paper, crumple it well and tear it into small strips.
4. Spread each strip with PVA and gradually glue the workpiece. It is better to glue the horns in 2-3 layers to make them strong enough.

5. After the glue has dried, you can start painting. Traditionally, the tips and middle are painted more bright color. You can separate areas to be painted with masking tape or draw boundaries with a pencil if the surface is not completely flat.
To be able to paint all the parts at once, the antlers can be hung on a ribbon.

Let the paint dry and enjoy the result.


I made some more horns bigger size and gave them a worn effect.


With a little imagination, deer antlers can be used in completely unpredictable ways and you can find many uses for them.
- Have a fun photo shoot with friends
- Make stands for bouquets from horns
- Decorate the wedding arch with horns at a wedding
- Make deer antlers an element of a boho bouquet
- Fit into the central composition of the table or use as a table setting
- Make a jewelry stand
- Use as curtain holders
- Decorate a wreath on the door with horns
- Use as wall decoration
- Put on the horn wedding rings for a photo shoot
- Hang on the horns new Year decoration or decorative elements
- Use as part of a costume.
And many more stylish ideas that just come to your mind.
Happy New Year, everyone! I plan to celebrate it with my family and will now sit down to write the script, but I decided to celebrate it in the guise of a Goat. Not blue, not green, but a natural beige goat. My husband is a terrible monogamist, so I had to make the horns myself.
If you like what I did, then read how and make your own unique horns (blue, green, and whatever comes to mind).
We will need:
0. RIM with teeth. He's not in the photo, but you can't go anywhere without him. Teeth are also required, otherwise your horns and ears will “fidget” around the rim wherever they want.
1. Thick wire for the frame (mine is about 2-3mm)
2. Thin wire (0.3mm)
2.1 I still have a rolled piece of thin paper lying around from a previous craft, I use it for fastening.
3. A skein of thick white thread
4. Gold thin elastic band (I have an elastic band, you can use thread, probably)
Tools: Hook No. 2 and scissors
All this, of course, may vary depending on the result you want.

First, I made the base of the horn using a vitamin cap. Leave the tail a few centimeters, then attach it to the rim. It’s even better to make the frame square, but I realized this only later.

Then long end We lift the wires and make a triangle. I made 15cm, because... 15th year, but it turned out to be quite long. Then as in the photo: a 90 degree angle in a circle and another frame triangle on top.

I secured the wire joints with double thin wire.

We make two such blanks and bend them like a goat. I bent them as in the photo and when I started attaching them to the rim, I got a devil, not a goat! My husband laughed all evening, and I was so looking forward to praise. So think carefully about how you will attach them and in which direction you will bend them.


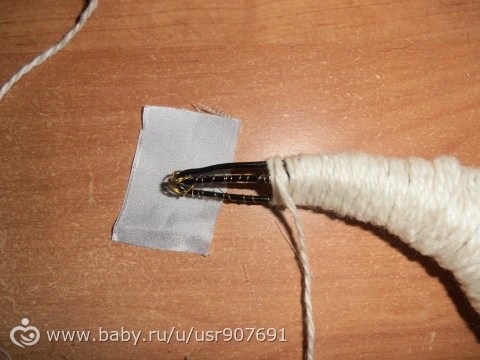
Therefore, you first need to wrap the horns with thin wire to give them ribbing.

I left the tail of the loop quite long and walked it around in a circle, attaching it to each corner to secure the thread.

Now we wind the thread around the horn.

You can cheat on the tip and wrap a piece of white fabric around it to hide the wire.

Then we go down, wrapping what has already been wrapped. Stop panicking if, during the second winding, it turns out that the first one seems to be weaker, everything is the same for me! Just wrap it up well.

At the end, we fasten the thread to the wire and hide it inside the horn.

When you are finished with the first horn, take the second piece that has fallen to the floor out of the child’s mouth and do the same with it.

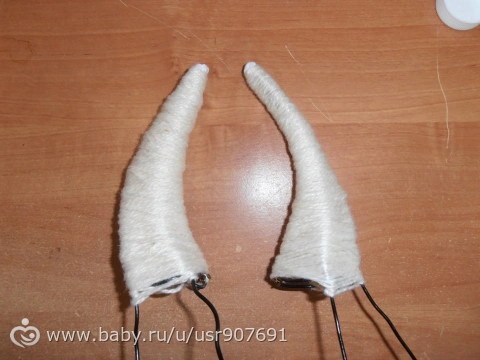
As you can see, my first horn came out thinner than the second, so I will wrap more threads around it. I will start from the top, throwing an air loop over the top of the head, and wrapping the end in a winding.

During the winding process, compare what you get, and why I didn’t compare it right away, oh, this “maybe”.

I'm starting to decorate. I put a loop of gold elastic on the “leg” of the horn and spiral up to its top (I try to keep the distance between the lines about 1cm).

At the top of the head I inserted a piece of thin wire into a white thread and use it to secure the gold elastic band.

After which I turn the elastic band back and walk it along the already laid path (it turns out to be a winding of two threads), and I hide the wire along the white threads.

The horns are ready, only the ears remain. 
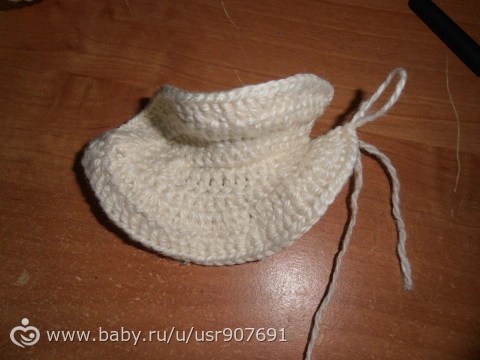
I crocheted the ears, trying and making mistakes as I went. I’ll post a diagram, don’t judge strictly and forgive those who are not familiar with the crochet hook, but I don’t have time to describe it in detail, and this is not the topic of my MK.
I cast 15 air loops and went down connecting posts (14).
1st row: 3 ch. lifting and 13 double crochets, 5 treble crochets. in the 15th v.p. and again 13 st.s.n.
Rows 3 and 4 are similar to row 2, but
3: *2 dc and 2 dc in one loop*
4: *3 dc and 2 dc in one loop*

This is how the ear turned out, you just need to fold the base in half and sew it together.
Now let's assemble everything onto the rim. I already wrote that I bent the horns in the wrong direction, so one of my “attachment legs” did not come out at the rim and I simply stretched it to the opposite corner.

The horns are in place, the ears remain.

I crocheted them, pulled the thread inside the ear, tied it with the tail from the beginning of the work and cut it.

There you go! I hope this year’s symbol and everyone who read it will be satisfied.

Happy New Year to you, dear reader!
Recently, kindergarten teachers have decided not to complicate life for parents and are trying to select roles for children for the holidays so that they can make a costume with their own hands inexpensively and relatively quickly. And the last “order” was for kids - accordingly, as many as seven kids in the group were kids. The teacher decided this: the girls and boys will be dressed smartly, and they will be turned into kids with hats. My daughter got the role of the youngest kid: we made a headband with ears and horns, and hung a bell around her neck.
This is what we got.

This is, of course, an option for girls. But making a kid costume for a boy by analogy is not difficult. On the contrary, it would be simpler: you can choose a headband to match your hair color and not decorate it at all, but limit yourself to gluing on horns and ears. Or you can keep the wreath idea, do without flowers, but make more felt leaves.
To make such a kid costume, you will need:hair band;
glue gun;
Super glue;
green felt, preferably two or three shades;
zigzag braid (bindweed);
jute twine natural color for horns;
wire or paper clips for the frame of the horns;
fleece or felt for ears;
threads to match the braid and fabric for the ears;
pencil or felt-tip pen for cutting out ears;
cardboard for ear pattern;
bell from the New Year's set;
ribbon for hanging a bell around your neck.
DIY baby goat costume: master classWe will divide our master class on creating a baby goat costume with our own hands into several parts:
Roses made from braid for a baby goat costume for a girlFor each rose we will need at least 40 cm of bindweed braid (its other name is zigzag).

Cut 2 pieces of 20 cm each.

We place the ends of the braid one on top of the other so that the wave on them goes in different directions (see photo). We sew the ends together (you can also use glue or clear nail polish and process the ends so that the edge does not become shaggy or crumble).

We intertwine both pieces of braid with each other.


We go over the woven braid with a “forward needle” seam.


We twist it into a tight roll, securing the edge of the braid with stitches (the same one that we stitched in the previous step with a “forward needle” stitch).


It turns out to be such a rosette made from braid.


Looking ahead, I will say that I needed 8 roses: 7 for decorating the headband, and one for the bell.
Baby goat costume for a boy or girl: making hornsFrom the wire obtained by straightening large paper clips, we twist the pyramids in an arbitrary manner. I twisted two triangles and crossed them so that I could then secure the end of the twine in the cross.


We fix the tip of the twine at the top of the wire horn (you can not only clamp it with wire, but also fix it by dropping a little superglue).

We wrap the wire pyramid with twine.

The tip can be fixed with glue, but for reliability I grabbed it with a few stitches of thread.

Let's estimate the location of the elements on the rim.

To pattern the ear, I drew a 9.5 cm long piece on cardboard and drew arcs on both sides of it by hand, without striving for perfection of the shapes. We cut out the blank for the ear and trace it on the fleece (from the wrong side) - 2 parts each in a direct and mirror image of the pattern.


Cut out the pieces with a small seam allowance.

We chop the parts in pairs, placing them face to face.

We sew along the perimeter using a machine or by hand with a “back needle” seam, leaving the hole unsewn in the place where the eyelet will be attached to the rim.

We turn the ear right side out, straightening it from the inside with closed scissors.

Carefully place the cuts on the hole inward and sew it up with a hidden seam.

We squeeze the ear so that it is wrapped, like a real kid, and stitch it.

Let's figure out how the whole headdress will look.

First, we draw and cut out many, many leaves from felt. I made small ones, but it could have been larger. I selected the size based on the parameters of the roses themselves.


Now we sew or glue 2-3 leaves to all the roses with a glue gun.

On the rim we mark with a pencil the location of the “key elements”: for us these are horns and ears. It is better to try the headband on the child and quickly make marks.

From the center of the rim we begin to glue felt leaves in random order - small piece. Superglue can also securely glue them to the smooth rim, but the other elements that go on top of the felt will not be taken by superglue; so you can immediately start working with a glue gun.

Glue one of the roses exactly in the center.

Glue the horns to the marked places. We fill the space between the horns with flowers and felt leaves.


Let's start creating the decoration. I first opened the bell several times with pearlescent nail polish.

We pass a ribbon folded in half through the hole in the bell and tighten it with a loop; glue a rosette with leaves sewn or glued to it to the bell.

And with this, our master class on creating a baby goat costume with your own hands can be considered complete.


Eva Casio specially for the site
We carry our childhood impressions of the New Year celebration throughout our lives, and, as adults, we strive to give the holiday to our children. What could be more fun than a costume carnival with family and friends?
The coming 2015 is the year of the Goat or Sheep. According to Eastern beliefs, he will bring positive changes to the lives of those who seek to change their way of life. In order for everything planned to come true, - New Year should be met in a good mood, in a noisy company at a generous table! Organize a real carnival for your family! One of the key symbols of the coming 2015 is a wooden figurine of a goat or sheep. They can be used to decorate festive table and a Christmas tree. All family members - participants in the holiday - can dress up in sheep and goat costumes. Couples suits can become the best decoration holiday! Mom Goat-Dereza and baby Goat, Little Sheep, Shaun the Sheep, Fiery Aries - there are enough images for everyone!

Actually, any festive clothing can act as a children's New Year's goat costume, which can simply be supplemented with accessories - ears, horns, and a tail. While it’s quite easy to make ears and a tail from a piece of fur, you’ll have to work hard on the horns. You can make horns with your own hands using available tools and creative materials - plastic cups, culinary foil, cotton wool, paper, glue and paints, self-hardening clay, plastic, etc.
Fabric horns
The easiest way to make cute little goat horns is to sew them from fabric using a simple pattern, which can be pre-drawn on paper.
Felt is well suited for such horns - it is soft, pliable in work and holds its shape perfectly. Horns made from this fabric can be stuffed with padding polyester.

Horns for carnival costume, workshop “Aelin", Moscow

Costume “Goat”, art workshop “Colombina”, Kharkiv
Fabric horns can be attached not only to the headband, but also to the cap. The hat can be crocheted or sewn from a suitable material.


Small plastic horns
Sculpt from plastic (self-hardening polymer clay) small cones (determine the size yourself, based on your idea). Give them a bend and apply a relief to the uncured surface using a wooden stick or toothpick. Leave the clay to dry for several hours.
After the horns are dry, paint them suitable color, and cover any uneven texture with contrasting paint. In this case, silver and black paints are used. You can make horns of any color, because they are intended for a carnival New Year's costume! Now we solve the question of how to attach the horns to the hair. In this case, it is suggested to use hairpins.

Polymer clay horns
They are suitable if the horns are light in weight. Heavy horns will not hold up like that and it is better to attach them to a wide rim, like fabric horns.
Paper horns
Large sheep horns can be easily made from paper. For durability, you should use cardboard. Cut the cardboard into long strips and roll them into spirals, gluing them as you roll. Hot melt adhesive is well suited for gluing, as it will add additional texture to the product. The spiral can be made not solid, but from rings of different diameters, gluing them in series.

After the base of cardboard and glue has dried, cover the horns with thin paper (napkins will do) to prepare the surface for applying paint. With the help of napkins and glue, you can give the horns the desired texture by making folds. Let the paper dry and start painting! Choose colors that will match the hair color of the person wearing the decoration and the color of the costume. It is more convenient to attach large horns to a hairband, which can additionally be fixed to the hair using hairpins and bobby pins. 
You can start preparing a New Year's goat costume for your child and for all family members now; there is not much time left before the New Year - very soon we will all have wonderful holiday evenings with our loved ones!


