Good day!
Do you want to decorate your apartment with something beautiful and magnificent? Certainly! Then how about a wreath, which is usually hung above the doors on New Year or on the bright holiday of Christmas. This type of room decoration will always remind you of the holiday and create an atmosphere of comfort and warmth.
My children and I usually decorate the house, and a must-have attribute is a bunch of, well, .
Well, let’s not waste time, let’s create wreaths, because this activity will give you a lot of positive emotions, and besides, you won’t need to buy such a craft again in the store.
Take these ideas and create! All the most interesting things await everyone ahead. Good luck!
There are a great many ideas for making such a craft, as it turns out. Let's look at a couple of them that I managed to find. Take thick cardboard and cut a wheel out of it. Then wrap it under wrapping paper or cloth.
Then make little bags from music paper or colored paper and decorate the rim (glue it to the blank).

Any New Year's silhouette, such as a twig or bow, will add completeness.

From such a soft foam plastic or polystyrene tube, you can first make a circle, and then decorate it, wrap it around cotton fabric. Then tie it with tinsel or use feathers.


And in the middle hang a snowflake made of plywood or

For children kindergarten or schools, I suggest considering the option of wire and any fabric. Twist the wire into a ring, and then tie strips of fabric of different colors onto it.


You can take a regular one satin ribbon and tie bows.


And now, another treasure made of chenille wire. This can be purchased at a fixed price or in the department for handicrafts and creativity.


Another option is to make the wreath glow, imagine how cool it will look, like...
Wreaths for the New Year from all sorts of things: 15 ideas
I would also like to show you ideas that may lead you to your next masterpieces. I really liked the wreaths made from balloons, as well as from dry twigs and candied fruits.


And here interesting craft from pop food, they came up with it, thanks to the authors for the new product!

Here in this one we see cones and others artificial fruit. It turns out that the wreath was woven from ordinary newspaper, and then they simply hid it in organza and wrapped it in tinsel.

The next work is made of dry twigs and decorated with balls and a bow.

In addition, you can use candles, although in this case the wreath cannot be hung, but simply placed on the table and used as a candlestick.

Decoration in the form of a wreath made of fir cones (detailed master class)
I offer another new product that you can easily build yourself from available materials. Take a look at the photo, I’m sure you have all this in your home, especially now when winter is in full swing.

First decide on the size of the wreath, then draw a circle on cardboard and another one on it, cut out this shape, in the form of a ring.

Then tie the ring with tinsel, glue the pine cones and tie bows.

Do this all using a glue gun or regular glue. Balls and plastic houses will also fit beautifully if you glue them to the product.

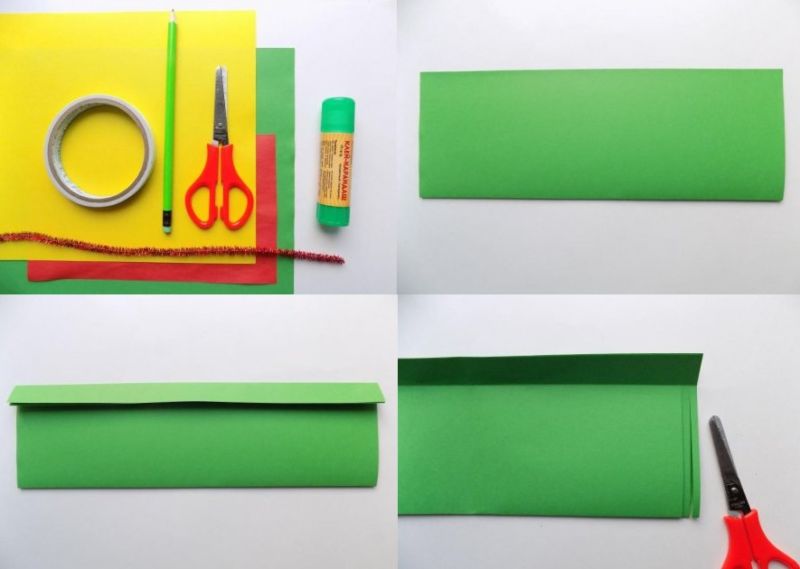
Then wrap it with masking tape and plain paper.

So that the wreath becomes voluminous and, as it were, lush.


Cut the leaf into strips.


Fold each strip several times and make frequent cuts.

Fold the flexible wire in half and begin to put the workpiece on it, so that you get a twig.

Insert the wire into the strip.


Make the required number of such branches, for example 5-6 pieces. And use them to decorate a ring.

Glue the pine cones in a circle and tie a bow.

Here's another example, use it:


New Year's wreath made of felt + patterns
An unusual work can be a product using ordinary fabric. Felt or foamiran works well here. The fact is that these particular species do not crumble and are easily cut with scissors, just what you need!
Take any round base with a hole inside, as shown here:

This is what our heroine created, and what about you? Share in the comments.

Or you can cut the felt into circles, then fold each one in half and in half again and secure with a needle, and then stick it on the polystyrene foam base.


In addition, you can decorate wreaths with flowers, because any holiday, even Christmas or New Year is no exception, does not cancel this attribute.

Take the base again and wrap it with burlap or linen cloth.


Afterwards, sew each petal with a thread, as if making a recess, and then sew them to the flower.

This is what the output should look like.


And then they ate it with live twigs.

And of course, satin or decorative ribbons and cones.

Christmas wreath made of knitted yarn
When I wrote this article, I had no idea that such a product could be created. It turns out you can make it from balls, take a look.


Next job, so snowy. A white woolen thread is taken and wrapped around a flat “steel”.

1. Wrap the threads tightly around the cardboard blank so that there are no gaps.

2. You can also make pompoms from threads or take ready-made balls.

3. Then secure them with glue or a gun to a wool ring.

4. Be sure to get small artificial Christmas trees. They will fit perfectly into the craft.

5. And also use beads or beads.

6. Hang the finished work on a ribbon or thread, a tinsel, and then hang the craft on the door.

Making wreaths from Christmas balls at home
Now let's move on to making another product, take a wire to work with and twist it into a circle, but make another loop, like a hanger. To make it convenient to hang such a wreath somewhere.

Now use your imagination and decorate the wire with tinsel and balls. Glue all components with glue using a hot gun. Or, if there are holes on the balls of the required diameter, then simply pass them through the wire.

You don’t even have to glue the balls, but simply use threads and tie them to the workpiece.

This is such a charm, you can make it multi-colored.

And for completeness, use a bow, which you tie where the loop is where you will hang the craft. Hide it.)


Here is another work, also exclusively red; it is this color that should prevail in such works in the first place.


Festive wreaths made of tinsel and candies
Another one interesting idea make a craft using edible things. After all, the candies are always brightly packaged and sparkle, so I think that you will also like this beauty. Well, cut the stencil out of the cardboard again. Glue the tape and fold it into a loop.

Then rewind the sample with tinsel and secure the end with glue. Glue the candies to the cardboard, that is, their ends.


Here are a few more works, perhaps you will like them more.

You can design the product using a regular embroidery hoop.

New Year's wreath on the door made of fir branches
Anyone can make a wreath from real twigs; imagine the smell that will waft through the apartment. I found a couple of photo instructions that will help you easily figure out something similar. Good luck!


Master class on how to make a Christmas wreath from newspaper tubes
If you want to make another masterpiece, and also from an unusual material. Namely, from tubes, but not plastic, but paper. Imagine, it’s hard to believe, but now it’s possible to do such things. Moreover, you will need old newspapers.

We will need:
- many newspapers
- PVA glue and moment
- stain or brown gouache
- thin wire
- thread
- bottle
- knitting needles
- decorative tape
- beads
- scissors
Stages:
1. Twist tubes from newspapers, use a knitting needle for this, treat the joint with glue. Then place them like shown in the picture and start weaving.

2. To complete the craft, you need to take a jar, like a tall flask, suitable for varnish or juice, and wrap it in a spiral.

3. You need to do it this way, take the first tube and bend it like this:

4. Afterwards, bend the adjacent one and place the next one, and so on until you have assembled the entire product.

5. Gradually raise the jar.

6. This is how the blank turned out, quite long.

7. Twist the resulting workpiece into a circle and connect the ends with wire. And then use stain or paint.

8. Thread the blue ribbon and glue on the beads.

There are still questions, then take a look at this video, maybe there won’t be any more. Make such beauty from paper vine. Good luck!
Beautiful New Year's craft from foamiran
Next, I suggest you familiarize yourself with another product, which is made from quite simple material like foamiran. Turn on the view button and watch, the author shows and tells at the same time. It turns out beautiful and cool!
Step-by-step instructions for making wreaths for the New Year 2020 from paper
The most common souvenir for children will probably be a wreath made of disposable tableware and paper hands of a child. Or simply use a plate to draw a circle on paper and cut it out with scissors, and glue the images of handles onto it.

The following strip work:

If you want a more voluminous wreath, then take this product as a basis.

Well, or take advantage of this master class.


New Year themed beaded wreath for beginners
Those who are fond of beadwork in their life know that beads can be used to create not only toys, but also any decor. And in this case, the wreath is no exception. Try to create such a wonder.

We will need:
- green or light green beads
- aluminum wire
- green decorative ribbon
- beads
- glue gun
Stages:
1. Take a long and flexible wire and put beads on it.

2. Then count fifteen pieces and roll the wire into a ring.

3. Then twist the wire four turns. You and I did something similar when we were collecting, remember? In this way, assemble a long branch from loops.
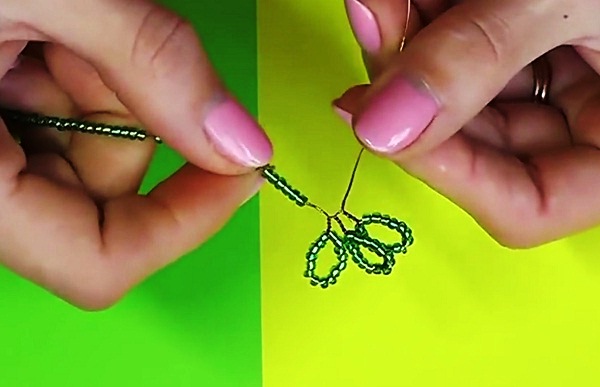
4. The chain should be as long as you want; the larger it is, the more voluminous the work will be.

5. Now take a thicker wire, for example aluminum, and tie it with green cloth or ribbon. And wind a bead blank around it in a spiral.

6. Connect the ends of the product with glue from a gun.

7. Now decorate with beads and bows.

8. What a delight it turned out, well, it looks like it came from a store, but I think it’s even better!

Here's another similar option. Don't miss it if you want to master this technique.
This is where I end the post, I hope you liked all the works and it was not in vain that you came to this page. Create wreaths for the New Year or Christmas and delight your loved ones with such beauty! See you soon and bye everyone.
New Year is a holiday highly revered in our country. This is a new stage of life, many believe that with the advent of next year, changes are bound to happen. And they depend on how you spend this holiday. There is even a proverb among the people: “how you celebrate the New Year is how you will spend it.” On this holiday, it is customary to prepare many different dishes, clean the house and decorate it in every possible way. Even without following traditions, people still decorate their homes before this holiday, since decorations are the harbingers of the holiday. They create a special atmosphere, create a New Year's mood and allow you to surprise guests with the skill of the owner. Today we will dedicate the day to create a DIY New Year's wreath with you.
Decorations are harbingers of the holiday

For the New Year's Eve, a wreath will be an excellent decorative element.

Wreaths are made from anything
In our country it is customary to make a wreath as New Year's decoration. However, it has a certain history and symbolism. This decoration came to us from Western countries, where it is a symbol of Christmas. And its real name is “Advent wreath”. Its invention is believed to date back to 1839, and is attributed to the hands of Johann Hinrich Wichern. A Hamburg theologian and Lutheran raised children from a poor family. With the onset of winter, they often asked their mentor if Christmas would come soon (and according to Catholic traditions it is December 25). So that the pupils could count down the days until Christmas, he made a wreath from an old wheel, branches from the garden and satin ribbons, and put 24 small red candles and 4 large white ones in it. Every day the children lit one candle, and on Sunday, along with the small one, they also lit a large white candle. So on December 24, the last candle was burned on Christmas Eve, which indicated the coming of Christmas.
This version is the most famous. However, there is information about ancient Germanic settlements where such wreaths were made before Christmas. The ancient Slavs made similar wreaths from ears of corn and hung them on the door at the entrance. They considered him a talisman and revered him very much. But there is no exact information about what these wreaths looked like and what symbolism they carried. In the old days, the Ukrainian Slavs, for example, used the didukh decoration as a symbol of Christmas. This is a sheaf of straw, which was installed in the corner of the house under the icon. It was considered a talisman, a symbol of wealth, prosperity and preservation of the ancestral family.
IN modern traditions The Christmas wreath has lost its symbolism and is used as a decoration. Often, fir branches, holly, mistletoe and poinsettia are used to make it. These plants are famous for their ability to stay green all winter. In addition, there is a belief that if two lovers kiss under a wreath of mistletoe on Christmas night, they will living together will be full of happiness. So, this decoration is hung above the front door or placed on festive table. In the second case, candles are often used to light them on New Year's or Christmas night.
In general, this tradition is typical for Western countries. However, we also find it in our country as a decoration. Only here it does not carry any special symbolism, and wreaths are made not for Christmas, but as a New Year's decoration. They look very attractive. We propose to create this miracle.

The New Year's wreath has its own history and symbolism

There are several stories of the appearance of the wreath
General principles
Although a Christmas wreath is recognizable in any form, different countries it has its own modification. So in Scotland we will see pieces of checkered fabric on the product along with spruce branches. American decorations use red ribbons, maintaining the country's traditional Christmas combination of red and green. In France we see wreaths with dried flowers intertwined. We use all available means. So you can see on your neighbors’ doors wreaths made of socks, ties, tinsel, and of course traditional fir branches.

For each country, the wreath has its own modification

The purpose of all wreaths is the same, only the modifications differ

Red ribbons are used in American jewelry
But regardless of their modifications, Christmas wreaths have a common creation principle. Only the tools and materials used differ; in some cases, the number of stages and principles of creation may differ. Let's divide the work into several stages.
|
materials |
tools |
||
|
Preparatory |
Prepare everything you need |
Depends on the type |
Pliers, thread, glue, scissors |
|
Creating the Foundation |
Make a circle for the wreath |
Wire, cardboard |
Pliers, scissors |
|
Preparation of decorative elements |
Cut off the required amount of tinsel or spruce branches, string candies onto a thread, etc. |
Candies, tinsel, Christmas tree decorations, fir branches, ribbons, pine cones, etc. |
Scissors, glue, threads, varnish, paint |
|
Preliminary layout |
Create a composition without fixing it |
Finished circle, material chosen as a base |
|
|
Final stage |
Lock all elements to the base |
All finished parts of the composition |
Glue, threads, tape, wire |
We see the main stages of creating a composition. We will follow them as we work. Let's start making holiday decoration, having considered different types New Year's wreaths.

Making your own wreath is easy if you follow the instructions.

Any available means can be used for a wreath
Various options
We offer you a variety of options for making New Year's wreaths. You will be surprised what materials are used and how many modifications of wreaths there are. We have already said that the principle of their creation is similar, but only the external design is different. And the ring for the New Year's wreath on the table is approximately the same for various options. There are two most used types: wire base and cardboard base. Of course, you can make a circle out of paper, wood, foam, or not use a base at all. However, the use of cardboard or wire will help make the product more durable. So, let's start with the basics.

A wreath can be made from cardboard

The wreath ring can be made of metal or cardboard

The use of wire can make the wreath more durable
Wreath ring
First, decide on the size of the future wreath. It depends on its location. If you plan to decorate the table, remember that it should be neat and not interfere with the food, but at the same time noticeable at the holiday.
So, first, draw a circle on a piece of paper that matches the size of your future wreath. Now cut the amount of wire to fit the circumference. We calculate its size using the presented formula:
Where C corresponds to the circumference, n is a mathematical constant equal to 3.14, r is the radius of the circle. You can measure the radius with a ruler and calculate the required wire length using the proposed formula. You can also use another method, and by applying the wire to the sketch of the circle, determine the required length. It’s even easier to form a circle “on the fly” without precise calculations.
In any case, we have decided on the length. Now twist its ends using pliers to form a circle. Depending on what the next layers are made of, wind one or two more layers of wire, fastening them all together. Ready.
The cardboard ring is made without a blank. A circle of the required diameter is drawn on a sheet of cardboard. Next, a certain distance from the outer line is set aside at four points of the circle (so that the inner one turns out even). The inner circle is drawn using the marked points. Now we remove it without disturbing the external one. So we only have the headband left. These are the rings for the New Year's wreath, on which decorative elements are attached.
Now the base is ready, and with its use we can start making Christmas decorations using various materials.

First of all, you need to decide on the size of the wreath.

It’s much easier to make a wreath on the go, rather than counting every centimeter
Christmas tree branches
It is worth paying tribute to tradition. The symbol of the New Year, and in Western countries, where this tradition came to us, and Christmas, is the New Year tree. A wreath made of fir branches is perfect as a decoration for a door, window, or table.
To create it, use both wire and cardboard bases. It is better to wrap the latter in a thick layer of paper to add volume. Now we prepare the decorative part. Take spruce or pine branches (with short needles), cut them into small pieces, prepare glue and yarn. Additionally, you can use cones, satin bows, artificial berries, bells, etc. But don’t overdo it. It is advisable to mix no more than three colors (in our case, green, red and gold).
Now let's start with the layout. It is carried out in two ways.
Regarding fasteners, you can:
- tie the branches to the base using threads;
- glue them using polymer glue.

The most popular is a wreath made of spruce branches

Toys, pine cones, and ribbons are suitable for decorating a wreath.

To create such a wreath, you can use cardboard and wire.
As for the appearance, we make the wreath in the following variations.
- “Russed”, arranging the branches in a chaotic manner. To do this they must be short. Place them on the glue so that they stick up. Fill in the gaps and add braid, pine cones, etc.
- “Smooth” compared to the first option. To do this, we tie the ring so that the branches are on both sides, and they are attached to the inside of the ring. This way they will be directed in one direction (from the inside to the outside), and we will get a relatively smooth and voluminous wreath. For this option you will need flexible and long branches.
A wreath of holly, fir or mistletoe is made in the same way. You can find it in flower shops or grow it in the garden. This amazing plant also remains green throughout the year.

The wreath can be made smooth by placing the branches in one direction

By arranging the branches in a chaotic order, you can get a voluminous wreath
Natural materials
Other natural materials that are quite suitable for making a New Year's wreath for the table with your own hands include pine cones, acorns, nuts, tangerines (dried), and berries.
For these materials, it is better to use a cardboard base, tying it with a large layer of paper or fabric (for volume). The best way to secure it is with glue.
You can make a wreath made entirely of pine cones. So, paint them the same color, different ones, or leave them natural brown. The pine cones also make excellent company for tangerines and cinnamon sticks. Gifts from a squirrel - nuts and acorns - look good together.
It is better to dilute such compositions with green color, using natural green leaves or a few sprigs of pine needles. It will also be good to keep the entire composition in brown color, adding twine or burlap to it.

Natural materials can be used for decoration

Pine cones are perfect for decorating a wreath

For natural materials It's better to use a cardboard base
Fabric and thread
By the way, about burlap. Use it yourself too. This is a great material for creating a warm, rustic atmosphere.
Create a wreath using burlap squares. We cut out identical squares and modify them as desired. We suggest folding them, turning the edges, and placing them overlapping each other. This way fill the entire circle. Add some greenery and a bright bow to the composition.
Another option. Cut a long piece of not very stiff burlap, fold it in half and sew it together. Then, using a needle and thread, sew a stitch down the center, gathering the fabric a little (to create an “accordion”). Here we have an airy and light wreath. Use it without a base, or secure the resulting element on a cardboard ring by diluting decorative elements(bells, stars, berries, etc.).
Introducing original idea using threads. A wreath of colorful balls. This option looks great both on the door and on the table, symbolizing home comfort and warmth. It is made as follows.
Make balls of wool of varying sizes. The threads should be woven as loosely as possible to make the balls light. Then sew or glue the resulting balls to the cardboard base in a chaotic manner, quite tightly. Knit a small fabric from the same threads. Sew it to several balls and stick the knitting needles. This idea looks creative and adds a special coziness.

You can use fabric and threads to decorate the wreath.

This wreath looks very beautiful and gives the room a special atmosphere.
Tinsel and Christmas decorations
New Year's tinsel is a material that is found in every home and is a symbol of the New Year. It will also make a wonderful Christmas wreath.
Here we will use a wire base. It is enough to wrap it in large quantities rain to create a voluminous silhouette, and the wreath is ready. We dilute it with cones, acorns, sweets, and New Year's balls. By combining several colors of New Year's tinsel, you will get a wreath with a pattern that does not require additional elements.
Mentioned christmas balls, like other Christmas tree toys, can be used independently. The principle is the same. Secure them to the wire frame with a thread, and the wreath is ready.
There are also many ideas: use pasta, socks, ties, beans, clothespins, sweets... In general, whatever comes to your mind. The main thing is to have a festive mood during the work process.
Video: DIY New Year's Christmas wreath
50 photos of ideas for creating a New Year's wreath with your own hands:


The tradition of decorating houses and apartments with wreaths came to us from Europe, where it is very common along with hanging boots in which Santa puts gifts at night, and other Christmas attributes. It is not surprising that we also liked Christmas wreaths, because they are so beautiful and the aroma of the New Year emanates from them.
In Europe and America, wreaths are hung on the doors of houses, but since we do not all live in private houses, it is better to place them somewhere in the apartment - hang them on the wall in the living room, above the doorway, or put them on the table, placing candles in the center. A New Year's wreath can easily replace a traditional Christmas tree, especially if it is made from spruce or pine branches.
Have you ever wondered why the wreath became a symbol of Christmas? In many cultures, the circle is considered a symbol of eternal life. A green color the evergreen spruce seems to be its embodiment. Initially, the color of decorations, ribbons and candles was also given great importance: gold and red colors were used, and the candles were purple and pink, which corresponded to the colors of worship during the four-week fasting period - Advent. We, of course, do not have to adhere to this at all; even among Catholics these traditions are rarely observed anymore.
Today, New Year's wreaths have become more of a decoration. They are made from the most different materials. Can be purchased finished goods, but many people like to create something on their own, so why not make a New Year’s wreath with your own hands.
Wreath Decorations: List of Ideas
Below you will see many photos of ideas for New Year's wreaths with different decorations. But generally speaking, no matter what the wreath itself is made of, it is decorated with:
- berries (real or artificial) - rowan, rosehip, viburnum, mistletoe;
- dried citrus slices - oranges, lemons or whole tangerines;
- shells of walnuts and other nuts or whole nuts;
- fir cones;
- apples;
- flowers;
- ribbons of any colors or threads;
- Christmas balls;
- bells;
- all kinds of figures, including angels, snowmen, Santa Claus, houses, birds;
- cinnamon sticks;
- tinsel;
- snowflakes;
- sweets.
What materials to use for the base
The most important thing in a wreath is its base. Use any available materials. However, it is best to make the base from branches, then you don’t even have to hide it with decor. She will look beautiful anyway. In general, they are widely used as a basis:
- regular cardboard or corrugated, from boxes;
- insulation for pipes;
- wire;
- polyurethane foam;
- wires;
- tightly compressed newspapers, sometimes they are also wrapped with tape for strength.
We propose to make a base from this waste material like tubes from toilet paper And paper towels.
 |
To make the base of the wreath, you will need several tubes from toilet paper rolls or paper towels. Cut them into pieces approximately 3-5 cm wide. Place them on the floor to determine the size of the wreath. |
 |
Take a thread or wire and assemble all the parts onto it. With wire, the wreath will be stronger. |
 |
If everything looks confusing during the process, that's okay. |
 |
Once the shape is assembled, tie a strong knot. |
 |
Take old newspapers cut into strips. |
 |
And PVA glue. |
 |
Moisten the wreath with glue and wrap the newspapers so that they are saturated. You can also coat the top. |
 |
Leave the wreath to dry for a day. It will be strong enough to withstand light decor. For example this perfect base then wrap it with threads or tinsel, and secure several small spruce branches. |
Video: frame made of wire and newspapers
Wreath: base made of pipe insulation
Made from spruce or pine spruce branches
Now let's move on to the most interesting part - making a wreath. In the best traditions, the wreath will be made from spruce or pine branches. It will fill the house with a pine aroma and will look very New Year's. Branches can be attached one at a time - using twine, hot glue, or green wire. And they do it in such a way that Bottom part The branches were covered by another fluffy part. You can first tie the branches in small bunches and tie them in this form to the base.
Watch the master class, here is a step-by-step presentation of the process of making a wreath from natural spruce branches from start to finish.
 |
Make a base out of cardboard. |
 |
Draw two circles with a compass or use a plate or lid from a frying pan or pot for this. |
 |
Cut with scissors. |
 |
Crumple up the sheets of paper and wrap them around a cardboard ring. |
 |
If the spruce branches are large, divide them into small branches. |
 |
Glue the branches to the base using hot glue. |
 |
Cover the wreath so that there are no gaps. |
 |
Take real pine cones. |
 |
Buy artificial branches with berries. |
 |
You will also need a bell... |
 |
and red yarn. |
 |
Wrap the yarn around the wreath. |
 |
Place the pine cones on the glue. |
 |
Attach artificial berries in random order. |
 |
Decorate with a bell. |
 |
Spray artificial snow on the branches. |
 |
The resulting wreath looks absolutely New Year's, and also exudes a pleasant pine aroma. |
It is not necessary to use natural branches; you can get by with artificial ones. You've probably seen it on sale spruce garlands. It’s very easy to make a wreath from such a garland.
Video: wreath made of spruce garland
Photo ideas for decorating a wreath of fir branches


Replace the branches with tinsel
Visually, green tinsel looks like spruce branches. If you wrap it around the base circle, you will get a wreath very similar to a spruce one.
Video: tinsel wreath
Although you can use tinsel not only green, but also any other color.
Options for tinsel wreaths


Wreath made of deciduous tree branches
Another option is to make a wreath from branches. Thin birch, willow branches or grapevines are suitable for this purpose. They are twisted into a tight circle and most often wrapped with twine; it matches the color well and is almost invisible. A wreath made of branches can serve as a frame for decorating with pine needles, rosemary, and branches with berries.
This wreath is made of grapevine, decorated with rosemary and laurel.

 |
Have on hand all the tools and materials you will need to make the wreath. |
 |
These are sprigs of rosemary and laurel. |
 |
Floral wire, wire wrapped in twine, garden pliers, side cutters. |
 |
Roll a grapevine wreath. |
 |
Use floral wire instead of hot glue so you can use the wreath again on next year with different decor. |
 |
Don't overcomplicate the wreath. Use a few branches of plants, decorations with natural motifs and a bright ribbon - this will be enough. |
 |
It is better to use a ribbon with wire inside so that the bow holds its shape. |
 |
Attach the decor to the wreath. |
This wreath is made from birch branches, and no other plants are used for decoration. But this is its charm.
 |
Take 9-10 thin branches - birch or others, for example, a grapevine looks good in a wreath. |
 |
Twist the branches into a circle and secure with twine. Choose the thickness of the wreath at your discretion. |
 |
Gold and red jewelry were chosen for decoration. Yellow and gold, as its shade, are trendy this year. |
 |
Wrap the wreath with beads. |
 |
Tie a few Christmas balls. |
How to decorate a wreath of branches - photo


Cones as the main decorative element
Do you know how to make a New Year's wreath from pine cones? No tricks here. It is enough to tightly cover the base with pine cones and you will get a good option. And if you also paint it with spray paint in gold, red, pink or green - whatever color you want - and decorate it, then it will turn out great. Look at the implementation of one of the ideas.
 |
First, paint the pine cones with white spray varnish. Be sure to lay newspaper or oilcloth underneath. Leave for some time to dry. |
 |
Used for decoration: ribbon big bow 5 cm wide, and multi-colored ribbons 1 cm wide for small bows. Colors of your choice, artificial berries, bells, Christmas tree decorations without a holder. |
 |
Let's make bows for decoration. Place two loops and tie them together. Cut off the excess. |
 |
Hot glue a small piece of ribbon of a different color in the middle of the bow to create a center and close the knot. |
 |
Decorate the bow with rhinestones. |
 |
Make a large bow according to the same instructions. |
 |
Draw a ring on the cardboard. A stencil can be a frying pan lid or a plate. Cut out the workpiece. |
 |
Take the twine and hot glue the end to the cardboard ring. |
 |
Patiently wrap the ring with twine without any gaps. Secure the tip again with hot glue. |
 |
Glue the cones so that it looks as natural as possible. |
 |
Decorate the wreath with bows, bells, and toys. |
Pine cone wreaths look unusual and beautiful, you can see this by looking at a selection of photographs.
Openwork wreaths made of pine cones: photo selection


Lots of paper ideas
When there are no spruce branches, branches, or cones at hand, they make do with paper. And interesting products are obtained. Some of them are as beautiful as wreaths made from natural materials. You can create with paper with your children; it doesn’t crack like a Christmas tree, and it’s easy to work with.
 |
It's easy to make a New Year's wreath from cardboard and crumpled paper. |
 |
Cut a circle out of cardboard, an old one will do cardboard box from under some kind of technology. |
 |
Slice corrugated paper pieces of approximately 10x10 cm. How many parts are needed depends on the size of the cardboard ring and the “terryness” of the wreath. |
 |
Remember the pieces with your hands and glue them onto a cardboard ring. |
 |
Place the parts close enough to each other so that there are no gaps. |
 |
Cut a strip of crumpled red paper and twist it with your fingers as shown in the photo. |
 |
Decorate the wreath. |
This option is a great idea for recycling old wrapping paper. Of course, it is also not prohibited to use a new one. Such wreaths are also made from book or magazine pages or scrap paper.

 |
Prepare some wrapping paper. |
 |
For the base, cut a ring from thick paper or cardboard. |
 |
Cut a lot of wrapping paper leaves. Evenness doesn't matter, although you can use a template if you want. You will need approximately 70 leaves. |
 |
Glue the leaves to the ring as shown in the photo. If you use different paper, do not forget to alternate patterns. If there are any leaves left, you can paste them into places that seem empty. Make a loop of twine or ribbon, wrap it around the wreath and thread the ends through the hole. You can hang a wreath. |
Photo options for paper wreaths


We collect from Christmas tree decorations
A New Year's wreath can be assembled from Christmas tree balls alone. It doesn't need expensive balls. Check out FIX PRICE before the new year, you will find what you need there. With a little investment, you can create a beautiful, rich wreath. Choose different toys that harmonize with each other in color and decorate with ribbons.

 |
To make this beautiful wreath, we used 6 packages of 12 balloons each and a few other red decorations that were lying around from last year. The wreath will be assembled on a frame made from a hanger. These are sold, for example, in Auchan. In addition, you will need tape, wire and pliers. |
 |
Shape the hanger into as circle a shape as possible. |
 |
Use pliers to unwind the wire. |
 |
Use pliers to straighten the tip as much as possible. |
 |
String the balls one at a time. |
 |
Move them as close to each other as possible so that the wire does not show between them. |
 |
Continue stringing the decorations, allowing them to be positioned at different angles. |
 |
Soon it will look like this. |
 |
If the decorations do not stick well to the wire, secure them with hot glue. |
 |
Continue stringing the balls. |
 |
When all the balls are already strung, twist the hanger again with pliers. |
 |
This is how the wreath turned out. |
 |
Take the wire tape. |
 |
Wrap it around the hook a couple of times. Secure with reverse side tape or hot glue. |
 |
Place several loops of ribbon. |
 |
Tie the bow with another piece of ribbon. For reliability, you can drip a drop of hot glue inside. |
Multi-colored wreaths made of Christmas balls - photos


We make New Year's attribute from fabric
Fabric wreaths look very beautiful. A wide variety of manufacturing technologies are used, and the resulting wreaths are just as varied. We presented three options in the form of master classes, but in fact there are many more of them.
For example, small ribbons or strips of fabric are tied tightly to each other on a wire frame.
Strips are cut out of the fabric and the edges are sewn together. The resulting “cases” are stuffed with synthetic padding.

 |
Cut strips of fabric of arbitrary length and width. Keep in mind that as a result of all the manipulations, the width of the finished strip with padding polyester will be approximately four times smaller than the original one. Fold the strip of fabric right sides inward lengthwise and stitch along sewing machine. Make transverse cuts from the side of the seam, not reaching it a little, so that the fabric does not pull anywhere later. |
 |
Turn right side out. |
 |
Fill it quite tightly with padding polyester, holofiber or any other soft filler. |
 |
Sew the edges of each soft ribbon and then place the three ribbons together and pin the edges together. |
 |
Weave a braid from the ribbons. |
 |
Bring the edges together and hand stitch. |
 |
Cut and sew a short length of ribbon as shown in the photo to hide the seam. |
 |
Now let's make a bow. It will be two-sided, i.e. red on one side, white on the other. We sew the edges diagonally. |
 |
Turn it inside out. There is no need to stuff the tape. |
The fabric is also folded. It is held in place due to the tight fit of the layers to each other. The following example shows how to create a burlap wreath.
 |
To make the frame, purchase galvanized knitting wire. Cut pieces of the following sizes: 130, 115, 100 and 85 cm. |
 |
Connect them in this way, bending the ends using pliers. |
 |
Cut a few more pieces of wire, fold them several times, slide them under the frame, bend them to the front side and thus secure the inner and outer ring. |
 |
Wrap the loose ends around the inner rings. Level the frame. |
 |
This wreath is made from burlap. It needs to be cut into strips. |
 |
Secure the end of the strip with hot glue or a piece of wire, or tie it. Move the strip of fabric to the jumper, the jumper should be left hand. Release folds in each gap. Twist the tape, move it to the jumper and repeat the steps starting in the same direction - from the inside to the outer edge. If you run out of tape, secure it like you did the starting end. |
 |
This is such an interesting looking wreath. |
 |
Decorate it Christmas decorations, lace decorations, artificial branches. |
Photos of wreaths made of thread and fabric


Almost out of waste
The idea of creating a New Year's wreath from materials that we throw away in everyday life is especially attractive, because you won't have to spend money on them. Who would have thought that from plastic bottles you can create a decent-looking New Year's wreath. You won’t immediately understand what it’s made of.
 |
Cut the bottoms from plastic bottles and paint them the color you want. Make cuts exactly in the place shown in the photo. |
 |
Fold the corners on both sides of the cut. |
 |
These are the blanks you should get. |
 |
Connect the “flowers” from the bottles, turning them over each time. Don't forget to make a hole in the center of each piece. |
 |
String the parts onto the wire. |
 |
Decorate the wreath with bows. |
Interesting options for wreaths made from scrap materials


How to hang a decorative element
It’s not enough to make a New Year’s wreath; you also need to hang it, if you specifically designed it for this purpose. It is better to choose the mounting method in advance. It will be unpleasant if it turns out that the wreath is too heavy and double-sided tape, for example, does not hold it. Then you will have to drive a nail, and this is not always possible. In addition to double-sided tape, they use hooks on suction cups, hook them with wire to the door peephole, purchase special snap-on fasteners that are put on the door from above, and tied with tape to the handle on the back side of the door.
Create New Year's wreaths based on master classes, be inspired by photo ideas and come up with your own options.
Before guests arrive, everyone cleans up the house and hangs up decorations. And among all the garlands, candles and gifts, of course, the Christmas wreath occupies a special place. It can be hung on a door or wall, or placed in the center of the dining table.
In stores on the eve of the holidays you can see big choice wreaths of various designs: with ribbons, balls, candles. But to make it truly special and unique, and also cost much less, make it yourself. How to make a Christmas wreath with your own hands? Very simple! 
Here you will find 5 step-by-step master classes on making a Christmas wreath. Choose which one you like best: from balls, spruce, pine, pine cones or even mesh.
First, let's look at how to make a traditional Christmas wreath from spruce, which can then be mounted on the front or interior door.

Tools:
- straw wreath mold (optional size),
- balls (must match the size of the wreath: as the base of the wreath increases, the size of the toys also increases),
- decorations in the form of branches with red and zloty beads, a red ribbon for a bow, Pine cones(big and small),
- spruce branches (thin so that they are easy to bend),
- several other branches (for example, pine),
- scissors, floral wire (preferably green),
- red and gold decorative flowers (three pieces each).

Lay everything out on the table and get to work.

TIP: You can make this form yourself from dry grass and cling film. Additionally wrapped with tape.
Step-by-step production
STEP 1: Making a base from branches


- First, make a base of pine branches. Lay them out in the same direction, e.g. counterclock-wise, let the ends of the branches be on the right, and lay the soft tops of the branches to the left side. Attach them to a straw wreath, tie around with floral wire, tie down to the base.
- Continue adding more branches around the shape.
- Look, are there any empty seats left?, fill in all the gaps with smaller branches.
- So far he looks a little disheveled and sloppy. Wrap a little more wire around to tie down any large branches that are sticking out. The wire should be hidden behind the branches. Now you have a uniform, lush wreath - the foundation for further work.
Step 2: Decorate the wreath


- Now add a few other sprigs (in the same direction as the pine ones), distributing them evenly throughout the wreath.
- Attach a red bow. You can do without it, then the look will be more festive.
- You can add small pine cones if there were none on the branches themselves.
- The distribution of colors should be symmetrical(so that it doesn’t turn out that all the red decorations are in one place, otherwise it will look like a red spot). Divide the wreath into 4 parts, one of them has a bow, and the other three add a branch with red beads.
In principle, it already looks good and you can leave it like that, you can finish it.
IDEA: Or hang the wreath first in this form, and after a week add decorations, this way the wreath will definitely not get boring during the holidays
Step 3: Add More Decorations

- For contrast, attach several branches with gold beads.
- Attach the pine cones: wrap the floral wire around the pine cone close to its base and attach it to the wreath, securing it well in place. Make sure the wire is visible, as less as possible. You can also stop at this point, or continue adding balls.
- Attach three balls, taking into account the same conventional division of the wreath into four parts
- Add three red and three gold decorative flowers.
You did it! The result is a wonderful Christmas wreath, all that remains is to attach it to the door to delight yourself and your neighbors!
How to make an Advent Wreath

Following the workflow just described, you can also create an Advent Wreath.
According to tradition, there are four candles on it: the first one was lit 4 weeks before Christmas, each subsequent Sunday one more was lit, so it was visible how the holiday was approaching.
Now a wreath of this type can be made with for traditional reasons and for decorative purposes. In any case, it will help create a festive atmosphere.
So, let's get to work:

- We create the base of the wreath from the branches, add small pine cones, as in the previous case.
- Fasten with hot glue gun candle holders(preferably with sharp pins at the bottom to insert into the wreath between the branches, but ordinary ones will do too), insert candles into them.
- We decorate the wreath with large cones and decorative flowers (two each in red and gold).
ATTENTION! Do not leave such a wreath unattended with lit candles!
Master class No. 2: Balloon wreath
To make such a wreath, you most likely won’t even have to go to the store for materials. After all iron clothes hanger and Christmas balls Almost everyone has it. So choose a time to work and get going!
You will need:
- 1 wire hanger, red Christmas balls (the number depends on the size of the balls you have at home),
- pliers, wire cutters (optional),
- bow ribbon,
- pine or Christmas tree branches (or garland),
- wire or strong thread (preferably green).

Step by step execution:

Step 1:
- Use pliers to attach the hanger round view. Don't worry if it's not perfectly level, the balls will cover all the unevenness.
- Unscrew the hanger, that is, disconnect it at the attachment point under the hook.
Step 2: 
- Place the balls on the wire. If the end is too sharp or uneven, cut it with pliers. Once all the balls have been strung, bend the hook with pliers to secure the circle.
- There is no need to hang the balls on top near the hook, since there will be ribbon and pine branches in this place.
Step 3:
- Attach branches to the top of the wreath on both sides of the hook (tie them with wire or thread).
- Make a ribbon bow and attach it under the hook.
- All is ready! There’s even a hook right away, all you have to do is hang it!
Master class No. 3: Pine cone wreath
A Christmas wreath made of pine cones is very simple to make, but its main advantage is that it is stored for a long time and does not fall off, unlike a spruce wreath. It can be sent for storage until next New Year.

Materials:
- Dry cones from 30 or more pieces, depending on the diameter of the wreath
- The base for the wreath (if you don’t have one ready like the photo, cut out a torus from thick cardboard)
- Glue gun.
- Decor at your discretion.
Work order:
Stage 1: Laying the first circle
- Using a glue gun, we attach the cones to the inside of the Torus or circle.
- Inside is best attach smaller cones.
- The distance between the cones is 1-2 cm. They should not be attached closer. Maybe even 3-4 cm.


Stage 2:
We do the same thing, but on the outside of the circle with larger cones. Distances between them - 3-4 cm. They should lie freely - not overlap each other.

Stage 3:
- And now fill the middle row- he seems to should be on top internal and external row. You can attach the cones not vertically upward, but slightly pointing them in different directions, filling the voids.
- We decorate with sprigs of berries or live spruce.


TIP: If you add a garland on top, it will be even more spectacular!

Master class No. 4: From pine branches
“Simple and tasteful” is the most suitable phrase for this method of production. Christmas greenery and minimal decorations. but nevertheless, when you look at the door with such a wreath, it immediately becomes clear that there is a truly festive atmosphere here!


Materials:
- wreath mold made of thick wire,
- greenery (real or artificial pine branches, other conifers are also suitable),
- cones, wire (for tying branches),
- glue gun,
- small bells,
- ribbon for bow.
ATTENTION! When choosing the length of the wire form, keep in mind that after attaching the branches, the wreath will increase several times in size.
Manufacturing stages:
- Take a few pine branches and Attach them to the form using wire. First fix the ends of the branches, then wrap them around the wire several times, wrap them with wire. Wrap the entire base in this manner.
- Make another ball of twigs on top of the previous one, in the same way. You should get a uniform coniferous wreath.
- Attach some pine cones.
- Add 3-4 bells golden or silver color to create festive mood. Attach with a glue gun.
- Make a ribbon bow and attach it to the wreath.
Every time you open the door, you will hear the quiet ringing of bells and understand that the holiday is in the air around you!
Master class No. 5: Wreath made of decorative mesh
With such a wreath you will definitely surprise all your neighbors! This colored hemisphere will not leave anyone indifferent; just looking at it will make you smile and have a sweet anticipation of the holiday!

Materials:
- round wire wreath base,
- decorative mesh in rolls about 50 cm wide (several colors, compatible with each other),
- fluffy decorative wire.

TIP: If you don’t have such a base for a wreath, then you can cut it out of thick cardboard with a torus thickness of -10-15 cm. Then attaching the mesh can be done using a needle and thread or a glue gun.
Manufacturing stages:
Step 1:


- Cut off approximately 25-30 cm mesh and roll it into a roll. Squeeze in the center with your fingers. To make it more convenient, you can take someone as an assistant to hold the packages.
- You will need a lot of these rolls, they don't have to be exactly the same length.
Step 2:

- Group rolls together 4 each, connecting the centers and tying them in this place with fluffy wire. Leave the ends of the wire for attachment to the base.
- Tie each such part to the base of the wreath(the remaining ends of the wire). They should be close to each other, leaving no free space.
- Continue until the entire space is filled.


Ready! It turned out very colorful and festive! If desired, you can hang a toy on the wreath so that it is in the center. But be careful not to overdo it, so that it doesn’t turn out to be “too much”, because everywhere you need to know when to stop.

Wreath ideas
Finally, I would like to point out that here are some ideas for making wreaths. And, in fact, there are a lot of them! After all, it’s worth replacing a small part, making your own amendment, and you’ll get a new unique copy! Turn on your imagination and create! Involve the whole family in this process to make the process even more interesting and enjoyable!
Merry Christmas!!!


Designer wreaths 2019
In 2019, vertical wreaths are coming into fashion; they are mounted not on the wall, but on the ceiling, like a pendant. The principle of assembling the wreath is the same as described above. BUT
- You can place candles on top of them.
- Add hanging elements
There is no limit to fantasy. The main thing is that there is somewhere to hang it on the ceiling! If your chandelier is not very good, then you can just place it under it.


Last weekend for round table People who are passionate about the New Year and floristry gathered in a cozy cafe. Creator of the flower workshop Aquamarine Flowers Alina Martynova told and showed how to make a beautiful New Year's decor: a wreath made of natural fluffy spruce, the aroma of which filled the entire room. In this article, we will not hide any important details, so it will not be difficult for you to create your own wreath at home.
DIY New Year's wreath: h what you need and where to get it
Main ingredient - Canadian spruce. It does not crumble, but dries out: the wreath will hang calmly during the holidays, and next year it will be better to replace the branches. Canadian spruce has large and non-thorny needles, so it is pleasant to work with. In Moscow, branches can be purchased at the Riga market, where they also have a wide variety of decor with which we decorated the wreath.
Next you will need wreath base. If you like a fluffy wreath, then appearance the base is not important - it will be covered by branches. In this case, you can buy a foam circle at a craft store or at a Crafts Fair. You can make the base yourself: cut a ring out of cardboard, and then tape crumpled newspaper or wrapping paper to it on one side to create volume.

There is another type of base - from twigs. They are sold at the same Crafts Fair (they may be in florist shops, but not for sure). This base does not need to be completely covered with branches; it is beautiful on its own.

You will need the following tools:
- thin wire black or green (less convenient options- fishing line or strong thread),
- scissors and secateurs,
- glue gun.
And of course decor. Here you are limited only by your imagination, but we used:
- cones,
- cinnamon sticks,
- coconut shell stars,
- Christmas balls,
- cotton,
- dried oranges,
- tapes.

Buy decor in multiple colors or hand paint it to make your wreath look brighter and more festive. Oranges, by the way, are not as easy to dry as they seem, so you can buy them (like pine cones, if you live far from the forest) in specialized stores.
Basic stage
Use pruning shears to cut large spruce branches into smaller “legs” - the desired size can be easily determined by attaching the branch to the base. These branches will need to be wrapped around the base using wire. Wire works best because it holds the structure together well, even if you let go of a loose branch. Due to the properties of the wire, the wreath can be additionally formed by hand after winding if the shape is not ideal.

Tie the wire to the base, then attach one or more branches (usually three is optimal to cover the front, outside and inside of the ring) and wrap. Try to guide the wire between the branches, rather than on top, so that it is less noticeable.

Add new branches, tucking their tips under the previous ones, continuing the winding. If there are gaps left, don’t worry - you can later add branches where there were not enough. If you wrap the entire wreath in a circle, move clockwise - this arrangement of branches is considered the most harmonious and positive. After finishing the winding, tie the wire into a knot on the wrong side of the wreath and cut it (if you wound it with a spool in your hand).


Take a critical look at what you've got. Using new portions of wire, add branches where there were not enough, or wrap protruding branches more tightly if they are out of order. The branches can be safely moved by hand, the structure will not be damaged: our wreath after wrapping turned out to be slightly oval, but a simple compression from the sides and displacement of a couple of branches was enough to correct the situation.

The wreath is ready, all that remains is to decorate it!
Wreath decoration
The main decoration tool is a glue gun. Plug it in and let it warm up. During this time, select decorative elements and arrange them harmoniously on the wreath. Here Alina gave some universal advice:
- There are two approaches: form groups of elements and then fill the voids between them, or evenly distribute the elements one at a time throughout the wreath.
- You can create groups from objects of the same type, the same shape or the same color - one or at most two parameters must match.
- Groups with three objects each look best.
- In groups, it is better to have connecting elements so that they come together in a composition: for example, the same object or color will be present in all groups.

- Arrangement of groups in an equilateral triangle should be avoided.
- The main thing is to try to avoid the “eye” effect - two identical or very similar objects symmetrically opposite each other. It will seem like the wreath is looking at you - we mean it. In this case, it is enough to place these elements diagonally - the effect is lost.
- Don't be afraid to place similar objects in pairs if that seems harmonious to you.
- Rely on your sense of beauty.


Gluing elements onto a wreath is very simple: squeeze a little glue onto the back of the decor, press it to the desired place on the wreath and hold it for a while. The main thing is not to try to glue it into the air between the branches - we tested it, it doesn’t work. Try to recess the decor a little into the branches: this way it looks like part of the wreath, rather than lying on top, and it sticks better.

The last step is to decorate the wreath with ribbon, if desired. You can tie a bow directly on the wreath, or you can make it separately and stick it on top like the rest of the decor. The ribbon can be a fastener for hanging a wreath on the wall, or it can be purely decorative detail. Then you need to make a wire loop on the back of the wreath.

The last thing left is a test of strength. Lift the wreath and shake it - if nothing falls off, then you did a great job with the glue gun, and the product will not be damaged even if you slam the door on which the wreath hangs. If it falls off, repeat gluing.
By the way! The wreath can not only be hung on a wall or door, but also placed on a table or chest of drawers, placing a composition of candles or a vase of tangerines in the middle.

Happy New Year to you!
Photos: Anastasia Vernaya


