The arrival of spring in itself is long-awaited and evokes joyful feelings. And the presence of a gentle and beautiful women's holiday this season - March 8 - causes even more positive emotions! Flowers and sweets are sold everywhere, there are long lines in shops, not only in those that sell cosmetics and jewelry, but also in craft stores. After all, it’s no secret that giving gifts is very pleasant, and if they are made with my own hands, then it’s doubly pleasant. Such a gift will definitely be unique and memorable.
In this master class I will show 10 options on how to make crafts for March 8th with your own hands with step-by-step unique photos. Such crafts will be a wonderful gift for your mother, grandmother, friend or colleague.
The spring women's holiday involves the presentation of gifts to all representatives of the fair sex. We have been following this tradition since childhood, when we started giving gifts to our mothers and grandmothers in kindergartens. After all, a gift made by children's hands is always highly valued and evokes only positive emotions.
At the same time, the process of making such gifts has a beneficial effect on the child himself, as it develops fine motor skills his hands, contributes to the manifestation of imagination and creative self-realization.
DIY crafts for mom on March 8
Sweet gift - candy grapes
In this master class we will make such a sweet gift.

For this we need:
- candies;
- wire;
- scotch;
- scissors and pliers;
- artificial grape leaves.

To give the candy the shape of a grape, use double-sided tape to glue one tail to the candy.


Using pliers, make a loop on the wire and screw on the candy.

Secure with tape.


We begin to collect 3-4-5 candies into a bunch.


Now we begin to collect a bunch of grapes.

We wrap the twig with green adhesive tape.


We attach the leaves.

All that remains is to decorate our gift - a low-tall basket is best for this.


Our candy grapes are ready!

Box “Dear Mommy” using decoupage technique
You can make such a box with your own hands as a gift for your mother using the decoupage technique. It is necessary to prepare suitable decoupage cards or napkins in advance.

We will need an empty box, we took a metal tea box.

We cover it with acrylic primer.

These decoupage cards can be ordered online.

We tear the map into uneven fragments.

Place it in water for a few seconds.

We transfer it to a transparent film (file) face down.

And carefully apply it to the box.

Cover the top with a brush with PVA glue.


When the box is dry, coat it with clear varnish.


Chocolate maker “To Mommy on March 8th”
A beautiful chocolate card, where you can put your sweet surprise, will complement the main gift in an original way. In addition, the chocolate bowl can also be used as an envelope for money, or you can put tickets for a concert or trip into it.
If you give just sweets, then after they are eaten there will be no memory of the gift, but if you present them in a chocolate bowl, then after the tea party you will be left with a beautiful postcard and a sea of pleasant impressions. Your beloved mother will be pleasantly surprised by an unusual handmade gift.

To make a chocolate maker using scrapbooking technique, we will need:
- Thick white cardboard;
- Blue paper with polka dots;
- A sheet of paper in a box;
- Glue;
- Ruler;
- Awl or sharp scissors;
- Scissors;
- The inscription “To Mommy”;
- Decorative paper flowers;
- Stamens;
- Gauze;
- Hair fixation spray;
- Pastel purple and of blue color;
- Half beads;
- Ribbon;
- Double-sided tape;
- Pendant "Heart".
To begin, draw a diagram of the chocolate bowl on a checkered sheet of paper, or print it out on a printer. This master class contains ready-made template. The dimensions of the postcard correspond to a standard chocolate bar.

Place a ruler along the fold line and draw the awl firmly to mark the fold lines so you can easily bend the cardboard.


Glue the chocolate bowl together.

Glue the chocolate bowl together. Glue a small strip of tape on the bottom to prevent the chocolate from falling out.


Let's start decorating the front side. Cut the cardboard with the pattern to the required size, cut out the inscription.

Now you need to tint the edges of the decorative cardboard. Use the sharp edge of a pair of scissors to rub together the blue and purple pastels. Dip a dry cotton swab into the pastel and rub it along the edges of the picture.


Cut a piece of gauze, spray it with hairspray and scrunch it up.


Twist the stamens together and glue them to gauze. Plant decorative paper flowers on the glue, add an inscription, and decorate the whole thing with half beads.


Using a ribbon, tie a metal heart to the gauze, tie a bow, and scorch the edges of the ribbon with a lighter so that they do not fray.


Make a bow at the bottom of the card and decorate it with half beads in the shape of a flower. Hide the edges of the tape under the back of the cardboard.


Using thick double-sided tape, glue the decor to the chocolate card. Thanks to this tape, a space is created between the card and the decor, and ready product looks more interesting and voluminous. On the inside, glue thin satin ribbons to the edges of the card so that it can be tied.


Now you can write the warmest and most sincere words, put a chocolate bar inside, tie on both sides and the gift is ready!


DIY gift for grandmother on March 8
DIY paper teapot
This teapot will be a wonderful gift for your mother or grandmother. Every housewife has beautiful plates and a salad bowl in her arsenal, in which she serves delicious holiday dishes to the table when guests arrive. An ordinary tea party with visiting friends is a completely different matter. It does not provide for the use of plates with appetizers and meat dishes, so it will not be possible to surprise guests with beautiful dishes.
What do you usually serve tea bags in? In a box or on a platter? This master class will tell you original idea unusual and beautiful presentation of tea bags.

You will learn how to make an extraordinary paper stand for tea bags. It is made in the form of a teapot. Interested? Then quickly prepare the necessary material:
- a piece of wrapping paper with a bright print;
- a sheet of white cardboard;
- glue stick;
- scissors;
- pen (pencil);
- stencils in the form of a teapot and a small cup;
- heat gun;
- ruler;
- braid, openwork flowers, bows and other ready-made decorative details.
First, take a sheet of cardboard and cover one side with brightly colored wrapping paper. To securely connect these materials, use a glue stick.

The result is a sheet of thick cardboard with a print in the form of roses.

Now prepare your stencils. Images can be found on the Internet and printed on a printer. If you know how to draw well, then draw the silhouettes of a teapot (teapot) and a small cup yourself.

Trace each stencil 2 times, placing them on the colorless side of the cardboard.

Cut out the blanks and paste them over wrapping paper from the second side.

You get these 4 parts that are needed for subsequent work.

Cut 2 strips from the remaining cardboard. One should be 5.5 cm x 15 cm in size, and the second should be 2.5 cm x 9 cm.

Cover each blank with wrapping paper with a picture of roses, and then fold it twice.

Now you need to assemble all the parts into a single structure. First glue the stripes using a glue gun. Apply glue to one of the parts of the teapot and fix the curved strip, as shown in the photo. Glue a narrow strip to the cup.

Glue the second part of the teapot and cup to the strips symmetrically to the first.

You get 2 blanks with deep “pockets”.


Now the cup needs to be glued to the teapot.

The main work is done, all that remains is to decorate the stand. You can use pieces of braid, bows and flowers.

Glue bows on central part crafts, flowers - on the lid of the teapot, and place strips of braid on the bottom and top of the teapot.

This is what the finished craft looks like.


You can put napkins in the large “pocket”, and tea or coffee bags in the small one.

Or this option: in a large “pocket” place tea bags with different flavors and coffee in sticks, and in the small hole of the cup there will be bags of sugar.


This original stand for bags of tea, coffee and sugar will become a real decoration for a tea ceremony. It will cause surprise and genuine interest among guests, and the tea drinking process itself will become twice as enjoyable.

Crocheted potholder for grandmother for March 8th
Another gift for grandma in the same red and white colors is an elegant potholder, which can also serve as a napkin for hot dishes, decorate the kitchen, and make it more comfortable. The potholder is knitted in two colors with single crochets using elongated loops. Leftover yarn can be used for knitting.

Materials and tools:
- inexpensive Karachay yarn in two colors;
- hook number 3.

Abbreviations used in the text:
- RLS – single crochet;
- Dc – double crochet;
- VP – air loop;
- runway – air lift loop;
- DC – double column.
We start knitting with the Amigurumi sliding ring. We work with red yarn.
1 row. We place the free end of the thread in the left palm, and working thread wrap it around the index finger of your left hand. Insert the hook into the ring, pick up the thread and knit a loop, securing it to the ring.

2nd row. 3 runways, 15 SSN. We pull the ring tightly at the free end and knit the connecting loop into the third lifting air loop.

In this row, together with the runway, you should get 16 CCHs. Next, we knit the entire fabric with single crochets.
3rd row. 2 RLS, * 1 RLS, DC (i.e., we knit 2 RLS in one loop of the previous row)* Repeat the pattern between the stars until the end of the row. The increase in the following rows will always occur above the last of the doubled columns, which will divide the circle into 8 sectors. Finished the series connecting loop.

4 row. 2 runways, * 2 sc, US. Repeat until the end of the row. We finished the row with a connecting loop.
5 row. 2 runways, * 3 sc, double the fourth column. Repeat until the end of the row. We finished the row with a connecting loop.

6th row. 2 runways, * 4 sc, double the fifth column. Repeat until the end of the row. We finished the row with a connecting loop. When knitting a connecting loop, change the color of the yarn to white.
7th row. We knit with white thread. 2 runways, * 5 sc, 1 US. Repeat until the end of the circle. We finished the row with a connecting loop.

When knitting a connecting loop, change the color of the yarn to red.
8 row. We knit with red thread. 2 runways, * 6 sc, double the seventh column. Repeat until the end of the circle.

We finished the row with a connecting loop. When knitting a connecting loop, change the color of the yarn to white.
9 row. We knit with white thread. 2 runways, * 7 sc, double the eighth column. Repeat until the end of the circle. We knit a connecting loop and change the color of the yarn to red.
10 row. We knit with red thread. 2 runways, * 8 sc, double the ninth column. Repeat until the end of the circle. We knit a connecting loop and change the color of the yarn.
11, 12, 13, 14 rows. We knit with white yarn.

We double one column in each sector. Otherwise we knit similarly to the previous row. Each sector should have 14 single crochets. When knitting the connecting loop of the fourteenth row, change the color of the yarn. We cut the white thread and fasten it. We won't need it anymore.

15 row. In each sector after the double stitch we knit 2 sc, the next stitch we knit with an elongated loop into the stitch of the thirteenth row, the next – into the stitch of the twelfth row, the next – into the stitch of the thirteenth row.
On each of the eight sides of the polygon there are two groups of loops different lengths. Between them we knit two sc, after the second group of loops we knit 3 sc. We finish the row with a connecting loop.

16th row. We continue to knit 15 sc each with red thread, doubling the sixteenth stitch. We knit this way in each sector.

17th row. We knit in the same way, doubling one stitch.
18th row. We finish knitting according to the same pattern, only after finishing the last circle, we knit a loop. We collect 16 VPs and, closing them in a ring, tie the ring with twenty single crochets.
Now you need to lightly steam the product using a damp iron, giving it a finished look. The potholder is ready.

The master class was prepared by Svetlana Chalkina
DIY crafts for a friend
If you want to give your girlfriend some jewelry or a scarf with flowers, but you think it’s not very interesting, then take it and make it yourself! Such a gift will be individual and will definitely not leave your friend indifferent. And you can put a piece of your soul into it, and at the same time show your imagination and love for your friend. In this master class prepared by Anna Moiseeva, we will crochet an easy necklace!

In order to knit such a necklace we will need:
- thread of blue, light blue, white;
- hook 1.75 mm;
- scissors;
- needle;
- chain.
For knitting such a product, it is better to take fine yarn. The thinner the better. Our necklace will consist of 7 circles. 1 of them will be the largest and will be located in the center. The remaining 6 are 2 sets of 3. The sets will be the same.
Let's start knitting from the central one, that is, from the largest circle. We knit 12 sc in a slip stitch with blue yarn. We close the circle with a joint and tighten the ring.


We knit 1 row with blue yarn, adding every 2 stitches in the row. Closing the row, change the thread to white. We perform a row, adding every 3 loops of the row.

And we just have to knit the last row. In it we make additions every 5 loops of the row. The central circle is ready.

The next circle will consist of only 4 rows. First, we form a slip loop with blue yarn and work 12 sc into it. We will consider this to be the first row.
Then we change the thread again, but now to white. Add through 2 loops. Once again we change the thread to blue and knit a row, making increases every 3 loops of the row.

We knit 1 more exactly the same circle. We just have to connect the last 2 circles. These are the smallest parts of the necklace.
Again we knit 12 sc in a slip stitch with blue thread. Then we change it to blue. We perform a row with an increase through the loop.

We knit the same circle again. Now we just have to assemble the necklace. To do this, you first need to unfold it in order to understand how to sew the parts together.
Then we sew 2 smaller circles to the central large circle. Sew on different sides.

And then we sew others onto these parts. And at the end we sew on the smallest circles.

The last step will be the chain. We attach it to the loops of the circles. The crochet necklace is ready!

Craft - surprise “Candy message” for March 8
When you don’t want to give your close friend a banal gift, the kind that others can give, your head is full of thoughts and wild fantasies, but nothing wise comes to mind, you can follow simple advice. The most The best decision in your situation - prepare a gift with your own hands! For example, you can give a gift “Candy Message”. It requires little investment and half an hour of free time.

In order to make this gift, you need to purchase a vase for candies and the candies themselves, which, naturally, must be tasty and beautiful in appearance. You can also use a decorative box, a satin bag, a basket for small items, and more as a candy dish (instead of a vase).
Also, to make a gift you will need several short satin ribbons any width (or thread) for winding scrolls and paper “scrolls” for wishes. Chains and beads, as well as various decorative elements, can be used as decoration and addition.

On the paper prepared for the scrolls, you need to write wishes, wrap the paper and tie it with ribbon or thread. The number and size of the scrolls should depend on the size of the vase and the number of candies. The color of the ribbons should be in harmony with the color of the candies and vase or be neutral.

Candies must be placed in a candy bowl, and scrolls with wishes should be beautifully placed between and on top of the candies. The gift is ready - stylish and fast!


Champagne with sweets
Traditional and at the same time a banal gift For colleagues and teachers on March 8 it is wine, champagne and sweets. In order not to change its essence, but to surprise with its design, you can create a unique bouquet of sweets or decorate the bottle in this way.

This one gift will contain champagne and goodies at the same time. It doesn’t matter what kind of candy you choose for this, chocolate or caramel, if you know the taste preferences of the woman to whom you will give such a bouquet - great! Well, if not, then it’s okay, take the most common ones and believe me, such a bouquet will definitely not leave anyone indifferent.
To work you will need a color corrugated paper, cardboard, plastic yogurt jar, scissors, tape, ribbons for decoration, thread, champagne and 7 sweets.

Making a skirt for a bottle. Cut the corrugated paper to the width of the circumference of the bottle, two heights of the skirt. In this case, one edge should be 2 cm shorter.

Fold it in half and stretch the paper wide along the fold line. Using a short edge, glue the skirt to the neck of the bottle with tape.

We wrap the long edge with thread to match the paper.

Using a lid of a suitable size, draw a circle on the cardboard - this will be the base of the cap. We use a yoghurt jar to make the top of the hat.


We wrap the blanks in paper and glue them together.


We cut out rectangles measuring 5 cm by 8 cm from corrugated paper, rounding the upper edges with them. Using your fingers, we stretch the petals wide along the upper contour, creating a gentle wave.

We begin to wrap the petals on the candies. One flower will need 5-7 petals.


We combine the blanks into a product. Tie a ribbon to the hat and glue a candy flower. Additional decoration if desired.

Glue flowers to the skirt in any order.

Petals made from green corrugated paper will look beautiful with flowers. Decorate the neck of the bottle with a lace veil. Original gift set ready.


A classic gift set for a woman can look like a real work of art. Such a gift will not leave any woman indifferent.


DIY postcards for March 8
As for the postcard, which does not require too much effort to make, you must use cardboard for its base, and the design can be done as appliqué, decoupage, scrapbooking or origami. It doesn’t matter what style such a card will be in, the main thing is that it should evoke tender feelings, be spring-like, bright, preferably with some flowers and contain warm words of congratulations. Usually there are no difficulties with materials for such a gift.
A fluttering and weightless butterfly landed on a card intended to congratulate loved ones on their birthday. wonderful holiday– International Women's Day. This gift is quite possible for a child to make if he is already a schoolboy. Mom will be happy to receive this elegant product, and the child’s efforts will be appreciated. Since the card was made for congratulations on March 8, you can get a little creative and make the central figure not quite ordinary.
Let the butterfly’s wings remain chic and spreading, bright and eye-catching. But let the body itself be made in the form of the number 8. This is the main highlight of the proposed present. Not everyone will dare to play with a simple insect figurine like this, but the result will be truly beautiful.

To create the same bright and unusual postcard prepare:
- thick cardboard base;
- plasticine for creating a background, design, inscription and additional decoration;
- a toothpick that will allow you to draw on plasticine and also attach small balls.
Making a greeting card with your own hands
Take everything you need for work. A big plus is the brightness of the plasticine; the brighter and more attractive the color of the material itself, the more expressive the postcard will be. Selecting shades of plasticine is already half the success.

To begin, very carefully apply juicy green plasticine to the surface of the cardboard. Try to make the layer very thin and smooth the pieces in different directions. It doesn’t matter that the light surface of the cardboard will show through. This way we will create an unusual, slightly aged effect. In general, the craft will look harmonious.

Make a thin purple sausage. It should be long enough to form a number 8. Glue the ends together to make a ring, then cross over to create the desired piece. Make wings from bright orange plasticine. Knead the pieces of plasticine in your hands, then press them on both sides with your fingers, while simultaneously giving the wings a suitable carved shape.

Start assembling a beautiful insect. Of course, we only use the silhouette to decorate our a wonderful postcard. Stick a figure eight in the center. Adhere to it on both sides of a pair of wings. Now we see a butterfly in front of us.

Roll out oblong white droplets from white plasticine. Make a couple of drops different sizes. These parts are intended to decorate the wings. Stick a few pieces on each side.

Also, use a toothpick to glue red balls along the edge of the wings. Above the image of the insect, write “Happy Holidays!” In this case, there is no need to indicate March 8, because the number eight already appears on the postcard, so it is immediately clear what holiday the craft is dedicated to. Stick patterns on the corners to make appearance finished.

A beautiful gift does not have to be expensive. The main thing is to do it from pure heart and don’t spare your imagination. Pack the gift beautifully, tie a bow, and now present it with in beautiful words to your loved one.


Greeting card with roses made of plasticine
On postcards dedicated to the International women's day, it is customary to depict flowers. This is the most desired and most beautiful gift for the fairer sex. And even if you don’t know what to give, flowers will always help out, it’s a win-win option.
But in this lesson, prepared by Elena Nikolaeva, we will not talk about how to choose a beautiful gift, but how to make it with your own hands. We offer an unusual three-dimensional option - a postcard decorated with a bouquet of plasticine. The central buds are roses, the additional branches are blue cornflowers. The card looks gentle and rich at the same time.

Materials for the postcard:
- thick cardboard;
- multi-colored plasticine: red, yellow, green, blue and white;
- thin toothpick.
How to make a beautiful greeting card with your own hands
There is a canvas in front of you. It doesn't matter what color it is. Pay more attention to its density and size. Choose the size for your craft, as well as the background color that will perfectly match the buds in the bouquet.

Fill the background completely with bright plasticine. Since you need to independently apply bright plasticine in a thin layer to the surface, the color of the cardboard is not initially important.

A beautiful bouquet can be made rich and beautifully complemented with simple wildflowers, such as cornflowers. Florists often do this. For small graceful branches, prepare thin green threads and green leaves, small blue beads.

First glue thin green branches with leaves under one side of the card.

Then press down each leaf with a thin needle to make the surface more realistic and textured.

Collect small cornflower flowers. To do this, combine 4 blue balls together, press with your fingertips to get petals. Insert a white ball into the center. Attach the resulting flowers to ready-made branches.

Make 10-20 blue wildflowers. Stick in different places. Press the white bead in the center on top with a toothpick, and also press down each blue petal.

Now move on to the rose leaves. They should be much larger. Make green flat droplets. Draw veins on top with a thin tool.

Assemble several combinations of thin green threads and the resulting carved drop-shaped leaves.

Glue green leaves randomly over the field branches.

For beautiful roses prepare red plasticine. Cut small pieces from the block.

Press and smooth each piece so that you get a flat, oblong petal.

Start twisting the petals into spirals to form beautiful red buds.

Form 3 buds. This will be enough to fill the picture.

Attach all the rose heads to the bouquet. Now you have a wonderful flower arrangement.

To make the inscription “Congratulations!”, stick a pink stripe somewhere on the side. Make an engraving with the sharp end of a toothpick.

If desired, fill the empty space with small multi-colored balls from plasticine so that the overall picture is rainbow-colored.

Beautiful greeting card ready with a bouquet of plasticine flowers.


Handmade gifts for any occasion are highly valued and arouse interest and tenderness towards them. Of course, you can’t say for sure that any woman will be happy with some small gift that you make with your own hands. After all, many expect chic and elegant gifts from their other halves. In such cases homemade gift can be given as a complement to the main and exquisite.
On March 8, women traditionally receive gifts. As a rule, they are awarded after any events. Every work team celebrates this holiday with joy. And besides flowers and nice congratulations women receive gifts. Of course, the most pleasant thing is to receive gifts that were made with your own hands. And in this article we will tell you about what gifts to make for your colleagues on March 8th.
Gifts for ladies colleagues
Original flower pots.
Every lady loves to plant flowers at home. Therefore, on Women's Day, you can present a flower pot as a gift. But to make the gift look interesting, decorate the pot in an unusual way.
So, find a suitable photo of a female colleague. There must be only one person in the photograph.
Using a printer, pictures are printed on plain or self-adhesive paper. The height of the photograph should match the height of your pot. The width should be equal to the diameter of the pot.
The pot should be smooth. This will prevent the image from being distorted. Degrease the surface of the pot and transfer the photograph with gentle movements. If the picture was printed on plain paper, then the surface of the pot is pre-lubricated with glue.
After gluing the picture, it is worth covering the surface of the pot with transparent varnish.

Jewelry box.
All women, without exception, are pleased to receive gifts of various kinds. If you have any craftsmanship skills, then please your work colleagues a beautiful box. To create it you will have to prepare:
- thick cardboard measuring 15 by 15 cm,
- toothpicks about 40 pieces,
- Super glue,
- plain threads or threads of different colors,
- decorative elements.
Progress:
- It is worth cutting out the bottom for the box from a piece of cardboard. It can have absolutely any shape.
- Each toothpick needs to be dipped in glue and inserted with the same side into a piece of cardboard. While working, make sure that the toothpicks do not pierce the cardboard. In this case, it is recommended to place toothpicks at an equal distance from each other.
- After the glue has dried, you should wind the thread on the toothpicks. Before starting work, glue the tip of the thread to the cardboard. Thus, it is worth braiding the entire box.
- The finished product can be decorated with beads or ribbons sewn onto it.

Cute paper flowers.
You don’t know what gifts to give your colleagues on March 8th, then look at the next gift that you will give without special effort. So, to create such flowers, a minimum of materials is required. It could be: colored paper, glue and scissors.
Progress:
- First of all, you should cut out the circle.
- A spiral is drawn on this circle.
- Then the spiral is cut with scissors.
- Twist the spiral. In this case, every second turn should be glued. As a result, you should get a “rosette”.
- In addition to flowers, you can make petals from paper. They are glued to the stems along with the roses.

A creative mug that will warm you up in winter.
If you decide to please your colleagues with something pleasant, then use your imagination and make a beautiful gift. If you bought a simple glass but think it is a boring gift, then using knitting skills and brightly colored yarn you can make it more interesting. Look now at unique ideas and study video materials on the Internet with which you can do this work.


Creative picture.
If you also have sewing skills, then you can embroider a picture for your work colleagues.

Lotus made from paper napkins.
An original gift for March 8 will be wonderful flower- lotus, which will not be difficult to make with your own hands. And if you're looking for Original gifts on March 8 to colleagues, then this option is considered ideal for you. To create a wonderful lotus you should prepare:
- scissors,
- thread and needle,
- colored paper.
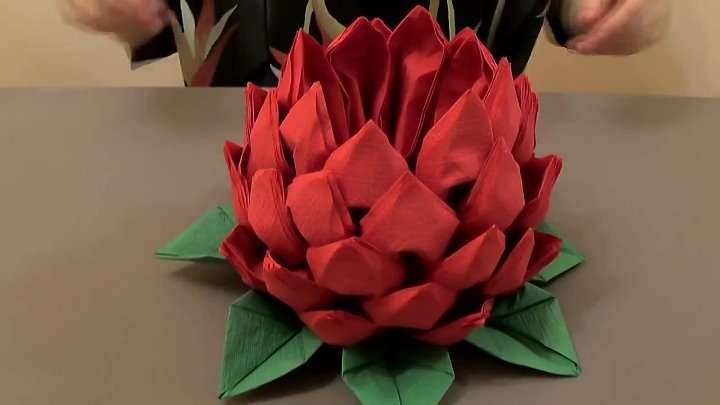
Progress:
- For the lotus, make 12 green modules and 6 pink modules
- Make a stand out of green napkins. To do this, fold the napkin into four and fold it diagonally.
- Then, from the top corner to the center, bend the two sides.
- After that, turn the small corners over and bend their tops.
- Fold in the center outwards. Your module is ready. There should be 12 such modules.
- Pull the finished modules together in a circle using a thread and a simple needle. The result will be a neat stand.
- Now let's start creating the flower itself. From a pink napkin, make exactly the same module as for the stand.
- Start collecting the first row of lotus.
- A module that has two corners should be connected to another module. Help yourself in your work with any object. This could be: the handle of a spoon or fork.
- Thus, you need to collect all 8 rows. Straighten the petals and bend them slightly forward.
That's all! Your lotus is ready! If you do not understand the details of its creation, then watch a special video on this topic.
Apron and other kitchen accessories.
An apron and other kitchen utensils would be an excellent gift for work colleagues on Women's Day. These could be: oven mitts or towels.

Ladybugs.
To please women at work on March 8, you don’t need to work hard. It is quite possible to get by with a simple gift. The next gift is very easy to make. And this idea may appeal to men. So, to make crafts you should take:

- raw chicken egg,
- black and red marker,
- acrylic paints,
- knife with a thin blade,
- plate and postcard.
Progress:
- Rinse the egg under the tap and dry it.
- Using a large needle, make one hole at the top and bottom of the egg. Extract the contents.
- Wash and dry the egg again.
- Carefully cut the egg in half.
- The halves are washed and dried again.
- Cover the dry halves with red paint or a marker.
- Use a black marker to color the narrow part. Draw a black stripe from it in the middle. Draw dots on the sides.
- Now paint the eyes with paints.
Lady's crust is ready!
Finally
Here we have listed some gifts for women on March 8th. You can present all these ideas to your colleagues. Remember that they will definitely be delighted with every gift.
The first one is coming spring holiday, and with it the pleasant chores of choosing a gift for March 8th. You don’t have to choose an expensive gift; you can do it on your own and on a modest budget and make an unexpected and pleasant gift with your own hands.
Hand-main is gaining momentum, there are a lot of manufacturing manuals on the Internet, and if you have a natural talent for creativity, then there will be no problems with either the idea or its implementation.
If you don't have enough ideas, I'll give you some various options– from easy to more advanced:
- Write a poem yourself or with the help of a hired poet (for money), do it yourself beautiful postcard and write your poems

- Bake a cake, decorate it with flowers and a figure eight, brew some fragrant tea and serve on a beautiful tray. If the cake is too complicated, make cupcakes or cookies. It's much simpler, but no worse in taste and appearance

- Knit a warm and unusual mug cover
- Paint the mug with paints or decorate it using decoupage technique
- Tie coasters for mugs so they don’t stain the table
- Weave flowers or trees from beads

- Embroider satin ribbons a picture of voluminous flowers. That's very beautiful
- Sew soft toy, for example, a bear or a bunny, and place a tulip or mimosa sprig in your hands
- Surprise your woman with a letter written by you in your own hand. Put it in a box (you can make or decorate it yourself). Can you imagine how surprised your wife or girlfriend will be at such an unusual gift?
- Sew a pillow in the shape of a heart or a regular square shape. Decorate with ribbons and flowers
- Take on all the household chores on this day - prepare breakfast, lunch and dinner, set the table, wash the dishes, take a walk with the children, put them to bed. On this day, do everything that is usually within the scope of your wife’s activities. She will be very grateful to you

- Many girls and even older girls love beautiful notebooks, and if you use scrapbooking when decorating, the gift is guaranteed the highest score
- Make soap. It is not difficult. Soap molds can also be found at home. As a last resort, buy silicone baking molds and use them. Play with color, cover with glitter for manicure
Remember that in addition to the gift, its presentation is important. beautiful and unusual design will intrigue and delight.
Corporate gifts for March 8 from newspaper sticks to colleagues
There are newspapers in every home. With the help of simple manipulations, you can prepare an economical gift option for your colleagues - an organizer for writing instruments.

Prepare:
- Newspapers
- PVA glue
- Corrugated cardboard
- Unfold the newspaper and fold it lengthwise, cut it
- Fold the half lengthwise again and cut with a knife.

- Take a wooden skewer and, starting from the corner, wrap the newspaper onto the skewer. At the very end, glue the corner so that the tube does not unfold
- Let us thus prepare the required number of tubes
- After the glue has dried, take out the skewer and roll the tube into a snail shape.

- We take the next one and apply glue inside, and then push the end of the snail into the cavity of the tube and wrap it further, forming an organizer part
- As you wind it, lubricate the sides with glue. You should get two parts with a diameter of 12 cm and one 9 cm

- We grease them with PVA glue, and until they dry, we form them, bending them in the right direction

- We cut out parts with sides of 6 and 25 cm from corrugated cardboard, wet the surface with a brush and water and separate the upper part

- We paint the part (9 cm) and corrugated cardboard with brown acrylic paint
- We paint the details in the desired color scheme

- We cover the edges of the finished parts with tape
- We secure the short corrugated cardboard ribs with self-adhesive film

- We assemble the structure - we attach the part to one part with glue, then on the other side, we fix the bottom with glue
- We apply glue to all surfaces, including internal ones. We send it to dry.
How to make paper flowers for mom and grandma in the senior group of kindergarten
In kindergartens, preparations are underway for Mother's Day - children learn poems and songs, prepare dances and skits. And, of course, they don’t forget about gifts for their mothers and grandmothers.
Let's prepare for work:
- Scissors
- Toothpick
- Green paper
- Yellow and white crepe paper
- Ruler
- Narrow tape
- Threads yellow color
Let's make daisies. The process is not complicated and entertaining.

- Cut a sheet of green paper in half lengthwise, and then cut one piece in half again. We twist the stem onto the corner of a toothpick for the future chamomile. After twisting the stem, take out the toothpick and glue the thicker end of the stem with tape so that it does not fall apart

- Roll white paper into a roll, measure 10 cm and cut with scissors
You should get pieces made of white with sides 25 cm by 10 cm and yellow 4 cm by 20 cm

- Fold the yellow sheet in half and cut it, then fold it again and cut both edges in 5mm increments

- Fold the white paper in half and cut it. Now we put a yellow strip in the middle and fold it from one edge, then turn it over to the other side and fold it like an accordion. And so, step by step, we make an accordion out of paper

- We tie the middle with a thread and cut off the edges roundly.

- Attach the stem with tape

- We straighten the petals and get a fluffy beautiful chamomile. Make several pieces and arrange them in a bouquet. And if you also make a vase, then there will be several times more delight.
Video - how to make a bouquet of sweets for International Women's Day for a girl
What girl doesn’t love sweets, and if it’s interesting to arrange them in the form of a bouquet, then it will be two in one - both the bouquet and the sweets.
How to make felt flowers for your sister
Fresh flowers are good, but they don’t last long. But a felt bouquet will delight you for many years. Just blow away the dust.
Let's prepare:
- Green and pink felt
- Basket
- Template for flowers
- Floral wire
- Scissors
- Twine
- Pencils
- Pliers
- Kraft paper
- Plastic mat
Don't worry about looking at the quantity necessary materials. Some can be replaced (if you don't have them), some can be simplified along the way. And in general, never be afraid to try something new. You never know what you can do till you try.

- Cut out templates from paper. You can easily draw them yourself in the size you need, and then cut them along the contour

- Using a large template, mark out the details on pink felt and cut them out.

- Cut the strip more light shade felt measuring 1 by 5 cm and make cuts on it at a distance of 3-4 mm

- Apply glue to the middle and connect the two parts. A small detail will serve as a bud for a flower. Roll it into a bud and apply glue to secure it

- We trace the second part on green felt and cut it out. This is a sepal for a rose

- We cut the wire to the required size, string a sepal on it and secure it with glue, and strengthen the rose on top
- Thus, we will prepare the required number of roses. If you are tired, you can end here. Just combine the flowers into a bouquet, tie it with a ribbon and the gift is ready.

- If you want to continue, then we’ll make a vase. You can buy a basket in stores. Cut a circle from a plastic mat the size of the bottom of a basket. You can also use thick cardboard or other suitable materials.

- We put moss inside, stick roses into it, and shorten the stem to the desired size. Instead of moss, you can cut out polystyrene foam or a thick piece of foam rubber

- Wrap it in craft paper and tie it to a bow with twine. Paper can be replaced with wrapping paper.
We create a beautiful bouquet of fabric tulips for the teacher on March 8
The flowers turn out very beautiful, almost real and are wonderfully suitable for a women's holiday.
Let's prepare:
- Cotton fabrics of different colors for patchwork
- Green cloth
- Cocktail straws
- Threads
- Lighter
- Needle
- Soft filler (holofiber, cotton wool, etc.)
- Scissors
- Paper and pencil
- Ruler
- Double-sided tape
Manufacturing:

- We cut out three blanks from paper with dimensions of 3 * 21 cm, 7 * 12 cm and 7 * 14 cm

- We fold the 7*14 piece in half lengthwise and draw a leaf on it and cut it out. We will use this template to cut the leaves.

- We mark the details on the fabric according to the templates. For one tulip you will need one 3*21 piece for the stem, 7*12 for the flower and 2 pieces for the leaves.
- If you are going to create a bouquet, then prepare all the details at once, carry out the work in stages

- For the stem, seal one edge using a lighter flame to make the seam look neat

- Place double-sided tape on the opposite edge

- Wrap the tube in fabric. We pin the remaining edges with needles and use a needle to hem the seam so that it is not visible

- Let's take care of the leaves. We turn the bottom edge of the part and sew it, then we put the parts together right sides and sew along the edges, turn them inside out, and iron them. It is better to perform this operation on sewing machine, but if it is not there, then manually

- Fold the edge of the fabric for the flower half a centimeter to the wrong side and smooth it with an iron

- We fold the fabric with the right side inward and sew the edge and turn it inside out. The result is a cylinder

- We go along the edge with a needle and collect the fabric, insert the stem inside and tighten the thread. We try to match the seams on the stem and bud and tie the stem and flower together with a thread

- Fill the bud with filler and tie it crosswise with thread. First from one edge to the other, then opposite. Press the corners with your fingers to give shape.

- We apply the leaf to the stem so as to close the seam and hem it with invisible stitches

- We prepare the rest of the flowers in the same way and decorate the bouquet with a ribbon or place it in a vase.
We make a box decorated with famiaran flowers for a gift to a friend
Does your friend like candy? Well, who doesn’t like it, you tell me. What if you present it not in a banal box, but in a box you made with your own hands and decorated with beautiful flowers made of fomiaran? I hope she likes it.

You will need:
- Fomiyaran
- Skewer
- Pastel
We produce:

- On the sheet we measure intervals of 2.5 cm on all sides. Using a wooden skewer, draw all the squares along a ruler.

- Take a pastel of a contrasting color and sketch half of the square, then cut it out

- We round two corners of squares - we get petals

- Curl the petals with a curling iron

- We leave two petals for the bud. We coat it with glue and twist the first petal into the bud, then put it into the other petal and twist it again. Don't forget to lubricate before twisting

- Now we glue the petals in a circle one by one and form a rose. We make several pieces

- For the box we take thick cardboard and colored cardboard. We cut out the bottom, glue the cardboard in a circle - it turns out Bottom part boxes. For the lid, we trace the top part, cut it out and also paste it in a circle - we get a lid for the box

- Cover the bottom and top of the lid with green cardboard

- We glue a polystyrene foam hemisphere onto the lid, paint it with paint to match the box and stick on the roses. Now we fill it with delicious candies, cover it with a lid, tie it with a ribbon and the gift is ready.
I have given several simple master classes on how to make a gift with your own hands for lovely and beloved women. Such gifts will last a long time and will be useful as an idea not only for a women’s holiday, but also for any other occasion.
Healthy candies made from dried fruits
Buy dates, prunes, dried apricots, almonds and walnuts. Pour boiling water over dried fruits and then grind through a meat grinder. Do the same with nuts. Then add some honey to the mixture lemon juice and roll the mixture into balls. Roll the finished balls in nuts, coconut or cocoa and place in a box. These candies are very tasty, healthy, and most importantly, they won’t ruin your mother’s figure!
Napkins with embroidery
How to give a gift to your mother on March 8? Try decorating the simplest plain napkins with bright buttons. Red ones are suitable for cherries and apples, purple ones for currants and cherries, yellow ones for apricots. And twigs and leaves can be embroidered with floss threads. You can decorate kitchen towels or a tablecloth with multi-colored berries.

Bouquet of buttons
With the help of floral wire and colorful bright buttons you can make something very special for your mother. beautiful bouquet ick that will never fade. Let the baby fantasize and create the flowers he wants, simply by pulling the wire through the holes of the buttons. How to make a basket with flowers for March 8th.

Tea composition
Prepare an aromatic tea mixture by adding loose leaf black or green tea pieces of dried fruit: apples, oranges, lemons, spices (cinnamon, ginger, cloves, pink pepper, star anise, thyme, rosemary, mint, cardamom), petals or small rose buds or dried berries. Just mix your favorite ingredients and pour into a beautiful jar.

Ripe berries
From bright pieces of fabric you can sew a comfortable pincushion in a few minutes by filling it with padding polyester or cotton wool. And if you add a few drops to the filler essential oil, you will get a fragrant sachet.

Cover for a diary - a gift for mom on March 8
Cut out a cover for your diary from a beautiful, bright fabric, measuring it first. Spray the fabric with aerosol glue or PVA and carefully glue it to the cover of any diary. For beauty, you can decorate the cover with various beads, ribbons and rhinestones, also gluing them to the cover using a heat gun.

Germination kit
If your mother loves flowers, the garden and the dacha, then ready-made bags with seeds will be an ideal gift for her. Select seeds from mom's favorite flowers (or make a mixture of seeds). Add some nutrient soil, making small balls out of this mixture. Wrap the balloons in cute paper and tie with ribbon. The gift is ready!

Kitchen hanger
An excellent decorative kitchen accessory that is made from a hanger. Paint it with spray paint in a color that matches the interior. Attach several hooks twisted from strong wire (available in craft stores) to the bottom placket. You can hang cute cups, kitchen towels and any other kitchen utensils on the hanger.


