It is said that now it is not customary to give postcards. This is a complete nonsense, because congratulations made by their own hands are always happy to receive, especially if they are from loved ones.
When it comes to a child, he can not only express his feelings through a manual picture, but also to show the presence of certain talents and character traits. And give such a postcard to your birthday girlfriend.
In the article I will give not only ready-made templates for creativity, but also the ideas that you can implement. All options are not complicated, but will require quality materials and a huge stock of accuracy.
To please these loved ones in their holiday, I want to make a special way, so you need to choose the right color. Immediate shades and smooth lines come to mind immediately.
Some ideas can be taken from the article about.
For example, ideas with the image of the dress are very interesting.

Let's make such a decor with your own hands.

We will need an openwork napkin for caps or candies and glue.

You can create a beautiful design, having worked well by a stationery knife.
For example, such an idea. 
A thick two-color cardboard is taken, this is sold in stores for scrapbooking or for creativity.
A pencil is applied with a drawing, you can take any of the Internet, for example, a cake or candles. Then neatly sharp tip of the stationery knife is extruded on the lines.
The main thing is to put the board under the cardboard, so as not to spoil the surface of the table.
You can leave so, but it is better to glue a rectangular sheet as an inscription substrate.

Another idea, where some elements are cut. The inscription and vegetable elements can be repeated with a black helium handle.

Look at another idea with the asymmetric edge of the front side. Here, by the way, also some elements can be cut through.

Another master class, how to make a bulk card inside.

For carved edges, you can use special scissors that give a cut in the form of a figure-line. By the way, we have already acquired such a stationery with my daughter. The child had a light shock that scissors could cut not only straight.
Ideas for congratulations to a man (dad or grandfather)
For men, you need congratulations on a universal pattern. And even better, if there is a special minimalism in decorating.
You can use only a sheet of paper and multi-colored braid, as in this embodiment.

Pay attention to the interesting edges of the sheet. And for the inscription you can use transparent tracing. You could see such paper in boxes with candy.
Or a very concise design, which is very suitable for the male holiday.

Here is a scheme for such a composition, you can even print the template, and on it already make an inscription.

See how it looks bright and festive, but there is nothing special in it. Just multicolored points set in chaotic order.

Scrapbooking technique allows you to create bulk products. For decor, different textures and shades are used.

Or you can work hard and make a congratulation with the elements of origami. The whole detailed master class is described.

I also liked a laconic idea with geometry. For example, using strips. It turns out strictly, but very elegant.

Strips can not only draw or stick out of paper. But take a look for this purpose to a dark scotch or braid.
We make postcards from paper and cardboard in kindergarten with children
Children are more likely to appliques using paper and cardboard. This is the most affordable material and from it can be made different forms and figures.
For the kids of the middle group there is an excellent master class. Keep in mind that at this age they can not smoothly cut the items, so be prepared to help.
We need:
- Cardboard sheet
- On white, green and yellow paper sheet
- Scissors
We need to make a strip of 1 centimeter width of 1 centimeter.

We glue the edges and get a droplet.
From yellow paper cut circles, 3 centimeter diameter. And we glue our droplets to the middle.

That's what happens.

Now from green paper needs to cut stalks. We form flowers.

The location of the junction of the stems can be decorated with a bow.
Another step-by-step instruction for creating design with daisies.

Place the paint or felt-tip pen.
Cut out 4 chamomile and paint the heart. Also pre-prepare three strips of green paper, 0.5 centimeter width.

We form the location of the stems and glue the strip.

On the wrong side of the daisies, we glue a piece of bilateral tape and cut the stalks to make them shorter.

On the stalks glue flowers. We make an inscription and a bow.

The edges of the postcards can be shaded or placed with colored paper. You can generally not touch them and leave as it is.
How to make a postcard with flowers for a woman's birthday
Women accepted not only bouquets of live flowers, but also postcards with their image.
I propose to make such a pretty applique.
You will need:
- Cardboard sheet
- 2 sheets of dense duplex pink paper
- tapes of two colors
- white factory sheet
- rule
So you first need to cut the vase.
I led a template for colors for which they need to be cut.

Bending petals needed using a ruler, like this.

You can use this template.

See how simple congratulations do not look gently. Even a schoolboy can repeat this idea. Moreover, roses can be replaced with another form of colors or in general to portray hearts or circles in their place.

An option for those engaged in quilling. Or an excellent opportunity to start practicing this technique. On the Internet there are many detailed instructions on this topic.
This decoration is very self-sufficient, it is not even necessary to add an inscription.

For needlewomen who use felt or sewing in their work, I propose such an idea.
Print items better on hot glue.

I think that all the features shown are easy to realize, most importantly, approach it with a soul.
Ideas of simple congratulations with
balls
Balls are one of the most important attributes of holidays. And on the birthday, they must be present, even if only on the postcard.
Look a selection of interesting ideas. Perhaps they will inspire you to a creative evening.

An idea with corrugated balls located in an accurate geometric grid.
Such circles can be cut out of packaging cards if you remove the top layer and get to the rigidity ribs.

But it is better to give a whole ohaper of multi-colored balls so that the birthday man flew to them to his swords.

A more complex idea of \u200b\u200bdesign.

Unusual color of balls. They are cut from background images.

At the volumetric double-sided adhesion glue the decor. Then it turns out the variation of 3D.

Another simple idea.

Note how simple little translucent buttons fit in this design.

Any font for the inscription you can download and install in the easiest graphic editor, even Paint on your computer.
Write in it a congratulation and translate, putting paper to the monitor. And here you are already ready template.

Background can be taken not only white, and both black. In general, give preference to contrasting, calm options.

I think that the balls can use in their composition absolutely any needlewoman.
Simple ideas for gift sister or girlfriend
Girls are much more often made postcards than boys. Therefore, feminine ideas are much more.
For a girlfriend, you can make a curly congratulation in the form of a crown.
The template for it can be taken any.

Also cut out animal figures.

From different textures to prepare letters for congratulations and make an inscription from them.

Just stick a lot of hearts.

Give a rainbow from buttons! I liked this idea more than anyone else. Prior to incredibility, but tasteful.

Another idea of \u200b\u200busing a bouquet of hearts. By the way, to make this option more interesting. Along the center of each heart, let the engine line be white thread.

Also a stylish and concise design using a contrasting substrate and a set of circles.
Such smooth circles can be obtained by using holes.

My dear, I disassembled the options that you yourself can repeat at home and having the simplest infirred materials. I will be happy if you add a bookmark article.
Original ideas are in the air. Catch and make it your hands the works of art from paper that will delight your loved ones. The most important thing is that all your work will really appear in a single copy, which means that the exclusive manual postcard will be the road not only on high spiritual criteria, but also materially.

Work in the technique of scrapbooking
The most fashionable technique of working with paper for today (scrapbooking) is invented and began its walking around the world as one of the ways of designing photos of albums. But why not use it to create beautiful postcards.
It became already usual that the demand, having slipped the tongue, struggling to have time for a suggestion, and therefore in the store there is everything so that we can safely do your favorite hobby - makeup cards for birthday in the technique of scrapbooking.

It will take:
- white paper for watercolor - sheet A4;
- colored paper (lilac, purple);
- lace wide ribbon - 12 cm;
- beautiful ribbons or braid - 30 cm;
- three white artificial flower, which can be cut off from hair gum;
- three small interesting buttons in the tone of paper;
- scissors, ruler;
- glue "moment";
- flomaster or gel handle of purple color.
How to make a postcard in the technique of scrapbooking
- At the beginning of work, you can make blanks from paper. Our greeting card "Happy Birthday!" In the finished folded form, there will be a size of 10x16 cm. Therefore, we fold a white sheet of paper in size 20x16 cm in half. Then cut out four colored paper blanks (two purple and two lilac), as shown in the photo.
- Carefully stir up lilac blanks into purple so that on each side there are equal equal field widths. Write the words of congratulations "Happy Birthday!" And circle the frame with a handle or felt-tip pen.
- Now you can stick all the rectangles on the workpiece, retreating from the edge of 10-5 mm. Get the lace and 12 cm tape on it, while taping the edge of textiles on the reverse side of the scrapbooking postcard.
- Start a color postcard on folded in half a paper blank. Now you can make a bow from the remaining tape, and glue it, bulk flowers and beautiful butt with the "moment" glue.
- The last stroke in the design of the postcard for the Birthday Day in the style of scrapbooking will be drawing with your own hands. Felt tip or handle Draw the monogram and dots along the edge of the frame. Expand the postcard and write congratulatory words.

Birthday Birthday Cards
No additional material investments require, do it yourself to make any student with their own hands, at the same time, are very interesting and original, these wonderful simple volumetric work from colored paper.

It will take:
- colored paper;
- scissors, Circle;
- double-sided tape;
- pVA glue;
- wooden wand;
- beads;
- beautiful ribbon.
Procedure for the embodiment of the idea
- Draw on colored paper circle circles of different diameters and cut them out. Guide scissors from the edge to the center, make a spiral from each circle. If you use curly scissors, the edges of the colors in 3D can be made terry or carved.
- Twist with a wooden stick from the edge to the center each spiral, fixing the resulting flower with a drip of the glue at the center of the circle spiral. Try to do not very dense buds so that the bouquet is lush.
- Fold a beautiful cardboard rectangle, intended for the bottom of the birthday gift, in half and make the first fitting.
- Cut out a colorful flower pot from brown paper and stick to its invalid side of double-sided tape.
- Shoot on the card with a green paper with a size of 1-2 cm smaller format. Now you can make a composition of a pot and flower on the birthday.
- Tie a bow and attach it to the pot. Stick the inscription "Happy Birthday!" And you can give a postcard made by your own hands to your beloved person.


Card folding "Chicken"
- To implement this idea, you need two sheets of cardboard or tight paper. One sheet size 12x12 cm Bend, retreating 3 cm from the edge.
- The second sheet of cardboard in size 15x18 cm must be folded in half. This will be the basis of the postcard. Therefore, you can decorate it, placing beautiful paper on both sides.
- Rush on the bend of the first billet 6 lines. Return from each edge of 3 cm. The side 4 lines should be 3 cm long and symmetrical in the column. The middle strip is cut into a height of the fold axis by 1.5 cm, down by 2.5 cm. The width of the resulting bands should be 1 cm. Bend them in the opposite direction so that three steps are the same height, but of different lengths. They will serve as supports for paper figures.
- Cut two brown eggs from colored paper, decorate them with appliqués and stick to extreme steps.
- Draw on paper a pattern "Chicken in Egg". It is necessary to cut on it first from the yellow paper of a newborn chick with a foot and scallop, and then from white paper shell. Slit them with each other, draw the beak, eyes and stick to the mid step. Doodle the background of a beautiful applique and chicken feathers.
Postcard in a quilling technique
Elegant, volume decorations on a postcard do not look at all as paper, and they are very simply made. It is only necessary to cut narrow strips from colored paper and in a certain way to turn them into a spiral.

Quilling technique is well described in many sources. You can learn the simplest techniques quickly. For such a picture, you need to make 4 "closed spirals" from green paper, 4 "non-central spirals" of yellow and 8 pink, as well as 14 green leaves in the form of "eyes".
Start clearance with a large flower. Its center is also made of a strip of paper rolled into the spiral, pre-cut to the middle of the width in the fringe. Then glue petals and leaves.

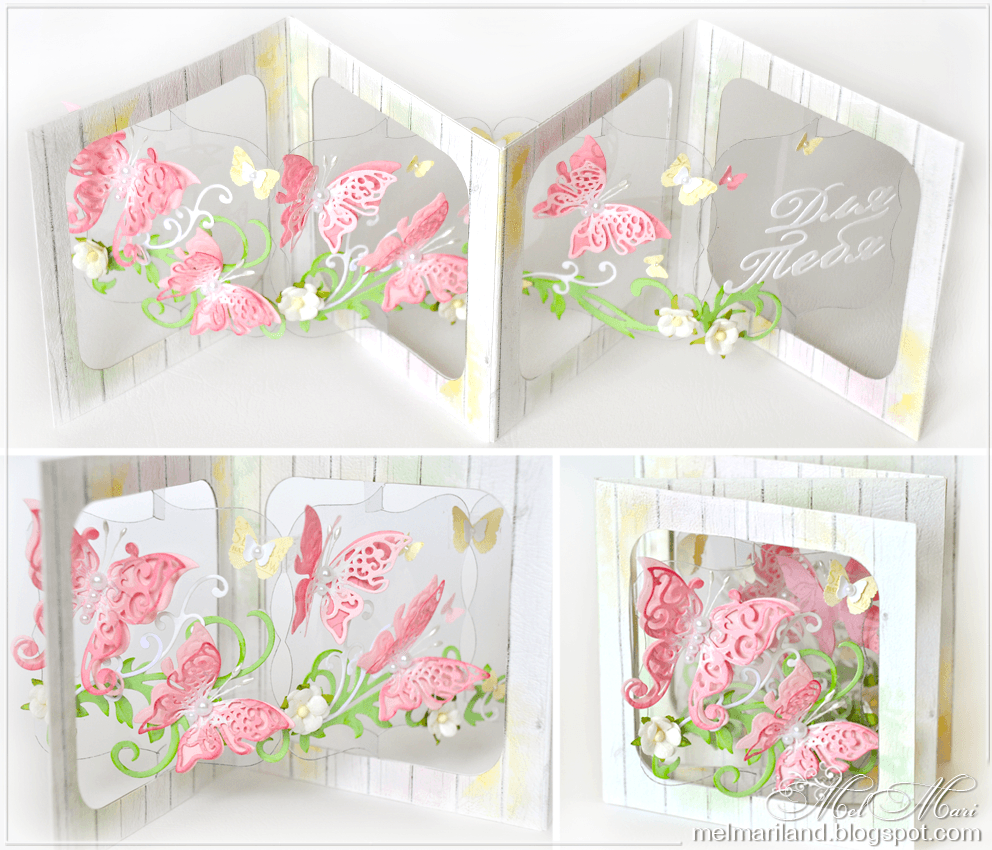
Attach the butterfly details in the upper left corner. Do not stick, spread the details of the pictures with congratulations and ladybug on a postcard, observing the proportion. It remains only to add "twigs" and fasten the still life.
Ideas for gift
In order for the bulk card to become even voluminous, you can not make a flat pot, but a bows with a bow. Fold from pink paper fan harmonica or, as in the photo, Crac. Fasten on the edge of the edge of the fuel on the paper and glue the corner of its bottom. To the fan did not open, limit it with a white ribbon with a bow.

In order for the inscription "Happy Birthday!" The postcard looked original, it can be done using silicone. Next, it is necessary to paint the brush with dry paint, and then carefully remove the silicone film with paper. There will be a white inscription on a colorful background.

No idea is easier and original than the "endless" postcard. Write congratulatory texts that are bursting and connecting during the folding process, prepare applications, drawings. Decorate this made with your own hands on the master class postcard shown on the video.
Use natural material: leaves, dried flowers, flattened straws, spikes. It revives gifts and give them natural living heat.
Postcards happy birthday with your own hands a wonderful festive attribute. It is not rarely used in schools to create congratulations to students. In the lessons of labor, many of the readers in childhood made their own postcards. From the moment there was a lot of time and today, especially on the Internet you can find a large number of original postcards for congratulations made by your own hands.
The relevance of a gift
Especially for children a lot of lessons created for the development of small motility. On the school, the school is offered to perform various exercises associated with the creation of paper products. The postcard will be an excellent solution for this. In addition, it is also worth considering that the child is trying to make such products and the process itself brings pleasure.

The article will consider different ways to create out of paper and related postcard materials in different styles. Methods of manufacture will be presented for readers:
- volumetric pictures;
- with the addition of fabric;
- collected from figures;
- with the addition of confetti;
- and envelope for money and coins;
- with volumetric figures on the main part;
- with the addition of carved animal images.
It is also worth noting making all the postcards described below can be easily at school or at home. For this can be used primary materials. The main thing to use the fantasy and show the smelting.
Table of materials used
Before you begin to consider how to make a paper card and that it may be necessary to make a table from frequently used materials and tools that can be useful in the process of creating an original gift.
As can be seen from the objects presented in the table, almost everything can be found at home or buy in the nearest store.
If the making postcard will be engaged in the smallest readers in school or at home, it is necessary to always follow safety and be careful when using stitching and cutting items.
View the original solution for making the birthday cards from paper in the video.
Video: paper greeting card
Master class postcard with your hands happy birthday
General instructions on example 3 postcards
In order to move to more complex paper products, it is necessary to practice the easiest. To do this, the following three options for creating paper from paper will be outlined. Having learned on these examples, you can move to more complex instructions for their manufacture.
For the first option, you will need the following set of tools and materials:
- Cold cardboard.
- Colored paper.
- Scissors or stationery knife.
- Conventional writing handle.
- PVA glue or adhesive pencil.
Making time not more than 15 minutes.

The first thing is necessary to cut the base in the form of a frame. For this, a dense cardboard is used. Color can be any depending on the preferences of the wizard itself. The edges of the card frame can be made figure as an example with a scissor or stationery knife.
To create smooth curly frames, it is better to use markups that are applied with a pattern or a ruler.
On the prepared base for cardboard, a second layer of colored paper is applied. Instead, it is possible to use the image printer as the main background.
Now there remained the most important task associated with the manufacture of festive candles and lights. To do this, you need to use the handle. A thin colored paper sheet needs to wind around the handle. The edge where the paper is attached is sick. In this position, you need to withstand the form of seconds 30. After that, remove the handle. Repeat the action depending on how many candles must be placed on the postcard.
Separately, lights are cut out of the colored paper, after which they are attached to the candles. The resulting design is glued to the postcard. After that, it must be signed and write a wish to the birthday man.
The second postcard will have a premium medal with the age of the culprit of the celebration.

To create it takes:
- Cardboard as a base.
- Colored paper set.
- Threads.
- Stationery knife or scissors.
- Adhesive pencil.
Make such a postcard Observing the instructions can be in just half an hour. In order to do everything correctly, the instruction will be written step by step.
Instruction
- Preparation of all necessary materials.
- Prepare the basis in the form of cardboard of any color at the request of the user.
- Decorate cardboard with different paper elements.
- Take a thin colored sheet of paper and fold it with a harmonica.
- With the help of threads to transfer the folded harmonica in the middle.
- Place the harmonica so that it has a circle form.
- To fix the edge of the painted harmonica, fasten with glue.
- Cut the circle of a smaller radius than the harmonica.
- Draw the age of the birthday or cut and glue paper numbers.
- Glue the circle on the harmonica.
- Printed the finished medal to the base.
Now everything, the postcard is ready.
The last postcard for training will have volumetric elements.

It will also take a maximum of 30 minutes of time. For the manufacture of postcards you will need:
- Dense color cardboard as the main background.
- Colored paper with patterns or real wool paper for gifts.
- Dressing ribbons.
- Scissors.
- Adhesive pencil.
The process of manufacturing such a postcard consists of the following steps:
- Prepare the base from the cardboard. The background can be written or glued additional items.
- In the upper part of the cardboard write the word "Congratulations!".
- Take colored paper or gift wrapper and cut the squares from it in in the form of packaged gifts.
- Stick squares at the bottom of the picture.
- Make a bows and dressing tapes for each of the glued gifts and attach them to them.
Instead of ribbons, you can also use colored threads or beeps.
All is ready. The postcard looks quite bright and interesting and has volumetric elements in the form of gifts and bows.
Volume 3D postcard
More complex options for postcards from paper will now be considered. The first postcards containing 3D elements will be presented.

To create a product, you will need:
- Several sheets of dense colored cardboard.
- Scissors.
- Adhesive pencil.
- Colored paper set.
The first thing you need to do is a tight cover book. For this, several cardboard sheets are glued together, and folded in half.
From the outside of such a cover, you can write congratulations and wishes, as well as to place the elements cut out of paper.
Now opens the resulting cover, and make the wrapper of the pyramid from future gifts in the open cover center. The workpiece is clogged in half so that the corner from the boxes of gifts began to perform when opening forward. Next, the base of gifts except the places where they are attached to the main sheet. The resulting workpiece is glued to the cover.
Places where gifts will do not need to speak when opening.
When the glue is dry, it is necessary to decorate the speaker when opening the pyramid of gifts and glue at the very top of the bow.
Paper Cards with Fabric Addition
To create a cloth card, you will need the same composition of tools and accessories. The only thing to add is different tissue types.

In the future postcard, the fabric will replace colored paper. It is attached to the base in the form of cardboard. It is noteworthy that such a product looks quite interesting and nice to the touch. For reliable fixation of all elements on the cardboard it is better to use PVA stationery glue.
However, it is worth being careful. Many tissue types absorb moisture well. If you move to glue after graze, traces will remain on the material, which will spoil the entire general view of the postcard.
From heart shape
For the next type of postcard, the shape of an even heart will be required. It is better to print it on a printer on colored paper or find a good and big template to circle it. You need to be attentive if the edges of the heart are not even postcards of the envelope fail.

It is also advised to use a gift wrapper instead of colored paper. All actions are designed for 5 steps:
- The template is prepared and the heart is cut.
- Turns over the back of the user.
- The sidewalls of the heart are smoothly folded.
- The heart turns over and the part that turned out to be below the half of the product.
- The upper part becomes the envelope lid. Boca for fixing is sampled.
On such an envelope from the front, you can stick a small bow or ribbon.
With the addition of confetti
Confetti is always a holiday. In order to make it not need to go and acquire a specially home firework. A hole punch and a set of colored paper of all colors of the rainbow will help to solve this task.
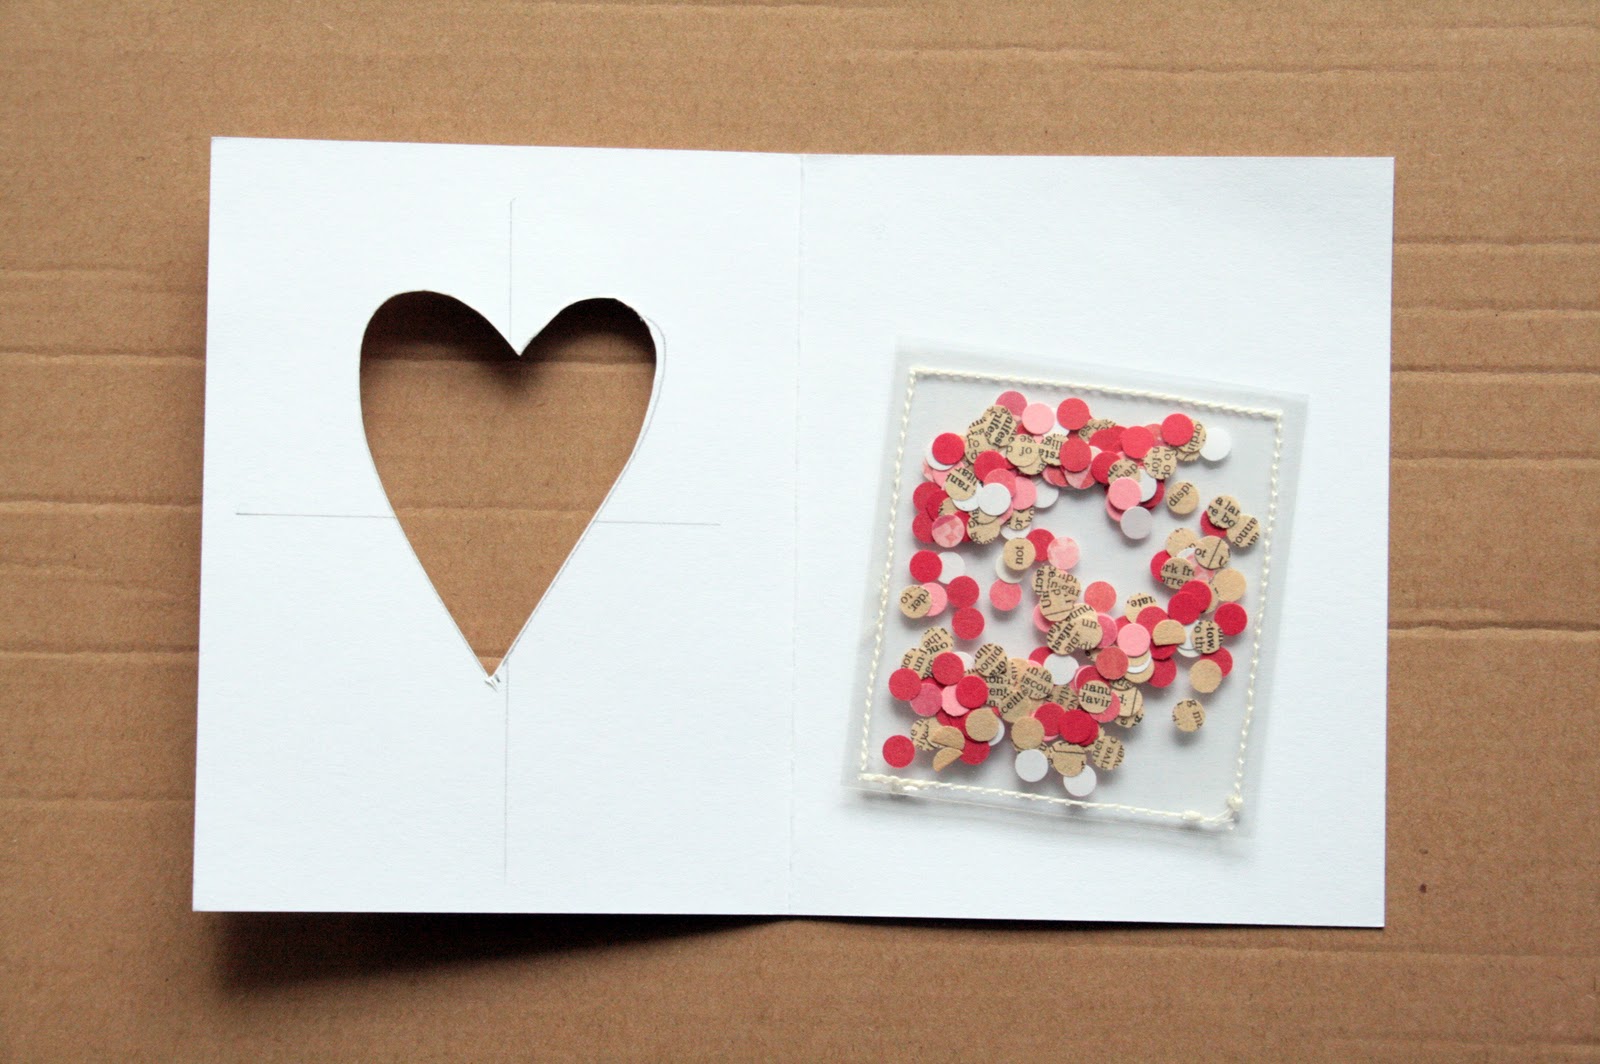
First you need to make a base of cardboard. It can be any color. It is better to make a card shaped frame. To do this, a large cardboard sheet folds with a grinding forming an equifiable triangle.
On one part of it passes the base. To diversify it, you can do, as shown in the picture of the envelope. It is better to use tight cellophane for this or transparent paper.
Securing the envelope or other transparent object with glue, it is necessary to make confetti. For this, a hole punch and a set of paper of different colors is taken. Now the slots are made using the tool. The chips has a smooth shape of the circle and is similar to confetti. Parts from the circles are glued to the postcard, and the other part is placed in the envelope.
On the eve of the celebration of the dear man's heart, I would like to make such a gift that I would impress and left pleasant memories. We offer to make volume postcards with your own hands, they are also called Pop-Up postcards. What are these wonderful postcards?! At first glance, these are ordinary postcards, opening that, in front of you, there is a surround figure or a whole composition! Such postcards will not leave anyone indifferent! Especially if they are copyrighted and keep the warmth of your hands!
Postcards with flowers inside with your own hands
Heart-shaped card with a surround flower can even make even a child:

You will come in handy
We do, both simple and complex creation technology.

The lush flower for the inner or outside of the postcard can be made of colored or even simple paper painted with watercolor paints or pastel shallow. Cut flowers can be used for this template:

Print the flower pattern, paint paints. We fold in accordance with the outlined lines of bend and glue the resulting flower to the basis of the postcard.

Undoubtedly please the beloved and such a magnificent and bright greeting card with flowers inside, made by their own hands.

How to do it tells in his master class ThejulianaHAPY.:
An option with gentle, pastel tones, flowers look very cute. Flower stamens do not make a lot of Labor!

The original master class in English, so for your convenience, we offer a brief translation of the process of creating this floral card.

Materials and tools Standard: Colored paper, cardboard, scissors, glue, plastic for imitation of glass in the window.
We take dense colored paper, fold it in half. In one half cut the square window.

We make a frame from color paper of another color. The glass for the window can be made of a protective film for the phone or transparent plastic. The resulting frame of the window is glued to the basis of the postcard. You can do and without "glass".


Insert into the hole
From the cardboard glue the flower pot, we glue it in the middle of the postcard on the fold line. The side sides of the received pot glue so that when closing the postcard, the pot has developed.


Next of the colored paper cut out green stems and all sorts of bright flowers: crocuses, hyacinths, daffodils and tulips. Perhaps your bouquet will not be spring, but a summer, which means that cornflowers will appear, chamomiles, pansies, and imp.


Insert flower pots
The height of flowers should be so that they are not sticking out of the postcard, and they were visible in the window!


The window can be decorated with a cozy curtain.

Original master class
By the same principle, you can make a postcard with flowers from felt or painted cotton disks. Additionally, insert along with the flowers is concise, but warm congratulations!

In addition to colors from a postcard can look out of balloons, asterisks, a bows.

How to make a panoramic floral card along with a congratulatory envelope shows in your master class Theworkshop.:
We take dense paper - the basis for our postcard. Create a rectangle in the center of the folding line card. The width of the rectangle is 3 cm, length - 7 cm.

By pink lines, we make cuts by a stationery knife. Then the resulting rectangle folds inside the postcard. The basis of the postcards attach to another sheet, b aboutto the size of the initial foundation.

Then make floral design: the flower pot, directly the flowers themselves, fluttering butterflies and grass. All this is combining and glued to the front of our postcard.


Original master class.
Using the same reception, you can make an original postcard-vase. Flowers in such vases you can also make your own hands from paper or other technicians.


We bring to your attention a master class on the manufacture of a very tender volume postcard, which will not only congratulate the belonging, but also perfectly fit into the interior, such as the children's room.

First we make a box-box. To do this, take a dense blue paper and cut out the template for the box out of it. The edges of the template we fold 4 times 5 mm on each side, forming the framework. We glue the resulting frames.

We glue on them with color or scrap paper in color suitable for your composition.

Next prepare the elements of the future composition. Bonding a balloon from paper circles. Mugs fold floors and glue together. The wax cord is inserted into the base of the basket and directly mugs forming the ball.

Cut the clouds from scrap-paper, and from the yellow paper Sunny. Insert the elements of the composition into the frame. The balloon is glued as follows: The base of the ball is glued to the volumetric tape, and the ball itself is on the glue. Clouds glue on the same principle: one on glue, second on volumetric tape.

Green trees make a simple napkin. First, it is cut, then we glue. On the right on the box we glue a tree made with a hole punch for scrapbooking. The last touch - in free places we glue serpentine, butterflies and a congratulatory inscription! On the bottom of the box we glue the ribbon with embroidery or lace. The original volume postcard is ready!

Original master class.
3D postcards in technique Kirigami
Kirigami - the art of cutting and folding figures and cards from paper. This is the main difference between Kirigami from other paper folding techniques and is emphasized in the title: "Kira" - cut, "Kami" - paper. The founder of this area is the Japanese architect Masahiro Chatani.

For the manufacture use sheets of paper or fine cardboard, which are caught and folded. Unlike traditional 3D postcards, these paper models are usually cut and folded from one sheet of paper. Most often we develop three-dimensional models of architecture buildings, geometric patterns and various everyday objects, etc.

It is better to start with a simple volume postcard with your own birthday. For example, using a thick paper of two contrasting colors, you can make a postcard-cake Birthday:

For its manufacture, use this template:

Using various templates, you can make postcard-cakes more comprehensive:


How to make cake kirigami tells in his master class Oksana.Hnativ:
Using this technique, you can cut various congratulatory inscriptions. Cake can be made and paint to your taste.

To create it, take this template:

From white relief paper, too, a spectacular postcard will be obtained:

By connecting two mirror parts "Current", cut from different sheets, you can make a whole bulk cake in the postcard!


Use the following template:

Options for creating volume postcards whole set! Cut and fold your paper masterpieces!
Volume cards in the scrapbooking technique
Scrapbooking is the art of decorating photo albums, but its techniques are very popular and when creating postcards.
Using the elements of Kirigami, in the technique of scrapbooking, you can also make a bulk card with your own hands. Cut and fold from the "Steps" scrap paper for the "pop-up" candles in the second half of the postcard. We glue the candles and stick the resulting blank on the basis of the postcard.

From scrap or colored paper you can make a simple, but original greeting card. The flame of the candle cut out and decorate the sequins, then glue on a 2-sided tape. We glue the second part of the candle with the help of glue. Congratulations can be born or glued to an elegant satin ribbon. Just and original!

From the paper of other invoice, the postcard will look at quite differently)

Obtaining each element of postcard on each other, using the two-sided adhesive again, you can create such a bulk bright cake!

Consider the master class of Tatyana Sadomskaya on how easy it is to make a bulk gentle postcard in scrapbooking technique using ready-made pictures.

To create such a postcard Tatiana used:
- scrapBERRY'S SkrapBerry's "Favorite Pet"
- scissors
- tight cardboard
It is better to use scrap paper with a large number of thumbnails that can be cut from a solid sheet, as well as painted prints of stamps and chipboard.
Before creating a postcard you need to decide on its plot to choose the color of the Basics of the postcard and its "acting persons". In this case, paper with a calm beige printer is taken as the basis, composite parts of the plot are cut out of it: kittens, puppy, flowers, crown on the pillow.

Do not forget before starting this job to decide that you will be in the foreground, and what for him!
In our case, larger than the kitten we put on the fore, it will increase the feeling that he is closer than the kittens with a dog.
We make the necessary slits. It turns out such a design with "steps". On the resulting "steps" glue the leaflers of arbitrary size. These leaflets imitate a wooden fence.

Next, gradually glue our elements, ranging from the closest to the distant. We start with the foreground and glue a kitten. Its glue to beer cardboard, since it gives an additional volume and discards the shadow. In the same way, the principle can be glued and several other elements, such as globes and flowers. When the inner side is ready, we glue it to the bottom of the postcard.

Outside the same decorating a postcard with an elegant flower print.

For greater kind, postcard elements decorate sequins (use the glitter).
Original master class.
For inspiration, admire the masterpiece 3D postcard-cake:

Volume cards diorama
We present to your attention a master class on the manufacture of a 3D postcard - a small three-dimensional scene. On such a scene, each can arrange various bizarre figures and decorations)

For the manufacture of the postcard, we take 4 sheets of dense cardboard, in this case we take the cardboard of four shades of orange. You can choose colors to your taste.

On the sheets of cardboard with a pencil diameters contour frames and cut them out. Frame contour we make 1 cm wide.

From the remaining fragments of paper, we cut two strips, each of which is a size of 10 to 4 cm. It is distinguished by 4 parts of 1 cm. Cut all the angles of the resulting strips. We fold strips along the lines so that it turns out a paper zigzag. These pieces of zigzags will support diorama fragments. We glue zigzags to the frame from two sides.

We glue the second frame clearly along the other side of the zigzag.


The top of the zigzag must close one of the parties of the frame. The same must be done with the opposite side. Thus, the first scene of the diorama is ready!

In the same principle, we make the remaining frames of the diorama.
It is better to decorate each of the frames in advance (especially the last) than to try to squeeze the decor to the finished postcard.
The rear wall does not have to be solid, you can make a transparent diorama without the rear wall.

Decorate not only the "wall" of the diorama, but also every frame. Use more bulk decorations, such as beads, bows, feathers, ribbons, etc. So the postcard will seem more voluminous and it will strengthen the 3D effect!

Original master class.
The plot you can come up with absolutely any! Create your little theater!
For example, waiting for an associate!

Or balloon in fluffy clouds.

Bright glade with lupine and butterflies!

Birdhouse with birds and flowers:

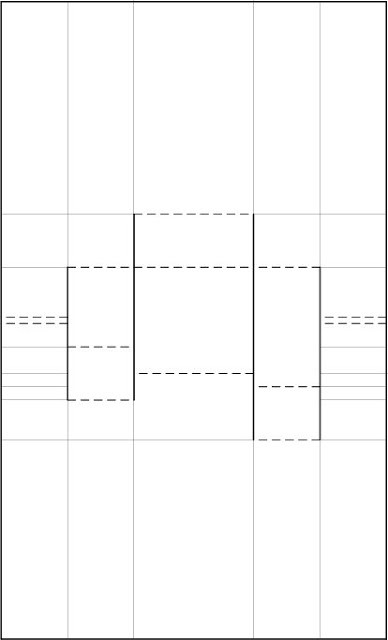
Accordion Postcard (Schemes and Templates)
Another kind of volumetric postcard is an accordion postcard.
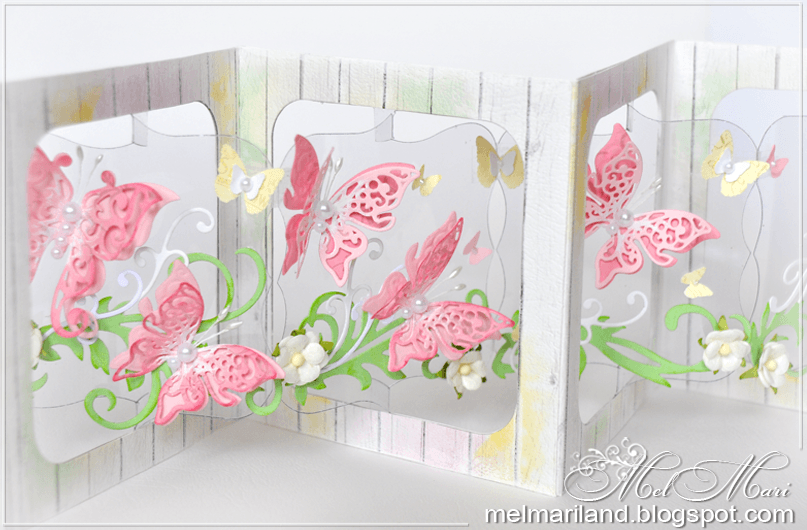
To create a similar postcard you will need: dense scrap paper for the base frame, cutting scrap-knife or stationery knife, transparent plastic for inner parts, stamens, semi-hemp, etc. Materials for decorating.
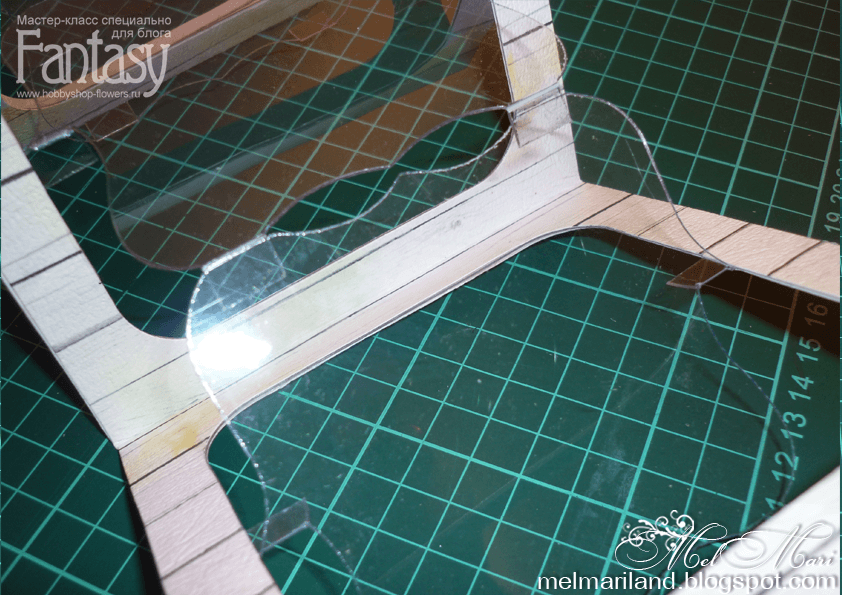
We take a pattern and make blanks for a postcard. From a dense scrap paper, cut 8 blanks for the base frame and 4 of the transparent plastic.

Blank of thick paper ...
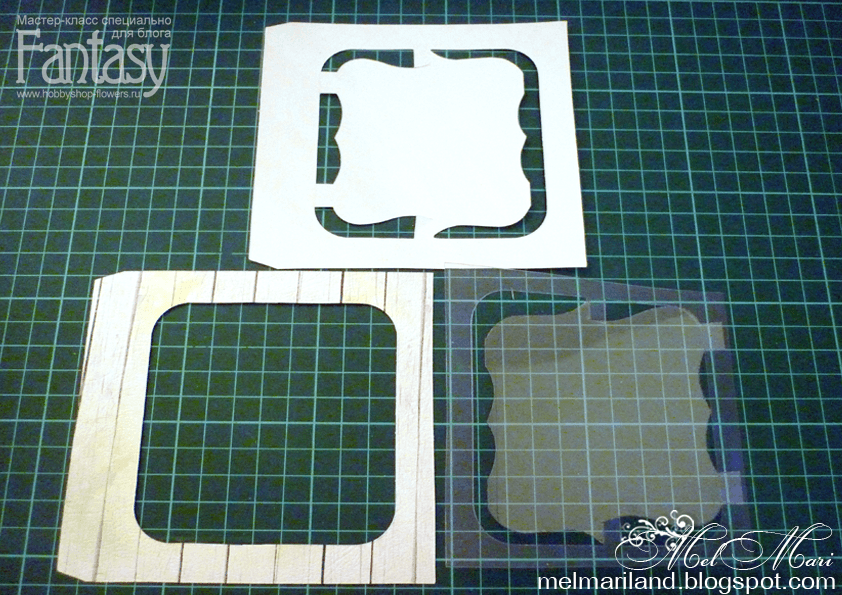
... and transparent plastic
Plastic blanks are glued to the basis of paper. To make a postcard, we make a double bick of about 2 mm on external bends. The obtained 4 parts connect - glue with glue or use 2-sided tape. We glue the remaining 4 frames from the opposite side.

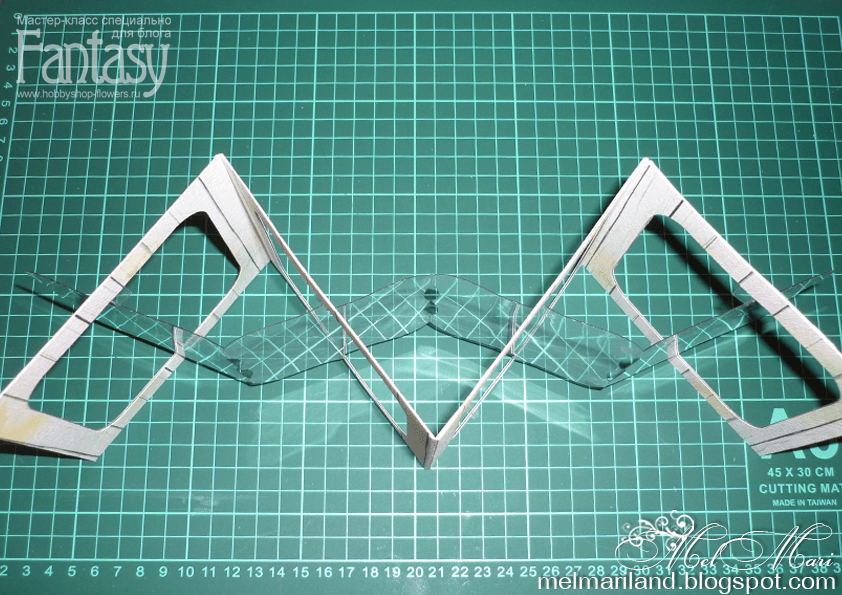
Now you can proceed to the very creative part of the Capture Creation - it is decorating! We glue to the plastic of fluttering butterflies and vituya greenery. Card ready!

Original master class
Different templates for the manufacture of the basics of such postcards See below:


Applying fantasy, you can create all sorts of options for such postcards. For example, with the predominance of children's themes. The number of component parts may vary.


Birds, flowers, butterflies - always very easily and air look at postcards!


Postcards for all occasions
We have already made sure that the postcards made with their own hands are original than those that you can just buy.
YOU'LL LIKE IT!
Let's give, and sometimes at all without reason! 🙂

Touching event - Mom's birthday. And even more touching - to congratulate the native person not just a purchased gift, but make some craft yourself. To present a pleasant surprise for Mom, you can make her birthday card with your own hands.
To realize the flight of fantasies into life and make a truly original postcard you will need a standard tool kit:
As well as a variety of materials:
- sheets of fine cardboard or dense colored paper;
- multicolored paper, you can for packing gifts;
- various ribbons, material flaps, laces;
- rhinestones, beads, beads, buttons.
Postcard in the technique of quilling for mom "Bouquet of flowers"
An excellent addition to a gift or as a small surprise is a postcard "Bouquet of flowers", made in a quilling technique (paper). For its manufacture, you will need a cardboard sheet, colored paper, suitable to it in contrast and color, tape, a wand for queening and a standard set of tools.
Now you can go to work:

Bulk card "Heart"
Greeting card with your own hands for mom for a birthday will look especially penetrating if the central figure will be a heart on it. For its manufacture, you will need sheets of dense white paper A4 and scarlet paper, glue and scissors. 
All work consists of 4-5 stages:

Postcard-suspension "Butterflies"
For the birthday of mom you can make your own hand postcard in the form of a butterfly.
Gentle and romantic handicraft, made in the beloved Tones of the birthday girl, will require a set of tools:
Work occupies a little more than an hour, and is divided into 4 stages:
- White paper sheet cuts out the blank base of postcards and bends in the middle. From the outside, this detail decorates the same as a sheet of paper for scrapbooking with an unobtrusive pattern.
- After connecting two sheets, a small hole is made in the upper left corner of the hole, which can be fixed and enhanced by chalk. Now, through the future postcard, you can turn a beautiful lace and hang the craft for a prominent place.
- The basis is ready, it remains to decorate the front of the crafts. Just below the middle of the cover are glued with segments of lace, imitating the fence of flower beds. On one of the edges, the core details 3 of the colors heads are attached to one of the edges. Above their pair of butterflies so that their wings remain free. Flowers and butterflies can be done by themselves, find ready-made, cut from postcards.
- The decoration process is completed by arbitrary stagnation of beads or beads, as well as attachment against the background of a small chipboard colors.
Goth's birthday card ready. Now you can decorate the inside of the product with your own hands by writing a couple of warm rows with calligraphic handwriting.
Postcard with a surprise: step-by-step manufacture
Surprise in a postcard is something unexpected and extraordinary. 

One of the options for such a gift is very simple:
- On a sheet, paper must be drawn with a circulation 2 circle, one in another, where the inner circle is 2 times less external.
- Petals are drawn between circles. As a result, the drawing looks like a disclosed chamomile.
- In the middle of the flower is written congratulations.
- Petals cut through, separated from each other, painted with color pencil and bend inside. On one of the petals can be written "I bloom in water." It will be a tip.
- Card ready. Now it remains to give a surprise birthday and watch, as a flower with warm words will open in the water.
Postcard with a secret inside
A pleasant surprise remains for a long time in memory, so you can congratulate the birthday party with a secret. To do this, you will need colored paper, glue, scissors and lace. 
The preparation of a gift consists of several stages:
- The basis will be a sheet of paper equal to the size of a double postcard. The billet bends in the middle, where paired cuts of different length are made. The number of cuts (future holders) is determined by the overall composition consisting of 2-3 secret parts.
- Cuts bend inside the future postcard. Several times the bending / extensive movements are made so that the paper makes the necessary form.
- Preparation of actually secret pictures. They can become carved from colored paper a bouquet of flowers, balloons, an anniversary date, as well as chipboard with congratulations. The card will look original with the wishes together with the photographic figure of the performer of the postcard itself.
- The outer side of the crafts is sealed with paper and size as the basis. Printed on the holders of the picture.
- If suddenly it seems that the outside of the postcard looks not festive enough, it can be decorated, placing the lace with beads over the entire surface. The main thing is that all the details have harmonized with each other.
Postcard with two sash
To make a postcard with 2 sash, you will need 2 sheets of photo paper, tape, tape and decorative elements at the discretion of congratulations. 
Total 4 steps and an exclusive gift Ready:
- One of the sheets is cut into 2 parts - they will become sash. Billets with the help of tape are glued to the main sheet.
- Each sash is attached to the cutting of the tape so that the bow can be tied. Calculate the fabric can be used with glue or stapler.
- Decorating the sash on the outside is recommended by several small details so as not to get a overloaded surface. You can, for example, use edging beads.
- The inner part of the gift should contain the text of the congratulations. So that everything looked worthily, you can use the computer set, decorating the congratulation itself not only in interesting font, but also with vignettes.
Card in the style of scrapbooking
For those who are not very familiar with the technique of manufacturing postcards in the style of scrapbooking, you can advise you to purchase a ready-made set of materials in which:
- several options for cardboard foundations;
- colored paper with different patterns;
- lace flaps and ribbons;
- beads with a flat base for convenience when gluing;
- elements of the figure decor: artificial flowers, various types of figurines, frames, templates.
If there is already experience in making postcards in a similar style, then fantasy can prompt replace cardboard photographic, artificial flowers dried and covered with a protective layer, factory lace on lace made with their own hands. 


In addition to the presence of materials, it is necessary to clearly understand what exactly I want to capture on the postcard:
- traditional birthday greetings,
- reminder of some kind of pleasant event,
- hobby hint
- humorous collage.
Only after that the selection of decor begins.
The easiest idea for congratulations Mom is a glued on a photo paper or a special cardboard frame.
It will be possible to put a photo of the birthday girl and write a few soulful words. The corners of the improvised portrait decorated with small bowls or flowers, in which beads can be attached to the core. The most important thing is not to overload the surface of the gift and stick all the details so that together they look like a single, holistic composition.
Original greeting card with flowers embroidered cord
Greeting card with your own hands for my mother's birthday will look original if the flowers on it to embroider with a lace. 
To perform work, you will need:
- lace of silver tone and color (1 mm thickness, you can buy in a specialized store);
- dark tone cardboard;
- 2 needles - with a big ear and with small;
- ordinary white threads;
- simple pencil, color markers;
- scissors;
- copy paper.
To begin with, you need to bend the cardboard in half the color outside. On an ordinary white sheet, the contour of an elegant flower or a beautiful bouquet is drawn. The drawing should not be difficult, as the chip is not in its sophistication, but in the resulting volume. The finished circuit is transferred to the color base of the postcard.
The surface is prepared for embroidery with a silver cord, which is in needle with a big ear (Gypsy needle). In an ordinary needle, a white thread is designed to secure the lace in certain positions and places. Flower head can be embroidered with a lace of another color. Plot cardboard is needed very carefully, so as not to remember.
Words Congratulations can be written with a marker or print on the printer and paste for a gift in a convenient location.
Unusual greeting card with fabric flowers
 A postcard with your own hands for my mother's birthday can be made of girlfriend.
 It will take:
- tape of fabric;
- buttons;
- needle, silk and ordinary threads;
- a set of paper and cardboard;
- glue.
A piece of fabric tape is stitched by a zigzag stitch, then tighten it and stitch the edges. The billet looks like a flower. He will have a bright core, a catchy button, which is sewn in the center with silk threads. If the bouquet is conceived, then the blanks should be 3 or 5.
The basis of the postcard is formed with the help of folded cardboardwhich paste colored paper slightly smaller sizes. Now, with the help of glue, you can start forming a bouquet. It can consist only of floral heads or have stalks made from a suitable cord.
Below the colors pasted a small leaflet with congratulations. Its form can be beat as a sheet, a bark of any tree or just a note from hand.
3D greeting card from girlfriend
Fantasy and diligence will help to make a very interesting 3D postcard for a native person.
It will be necessary for it:
- photographic sheet;
- cardboard sheet;
- bilateral adhesive tape and glue;
- ribbons (lace and satin);
- scrap-sheet;
- small scissors.
To begin with, it is selected on the Internet pictures with the image of various colors. It is printed several times on the photographic paper using a color printer.
Now you can make 5 colors blanks, cutting parts for each flower as follows:
- 1st - in full size;
- 2 - a little less than the first;
- 3 - even less;
- 4 - a little more of the flower center;
- 5th - almost the center.
On the back side of each workpiece sticks double-sided adhesion, after which the flowers are carefully collected. 
The basis of the postcard will be bent in half the cardboard on which a slightly smaller scrap-sheet is pasted. In a few CM from the edge of the latter in width, a lace tape is attached, and on top of it - satin. These manipulations are better carried out using two-way or foamed tape.
From the remaining trimming of cardboard and scrap-sheet, 2 ovala are cut - color slightly less than white, they must be glued together and attach to the basis of the postcard. On the oval part, the composition of the colors made. It remains only to write wishes for a loved one or on the greeting card or on a curly sheet (card), which after attaching to the inside of the gift craft.
Original ideas for making postcards for mom for a birthday from a daughter
How many pleasant memories are flooded after many years to mom, when it gets a postcard, once made daughter. Such crafts are particularly touching, where the main detail appear to the pencil hands on the paper. 
To implement one of these ideas, it is necessary to circle a pencil on the cream color paper, cut the outline and stick it to the postcard prepared at its discretion in such a way that the fingers remain free. Next, using queling technique, make 3-5 colors heads and cut the stems and leaves from green paper.
The flower arrangement is attached to glue so that the impression of the hand holding flowers is created. A couple of good wishes will complement a postcard. Another idea for a postcard will require a photo of the birthday girl (better together with the performer of a gift), which passes on the prepared framework of the crafts. Photos can be taken into the lace frame.
The second step is the cutting circuit of the right and left hand with a continuation of the wrist. The workpieces are pasted in such a way that it seemed that the children's hands crosswise arrive or hold a photo.
You can not waste time making cards for your mother on her birthday, you can find something suitable in the finished printed abundance. But isn't the purchase card absorb the warmth of loving hands, will the template of congratulators reflect the whole range of his daughter's feelings?
Video: Greeting card with your own hands for my birthday mom
How to make a postcard for mom with your own hands, look in a video clip:
We make a postcard for mom with your own hands:
We advise you to read
 What can I give a friend or a friend for your birthday?
 Presentation on the topic "My Family" to make a presentation of a family in the garden
 Congratulations to parents Happy Birthday Son
- Presentation on the topic: "My family" presentation for the lesson (secondary group) on what family is a presentation for kindergarten