One of the favorite women's accessories is a brooch. With the help of one small element, you can change the whole image. Today we will get acquainted with various master classes and ideas on the topic of making brooches from beads.
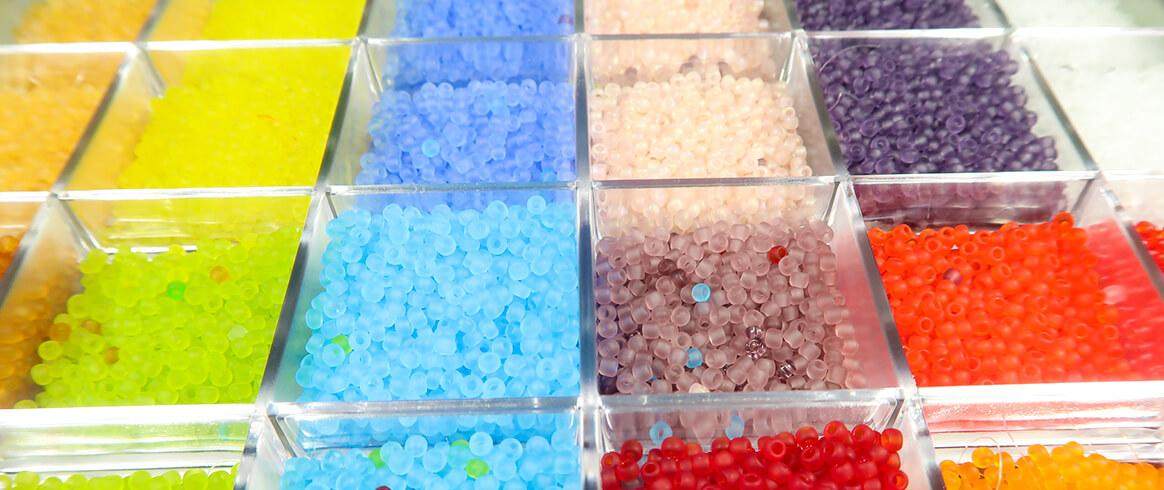
Beads are small glass balls with a through hole, which allows you to collect them on a fishing line, thread or wire and use them to decorate various surfaces. The variety of beads displayed on the windows makes the needlewomen spend a lot of time choosing the right option, because absolutely everything is liked! In the stores you can purchase the following types of beads:
- transparent (monophonic beads made of colored transparent glass);
- with a silver hole (transparent beads in which the inner hole is coated with silver paint);
- rainbow (bead balls are coated with glaze on top);
- opaque (frosted bead balls);
- marble (with a coloring under a natural stone);
- bugles (oblong tubules).
All types of beads are made in different shades of color, so you can choose the perfect option for your brooch. If you want to avoid excessive shine, it is better to choose matte beads and beads to match it.

DIY Bead Brooch for Beginners
Beginning needlewomen should start working with simple tasks, for example, to complete a butterfly brooch or a flower from plain beads. Before starting work, practice stringing and determining the desired step with a needle so that all the beads lie flat and neat.
Creating a bead brooch usually consists of the following steps:
- Choose an idea to work with.
- Choose the necessary materials (wire, fishing line, beads, beads, felt, etc.).
- Transfer the silhouette of the image to felt (or any other basis).
- Fill the outline and the entire shape with beads. The simplest seam “forward with a needle” will allow you to accurately fix all the beads, the length of one step is equal to the size of the bead
- Cut off excess base material.

Brooch from beads and other materials: master class
To get started, you will need to choose an idea for implementation and materials from which you will create your masterpiece. Traditional combinations that have proven themselves for quite some time look like this:
- brooch bead and bead
The small bead balls that form the basis of the pattern can be varied by adding several different beads. For convenience, it is better to take special half beads, as if cut in half. It is convenient to sew them and they will perfectly lie on the base plane.

- brooch from felt and beads
Felt is the favorite material of needlewomen. It is soft, but durable, does not require edge treatment, is easy to cut and does not lose shape. Felt is used as the basis for brooches. To do this, on a piece of felt of the right size, outline the silhouette of the future accessory and then sew on the base of the beads. Excess pieces of felt are cut off at the end of work. The back side can be closed with a second piece of felt and hide the fastener fastening between them.
- brooches from beads and stones
Decorative stones will add luxury to your brooch and will look very contrasted with shiny beads. If you use a stone of oval or round shape, and dress it in a frame of beads, then such a brooch will be called a cabochon.

- brooch from beads and sequins
The most glamorous brooches are obtained by combining beads, sequins and rhinestones. In the sun, you and your brooch will shine! Sequins are ideal for transferring fish scales or intricate patterns on butterfly wings. Pay attention to the arrangement of sequins, laying them on top of each other, you can create a three-dimensional picture.

Bead weaving brooch
If you want the brooch to be light and airy, you can weave it. You will need a thin wire, in diameter it should be less than the diameter of the hole. Stringing beads on a wire, you can create individual elements, as well as easily fasten them together later. Due to its plasticity, the wire will be easy to bend, and you can give different shapes to your brooch. Usually this technique is used to create a brooch in the form of a flower or butterfly.

DIY bead brooch
Before starting work, choose one of the schemes for yourself, and try to complete all the steps exactly, then the result will definitely not disappoint you. Before you begin, make sure that your arsenal contains beads, fishing line or thread, a warp (if you use it), a needle (special needles for beads are sold) and a safety pin.
Beaded Owl Brooch
An owl brooch will look spectacular on a jacket lapel or blouse. To create such a brooch you will need:
- two rhinestones for the eye
- bead for nose
- two-tone beads for the torso and head
- you can use bugles to simulate feathers.
The sequence for creating the brooch:
- Based on the drawing, we outline the silhouette of an owl.
- Work begins with the most prominent part - from the eyes, if the rhinestones are sewn, then with the help of a thread we sew them to the base, if not, then just glue it.
- Then we frame the eyes with beads, sewing it one at a time in 1 step of the needle. Beads in 2 rows will emphasize the owl’s eyes and add the necessary contrast, now we move on to filling the body with two-tone beads, which imitates iridescent feathers.
- At the end, add the bugle in place of the crest and wings.
- Cut an owl from the base, add a pin fastener and close the back with a piece of leather or felt.


Bead brooch
- A beautiful bug will turn out if you use a stone imitating a body.
- Having glued the stone to the base, further work will consist in the accurate execution of the bead frame.
- To make paws and antennae, use the wire, having strung the required amount of beads, fix it on the back of the base.


Beaded rose brooch
A brooch in the shape of a rose can be made using various techniques:
- flat pattern of beads neatly embroidered on the base;
- voluminous rose collected from petal elements woven from beads and wire;
- volumetric rose, embroidered with beads in several rows, spitting on each other.
All of these options will require strength and patience.


Bead dragonfly brooch
A dragonfly brooch will also require your zeal and skill, in order to convey all the beauty you need to use various techniques. As with the beetle, an elongated stone or rhinestones can be used to indicate the body.
- If you create a brooch by embroidering with beads on the base, then to add shine or volume to the wings, you can use sequins and large beads.
- For airiness and lightness, you can make wings of wire.
- Select all the elements of the brooch by tone, then your work will look like a real designer jewelry.

Bead brooch
Bird of paradise, bullfinch or swallow, any bird you can create using colorful beads. For the basics, it is better to take felt, which you can not completely cover, and embroider with beads only a few elements.


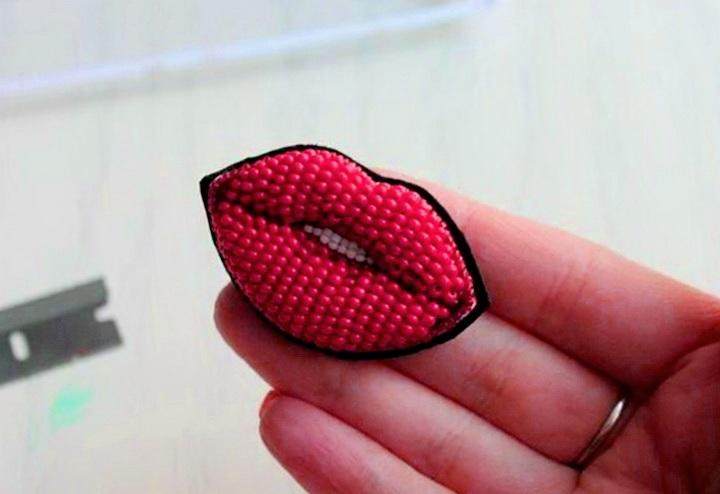
Bead lips brooch
Bright red lipstick can be present not only in your makeup, but also be used as an idea for an extravagant brooch. For the implementation you will need only beads of red and white colors.
- The whole secret of voluminous lips lies in several layers of felt.
- On the base you apply a lip silhouette, sew on the contour of the beads, and then glue another layer of felt inside the resulting contour and fill it with beads.
- White teeth can be added at the very end.

Beaded kitten brooch
A little funny kitten will be a great gift for a young fashionista, it can be attached to the pocket of a dress or sewn on a hairpin. Using just a few colors, you can easily embroider such a brooch with beads.

The things you create with your own hands have an amazing property to fit perfectly into your wardrobe, because they carry a part of your style and energy. Any brooch will add a twist to the image, but only made with your own hands will make it original and unique. I wish you success in your work, bold ideas and new experiments!
Video: How to make a brooch from beads with your own hands?
Every modern woman or girl can decorate herself with beadwork. Today, such jewelry is so diverse that everyone will find a piece to their taste. Bead brooches were and will be very popular. They can be worn on clothes, bags, and scarves. But still I want to create a beautiful thing with my own hand. Fortunately, in the global network you can find lessons in making any kind of jewelry, including do-it-yourself bead brooches.
Beads, beads, beads
 For many years, from Ancient Egypt to the present day, beadworks are very popular. Craftswomen from all over the world created incredible jewelry from small glass beads; they embroidered the clothes of noble people, embroidered paintings, used as an element of decor.
Today, beads are no less popular. It comes in a wide variety of shapes, sizes and colors. It can be combined with precious stones and metals, but at the same time used to decorate elements of everyday clothes to give them new colors and style.
And most importantly - anything can be made from beads.
Magnificent brooches
Brooches have always been popular with fashionistas. The variety of forms and uses of this product is incredibly great. A brooch can be a fun little thing for everyday life or a luxurious decoration for a gala evening, as well as a nice gift.

Brooches can be purchased in stores or ordered from masters; these products are not cheap. But it will be much more interesting and cheaper to make such a decoration yourself.
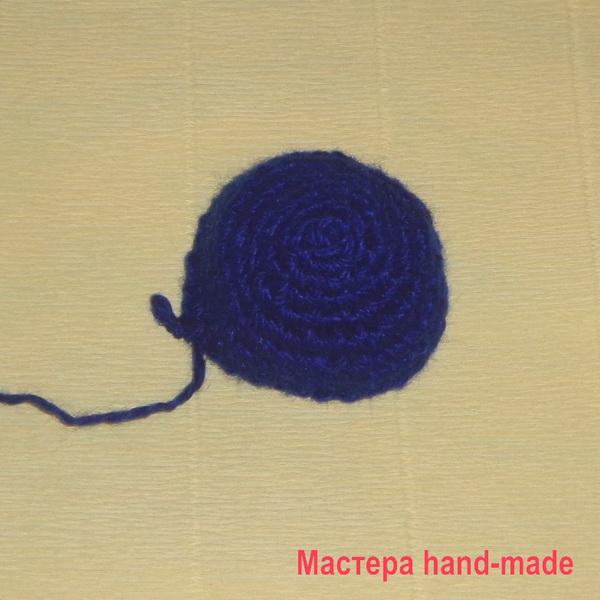
Heart of the sea
The blue-green color is always associated with the sea and with its waves running onto the white sand, with vacations and vacations. And many would like to carry a piece of this beautiful element with them in order to remind themselves of summer, the sun and the brackish wind on gray winter days. It is good that creativity has reached such a level that it has become possible.
DIY materials for brooches made of beads and beads:

 The craft is incredibly easy. This do-it-yourself bead brooch for beginners is just perfect. The combination of shades and sizes of beads and beads can be chosen to your liking, which will add personality to the decoration.
Having set a clear goal to make a beautiful brooch, you can create real art from beads with your own hands.
First you need to decide on the parameters of the future product. This is entirely up to the master. A stencil of the desired shape and size will need to be cut out of cardboard, and then transferred to felt. After applying the stencil to the material, it is necessary to circle it with a thin piece of soap or chalk. You can draw directly on felt, but a cardboard pattern will increase the likelihood of symmetry and even edges of the brooch.
Step Two - Sewing Beads and Beads. First you need to figure out which way to embroider most conveniently. The simplest and most practical seam is stalk. It makes it easy, without numerous nodes, to fix beads or beads on the material in any order.
On a felt pattern, begin to sew on beads and beads. You can embroider any patterns that only come to mind, or completely randomly arrange the elements together - the result will be good in any case. You can add glass spangles, bugles, chains or stones to the main composition at will - it all depends on the unlimited imagination of the master.

So that not too beautiful threads can be seen from the back side, you need to cut the basis of the decoration using a stencil from a leatherette, and then fix the basis for the brooch in it.
A cardboard stencil will also work. It will play the role of a frame, so that the decoration holds its shape better. It is necessary to cut the cardboard around the edges a little (with a height of not more than 2-3 mm) and, glueing both sides with glue, lay between the “bottom” of the embroidered part and the base. Then firmly press and trim the edges.
Further, so that the border between felt and leatherette is not visible, you can decorate the seam with beads. To do this, you need to sew it in a circle, threading the edge from top to bottom (or from bottom to top), stringing a bead on each turn. This technique is called a “closing seam.”
With a critical look around the product, make sure that no threads stick out anywhere and no glue smudges are visible. If everything is in order, now the master can accept congratulations on making a brooch from beads with his own hands.
Red lips
 Plump lips have always been a standard of beauty. Photographers caught the curves of beautiful smiles, which later drove the public crazy on the covers of fashion magazines. Scarlet lipstick added charm, courage and a riddle, making lips even more expressive.
Lips depict many logos, they are used in the form of jewelry, including in the form of brooches. Such a product will brighten everything on which it will be fixed. This brooch is made with beads from your own hands.
Necessary materials:

 First of all, you need to make a stencil of sponges from cardboard, then transfer the drawing to felt, but not cut it out yet! Also transfer the pattern to the non-woven. It will be convenient to do this with a ballpoint pen or ordinary pencil. The sharper and finer the contours, the better.
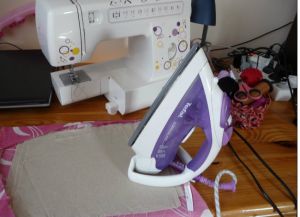
Glue non-woven to felt. Flizelin is an adhesive cushioning material that is often used in sewing craft. Its function is to provide strength to the material on which it is glued, it is also needed to avoid stretched edges during further work with the material. Flizelin has 2 directions - in one it stretches slightly, in the other - no. It is better to connect the product with non-woven material so that the length of the work is parallel to the poorly stretched axis.
Flizelin has two sides - the outer (smoother) and adhesive. To fix it on a fabric or felt, you need to put the non-woven on the material with the bottom side and walk on it with an iron with a steaming mode. If the parts are not well connected, glue can be used.
You can begin to embroider the contour with a stalk seam using red thread and Japanese beads. At the end, in order to make the bends look smoother, go through all the beads at once and slightly tighten.

So that the brooch does not seem flat, you need to make it voluminous. Cut the upper and lower lip from a piece of felt. For convenience, you can divide the stencil into parts and draw a contour along it, previously depicting another shape of the brooch on the cardboard - the future frame.
Fasten the felt lips on the embroidery. It is necessary to ensure that the glue does not get on the beads, which then will be very difficult to peel.
The next step is to sheathe each lip with Czech beads. This is not done with a stitched seam, rather resembles something like embroidery stitch. The number of beads must be selected "by eye".
White beads need to fill the void between the lips, now the brooch can sparkle with its teeth.
Very carefully try to trim the excess felt, being careful not to cut the threads. Next, you need to cut the frame from cardboard, reducing it by 2-3 mm from the edge compared to the original dimensions, and stick to the embroidery.
Then you have to glue the base for the brooch to the cardboard and secure it with monofilament. Sew the product through and through. The thread will not be visible and will provide an additional connection of “pins” and embroidery.
 The base for the brooch, which is already attached to the embroidery, should be fixed in a piece of leatherette. Having marked on the leatherette the location of the edges of the pin, make 2 small holes. It is necessary to try to make holes as small as possible so that they are not visible later.
After that, applying a thin layer of glue to the cardboard, connect the leatherette with the base of the brooch, smooth it out thoroughly and allow to dry.
The next step is to remove the unnecessary. Leaving 2 millimeters in reserve, carefully cut off the excess part of the skin substitute.
Exit to the finish line - processing the edge of the brooch with a seam using Japanese beads and monofilament.
The brooch is ready!
Attention, only TODAY!
Bead brooches are chic jewelry, the weaving of which can be mastered independently at home. The main thing is the availability of quality material: calibrated beads, interesting cabochon, semiprecious stones. All these details will help you to weave a delightful accessory with your own hands, which you can pin to a blouse, dress or decorate a scarf with a scarf.
We have prepared for you several ideas, a master class and weaving patterns, based on which you will be able to make wonderful brooches from beads and stones.
 In order to complete this master class, prepare the following materials and tools for weaving:
- beads (take Czech production, they are better) number ten white glossy, delicate green and pink shades;
- glass cabochon;
- fishing line with a diameter of 0.2 mm;
- a needle;
- special mount for brooches.
We string thirty-six beads on a fishing line and make a ring from them with our own hands. Next, using the technique of mosaic weaving, we make the initial row. After - four more. The next one is also weaved in this technique from pink beads (take smaller beads). In the final row, you need to weave three beads of pink hue through one bead in a row and tighten the weave. We look at this process in the photo. Next, inside, you need to insert a cabochon of white-tone glass of a suitable size. The reverse side is woven with a decrease in the mosaic technique.
 At the next stage, the master class begins weaving the petals of large and small sizes. To do this, you need to bring the line through a white bead over an arbitrary pink bead and braid two more pink ones in a circle. We look at how these actions look in the photo.
Petals of large and small sizes are woven in succession through one, according to the diagram and photo. At the end of the creation of all the petals, you need to connect them with arches, consisting of three pieces of beads. The initial row of petals consists of small linked petals, and the next one, which is located below, consists of the same petals, but of a larger size. As a result, we form the middle of the future flower.
 The next step is to weave wide-shaped petals. To do this, you need to remove the fishing line from the bead, indicated in the photo, and then, according to schemes 1, 2 and 3, attach this petal.


After you have finished weaving the first petal, we begin to weave the rest according to the marked beads. Next, we trim with arches of pink beads all the details of a wide form.
We string three pieces of pink material and form an arch from them according to the photo. In this way, you need to sheathe each of the elements. The end of the braiding process means. That we are approaching the final stage.
 The leaves for the brooch must be made from beads of a soft green hue, using the mosaic technique of weaving, according to the scheme. Weave the woven leaves to the flower.
It remains to attach the prepared clasp to the resulting bead brooch.


This brooch turned out to be of a beautiful gentle shade. Use your color combinations for weaving, and you can decorate your clothes with an original accessory made by yourself.

Cabochon base bead brooch
Such an original asymmetric bead brooch will look equally beautiful on a delicate blouse and a warm jacket. Taking this workshop as a basis, you can introduce beads and beads of different sizes and colors into your weaving as you wish.
In the first lesson, we looked at weaving a bead brooch. The presented option in the second part of the lesson will show you the manufacture of such jewelry using the sewing of selected parts to the cabochon, which is the basis for this composition.
 Prepare such materials:
- Cabochon;
- Felt;
- Beads;
- Stone chips;
- Needle;
- A thread;
- Glue;
- Paper;
- A piece of skin;
- Scissors;
- Special clasp.
We start the master class by cutting out the basics for sewing the details of a felt brooch. The size of the segment should be larger than the size of the finished decoration.
We take the cabochon and glue it to the prepared section. We use medium-sized beads in the work, since the use of smaller material will require a certain skill and experience.


We proceed to sheathing the cabochon with beads. It is necessary to bring out the needle with the thread, the product is visible a few millimeters from the cabochon. Next, you need to collect the bead and insert the needle into the felt in the gap that approximately equals the caliber of the selected bead. Pull the thread.
The following procedure: the needle is reinserted at a distance of the width of the beads, displayed after the first two and the third bead is recruited. After that, the needle is displayed after the two previous ones and the next one is dialed - the fourth in a row.
In this way, we completely braid the entire cabochon.
 Pay attention to the fact that the beads lay close to each other in an even sequence. As a result, we get the following detail, as in the photo:
 The next row is made of beads of a different shade. The needle is removed through the felt, bead is collected and drawn through the bead in the first row.
 We are moving as shown in the photo:
 Poke the needle through the bead, located under the initial in the second row. After, output through the initial bead here:
 Leaving the previous row, we put the needle through the second bead, pick up another one and stretch the thread through one in the initial row.
 We continue in this way weaving around the entire circumference. After completing these steps, you can finish the braiding or, at your discretion, continue it by adding a few more rows.


The base of the brooch will be decorated using stone chips. To fix it, you can use beads in a contrasting color, as in the photo.


Fill the edges of the brooch tightly so that there are no gaps. Just make one after the other two side rows of stone chips. Work carefully, sequentially sewing with your own hands these parts close to each other.


Today, the trend is handmade items, from decorative elements for the home to sweet products. The cost of such products is quite high, but with a little perseverance and insignificant material investments, you yourself can do something similar. In this article, we will dwell on beadwork, namely, brooches embroidered with beads with their own hands. Consider the necessary materials and tools. We will learn how to make a brooch from beads on felt, a master class will help us with this.
Necessary materials and tools
The tool kit may vary depending on the type of product. In the future, each master has his own preferences and tricks, but we will consider the basic tools and schemes.
Tools

- natural. They have a wide color palette, they are soft, tactilely pleasant. There are also disadvantages - low strength, quickly tear, rot at high humidity (after treatment with beeswax, this disadvantage will be eliminated);
- synthetic from polyamide and lavsan. Their advantages - high strength, resistance to external factors, shrinkage is insignificant, high durability and sliding ability are not confused. But such threads can cause allergic reactions due to chemicals;
- reinforced from mylar core, braided with a second thread. They have high strength, elasticity, wear resistance, resistance to external factors. Of the disadvantages - the high cost and interspersed with chemical elements that can cause allergies.
In addition to the material, it is important to consider the thickness of the thread. Sometimes threads can be replaced with fishing line or monofilament.
- Scissors.
Materials for work
To make a beautiful brooch, you will need:
This is our basis for embroidery. This material is based on wool fiber. It happens:
- natural - quite resistant, malleable to coloring. It repels pollution, hypoallergenic. It has a high cost and increased ability to deform;
- half-woolen - often the ratio of wool to viscose is 60:40. It is not inferior to the natural in properties, but for small details, for example for a brooch, it is completely unsuitable, because the product will lose shape;
- artificial - acrylic or eco-felt. Suitable for washing, retains shape, stains well, does not fade, hard, not elastic;
- with bamboo fibers and viscose - tough, durable, well painted, pleasant to the body, but loses its shape.

Beads
These are small beads of various shapes. Choosing the type of beads, it is better to dwell on one, so that the pattern does not seem blurry, heterogeneous, or individual beads do not break out.
Quality control points are uniformity (the size and shape of the beads do not differ from each other) and do not stain when water enters.
Types of beads can be divided depending on the country of origin:
- chinese is small, the beads are not the same. Therefore, to create brooches with beads on felt, it is better not to use it, since you will have to spend a lot of time and supplies to get a picture;
- czech. Beads with clear and even edges. It is very popular. Please note: from batch to batch, the color shades are different, and defective beads are also found. Czech beads are in the middle price category;
- japanese is one of the highest quality: color gamut matching, shape, size, weight, but price is an indicator;

Japanese beads Miyuki

Japanese Delica Beads

Czech beads

Chinese beads
- taiwanese or Indian. It can not be attributed to quality. It is very brittle, heterogeneous, pointed edges are observed, a narrow color range, paint is unstable;
- indian - has all the characteristics of Taiwanese.
Each country uses its own classification system for size, so it is important to consider these features.
The shape distinguishes:
- beads - a round shape with a round or square hole, the edges are fused;
- felling - short cylindrical shape (about 2 mm);
- bugles - cylindrical shape (3-25 mm), the edges are rounded, faceted, twisted.

Round beads


Beads bugles
Size classification: 6.0 - 15.0. How to understand the marking: it is assumed that 1 inch (and this is 2.54 cm) contains the number of beads declared on the marking. For example, 15/0 - 15 pcs. beads fit in one row of 2.54 cm.
In addition, the number also depends on the number:
- hole diameter;
- the number of beads in 1 g.

There is no single measurement system, sometimes in books on needlework its own way of marking is attached.
- Genuine leather - for the back of the brooch.
- Beads - have an even spherical shape. The brooch is used to highlight part of the picture, giving volume. Beads can be natural, artificial and semi-precious.
- Stamens are an additional element for creating flowers (like a core), as a decoration.
- Ribbons - an additional element of the decor of the brooch, useful for finishing edges and giving volume. By the type of material are different (silk, satin, cotton).
Where to start and how to choose the most effective combination of materials
First you need to decide on the type of decoration. It can be an insect, a flower, an animal, part of a plant. Based on this, a weaving scheme is selected. As a rule, a master class knows what materials you will need. But you can change them at your discretion.
At the preparatory stage you need to:
- choose the type of product (shape, size, purpose) - for beginners it is better to train on simple colors and butterflies. Before choosing the type of brooch, think about what you will wear it with, where to fix it. For a summer outfit or spring jacket, a funny bug, fruit or bee is suitable. For an autumn coat or a knitted sweater - a voluminous, large sheet, not very mottled in shades;
- select materials and their compatibility. The brooch can be made from budget materials (plastic beads, Chinese beads, plain felt), or you can weave a real jewel. Of course, for this you will need silver-plated beads, semiprecious or crystal stones, rhinestones and beads. But you must admit, the appearance of such a product will be much more representative and spectacular.
- to practice stringing beads and evaluate how even the drawing fits, whether the tools are convenient.
Brooches from beads and felt and their patterns
After preparing the necessary equipment, you can proceed to step-by-step master classes. There is no one universal scheme for any kind of brooch, so we suggest staying at the most famous ones.
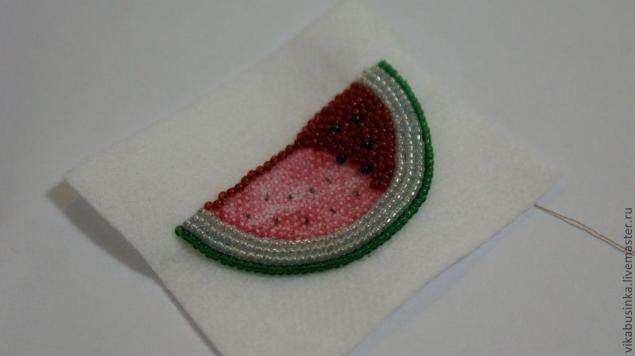
Bead embroidery on felt - pattern of the Watermelon brooch, master class


Separate each inner segment with color shades, creating watermelon outlines due to more saturated colors. 
- If necessary, replace the thread, or if it has ended:
- do not use the thread completely, leave to fix the beads;
- fasten the last few beads several times with the remnants of the thread;
- with stitches on the wrong side, bring the thread to the center of the future brooch and fasten with a knot;
- print a new thread through the middle of the embroidery through the last 3-4 beads.
- we transfer the pattern template to the cardboard. The new template should be a few millimeters smaller than the embroidered pattern;

- carefully lubricate the felt with glue, thereby fixing all the nodes, transitions, and glue the cardboard;

- now glue the pin on the cardboard. We give the glue time to dry;
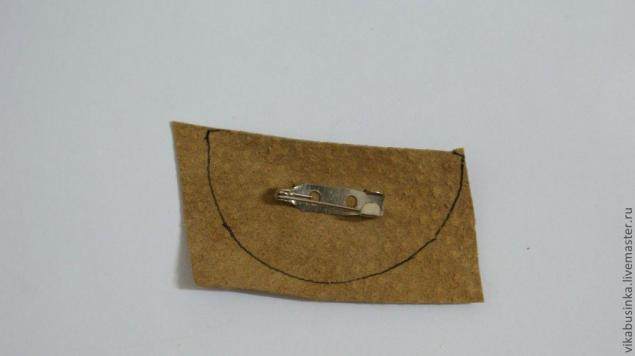
- on suede or leather (wrong material) we make holes for the size of the pin;

- lightly grease the pin with glue to fix it;
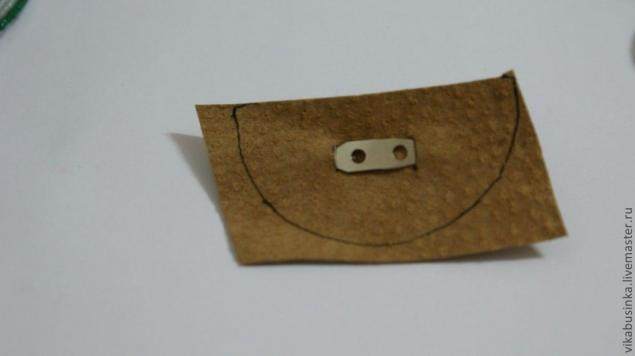
- cut off unnecessary parts of suede (leather);

- we sew the felt and the wrong material. We make the knot on the wrong side, stringing the beads, we pass through any processing seam along the edges.


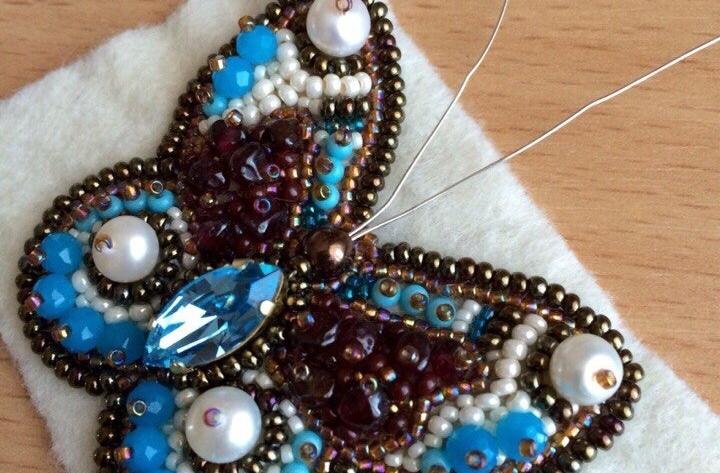
Embroidery from felt, bead patterns of the brooch “Butterfly” and a master class

Some stages will be similar to each other or repeated, so we will not dwell on them in detail.

(Click on the image to expand it in full size)
Brooch from beads on felt "Cat, cat"
There are many variations of the schemes of cats and cats; consider a more complex type of scheme - the Siamese cat. The difficulty lies in the following: in order for the brooch to correspond to the species characteristics of the animal, it is necessary to observe the transition of the characteristic color of the coat. Before you begin, carefully study and think about which beads and which shades will be better combined and not merge.


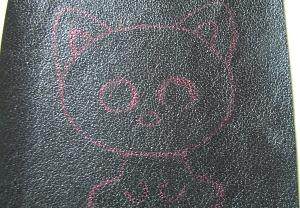


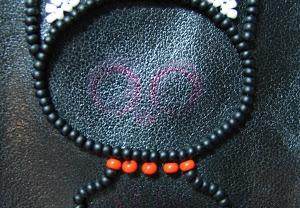

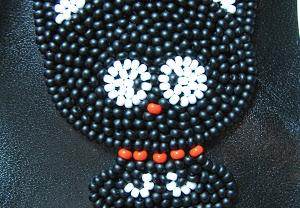


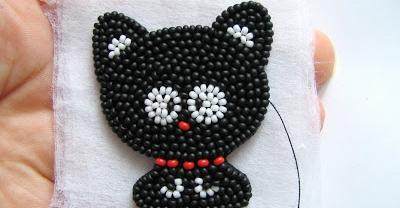


You can pay attention that the technique of embroidering brooches on felt with beads is the same, only to pre-install the features. For instance:


Not only brooches are made from beads, but also necklaces, belts, collars, the latter especially gaining popularity and are in trend.
Video lessons
Additional DIAGRAMSbrooches and pendants
Dear master, if you are fired up by the creation of embroidered pendants and brooches, then this kit is perfect for you! With it, you can create a variety of compositions, for any occasion. We drew them ourselves, so they are 100% original and fit the lesson. You can use them for any purpose, including commercial.

Indicate your Name and your mail where to send a set of schemes
Simple expert advice will help you create a masterpiece. Just listen to them:
- Pay attention to the size of the beads.
- Czech-made beads are more common on the market. It is inexpensive and good.
- When attaching pins to the skin, first mark the locations of the inserts.
- Making cuts or holes for inserting pins, let them be slightly smaller than necessary.
- Sewing beads is best on non-slip fabric, and felt is an ideal option.
- Use organizers or small containers to store beads. In such containers, the beads are calibrated by color and size (which reduces time for embroidery), if this is not, pour small amounts of beads on a napkin.
- Pick up the beads with a needle.
- For beginners, at first it is better to use ready-made schemes, gradually turn on one new element and not deviate from step-by-step instructions.
- If it is difficult to insert the thread into the eye of the needle, then you can end the thread:
- dip in colorless varnish, dry, pinch with your fingers;
- fingers to press the end of the thread to the candle and stretch it;
- lighter slightly burn the end of the thread.
- It is better to start from schemes that include no more than 5-6 color shades.
- The process should not affect health, so use a lamp, a magnifying glass, place materials and tools conveniently and side by side. Do not hold the product too close or far away from you.
- Do not experiment with new ways of attaching beads to the product; do training stitches on a separate material.
- Do not stop at just one seam; learn new techniques. From this product will only benefit.
Thus, despite the many nuances and peculiarities of embroidering brooches with felt beads, this kind of handmade should not cause great difficulties. The main thing is to clearly determine the scheme and purpose of the product.
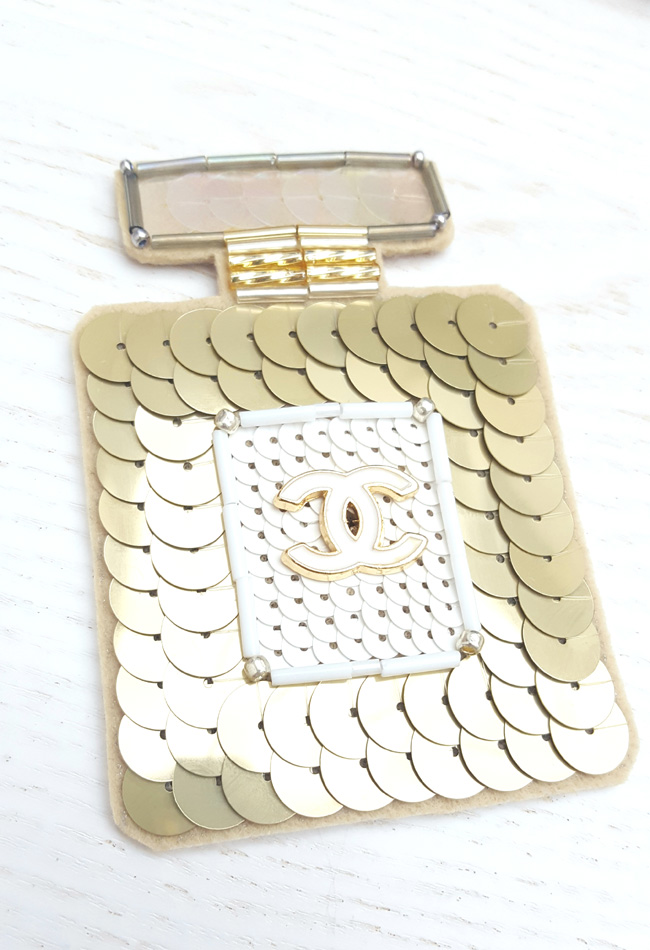
Therefore, I decided to try to make such a brooch with my own hands. And now I'm sharing my experience in a real master class.
You will need:
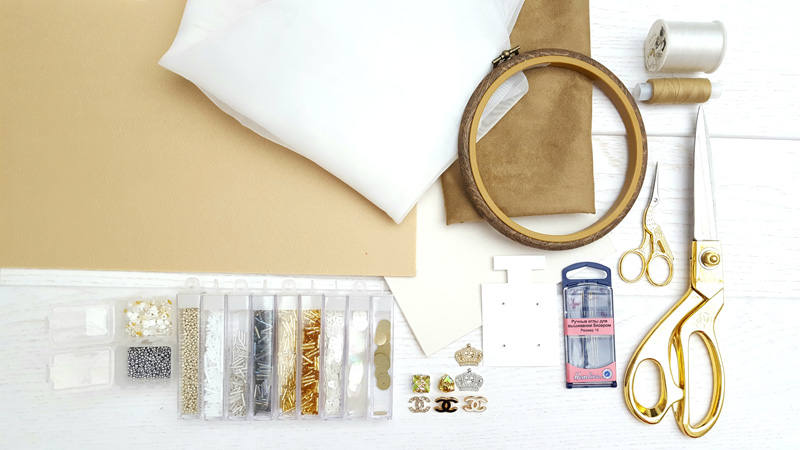
1. Gold sequins - diameter 10 mm
2. Mother of pearl sequins - diameter 10 mm
3. White sequins - diameter 5 mm
4. Bugles white, gold, silver, pearl - 9 mm
5. Bugle white - 3mm
6. Mix of beads in white and gold colors
7. Beads light gold - size 11
8. Pin - fasteners for brooches
9. Decoration in the center of the bottle - button, rhinestones, etc.
10. Hard felt with a thickness of 1-2 mm
11. Hoop (optional)
12. Organza or cotton fabric (optional)
13. Faux suede, or leather, or any other non-bulk material
14. A piece of any glue (non-woven, doublerin)
15. Monofilament
16. Sewing threads in tone suede (leather)
17. Needles for beads
18. Scissors
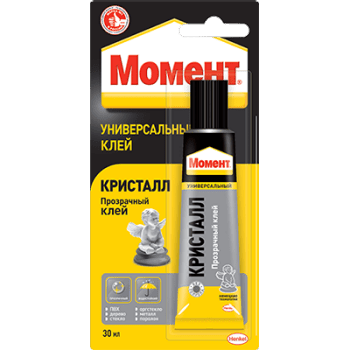
19. Clay "Crystal moment"
20. Future Brooch Template
21. Cardboard
do it yourself
Step 1

First, you need to determine the size of the future brooch and draw a template.
In this embodiment, the template has the following sizes.
Step 2


We transfer the template to felt using a fabric marker or a helium pen (I transferred it with a silver helium pen).
Step 3

We fasten the fabric in the hoop and fix the felt with a couple of stitches. This is done for added convenience. If there is no hoop, you can do without them, because felt and so hard enough.
Step 4

Step 5


We bring out the needle to the right of the payetka and enter it in the center.
Step 6

We bring the needle to the face on top of the sequin.
Step 7

We string the next patch and carry out the same manipulations with it.
Step 8


Thus, we sew two rows of 11 pieces. I started each row from below so that the sequins lay in one direction, but you can sew with a “snake”. It will look a little different.
Step 9


After, we sew the sequins in the sequence, as in the photo.
Step 10
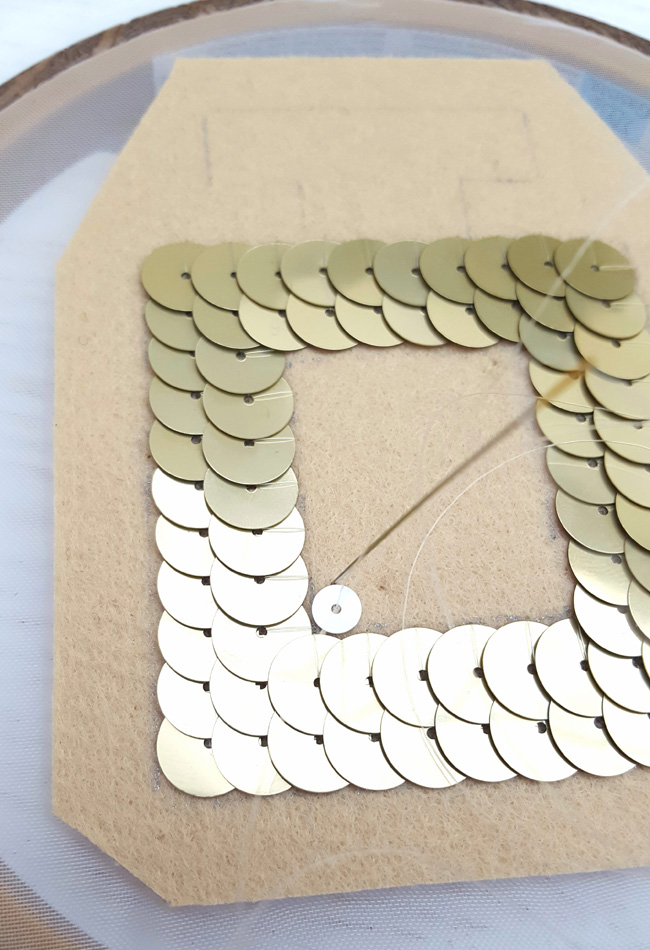

Having finished the frame of gold sequins, fill the middle according to the same principle with white, 5 mm in size. Sewing is necessary by stepping about 1 mm from the gold sequins.
Step 11


In the fourth and fifth vertical rows, we miss two sequels. This is necessary for fixing the future decor (in our particular case, if a strass will be sewn on, no passes should be made).
Step 12

Next, we make a frame of white glass beads 9 mm and 3 mm, and silver beads (in the corners). First, we sew the whole row, and then each element individually. More detailed photos are shown on the example of filling the "neck" of the bottle.
Step 13
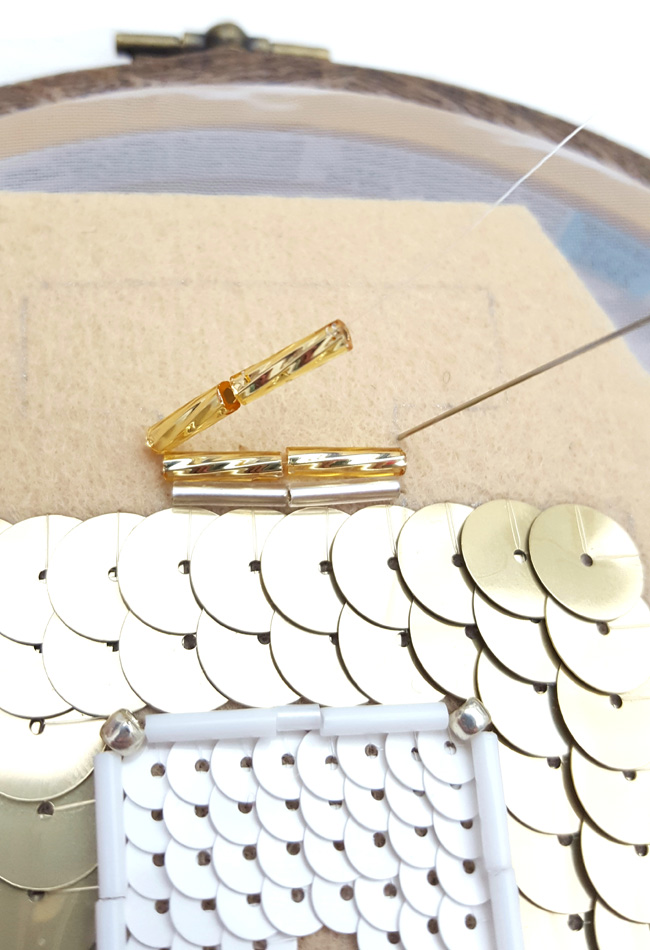


We fill the 9 mm “neck” of the bottle with glass beads, alternating different colors and textures in pairs. In this case: silver, two rows of golden twisted, silver, smooth golden. First, we sew two beads at once, then each separately.
Step 14

Sew 7 mother-of-pearl sequins 10 mm in size on the bottle cap.
Step 15

We decorate the frame around the pearl paillettes with silver beads and pearly 9 mm glass beads.
do it yourself
Step 16


Initially, it was necessary to determine the decor in the center of the composition. In our case, this is a button a la Chanel. But options are possible with rhinestones. As an example, Swarovski rhinestones in a frame.
Step 17

At the place of attachment of the decor (buttons), we make the hole sufficient to “drown” the leg of the button.
Step 18

On the wrong side, we fasten the button with a metal pin (in this embodiment, this is a piece of a thick needle). So you can be sure that the decor is securely fixed.
The front side is ready
Step 19
Remove the embroidery from the hoop and carefully cut along the contour, stepping back from the edge of the embroidery 1 mm.
Step 20


We circle our brooch on thick cardboard (I use binding). Reduce our cardboard print by 4-5 mm along the entire contour, cut it out and carefully glue it to the wrong side of the embroidery.
Step 21

We duplicate artificial suede with glutinous (non-woven, doublerin), as it is still a fabric and it tends to crumble. We circle the brooch and cut it exactly along the contour. Try on, if there is too much, cut.
Step 22

Mark the location of the pins. We make accurate cuts, thread the ends of the pins to the front side and fix with several stitches (there are two holes in the pin for this).
Step 23

Apply glue to the cardboard and fix the part from suede.
Step 24
Let it dry well.Go to the edge design
To do this, we use sewing threads in tone suede and round light golden beads of the 11th size. It is advisable to unwind the thread so that it is enough to sheathe the entire edge (a little more than a meter should be enough). To make the thread less tangled, it must be waxed.Step 25

We introduce a needle between suede and felt.
Step 26

String the bead and insert the needle from the side of the suede through both layers. We output from the front side.
Step 27


Draw the needle into the bead in the direction from the inside to the face. Tighten well.
Step 28


String the next bead and repeat all the steps in accordance with step 26.
: Master Class
Step 29


Thus, we trim the entire edge. We connect the last bead with the first, pulling a thread through it. We fix it somewhere in an inconspicuous place with several knots and cut the thread. We try to ensure that the stitches are the same length and the same distance from each other.

The brooch is ready!

And a variant of embroidery on black felt, trimmed with black beads around the edge.

Victoria Leonova
He has been fond of needlework for a long time. She uses any free minute to realize her creative ideas. He tries himself in different types of needlework - textile dolls, creating interior compositions, knitting, scrapbooking, beadwork (brooches), embroidery. But the main and most favorite hobby for Vicki was sewing. She began to sew clothes not so long ago and now she simply cannot imagine herself without this activity.
Vika won a special prize for beginners - a training course at the Burda Academy.
Victoria’s great works can be found on Instagram and on her page.