Children in kindergarten and elementary school carry out crafts from various materials: natural and waste, plasticine and salt dough, cereals and polystyrene. Work can be created from strips of paper using the technique of quilling and tearing. During manufacturing, children learn about the properties of materials and give objects a second life. Working with hands, kids learn to create, logical thinking and fantasy develop.
In the article, we will consider what materials can be used to make fish crafts; we will tell you step by step how to do such work with a child at home.
Volumetric fish
To make such a craft - fish - you need to take a square of colored paper, it is desirable that it be double-sided. Next, you need to bend the sheet in half diagonally. In the resulting double triangle, you need to cut off all the corners. You should get a trapezoid shape. Then the folded sheet unfolds back and is cut into thin strips from one side to the level of the head of the fish. This moment must be determined by eye. But about two-thirds of the distance from one end to the other. There should be three cuts at the top and three at the bottom.
Then it remains only to correctly fold the strips in pairs and glue them together in the center. Begin this procedure from the middle of the craft in the form of a fish. The two central strips first cross, and the joint is lubricated with glue and firmly pressed until it dries completely. Further work continues with the second and extreme stripes. When all the parts are glued together, the fish itself takes on a three-dimensional shape. It remains only to finish the small details: eyes and mouth.
Fish from plates
Very large and colorful fish crafts are made from disposable paper plates. Turning the product on the back side, you need to apply the main background with gouache paints. While the plate dries, proceed to make the tail. It is made by folding the paper with an accordion. We take thin double-sided glossy paper, and carefully aligning each line with a finger, fold it to the end.
Then you need to fold the accordion in half and smooth the fold line well. The internal parts are coated with glue and glued. It turns out a triangular tail-accordion.

The next step is the assembly of the craft - the fish takes shape. So that the tail does not fall out of the plate, it must be securely fixed there. Since it is upside down, there is empty space inside. On the back of the plate where the tail will be located, you need to cut a few centimeters of the rim to give an outlet to the "accordion". From the inside, the edge of the tail is also smeared with glue and attached to the plate. It remains to draw the eyes and mouth. Instead of scales for this fish, you can stick pieces of torn paper. Then the body drawing will be voluminous, and the craft will be more interesting.
Weaving method
Craft "Fish" from paper can be made another original method. The interweaving of multi-colored stripes is often used in paper work. Let's see how to do it step by step. First you need to cut out the shape of the future fish. To the body was symmetrical, you need to draw the contours of the body on paper. First, cut the tail in the shape of a trapezoid, and fold the rest of the sheet in half. Before cutting, you can draw the necessary contours with a simple pencil.

In the middle of the body of the fish, cuts must be made with scissors, but not completely. Take a close look at the photo with the master class. At the end of the work, it remains only to insert multi-colored strips into the slots, threading through one.
Their edges are glued pointwise at the end of each row of weaving. Then you can do it differently. Cut the remains at an angle to make fins, but you can cut them in the shape of a fish. At the end, eyes and mouth are made.
Quilling method
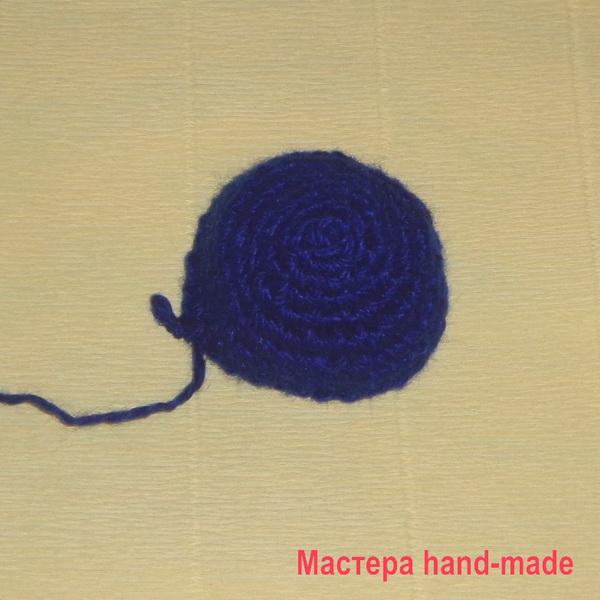
To do this, you need to purchase a set of quilling strips in two colors at the stationery store. If you don’t have a special hook, don’t be discouraged, any thin stick is suitable, for example, the back of a paint brush. The body of the fish is performed by winding the strip freely, without strong tension. If one piece is not enough, then you can glue the next one at the end and continue winding.

When the desired volume is reached, the edge is glued to the PVA glue to the last turn. The ring from the stick is gently pulled together and slightly pressed down on both sides by the fingers. The shape of the body is ready. Now they glue the plane on one side with glue and, gently squeezing the whole palm, glue it on a sheet of cardboard. Further work is on the fins. They need to make four pieces of the same size. The manufacturing method is the same, we will not repeat. When all the parts are ready, we begin the assembly. Everything, the "Fish" craft is ready. Further, a few more ways.
Plasticine Craft
The easiest way to make fish is for children from plasticine. Let's see how easy it is to make Nemo with this plastic material. First you need to take a large piece of orange and make the main shape of the body. This is an oval and a triangle for the tail. Next, you will need two colors for the bright black and white stripes inherent in this type of ocean inhabitants.

First, a black stick is made by rolling, then it is flattened and applied to the body of the fish. When all three flattened stripes have found their places, we do the same with white plasticine, only the parts are taken smaller so that when placed on top of a white strip, black outlines appear from the sides. At the end we make an eye and a side small fin.
Salt Dough Crafts
Fishes can be sculpted from dough mixed with salt. The body is shaped like a pointed oval. A knife is cut into the mouth. Fins are also performed with a knife or scissors. And for squeezing the scales they take a cork or a small glass, only one edge is pressed.

The process resembles modeling from plasticine, only after manufacturing the product will have to bake in the oven over low heat. When the product is completely baked, you can start coloring the fish from the dough. The craft is original, and there are a lot of options for creative ideas. To make the work smooth and bright, in the end the craft is covered with acrylic varnish.
Creative success!
Print Thanks, great lesson +4
A paper fish is one of the simplest crafts in the origami technique, and if your child is still unfamiliar with this type of creativity, then perhaps start with this photo lesson. Just one square sheet - and your baby will have a new paper toy or even an element for decoration that fits perfectly into the marine or summer theme. When a child can freely and easily do such a craft - move on to new ones, mastering all the subtleties and secrets of origami.

- Black marker
- Square sheet of paper
Step-by-step photo lesson:
We place a square in the form of a rhombus. We impose the right side on the left.

We reveal.

Fold the top of the square down. Expand.

Now place the sheet in the form of a square. Bend down.

Expand.

Then you should bend a sheet of paper to the left in half.

We open it and get 4 auxiliary folds that will help in the future to lay down a beautiful fish.

We bend a square sheet in half and with our fingers we engraft on the sides.

It turns out here is such a triangle.

The first layer of the lower triangle is bent upward at a slight angle. The first fin is ready.

Now bend the top corner. We overlap the first fin made.

We turn the craft over and get a finished fish made of paper using the origami technique. Marker can add eyes and beautiful patterns on the surface of the body. Since it has a flat shape - it can be used to decorate a postcard, album or even a room by gluing it to interior items with double-sided tape.

Video lesson
These beautiful fish can become a decoration in a children's room if you hang them on strings from the ceiling or to a chandelier. Then they will wave from the slightest breath of the wind, as if floating in the waves. And also, having made several fish from multi-colored paper, you can teach your child a simple account. Despite such a large number of photographs, this craft is simple, and even a preschooler will cope with it. And mother can help him a little in this.
To make such a fish, you will need a square sheet of colored paper. Fold it in half diagonally.

Expand and diagonally connect the other two opposite corners.

Expand the sheet again, flip it to the other side and fold it in half horizontally.

Now fold vertically and unfold. You will get such a blank.

Grasp the opposite corners of the square and connect them together and with the bottom corner.

You will get such a folded square.

Fold the two lower sides toward the center.

Bend the top corner down.

Expand the edges of the square.

Open the formed "pocket" to a horizontal fold.

Wrap its edges inward along the marked lines.

You should get such a blank.

Bend the moving parts of the workpiece up.

Fold the sides of the figure in half.


Turn the “trident” figure down and bend the middle part as far as possible.

Return it to its original position and bend it to the right, combining the side and the horizontal bend.

Expand and align the left side with the new fold.

Bend the part to the same width on the right side.

With two fingers, grasp the corner of the workpiece and bend it up. This is part of the tail.

Turn the future fish to the other side so that the tail is on the left.

Bend the triangle in the middle from left to right.


Again, turn the craft from left to right on the other side and fold the figure in half vertically. Most of the rhombus will cover the tail, and a smaller part will become the head of the fish.
We want to show you a master class of a very simple and beautiful fish, which can be made of colored paper. The fish turns out to be voluminous.
How to make paper fish
Fish can be of completely different sizes, but they are all made of a rectangle in which one side is twice as long as the other. How to put it into practice? Very simple. Cut the square first. We bend it in half so that we get 2 rectangles. Cut along the fold line.

From each rectangle you get 1 fish (that is, a square is enough for 2 fish). Bend the rectangle in half along the long side. We cut off on the one side along the oblique, on the other we come roundness.

Expand. We make cuts for weaving the tail.

We alternately apply strips to each other and glue them at the intersection point.

The fish is almost ready.

We draw fish eyes, decorate at our discretion. And now you can stick these fish on a sheet of blue paper, stick paper algae and we get a very beautiful aquarium. And if you get together the whole class or group of kindergarten, and make a lot of many of these fish, there will be a great and impressive group craft!