Creativity is a delicate matter. And recently, people's creativity has been developing rapidly, and as a result, to create various crafts, things are used that previously simply would not have thought of using in this context. But everything is subject to development, and creative activities, including with children, are no exception.
Many diverse workshops can be found on the Internet. Below we will talk about some interesting methods for making crafts.
Disposable spoons in the creative process
So, we will talk about what kind of craft from disposable spoons can turn out. It is such a simple and versatile tool that it can come in handy for many diverse creative ideas.
Do you have any plastic spoons from your last outing? Do not throw them away, but use them to create beautiful and original things that can decorate your home interior and create an atmosphere of beauty and order.
So, we will consider a master class "" How to make a craft from disposable spoons "". In this case, it will be beautiful tulips.
You will need:
- disposable spoons of red or white, painted independently in red;
- green napkins;
- transparent or green tape.
How to make tulips from disposable spoons
Getting to work.
Tulip is a very simple and at the same time cute craft made from disposable spoons. You can make a bouquet of several flowers and decorate an empty vase on the table.
Materials for the rose
Using spoons, you can make almost any flower. For example, a rose. True, this will have to work with fire. Therefore, for small children, this method is not suitable. But for everyone else - easy.
To make a beautiful rose - a craft from disposable spoons, stock up on the following tools and materials.
- 13 plastic spoons of the color you want to get a rose. You can take whites and color them, but only at the end, when the rose is formed.
- Pliers or wide forceps.
- Scissors.
- Candle or lighter.
- Glue gun.
Make a rose together
Now you can start. Work in a well-ventilated area.

Your rose is ready. You can decorate it in any color that you like, or leave it white.
Materials for the pineapple lamp
It is very easy to decorate the interior of the house using bright and beautiful crafts from disposable spoons. Doing something attractive with your own hands is not a problem. The following is an example of how to make a pineapple-shaped lamp.
You will need:
- small lamp;
- wide bottle;
- disposable spoons (125 pieces);
- yellow paint;
- green cardboard;
- glue gun;
Making a pineapple lamp together
By the way, these crafts for children are also suitable. Of disposable spoons they will be interested in making the shape of an exotic fruit.

The pineapple lamp is ready. Here's an article made from disposable spoons. You can check the photo in the process. The work will not take you much time, and the result will pleasantly surprise you. After all, such a lamp is a unique and unique craft.
Peacock made of spoons
So, the master class "" Craft from disposable spoons - peacock "" is presented to your attention.
In order to make a beautiful and bright bird, you need to prepare such materials in advance:
- disposable spoons (from 10 to 15);
- cotton buds for ears;
- paints;
- scissors;
- cardboard;
- glue gun;
- rhinestones.
Making a peacock together
You can proceed.

The peacock is ready. As you can see, everything is very simple and interesting. You can make such a peacock with children, they will really like to paint all the components of this spectacular bird.
Spoons can be used in many crafts. Rely on your imagination and plunge into the world of creativity and bright colors.
Crafts from disposable spoons always turn out to be beautiful and unusual, there are no standards and general requirements - just take and do.
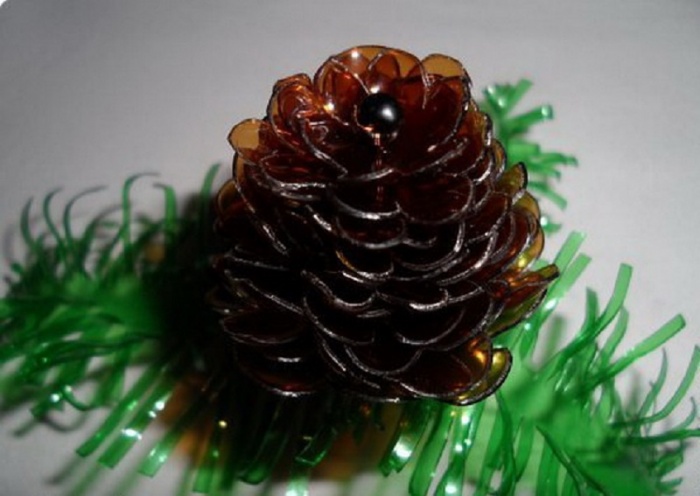
Crafts are often intended for landscape design of the site, but sometimes they look relevant in the apartment. One striking example of widespread use are cones made of plastic bottles. Small neat pieces organically fit into the New Year’s interior of the room, giant products effectively decorate the house area. The proposed master classes will help to master the art of forming cones for various purposes.
Pine cone: manufacturing steps
A pine cone, depending on the size chosen, can become a decoration of a plastic Christmas tree in the yard, used at home as a New Year’s toy, or act as a keyring.
To make one copy, you need to prepare:
- 2 liter plastic bottle The color is chosen arbitrarily, the brown or dark green product looks natural, transparent plastic can be interestingly painted at your own discretion.
- A pine branch is formed from a plastic bottle in a deep green hue.
- Sketches of cone layers made on thick paper.
- Large dark bead and wire.
- Marker, scissors and a candle.
So, a pine cone from a plastic bottle master class:

A bump without a frame looks uninteresting. A sprig will help to achieve an effective composition. To do this, a strip is cut out of a green plastic bottle, frequent cuts are made on both sides. The blank is held above the candle so that the "needles" are spread in different directions and the branch becomes fluffy.
On this, the transformation of the bottle into a pine cone can be considered complete.
Bump giant
The second method is ideal for decorating the territory. It can be a playground, a summer cottage or a garden flower garden.
Materials and tools available:
- Many bottles of the same volume and shape. You can use plastic containers of 1.5 liters, 2 liters or 2.5 liters. It all depends on the desired result.
Attention! The container is selected in one, two or three shades. Usually used brown, dark yellow and green specimens.
- Corrugated fittings or flat pointed stick for stringing workpieces. The length depends on the volume and number of bottles prepared for the cone.
- Manicure and stationery scissors (all metal, without plastic handles).
Giant cone from plastic bottles master class:

A bump can be made plain or combine 2-3 colors. It is not always convenient to store a large number of plastic containers, therefore, having accumulated 5-6 copies, the bottles can be cut as described in the master class and left folded. Thus, they will not take up much free space.


We are used to taking plastic dishes with us when we are going outdoors. After a picnic, it often remains a lot, and from it you can make beautiful crafts that will delight the eye.
Tulip
One such example is the wonderful of plastic spoons. For example, a tulip that will “blossom” with plastic cutlery and a few more elements. Take for work:
 First you need to make a few red squares of corrugated paper, wrap them on spoons. After that, so that the paper does not fly off, we fix it with PVA glue with a brush. We do the same with the other four spoons.
Next, you need to fasten two flowers with green electrical tape, we attach the remaining tulips to them in the same way. Now from green paper you need to make about three large leaves for one flower. In this case, the petals need to be fastened with thin multi-colored ribbons. To complete our product you need to place the resulting tulips in a vase.
Water lily
 After such an example, many people wonder what can be made of plastic spoons, except for tulips. And water lilies will be a great option. For this we need:
- plastic spoons;
- glue gun;
- plastic bottle;
- brush and.
 First, prepare the disposable spoons for work, cutting off the handles from them. In order to convey the quality of the water lilies well, for the central part of the flower we will choose the smallest spoons. To fasten them together, you will need a glue gun. In exactly the same way we make the front row of the flower. For the core of the water lilies you will need several yellow-colored strips of a plastic bottle (12x3 cm).
Now the core needs to be rolled up and fastened with PVA glue. After the core has dried, you can proceed to the next step. We attach the core to the petals. It will take a few petals, which we cut from a green plastic bottle. If there is no bottle of this color, after cutting it is necessary to color the leaves with green.
White Rose
 Very beautiful and natural, you get white roses from plastic spoons. As a rule, they do not have to devote a lot of time and labor to them. For work first you need to heat the spoons for the petals above the fire to such an extent that they curl up.
It is worth noting that you should not keep spoons too close to the fire, as they can blacken and ruin the appearance. Also, it is necessary to warm the cutlery on both sides, so that the petals look more believable. The edges of the spoon should be turned out with the help of fire so that they look like the petals of a rose.
 So we do with the petals that are in the very middle of the flower. And the edges of the second row need to be warmed a little less, since the bud will open. We expand the third row even less. It is important to know that when heating the petals on a fire, you need to slowly turn the spoon so that the edges are not the same. Now that the petals of all the rows are ready (there should be about four of them), you can cut off the handles from them, leaving only the main one - which is the core of the flower.
Then we do the main work - we collect the petals together. To do this, take the core of the flower and PVA glue. Tightly attach another petal to the petal with the handle, we do the same work with the rest of the petals. Under the bud of our flower there was a completely ugly "ass". It can be fixed with leaves for the flower.

To do this, take new spoons and heat them until the bottom becomes more even, and then manually cut out leaves from them. We warm the tip of the leaf a little to make a hole in it. Now, as the sepals of the flower, you need to warm up the spoon from the inside and cut out the corresponding figure from it. We penetrate the holes into the holes, which can be hidden behind a green ribbon or green corrugated paper.
On this work on our rose is completed. But if you want to make it a different color, then you should choose a color for the rose. Spray cans are best for coloring finished roses. It is recommended to first color the petals, and then the leaves. But they must be painted before attaching to the bud.
New Year tree
 You can make a Christmas tree out of plastic spoons as a crafts for the New Year in a kindergarten or for a primary school student. There is nothing complicated in this product, but you will need a little more elements to work:
- disposable triangular glasses or wine glasses;
- plastic spoons (about 100 pieces);
- candle;
- glue gun;
- green paint in the spray can.
 First of all, you need to separate the coasters from two wine glasses and connect them with glue or a glue gun. We turn over one wine glass and attach it in the same way to the resulting structure. Cut off the tips of the handles on the spoons. Then with a candle, you need to heat the spoons: you get bent tips. All that's left is to attach the spoons with the tips to the wine glass from bottom to top and paint the resulting Christmas tree with a spray of green paint.
Birds and insects from plastic spoons
 In addition to flowers, you can make a mysterious bird - peacock. To do this, you need to color absolutely all the spoons in the color that applies to the bird.
Now we need a tail base that can be made out of cardboard. Make a circle with a diameter of about 20 centimeters.

You can use yellow cardboard, or you can glue it with colored paper, sprinkled with yellow sequins or using yellow shiny nail polish.
We turn to the body of the bird. It can be cut out of cardboard by sticking on it the edges of cotton buds painted in blue. Then, having cut off the handle from a plastic spoon, you need to paint the resulting part in blue and stick it on the convex side so that it is clear that this is the head of a peacock.
 Now you need to mark the eye on the head (you can draw it yourself, or you can glue a small strassik) and glue the black triangular cardboard in the form of a beak. The crest of the bird must be made of cotton buds, painted them in green and blue.
To make simple crafts from plastic spoons, you can take, for example, insects such as a ladybug. Such a product can be made even by a child, using spoons, paints and a large black button. Everyone knows the color of this cute insect, so it makes no sense to describe in stages.
Materials for working with crafts
If you have littered with disposable spoons, forks or any other plastic utensils, do not hold it until the next picnic or throw it out because they may not be useful. It’s better to sit and think about what you can do with disposable tableware. Simple crafts in kindergarten can be your child’s first masterpiece. And for such an occupation, family members will certainly not be bored. In addition, a do-it-yourself product can be left to yourself and used as an additional element to the interior or to give such a creation to your loved ones for their holiday. Just something necessary:

In addition to the above examples, you can make other crafts, including fantasy. It’s easiest to make flowers from plastic spoons, but if you decide to make your own invented masterpiece, then you don’t have to look for a photo of the sample, and this is already harder. You can make ready-made patterns, for example, a lake with one swan or a whole family of these wonderful birds. By the way, your imagination can be absolutely unpredictable, so translate your ideas into reality!


We make charming bugs on a leaf from disposable spoons. Interesting summer crafts for the kindergarten is not only one of the ways to entertain children in their free time, but also the opportunity to beautifully design a children's corner, room, thematic exhibition or stand.
Original crafts can be made of: with their own hands, children can easily turn them into a variety of images, it’s enough to submit a few ideas.
For example, you can make a beautiful composition out of disposable spoons with your own hands. To do this, you will need:
- three white plastic disposable spoons;
- acrylic, oil paints or gouache (watercolor work will not work);
- wide and very thin brush or wand;
- green felt;
- scissors;
- green felt-tip pen;
- polymer glue.
Getting started with creativity.
First of all, we color the spoons: a thin part of them (held) is covered with brown paint, and a wide part (held) is covered with bright colors of different colors (one color for one spoon).


Spoons painted with spray paint for wood, plastic or metal look very nice. However, it’s too early for the children to work with such paint, so you can color the spoons in advance, and do the rest of the work with the child.
When the paint dries, we apply a drop of paint of contrasting color to a wide part of the spoons. Use a thin brush or wand for this.


Put the spoons to dry.
Take the felt. With a green felt-tip pen, draw the contours of a leaf on it.

We cut out, with the same felt-tip pen we draw veins.

A fairly wide hole is cut at the base of the sheet.

Gently insert a spoon into this hole.

Having passed all three spoons into leaflets, we fasten them together with glue so that a tree branch with bugs sitting on it turns out.

We draw eyes for the insects, let it dry.

Such a simple composition will be a wonderful decoration for any children's corner.
If you and your child decide to spend an interesting winter evening, try giving a second life to ordinary plastic spoons. You can get a very creative Christmas tree if you paint disposable tableware in a vintage color.
Materials:
- disposable spoons;
- scissors;
- cardboard cone;
- paints.
How to make a Christmas tree from plastic spoons
Lay out your blanks on a white sheet and start staining.

After the surface of the spoons has dried, turn them over and paint the inside.

Now you need to prepare the basis for the Christmas tree. Most often, they use an ordinary cardboard cone, which you can make yourself. If there is no cardboard, try making a cone shape out of or out of.
It is desirable that the base of the tree was in the color of spoons, needles, otherwise it will be visible through the gaps between the parts.

Glue and paint for making Christmas tree from disposable tableware


When christmas tree made of plastic spoons will be ready, decorate it to your taste. You will get a very creative craft that is ideal for decorating modern interiors. If you cut the handles of the spoons, then your child will even be able to stick needles on the cone on his own or entrust him with the manufacture of paper cones. Disposable tableware today is widely used for the manufacture of a variety of crafts, as it is considered one of the most inexpensive materials for needlework and convenient to use.


 Christmas tree big volume from buttons")