When the children have grown up and it is time to give them to go to sports sections, many mothers who have chosen martial arts for their children have a question: where to get a kimono? In stores, you can not find it everywhere, and the price does not suit everyone. The solution in this case will be sewing a kimono with your own hands.
Kimono is a comfortable loose clothing for sports (karate, judo, aikido and more) and more. Sew it from natural fabrics that absorb moisture well. Buttons on such clothes are not provided, but there is only a belt. Now turn to the patterns.
Karate kimono pattern
Yes, that’s exactly what kimono is called Japanese. Perhaps this is due to the ease of sewing and lack of size.
The kimono pattern for karate looks like this:

This is an approximate option, such a drawing can be adjusted at your discretion. Also, the pattern can be used as the basis for sewing different styles. The principles of sewing for all types are similar to each other.
Features of tailoring
1. Usually the fabric is measured in height for male models. Women take a little more fabric. The length can be changed at the expense of the belt. If desired, wedges are cut out in the form of triangles, which are sewn from the level of the waistline. Their presence is completely optional. Kimono can be schematically depicted as follows: with wedges and without them.


In general, when sewing, mostly rectangular shapes are used. You cannot see rounded seams anywhere.
2. When cutting, allowances for seams, for odor and hem of the bottom are taken into account. Specific figures are not given, because everything is very conditional in the construction of the pattern.
Another pattern without triangles.

The figure shows all the allowances for the seams, with the exception of the hem. The pattern is designed for 110 cm of fabric.
3. The sleeve of the kimono, the pattern for which is located at the bottom of the illustration, measures out a width of 54 cm and a length of 75 cm. This length is usually enough even for a tall person, and the width can be increased.
4. The width of the back is taken 60 cm.
5. The collar is cut out in the form of a rectangle. Its feature is that it must reach the waist.
Sewing technique
- Sew two parts of the back.
- Mark the neckline and cut out.
- Sew both shelves on the shoulders.
- Fold a sleeve detail and sew.
- Find the middle of the sleeve and align it with the shoulder seam.
- Connect the collar parts. Fold the resulting strip in length, stitch and twist. Then connect the stitched part to the neckline.
- Work all edges.
Kimono dress

It is sewn on the basis of the patterns of the bodice and sleeves without tucks. That is, you need to edit the dress pattern.
- Waist line correction: lower the perpendicular from the bend of the armhole down and retreat to the left 2 cm.
- The construction of the sleeve. Find the upper point of the shoulder and deviate from it 0.5-1 cm upward, from the bottom also upward to put aside 1-2 cm. Connect the new points to each other. On the shoulder line, lay the length to the level of the forearm or wrist, depending on which sleeve is planned. Set aside 2 to 9 cm from the armhole and build a horizontal line to the right. Then finish the sleeve, focusing on the pattern below.

Below, watch a video on patterns and sewing a kimono dress, and it will also tell you how to take measurements correctly and learn how to sew on your own.
Kimono pattern for geisha and aikido
A geisha kimono can be sewn according to the same pattern, only more material will be needed than for the classic version. The length of the fabric is taken about 190 cm.

It is elegantly decorated. Such a kimono is not cheap.

For aikido, they sew a jacket using a shortened pattern and trousers.
Kimono is a traditional robe in Japan worn by men, women and children. Its cut is very simple, so if you need to recreate the image, you can make this outfit with your own hands with minimal financial costs. In fact, the kimono is Japanese - it can be straight or flared, it all depends on the size of the product and the intended image. These charming bathrobes can be great home clothes. Also, based on this pattern, many blouses, dresses and jackets are created. That is why it will not be superfluous to get acquainted with the construction of such a pattern.
Kimono pattern
It is believed that the Japanese kimono is such a dimensionless bathrobe, which will suit any figure. The standard width of the back in such a product is 60 cm, which, with the help of a belt, is draped directly on the figure and the thing does not seem large. However, if the volumes are too large, then wedges are added to the main pattern in the side seams. Another feature of this thing is that the kimono has absolutely no fastener except a belt at the waist.
The traditional Japanese kimono is sewn of fabric with a width of about 30 cm. This requires making a stitch detail of the back, but if there is material of a more impressive width, then it is not necessary to make it, unless, of course, it is necessary to recreate the image of an ancient dress.
In cut products use only geometric shapes. The back is a rectangle with the necessary height and length of 60 cm.

The shelves in front of the bottom are 45 cm, and in the area of \u200b\u200bthe waist, the edge is cut off at an angle of 15 degrees to the neck. For processing a slice at the throat, a strip of tissue 10 cm wide is used, which in finished form forms a five-centimeter bar.
The peculiarity of the traditional female model is the length of the product, which is usually done 20 cm more than it is necessary for growth.
Sleeve pattern
The sleeves are also cut out in the form of rectangles, however, in the traditional outfit, these are not narrow narrow sleeves familiar to everyone strictly according to the hand, but rather very wide and corner-sewn elements with a hole for the wrist in the upper corner. The entrance to the sleeve is also in the upper corner on the other side of the rectangle. At the same time, the sleeve is sewn into the kimono base not in a full cut, but only in half, and the large side of the sleeve folded in half does not fall on the side of the hand, but on the hanging edge. And the remaining open edges are sutured with a corner. Thanks to this, a special look is obtained, which distinguishes the Japanese kimono from others that are similar in cut outfits.

Another cut of the sleeve for a kimono is based on a trapezoid, the top of which forms a narrow sleeve, and the bottom is maximally expanded.
Slice Processing Options
What is the best way to process products? Are there any special secrets and will any special skills and knowledge be required? Perhaps, even a beginner can easily cope with such a task. You can sew a Japanese kimono with your own hands, both with only a straight-line sewing machine and with overlock seams. However, the simplest option is to process slices with a two-turn turn and grind parts. This assembly method saves processing time, thread consumption and makes the seams more durable. And he is also good for being suitable both for silk and cotton, as well as for chiffon and satin.

If you have an overlock on hand, it can also be used to process slices. With its help it will be possible to sew and overcast all parts in one step, without laying additional lines.
Fabric selection
A person who knows Japanese culture will easily say that there are several varieties of kimono. There are models specifically for married and unmarried girls, men and children, wedding ceremonies and just for publication for any reason. But if there is no need to delve into such subtleties, then you can use absolutely any material you like for sewing the product. Japanese girls in kimonos in the photo from the Web are usually dressed in an outfit with floral motifs. Quite often, colorful fabric is combined with contrasting plain or materials are selected with a sophisticated and delicate pattern, a smooth transition of the background shade from saturated and bright to translucent, barely perceptible. It is such models that can be taken as the main source in the manufacture of beautiful kimonos. Japanese women's attire must have a wide belt, and for him, as a rule, take a plain fabric. It can be in tone with the main canvas or, conversely, become a bright accent.

Dressing
To make the product more effective, it can be sewn multilayer. It all depends on the purpose of the kimono. Japanese women's attire can be very modest or, conversely, provocative, and not only color plays an important role here, but also the length and transparency of the canvas used. Naturally, you should not miss the opportunity to make small design digressions and sew a product from guipure or seductive chiffon. But here again, one should remember the purpose of the outfit.
Japanese kimono for girls can be decorated with various lace and satin ribbons. Also, a favorite decorative element in the clothes of Japanese women is large bows on the back, which are attached to the belt.
Wide belt for kimono
A traditional Japanese kimono must have a wide belt. In more modern models, especially for the home, this part is disregarded and a regular gown belt is used. But if you need to achieve an impressive image, this element is required. To stitch it, you need two strips of fabric with a waist about 30 cm wide, a velcro that is suitable in color and equal to the width of the belt, as well as a fabric sealant such as non-woven. However, this option is simplified. In traditional models, the belt is wound around the waist two or three times and does not fasten, but simply tuck the edge under the lower layer. After they tie a thin ribbon over the belt and another piece of fabric is curled behind the belt. However, for a home-made version, such a kimono is hardly a good solution. In constant motion, such a belt will constantly weaken. Therefore, if accurate reproduction by centuries of an established image is not required, these elements can be omitted.
Baby kimono
Japanese kimono, the pattern of which is described above, can be a great option for a New Year's outfit for a girl. And if you fantasize a little and make it a little longer than a shirt, and then complement it with a multi-layer skirt-sun from the same fabric, an original outfit will come out. On the hem of the skirt, as well as on the neck and cuffs, you can put on beautiful lace, put on a contrasting wide belt with a large bow on the back, pick up a chic wig with black hair, and a real Japanese woman will be ready to go out.

The traditional Japanese outfit for a child differs from an adult solely in size. For girls, the same fabrics are selected as for women, and for boys, the same kimonos are made as for men. To create a pattern, the following measurement should be taken as the basis: back width - 40 cm.
But the boys today need a kimono unless for a fight. In this case, you should choose a pattern without a hanging sleeve. Its length is slightly longer than the line of the hips. For a complete set, sew ordinary pants on an elastic band from the same fabric.

Japanese kimono these days
Naturally, the Japanese traditional outfit will be appreciated only in its homeland. But lovers of this culture often use this piece of clothing for home hanging out. That is why the version of the classic Japanese kimono has somewhat changed. More and more often on the market there are kimono robes with one-piece sleeves, the usual thin belt and internal fixation. Of course, we can say that such an outfit has nothing to do with the national clothes of the Japanese, but for the home, it is more convenient not to find an option. Therefore, when sewing, you can slightly deviate from the written instructions and simplify the model.
 A bathrobe is a state of mind, but a kimono is just a song! Remember how Oblomov was attached to his sofa and bathrobe? A medical gown is called to inspire confidence, and what associations does the word "kimono" cause? Languid Japanese geisha or nimble wrestlers on the tatami. Let's try to create an image in the Japanese style.
Kimono is perceived in Japan as a synonym for the word "clothing", according to tradition, it is worn by both men and women. The shoulders and waist of a person are accepted according to the principle: "less bulges and irregularities - better result."
Reference! All women’s kimonos are of the same size, men’s kimono vary in height of the hips.
If there is a finished pattern, then the following measurements are necessary:
- hips circumference;
- chest circumference;
- length of the product;
- sleeve width.
 If you want to build patterns for your type of figure, then the measurements will be as follows:
- The length of the shoulder seam, the sleeve will be sewn at this distance. We measure the distance from the shoulder to the elbow on both hands, the average value (* A) is taken. On the lowered hands we measure the distance between points A of each hand, around the neck around the measuring tape.
- Neck circumference - measured at the base of the neck along the jugular cavity.
- Chest girth - behind the shoulder blades, front - at the highest points of the chest.
- The circumference of the abdomen, waist, hips - as a standard measure for the protruding points, select the highest value.
- The length of the sleeve from the sewing point to the wrist - we find the place where a fold is formed when the wrist is bent. We measure the distance from the shoulder seam to the hand.
- Product length - choose a convenient length.
- We are looking for the distance from the beginning of the shoulder (cavity) to the middle of the sternum.
- Slewing line - the distance from the neck and shoulder to the end of the sternum is found.
- Sleeve width - the distance from the beginning of the neck to the desired width (in our case, to the knee). If you need a short sleeve, then the length from the neck to the floor is divided into three parts.
- Opening of the sleeve - measure how many centimeters between the maximum protruding little finger and the thumb. On a separate sheet of paper, circle the hand, then measure with a ruler.
The choice of style and fabric for kimono
Determine the matter: silk, satin, cotton, linen, less often mixed and synthetic fabrics.
 If you need a warm product, then take a terry cloth that holds its shape well.
- All seams are straight, flat. The fabric does not stretch too much.
- The sleeve width in a traditional kimono is associated with the status of a woman, unmarried are wide. In holiday dresses sleeves to the hem.
- The finished product is not more than one and a half girths of the hips wide.
Reference! The most common type is Yukata. It is possible to sew a dress, a bathrobe and even a coat on these patterns.
Preparation of patterns for kimono patterns
 We postpone the measurements on a sheet of tracing paper, wallpaper or special paper for patterns. Seam allowances are not taken into account.
It is more convenient to use a tailor's ruler.
Building a stitching back - in Japan, this is an obligatory rule for kimono. In this case, not a bend, but a seam in the center of the back.
Wedges are inserted for a large bathrobe. Length is measured from waist to hem. The width of the bottom is arbitrary.
A complete construction of a pattern of rectangles is possible - a back, two shelves, two sleeves.
If you decide to make a bar, shelves - we cut it along a shared thread.
Read more about patterns in model descriptions.
Models
Kimono without paper pattern
 In half an hour you can sew a dressing gown without patterns and complicated measurements. This model is suitable for slim girls up to size 48.
You need a ruler, soap or chalk for drawing, a sewing machine and a piece of fabric (with a width of 90 cm. You need 150 cm of fabric). The material we choose is well draped and flowing: crepe, chiffon, acetate.
Sew the finished product.
Stages of work:
- We fold the fabric face to face in half.
- From the free edge, measure 25 cm and go deep by 15 cm.
- Connect the labels, thus highlighting a 25 x 15 cm rectangle from each edge. The design should resemble the letter "T", where the upper part is the fold of the fabric.
- Cut it out.
- Sew on a typewriter, previously chipped with pins, or with a “live thread” stitching seam.
- Fold the resulting workpiece in half to find the line along which we will make the cut.
- We cut the shelf along this line without affecting the back.
- We fold the back in half, draw up the neck.
- We process slices in a convenient way - zigzag, overlock, edging, inlay.
2. Simple model with set-in sleeve
 The kimono dressing gown is long, one-piece on the back, overly loose cut. There is a big smell. Sleeve length - three quarters. The slanting edging is wide, edging the sides and neck. The dressing gown is spare, tied with a belt, there are no locks and buttons.
Pattern for chest circumference 96-100 cm, designed for men and women.
It is necessary to prepare:
- matter ( chintz, satin, terry cloth, satin, silk): width 1.50 m - 2.40 m; width 80-90 cm - 4 m;
- finished oblique inlay or material for it 10 cm wide - 3.30 m.
Important! We remember that the inlay is cut out at an angle of 45 0.

When cutting, we take into account the shared thread. Standard allowances - 10-15 mm, for bottom hem - 40 mm:
- Shelf - 2 pcs.
- Back - 1 pc. with a fold.
- Sleeve - 2 pcs.
- Belt - 1 pc.
- Slanting inlay for the sleeve - 2 pcs.
- Slanting inlay for shelves - 1 pc.
Sew the finished product
 Work sequence:
- Stitch shoulder seams on the machine. Do not pull the thread, matter, too.
- Ironing allowances to the back. We iron all seams.
- We sew sleeves into the armhole.
- We sew side and sleeve seams with a single line.
- Ironing allowances to the shelves.
- We sew a slanting inlay.
- We process the flooring of the dressing gown, the first seam is machine.
- Finishing, bent in half, we accept.
- We process sleeves in the same way.
- We start the belt, twist the front side, manually sew the hole.
- Iron the belt.
 If desired, sew a belt to the robe.
Choosing a Kimono Robe Ornament
In Japanese culture, kimono was traditionally decorated with embroidery or batik - painted on fabric.
Batik was carried out before cutting, and the pattern had to be combined specially. A ready-made kimono was embroidered according to a previously invented pattern. The simplest seam - a goat, a cross or a smooth surface - can also decorate your finished kimono.
A sufficiently interesting and exciting can be called a master class, which describes how to sew a kimono with your own hands. It will be interesting not only to try our own strengths, but also to learn the history of this traditional Japanese outfit. On the one hand, you need to know how to sew a kimono robe, the pattern of which will be given for clarity, on the other hand, you need to choose the right material for this work.
In general, a kimono dress, the pattern confirms this, is a t-shaped dressing gown, the length of which can be completely different.

The fixation of this Japanese clothing is carried out using a belt located at the waist and called "obi".
In addition, the Japanese do not use classic buttons in their traditional clothes like those of Europeans, and their fasteners consist of straps and twine.
Particular attention should be paid to the interesting shape of the sleeves, which is the hallmark of this garment. Sode, and this is the name given to this form of sleeves, is much wider than traditional ones and have a shape resembling a regular bag. Japanese kimono pattern shows how much the sleeve hole is less than the height of the sleeve itself. The kimono resembling the shape of a traditional European bathrobe does not constrain movement and is comfortable to wear. It is also worth noting that the Japanese kimono still resembles a European bathrobe and does not contain an open collar, which is an obligatory attribute of every European costume.
Inelastic fabrics are usually used for this type of clothing, and only cloth material for the belt. The pattern of a kimono is quite simple and does not contain any curved and rounded shapes. On the one hand, this is a kind of material saving when sewing, and on the other hand, the remains of a rectangular shape may well be useful for sewing other types of clothes. It should be recalled that in Japan, matter was a deficit.
The threads must always be soft to reduce the risk of pulling the fabric. In the event that the design of the clothes was broken during wear, it can be altered from the same material.
The basic principle of cutting and sewing the Japanese kimono was already formed by the seventh century AD, and in the following centuries it lost its free lines. In general, a kimono should hide female lines, and not reveal them. It should be noted that the kimono belt is wide enough and should be worn much higher than the natural waistline so that the Japanese woman looks flat in front and there is an imitation of humpback in the back.
In order to make the kimono sewing process more understandable, one should know its full structure. http://www.aikikan.ru/sites/default/files/k10.png
So, the Japanese kimono consists of:
- patch collar (1);
- the main collar (2);
- the right body part in front (3);
- the left body part in front (4);
- the left body part at the back (5);
- the right body part at the back (6);
- sufficiently wide sleeves (7);
- a separate part of the bottom of the sleeves (8);
- left insert in front (9);
- bottom insert in front (10);
- details called the "tip of the sword" (11).
This is what the bride’s kimono looks like in the Kunstkamera.

Properly selected fabric and drawings on it allow you to create a truly work of Japanese art.
And here is a variant of a kimono with pheasants that are successfully combined with peonies.


An interesting combination of flowers in a kimono with pine trees and fog.
Airy fabrics, flying silhouette, aura of summer relaxation and carefree laziness - such an atmosphere and winter is not a hindrance! And in the process of making this charming piece of clothing you don’t have to strain too much - everything is so simple that you are unlikely to stop on one copy. By the way, a self-made kimono can be a wonderful gift - you will definitely not be mistaken in size!
You will need:
- Chiffon or silk (1m x 1 m 40cm)
- Ruler
- Scissors
- Pins
Step 1

Fold the fabric in half with the front side inward.
Step 2
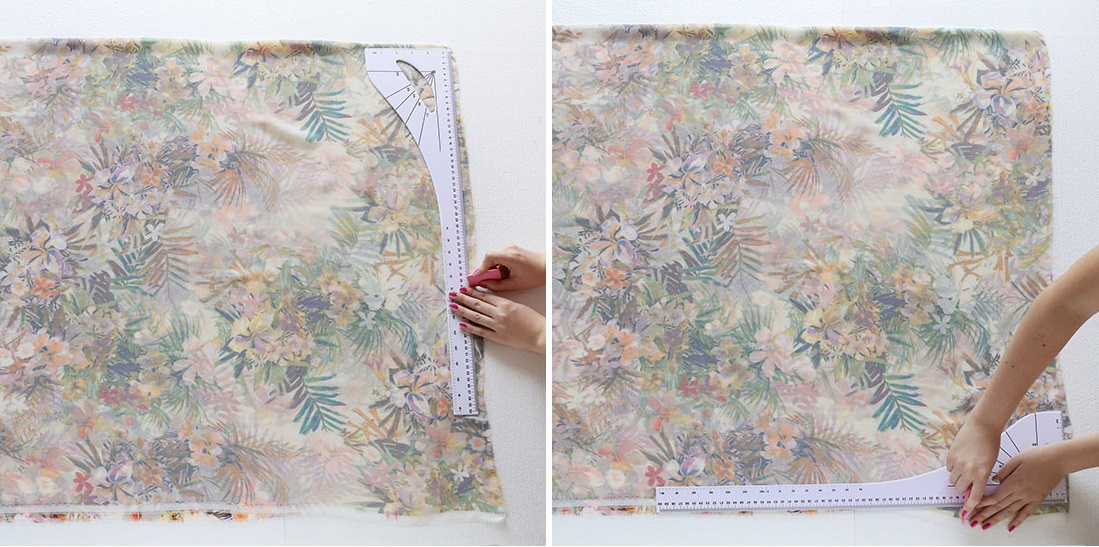
From a bend down, measure 25 cm, and then along the edge line - another 15 cm.
Step 3

From the deferred points, draw straight lines until they intersect. Do the same on the opposite side - you should get two rectangles.
Step 4

With pins, fasten the fabric along the drawn lines and cut the resulting rectangles.
Step 5

Sew side seams.
Step 6

Using a ruler, determine the middle of your product, draw a line and cut the top layer of fabric - from the future neck to the very bottom.
Step 7

At the last stage, you need to process the slices. To do this, simply tuck the fabric 2 cm, starting from the top of the neck, and sew. If necessary, also process sleeves.

Photo: pinterest.com
Material prepared by Nick Bazhanova


 Christmas tree big volume from buttons")