Let us consider a rectangular parallelepiped in the atmosphere with edges dx, dy, dz(Fig. 5.12) . We are interested in the change in pressure in the horizontal direction, i.e. along the axis X.
Let the isobar with pressure R directed parallel to the axis y, along the edge. Parallel to it along the edge NE passes through an isobar with pressure ( p+dp). Recall that atmospheric pressure is characterized by the force acting on a unit surface area, normally the latter. In what follows, we neglect temporary changes in pressure, i.e. We consider its change only in space.
Fig/ 5.12. Towards the calculation of the force of the horizontal pressure gradient
So, on the left side of face AA"D"D the atmospheric pressure is R. On the opposite side of BB"C"C the pressure is equal to . Since the force acting on the entire face is equal to the product of atmospheric pressure and its area, we write the expression for the force:
· left рdydz,
· on right .
As a result, the volume dxdydz force acts ( dF x), equal to
According to Newton's second law, force dF x and the mass of the volume under consideration
dm = рdxdydz (5.2)
interconnected (the ratio of force to mass is equal to acceleration A):
from where, taking into account (5.1) and (5.2)
We have obtained an expression for acceleration A, which is created by the force of the pressure gradient. Its value, according to (5.3), is equal to the pressure gradient force per unit mass of an elementary volume of air. The minus sign in formulas (5.1) and (5.4) indicates that the force and acceleration of the pressure gradient are directed in the direction of decreasing pressure. Moreover, the force and acceleration of the pressure gradient act in the direction of the most rapid decrease in pressure. This direction is the direction of the normal to the isobar at the considered point of application of the force.
In (5.4) the expression is equal to the numerical value of the pressure gradient. The horizontal pressure gradient can be graphically represented by an arrow directed normal to the isobar in the direction of decreasing pressure. The length of the arrow should be proportional to the numerical value of the gradient (Fig. 5.13). In other words, the magnitude of the horizontal pressure gradient is inversely proportional to the distance between the isobars.
It is obvious that where the isobars are concentrated, the pressure gradient, i.e. the change in pressure per unit distance normal to the isobar is greater. Where the isobars are moved apart, the pressure gradient is smaller.
Rice. 5.13. The arrows indicate the horizontal pressure gradient at three points of the pressure field
Isobaric surfaces are always inclined in the direction of the gradient, i.e. in the direction where the pressure decreases (Fig. 5.13).
The vertical pressure gradient (see Chapter 1) is tens of thousands of times greater than the horizontal one. Further we will talk only about the horizontal pressure gradient. To determine the average pressure gradient for a section of the pressure field, the pressure is measured along the normal to the isobars at two points located at a distance corresponding to one degree of the meridian (111 km). The pressure gradient is numerically equal to the pressure difference and has the dimension mb/111 km (or hPa/111 km). In the atmosphere near the earth's surface, the order of magnitude of horizontal pressure gradients is several millibars (usually 1–3) for each meridian degree (111 km).
Rice. 5.14. Vertical section of isobaric surfaces. Arrow – direction of horizontal pressure gradient; double line – level surface
For example, let on a synoptic map of scale 1: 10,000,000 the distance between adjacent isobars be 2 cm. The isobar spacing is 5 mb. For the indicated scale, 2 cm on the map corresponds to 200 km in reality. Therefore, the pressure difference per 100 km will be 5/2 = 2.5 mb/100 km. For a distance of 111 km, this difference = 2.75 mb/111 km.
If only the force of the horizontal baric gradient acted in the atmosphere, then the air would move uniformly accelerated, with an acceleration that can be calculated using formula (5.4). Acceleration at real pressure gradients is small, on the order of 0–0.3 cm/s 2 . Nevertheless, with increasing duration of the pressure gradient force, wind speeds would increase indefinitely. In reality, wind speeds rarely exceed 10 m/s or more. Consequently, other forces also act, balancing the force of the pressure gradient (more on this in the next chapter).
Change in pressure gradient with height associated with uneven temperature distribution. Following S.P. Khromov, imagine that the pressure gradient at the earth’s surface is zero, i.e. the pressure at all points is the same (Fig. 5.15). In this case, the temperature in one part of the region under consideration is higher, in another lower. G The horizontal temperature (thermal) gradient, by definition T, is always directed normal to the isotherm (line of equal temperatures) in the direction where the temperature increases.
Let us remember that the lower the air temperature, the faster the pressure decreases with altitude. It follows that isobaric surfaces with uneven temperature distribution cannot be horizontal. Even if the surface isobaric surface is horizontal, then each overlying isobaric surface will be raised above the underlying surface less in cold air and more in warm air. This means that the overlying surfaces will tilt from warm air to cold air (Figure 5.15). Thus, although the horizontal pressure gradient at the earth's surface is zero, there is such a gradient in the overlying layers.
|
Cold Warm
Rice. 5.15. Relationship between horizontal temperature and pressure gradients
Moreover, whatever the horizontal pressure gradient at the earth's surface, with height it will approach the horizontal temperature gradient in its direction. At a sufficiently high altitude, the horizontal pressure gradient will closely coincide in direction with the average horizontal temperature gradient in the air layer from the lower level to the upper. From Fig. 5.15 it follows that in warm regions of the atmosphere the pressure at a given altitude will be increased, and in cold regions it will be decreased.
- Pressure gradient is a vector characterizing the degree of change in atmospheric pressure in space. In numerical value, the baric gradient is equal to the change in pressure (in millibars) per unit distance in the direction in which the pressure decreases most quickly, that is, normal to the isobaric surface in the direction of decreasing pressure.
The pressure gradient is also called the barometric gradient. In meteorology, a horizontal pressure gradient is usually used, that is, the horizontal component of the gradient at sea level or at another level; in this case, the normal to the isobar at a given level is taken. Typically, the horizontal pressure gradient is 1-3 mbar per 100 km, but in tropical cyclones it sometimes reaches tens of mbar per 100 km (1 mbar = 100 N/m²).
The pressure gradient is one of the reasons that lead to atmospheric circulation.
Related concepts
Isobars are isolines of atmospheric pressure values. They are depicted on the map as lines connecting places with the same pressure. Most often, isobaric lines are depicted on meteorological maps.
Tropopause (from ancient Greek τρόπος “turn, change” + παῦσις “stop, cessation”) is a layer of the atmosphere in which a sharp decrease in the vertical temperature gradient occurs, a transition layer between the troposphere and stratosphere.
Compensation method of measurement (lat. compensatio) is a measurement method based on balancing (compensation) of the measured value with a homogeneous standard value (see System of relative units). The compensation measurement method is used to measure electrical (emf, voltage, current, power, resistance, etc.) and non-electrical quantities - temperature (isotherms), mechanical movements, light fluxes, mass (relative atomic mass, solar mass), relative position.. .
The planetary boundary layer (“atmospheric boundary layer”, “friction layer”) is the lower layer of the planet’s gaseous shell, the properties and dynamics of which are largely determined by the interaction with the solid (or liquid) surface of the planet (the so-called “underlying surface”).
Thermal slip is the phenomenon of movement of a layer of gas located at the surface of a solid body, the surface of which is heated unevenly, towards a more high temperature. Observed in a rarefied gas environment.
The main hydrophysical characteristic (WHC, water retention curve) is in soil physics an isothermal equilibrium relationship between the capillary-sorption (matrix) pressure of soil moisture and humidity (usually volumetric). The form of WRC is specific for each soil sample and characterizes the structure of the soil pore space, granulometric and mineralogical composition. It is characterized by hysteresis, that is, the discrepancy between the shapes of the curve when the sample is moistened and dried. In terms of dominance...
Temperature stress is a type of mechanical stress that occurs in any environment due to changes in temperature or uneven distribution.
Kelvin-Helmholtz instability occurs when there is a shear between layers of a continuous medium, or when two contacting media have a sufficient velocity difference. In this case, in the section perpendicular to the interface between these media, the velocity profile has an inflection point (the second derivative of the velocity with respect to the cross-section coordinate becomes zero). As Rayleigh showed, a flow with an inflection point in the velocity profile is unstable. A typical example of such instability is the occurrence of waves on the surface...
Temperature difference - the difference between the characteristic temperatures of the medium and the wall (or phase boundary) or two media between which heat exchange occurs.
Atmospheric front (from ancient Greek ατμός - steam, σφαῖρα - ball and lat. frontis - forehead, front side), tropospheric fronts - a transition zone in the troposphere between adjacent air masses with different physical properties.
Atmospheric thermodynamics is a branch of atmospheric physics devoted to the study of the processes of transfer and conversion of heat into work (and vice versa) in the Earth’s atmosphere in connection with the study of the physics of weather phenomena or climate based on the fundamental laws of classical thermodynamics. Research in this area is necessary to understand the properties of atmospheric turbulence, convection, dynamics of the planetary boundary layer and its vertical stability. Atmospheric thermodynamics serves as the basis for modeling...
The Joule-Thomson effect is the change in temperature of a gas or liquid during stationary adiabatic throttling - the slow flow of gas under the influence of a constant pressure difference through a throttle (porous partition). Named after James Joule and William Thomson who discovered it. This effect is one of the methods for obtaining low temperatures.
Geothermal gradient - a physical quantity that describes the temperature increase rocks in °C in a certain area of the earth's thickness. Mathematically expressed by the change in temperature per unit depth. In geology, when calculating the geothermal gradient, 100 meters are taken as a unit of depth. In different areas and at different depths, the geothermal gradient is not constant and is determined by the composition of rocks, their physical state and thermal conductivity, heat flow density, proximity...
Inversion in meteorology means the anomalous nature of changes in any parameter in the atmosphere with increasing altitude. Most often this refers to temperature inversion, that is, an increase in temperature with height in a certain layer of the atmosphere instead of the usual decrease (see Earth's atmosphere). Mountain-valley winds also play an important role in this process.
A concentration gradient or concentration gradient is a vector physical quantity that characterizes the magnitude and direction of the greatest change in the concentration of a substance in a medium. For example, if we consider two regions with different concentrations of a substance, separated by a semi-permeable membrane, then the concentration gradient will be directed from the region of lower concentration of the substance to the region with higher concentration. The diffusion flow vector is directed opposite the gradient vector...
The Stefan flow is the phenomenon of the occurrence of a hydrodynamic flow of a medium during the process of evaporation or droplet growth.
Air density is the mass of gas in the Earth’s atmosphere per unit volume or the specific gravity of air under natural conditions. Air density is a function of pressure, temperature and humidity. Typically, the standard value for air density at sea level in accordance with the International Standard Atmosphere is 1.2250 kg/m³, which corresponds to the density of dry air at 15 °C and a pressure of 101330 Pa.
Current (of reservoirs) is the movement of water masses in reservoirs (seas, lakes, reservoirs). The main types of currents are: waste (sometimes called katabatic), wind, convection.
Thermocompass (from Latin themo - heat and Latin compassum - measuring direction) is a flight instrument for searching and indicating the direction to the center of thermal flow in paragliding.
Sedimentation analysis is a set of methods for determining particle sizes in disperse systems and the molecular weight of macromolecules in polymer solutions by sedimentation rate under conditions of sedimentation-diffusion equilibrium.
The jump layer is a layer of water in the ocean (sea), in which the vertical gradients of oceanographic characteristics (temperature, salinity, density, speed of sound, etc.) increase sharply compared to the vertical gradients in the above and underlying layers.
Soil permeability is the ability of soil to pass water through itself due to a pressure gradient. It is associated with one of the most important processes of mass transfer in soils - the filtration of water (or other liquids), studied in engineering geology and hydrogeology.
Viscosity (internal friction) is one of the transfer phenomena, the property of fluid bodies (liquids and gases) to resist the movement of one part relative to another. As a result, the work expended on this movement is dissipated in the form of heat.
International Standard Atmosphere (abbr. ISA, English ISA) - conventional vertical distribution of temperature, pressure and air density in the Earth’s atmosphere accepted international organization on standardization. Up to an altitude of 80 km, atmospheric parameters correspond to the average for a geographic latitude of 45°. The basis for calculating the ISA parameters is the barometric formula, with the parameters defined in the standard.
Thermocline, or temperature jump layer - a layer of water in which the temperature gradient differs sharply from the gradients of the above and underlying layers. Occurs when there are unmixed layers of water with different temperatures. It can have a thickness from several meters to tens of meters.
Rayleigh-Taylor instability (named after Lord Rayleigh and J.I. Taylor) is a spontaneous increase in pressure, density and velocity disturbances in gaseous and liquid media with inhomogeneous density, located in a gravitational field (Rayleigh, 1900) or moving with acceleration (Taylor, 1950).
Pressure trough - elongated areas of relatively low atmospheric pressure, in some cases associated with atmospheric fronts. The opposite sides of pressure troughs are characterized by a turn in the direction of the wind, which can be noted by an observer on the surface as they pass. Synoptic areas of low pressure with no wind turn are called pressure saddles, the latter usually associated with certain mountainous regions.
Microturbulence is a type of turbulence whose properties change over small length scales. Large-scale turbulence is called macroturbulence.
Temperature drift is a change in the electrical parameters of an electronic device, an electronic device caused by a change in the external temperature of the environment. Sometimes this change is called the temperature drift of the parameter.
Temperature (from the Latin temperatura - proper mixing, normal state) is a physical quantity that characterizes a thermodynamic system and quantitatively expresses the intuitive concept of varying degrees body heating
Wind shear is an increased gradient of wind speed and (or) direction in cases where they change significantly over a relatively small area in the atmosphere. Wind shear is usually decomposed into horizontal (m/s per 1 km distance) and vertical (m/s per 30 m height) components, of which the horizontal is usually more significant in the region of atmospheric fronts, and the vertical - at the Earth's surface, although both can be significant at high altitudes in the area of high-altitude jets...
Magnetohydrodynamic treatment (MHDT) is a method of influencing the flow of mineralized water, in which an electric current is induced under the influence of a magnetic field. The electric current in electrolytes is maintained, as is known, by the movement of charged ions and in the water flow, a change in the concentration in the volume of the flow of positive and negative ions occurs. Using MGDO, it is possible to achieve such effects as a local decrease in the pH of water (to reduce the corrosive activity of the water flow), creating...
The Venturi effect is a pressure drop when a liquid or gas flows through a constricted portion of a pipe. This effect is named after the Italian physicist Giovanni Venturi (1746-1822).
(ancient Greek τρόπος “turn, change” + σφαῖρα “ball”) - the lower, most studied layer of the atmosphere, height in the polar regions 8-10 km, in temperate latitudes up to 10-12 km, at the equator - 16-18 km.
Stratification of the atmosphere (from Latin stratum - layer and facio - do) - temperature distribution in the atmosphere with height. The stratification of the atmosphere can be stable, unstable and indifferent in relation to dry (or moist unsaturated) and saturated air. With stable S. a vertical gradient temperature is less than adiabatic (dry or wet adiabatic, depending on the humidity conditions), when unstable - more than adiabatic, when indifferent - equal to adiabatic. Unstable...
Horizontal pressure gradient
1. Looking at the isobars on a synoptic map, we notice that in some places the isobars are denser, in others less frequent. It is obvious that in the first places the atmospheric pressure changes in the horizontal direction more strongly, in the second - less. They also say:<быстрее>And<медленнее>, but the changes in space in question should not be confused with changes in time.
You can accurately express how atmospheric pressure changes in the horizontal direction using the so-called horizontal pressure gradient, or horizontal pressure gradient. Chapter four talked about horizontal temperature gradients. Similarly, the horizontal pressure gradient is the change in pressure per unit distance in the horizontal plane (more precisely, on the surface of the level). In this case, the distance is taken in the direction in which the pressure decreases the most, and this direction at each point is the direction normal to the isobar at that point.
Thus, the horizontal pressure gradient is a vector, the direction of which coincides with the direction of the normal to the isobar in the direction of decreasing pressure, and the numerical value is equal to the derivative of the pressure in this direction. Let us denote this vector by the symbol -s/p, and its numerical value (module) -dr/dp, where n is the normal to the isobar.
Like any vector, the horizontal pressure gradient can be graphically represented by an arrow, in this case an arrow directed normal to the isobar in the direction of decreasing pressure. The length of the arrow should be proportional to the numerical value of the gradient (Fig. 58).
Rice. 58. Isobars and horizontal pressure gradient (arrows) at three points of the pressure field.

Rice. 59. Isobaric surfaces in a vertical section and the direction of the horizontal pressure gradient. Double line - level surface.
At different points of the pressure field, the direction and magnitude of the pressure gradient will, of course, be different. Where the isobars are concentrated, the change in pressure per unit distance normal to the isobar is greater; where the isobars are moved apart, it is smaller. In other words, the modulus of the horizontal pressure gradient is inversely proportional to the distance between the isobars.
If there is a horizontal pressure gradient in the atmosphere, it means that the isobaric surfaces in a given part of the atmosphere are inclined to the level surface and, therefore, intersect with it, forming isobars. Isobaric surfaces are always inclined in the direction of the gradient, that is, in the direction where the pressure decreases (Fig. 59).
2. The horizontal pressure gradient is the horizontal component of the total pressure gradient. The latter is represented by a spatial vector, which at each point of an isobaric surface is directed along the normal to this surface towards the surface with a lower pressure value. The modulus of this vector is equal to - dr/dp, but here n is the normal to the isobaric surface. The complete pressure gradient can be decomposed into vertical and horizontal components, or into vertical and horizontal gradients. You can also decompose it into three components along the axes of rectangular coordinates X, Y, Z.
Pressure changes with height much more than in the horizontal direction. Therefore, the vertical pressure gradient is tens of thousands of times greater than the horizontal one. It is balanced or almost balanced by the force of gravity directed opposite to it, as follows from the basic equation of atmospheric statics. The vertical pressure gradient does not affect the horizontal movement of air. Further in this chapter we will talk only about the horizontal pressure gradient, calling it simply the pressure gradient.
3. In practice, the average pressure gradient for a particular section of the pressure field is measured on synoptic maps. Namely, they measure the distance An between two adjacent isobars in a given area along a straight line that is sufficiently close to the normals of both isobars. The pressure difference between the isobars Ap (usually 5 hPa) is then divided by this distance, expressed in large units - hundreds of kilometers or meridian degrees (111 km). The average pressure gradient will be represented by the ratio of the final differences Ap/Ap hPa/meridian degree. Instead of a meridian degree, they now often take 100 km. The pressure gradient in the free atmosphere can be determined by the distance between isohypses on pressure topography maps. Under actual atmospheric conditions at the earth's surface, horizontal baric gradients are of the order of several hectopascals (usually 1-3) for each meridian degree.
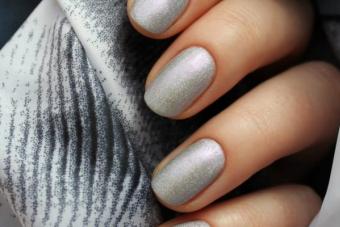
What is a manicure gradient? Types of design and their differences.
We meet on the pages of magazines and on the Internet different names and types of this design - gradient, ombre, Dip Dye and even striped manicure. What is this design?
Gradient manicure is a special nail coating technique in which one color smoothly transitions into another. This manicure is often called fashionable manicure ombre In part, this has become synonymous with the word gradient, but the ombre design on nails involves gradually lightening the tips by several tones, while the color remains the same color scheme. There is a term Dip Dye, it is also a synonym and has a similar meaning, but it more reflects the essence of the gradient as such. Dip Dye means dyeing something completely different bright color.
There are several types of gradient, among them are gradient and. Of course, every year more and more variations of this fashionable nail coating appear, but the classics still remain in fashion. The gradient manicure technique is not complicated, but it will require a lot of patience and perseverance to perform.
Gradient with transition: how to quickly create a fashionable design.
Easiest to do gradient with transition. What colors are needed for this? We take 5 varnishes of the same color, but different shades, and cover each nail from the little finger to thumb in turn, the transition is obtained from one finger to another. If you don’t have 5 shades of the same color, it’s easy to create them yourself. To do this, we need a primary color - for example blue, and an additional color - for example white.
We cover the first nail with a blue tint, on the second nail in a separate container or simply on a plastic/glass palette we mix in a drop of blue varnish and not a large number of white, thus obtaining a shade that is a shade lighter. Cover the second nail with the resulting color. Next, mix in a little more white again, getting even more light blue shade, and cover the next nail. Next, we simply continue mixing polishes according to this scheme until we reach the last nail. At the same time, we can also show originality and creativity, cover all 10 fingers in a gradient from blue to absolutely white, or cover 1 hand from blue to the lightest blue, and cover the second hand as well, or mirror it.

Horizontal and vertical gradient: technical features.
What is horizontal gradient? In this case it is created smooth transition colors on the nail, starting from the cuticle area and moving towards the tips of the nails. The color scheme can be absolutely any, from close shades - then the manicure will turn out more delicate and “smooth”, to completely different, contrasting colors. In this case, the manicure will turn out bright and extravagant.
In this manicure you can combine two, three or even more colors. It should be noted that the more colors are used, the sharper the transition of colors in a contrasting gradient of nails will be and the smoother the gradient will be with similar shades of varnishes.

Vertical gradient It is also performed on the nail with a smooth transition from one shade to another. However, the technology differs in that the color changes from one side roller to another, vertically. You can also create different variations of this nail coating. For example, a manicure looks very original in which the little finger is painted entirely in one color, a gradient transition to another color is made on the ring finger, the middle finger is covered with the color we switched to on the ring finger, and a transition is made on the index finger again. This way, 3-4 or even 5 colors will be used in the gradient, and the manicure will become even more original.
Another interesting feature of ombre manicure is the use of thermal nail polishes. You also do a manicure with color transitions, but instead of just polish or gel polish, you use thermo shades; at the slightest change in temperature, the polishes will change shades and the gradient will sparkle with new colors!


How to do a gradient manicure at home.
Here it is very important to consider the materials that you want to use for manicure: varnish or gel polish coating. Depending on your choice, the coating technology will change.Let's look at the materials needed for the gradient.
When using quick-drying varnish you will need:
Several shades of varnish coating (gel polishes or nail polishes),
A soft sponge or a special sponge for gradient manicure,

Many people ask the question: which varnish is suitable for a gradient manicure?
We recommend using varnishes with a dense texture and good pigmentation - they are optimal for the design and require a minimum of coating layers. Next, you need to choose one of the gradient methods that is convenient for you:
Gradient is quick and easy. The two most popular methods of execution.
The first method is to apply several shades of varnish in strips directly onto a sponge. Immediately after application, you need to transfer the varnish onto the nail with light patting movements - due to this, the varnishes on the border will mix and give a soft transition. However, be careful! If you fiddle with the sponge for too long, the varnishes at the border of the transition may interfere with each other and give a dirty shade. To prevent this from happening, it is better to use different shades of the same color for this method. There is also a high probability that the varnishes will begin to dry out, since the layer of varnish on the sponge is very thin, and will begin to roll off on the sponge and nail, leaving stains and gaps. In this case, it is better to make a thin first layer, dry it, and then add a new varnish to the sponge and duplicate the layer again - this way it will be bright, and the sponge will not create any inconvenience for you :)

In order to easily and quickly clean the skin of excess paint after performing the ombre effect on your nails, you can use liquid tape(it’s called Skin Defender). Also popularly, this product for water and French gradient manicure is called pink ribbon or pink thing. It will allow you to remove excess from your fingers quickly and without the use of cleaning liquids, without drying out the skin of your hands and fingers.


The second method of applying gradient manicure with nail polish is to use any hard surface, plastic or glass. You can also mix polishes and create transitions using a special silicone nail mat.

We apply the most light shade, used in the gradient and let it dry. Next, we’ll dampen the polish sponge a little, so the polish won’t be absorbed into it too quickly and will allow us to do a manicure. On our glass surface we need to apply the dark shade used for the gradient, and next to it the same light shade that we applied to the nail. The shades should touch slightly. To make the border even smoother, we mix the varnishes at the junction with a toothpick or an orange stick, now we have our gradient in front of our eyes. This procedure must be done quickly enough so that the varnish does not have time to dry completely.
Next, we imprint our gradient onto the sponge with patting movements, slightly smearing it so that the borders of the colors blend a little and give a smooth transition, and apply the varnish from the sponge to the nail with the same movements. For each subsequent nail, you need to renew the varnishes, but with proper skill you can manage to apply the coating to several nails at once.

Geometric gradient: design features and method of implementation.
In the last season, geometric gradient (graphic) on nails gained enormous popularity. The geometric gradient design with gel polish is done with a thin brush. For it you will need 2 gel polishes: rich color and white. Gradually diluting the colored shellac with white, we get an increasingly lighter shade and draw a geometric gradient step by step with a thin brush from the lightest shade, gradually moving to the darkest, applying a thin layer so that the gel polish does not spread. There is no need to dry each step. Only after finishing the entire drawing, we send the design to dry in the lamp. The most common and popular in 2016 was the geometric diamond gradient (diamonds, diamonds).
How can you create a geometric gradient on your nails with regular polish, since it dries very quickly?
For this it is better to use nail stencils. Stencils can also be used in gel polish manicure. But gel polishes tend to flow under the stencil, so you need to get used to it. For varnish, this is an excellent option, the varnish dries quickly in the air and does not spread, its excess can be easily removed with a cotton swab dipped in nail polish remover. In addition, manufacturers now offer a large number of stencils and slider designs with a variety of geometric patterns that are suitable for creating incredible geometric manicures.

Beautiful gradient manicure:

Ombre design with gel polish and gel paint: subtleties of application and methods of execution.
The technology for applying a gradient manicure with gel polish or gel paint is significantly different. For such a manicure, we must fully prepare the nails for coating, apply the base coat and remove it sticky layer. It is advisable that the base coat be leveled, especially when using gel paint. Otherwise, all the irregularities will be clearly visible on the surface of the nail, and the gel paint will only highlight them even more, since it is a very thin coating.
For the first method we need 2 shades of gel polish and a thin brush. The simplest and most common method of creating a horizontal gradient is with a thin brush. It is necessary to apply 1 layer of colored gel polish to the entire nail and dry it in a lamp. Next, apply the second layer and, without drying it, apply a small drop of the second layer to the area near the cuticle. Be careful not to fill the cuticle with gel polish! Since gel polishes are thinner than gel paint, they flow more easily, so gel polish should be applied in a medium drop and slightly indented from the cuticle. We pre-painted the area near the cuticle with a brush in 1 layer so that there were no gaps in it.

Next, we distribute our drop with a thin brush, gradually “smearing” it down towards the end of the nail, but not reaching it. Depending on how well you blend your second shade, the smoothness of the gradient transition will depend. There are also special brushes for gradients; they are wider and make the process of creating a gradient much more enjoyable, speeding it up significantly.


The second method is similar to the method of applying a varnish gradient - with a sponge. However, it is better for gel paints, since they do not smear and have good pigmentation. We also apply the gradient to the nail with a sponge, without drying it, remove the excess from the side ridges and cuticle area, and send the design to the lamp to dry. If necessary, repeat the procedure 1-2 times and cover the finished manicure with a top coat for gel polish.
For vertical gradient technology, you can use a brush from the shellac bottle itself. It is better to use a brush of a darker shade, but you must always have a dry cloth on hand and often wipe the brush with it, so as not to introduce a different color into the bottle of gel polish. You can also use a flat square or oval brush. They are usually used for gel, but they are very convenient for creating a gradient. In this technology, a light shade of gel polish or gel paint is applied to half of the nail. Next, apply a little onto the light part with a spatula on the second half. dark color paints. After this, we wipe the brush and use a dry brush to walk along the border of the colors. This is our first base layer, put it in the lamp for 2 minutes. After this, we take a brush with half of the dark paint and the other half of the light paint at the same time, as if forming a gradient immediately on the brush. Using a brush with gel paints, apply the second layer with a brush strictly in the center of our nail, so that the middle of the gradient on the brush approximately coincides with the middle of the gradient on the nail. This way we form a soft vertical gradient.

"Air" gradient: features of using an airbrush to create a manicure.
Nowadays, creating gradients, especially horizontal ones, using an airbrush is gaining popularity. An airbrush is a special device that sprays a thin layer of paint using air pressure. We'll look at the pros and cons of brush and airbrush gradients.
A horizontal gradient with a brush on nails is quite difficult to perform; its careful execution is painstaking and time-consuming work. Many masters use an airbrush to simplify and speed up their work; thanks to the device, it takes about two minutes to create a gradient on 1 nail, while with a brush we spend about fifteen minutes shading gel polish or paint. The essence of the method is that we pour paint into the airbrush, turn on the compressor and simply spray the paint onto the nail. In this case, the paint is usually water based, or alcohol. In order to clean the client's handles and side rollers, there is no need to use special liquids; it is enough to cover the design with topcoat and send the client to wash their hands with soap. This not only saves liquids for the master, but also does not harm the skin of the client’s hands and eliminates allergies to liquids. The paint is sprayed in the thinnest layer, so paint consumption is minimal. The layer on the nail is thin and does not create “patty nails” that can be obtained by layering with a regular gradient.

What to choose, gradient manicure with shellac or varnish?
If you actively use gel polishes, then we recommend using gel polishes and paints, because the gradient effect in this case will remain on your nails for several weeks and will delight you every day. The nail polish gradient is quite simple to perform and can be completed faster, but it will last just like regular nail polish for 3-6 days.

CSS gradient represents transitions from one color to another.
Gradients are created using the linear-gradient() and radial-gradient() functions.
The gradient background can be set in the background, background-image, border-image and list-style-image properties.
How to make a gradient in CSS
Browser support
IE: 10.0
Firefox: 16, 3.6 -moz-
Chrome: 26.0, 10.0 -webkit-
Safari: 6.1, 5.1 -webkit-
Opera: 12.1, 11.1 -o-
iOS Safari: 7.1
Opera Mini: —
Android Browser: 4.4, 4.1 -webkit-
Chrome for Android: 44
1. Linear gradient linear-gradient()
 Rice. 1. Gradient line, start and end points and gradient angle
 Linear Gradient created using two or more colors that have a direction specified, or gradient line.
If the direction is not specified, the default value is used - top down.
By default, gradient colors are distributed evenly in a direction perpendicular to the gradient line.
Background: linear-gradient(angle/side or slant by keyword(pair of keywords), first color, second color, etc.);
Direction the gradient can be specified in two ways:
using tilt angle in degrees deg, the value of which determines the angle of inclination of the line inside the element.
Div ( height: 200px; background: linear-gradient(45deg, #EECFBA, #C5DDE8); )
using keywords to top , to right , to bottom , to left which correspond to a gradient angle of 0deg , 90deg , 180deg and 270deg respectively.
Div ( height: 200px; background: linear-gradient(to right, #F6EFD2, #CEAD78); )
If the direction is specified by a pair of keywords, for example, to top left , then the starting point of the gradient will be located in the opposite direction, in this case the bottom right.
Div ( height: 200px; background: linear-gradient(to top left, powderblue, pink); )
For an uneven distribution of colors, the starting position of each color is indicated through the stop points of the gradient, the so-called color stops. Breakpoints are specified in %, where 0% is the starting point, 100% is the end point, for example:
Div ( height: 200px; background: linear-gradient(to top, #E4AF9D 20%, #E4E4D8 50%, #A19887 80%); )
For a clear distribution of color stripes, each subsequent color must begin from the stopping point of the previous color:
Div ( height: 200px; background: linear-gradient(to right, #FFDDD6 20%, #FFF9ED 20%, #FFF9ED 80%, #DBDBDB 80%); )
2. Radial gradient radial-gradient()
Radial Gradient differs from linear in that the colors come from one point (the center of the gradient) and are evenly distributed outward, drawing the shape of a circle or ellipse.
Background: radial-gradient(gradient shape/size/center position, first color, second color, etc.);
Gradient shape defined by the keywords circle or ellipse . If no shape is specified, the radial gradient defaults to an ellipse shape.
Div ( height: 200px; background: radial-gradient(white, #FFA9A1); )
Center position specified using the keywords used in the background-position property, followed by the at prefix. If the center position is not specified, the default value at center is used.
Div ( height: 200px; background: radial-gradient(at top, #FEFFFF, #A7CECC); )
A pair of values, specified in % , em , or px length units, can control the size of the elliptical gradient. The first value specifies the width of the ellipse, the second – the height.
Div ( height: 200px; background: radial-gradient(40% 50%, #FAECD5, #CAE4D8); )
Gradient size specified using keywords. The default value is farthest-corner.
div ( height: 200px; background: radial-gradient(circle farthest-corner at 100px 50px, #FBF2EB, #352A3B); )Using a radial gradient you can create realistic volumetric figures, such as balls, buttons.
Ball
div ( width: 200px; height: 200px; border-radius: 50%; margin: 0 auto; background: radial-gradient(circle at 65% 15%, aqua, darkblue); )Button
Postage Stamp

Using transparent color in gradients, you can create effects like this.
Jpg">