Today, many people are interested in creating homemade jewelry. The news portal “site” has decided to prepare for you a series of articles about homemade bracelets that will be very appropriate in the hot summer.
What are the benefits of handmade bracelets? The fact that they have a low cost and they are unique, which means that you will not see the same bracelets on anyone else.
 In this article we will learn how to make a bracelet from buttons. Every home has clothing accessories - buttons. Buttons come in so many different shapes and colors that there are an incredible number of options for ideas for button bracelets.
To make a bracelet from buttons, you will need buttons and decorative ribbon or braid, multi-colored threads, thin elastic, wire, etc. The style of your future bracelet will depend on what material you choose.
DIY button bracelet on a thin ribbon
 Choose a thin ribbon of the desired color and string buttons on it.
Make knots after each button. The knots will secure the button in the desired position. Buttons can be chosen both large and small, in two colors, or in one color.
Bracelet made of buttons on a decorative cord
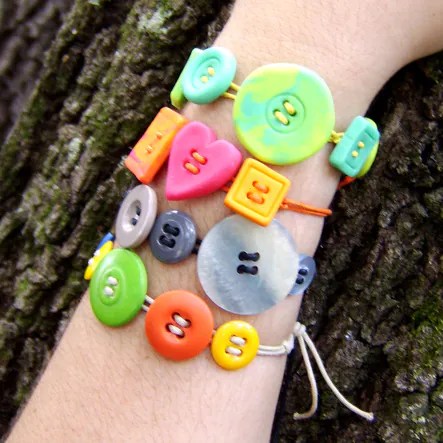 Bracelets made from curly buttons - hearts, stars, squares and diamonds - look very original. The brighter the color of the buttons you choose, the more fun the bracelet will look.
Multi-colored bracelets will especially appeal to little fashionistas.
Button bracelet ideas
 When stringing buttons, you don’t have to tie any knots, then the bracelet will turn out lush and noisy. With every movement of your hand, the bracelet will make a pleasant rustling sound. This type of bracelet is especially suitable for performers of oriental dances.
 Button bracelets made from leather or coarse threads look very original and are perfect for a hippie look or a beach suit.
Button bracelets made from wire can even pass as evening jewelry - the main thing is to responsibly choose the buttons themselves. It is better to choose buttons for a luxurious bracelet with gilding or sparkles.
Recently, my child and I have become interested in making various bracelets. This is an exciting game, excellent development of fine motor skills, and a wonderful gift for friends and family for the New Year. Over the past month, we can already compete with a small enterprise in terms of the quantity of product produced. Fortunately, there are a lot of ideas around.
In this post I want to talk about button bracelets. It's simple, beautiful, stylish and interesting. Even three-year-olds (and probably younger children too) will be happy to take part in this exciting activity :)))
What do we need
Making a bracelet with your own hands is very simple. To make it we need only 2 things:
- string (fishing line, thread, etc.)
- buttons.
The main thing is to choose good buttons of the desired shape, size and color. And the options can be very diverse. See for yourself :)))


More options...
You can tie buttons in another way. As if not flat, but butt (I don’t know how to say it differently)

You can make the job more difficult. Glue small photographs or pictures onto the buttons. We made such a bracelet with photographs of our closest relatives. We also want to do the same thing, but with the kids’ friends. Something like this:

It's also very easy to do:
- print out small photos
- you select buttons of the same size and shape, but in different colors
- making a bracelet
- stick photos on buttons
- You can decorate the bracelet. We simply made dots around the photos, like in the pictures with glitter glue.
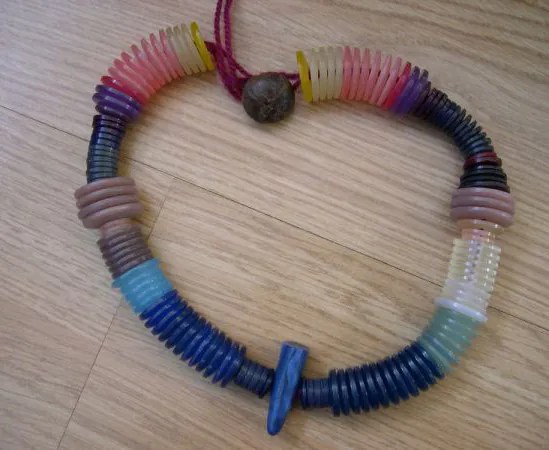
You can combine buttons and beads. It turns out very beautiful too.

You can make a sophisticated bracelet from small buttons :))

In a word, as you can see for yourself, making a bracelet with your own hands from buttons is a very creative, simple, and exciting activity. And, on top of everything else, it’s also useful, because you can give a lot of gifts to your family and friends!
We invite you to make bracelets from buttons together with your child. This craft will be a beautiful summer decoration or a nice gift for your sister or friend.
We have already suggested making a bracelet from buttons and ribbons. Today's bracelets are much simpler to make; older children can do the work themselves.
1.Fun summer bracelet.
Locks and fasteners are on sale, as well as buttons. You can string them on threads or thin fishing line, or you can also use a thin elastic band, then you can make these bracelets without a fastener.


2. Bracelet for an older girl.
 |
|
|

3. Bracelets with cord or thread.

You will need:
- a variety of buttons
- any rope of your choice and color (beautiful threads, floss, etc.), the main thing is that you can put the buttons on,
- scissors,
- centimeter or ruler,
- colorless nail polish (if the string is fraying),
- Super glue.
Selecting buttons for a bracelet
Typically, a bracelet requires 9 to 14 buttons in one row.
The quantity depends on the size of the buttons and the desired length of the bracelet.
Select a suitable rope/thread.
It is better to take a little more than the required length in order to have a reserve at the end; approximately you will need a rope from 75 to 90 cm.

If your string is fraying, paint the ends with nail polish.
This is not necessary, but it does make the work easier, since it is easier to insert the buttons with slack.
While the varnish is drying, arrange the buttons in the order they will go on the bracelet.
Fold the rope in half.
Tie the first knot, creating a loop at the bend, the loop should be of such a size that the last button of the bracelet goes through it, but not too loosely.
Thread the thread through the first button.

There are two options for how to do this: thread a double thread or just one, as shown in the photo.
Tie knots between each pair of buttons to prevent them from moving back and forth on the bracelet.
Continue to put on buttons of the desired length. You can use durable buttons with holes.
Tie a square knot when done.
Cut the ponytails so that they do not peek out from under the last button.
A drop of super glue will help secure this knot.
This is what the back of the finished bracelet, ionsam, looks like.

This blue bracelet is made from vintage buttons, but you can use all new ones or mix and match new ones with retro ones.
Experiment by adding beads.
Try making some bracelets for different wrist sizes!

Today we have a very simple master class. Ekaterina Batyreva showed how to make funny bracelets! To work, you will need buttons with four holes (in addition, you can also take one decorative button in the shape of a butterfly with a loop at the back), waxed cord, a couple of beads, scissors and superglue.
Sequencing
We select the material for the bracelet and determine their order. We take two identical pieces of waxed cord. Ekaterina made them about 3 wrist circumferences long for comfortable work. We thread both threads into the loop of the decorative button and spread them apart so that they cross inside the loop. Drop a drop of superglue into the loop on both sides and pull the threads until they are fixed.
While we are working with one half of the bracelet, I tied the other half so that the threads do not interfere. We thread the threads into two adjacent holes of the button, move one thread in its place and diagonally. Having not pulled the second one all the way through, drop a drop of superglue onto the crosshairs and quickly tighten it. The most important thing here is to firmly press the joint. We help ourselves with pliers, pressing on the gluing area with one part of them. But do not squeeze the button, as this can scratch it. We do the same with the following ones. With this fastening, the parts are securely fixed and do not move anywhere from their place.
Having finished one half, do the same for the second. Trying on the bracelet on your wrist. The length suits me considering that there will still be ties. We determine the length of the ties, thread both threads into the bead, tie the knots and cut off the excess part. Don't make it too short, otherwise it will be difficult to put on our jewelry yourself.
This is such a cheerful bright bracelet. Let's try on something new! At the same time, we’ll look at how you can put it on and take it off yourself with ties without outside help, maybe it will be useful to someone. You can safely experiment with the size and color of buttons. You can also place the buttons not end-to-end, but at intervals, as Katerina did in this blue bracelet. If desired, you can do it not with ties, but with a clasp. Such a funny bracelet will certainly make you smile and lift your spirits!
Making a bracelet from buttons
Before I was born, I loved making beaded bracelets in my free time. Now a mom of 3 small children, I don't get a ton of free time. When I do this, making bracelets is not on my to-do list. Taking a long hot shower, drinking a cup of coffee, going for a relaxing walk... these might be things I prefer to do. But I love creating, playing, learning and being in the kitchen with the kids. These things keep us busy and we have fun doing them. So I thought to myself, instead of using my free time to make bracelets, why not make bracelets with the kids. I chose a simple Button Bracelet for us to create. It was fun spending time with my kids and doing crafts. So glad they liked their button bracelets we made.
Supplies / what we used:
color line
colorful buttons
scissors

Start by cutting a piece of rope long enough to allow extra room on your child's wrist. I took one end and made a loop. I tied a knot at the bottom of the loop. Make the loop large enough for the button to go all the way through.

Now string the buttons you select onto a string. We had yellow and orange thread that we used.

Once you have your buttons selected, select another button. This button should correspond to the loop we have already made. Take the bracelet and make sure it fits well around your child's wrist before putting the button on. I had to leave a little string to make sure the snap bracelet fit. So I left a space on the bracelet and then tied or tied a snap on the end. I cut the free line.

Now children had simple and comfortable bracelets with buttons. They were so excited to help make them.