Creating crafts with your own hands is interesting not only for children, but also for adults. However, a sufficient number of models have been invented for adults, which differ in the complexity of execution and the time spent on their creation. Recently, adults and children have become interested in creating complex geometric shapes. This type of figure includes the icosahedron, which is a regular polygon and is one of the Platonic solids - regular polyhedra. This figure has 20 triangular faces (equilateral triangles), 30 edges and 12 vertices, which are the junction of 5 edges. Assembling a correct icosahedron from paper is quite difficult, but interesting. If you are passionate about origami, then making a paper icosahedron with your own hands will not be difficult for you. Make it from colored corrugated paper, foil, wrapping paper for flowers. Using a variety of materials, you can add even greater beauty and effectiveness to your icosahedron. Everything depends only on the imagination of its creator and the available material on the table.
 |
 |
 |
 |
 |
 |
We offer you several options for icosahedron developments, which can be printed, transferred to thick paper and cardboard, folded along the lines and glued.
How to make an icosahedron from paper: diagram
In order to assemble an icosahedron from a sheet of paper or cardboard, you must first prepare the following materials:
- icosahedron layout;
- PVA glue;
- scissors;
- ruler.


When creating an icosahedron, it is important to reverse Special attention on the process of bending all the parts: in order to bend the paper evenly, you can use a regular ruler.
It is noteworthy that the icosahedron can also be found in Everyday life. For example, in the form of a truncated icosahedron (a polyhedron consisting of 12 pentagons and 20 hexagons correct form) made a soccer ball. This is especially visible if you color the resulting icosahedron in black and white, like the ball itself.
You can make such a soccer ball yourself by first printing out a scan of a truncated icosahedron in 2 copies:

Creating an icosahedron with your own hands is an interesting process that requires thoughtfulness, patience and a lot of paper. However, the final result will please the eye for a long time. The icosahedron can be given to a child to play with if he has already reached the age of three. By playing with such a complex geometric figure, he will develop not only imaginative thinking and spatial skills, but also get acquainted with the world of geometry. If an adult decides to create an icosahedron on his own, then creative process How to construct an icosahedron will allow you to pass the time, and also show off to your loved ones your ability to create complex figures.
 Crafts with children. FOOTBALL BALL AND POLYHEDARS FROM COLORED PAPER.
Among my readers there are a lot of Kindergarten teachers and heads of Art clubs, in connection with this, I occasionally publish posts with crafts with children and for children.
By the way, I would like to recommend to all parents the very good children's studio "Teremok", which has existed for two years and has established itself as one of the best studios in educational work with children. "Teremok" will help your baby find mutual language in communication with peers, develop respect for elders, entertain by organizing holidays and competitions and much, much more. It is very necessary for children, from the very early age, instill a love of creativity. This develops their curiosity, broadens their horizons, and instills a love of work. The studio has a very good art group in different types and genres of fine art. You can find out more about the studio on the website - http://teremok64.ru.
And now, p I suggest you keep the children busy and make polyhedra out of colored paper with them. This will not only captivate them, they will gain first knowledge in mathematics. Below, under the cut, are five templates for some polygons that need to be printed and enlarged. Everything is very easy and simple, cut, bend and glue. Very beautiful garland, bright, cheerful and sunny)
You can make a model of a soccer ball. To do this, it is advisable to take thicker paper.
Attached is a life-size ball template consisting of eight pages.
The attachment:


DODECAHEDRON 
ICOSAHEDRON 
OCTAHEDRON 
TETRAHEDRON 
Cut out the templates and bend along the dotted lines


VOILA. You can collect them on a string and make a mathematical garland)
Here are a few schemes according to which you can make volumetric geometric figures.
The simplest one is tetrahedron.

It will be a little more difficult to make octahedron.

But this three-dimensional figure - dodecahedron.

Another one - icosahedron.

More details about making three-dimensional figures can be found here.
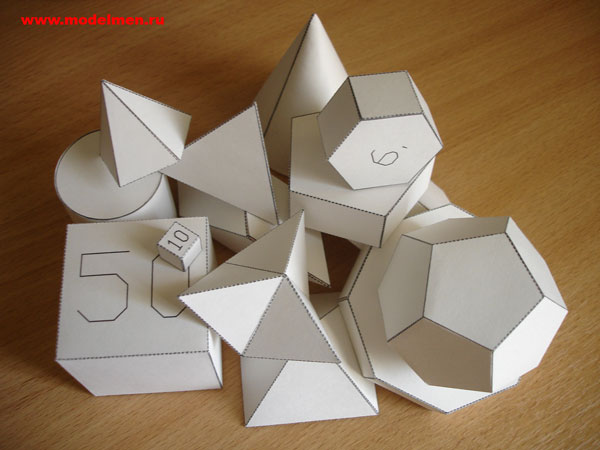
This is what three-dimensional figures look like when not assembled:

And this is what the finished ones look like:

You can make a lot out of three-dimensional geometric shapes original crafts, including gift packaging.

So that children can better remember what geometric shapes there are and know what they are called, you can make them out of thick paper or cardboard volumetric geometric shapes. By the way, you can use them to make beautiful gift wrapping.
- thick paper or cardboard (preferably colored);
- ruler;
- pencil;
- scissors;
- glue (preferably PVA).
The most difficult thing is to develop and draw developments; you need at least basic knowledge of drawing. You can take ready-made scans and print them on a printer.
To keep the fold line straight and sharp, you can use a blunt needle and a metal ruler. When drawing a line, the needle must be bent strongly in the direction of movement, almost laying it on its side.
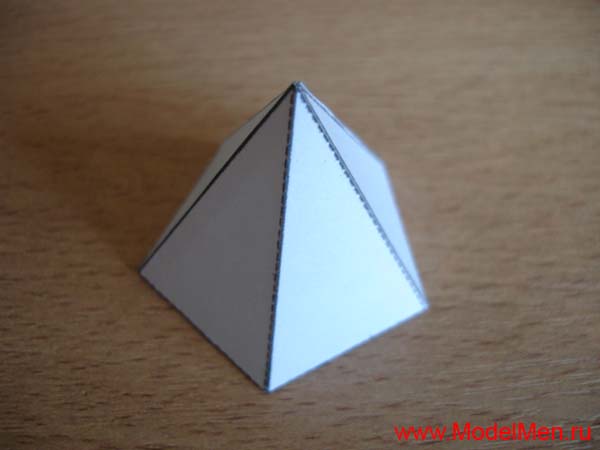
This is a development of a trihedral pyramid

This is a cube scan

This is the development of an octahedron (tetrahedral pyramid)

This is the development of a dodecahedron

This is the development of an icosahedron

Here you can find templates for more complex figures (Platonic Solids, Archimedean Solids, polyhedra, polyhedra, different types pyramids and prisms, simple and oblique paper models).
By making three-dimensional figures from paper yourself, you can not only use them for entertainment, but also for learning.
For example, you can clearly show your child what a particular figure looks like and let him hold it in his hands.
Or you can print out diagrams with special symbols for training purposes.
So I suggest you familiarize yourself with this topic below dodecahedron, both simple and with small drawings, which will only attract the baby’s attention and make learning more fun and entertaining.


Also the diagram Cuba Can be used to teach numbers.


Scheme pyramids can help you understand the formulas that apply to a given figure.


In addition, I suggest that you familiarize yourself with the diagram octahedron.


Scheme tetrahedron Among other things, it will help you learn colors.


As you understand, the above templates must be printed, cut out, bent along the lines, and glued along special narrow strips adjacent to selected sides.
Before you start making three-dimensional geometric figures, you need to imagine (or know what it looks like) the figure in 3D dimension: how many faces does this or that figure have.
First you need to correctly draw a figure on paper along the edges that must be connected to each other. Each shape has edges that have a specific shape: square, triangle, rectangle, rhombus, hexagon, circle, etc.
It is very important that the length of the edges of the figure that will be connected to each other are the same length, so that no problems arise during the connection. If the figure consists of identical faces, I would suggest making a template while drawing and using this template. You can also download from the Internet ready-made templates, print them, bend them along the lines and connect (glue them together).
Pyramid - development. Pyramid development for gluing. Paper scans
Rectangle, square, triangle, trapezoid and others are geometric figures from the section of exact science. A pyramid is a polyhedron. The base of this figure is a polygon, and the side faces are triangles with a common vertex, or trapezoids. To fully represent and study any geometric object, mock-ups are made. They use a wide variety of materials from which the pyramid is made. The surface of a polyhedral figure, unfolded on a plane, is called its development. The method of converting flat objects into three-dimensional polyhedra and certain knowledge of geometry will help you create a layout. It is not easy to make developments from paper or cardboard. You will need the ability to make drawings to specified dimensions.
Materials and accessories

Modeling and executing multifaceted volumetric geometric shapes is an interesting and exciting process. From paper you can make a large number of all kinds of layouts. To work you will need:
Defining parameters
First of all, let's determine what the pyramid will be like. The development of this figure is the basis for the manufacture volumetric figure. Completing the work will require extreme precision. If the drawing is incorrect, it will be impossible to assemble a geometric figure. Let's say you need to make a model of a regular triangular pyramid.
Any geometric body has certain properties. This figure has a regular polygon as its base, and its vertex is projected into its center. An equilateral triangle was chosen as the base. This condition determines the name. The side edges of the pyramid are triangles, the number of which depends on the polyhedron chosen for the base. In this case there will be three of them. It is also important to know the dimensions of all the components that will make up the pyramid. Paper developments are made in accordance with all the data of the geometric figure. The parameters of the future model are agreed upon in advance. The choice of material used depends on these data.
How is a regular pyramid unfolded?
The basis of the model is a sheet of paper or cardboard. Work begins with a drawing of the pyramid. The figure is presented in expanded form. A flat image on paper corresponds to pre-selected dimensions and parameters. A regular pyramid has a regular polygon as its base and its height passes through its center. Let's start by making a simple model. In this case, it is a triangular pyramid. Determine the dimensions of the selected figure.

Layout assembly
Using scissors, cut out the completed design along the contour. Carefully bend the development along all the lines. We tuck the trapezoid valves inside the figure so that its edges close together. We lubricate them with glue. After thirty minutes the glue will dry. The three-dimensional figure is ready.
Development of a quadrangular pyramid
First, let’s imagine what the geometric figure looks like, the model of which we will make. The base of the selected pyramid is a quadrangle. The side ribs are triangles. For work we use the same materials and devices as in previous version. We draw the drawing on paper with a pencil. In the center of the sheet we draw a quadrilateral with the selected parameters.

We divide each side of the base in half. We draw a perpendicular, which will be the height of the triangular face. Using a compass solution equal to the length of the side face of the pyramid, we make notches on the perpendiculars, placing its leg at the top of the base. We connect both corners of one side of the base to the resulting point on the perpendicular. As a result, we get a square in the center of the drawing, on the edges of which triangles are drawn. To fix the model on the side faces, add auxiliary valves. For reliable fastening, a strip of centimeter width is enough. The pyramid is ready for assembly.
The final stage of the layout
We cut out the resulting pattern of the figure along the contour. We bend the paper along the drawn lines. The three-dimensional figure is assembled by gluing. Lubricate the provided valves with glue and fix the resulting model.

Volumetric layouts of complex figures
After completing a simple polyhedron model, you can move on to more complex geometric shapes. Unfolding a truncated pyramid is much more difficult to perform. Its bases are similar polyhedra. The side faces are trapezoids. The sequence of work will be the same as that in which a simple pyramid was made. The sweep will be more cumbersome. To complete the drawing, use a pencil, compass and ruler.
Construction of a drawing
The development of a truncated pyramid is performed in several stages. The side face of a truncated pyramid is a trapezoid, and the bases are similar polyhedra. Let's say these are squares. On a sheet of paper we draw a trapezoid with the given dimensions. We extend the sides of the resulting figure until they intersect. The result is an isosceles triangle. We measure its side with a compass. On a separate sheet of paper we construct a circle, the radius of which will be the measured distance.

The next stage is the construction of the side ribs that the truncated pyramid has. The sweep is performed inside the drawn circle. Using a compass, measure the lower base of the trapezoid. On the circle we mark five points that connect the lines to its center. We get four isosceles triangles. Using a compass, measure the side of the trapezoid drawn on a separate sheet. We put this distance on each side of the drawn triangles. We connect the resulting points. The side faces of the trapezoid are ready. All that remains is to draw the upper and lower bases of the pyramid. In this case, these are similar polyhedra - squares. We add squares to the upper and lower bases of the first trapezoid. The drawing shows all the parts that the pyramid has. The scan is almost ready. All that remains is to finish drawing the connecting valves on the sides of the smaller square and one of the faces of the trapezoids.
Completing the Simulation
Before gluing the three-dimensional figure, the drawing along the contour is cut out with scissors. Next, the development is carefully bent along the drawn lines. We tuck the mounting valves inside the model. We lubricate them with glue and press them to the edges of the pyramid. Let the models dry.

Making different models of polyhedra
Making three-dimensional models of geometric shapes is a fun activity. To master it thoroughly, you should start by performing the simplest sweeps. Gradually moving from simple crafts With more complex models, you can begin to create the most intricate designs.
Development of geometric shapes
Large selection of developments of simple geometric shapes.

Children's first introduction to paper modeling always begins with simple geometric shapes such as cubes and pyramids. Not many people succeed in gluing a cube together the first time; sometimes it takes several days to make a truly even and flawless cube. More complex figures, a cylinder and a cone, require several times more effort than a simple cube. If you don’t know how to carefully glue geometric shapes, then it’s too early for you to take on complex models. Do it yourself and teach your children how to do these “basics” of modeling using ready-made patterns.
To begin with, I, of course, suggest learning how to glue a regular cube. The developments are made for two cubes, large and small. A small cube is a more complex figure because it is more difficult to glue than a large one.

So, let's begin! Download the developments of all the figures on five sheets and print them on thick paper. Before printing and gluing geometric shapes, be sure to read the article on how to choose paper and how to properly cut, bend and glue paper.
For better quality printing, I advise you to use the AutoCAD program, and I give you the layouts for this program, and also read how to print from AutoCAD. Cut out the development of the cubes from the first sheet, be sure to draw a compass needle under the iron ruler along the fold lines so that the paper bends well. Now you can start gluing the cubes.

To save paper and just in case, I made several unfolds of a small cube, you never want to glue more than one cube together or something won’t work out the first time. Another simple figure is a pyramid, its development can be found on the second sheet. The ancient Egyptians built similar pyramids, although not made of paper and not so small :)

And this is also a pyramid, but unlike the previous one, it has not four, but three sides.

Development of a trihedral pyramid on the first sheet for printing.

And another funny pyramid of five sides, its development on the 4th sheet in the form of an asterisk in two copies.

A more complex figure is a pentahedron, although a pentahedron is more difficult to draw than to glue.
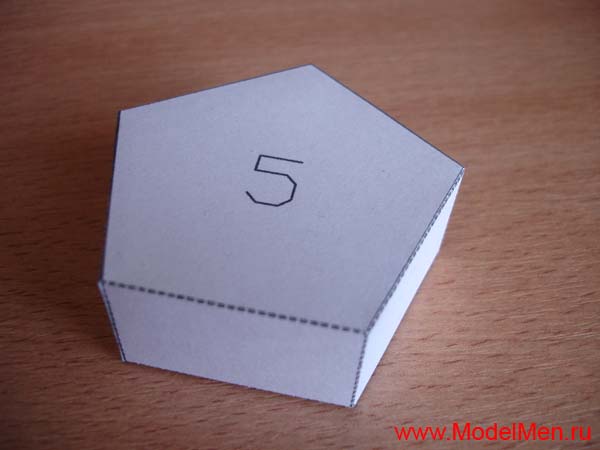
Development of a pentahedron on the second sheet.

Now we get to complex figures. Now you have to work harder, gluing such shapes together is not easy! To begin with, an ordinary cylinder, its development on the second sheet.

And this is a more complex figure compared to a cylinder, because at its base is not a circle, but an oval.

The development of this figure is on the second sheet; two spare parts were made for the oval base.

To accurately assemble the cylinder, its parts need to be glued end-to-end. On one side, the bottom can be glued without problems, just place the pre-glued tube on the table, place a circle on the bottom and fill it with glue from the inside. Make sure that the diameter of the pipe and the round bottom fit tightly together, without gaps, otherwise the glue will leak and everything will stick to the table. It will be more difficult to glue the second circle, so glue auxiliary rectangles inside at a distance of paper thickness from the edge of the pipe. These rectangles will prevent the base from falling inward, now you can easily glue the circle on top.

A cylinder with an oval base can be glued in the same way as a regular cylinder, but it has a smaller height, so it’s easier to insert a paper accordion inside, and put a second base on top and glue it along the edge with glue.

Now a very complex figure - a cone. Its details are on the third sheet, a spare circle for the bottom is on the 4th sheet. The whole difficulty of gluing a cone is in its sharp top, and then it will be very difficult to glue the bottom.

A complex and at the same time simple figure is a ball. The ball consists of 12 pentahedrons, the development of the ball on the 4th sheet. First, two halves of the ball are glued, and then both are glued together.

Quite an interesting figure - a rhombus, its details are on the third sheet.

And now two very similar, but completely different figures, their difference is only in the base.

When you glue these two figures together, you won’t immediately understand what they are, they turned out to be completely unresponsive.

Another interesting figure is a torus, but we have it very simplified, its details are on the 5th sheet.

And finally, the last figure of equilateral triangles, I don’t even know what to call it, but the figure looks like a star. The development of this figure is on the fifth sheet.

That's all for today! I wish you success in this difficult work!
COMMENTS
We were asked about geometry: tetrahedron, cube, octahedron, dodecahedron, icosahedron. I made a tetrahedron, a cube and a dodecahedron, but I didn’t make the remaining two (((
Still having difficulties with gluing...
Thank you, I don’t know what I would have done if it weren’t for this site =)
Thank you very much!)))) helped a lot!
I wouldn’t have been able to do it anyway, it was useful to read it.
help, how to make a net of a quadrangular pyramid with a rhombus base
How to make a development of a torus (that is, a ring, or rather, its surface)?
The question was asked for a practical purpose, I want to cover the steering wheel of my car with leather myself, but for this I need to draw a pattern, and this is where the difficulty arose - I don’t have enough imagination to draw all this, because the surface of a torus is the so-called. non-developable surface (or rather, conditionally developable).
People, help with advice or links, please!
I would advise you to go to the store and see how similar covers for a car steering wheel are sewn. In general, leather is a specific material, you can do almost anything with it, you can’t do this with paper, so it’s difficult to advise cutting here, it’s better to see how it’s already been done and think at home how to make your own.
how to make a truncated pyramid
Thanks for the information, but not all the figures are depicted. We went to 9th grade, but not in RUSSIA. Help is needed. Best regards, Tamara.
Maybe a stupid question, but how to make a ball out of paper? those. not just a circle, but volumetric ball? Is there such a development in nature at all?
The development of a paper ball consists of slices, strips of paper tapering at the edges. The pattern of the ball is similar to the pattern of stripes on a watermelon.
Dmitry, I also remember this from my school geography course :)
But how to make an electronic ball from atlas in electronic form, so that you can then print it and stick it on?
Why are the parameters not specified? Length, width, etc.?
how to make a cylinder out of paper please help
Thank you so much.
Models of polyhedra have already been published here (http://master.forblabla.com/blog/45755567715/Mnogogranniki), but I would like to add my own. The link is the same, to wenninger.narod.ru. First I got a book, then, when I connected to the Internet, I even wrote a letter to the author and received an answer, then the book and the letter were lost, but I found the site and continued making models.
If you're interested, I can photograph each one separately.
Alexander
Well, at the request of the workers, I am posting photos of all the polyhedra. I don’t really remember the names, I classify them by polyhedral angle. The book (Wenninger. Models of polyhedra) contains both polyhedra and their star forms. Platonic solids are 5 convex regular polyhedra. They have the same type of faces (regular triangles, squares and pentagons) and all polyhedral angles are the same. Archimedes added 13 more convex semi-regular polyhedra (the faces are different polygons, but all the angles are still the same). But if we take not convex polygons (the book uses triangles, squares, pentagons, octagons and decagons), but their star forms (pentagonal, octagonal and decagonal stars), then we get a lot of new polyhedra. In addition, the faces can also be connected in the form of stars, so non-convex polyhedra can consist of both star polygons and convex ones.
Finally, just as the continuation of lines turns a convex polygon into a star-shaped one, so the continuation of edges forms star-shaped shapes. True, only 4 regular polyhedra of this type are known (all three stellated forms of the dodecahedron and one stellated form of the icosahedron), others either have faces that are irregular polygons, or the polyhedron breaks up into several separate polyhedra.
Particular beauty is provided by forms in which the edges are visible on both sides, as well as those containing holes, plus those whose parts only touch each other at their vertices.
Of course, polyhedra have their own mathematics, but more on that later.
The photos are accompanied by models of polyhedral angles. This is the base of the pyramid, which will be obtained if a piece is cut from the top of the polyhedron, like from a cake. 3, 4, 5, 6, 8 and 10 denote convex polygons, 5/2, 8/3 and 10/3 - pentagonal, octagonal and decagonal star (the sequence of vertices makes 2, 3 and 3 revolutions around the center, respectively).
Go. First the triangles. (in parentheses are model numbers from the book).
An infinite family of prisms.
 Triangular prism.
 Quadrilateral prism, hexahedron, cube (3).
 Pentagonal prism and its star shape.
 Hexagonal prism.
 Tetrahedron (1).
 Dodecahedron (5) and its three stellated forms, which are regular polyhedra: small stellated dodecahedron (20), great dodecahedron (21) and great stellated dodecahedron (22):

 Truncated tetrahedron (6).
 Truncated octahedron (7).
 Truncated hexahedron (cube) (8).
 Truncated icosahedron (9). This is how soccer balls used to be sewn.
 Truncated dodecahedron (10).
 Rhombic truncated cuboctahedron (15).
 Rhombic truncated icosidodecahedron (16).
 Quasi-truncated hexahedron (92).
 Quasi-truncated cuboctahedron (93).
 A large quasi-truncated icosidodecahedron (it was. Alas, it was fragile from the inside and one day it broke). (108)
Let's move on to polyhedra with 4 faces meeting at a corner.
First, the vertex figure is in the form of a square.
An infinite family of antiprisms.
 Triangular antiprism, octahedron (2), and its stellate shape - stellated octahedron (19).
 A square antiprism and its two star shapes.
 Cuboctahedron (11) and its stellate forms (43 - 46).
 The icosidodecahedron (12) and its stellations (47, 63, 64), and there are a lot of them in the book.
 Rhombicuboctahedron (13) and its stellate shape.
 But this polyhedron (pseudo-rhombocubooctahedron) caused a lot of noise, because... it was published only 2000 years after Archimedes (at the turn of the 50-60s of the 20th century). In fact, it has a defect: when I said that semiregular polyhedra have the same angles (vertex model), you can notice that the order of traversing the faces of neighboring vertices is always mirrored, for example, if one vertex has faces in the order of 3- 4-4-4 clockwise, then the neighboring vertex has the same order, but counterclockwise. So, the pseudorhombocubooctahedron has pairs of vertices that do not have mirror symmetry.
 Rhombicosidodecahedron (14).
 Small icosoicosidodecahedron (71).

 Dodecododecahedron (73).
 Rhombododecahedron (76).
 Great icosidodecahedron (94).

 Great dodecoicosidodecahedron (99).
Now polyhedra, which also have 4 faces meeting at one vertex, but the order is criss-cross:
 Tetrahemihexahedron (67).
 Octahemioctahedron (68).
 Small cubocuboctahedron (69).


