I would like to remind you of the wonderful MK "Rats and Taxi" by Tatyana Lisko
http://www.liveinternet.ru/users/strekasa/post254513494/
and offer your own version of a dog. Unlike Tatyana, I knit the dog from the bottom up, change the shape of the muzzle and tail, and make different front legs (handles).
To work you will need:
- yarn yellow color(2018 is the year of the yellow earthen dog),
- filler,
- hook,
- scissors,
- needles (with a large eye and regular),
- thread for sewing on eyes,
- beads for the eyes.
- a thin tube for stuffing the legs and tail (I used an old ballpoint pen),
- some black wool and a needle for felting a nose (but you can embroider, glue or knit a nose).
I knitted the dogs from Alize Cotton Gold cotton yarn (100 g/330 m) and acrylic yarn "Pekhorka children's bulk" (50 g/200 m). The height of the toy is approximately 8-9 cm.
Legend:
VP - air loop
СС - connecting post
RLS - single crochet
UB - (decrease) knit 2 sc together
PR - (increase) knit 2 sc in one loop
* - repeat the specified number of times
The number in brackets shows how many total loops there should be in this row.

PENS
If you only have one skein of yellow thread, we start by knitting the handles (they will then need to be inserted into the semi-knitted body).
We leave long end threads (40-50 cm). We knit a chain 3 VP.
Insert the hook into the second loop from the hook and knit a connecting post.


We knit the second SS on the third loop from the hook (the first knitting loop). The result is the first finger.

We collect 2 air loops.

Insert the hook into the second loop from the hook and knit a SS. Then insert the hook under two loops (indicated in the photo by arrows) - the outermost loop of the first finger and the initial knitting loop.

We knit SS. It turned out to be a second finger.

Again we cast on 2 air loops, in the second from the hook we knit a SS. Then insert the hook under 3 loops (indicated in the photo by arrows) - the outer loop of the second finger, the outer loop of the first finger and the initial knitting loop.

We knit SS. The result is a third finger.
Now we knit a handle (cord). Yarn over with the remaining long end of the thread, hook the main thread and knit two loops together, yarn over again, etc. We make a yarn over from the bottom up from ourselves.

We knit approximately 25-27 loops (so that this cord can later be tied in a knot). We fasten the thread. We trim the ends, leaving 7-8 cm, so that it is convenient to hook them when we insert the handles.

LEGS
1st row: 6 sc in “amigurumi ring”, knit in circles
2nd row: (PR, 2 RLS)*2 (8);
3rd row: 8 RLS;
4th row: (PR, 3 RLS,)*2 (10);
5th row: 10 RLS.
At the first leg we cut and stretch the thread, fasten it.
We do not cut the thread on the second leg. We cast on 5 VP, insert the hook into the first leg in the place where we secured the thread, make a sc, connecting the leg and a chain of chain loops, and continue to knit with single crochets around the first leg (10 sc in total).

Then we knit along the jumper from air loops, picking up the loops at the top edge (5 sc).

We move to the second leg and tie it (10 RLS).

Again we knit along the jumper (5 sc). Make sure that there are no holes between the posts at the junction of the legs and the VP. If there is a hole left, it is better to knit an extra stitch into it.

TORSO
Continuing to knit in the round, we make increases on the sides of the body. We knit 5 sc around the leg, increase, and then in a circle to the other side, there we also increase. In principle, you don’t have to count the columns, but determine the places of increase “by eye” so that they are more or less symmetrical. I knit 2 rows with increases (4 increases in total - 2 on each side), but 3-4 rows of increases are possible (the dog will be thicker).

Then we knit straight without increments 8-9 rows. After knitting several rows, we stuff the legs. We stuff it tightly so that the dog can stand. It is convenient to use some thin tube to stuff the legs. I compact the filler with an old ballpoint pen.
In order not to get lost, I mark with a piece of thread the side from which I begin to make decreases.

We make decreases from the sides in every second row. When decreasing, we knit two stitches together, grabbing only the front walls of the loops (the decreases will be less noticeable).

After making 2-3 decreases, insert the handles. We bring the hook out between the posts, pull the ends of the threads inward, and then pull them with your hand so that the cord goes into the hole.

Checking the symmetry of the handles.

We tie the cord inside with a knot.

Before tightening the knots too much, we again check whether the handles are the same in length and symmetrical. If necessary, turn the handle in the hole (after stuffing, it will be almost impossible to correct the incorrect position).

We continue to knit with decreases in every second row until 24 stitches remain around the circumference of the neckline. We stuff the torso.

Then we decrease 6 times in each row:
(2 RLS, UB)*6 = 18
(1 RLS, UB)*6 = 12
UB*6 = 6

When there are 6 loops left, we cut and fasten the thread, and sew up the hole: we pass the needle through the outer edge of all six loops and tighten it.

If these loops at the top stick out too much, perhaps you should leave not 6, but 7-8 loops when decreasing. We fasten and hide the end of the thread.

EARS
1st row: 4 RLS, VP;
2-7 rows: 3 RLS, VP;
Row 8: Knit 3 sc together
I tie my ears directly to my head. Leave the long end of the thread for tying the edge (at least 50-60 cm). On the dog’s head, under the third row from the middle of the crown, we select 4 spaces between the posts into which we will tie the ears. Choose spacing so that the ears are symmetrical. Insert the hook from bottom to top into the right gap and knit a single crochet.

Then we knit a sc in the next gap, etc. We knit a total of 4 sc.

Good afternoon friends!
Preparations for the New Year have already begun and many needlewomen, observing tradition, knit, sew, and craft from different materials little animals are symbols of each year.
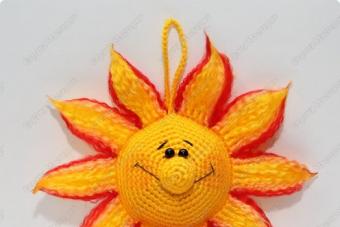
All kinds crocheted dogs - the symbol of 2018 - are now very common. I’m not a fan of knitting toys, and I don’t have time for it, but this funny crochet New Year’s dog in the shape of a ball for a Christmas tree especially caught my attention. It is very easy to make and I decided to knit it to tell you. I drew diagrams, made a description and a master class.
New Year's Dog Crochet Ball: master class
Tie this little one New Year's dog Crocheting is so easy that even a novice needlewoman can do it.
It is a ball on which knitted paws, ears, tail, nose and eyes are attached.
For knitting, I used light orange “Peony” threads from Fixprice, which I found at home, some white and black Iris threads, hook number 1.5.
I specifically purchased the eyes at a craft store.
Crochet a ball - a dog
First of all, we will knit the body of the dog - a small ball using single crochets.
We start knitting with white yarn.
I cast on 2 chain loops and knitted 6 single crochets in the first row; at the beginning of knitting, insert the hook into the second loop.
Having knitted 5 rows, we will already have a dog’s belly.

In the sixth row, we change the thread to a colored one and continue to knit all the other rows with it.
By the ninth row you should have a circle of 48 stitches.


And from the 15th row we make decreases (we knit two columns together) in the reverse order in relation to the rows with increases: i.e. after 6, then after 5, 4, 3, 2, 1 column.

Knit tightly so that there are no gaps or holes.
By the end of knitting, you need to fill the resulting ball with holofiber. Stuff more material, the ball should be dense.

When the ball is ready, tighten the last loops, cut the thread and hide its tip.


Dog ears
In the middle part of the ear we will tie a strip with white threads and tie it with colored ones.
It is better to use a darker yarn, but I didn’t have any other one, so I knitted all the details in one color.

We collect a chain of 10 VPs.
1st row: 9 sc with white threads.
2nd row: attach colored thread, 1 VP, 3СБН, 1 half double crochet (do a double crochet, pull out the thread and knit all three loops on the hook at once), 3С1Н, 5С1Н in the outer loop of the chain and in reverse order on the other side of the chain – 3С1Н, 1 half double crochet, 4СБН .

Paws
We crochet the paws of our New Year's dog using 10 chain stitches.
1st finger: 2 sc.
2nd finger: continue knitting from the first finger - 2VP, then knit 1SC on them, inserting the hook under the second chain loop, 1SC, inserting the hook into the base of the second column of the first finger.
We knit the 3rd finger from the second: again 2VP, 1SC in the 2nd VP, 1SC at the base of the first finger.

I drew a knitting direction on the diagram with a pencil and circled the junction of the fingers.
When the fingers are tied, we continue to tie the chain with single crochets.

Tail
The dog's tail is a straight strip of 10 VPs and single crochets along it.


Spout
I knitted the nose with black iris like a small circle: three rows with an increase in the number of loops and another row without increases.

Assembling parts of a dog toy

- We unfold the ball so that the white belly is not in the center, but at the bottom.
- Choosing a place for the spout.
We crumple the circle of the nose with our fingers on three sides so that it takes the shape of a triangle.
We pin the nose to the ball, sew it with a needle and thread, tighten the sides of the nose (tighten the “nostrils”).
I was also supposed to sew a bead on the nose, but I didn’t have anything suitable at home, and I didn’t buy a whole bag just for one.
- We mark the places for the ears and sew them on.
- We sew the front legs on the sides in the central part of the ball at ear level.
- Sew the tail on the back.
- I glued the eyes with “moment” glue, I took ready-made ones for toys, but you can cut out and glue pieces of felt, and on them the pupils are half-beads.
No matter how hard I turn my eyes, the dog still looks sad. Only if you put her on her back, she starts to play around and roll her eyes.
This is such a cool, funny little New Year's dog I came up with a crocheted ball.

A universal selection of gift ideas for any occasion and occasion. Surprise your friends and loved ones! ;)
Good day, dear friends! New Year 2018 is coming very soon. This means that it’s time to prepare in full for the upcoming event, for example, prepare homemade gifts. Do-it-yourself dog - what could be better as a souvenir for an upcoming event?
Now many have already begun to prepare for the holiday, which I strongly advise you to do too. In this article you will find many representatives of the canine world of various breeds and from a variety of materials.
This post is so detailed that I will be very surprised if you don't find what you are looking for. This year will be special for me, since I was born exactly two eastern calendar cycles ago, also in the year of the dog. So I’ll try not to lose face and collect as much as possible more ideas. There will be warm and soft toys, pillows, crafts, even elements of home comfort.
Do-it-yourself dog: symbol of the New Year 2018 with photos and master classes
To make a dog yourself, you don’t need any special skills or hard-to-find materials. Almost everything is clear from the master classes, and sometimes even from the photos themselves. The main thing is to be patient and do something really practical.
By the way, a dog can be given not only for the New Year. After all, this creature is the personification of loyalty and devotion, so by presenting it, you seem to want to strengthen the connection with the person to whom you decided to give such a surprise.
Dog costume
To create a dog costume, it is not necessary to sew a full-fledged outfit for going out. It is enough for him to acquire, for example, a cool mask of this furry creature. It can be printed on a color printer or used as a template for cutting out felt.

If you want to make the image complete, then I advise you to take a closer look at the following simple ideas for the holiday. What and how can you make a cute New Year’s costume for a child and more?
Look at the girl: she is wearing a fluffy tutu skirt, which is complemented by an openwork top, striped tights and a headband with textile ears. Two cute ponytails will help complete the look. A small nose is drawn on the nose.
It’s easy to make a tutu skirt yourself, for this you will need a large number of translucent fabric, which will need to be folded in several layers and gathered at the top with an elastic band.

For a boy, you can adapt a fluffy suit from pajamas (for example, a Japanese onesie) or sew it like one. For such an outfit, only approximate body parameters (height of the child and waist circumference) are useful, so even a not very experienced seamstress can handle the creation.

Do you want to do it easier? Make a cap with ears, the creation process of which is described below. Take fur, fleece or velor for her. Velsoft is also suitable if you can handle it (it stretches quite strongly).

Other options for hats can be seen in the following pictures. For example, this hat could be a good alternative previous version. You will need fleece with long pile.
In the future, such a hat can be worn outdoors as the main headdress. In this case, it will be enough to match such a hat with a T-shirt and pants (skirt) in the color of the dog. The image will be almost complete.

Another headdress is sewn using the same patterns, but the muzzle here is completely different, as well as the ears. Fleece here can be taken with much shorter pile.

How about a flirty dog hat? Choose a cartoon character and make a catchy addition to your look.
Progress:
- Cut out a circle base from thick cardboard.
- Cut a circle of fabric, one and a half to two times the diameter of the base, and tighten it using a “forward needle” seam along the edge. Place a solid base inside.
- Using a similar principle, make the top of the cylinder.
- Side part: Cut a long strip of thick cardboard and cover it with fabric so that the edges do not stick out. Join at the back using a blind stitch.
- Sew or glue the top of the hat to the side so that the side fits tightly to the top and forms a cylinder. Attach the design to the bottom base and decorate the hat.
You can attach this to your hair using hairpins or a headband.

You can also sew ears on the headband; for this you will need the headband itself and ear patterns. The first option is more complicated; it implies that the inner part will be slightly smaller than the outer part. To create it, it is best to use fur or fleece.
 But the ears are simpler.
To look real, take regular gloves in the color you want and some felt. Cut out the details of future paws from felt and attach them with a thin layer of glue or thread. You can make these gloves in literally 10-20 minutes!

Crafts from scrap materials and more
We got the costume, but what about the Earthen Yellow Dog crafts? We will make them the most different ways. Paper cards and souvenirs, even matchboxes - all this will be used and will delight you with its unusual appearance.
Paper fantasies: postcards and origami
You can make cards and original origami from cardboard and paper. For example, what do you think of this cartoon dog? You can print it out and trace it around to make your own original postcard. Congratulations can be written on the card itself, or the text part can be attached inside as a separate layer.

The second option with a simpler form looks no less original. And if you try, you can also make such a dog with a surprise: if you pull the tongue, the ears will open.


Try transferring this dog to felt. This way it will last much longer than the paper version and can be used even after the New Year.

The next dog can be used as a bookmark, which will certainly come in handy around the house. Make it from a regular square of paper.
FROM such paper dogs you can create a New Year's tree garland that will remind you of the symbol of the year.

Here's how you can fold napkins onto festive table. This form is quite stable, but at the same time it does not take much time to assemble. Fans of Scottish Terriers will especially appreciate it.

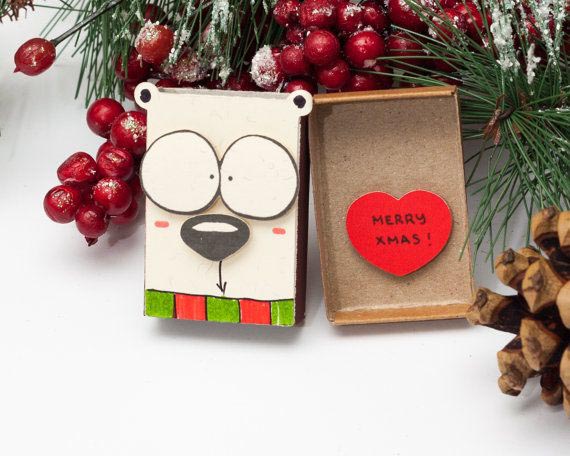
The last one in this series is a very cute and inventive dog: it is made from matchbox, and a heartfelt message was left inside. A series of such boxes will make all your family and friends happier. If you cover the boxes special varnish for paper, then even snow and rain will not be a threat to such a gift (although you still shouldn’t wash it).
Wooden doggies
Warm material that is perfect for celebrating the upcoming New Year. Make a key holder or some sort of hanger for dog things out of plywood. Woodworking skills, templates for carving a dog and acrylic paints with specialized wood varnish.

As children, many of us made toys from plywood. This hobby can be turned into something more by making a full-fledged home sculpture.

And here it is completely children's way prepare for the holiday: a dog with movable legs, which can be made from cardboard or plywood.

New Year's toys
In fact, you can hang almost anything on a Christmas tree. For example, I decorate a green tree with small soft toys- purchased and made by myself. Try sewing the dogs you see below. You can literally take them from a photo and get ready-made patterns.

A great way to surprise your friends and family is to paint your own Christmas tree balls. To do this, buy plain round balls and acrylic paints.

We use polymer clay and plasticine
Many children really like to create figures from plasticine, dough or polymer clay (by the way, using the presented mk you can make both). But this develops fine motor skills and in many ways has a very positive effect on the child’s psyche. Therefore, when preparing for the New Year, let’s take this important factor into account and create several cute dogs.
The production of such figurines is generally the same, but has some differences. If you're good at sculpting techniques, you can jump right into something like the dog below.

If you still consider yourself a beginner, then start with simpler forms, which can be repeated right after the photo, as in the picture below. It turned out to be a very cute pitbull)

The pug is also not inferior to its brother. Thanks to its simplest form, even very young children can do it.

With the next three step-by-step master classes you will create several dogs of completely different breeds. All of them can be done with children.
The souvenir can be either close to real-life dogs or have the appearance of a cartoon character (in the second case, this may turn out to be even more interesting).


How to sew a dog from fabric: patterns like this
Sewn dogs will be popular not only on the eve of New Year's holidays, but also in the future.
Stuffed Toys
A fabric dog can be sewn in a variety of ways. How do you like the doggie below? He rather resembles a hyena, but due to his similarity with the desired character, he looks very attractive.

You'll definitely love the avant-garde patterned characters you can see below. They have very large heads and small bodies, making these dogs look childishly clumsy and naive. The effect is achieved using a very wide insert in the head and rather modest side parts.

The classic dog in the next version is made from faux fur and stands on 4 legs, unlike most of the previously mentioned dogs. For the New Year, she can sew a Christmas red cap and scarf.

Our selection even includes designer dolls and toys with designer patterns. Just look at this adorable basset hound! The author (Alice Shangina) even came up with a description for it: “The world is beautiful, like a basset.” The dog's nose is felted from dry wool, but it can also be cut out separately by highlighting the corresponding part on the muzzle pattern.

If you love the Dalmatians, then you will definitely like the following idea for a New Year's surprise. The patterns are of a fairly high level, but the result is simply gorgeous. Stock up on white fleece, white and black thread and beads for the eyes. Don't forget the black marker.
Sew a dog like this better with your hands, because you just have to be a virtuoso sewing machine, in order to thoroughly grind the parts of such a dog.


A tilde dog can be made using the following patterns. For it, take a thin cotton fabric. A dress, trousers, whatever you want will suit your character.

A square-headed dog can be made even without ready-made patterns(create them yourself) if you look closely at its structure.

If you have several pieces of leather in stock, then create a small dog from them.

Let's use socks
The good thing about socks is that there is a huge selection of colors even in small stores (unlike the same fabrics). So feel free to go to the store for a new pair of socks and create adorable babies.
Both options New Year's dogs sewn according to the same principle, but the result comes out completely different. The first dog is very bright and cheerful, while the second one is restrained and laconic; it can be given to even a serious man.


What can be done from nylon tights! A couple of pugs for inspiration from Lyudmila Tkachenko. They are made by tightening and further painting.


We create from felt
Pugs are incredibly charming representatives of the canine kingdom. To make such a dog, you will need several colors of thick felt and thread to match the color of the fabric. Then this symbol of the year can be turned not only into a keychain, but also into a brooch, magnet, or simply left as a soft souvenir. Please note: the clothes are sewn on top of the finished body.


The Scotch Terrier breed inspires designers and creators to create the most various crafts with him. Below it is proposed to make a puppy and an adult version of this wonderful dog.

Continuing the series of flat felt toys, it is impossible to pass by this dog. It is sewn a little more complicated than the previous options.

Well, how can you get past this charming boule? Try to do it too.

A refrigerator magnet with a Chihuahua can also be made from felt. You don't need threads here - just stock up on transparent glue and scissors.

Pillows with dogs
Decorative pillows can do more than just sit on sofas. This dachshund, for example, props up the door and protects against drafts. You can sew it according to the indicated patterns, increasing the animal to the required size and stretching it in the center. The body can also be composed of many pieces.


Two dachshund girlfriends are well suited for daytime relaxation, and at the same time as cuddle toys for a child.

Do you want more ideas? There will be more than enough of them in the next selection! They are easy and quick to sew, but each one can be given as a gift for the New Year and beyond. Use them in the car or at home.


Other gifts with the symbol of the year
If you want to surprise your loved ones not only original toys and keychains, you can make a set of potholders for them. Design them as your imagination dictates.

When creating a souvenir, you can also take into account the favorite breed to which the recipient gravitates.

Wool dogs
They can be felted from dry wool, and fastenings for a brooch or magnet can be glued or sewn on the back.

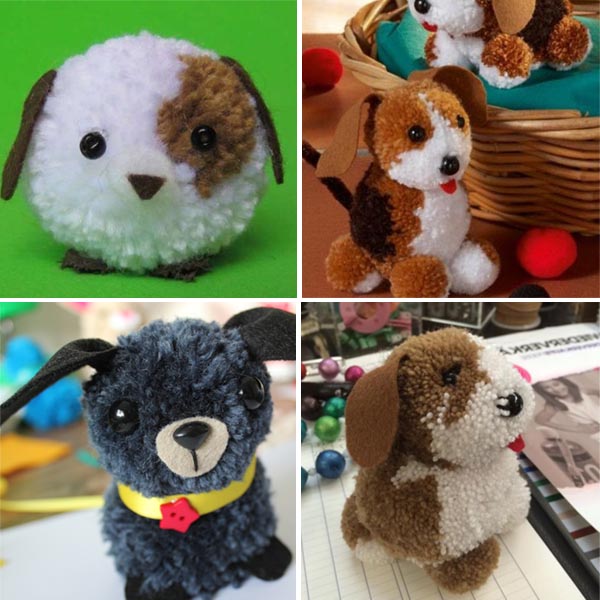
Threads and pompoms
Thread pompoms make very realistic dogs. To create pompoms you will need special devices or two circles of very thick cardboard on which threads will be wound. After winding several layers, cut the threads along the outer edge and thread another thread through the rings, tightening properly to form a knot.

The most important thing is to learn how to make high-quality pom-poms. And from them, with the help of various variations in sizes and additional elements, you can get a variety of figures.
Experiments with coffee beans
Funny dogs can also be made from scattered coffee beans. To do this, you only need to outline the contours of the dog and cover the entire surface inside with glue. This way you can keep your child busy and make a beautiful holiday panel.

 Bottle dogs
Schools and kindergartens often require crafts made from recycled materials. Bottles will come in handy here. In addition to the base of plastic bottles You can make fur and other decorative elements. You can put it inside the bottle colorful balls made of glass or something similar to make it look more festive.

Rolling up a towel
A universal gift that is in no way inferior to the store-bought version. Thin mohair towels are suitable for this, but thicker ones with wider edges can be used. A towel alone is not enough: for a believable image, ears made from pieces of felt, a nose, eyes and a ribbon will come in handy.

And a few more ways to festively roll up a towel. Not only in the form of a dog, but also in the form of other representatives of the fauna around us.
I saved the juiciest for last) Just look at this amazing lamp in the shape of a dog, which you can create yourself. This masterpiece will be a worthy gift for your loved ones.
Knitted and crocheted dogs: video mk
Since knitting is not so fast and simple thing, then I decided to make a selection of video master classes on this topic.
First of all, I suggest you knit baby booties (this is done with knitting needles). If you or your family have Small child, then this will be a great gift.
But the next three dogs are crocheted using the favorite crochet hook. The result is completely different and dissimilar dogs, each of which claims to be a designer toy (which costs a lot of money in stores). Thanks to detailed instructions, you will learn how to make exactly the same dogs.
The first one is made of fluffy yarn, which makes dogs very soft. The rest are made from ordinary threads, but also have their own charm.
The next two dogs are knitted according to the amigurumi principle, a very popular type of knitting now. Thanks to it you can create very cute creatures.
Finally, I suggest you make a square dog like this. Here presented detailed description the creation process along with patterns at the end of the document.
That's all for today. Happy New Year to you, friends! Create creative dogs with your own hands and come visit more often. I will be glad to see you here and in other articles on my blog. See you soon!
Sincerely, Anastasia Skoracheva
Perhaps the most relevant gift for New Year 2018 will be toys-symbols in the form of dogs! Therefore, today we will show you how to knit a dog amigurumi crochet. The master class describes in detail each knitting step.
For knitting we need:
- yellow, white and brown yarn;
- hook;
- scissors;
- synthetic fluff;
- 2 identical beads;
- needle.
We take a white thread, since we will first knit the muzzle. We form the initial loop and do 2 air. loops.
Then in the very first loop (2nd from the hook) we make 6 single crochets. We will do all knitting only with single crochets.
In the 2nd row we will add. We knit 2 stitches in each loop.
3 yd. We add again, but through the th loop.
4 rows. We increase every 2 stitches.
5 row. Add through 3 loops.
At the end of 5 rows we will have a circle of 30 loops.

In the 6th row we knit 30 stitches. We don’t make any increases, but simply knit 1 stitch in each loop.
7th row. We will add again. This time we increase every 4 stitches. At the end we will get 36 loops, since we made 6 increases.
8 row. We knit 36 single crochets.
Change the thread to yellow and knit 1 row of 36 stitches.

Next we will decrease it.
10 row. We knit with decreases every 3 loops.
11 row. We knit without decreasing.
12 row. Decrease again after 3 loops.
13 row. No deductions.
14 row. We will decrease every 2 loops.
15 row. We don't reduce it.

16th row. We knit decreases through every 1 loop.
Next we will knit the 17th, 18th and 19th rows without decreases. We fill the resulting part with synthetic fluff.
19 row. Decrease again after 1 loop.
Then we knit decreases in each loop until the hole is closed.

The head was tied. Let's start knitting the body.
We start with yellow yarn. The beginning is exactly the same as the head. We collect 2 air ones. We perform 6 stitches in the first loop. In the 2nd row we increase their number to 12, making an increase in each loop.
Next, add through 1 loop. Then 1 row through 2 loops. We get 24 loops. It would be enough.
We knit 3 rows without increases.
Change the thread and perform 2 more rows. Change the thread again and knit 3 rows. Change the thread and perform 2 rows.
We change the thread to yellow and begin to decrease. We knit decreases through 2 loops. Then in a new row through 1 loop. Don't forget to fill the part with filler.
Next we will decrease until the details are closed in each loop.

We knit the hind legs. We start with white yarn. Again we form an amigurumi ring of 6 stitches and knit an increase in each of them. We perform 2 rows without adding and change the thread. We knit 2 more rows further.
In the next 2 rows we will decrease through 1 loop.
And we will knit 1 row, sewing the piece together with single crochets.

We knit the front legs.
Again we make a ring of 6 columns, then increase to 12. We perform 4 rows. Next, decrease through 1 loop and knit 3 more rows.
We change the thread and knit 3 more rows and 1 row for sewing the part.

We will knit the ears with yellow yarn.
We collect a chain of 12 air loops. Next we knit 2 single crochets. 1 in each loop.
Then 2 half columns. Next are 6 double crochets. The last loop remains. We work 5 double crochets into it.
We knit the second side in the same way, but in reverse order. First 6 double crochets, then 2 half double crochets and 2 single crochets.

To tie the ponytail we will make 9 air stitches. We knit 4 stitches without a stitch, then make 1 decrease. We finish the row with single crochets.

We embroider the nose and mouth with brown yarn.
What do many people expect for the New Year? Some people want a new life, some people meet with friends and family, but everyone certainly wants to receive a gift. Let it be a small souvenir in the form of a dog, the symbol of 2018. If you like to give gifts and want to pleasantly surprise the recipient of the gift, then try knitting a dog. Diagram and description of this original gift is waiting for you in the article. The owner of the coming year will be able to take his place of honor in the house of the one for whom you try. Such a gift will be of particular value because the hand-made symbol of 2018, a dog, will not leave anyone indifferent.
This cute puppy's name is Buffy. Although it is not big, it is so cute that it will become a child’s favorite toy, and an adult will be able to develop warm feelings for it.


Of course, such toys are sold in stores, especially on the eve of 2018, the symbol of the year, the dog, will fill all the shelves. But making such a toy with your own hands is much more enjoyable.
What you will need to knit a dog:
- knitting needles No. 3.5;
- yarn of 2 colors;
- filler;
- lining;
- wire;
-2 beads for eyes;
-button.
Tips for preparing to knit a dog toy:
It is better to use wool yarn, but with the addition of acrylic. Choose colors to suit your taste, but make sure they match each other and one color is lighter than the other.
It is preferable to choose colors close to natural - beige, gray, brown.
Use holofiber or padding polyester as filler.
You may want to consider an unusual filling option knitted toy in the form of lentils. It is used only if the product does not require washing. To do this, you need to make bags from the lining, sew lentils into them, and stuff the toy with the bags. Then the filler will lie evenly.

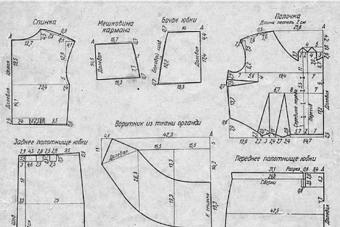
Knitting a dog with knitting needles, the diagram and description of which are given below, is not difficult, but you should start knitting from the back.
We make two parts as in the picture below

1st row: cast on 14 loops and knit them
2nd row: 14 loops
3rd row: 14 loops +5 loops.
4th row: 19 loops
5th row: 19 loops + 5 loops
6th row: 24 loops
7-18 rows: 12 rows knit 24 loops
Row 19: cast off 2 stitches. 22 loops
Row 20: 22 loops
Row 21: cast off 2 stitches. 20 loops
22nd row: 20 loops
Row 23: cast off 2 stitches. 18 loops
Row 24: 18 stitches
Row 25: cast off two stitches. 16 loops
Row 26: 16 stitches
Row 27: cast off 2 stitches. 14 loops.
28th row: 14 loops
Row 29: cast off 2 stitches. 12 loops.
Row 30: 12 stitches
Row 31: cast off two stitches. 10 loops.
Row 32: cast off two stitches. 8 loops.
Cast off the last 8 stitches.
We knit the dog's front legs with knitting needles.

This is what the paws look like on the inside

To knit them, we cast on 20 loops.
1st row: 20 loops
2nd row: add one loop. 21 loops
3rd row: 21 loops
4th row: add 1 loop. 22 loops
5th row: 22 loops
6th row: add 1 loop. 23 loops
7th row: 23 loops
8th row: add 1 loop. 24 loops
9th row: 24 loops
10th row: add 1 loop. 25 loops
11th row: 25 loops
12th row: 25 loops
Row 13: decrease 5 stitches
14th row: 20 loops
Row 15: decrease 5 stitches. 15 loops
16th row: 15 loops
Row 17: decrease 4 stitches. 11 loops
18th row: 11 loops
Row 19: decrease 4 stitches. 7 loops.
20th row: 7 loops
Cast off the last 7 stitches.
Only when these parts are knitted can we move on to knitting the dog's belly.
We make this part in two copies.


Leave the two parts for now without connecting them.
We knit the dog's hind legs.
There should be two such details. You can also sew them right away, like the front legs.

We make the feet from lighter yarn.

We make two parts that will also be part of the legs.

Look at the picture to see how these parts are used to create the legs.

If you have already prepared all the parts of the legs, you can connect them: sew the front seam, sew the heel.
Dog's tail.

This is the simplest detail.
Place a wire inside the dog's paws.

Let's knit a bottom for a dog

And now you can begin the final assembly of the dog toy. Let's connect the body with the paws. We start with the back seam along the back, sew the bottom and make the front seam.
While we are sewing the toy, we fill it with filler at the same time.

Head.
The most important part remains - the dog's head. It is knitted from light yarn.