Any creative activity hides several aspects: interest, focus on a specific result and a serious approach. You can realize your creative potential in different ways, because there is always an interesting activity to your liking. Everyone chooses their own hobby depending on their individual preferences. When you are not looking for difficult ways, but the thirst to create something beautiful is great, you can stop at weaving baubles from ribbons.
Such accessories are especially popular today, despite their long historical past. Uninformed people, looking at this colorful splendor, wonder how to make a bauble from ribbons? It turns out that this is not at all difficult, as it seems at first glance. Ribbon baubles are woven square and round, flat and twisted, in one color and multi-colored - you can weave any ribbon baubles very quickly and easily. Weaving fennies is no more difficult than weaving braids and tying bows. Free MK and video lessons will help you understand any of the methods.
Historical background
Such a cute accessory is now in a special trend, especially among girls. The bauble can be in the form of a bracelet, keychain or phone ring, bookmark, etc. If earlier wearing a bracelet or bauble had some specific meaning, in the modern world it is simply an attractive trinket.
Delving into the historical roots, we can say that the first baubles appeared among the North American Indians. Woven bracelets had specific ritual overtones. Various magical rituals were performed with them.
The second rise of such an innocent trinket occurred during the heyday of American hippies. Participants in this movement replaced wedding rings with baubles. Depending on the color scheme, one could tell about the status and financial situation of the owner. At all times, such a gift was considered a sincere manifestation of friendship and sympathy..
Weaving baubles from ribbons for beginners
 The easiest way to make baubles is from satin ribbons, since the material is plastic and holds its shape. Although, professional craftsmen choose leather cords, fabric threads, beads and beads. But beginners are recommended to stick to the simplest one - satin ribbon.
Before you start weaving bracelets and other products, you need to be patient. Psychologists consider this activity to be beneficial for the psyche: it encourages positive thinking, helps solve complex problems, and makes you think a lot. And this always brings a positive result.
First you need to learn a number of basics on how to weave from ribbons:
- Using existing standard weaving patterns, it is possible to make not only a bracelet, but also various small attributes. By collecting individual elements, you can get an exquisite panel.
- To create a simple version, you only need ribbons. If you want to create something spectacular, use additional decorations made of beads and beads.
- For beginners, for convenience, it is recommended to secure the base of the braid with a pin to the pillow. To prevent the work from going to waste, strips of at least one meter in length are initially cut. It’s better to cut off the excess later than to feel a shortage in the midst of work.
- Satin is a beautiful, modern material, but tends to fray around the edges. Therefore, the edge should be melted under fire. At the same time, fire safety is observed.
- The number of ribbons in a braid is determined individually in each case. This is influenced by the specific scheme and skill level.
- It is important to choose the optimal color combination.
- Excessive tightening of the knots will lead to deformation of the product.
Having mastered the basics of weaving baubles, you can proceed to more complex variations.
Gallery: ribbon bauble (25 photos)


Weaving a bracelet from ribbons
 It doesn’t take much time to learn how to weave beautiful baubles., the main thing is to delve into the process itself. To achieve a professional level, you should train more. It’s better to start with the simplest option - a bauble made of two ribbons. The axiom of how to weave baubles from 2 ribbons is simple and boils down to the following:
- Cut two strips 1 meter long. We can choose any width, but it’s easier to cope with a narrower one.
- We fasten both strips with a knot at one end.
- Let's start working. Fold a loop on each of the strips, parallel to each other.
- We put one loop into another, tighten it by pulling one end. The color we pull will determine the finished knot.
- If the ribbons are multi-colored, then we alternate. The second step is similar. We thread the loops and tighten them.
- We continue in this way until a certain length is achieved. At the initial level, such weaving of two components will be the best way to gain experience. Experienced needlewomen can handle this type of work in a matter of minutes.
Round baubles
There is an opinion that the circle represents friendship and sincere expression of good attitude. Gifted round bracelet - bauble will become a genuine expression of friendliness. Initially, two ribbons are prepared, each 2.5 meters long and of different colors. We’ll answer further on how to make a bauble from ribbons in the shape of a circle.
Weaving baubles from ribbons is another type of handicraft. It can be practiced by children and adults at any age. Mastering this kind of weaving is not difficult, and it does not take much time. Weaving from satin ribbons is easier than from beads or ordinary threads, since the material is softer and more pliable. We will tell and show you about weaving with ribbons for beginners, how to weave bracelets from them and much more, we will introduce you to some patterns.
Ribbon weaving for beginners
When learning any new business, you must first find out where to start, get acquainted with the important key points, find out what is most important in order to eliminate possible mistakes in the future. Also when weaving ribbons, start with the basics. To get started, buy satin ribbons; they are sold in fabric stores or craft stores. The tapes come in different widths and are sold by the mentrozh. The range of colors is huge. It is best to take a ribbon of medium width, since with a wide ribbon it will be difficult for beginners to master weaving with ribbons, and one that is too narrow will wear out quickly. For your first work, it is better to choose only two colors, and for example, weave a bauble; this video will help you with weaving from ribbons:
Weaving patterns
Weaving satin ribbons allows you to create many beautiful things, bracelets, necklaces, keychains. In this regard, weaving from ribbons, weaving patterns are presented in large quantities. They differ in the number of colors, the complexity of execution, the addition of additional materials and simply unusual patterns. We invite you to watch video diagrams of weaving from ribbons of the most interesting of them:
Also, on the eve of the New Year holidays, patterns for weaving New Year's balls will be relevant:
Weaving bracelets
Most often, bracelets or baubles are made from ribbons. The pattern for weaving baubles from ribbons is not difficult to implement, but you can make a variety of options. Weaving bracelets from ribbons can be made from 2, 4, 6 or more ribbons of different colors, often adding additions in the form of beads or pendants. You can visually evaluate them in ribbon weaving video lessons:
Weaving flowers from ribbons
Weaving flowers from ribbons has not only an aesthetic, but also a practical meaning. You can decorate clothes with these flowers, make brooches from them, decorate bags, or even create an entire picture by attaching them to cardboard or plywood and placing them in a frame. Weaving from satin ribbons in this case gives a very bright, rich color and shine. Ribbon weaving: the flowers even have their own special name - kanzashi. We invite you to watch several videos on weaving similar flowers:
As you can already see, weaving flowers from ribbons is very diverse, we have shown only a small part of what can be done using ribbons.
Most likely, teenage girls will like weaving baubles from ribbons, young girls will like elegant bracelets with beads, and older ones will want to take up weaving kanzashi flowers. But in fact, there are no age restrictions. Do what you like, the main thing is that this activity brings you pleasure.
You can create your own bracelets from many different materials: threads, beads, plastic, and also from ribbons. Such decorations look beautiful and are always in place. In addition to ribbons, such bracelets may also contain beads, which makes them even more elegant. In this article we will try to figure out how to weave handmade bracelets from ribbons.


We weave bracelets from ribbons and beads
Basically, all baubles of this type are woven in the form of a braid, and learning this technique is not at all difficult. In order to learn how to make bracelets from ribbons with your own hands, the master class below will not be amiss. All you need for this job is your imagination and tape. The only condition: the ribbons must be 0.5 cm wide and three times longer than the expected length of the bracelet.
Take two ribbons of contrasting colors, or those shades that go well together. Tie them together with a knot, leaving 5 cm ends - this is for ties.

Bend each strip into a loop, close to the knot.

You need to thread a loop of pink ribbon into the green loop.

Now fold the green ribbon into a loop again and thread it through the pink one.


Pull the pink ribbon so that it fits tightly around the green one. And then make a pink loop.


Now thread the pink loop through the green one. Continue making the bracelet in the same way until you reach the length you need. After this, tie the remaining ends of the threads in a knot, that’s all, the product is ready.


In the form of a rope
Of course, with all the variety of weaving techniques, the question arises, what kind of bracelets can be made from ribbons besides the standard version? There is another weaving option - a rope of ribbons.
In order to make such a decoration, we will also need two ribbons, 0.5 cm wide and 2 m long each.
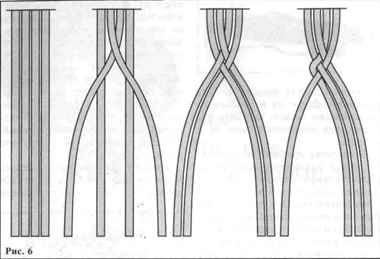
Take a white ribbon and place a blue one on top of it to form a cross. All sides of this cross must be equal. In the middle, attach both ribbons with a pin to the pillow, this is necessary so that they do not twist.


Now place blue ribbon number 1 on white ribbon number 2. Now lift the same ribbon number 2 and place it on top of blue ribbons numbered 1 and 3. Now place blue ribbon number 3 on top of ribbon 2 and pass under ribbon 4 .


Now pull the strings and tighten the knot, you will end up with 4 small squares.

All other rows are woven in the same way, you just need to lay out the ribbons as prescribed earlier. Weave until the bracelet is the desired length.

Everything is ready, now you just need to thread two more ribbons for ties under the white ribbon at the beginning of the bracelet.

With beads
Well, you shouldn’t forget about additional decoration elements when it comes to such fennecs, these can be chains, rhinestones and beads.


So, to create one of the bracelets presented above, namely from ribbons and beads, you will need:
- Beads.
- Select satin ribbon, shade and width depending on the beads.
- Needle and fishing line.
There is nothing complicated in creating such a decoration, and it can be done in a very short time. Take the tape and make a loop at a distance of 15–20 cm from the edge. Now take the needle and fishing line and pierce the loop, securing the fishing line with a good knot.


Take a bead and thread a needle and fishing line through it.

Now make another loop and add the next bead. Continue until the bracelet is the desired length.


You can fasten the fishing line; to do this, make a loop after the last bead and pass a needle with fishing line through it, secure with a knot. Tie the ribbon itself into a knot as close as possible to the last bead.

Alas, we don’t have patterns specifically for weaving baubles from ribbons, but we do have samples for creating bracelets from leather strips, and they are perfect.
Four-row braid:


Braid with teeth:
Chinese knot:

Round lace:
Weaving of five or more stripes:


From center to edges:

Braiding around a rope:


Bracelets that are woven from ribbons, as well as from threads, are called baubles. They are made not only from two ribbons, there are also more of them. Below is a video on the main types of such art.
Handmade bracelets made from silk ribbons have long been of great interest among representatives of different subcultures. For example, they were actively made and worn by hippies, for whom such bracelets even served as wedding rings. Depending on the color of the woven ribbons, these people could learn about the life position of their brothers.
Baubles woven from a large number of ribbons of different colors symbolized the unity of different social groups and statuses, while white and red bracelets meant readiness for relationships without obligations.
The current generation is rediscovering all the tricks of weaving ribbon bracelets with their own hands, realizing how simple, exciting and interesting this activity is, bringing not just pleasure, but also material benefit.
simple pattern for weaving ribbon bracelets
To get started, all you need to do is purchase two ribbons of the desired color and length. By the way, the latter must be at least a meter. Regarding the color of the consumables, we can say the following: choose contrasting shades that will give bright and catchy combinations and ensure ease of weaving.
Please note that the bracelet should not be too tight on the wrist, nor should it dangle on it.
Subtleties of ribbon weaving bracelets
Before weaving ribbon bracelets for the first time in your life, it still makes sense to familiarize yourself with the hidden meanings of colors. To get an accessory with a secret meaning that expresses your state of mind or attitude towards the world, study the part of the history of hippie culture that tells about their homemade jewelry and the degree of its significance.
Remember, you don’t need to tighten the loops too much for fear that the bauble will spread or lose its shape. Loosely fixed ribbons will take on the desired outlines themselves and make the decoration neat and attractive. Don’t be discouraged if your first craft doesn’t please you with its excellent appearance or high-quality technology. Despite all the shortcomings, it will definitely be the most beloved, and will never end up in the trash bin.
It is difficult for beginners to immediately learn how to weave ribbon bracelets, and therefore they can be recommended to help themselves with several pins. They will prevent the loops from stretching and make their sizes identical.
Weaving bracelets from ribbons on pins
Before making such a bracelet, from all available ribbons, select two that are as narrow as possible, approximately 0.6 mm wide. The length of each should be more than a meter, and the coloring should be the brightest and most varied. The silk strips must be bent so that at the ends there can be 15 cm of reserve for the future knot that secures the jewelry on the wrist.
Then you need to do the following:
- The ribbons are placed on top of each other and secured with pins;
- The upper strip bends through the lower one, thereby forming a kind of loop;
- A loose ribbon is passed through the loop;
- Manipulations continue until the bracelet of the required length is obtained.
weaving bracelets from ribbons for beginners
First, try making a simple bauble with decoration.
For it you will need:
- the tape itself with sewn edges is 0.9 m;
- button, pendant or other decorative element.
The whole process looks like this:
- Pass the ribbon through the hole of the button or pendant so that the decor marks its middle;
- Tie a tight knot that will secure the decorative element;
- Wrap the ribbon around your wrist until you are sure that the jewelry reaches the desired length;
- Mark the location of the second knot that will hold the accessory on your hand;
- Tie another knot at the marked place;
- The last knot is knitted in such a way that a button or pendant can pass between it and the second knot.
If this option seems too tricky, then weaving ribbons can be turned to your advantage by creating bracelets for beginners from one meter-long silk strip and an accessory with a separate clasp.
For example, an openwork metal flower is tied to one end of the ribbon, and its stem, which acts as a retainer, is tied to the other.
Currently, the ability to create wonderful models of jewelry with your own hands is highly valued. This is not only an interesting way to spend time, but also a way to save money on purchasing bracelets. Nowadays, jewelry made from bright satin ribbons is one of the main fashion trends. In this article we will look at how to weave baubles from ribbons.
Important! Any woman wants to have different jewelry for each set of clothes or look, but not everyone can afford to buy them. In such cases, it’s worth trying to diversify your jewelry park by creating several interesting little things with your own hands. How? Read, learn and try:
Primary sources of baubles
If we consider history, it is believed that the primary sources for the creation of wicker jewelry are the American aborigines, the so-called Indians. Using ribbons and threads of various colors, the Indians developed the “quipu” writing, which is so unique that it cannot be deciphered to this day. For modern followers of the Indians, who are hippies, weaving baubles is important; they attach special meaning to this technique.
Important! It is known that by using ribbons of various colors, hippies thus indicate their belonging to a particular group. In addition, the presence of a certain color helps to recognize the sexual orientation and age of the owner of the talisman. Very often, hippies use baubles instead of modern wedding rings.
But not all owners of baubles are hippies; in many cases, this is just a variant of fashionable jewelry that can be made with your own hands relatively quickly. To create such a product it is not at all necessary to be an experienced needlewoman - even a novice craftswoman can easily cope and master the technique of weaving baubles. You just need to put in a little effort and work.
How to weave the simplest bauble? Master class for beginners
Let's consider the option of weaving the simplest bauble, a technique that can be mastered by any novice craftswoman. To make such a product, you need to prepare the following materials:
- Two satin ribbons, which have a width of about 3-5 mm and a length of 50 cm to one meter. The choice of color does not matter - the ribbons can be used either plain or in different colors.
- Pin.
How to weave baubles from ribbons:
- In our case, we will use ribbons of two shades - yellow and green. We start the weaving technique with a green ribbon, the tip of which is folded into a loop.
- We hold the green ribbon with one hand, while with the other hand we take the yellow ribbon and make a loop out of it in exactly the same way.
- We thread the yellow loop into the green one.
- Tighten the green loop.
- Again we form a new green loop, thread the ribbon with the green loop into the yellow one.
- Tighten the yellow loop.
- We again make a loop from the yellow ribbon, pull it into the green loop and pull it up.
We repeat this weaving technique as many times as needed to form the bauble, or until the ribbons run out.
How to weave a round bauble?
The round bauble is formed from “lotus” knots, which are also called “Chinese knots”. To weave such a decoration you will have to spend at least an hour. Before you start making a round bracelet from ribbons, you need to prepare the following materials:
- two tapes with a corresponding length of about 2.5 meters or four tapes with a size of 1.2 meters;
- pin.
How to make round baubles from ribbons:
- For example, we take black and silver ribbons. We arrange the ribbons crosswise.
Important! If two tapes are used, then for the initial position they must be placed crosswise and connected to each other with a pin. If there are four ribbons, they should be laid together, leaving about 10 cm for the ties, and tie a knot from them, secured with a pin. In order not to lose the original shape of the bauble, it must be tied tightly.
- First, we place the upper section of the black tape, which is located vertically, on the left side of the silver tape, located horizontally.
- We wrap the left section of the silver ribbon behind both halves of the black ribbon, which is directed downwards.
- We direct the right half of the black ribbon upward.
- At the end of the completed knot, we place the upper part of the silver ribbon under the half of the black ribbon located at the top.
- Tighten the knot.
Important! If you need to apply force to tighten it, you should straighten the ribbon, after which it will be easier to tighten the knot.
- Starting from this point, we repeat all the steps, as a result of which we form a cord.
- At the end of the weaving process, we pull half of the ties under the working tape on the back side of the cord. If this condition is met, it will be much more convenient to wear the bracelet.
The round bauble is ready!
How to weave a spiral bauble?
One of the options for wicker jewelry is a spiral bracelet. In order to create such a product, you need to prepare the following materials:
- two satin ribbons about one meter long;
- pins.
How to weave spiral bracelets from ribbons:
- For example, let's take black and silver ribbons. First, we bend 10-15 cm from the end of each material, folding the ends onto the rest of the tape.
- We lay both tapes at an angle to each other, which should be slightly less than 90 degrees.
- We bend the black material under the silver ribbon so that an element similar to a knot is formed.
- We turn the tape so that a full circle is formed, with a section of the black tape sticking out.
- Pass a large silver loop through the small black loop.
- Now we pull on the section of the black loop that protrudes slightly. As a result, a loose nodule appears.
- We make a new loop, which we pull through the rest of the loop.
- We tighten the end of one loop, while simultaneously fixing the second loop.
Important! The loops should not be too tight, but the same, otherwise the bracelet will not look very nice.
- We observe the formed square. To make the edges even, you need to adjust them as you work, tightening the loops.
- From this point we repeat all the steps until a bracelet of the required length is formed.
The spiral bauble is ready!
Important! You can never have too many original accessories, and even if you have a new bracelet or bauble, you want to have something else, for example, earrings. It’s difficult to buy something to match a ready-made bracelet, and why stop there when you can make earrings yourself. We have selected several interesting and unusual options for you:
How to weave a square bauble from four ribbons?
One of the varieties of weaving baubles is a square bracelet made of four ribbons. The decoration received its name because of the shape of the knitted accessory, which in cross-section resembles a square.
In order to create such a product, you need to prepare the following materials:
- Pins.
- Four working belts that are no more than 7 mm wide and no less than two meters long. The dimensions of the finished product play a role in choosing the length and width of the ribbons.
Important! Since both sides of the material will be equally visible when weaving, there is no need to pay attention to the front and back sides of the tape.
How to weave square baubles from satin ribbons:
- We connect all four ribbons into one knot, leaving 10-15 cm free.
- We arrange the ribbons in the shape of a cross.
- We start weaving from the top ribbon, from which we form a loop from top to bottom.
- Using the ribbon, which is on the right side, we go around the resulting loop in the direction from right to left.
- Using the ribbon that is located below, we go around the previous side loop, while performing actions from the bottom up.
- We transfer the left ribbon to the right side, threading it through the first loop.
- We tighten each ribbon one by one, resulting in an even wicker square.
- We continue to weave, forming new loops one by one. When the required length is reached, the decoration is ready.
This product has a three-dimensional shape. A knitted bracelet can be worn either straight or twisted, resembling a spiral shape.
Important! It is necessary to put on the jewelry very carefully, since stretched ribbons lose their original shape and cannot be returned to their original appearance. There is an option to strengthen the square bauble. To do this, while working, you can stretch a fishing line or strong thread in its center.
How to weave baubles from ribbons with names?
A very interesting option is ribbon weaving, which results in bracelets with names. For handicraft lovers, you should prepare the following materials in advance:
- Thin ribbons made of soft fabric - silk or chiffon. You can also use narrow strips of satin, but the material should not crumble when cut. The fabric can be either synthetic or natural. In our case, we choose one pink ribbon, and seven orange stripes.
- Pins for fastening.
How to weave bracelets from ribbons with names:
- Using pins, we secure all the ribbons on the table surface so that the pink stripe is on the left side, and all other ribbons of a different color are located on the right.
- We start weaving from the first row. We make pink knots around each orange ribbon.
- When all the knots have been tied, the first row is complete, now we move on to creating the second row.
- We tie knots in the opposite direction, that is, from right to left.
Important! All personalized baubles require a diagram, which can be found very easily on a special site with name schemes. We enter a specific name in the search bar, and the site will display the desired scheme. In the description of the pattern there are many small circles, which are designated as a weaving knot. Each circle has arrows:
- The direction of the arrow to the left corresponds to the left node.
- An arrow pointing to the right identifies the left node.
- The down arrow corresponds to the third knot made when the tape is pulled up.
After the provided diagram, the site provides a detailed description of the knot used, which greatly simplifies the weaving process.
- According to the diagram provided by the site, the nodes of the letters of the name are indicated in a different color. In the row in which the first knots of the letters are made, we perform the first left knot, after which, according to the pattern, we weave five knots indicating the letter.
- We decorate the knots for the letter with orange ribbon. A distinctive feature of such a knot is that it is directed upward, and not to the right or left.
- We wrap the orange ribbon around the pink working strip and then pull it up. This row consists of five knots, which are indicated in the diagram.
- The last knot is formed with a pink ribbon around the orange stripe and is made in a direction to the right, not up.
- Using all the icons of the scheme, we carry out personalized weaving until the very end.
The personalized bauble is ready!
How to weave a bracelet with a rope?
The bracelet looks very beautiful and original when woven with a rope. To create such an accessory you will need the following materials:
- two ribbons;
- pin;
- pillow.
How to weave baubles from ribbons with a rope for beginners:
- We put one tape on top of the other so that a cross is formed with equal sides.
- We secure the cross in the middle with a pin.
- To prevent the ribbons from twisting, we pin the ribbons to the pillow.
- For convenience, we conventionally designate each side of the cross with numbers, 1 and 3 sides - a blue ribbon, 2 and 4 correspond to a red color.
- We bend 1 strip and transfer it to the 2nd strip.
- We bend strip 2 and move it to strips 1 and 3.
- We move ribbon 3 onto the 2nd strip located on it, and pass it under the 4th ribbon.
- Tighten the loops, while lightly pulling each section of the tape.
- As a result, four small squares are formed.
- We repeat the described steps until the bracelet is of the required length.
The bracelet, made by weaving in the form of a rope, is ready!
Important! You can also use several braids to create this kind of bracelets. With your own hands you can weave beautiful and unusual decorations consisting of three, four or even five ribbons of different colors. In exactly the same way, you can make not only jewelry from satin ribbons, but also accessories made from leather strips.
How to weave a bracelet from ribbon and beads?
Let's look at the most common method of making jewelry from ribbons with beads. To create this accessory you will need the following materials:
- bright colored ribbon;
- needle;
- thick thread or fishing line.
How to weave a bauble from ribbons with beads:
- We bend the tape, retreating about 10-15 cm from the edge to form a loop.
- We fix the formed loop with a needle and fishing line.
- We string a large bead onto this fishing line.
- We form a loop again and pierce it with fishing line, after which we string the bead again.
- We repeat all steps until the desired length of the bracelet.
- At the end of the work, we secure the decoration with any knot.

There are many creative options for designing this type of bracelet:
- A simple and affordable way is to weave from materials that have different textures. By weaving a delicate satin ribbon with a strip of exactly the same thickness, but made of rough leather, you can create a very creative and stylish product.
- You can also use a metal chain for weaving, which will give the decoration a special charm.
- You can use the method described above for creating a bracelet from beads and ribbons, but in this case, string the beads not one after another, but after three loops, or make loops from strips of different sizes. This decoration will look very original.
- You can also embroider the bracelet with shiny rhinestones or sequins. This method will add glamor to your product.
Important! You can create beautiful decorations using more than just ribbons. You can decorate such accessories using almost any accessories - large beads, seed beads, bright buttons and even zippers. Such elements can add uniqueness and elegance to the decoration.
In order for the weaving to have a beautiful appearance, it is necessary to adhere to some recommendations in the process of creating baubles:
- Based on the ideas of hippies and other various subcultures, the combination of certain colors when making baubles has a certain meaning. Therefore, you need to take a responsible approach to choosing the colors of satin ribbons. First you need to familiarize yourself with information about the meaning and significance of colors.
- In the weaving technique, when tightening the loops, try not to use excessive force. The nodules should be in a somewhat loose state, so they will look neat and have the same appearance, while their location will be strictly symmetrical. Only in this case will the wicker product be attractive and beautiful.
- If the decoration looks unpresentable and unsuccessful at first, don’t despair, you can unravel it and re-create a new accessory.
- During the weaving process, you should not rush, but be careful, then you will not have to redo the decoration, and you will succeed the first time.
- If during the weaving process the ribbons slip out and the loops fall apart, you can use a pin to secure the ends of the loops. When you gain experience, everything will work out for you, and the loops will be smooth and neat.
- At the end of creating the decoration, we form a knot from the remaining end of the ribbon, or you can simply leave the unused section hanging down.
- It is advisable to use ribbons in contrasting bright colors. When using ribbons of similar colors, weaving difficulties will arise. Contrasting shades in the bracelet add brightness and catchiness to the decoration, in addition, the weaving procedure is much easier.
- The ribbons used should be neither narrow nor wide. The optimal width of the tapes should be 5 mm.
- You also need to choose the correct length of the ribbons, which should be 2-3 times longer than the expected length of the bracelet. The choice of length is also influenced by the type of weaving. The most optimal length is a size of at least a meter.
Important! But jewelry made from scrap materials will never replace jewelry, but in order for the latter to always please the owner, you need to know a few simple rules for caring for “jewelry.” Read more about cleaning precious jewelry on our website:
Video material
Now you have an idea of how to weave different baubles from ribbons. Start with simple patterns, improving and complicating the patterns as you gain experience in such needlework. Then your box will be replenished with unique jewelry that you can change every day to suit your mood!
We recommend reading
 Is it possible to wash off henna from hair and how to do it How can you wash off henna
 Pearl manicure - the most fashionable and beautiful nail design ideas with photos Pearl nail polish
 Hairstyles for the New Year - the most stylish, beautiful and original New Year's hairstyles
 Fashion legend Hubert de Givenchy Clients - Grace Kelly, Wallis Simpson, Jackie Kennedy and others