if you have free time and a little patience, then bead crafts will interest you. Since you can create various crafts from this material with your own hands: jewelry, decor items, embroidery, mosaics, key chains and much more. In this article, we will tell you about several options for DIY bead crafts for beginners, children and experienced craftsmen. Let's now get acquainted with our options for crafts and try to make them.
The program "Beads 2.0" for creating patterns of knitting and weaving with beads!
Anyone who wants to weave something of their own from beads or, perhaps, even create a pattern for embroidery / weaving from a photo, should try the Russian-language program "Beads 2.0"!
Here is the program's website, where all its features are described in detail: programma-biserok.ru
But in a couple of words, I'll still state.
Firstly (and this is its main purpose), with the help of "Bead" in a couple of seconds from any of your photos or pictures you can create a full-fledged embroidery / beading scheme! You no longer need to embroider other people's ideas of ornaments or according to other people's schemes - now you yourself can bring to life any of your ideas, any drawing, or even embroider a photo!
The most important thing is that after creating the scheme, the program will indicate the specific catalog numbers of the Preciosa/Gamma beads required for embroidery/weaving of this scheme. You just need to come to the store, buy the necessary beads according to the list provided by the program - and you can get down to work even today!
With "Beads" you can either create a scheme from a photo / picture, or draw your plot from scratch. The program provides the possibility of full manual editing of any scheme created "on the machine". When creating, you can choose the type of future scheme - regular or brick scheme. If you plan not to weave your work, but to embroider it on fabric, the program always provides a complete scheme for printing on fabric at the output. All as in the purchased set!
The program has an interface completely in Russian, installation of the program on a computer is carried out “in one click”, in addition, the Russian-language instruction is built into the program, and you can always ask for help from technical support on the program website (or even call them on the free number 8 -800 indicated on the site).
In general, if you once had an idea to embroider or weave something of your own with beads, I advise you to get acquainted with the Beads program.
DIY beaded birch
Now we will look at how to make a birch tree from wood, which will then serve as a decoration for your interior. Let's start the process of doing DIY crafts. 
You will need:
- Fine wire (0.3)
- Medium wire
- Beads green (3 shades)
- yellow beads
- Scissors
- Crepe paper white
- Foil
- putty
- Brush
- Paints
- decorative moss
Progress:
- We need to mix all the beads in one container.
- We cut off a piece of wire (about 60 cm) and make a loop on one side, twisting it so that the beads do not fall off.
- Now we string the beads on the wire in a chaotic manner. We lower the wire into a jar of beads and string the beads with piercing movements.
- The length of the stringed beads should be approximately 15 cm.
- Next, 7 beads are separated from the total mass and dragged to the extreme part of the wire. With a twisting motion, close these 7 pieces with a loop, with a twisting motion. So you need to do about 5 turns.
- In a similar way, we do with all the remaining beads on the wire, keeping a distance of about 1 cm between the loops. This will be our branch. We need about 60 of these branches.
- From these blanks we make full-fledged branches of the tree, collecting several pieces and folding them at different levels. To do this, take 3 branches and connect them together, fastening and winding on a common wire of slightly greater thickness.
- We cut the crepe paper into strips about 1.5 cm wide. Wrap the wire of our branch so that it looks like a tree bark. Use glue to fix.
- So we do with all the branches.
- Let's start building the tree. We take a thicker wire, it will serve as the basis for the tree, and fold it in half.
- We begin to attach the branches of the tree to the wire, fixing the branches with tails. We do this in a twisting motion.
- So we attach all the branches to the trunk.
- We close all the branches with foil.
- We breed putty and put it on the base for our tree.
- Place the tree trunk in the mortar and level the mass. To fix the tree, substitute any object under it.
- Now apply a putty solution to the trunk. Two coats are better to make it thicker.
- When the solution has hardened, paint it with white paint. With black paint, make spots on the trunk.
- Remove the foil and straighten the branches of our tree.
- Glue moss onto the base for the tree so that it looks like the ground where the tree grows.
Video how to make a birch from beads with your own hands
Craft "Apple"
For beginners, this craft will be interesting. You can make it yourself, because the assembly scheme is simple. You will have a good evening doing what you love. Let's take a look at the diagram with the step-by-step instructions that we have prepared for you.

You will need:
- Red, yellow and green beads
- thin wire
- Scissors
- fishing line
Progress:
- This craft must begin to weave from the bottom. We string 3 beads on the fishing line, after which we begin to make rows in the following sequence:
- 1 row - 9 pcs.
- 2 row - 12 pcs.
- 3 row - 14 pcs.
- 4 row - 17 pcs.
- 5 row - 17 pcs.
- 6 row - 16 pcs.
- 7 row - 15 pcs.
- 8 row - 12 pcs.
- 9 row - 9 pcs.
- You need to start weaving from left to right.
- The craft ends with an apple tail. It is made with three beads.
Christmas toys
To decorate a room New Year can become a garland of beads and discs. Children 4, 5, 6, 7 years old will cope with such a craft. It is simple in execution, but it looks very unusual and elegant. It can decorate both the children's room and the living room.

You will need:
- Beads of various colors
- old discs
- fishing line
Progress:
- To make this, you need to cut the disk into even small squares.
- First of all, a piece of a disk is strung on the fishing line, followed by 6 beads of different colors, then again a piece of the disk.
- You need to repeat this at least 10 times to Christmas tree toy looked decent and beautiful. At the top of the craft, you need to make a loop. Great beadwork for beginners.
Mobile phone pendant
Decorate mobile phone can be a pendant made of beads and beads. It will be a great decoration, you can also present it as a gift to a friend or mother. It is very easy to make such a craft with your own hands, just read the step-by-step instructions.

You will need:
- Beads blue color silver
- fishing line
- Swivel with eyelet
- Scissors
Progress:
- Cut off a piece of fishing line and fold in half.
- We string 2 blue beads on one side of the fishing line, and with the other side we pierce these beads on the other side.
- Next, string 2 silver beads on each side of the fishing line.
- Then again you need to string two blue ones, penetrating them with fishing line from two sides.
- Repeat all the steps until you get the desired length of the craft.
- Now let's finish it by stringing 3 silver beads on each side of the fishing line.
- Attach a swivel with a loop to the end of the workpiece so that the pendant can be attached to the phone.
- In the same way, you can make various pendants by changing the colors of beads and weaving methods.
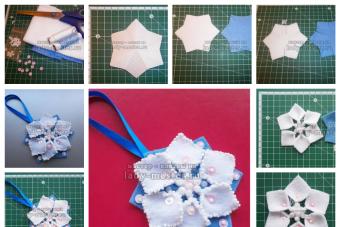
Snowflake from beads
In winter, such crafts can decorate windows or Christmas tree. It can be made various shapes or size, it all depends on your imagination. And now let's look at the diagram with step-by-step snowflake instructions that we have prepared for you. 
You will need:
- Beads blue and transparent
- Wire
Progress:
- Dial 4 transparent and 1 blue beads, then 2 transparent and 1 blue.
- Now step back from the beginning of 15 cm and with the end of the wire we pass into reverse side through the last 3 beads (2 transparent and 1 blue). So we do it two more times.
- Now we collect 1 blue, 3 transparent, 3 blue, 3 transparent. Now we draw the tip of the wire into the first blue bead, so a circle is formed.
- We repeat point 3, only with the second end of the wire.
- Now we draw the wire back through 4 transparent ones.
- We collect: 1 blue, 3 transparent and go back.
- Repeat step 6.
- On the long side of the wire we string 4 transparent, 1 blue, 3 transparent, 1 blue. Hold one part with your hand, and for the second dial 6 white.
- Pass the wire through the last blue bead so that we have another circle.
- Next, we collect 1 blue, 6 transparent and make a ring. Now for another ring.
- Pass the wire through the blue one, 3 transparent ones and the next blue one.
- Dial 3 more transparent beads and pass the wire through the first of the last two blue beads. We have one part of a snowflake with two branches.
- Now we repeat these 5 parts.
- We fasten all the blanks neatly in a circle with wire and we will get a six-pointed snowflake.
Video master class beaded snowflake
Brooch "Dragonfly"
If you love jewelry, then I want to invite you to make your own beautiful brooch from beads in the form of a dragonfly. Its principle of implementation is very simple, this craft is designed for children and beginners. 
You will need:
- Wire
- Beads yellow and green
- Large green bead - 2 pcs
- Pin
Progress:
- We collect a green bead, then a bead and again a bead.
- Next, we string the green bead again and draw the other side of the wire through it. Now bring everything to the middle.
- We make paws. Put a green bead on one end of the wire and fix it with a twisting motion. In a similar way, we make a foot on the other side.
- To make wings on one end of the wire, we need to string yellow beads, at the beginning we need to string it alternating with 3 green ones.
- We fix the wing by twisting 2 wires together.
- We also make the second wing.
- We need to make the bottom wings. They are made in the same way as the top ones, only smaller.
- For the body, we need to string a green bead on both wires.
- We make the lower paws in the same way as the upper ones, only a little longer.
- Take a pin and straighten it.
- String 6 green beads on a pin and give it its original shape.
- Pass both sides of the wire through all the beads on the pin.
- Next, string 7 more beads onto both wires and close the craft by passing the end of the wire through the last bead again. Do this several times.
- The brooch is ready!
Video how to make a beaded brooch with your own hands
Beaded necklace
I want to offer you another option for decoration, but in the form of beads. They are made very simply, but they look very unusual and beautiful, like a pigtail. And now we will consider step by step instructions how to make such beads with your own hands, with a photo and video description. 
You will need:
- Blue beads
- fishing line
- Clips for attaching beads
- Connecting ring — 2 pcs.
- Carabiner for jewelry
Progress:
- We take a fishing line of the desired length and string beads on it, calculate the number of beads for yourself at will.
- When you have strung the beads, fasten the bead clip to the fishing line using an additional bead.
- Now, holding one free end, start stringing beads on the second side of the fishing line after the clamp.
- On the other hand, fasten the clamp in the same way.
- Cut off the excess line.
- We need to make 3 such parts.
- On the one hand, we connect our blanks together with a ring.
- Weave a tight braid from bead blanks and also fasten it with a ring from the other end.
- Now attach the carabiner and our beads are ready!
Video how to make beads a pigtail with your own hands
Many people like bead trees, but beginner needlewomen often have difficulty creating a stem for such a tree. You have to choose between ease of execution and realism. In our master class, we will tell you how to make a beaded tree trunk.
Beaded jewelry looks very beautiful and never goes out of style. Especially when it comes to accessories. self made. The cross may be different sizes and shapes - flat or convex, dense or openwork. A master class on weaving an openwork beaded cross is in the article.
Beads are a very versatile material that allows you to create a variety of crafts. Many are fond of weaving flowers from beads - lilies, roses, snowdrops. We suggest you create a more original version - a beaded cactus. How to do this, read the article.
Beaded key rings must have been in every person at least once in their life. Someone prefers to buy ready-made ones, while someone prefers to make unique beaded crafts with their own hands. If you belong to the second category, our master class on creating a beaded sheep is for you.
Beading is very popular in more than 50 countries around the world. It is not surprising, because from small colored beads you can create incredibly beautiful products - from key rings to embroidered icons. We offer you a master class on creating a star from beads, which can be a great gift for loved ones. It will also come in handy for your home decor during the New Year and Christmas holidays.
Everyone is used to the fact that egg-shaped figures decorated in various ways are an indispensable attribute of Easter. However, decorative eggs decorated with rhinestones or beads themselves look very impressive and attractive. Such unusual decoration useful to you not only on the eve of Easter, but also for original decor houses or apartments. If you are wondering how to make a beaded egg, our article is for you.
Beaded crocodiles are the most popular type of homemade key rings. Remember, in the 90s every schoolchild had them, without exception. Another option for crocodile lovers is beadwork on fabric. If you would also like to get a crocodile keychain or a T-shirt decorated with the image of this predator, our article will come in handy.
Beaded jewelry never goes out of style. The most popular motifs in them are flowers, geometric patterns and abstraction. But if you want something more bright and original, we recommend that you pay attention to dragons woven from beads. Such an accessory will surely become the highlight of any image. Read more about how to weave a dragon from beads in our article.
Beaded accessories and jewelry look very beautiful. Masters of beading create real masterpieces with the help of beads and fishing line. It is hard to believe that most of them are based on fairly simple weaving techniques that anyone can master. Read more about basic techniques in our article.
The fish is a symbol of good luck, fertility and business success. Fish figurines are often used in accessories and jewelry. If you also want to get a talisman fish, we suggest you make it yourself from beads. It is very simple and does not require special skills. Read more about how to make a fish from beads in the master class.
With the help of beads, you can create not only pictures that enchant the soul, patterns on clothes, but also excellent gifts in the form of flower arrangements. So, it will not be difficult to create such a masterpiece even for a beginner. The main thing is to follow the instructions given in this article.
Many of us at least once made a gift with our own hands, believing it to be one of the most best gifts In my life. Without a doubt, such a basis has sufficient grounds. In this article, we invite you to consider, and also try to make an analysis of the main features of how to do it yourself, since they are considered one of the best.

Initially, it is necessary to recall the functions of such a gift, which consist in the transfer of emotions, in most cases such emotions are positive, since the one who gives the gift does not in any way want to offend the one who receives this gift. It is for these reasons that a hand-made gift will perform its function much better than if you buy a souvenir at a retail outlet. However, such a gift should not be thrown off the scales, since its choice quite often takes a long time, which suggests that the person for whom the gift is bought is of great importance. It is also necessary to take into account the emotions made by you when receiving the gifted person, and they will be much more eloquent than through a gift bought in a retail network.
Why does a handmade gift do such a good job of conveying emotions? such a thing is made by hand, which indicates that you have invested a soul in its manufacture, which cannot be bought for untold riches. In addition, you contribute certain resources to making a gift, spend a certain amount of time, your strength and emotions. Frankly speaking, such costs are very difficult to express in terms of money.

One of the important factors of a handmade gift is its uniqueness, since such a thing is not some kind of copy, and the person presented is completely sure that only he has such an original product in a single copy.
The main advantage for the donor can be considered that there is no need to visit many stores, despite the fact that it will be necessary to seek help from the master. From the foregoing, it can be concluded that homemade gift has many advantages that put it in first place over a gift that is purchased in a retail chain.
From beads you can weave a lot of useful things that will decorate your home. We invite you to familiarize yourself with the master classes and learn how to make such handmade beadwork for beginners as flowers and trees.
Making a flower
So, let's consider what products can be used for any purpose: for making bouquets, as decoration for hairpins, brooches, and so on.
We present to your attention a master class on how to make a flower:
The flower is ready!
Second assembly method
Using the same type of spiral petal, you can get completely different beadwork. An example photo can be seen below.

Make a lot of petals, just do not cut the ends of the wire, but twist it. Then weave them together in pairs. Then twist all the stems together. Leave the flower as it is or unfold the petals. If you want to use the craft as a decoration, then roll the wire and stick a piece of fabric on top.
Pot of pansies

We collect a product from beads (schemes)
Flowers must be collected as follows:

The craft is ready!
Create a beautiful rose
It's very easy to do:

The beaded rose is ready!
Beadwork: Trees
To make such a tree, special skills in beading are not required. But the work itself is quite painstaking and time-consuming. Therefore, you will need calmness, attentiveness and self-confidence.
We present to your attention a master class on how to make trees:

By performing these simple steps, you can create not just a masterpiece of beads, but also a whole composition.
white tree
To make this craft, you will need a thin white wire.

You can glue such a tree to a stand or place it in a pot or container, covering the “roots” with decorative pebbles. By creating several of these crafts, you can bring a special zest to the interior of the room.
- If you use multi-colored beads when weaving a tree, then you will get a New Year's craft.
- Weave a flower, wrap the wire a couple of times, and bite off the excess. Glue a piece of fabric on top of the fishing line. Take a hairpin or brooch and remove the decor. Glue your beaded flower onto the blank. You will get a homemade brooch or hair clip.
- A small flower can be glued to various jewelry, then you will have original decoration self made. And if you make two identical crafts and fasten a special hook, you will get summer earrings.