A wonderful holiday on March 8 is impossible to imagine without beautiful flowers, warm congratulations and sweet ones, including those made with your own hands. Particularly touching are children's crafts for March 8 with their own hands, which kids prepare for mothers and grandmothers in kindergartens and elementary schools. What materials do they use to create these lovely souvenirs for International Women's Day! With a light hand, ordinary cotton pads, corrugated paper, napkins, water tubes, scraps of fabric turn into amazingly beautiful flowers, vases, jewelry and other presents. Such do-it-yourself crafts delight mothers and grandmothers for many years, reminding them of the sincere and good moments of the holiday. Our article today contains simple master classes with step-by-step photos and instructions for creating original crafts for March 8, which any child can master. Read more about how to make a beautiful gift with your own hands for International Women's Day, read on.
Do-it-yourself crafts for March 8 from cotton pads for the senior group of the kindergarten, a master class with a photo
Let's start with a do-it-yourself craft for the older group of the kindergarten on March 8 - sophisticated callas from cotton pads. This master class can also be used for children in the middle group of the kindergarten. More details on how to make this version of crafts on March 8 from cotton pads with your own hands in the senior group of kindergarten, below.

Necessary materials for crafts on March 8 from cotton pads for the senior group
cotton pads
- cotton swabs for ears
- yellow marker
- straws for drinks

Instructions for DIY crafts from cotton pads on March 8 for kindergarten
- As mentioned above, in this version of the craft, it is proposed to make an original bouquet of cotton pads, consisting of calla flowers. First you need to make stamens for this amazing flower. To do this, one side of the cotton swab needs to be painted with a yellow felt-tip pen.

- Then the finished stamen should be glued to a cotton pad, as shown in the photo below.

- The edges of the disc must be wrapped inward, forming the basis for the bud, and secured with glue.

- The free end of the stick should be inserted into the green drink tube, which will become the stem for the flower.

- Then you need to make another petal from a cotton pad and fix it on the stem with glue. Ready!

How to make a craft "Tulip" on March 8 with your own hands for mom, grandmother, step by step
The tulip can be called the flower-symbol of International Women's Day, so it is not surprising that it is often chosen for presentations on March 8th. Making a DIY craft in the form of a tulip on March 8 for mom or grandmother is not difficult at all. For example, you can create a stunning bouquet of corrugated paper tulips, which will please its owner for many years. Learn how to make a Tulip craft with your own hands on March 8 for mom or grandmother from the next master class.

Necessary materials for DIY crafts in the form of a tulip on March 8
- corrugated paper in different colors
- pliers
- cardboard
- simple pencil
- green adhesive tape
- thin wire
- hot glue
- scissors
Instructions on how to make a tulip with your own hands on March 8 for mom, grandmother

Original DIY postcard for March 8 for kindergarten, step by step
An original and good version of do-it-yourself postcard crafts for March 8 for kindergarten awaits you further. In this master class, there will be no traditional figure eight, which usually adorns the front side of any children's postcard on March 8th. How to make an original DIY postcard for March 8 for kindergarten, read on.

Necessary materials for crafts-postcards on March 8 in kindergarten
- colored paper
- scissors
- white cardboard
- double sided tape
Instructions on how to make a card for March 8 with your own hands for kindergarten
- Fold a sheet of cardboard in half.

- From pink and red paper, cut out hearts of the same size.


- We take 2 hearts of pink and red color and put one blank on the other. By the same principle, we will attach hearts to postcards, forming a three-dimensional beautiful flower from them.

- On the back side of the blanks we fix double-sided tape. We spread the petals-hearts on cardboard, forming a flower that looks like a peony. In this case, the red and pink hearts should also be connected to each other on one side with adhesive tape.


- Gently move clockwise, forming a flower. Ready!

Beautiful DIY crafts for March 8 from satin ribbons, a step-by-step master class
Incredibly beautiful crafts for March 8 with your own hands can be made from satin ribbons. Ribbons make lovely decorations, such as brooches, for mothers and grandmothers. Learn how to make beautiful crafts for March 8 with your own hands from satin ribbons in the form of brooches from the following step-by-step master class with a photo.

Necessary materials for crafts on March 8 from satin ribbons with your own hands
- satin ribbons 2-3 shades
- lace
- large beads / pearls / beads
- thread and needle
- scissors
- pin
Step-by-step instructions on how to make crafts from satin ribbons on March 8 with your own hands
- First you need to make blanks for the brooch. To do this, a wide tape must be cut into 8 pieces of 6 cm in length. Each segment should be folded in half. Two segments need to be folded in the form of a heart, as shown in the photo below, and stitched with threads.

- Of the four finished blanks, you need to make two. To do this, 2 blanks need to be folded together crosswise and stitched with threads.

- Then the blanks should be folded together again crosswise and stitched with a few stitches.

- A thinner ribbon of a different color should be cut into 5 pieces of 3-4 cm in length. Each piece must be folded together and stitched from the bottom.

- Small blanks should be laid out on top of the main part of the brooch and secured with threads. Then cut off a small piece of lace ribbon and use a thread to form a blank out of it, as in the photo below.

- The lace part should also be sewn to the main part of the brooch. Then the middle of the jewelry must be decorated with beads or pearls. Attach a large pin to the back of the brooch with glue. Ready.

Children's crafts for March 8 with their own hands from napkins for elementary school, a master class with a photo
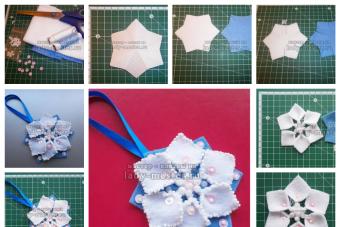
The next master class of children's crafts on March 8 with their own hands from napkins is perfect for elementary school. It tells how you can use the origami technique to turn an ordinary paper napkin into a useful vase in which you can store small jewelry, sweets and other trifles. Read more about how to make children's crafts for March 8 with your own hands from napkins for elementary school in the master class below.

Necessary materials for crafts on March 8 with your own hands from napkins for school
- paper napkins in different colors
- small jar or glass

Instructions for children's crafts on March 8 from napkins for elementary school
- We take a napkin and straighten it carefully.

- Now we bend each corner of the napkin inward to its middle.


- We repeat the same thing, but with the corners of the resulting square.


- Once again we repeat the same thing - we bend each corner inward to the middle of the napkin. Press with your finger for a few seconds so that the workpiece holds its shape better.


- Now we turn over the workpiece. Again, bend each corner to the middle and lightly press with your finger so that the workpiece does not fall apart.


- Then we turn the workpiece over again and put it on the opening of the jar or glass.

- Now, holding the middle of the workpiece with your index finger, carefully straighten each fold of the napkin, as shown in the photo below.


- After the first four "petals" are straightened, we move on to the next row of corners. We continue to straighten each corner one by one until all the “petals” are dissolved.


- Now it remains to carefully remove the finished vase from the jar and turn it over. This is just the perfect device for storing small things that need to be kept at hand at all times.

Do-it-yourself paper crafts for March 8 for mom, master class with photo
This version of paper crafts with your own hands on March 8 will appeal to any mother. After all, it is a huge peony flower, which is not inferior in beauty to its living counterpart. Learn how to make this do-it-yourself paper craft for March 8 for mom from the next step-by-step master class.

Necessary materials for paper crafts for mom on March 8 do it yourself
- corrugated paper pink, green
- wooden skewers
- green paper tape
- scissors

Instructions on how to make paper crafts with your own hands for mom in honor of March 8
- First of all, you need to draw a template for a large heart, which will become the basis for the correct shape of the petals of our peony. The finished template should be attached to corrugated paper and cut out 8-10 blanks.


- We put two wooden skewers or sticks together and wrap them with green paper tape - this will be the basis for the peony stem.

- Now you need to give the petals the correct shape. To do this, each heart blank must be properly stretched in the middle. Then the edges of the petal should be slightly wound around the pencil in the opposite direction, as shown in the photo below.


- At the next stage, you can proceed to the assembly of the flower. To do this, each petal must be wrapped around the stem and secured with glue and tape.

- From green corrugated paper, you need to cut a blank for a leaflet, and then fix it on the stem with paper tape.

- It remains to cut out the base for the sepal from green paper and fix it on top with adhesive tape.

Do-it-yourself crafts master class for a child on March 8, video with instructions
You can find another simple master class of the original DIY craft for March 8 for a child with step-by-step instructions in the video below. In this do-it-yourself crafts master class for a child on March 8, it is shown how you can make a very interesting present for mom or grandmother from colored paper. Details in the video below.
Summary: DIY postcards. Do-it-yourself postcard for mom. Handmade postcard for grandma. Postcards for March 8. Do-it-yourself postcard for March 8. Handmade gift for mom. Do-it-yourself gift for mom on March 8. Handmade gift for grandma. DIY crafts for March 8. Crafts for March 8 in kindergarten. DIY paper crafts for March 8.
Do-it-yourself postcard for March 8 is a wonderful gift for any girl or woman. It is a real pleasure for children to make handmade cards for grandmothers and mothers, even with the participation of adults. The participation of adults in preparing a surprise is important in order to show the baby an example of how to do it. Welcome any manifestation of fantasy in the design of the postcard. Your ideas and creative examples will help the baby navigate and add something of their own.
1. Postcard to mom with your own hands
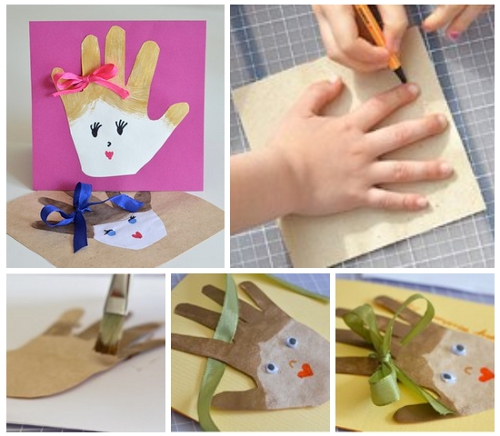
The child will definitely like the idea of circling his own palm, cutting out the resulting silhouette and making a postcard out of it for mom.

Separately, cut and glue a bouquet of spring flowers from colored paper. Glue your palm to the front of the postcard for March 8th. Just leave your fingers unglued! Put flowers in them, bend and only then glue. Do-it-yourself postcard for mom is ready!


From the silhouette of a child's hand, you can make another original postcard for March 8 with your own hands.
Here is another version of the postcard for March 8, decorated with a voluminous paper application. Very kind, beautiful and tender card. You can view the instructions and download the postcard template on the website Krokotak.com

Volumetric postcard "Vase with flowers". It is very easy to make it. Flowers are made of colored circles of different diameters. The vase is made of a piece of rectangular paper glued to a postcard. For detailed instructions on how to make such a gift for mom or grandmother with your own hands, see.

A spectacular postcard for mom is easy and quick to make using a regular hole punch. To make this postcard for March 8 with your own hands, you will need blue and yellow paper. Link >>>>

Here is another interesting option on how to make a voluminous postcard for mom with your own hands. Flowers are made of corrugated paper and so-called. chenille wire. The card itself has two layers. For more information on how to make such a voluminous postcard as a gift for March 8, see.


3. Do-it-yourself postcard to grandmother
And the child can make this voluminous postcard together with his mother and present it to his grandmother or aunt. For detailed instructions on making a volumetric postcard by March 8 with your own hands, see the link >>>>

A postcard by March 8 with your own hands can be decorated with an original application in the form of spring flowers, made from circles folded in half. See link >>>>

Here is an example of another do-it-yourself voluminous postcard, decorated with an appliqué in the form of flowers made from circles of different sizes. Both the petals and the leaves of the flowers on the card are made of two circles each: one is larger, the other is smaller.


A beautiful three-dimensional flower applique is also obtained from hearts folded in half. For detailed instructions on how to make this postcard on March 8, see.


applique flowers
Here we want to give a link to the book "Flowers. A simple application (for children from 2 years old)" by the publishing house "Karapuz". In it you will find many interesting and simple ideas on how to make an application of flowers to decorate a postcard by March 8th. It is not necessary to buy the book, all the illustrations from the book are posted on the website of the Labyrinth online store.

Continuing the theme of paper flowers for beloved mothers and grandmothers, we will share with you an interesting master class from the site maaam.ru Do-it-yourself card for March 8, decorated with a three-dimensional paper flower. See how to make it.

This homemade postcard for March 8 is decorated with a voluminous application made of colored paper. To make one tulip flower, you need to cut out two identical tulips according to the template, bend them in half, and then glue the sides together. To add volume to the leaves of flowers, bend each leaf in half and glue only one half of the sheet to the postcard.

A paper flower can be wrapped in a paper lace napkin. It will turn out a very delicate spring bouquet. Link >>>>

A creative solution is to make a card for March 8 in the shape of a cup, inside which you can put a bouquet of paper flowers. Please note that the front side of the postcard is decorated with flowers. Vytynanka is a type of creativity that is based on cutting out patterns from paper. For cutting, use ordinary office paper or sheets of drawing paper. You can cut with a clerical knife or a special craft knife. Also, nail scissors are often used to cut vytynanok templates.


The original application of flowers can be made from colored pencil shavings.

From paper molds for cupcakes or paper filters for coffee, you can also make flowers to decorate postcards for March 8th. In the center of the mold, the child can stick his photo.

An imprint in the form of a rose leaves a celery root on paper if it is previously painted with paint. Try to make a DIY postcard with your child using this unconventional drawing technique.


Surely, you are familiar with the technique of paper weaving. Using this technique, you can create beautiful paper napkin rugs. see link

By weaving such a paper rug, you can then cut out a basket for mom or grandmother from it. Be sure to decorate the finished basket with flowers. Link >>>>

The postcard in the photo below is decorated with flower petals made from corrugated paper. How to make such an original voluminous postcard for March 8 with your own hands, see the link >>>>


Flowers can not only be cut out of paper, but also drawn with paints, pencils or felt-tip pens. Here is an interesting way to decorate a postcard for mom on March 8 >>>> First, very easily outline the plot spot with a simple pencil. Then, with watercolor paints on wet paper, draw multi-colored spots. When the paint dries (you can dry the paper with a hairdryer), with a black thin marker (felt-tip pen) or a gel pen, paint on the veins on the leaves, flowers, decorate and sign the postcard for mom. Another related link.

You will find a master class on making a postcard for March 8 with your own hands with a voluminous application from napkins on the Country of Masters website.

Quite interesting postcards are obtained if you use elements folded using the origami technique in them. These elegant postcards can be made by hand for a woman using an origami dress. Such dresses can become both a decorative element of a postcard and an independent decoration, for example, a gift tag.


Master class on making origami dresses see link >>>>

And here is a simpler version of a postcard for March 8, decorated with a paper dress. Here the dress was made from a book page. Separately cut out and glued the bodice of the dress. We made a skirt separately by folding thin strips of paper like an accordion.

And one more example of a do-it-yourself postcard for March 8, decorated with a paper dress. For this dress, a skirt is separately cut out and folded out of paper, and a bodice separately. Use the ready-made dress template. See link.


Finally, the simplest version of a three-dimensional postcard for March 8, decorated with a tutu skirt. The skirt is made from a strip of paper folded like an accordion.

From plasticine flagella (sausages), a child can make an original application as a gift for his mother or grandmother for the holiday.

The basket with flowers in the photo below is also molded from plasticine sausages. It turned out a beautiful and original card for mom on March 8.

Here is an example of another interesting postcard for March 8, made of plasticine using the appliqué technique.

A handbag is an indispensable attribute of every woman, so it would be appropriate to depict it on a postcard. For example, you can make an application in the form of a colored paper bag decorated with rhinestones and sequins. Link >>>>


And an obligatory attribute of a true lady is a lady's hat. Complement your gift for your beloved mother with a small original postcard in the form of a hat. How to make this card for mom on March 8, see. It sits well on the table. Inside, congratulations. Outside - any design of your choice. You can come up with a wide variety of hat decorations: flowers from napkins, origami flowers, quilling flowers, as well as buttons, lace, ribbons, sequins.

If your mother and grandmother are big tea lovers, then for them you can make a postcard for March 8 with your own hands in the form of a cup with a tea bag.
Here is the easiest option.
Make an applique of colored paper in the form of a cup and saucer. At the same time, glue the cup to the base of the postcard not completely so that you can put a tea bag inside.

And here are two more interesting options for making a postcard by March 8 with your own hands, but they are also more complex.
To make a three-dimensional postcard as in the photo below, download the postcard template from the link. Print it out and let your child color it. Then you need to make cuts on both parts of the card with scissors and insert one part into the other. For detailed instructions for making this craft for March 8, see the link >>>>

And this postcard is in the form of a teapot. Inside you can put delicious tea bags and congratulations on March 8. A template for making a postcard with your own hands at the link. To make this paper craft for March 8, you will also need a beautiful ribbon.


If you want to emphasize the role of your mother or grandmother as a hostess in the house, if your mother or grandmother loves and knows how to cook deliciously, then make a postcard for March 8 with your own hands, decorated with a paper application in the form of a kitchen apron.


On the same site there is a section with do-it-yourself voluminous postcards for March 8. A card in the form of a bouquet of flowers, or a cup of coffee or a basket of flowers. All this and more can be found on the Creative Park website.


10. How to make a postcard. Postcard templates
Volumetric postcards-toys from the site www.nika-po.livejournal.com deserve special attention. These postcards will occupy the attention of the recipient for a long time, he will roll the ball through the maze or follow the spilling beads. The main element of all these voluminous postcards with a window is a plastic cap from food packaging (for example, from sour cream). For a detailed master class on how to make a postcard with your own hands, see. Here is another link to the book of the author of the site, the book is called "Entertaining Postcards".

March 8 not far off and we with kids have already started preparing for the holidays. crafts and applications. In the course are plasticine, and colored paper, and newspapers, and leaflets. The results of our work will be posted in about 1-2 days.
You should have seen with what zeal and interest children(my nieces and son) getting ready for March 8! You can only hear: “I am doing this craft for my grandmother”, “And I am for my mother”, “And I am for my sister” :) In this atmosphere of bright crafts, the approach of spring and warmth is already felt! I think and your children, performing crafts for March 8 will fill the house with warmth, joy and celebration! All with the coming!
1. Postcard for March 8 "Flowers in a pot" (3-6 years old)
How to do:
Cut out a pot and flowers from white paper with your child and decorate them with magazine clippings. Circle the contours of the flowers with felt-tip pens. Let the child glue the resulting pot on the second sheet of paper and draw the stems for the flowers. Now you can glue the flowers.

You can sign a postcard in an original way: attach it to the refrigerator with magnetic letters.
2. Craft from plasticine balls "Festive dress" (1-3 years)
The little ones will also be able to congratulate their mothers on March 8! This craft was done by Varechka for her mother, sometimes asking me: “Julia, are you sculpting here? Julia, right?
Material: colored paper; plasticine; cardboard (we have from a box of marshmallows).
How to do:
Cut out a dress from colored paper: fold the sheet in half, draw only one half of the dress at the fold, cut and unfold the sheet, you get a dress. Glue it onto cardboard.


Draw circles on the dress. Roll up balls from plasticine, and let the child stick them in circles on the dress. By the way, I wrote about classes with plasticine balls and their benefits in the game.
P.S. With the help of plasticine balls, Varechka decorated the cardboard itself. Since she is still small and cannot write herself, we cut out the inscription "March 8" from the newspaper and pasted it next to the dress.
3. Craft "Mimosa" (3-5 years)
Do you know why mimosa? It symbolizes the sun, warmth and the beginning of spring. When Slavik was making this craft, there was a feeling that everything around was beginning to bloom, although there was still slush and snow in places outside the window.
This under the tree I suggest making it for children from 3 years old, because it takes a long time to sculpt balls and not every two-year-old kid can withstand 10-15-minute modeling.
Material: yellow plasticine; cardboard (we have from a candy box); colored paper (green).
How to do:
Draw the mimosa stems with a green felt-tip pen.


Cut out leaves from green paper, cut their edges slightly - so they will look more like real mimosa leaves. Roll up balls of yellow plasticine with your child and let him sculpt them on the stems.
4. Craft "Talking flowers for mom" (5-10 years)
This craft was made by my eldest nieces Arisha and Vikusha. In a day March 8 their mother will receive a gift that will speak for itself! Such under the tree You can give your mom or grandmother not only on March 8, but also on your birthday.
Material: colored paper and colored cardboard
How to do:
Let the child circle his palm on 5 multi-colored sheets and cut out traces along the contours. These will be flowers.


Then you need to cut out the stems and the vase and stick everything on the cardboard. On the vase, the child can write "I love my mother (or grandmother) because...", and on the palms-flowers - the answers.
5. Craft "Bouquet for March 8" (3-8 years)
When we made this bouquet, we did not think that it would turn out so ... real!
Material:
- colored paper; 2 sheets of cardboard (I used a filter box)
- a round white paper napkin (if there is no such napkin, cut out a large circle from white paper, make the edges wavy);
- ribbon.
How to do:
Cut out flowers and leaves from colored paper. Let the child glue them on a round napkin.


To prevent the napkin from becoming wavy from glue and to be more durable, glue a circle of cardboard on its back.


From the second sheet of cardboard, cut out the base of the bouquet and glue it, as in the photo. Draw the stems with a green felt-tip pen.
At the end, decorate the bouquet with a ribbon.
6. Craft "March 8" (1-3 years)
And again crafts for kids! For mom, we have already prepared a gift (craft 2). Now we will please grandmothers and sisters!
Material: colored cardboard (1 sheet); flowers cut out of magazines, newspapers and leaflets; plasticine.
How to do:
Cut out the number 8 from colored cardboard. For this, I needed 2 bowls of different sizes and nail scissors.


Roll balls from plasticine, prepare cut flowers. Let the child sculpt and stick everything on the figure eight.
Paper is the most popular and environmentally friendly craft material. From it you can make almost anything that your imagination wants. In this article we will look at: how to make paper gifts for March 8 with your own hands.
You will need: colored paper, scissors, needle, ruler, glue stick.
Master Class

Roses from money
You will need: printed banknotes of any denomination, wire.
Master Class

Box with a surprise
You will need: 3 A3 sheets, black pastel paper 50x65 cm, 2 types of scrapbooking paper (red and with flowers), Moment Crystal glue, pencil, ruler, red satin ribbon, mug, 4 bars.
Master Class
- Take a sheet of A3 format and redraw the diagram of the box.

- Take another sheet of A3 format and redraw the side edges of the box.

- Take the third sheet of A3 format and redraw the diagram of the box lid.

- Cut out pieces from 3 sheets.

- Glue the sides of the box.

- Fold 2 times inside the edge of the lid.

- Fix with glue.

- Cover the sides of the box with black pastel paper.

- Cut out a blank from black paper according to the lid pattern.

- Cover the lid with black pastel paper.

- Cut out 4 rectangles measuring 15x16 cm from black pastel paper.
- Cut out 4 rectangles measuring 13x14 cm from red scrapbooking paper.

- Paste the inside of the box with black rectangles.
- Attach a piece of red ribbon to each side.

- Glue the red rectangles to the inside of the box over the ribbons.
- Cut out a 15cm x 16cm rectangle from floral scrapbooking paper.

- Glue it to the center base of the box.
- Cut out a 13x164 cm rectangle from floral scrapbooking paper and glue it onto the lid.

- Arrange 4 bars on the sides and tie with ribbons.
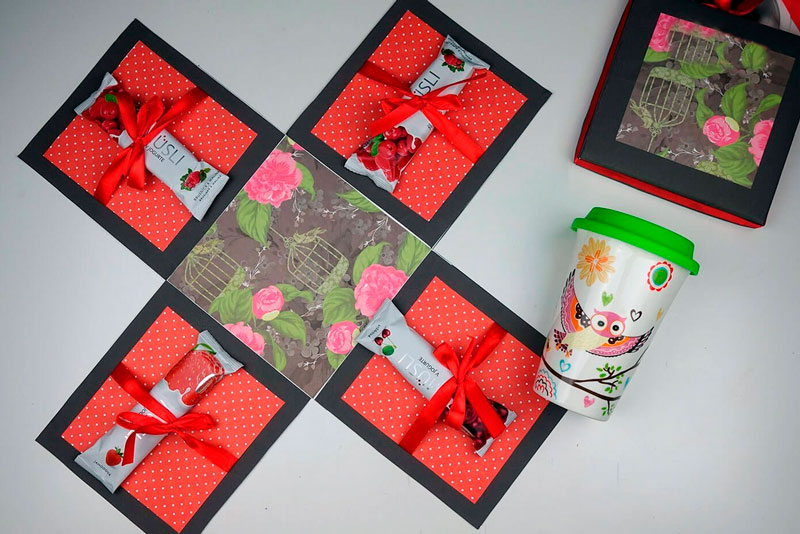
- Place the mug in the center, raise the edges and close the lid.

- Decorate the lid with ribbon and tie a bow.
giant flower
You will need: colored thick paper, a sheet of cardboard, scissors, glue.
Master Class
- Create templates for the petals: 6 large, 6 medium and 6 small.
- Cut out the petals.

- Make cuts at the base of the petals.
- Fold the ends of the petals away from you.
- Turn the petals over and glue the ends next to the notch, forming a natural petal shape.

- Glue 6 large petals together in a circle.
- Glue the medium petals, and then the small ones.

- Glue a sheet of cardboard to the bottom of the flower.
- Fold the sheet in half and cut the "brush" from the side of the fold. Repeat this process with two more sheets.
- Peel off and unfold the cut sheets.

- Fold the first sheet, then add the rest to make the core.
- Glue the core to the center of the flower.
Ship of money
You will need: 7 sheets of A4 format with the image of various banknotes (euro, dollars, hryvnia, rubles), white sheets of A4 format, silicate glue, scissors, glue gun, thick cotton threads, skewers 20-30 cm long, polystyrene, flat box on half as wide as the bottom of the ship.
Master Class
- Fold the boat from a sheet of paper, as shown in the photo.

- Carefully turn the boat inside out so as not to tear.
- Fold and iron the boat.
- Outline the boat on another sheet, then draw a dividing line and cut out 2 pieces.

- Coat them well with glue and glue them to the inside of the boat to make two-layer sides.
- Cut the money sheets into strips 1.5 cm wide.

- Tape the boat with money stripes.
- Thoroughly coat the entire boat with glue for strength and leave for 2 hours to dry completely.
- Fold the same bills side by side and glue them. Make 3 of these - out of five, out of three, and out of four bills. These will be the sails.

- Carefully thread the sails onto the skewers and fix the joints with glue so that they do not slip.
- Take the boat and glue 3 pieces of Styrofoam inside.
- Insert skewers into foam for front and rear yards. The front yard should be 1/3 longer than the back. Make sure the lines are even, then secure with a glue gun.
- Insert skewers with sails, placing them at the same distance. It is worth noting that the deck should be smaller than the stern.

- Fold the threads in 2-3 layers the length of the sail and additional centimeters for the ties.
- Tie the threads to the skewers as shown in the photo.
- Cut 2 bills diagonally and fold the edges 0.4 cm.
- Glue banknotes (sails) to the rail threads.

- Make the sails to the stern in this way: do not twist the bill into a tube, bend the edge, then glue it.
- Fold 3 bills in half, shape them into flags, then glue.
- Cover the deck with banknotes.

- Make a ship stand out of a flat box.
- Glue the desired background onto the box.
- Glue the ship.
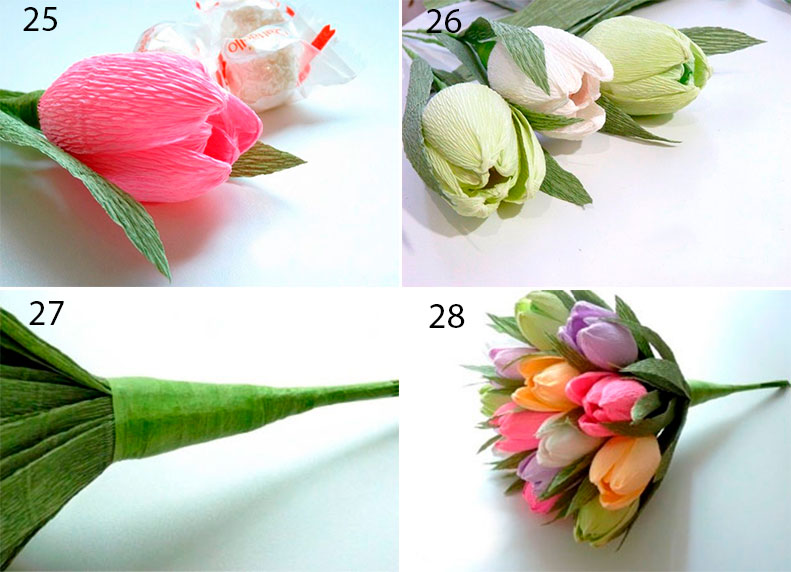
Corrugated paper tulips
You will need: corrugated paper of your favorite colors for buds, green corrugated paper for leaves, Raffaello sweets, double-sided thin tape, green teip tape, satin ribbon, packaging material for the bouquet, scissors, wire, pliers, wooden stick, if desired, to create dew - transparent beads , glue gun, tweezers.
Master Class
- Prepare the wire by making the desired number of stems of the same length.

- Cut long strips of corrugated paper, cut the long strip of corrugated into 2 pieces, then cut into 4 pieces. You should get 8 strips, 6 of them will be needed for the tulip bud.
- Turn each strip around the center, bend in such a way that the front sides of the strip are directed in one direction.

- Make 6 blanks in the same way.
- Attach double-sided tape to the end of the wire.

- Attach the candy to the end of the wire.
- Collect the tulip bud in this way: take the first petal and attach it to the adhesive tape. Place the second and third petals near the candy and, holding with your fingers, fix with tape tape.

- Attach the remaining petals in the same way, forming a tulip bud and securing with tape.
- Trim excess crepe paper at an angle at the base of the bud.
- Wrap the stem with tape.

- Cut off a strip of green crepe paper.
- Cut into two almost equal parts.
- Fold each part 4 times and cut out the leaves.
- Pull each leaf out in a spiral using a wooden stick.

- Place a short leaf, and lower on a longer one. Secure each leaf with tape. Tulip is ready! Make the right amount of tulips in different colors.
- Collect tulips in a bouquet in this way: connect 2 tulips and pull them together with teip tape, then add one tulip one at a time, placing the colors in a checkerboard pattern.
- Cut 20 leaves, and arrange them around the perimeter of the bouquet, fixing with teip tape.
- Wrap the bouquet in wrapping paper and tie with ribbon.

- Create dewdrops on the tulip buds by gluing clear beads using tweezers and hot glue.
Papier-mâché plate

It is not at all difficult to create beautiful bouquets of colored paper or original postcards for the Spring holiday with your baby! Embrace simple and bright ideas!
Source: instagram @happy._.pappy @mamavkurse
We offer 7 original ideas with which you can make paper flowers for crafts on March 8!
Roses from colored cardboard
You will need:
- colored cardboard
- scissors
- green paper
- scotch

Process:
- Cut out several even circles from cardboard of different colors. For example, red, yellow, pink. To make the circles the same, you can use the bottom of the glass.
- Make a spiral out of the circle as shown in the picture and twist it into a rosette. Secure the end with a piece of transparent tape.
- From a long strip of green paper, twist the stem, glue it to the rose. You can also decorate the finished rose with a leaf at its base.
Snowdrop card
You will need:
- colored cardboard
- white and green paper
- PVA glue

Source: instagram @mamavkurse
Process:
- From white paper, cut out several short strips of white paper and glue as shown in the picture to make a flower.
- Hide the joints under the dome of green paper. Draw a flower stalk and glue green paper leaves to the base.
Sakura from napkins
You will need:
- brown plasticine
- pink napkins
- PVA glue
- cardboard

Source: instagram @all4mammy
Process:
- On a sheet of cardboard, fashion the trunk and branches of a tree with the baby. The more there are, the better.
- Tear a pink napkin into small pieces, then twist small rollers out of them with your hands and glue them onto cardboard near the branches.
- When the painting dries, you will have an amazing 3D sakura craft!
Bouquet from an egg mold
You will need:
- cardboard form for eggs
- gouache
- beads
- green cardboard or straws