In the list of the best, affordable and convenient materials for various artistic techniques, jute undoubtedly takes pride of place. It is easy to work with, it is easy to find, it is almost impossible to make a mistake when working with it. And today we will tell you what any novice master can do with his own hands from this wonderful thread. We have collected some cute twine crafts for you and give you some tips so you can easily repeat them.
Twine can be used for winding any surface, knitting, weaving and as an independent material. It's also very easy to paint. So if you don't like its particular color, you can easily change it. Or apply a pattern to the twine winding using paint from a balloon and a stencil.
Unusual balls
Let's start simple. Earlier we told you about the technique of creating twine lampshades using hot air balloon and glue. Today we will diversify this method and go a little further. Inflate the ball quite a bit. Let's do the same steps as before.
When a small ball is ready, we will turn it into a vase for dried flowers or place a small pot inside. It will turn out a beautiful and unusual pots.

And if you add a few extra accessories, you can make a cute little animal. If you have eyes and a nose from old toys, you can make, for example, an unusual Christmas ball. Or just a hanging animal.

Twine for decoration
There are no tricks here. We take an ordinary shoe box and completely coat it with PVA. Then we just do a neat winding: thread to thread.

Or decorate only part of the basket.

In the same way, you can make cute round coasters for mugs or hot napkins.

Twine for knitting
If you know how to knit and crochet, you can create very beautiful twine items.

Only at first glance it seems that this material is very rough. This is not entirely true. And no one says that you need to knit clothes from twine. But napkins and coasters - quite.

Twine for jewelry and accessories
You won’t believe it, but even earrings can be made from twine, and they are very fashionable. Just wrap the hoop earrings in several layers, and glue the tip. Add some extra decor - you're done!

And even the usual braided bracelets can be made from twine. Just take it instead of floss. You will be surprised how great it will turn out.

In addition, twine makes a very pretty winding for bouquets.

Twine on the wall
If you own the quilling technique, you are in luck: the twine will come in handy here too. For example, you can draw something unusual on the wall, and then fill the space with twine. Twisted like quilling elements. Well, all this is fixed with glue and safety pins. Here, for example, is a kind of map of the world.

These are just a few examples of working with twine. In fact, you can create hundreds of different crafts. From one skein you get about a dozen wonderful accessories for home and life. Try it, it's much easier than you think!
Views: 2 570
Such a charming vase with a bunch of jute twine can be a great gift for friends and colleagues.
We will need:
- pipe from linoleum;
- titanium glue and glue gun;
- Twine, of course, plain, bleached and stained;
- scissors;
- scotch;
- wire;
- cardboard;
- file (I glue on a transparent folder);
- and all sorts of differences for flowers: coffee, pistachio shells, skins from tangerines and salty dough for stamens.

At one end, I wrap it with cardboard to thicken it and smooth everything with adhesive tape, and on double-sided tape I begin to wrap the future vase with twine.

Here she is already wrapped with twine.

Now we make leaves or grass. We draw a sheet on paper, put it in a folder, squeeze it along the contour with glue and lay out the twine. Two circles with ordinary twine, and then bleached (bleached in Whiteness).

After bleaching, the twine becomes a little thicker and fuzzy, then I scroll it a little between my fingers. Here is one leaf. You need a lot of these, I was tortured to make them, and even their size is large.

And we begin to stick on the Titan to the vase. It is better to glue when the leaf is still wet from the glue, then it will take any shape and it is easy to bend it.

Already finished here. I made a couple of leaves dark. And then I made an edging or a leg, I don’t know how to say it correctly. A strip at the very bottom of the vase.

I just glued the twine into such a strip of the desired length. My folder size turned out to be small, so I had to finish one more piece like this.

And glue it on the bottom, moisten it with plenty of glue to give it even greater hardness.

And let's move on to the flowers. We draw a circle and draw it out in the form of a droplet and lay it out with twine.

And while the glue is not high, i.e. while the flower is still wet, roll it into a bag with a small hole at the bottom.

But I wanted to add colors and since I will have tangerine roses in the bouquet, I decided to make them red. Painted with a water stain Larch. I just poured it into a plate and dipped bleached twine there to make the color richer. Then we just wring it out, you can rinse it in water, otherwise the twine will be a little harsh and dry.

Here I made some more flowers.

Then we measure the twine of the desired length, glue it into two threads. This will be the stem. We put it through the hole at the base of the flower and glue it to the vase, as you like the glue gun better.

Here is one flower closer. First, I painted the tip of the stamen in dark color, but then all these made them pale yellow (salt dough).

That's how I did it! It's almost done, it remains to decorate the top to give it a finished look.

I made these small leaves of various shapes.

And she began to glue the vase to the neck.

It turned out like this.

Now the vase is ready! Let's spin.


I made tangerine roses, pistachio flowers and coffee balls. And then I glued everything on the burlap, cut out the squares, loosened the ends and glued the flowers.

Then she wrapped wires of different lengths with twine, wrapped them with ordinary twine and bleached twine, and then twisted it into spirals. I rolled them on a stool.
And then I pasted all the flowers on the glue gun and also decorated them with coffee beans.

Now it remains to insert the bouquet into the vase. Since my vase is tall, I filled it with Styrofoam almost to the top and stuck spirals into it.


That's all, the vase and bouquet are ready! I like it so!!! If desired, you can remove the bouquet and insert a carafe of water into a vase and put fresh flowers in it. But I like that too!

Once again the bouquet is closer.


Well, in order to understand the size of the vase, I invited my Maska for evaluation.

And here is such a pistachio flower. Master class on it.

Here you can see the synthetic winterizer and roses better.

And flowers closer.

Coffee ball.

Spirals.


No matter where I put it.


Beautiful twine crafts for decor are famous for their originality and can create a pleasant atmosphere inside the house. originality finished products do not occupy.
In addition, twine is appropriate not only on its own, but also in combination with other decorative elements. Together, they endow any craft with features of originality. Let's try to understand some of the subtleties of this curious needlework.

Twine bow and vase
The material is a packing thread, which is made from jute. Below will be presented several workshops on twine crafts. They are especially useful for beginners.

The first product is a bow, which is simple in execution and will allow you to practice well. Of the materials we need: twine, a small glass jar, scissors and silicone-based glue.

The manufacturing process consists of the following simple steps. First, the twine is wound around the jar in tight and neat coils. The width of the future bow depends on the number of turns. After winding, the thread is cut off.

The main thing is to make sure that it does not bloom. After that, the workpiece is abundantly covered with glue. When it is completely dry, the glued twine is pulled off the can and compressed strictly in the center. The result is a beautiful bow.

At the final stage, the place of the inflection must be carefully wrapped with a thread, hide its tip with reverse side and glue the resulting knot.

Original ideas and instructions for twine crafts can be found in specialized needlework literature or on the Internet.


Now let's try to make out the nuances of making another curious thing - a vase. To do this, you will need: a small jar (for example, with a volume of 0.7 liters), twine, scissors and glue. The jar is covered with glue, after which a jute thread is tightly wound around it, starting from the bottom and moving up.


Upon completion, the twine is cut off, the future vase is left to dry. At will, the finished creation is decorated with beads, rhinestones, flowers, etc.

Making a basket
How to make a twine basket with your own hands, and so that in the end you get a beautiful and useful thing? Let's go over the entire sequence of steps.

Materials needed: a plastic container of the required dimensions (a five-liter bottle with a cut off top is suitable), twine, scissors, a crochet hook and glue. On the cut of a plastic bottle, maintaining the same distance, small cuts are made that will prevent the thread from slipping to the sides.

Next, vertical winding is carried out. The cut ends are fixed with glue. After that, horizontal winding is carried out from below with threading (manually or crochet) between each turn of the vertical winding.

It is not brought to the very end, leaving a margin for the design of the top. The bottom of the basket is fixed with glue directly on the threads braiding the bottom of the future product. It itself is a circular winding.

The design of the top is carried out by twisting two adjacent vertical turns. The final stage involves bonding the entire craft with glue.

After drying plastic bottle removed, and the basket becomes complete. It can be used as a planter, a box for useful little things or a fruit container.


Crafts from coffee and twine
There are a lot of simple twine craft ideas for beginners, some of them involve the use of coffee beans. Consider how you can get decorative acorns. For this, plastic containers from kinders, twine, coffee beans, a piece of burlap, floral wire, glue and scissors are useful.

Glue one end of the wire to the side of the container, the other should get on top of it and rise freely. Next, the workpiece is tightly braided with a thread, which is fixed with glue. Movement is from below.


On half of the blanks, the free ends of the twine are left; in the future, it will mask the wire connection. Similarly, the procedure is repeated with all available containers. Coffee grains will imitate an acorn cap. They are glued in turn in the appropriate place, trying to overlap with the previous grain.

The leaves are made from a piece of burlap, which is cut accordingly. The contour of the oak leaf is glued with twine, the veins are also made from it. A piece of wire is placed in the center of the sheet and masked. All ends are twisted together and hidden under additional decorative winding.

Leave a small loop at the top of the hat for hanging. A wonderful decorative element in the form of acorns is ready to use. In addition to aesthetic pleasure, the pleasant aroma of coffee beans will also delight.


Photo of twine crafts


What materials do needlewomen not use for making decorative crafts. One such unusual material is jute. Unusual twine crafts have a unique appearance and are widely used in decoration. Despite the inconspicuousness of these threads, with their help you can make very interesting things with your own hands.
 Even beginners can weave simple crafts from jute threads. Experienced craftsmen use jute to weave more complex unique things using other decorative elements. Help to master unusual technique several workshops on do-it-yourself twine crafts.
Before novice craftsmen weave something, you need to familiarize yourself with the jute thread. This durable dressing most often used in everyday life. In addition, due to its strength and neat appearance, it is used for dressing, packaging and stitching various products. There are several types of twine, each of which is used in a specific technology:
- polypropylene - able to withstand high temperatures up to 50 degrees. He is not afraid of moisture or alkali. It is the strongest thread, which is why it is called a cord;
- textile - used for packaging and stitching products;
- jute;
- linen;
- linen-hemp;
- linen polished.
Before starting work, you should choose the type of thread and prepare everything you need so that you do not get distracted in the process, but completely surrender to creativity.
Broom-amulet
Beginners should start with the simplest crafts. This is exactly what a broom-amulet is. It is simple to make, you will need: scissors, jute thread, a book.
Making a broom:

Such a charm should be in the house. It will be correct to put a broom on the handle. That is upside down. In this position, he will certainly bring good luck and save the house from trouble.
Jute rug
Another do-it-yourself jute crafts workshop available for beginners is weaving a rug. Due to the strength of the twine, good jute rugs are obtained. Weave them with a large hook.
Making a jute rug:
- cast on 8 air loops on the hook, close them in a ring;
- then there is 1 lifting air loop and a row of single crochet stitches is knitted, adding a few loops;
- in this way, several rows are knitted to the desired diameter of the rug.

Such rugs can often be seen on the floor in the hallway or bathroom. If desired, the threads can be dyed or bleached.
Twine basket
Very interesting craft from a tourniquet - a basket. Such exclusive thing, which is not only original, but also useful, can perfectly cope with the role of decor in the kitchen.
For a master class on making a twine basket with your own hands, you will need:
- hook;
- scissors;
- plastic bottle;
- glue gun, silicone glue can be used;
- twine.
A plastic bottle for this craft can be taken of any diameter based on the size of the planned basket.
Basket making:

It will look very interesting if you use twine different color. It can also be decorated, for example, with a rope flower.
Additional decor elements
Any crafts from a bundle of rope and twine can be decorated with cute flowers of your own making. Such a product will look even more attractive. Flowers made of paper twine are especially good.
For work you will need:

Before you start work, you need to think over the composition of the decor. You can’t overdo it with flowers, no matter how many of them are made, the thing will look original in any case.
How to make flowers:

A do-it-yourself twine crafts master class involves the use of various decorative elements. Flowers cut from simple burlap will also look interesting.
Twine dyeing methods
At home, threads can be dyed in several ways. Each of them is effective in its own way.
As paints you can use:
- household dyes - building colors, stains of different colors;
- food - Easter paint for eggs;
- natural - brilliant green, onion peel, wine.

After each staining with a dye of any type, it is necessary to fix the result with a solution of vinegar. This requires 1 tsp. vinegar essence dissolve in 0.5 liters of water. But before the twine can be dyed, it must be bleached in plain white.
Whitening twine with whiteness
The twine bleaching process is not at all laborious. The main thing is not to soak the thread with a skein in whiteness. They must be gradually unwound, immersed in a container of bleach.
For bleaching you will need:
- whiteness - 250 ml;
- enameled container for bleaching;
- water 1 l;
- twine threads;
- fabric softener.
This amount of bleach is designed for a small amount of thread. Accordingly, if there are more threads, whiteness must be added. In this case, you will need to use a container for soaking a larger size.
Whitening process:
- dissolve whiteness in warm water in an enameled container;
- gradually immerse the twine in the solution;
- leave the threads in the solution for a day;
- after 24 hours, remove the threads, squeezing them slightly, and rinse in fabric softener;
- put the threads on a bag, battery or hang on a rope until completely dry.
When working with whiteness, rubber gloves must be used. After the twine is completely dry, you can start painting it.
Dyeing threads with different dyes
 Any do-it-yourself twine craft will look much more interesting if you use threads of various bright colors in weaving.
For work it is necessary to prepare:
- newspaper;
- glass jar;
- vinegar;
- food coloring;
- bleached twine.
Before dyeing the entire twine, you should try the paint for color. To do this, you need to dilute it in a jar, stir well until completely dissolved. Cut off a small piece of twine and dip it in the coloring solution. If the color on the thread is suitable, you can start dyeing the entire batch of threads. If the color is not saturated enough, you can add a little more dye.
Coloring threads with food coloring:

Similarly, staining and coloring occurs. The only difference is that after dyeing with such methods, it is necessary to rinse the threads under running water.
With this method, you can dye the threads in absolutely any color. Spending a little time, the result can be obtained unusually a beautiful craft handcrafted.
How to make beautiful products using jute filigree technique: master classes for beginners
To make decorative items using the jute filigree technique, skill and patience are needed.
But for real needlewomen, nothing is impossible! If you are just learning the basics of working with this material, check out the master classes on making jute crafts with your own hands. Great ideas for jute filigree are the decoration of photo frames, wall clocks, caskets, candlesticks, headbands and bracelets. All of the above jute patterns for beginners are for your attention on this page.
Easy Jute Pattern Crafts for Beginners: Filigree Photo Frame
The first work in the jute filigree technique was the design of a photo frame.
In order to make this jute product with your own hands, you will need:
- a small piece of hard cardboard (you can use cardboard from a shoe box);
- a piece of paper of any dark color;
- wooden skewers;
- a small piece of wire, suitable in cross section for the thickness of the skewer;
- jute twine;
- any beads for decoration;
- glue;
- tweezers;
- scissors, utility knife.
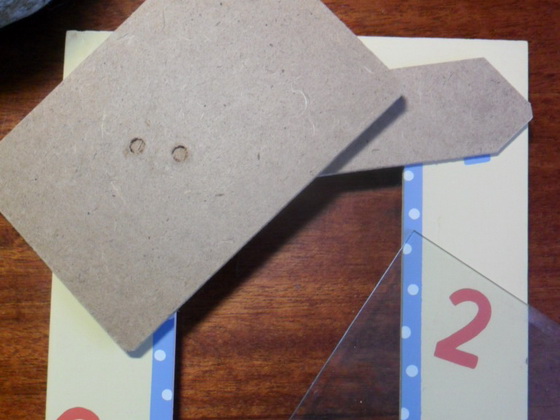
A photo frame with an openwork filigree pattern will have rectangular shape, rounded like an arch, from above. The outer dimensions of the frame are 13 cm high and 11 cm wide. The inner photo window is 7 cm wide and 9 cm high. The height of the upper part of the frame is 6 cm. We make a frame drawing on cardboard and cut out the blank. This will be the basis for the openwork pattern. You can paste over the workpiece with any colored paper. It must be borne in mind that the openwork pattern looks better on a dark background.

The width of the side openwork filigree pattern with jute is 1.5 cm. We mark the scan, make a drawing. We place the picture in a folder-file.
When making this craft from jute, you first need to work with a cardboard base.
We will decorate the cardboard frame pasted over with colored paper along the outer edge and inside the photo window with borders.

To do this, wrap the skewers, smeared with glue, jute twine. We do the same with a piece of wire. With such a flexible border we paste over the upper rounded edge of the frame.
Cutting off the resulting borders of the desired length, glue them directly to the ends of the frame. To close the gluing point between the border and the cardboard frame, we glue a piece of jute between them along the entire length, both from the front and from the wrong side of the frame.
From the wrong side for this product, using the jute filigree technique, we will make a pocket for a photo. We glue the skewers, stepping aside from the window 5-7 mm from the bottom and from the sides. Glue a piece of cardboard on top that fits in size so that the photo does not fall out of the pocket.

Let's get down to more interesting work - a set of openwork patterns from jute. Remember that you need to cut the cord at an angle so that the cut ends of the elements do not bulge and stick together more tightly.
Let's start from the bottom of the frame, and then move on to the sides. First, we make large elements of the picture. After they are glued, let's move on to a set of smaller elements.
Along the line of the pattern for a jute product, we distribute glue with a toothpick or the thin end of a skewer.

Glue curls to this place. We supplement large curls with loops and smaller curls according to the pattern. We make all the elements from separate pieces of jute, firmly glue them to each other, press the gluing points with tweezers or a finger. If a lot of glue has been squeezed out, then it can be distributed over the surface of the pattern or removed and spread on jute twine to make it less shaggy. If the excess is not removed, then the elements may crawl and begin to bristle.
After a set of sides, we proceed to the jute pattern over the top. We start with the central small curls. Then we glue the arcuate crossbar between the curls.

While this part of the drawing for do-it-yourself jute crafts dries up, we begin to make large petals.
It is better to start from the center. Each petal is formed from two pieces of cord.
In the upper, pointed part of the element with tweezers, we press the ends of the rope to each other so that they stick together tightly and do not move apart.

While we were making the contours of the petals, the central part has dried up, and its contours do not spread to the sides. We fill it according to the drawing with small elements in the form of eyelets.
When the jute twine craft pattern set is ready, we put it under the press so that later the pattern remains even and the elements are on the same level. Let dry for three to four hours.

Then we remove the work from the film. We cut off all visible streaks of glue along the edges and between the elements with a clerical knife from the wrong side.
This is a painstaking but very important step. Excess glue must be carefully removed so that the work looks neat and beautiful. We carefully examine the cleaned work.
We apply to the cardboard blank.

If you didn’t really like the combination of the background of the frame and the do-it-yourself jute filigree openwork pattern, then the background of the cardboard frame can be replaced by gluing another paper.
The openwork pattern is not closely adjacent to the cardboard, but is slightly above the colored background of the frame. It sticks to the curbs. And this creates an even greater volume of openwork pattern.
And now you can decorate the openwork pattern with beads to your taste, as fantasy tells.
Do-it-yourself jute master class: craft-watch for beginners
Now learn how to make DIY jute twine crafts like a wall clock.

For this jute twine product you will need:
- piece of fiberboard
- clock mechanism with arrows,
- jute twine,
- wooden skewers,
- glass marbles,
- mother-of-pearl half beads,
- glue,
- stationery knife,
- tweezers,
- scissors.

With its contours, the shape of the clock will resemble a hut. Therefore, we draw the outlines of the hut on a piece of fiberboard. Its height is 32 cm, width 22 cm. We cut out the shape with a jigsaw or a small hacksaw. This blank will be the basis for the clock.
On top we will place an openwork jute appliqué.
To make the side cuts of the sawn piece look presentable, we decorate them with skewers wrapped in jute. First, sand the edges of the cut a little. Next, we glue the wooden skewer and carefully, turn by turn, wrap it with jute twine.
We apply ready-made borders for crafts made of jute filigree to the side of the sanded side of the workpiece, cut off the desired length and glue. Thus, we paste over with borders all the sides of our workpiece-hut.

We outline the center of the composition. We draw a circle. This will be the place of the dial. We place around the dial a drawing of the elements of the future openwork decor.
We place the picture under the film or in a file folder.

We start a set of jute patterns from the central part of the dial. In the center we form a ring, around which 12 sectors in the form of petals will be located. Glue circles of jute between the petals.
Starting from the center, fill the space inside the large petals with small elements.
First we make a small loop and then fill the petal with arcs to its top.

After we have made the dial, we proceed to filling in the pattern, first with large elements.
Marble inserts will be located at the bottom.
In order to paste the insert into the openwork ornament and so that it sticks well with neighboring elements, you need to make a cast. To do this, glue the marbles around the circumference with jute in two turns.

Glue the finished insert in the right place according to the drawing.
Around the insert we collect large elements - curls of three turns. From below we fix the insert with a loop. We continue the set of large elements according to the drawing. It's also curls. When typing, we try to observe the smoothness of the line and the accuracy of the turns. They need to be as even as possible.
All elements must be glued together and not fall out of the overall pattern.
Gradually, making large curls, we rise to the top of the clock pattern.
In the center of the upper part there is also an insert-mables. We paste it and start filling around it with smaller elements.

These are also curls and loops, arranged so that they are woven into an elegant and beautiful drawing. They seem to smoothly transition from one to another, creating a slight movement. However, they are firmly glued together, and the insert sits confidently in its place.
Filling in our drawing with small elements, we move gradually from top to bottom.
And at the bottom we have two more inserts. We fill the remaining space with the necessary elements.
When the entire set is done, leave the work to dry for four hours. You can put a press on top.
At the next stage, we will get rid of the dried glue between the elements of the set.

After the glue has dried, remove the typed openwork from the film. Slightly prying with a knife, carefully separate it from the surface of the file folder. No element should fall out of the set. It can be seen that an adhesive film has formed on the wrong side. These are the streaks of glue that need to be cut off.
We check the work for durability. See if all the elements are well glued together.
Lay the work face down on the board. With a clerical knife, carefully begin to cut off the streaks of glue formed between the elements. The blade of the knife must be sharp. If it gets dull, we change it immediately.
Neatness at this stage makes the work clean, without glue residue around the edges.
In order to make the filigree pattern look even more openwork and light, you can also glue the pattern over natural jute with bleached jute.

We glue them around the circle of the dial, and you can also glue them where your own imagination tells you.
Now our openwork needs to be glued to a rigid base. We apply it to the sawn base. Mark the center of the dial with a pencil. Here you need to drill a hole to strengthen the clock mechanism.

Glue the openwork to the base. We fix the clock mechanism.
It remains to make "weights" on the chain. To do this, you can find natural cones, or you can make them yourself.
Any wooden base in the shape of an egg or an oval is suitable for this.
On one side, drill a shallow hole.

We make a loop out of jute and glue it into this hole. For beauty, you can skip the loop through a small mother-of-pearl bead. Attach a chain to this loop.
We decorate the "weight". The bottom and top of the wooden oval shape glue in a circle several elements of "loops" in the form of a flower. We tightly wrap the distance between the flowers with jute, having previously smeared the surface of the mold with glue.
You can buy a textile chain for a product using the jute filigree technique in a store, or you can make it yourself. We glue rings from identical pieces of jute, threading one ring into another. The chain can be of any length.
We connect the chain with the "weights" and hang them to our watch. On the reverse side of the clock, we pre-glue two jute rings, to which we will hang decorative “weights”.
You can hang our fabulous clock on the wall. Let with their quiet sound they create comfort and fabulous atmosphere in the house.
Filigree decorative items: jute cord candlestick
The next do-it-yourself jute product for beginners is a decorative candlestick.
For this jute cord craft you will need:
- wood beads;
- aroma candle in a glass jar,
- glue;
- scissors;
- tweezers;
- stationery knife,
- glass inserts-marbles 12 pieces;
- bamboo skewers,
- jute twine.

The candlestick has the shape of a cube on legs with an arched connection, and on the top of the four sides there are tops in the form of segments. Smooth lines at the top and bottom of the cube give it an elegant look, and the filigree pattern on all four sides makes the work exquisite and unique. When a candle is lit inside such a candlestick, it will cast shadows and highlights, giving the interior a fabulous look.
Since jute is a combustible material, a fragrant candle must be placed in a glass glass.
We make a drawing of a sweep of the side of the cube and the top.
Sides: 10 cm plus 3 cm legs. Top side 10 cm, height 2.5 cm.

We outline in the center of the picture a place for three inserts in the form of circles and from them we draw all adjacent elements, starting with the largest lower ones.
We place the picture in a folder-file.
Wrap bamboo skewers with jute.
To do this, we glue the skewer along the entire length and wrap it in tight turns.

From skewers we make the frame of the side of the candlestick. We cut the desired length according to the drawing and glue them together.
We connect the legs with a piece of jute, curved into an arc. For a fortress, you can make an arc of two rows of jute.
Prepare glass inserts. We make a cast, to which the elements of the openwork set will be glued. We coat the marbles around the circumference with glue and make two turns of jute around. Press firmly so that the jute adheres well to the glass surface. You can immediately prepare all the inserts for four sides.
We glue the finished inserts to the drawing in the intended places.

Let's move on to filigree. Before starting to make the elements, we coat the jute with glue so that it does not shaggy and is more elastic.
Let's start with the elements around the marbles.
We apply glue according to the drawing, apply jute, cut off the desired length. The contours of the pattern around the marbles resemble leaflets.
First, we outline the outer contours of the petal around each insert. Inside the petal we form two leaves.

Then - the next large curls around each insert.
Two large curls converge with heads in the upper part on both sides of the upper marbles.
We supplement the lower composition with small curls inside the large ones and glue a loop in the center. Glue a smaller loop inside it. Glue two small ones inside the upper curls.
We denote the contours of the apex in the form of a segment. We glue the jute along the contour in two rows. We make inside a set of two counter curls and two loops.

Having finished the jute pattern set, let the work dry, and then separate it from the film.
We begin to get rid of the streaks of glue.
We put the work on a wooden board with the wrong side up and carefully cut off the glue between the elements with a clerical knife.
Glue the top to the finished side of the candlestick.

In the same way, we make three more sides of our future candlestick.
After all four parts are ready, we glue them together along the entire length of the ribs.

Glue borders equal to the length of the rib to the place of gluing the side from the outside. They will cover the visible place of gluing and make the support ribs stronger and more stable, giving the ribs a clearer outline.
Let's proceed to the design of the bottom of the candlestick. It needs to be made tough. The candle is quite heavy and can bend the openwork bottom with its weight. To do this, we will build a frame of borders.
We make spacers from corner to corner and two transverse struts. We glue the ends of the spacers well in the corners and to the sides of the bottom of the candlestick.

Now you can start making the bottom. Let's make it simple. We glue a square frame of borders. Its size should be equal to the size of the square hole in the bottom of the candlestick. We glue the frame on the surface of the folder-file. And starting from the center, we turn the jute into a disk until it touches the sides of the frame. Pre-lubricate the place under the disk with glue. When the disk is rolled up, we glue it on top again. We generously lubricate with glue and distribute it over the entire surface of the disk with our fingers, while aligning the turns of jute. Check the strength of the adhesive. We leave to dry.

After drying, remove excess glue and glue our bottom on the underside of the candlestick so that the spacers remain inside the candlestick and are not visible from the outside.
Now that the candlestick is completely ready, we decorate the tops of the ribs with wooden beads. Beads can also be glued to the bottom of the legs. When the candlestick stands on round beads, it will become more weightless, although it stands quite steadily on all four legs.
The work is ready. We place a glass with a fragrant candle on the spacers inside the candlestick. We light and enjoy the combination of highlights and shadows falling from the openwork walls of our candlestick.
Products with do-it-yourself jute twine decor: craft-casket with patterns

Now learn how to make this simple craft from jute, like a casket.
For this product with jute cord patterns you will need:
- jute twine;
- wooden skewers;
- tweezers;
- scissors;
- stationery knife;
- to decorate the box, we need mother-of-pearl half-beads.

The casket is a small box with four curved sides and a lid.

We draw a drawing-sweep of the frame. Side 15 cm, height 5 cm, leg height 2 cm.

Dimensions of the front side of the frame: width 7 cm, height 5 cm, legs 2 cm.
We place the drawing in a folder-file.

First you need to make a rectangular frame of the box with legs. We will attach the openwork sides to it.

In order to make a frame, you need to prepare several skewers wrapped in jute. We glue the skewer along the entire length with glue and wrap it tightly with jute.

Glue the prepared skewers according to the drawing. It turned out four parts: two side and two end.

We form a volumetric frame. Glue these four sides together.
We leave the finished frame to dry.

Now let's get down to the hard work. First, we draw the side side.
The length of the openwork side will also be 15 cm, and the height will be 7 cm, a little more than the height of the frame: with the expectation that it will be slightly curved and reduced due to this.

At the same time, we will prepare an openwork pattern of the end side. Dimensions - 7 cm.
We place ready-made drawings of patterns for crafts from jute twine in file folders.

We start a filigree set of drawings from the central part.

Do not forget to glue the surface of the jute before starting.

We coat the line according to the drawing and glue the main element. It looks like two connected curls.
We fix the connections.

Then we make the following elements on the sides of the curls - loops. Cut off the ends at an angle. We fix them so that they do not stick out.
We do this with all curls.

Inside large elements, filling can be made from thinner jute twine.
Having finished central part drawing, proceed to a set of ornaments around the central part.

We first make the largest curls with three-turn heads.
Then we make smaller curls and loops.

We make the filling inside these elements thinner from jute twine.
Do not forget that all elements must be firmly glued together.

After the entire drawing is typed, you can once again glue the joints between the elements from above. To do this, apply a small amount of glue, just a few drops, and rub it gently with your fingers, while leveling the surface of the pattern.

While one side dries, you can start making the next three sides.

After two hours, remove the openwork set from the film and get rid of the glue streaks. To do this, use a clerical knife and nail scissors.

The adhesive between the elements must be carefully cleaned off. The quality and beauty of our work depends on this.
Then we attach the cleaned and dried sides to the frame.

We bend them first. You can bend them with a small plastic bottle. You can use a bottle of glue with which we work.

Openwork is easily deformed under the warmth of the hands and keeps its shape.

Glue the curved side to the frame. We coat the frame with glue and apply the openwork side to it.

Having strengthened all sides on the frame, we leave the work to dry and proceed to set the bottom. The size of the bottom corresponds to the size of the bottom of the frame. We make a drawing of the bottom, place it under the film and start the openwork set with the largest elements.

Let it dry, remove from the film and get rid of excess glue.

Glue the bottom to the bottom of the frame from the outside. Donets do not bend. It must be flat. We close the resulting voids near the legs with small discs twisted from jute.
Now you need to make a lid.

The lid has a curved appearance with beveled sidewalls in the form of segments.
We make a drawing. The length of the rectangle is 14.5 cm, the width is 9 cm. On the sides of the rectangle, draw recesses of 1.3 cm. We connect the edges of the rectangle on the sides with smooth lines.

Inside the resulting sweep we make a drawing. Then we put it in a folder-file and proceed to the set. First, we make large elements of the picture, and then fill in the small ones. We have left open places between the curved sides of the box. We measure the width and length of the holes. According to these dimensions, we draw a scan.
It will have an oblong shape resembling a leaf.

You will need four leaves. The drawing inside the leaflet can be arbitrary.

We glue the leaves at the corners between the sides, slightly arching them in shape and tightly closing the holes between the sides of the box.

Our beautiful jute craft-casket is almost ready! It remains only to decorate the openwork pattern with mother-of-pearl half-beads.
Jewelry with patterns from jute cord: work with a rim and a bracelet using jute filigree technique
This part is devoted to DIY jute twine products such as a headband and a bracelet.

To work with these jute crafts for beginners, you will need:
- jute twine;
- medium-sized beads of three shades of the same color scheme;
- glue;
- tweezers;
- scissors;
- old plastic bezel and bracelet.

As a basis for the work, we take an ordinary plastic, not very wide bezel.
We glue the side lines and the outer side of the rim with jute.

While the glued bezel dries up, we will prepare the decor elements.
We will prepare cuttings for the "berries" with which we will decorate the rim.

We glue a piece of jute cord well with glue. We rub it over the entire surface of the jute until it stops sticking to the fingers. From glue, jute will be more solid. Then cut into smaller pieces. These will be the cuttings. When they dry, they will become stiff, and they can be easily threaded into the holes of the beads.

We take a bead, thread the handle so that it comes out of the hole by about 1 cm. Lubricate this tip with glue in advance. We bend this tip and insert the beads into the hole. We drag the handle back so that it does not protrude from the hole in the bead.

Having prepared all the beads for jute crafts using the filigree technique, we begin decorating.
To make it more convenient to work, the rim can be put on, for example, a jar.

Glue a smooth jute line along the entire length of the rim. It will set the right movement for the decor. On both sides we will glue beads and leaves.
Leaves are made on a plane. You can draw a leaflet on paper and place the drawing sheet in a file folder. The size of the length of the leaves should not be more than 2 cm.

We make the first two leaves. As soon as we finished making them, we immediately remove them from the film.

Since the glue is not completely dry yet, the leaf will be soft and can be easily deformed, giving the desired bend. The remaining glue on the edges can be crushed under the leaf with your hands or cut off with scissors. The glue is still soft, so it can be very easily bent under the wrong side of the leaflet.

We place the leaves on both sides of the smooth line, spreading them slightly to the sides from the line. We work from the center of the rim, first to one end, as if backing away.

We take a few beads and apply them to the leaves from different sides. The cuttings can be trimmed if they are too long. Then glue the "berries" in the intended place.


But I do not advise you to make a lot of them, as they can dry out a lot and it will be difficult to bend them.

In general, this process can be absolutely creative. We do everything at our discretion. You can dot the rim with beads very densely. And you can make the decor more modest. It depends on your desire and imagination.

Now we have finished one part of the rim, now we are going to the next one. We also go from the center to the other end. That is, the leaves and "berries" on the rim should be located towards each other.
The principle of working with this jute cord decoration will be exactly the same as with the rim.


