A DIY New Year's deer is something you can make for decoration during the main event. winter holiday. Such a craft will definitely not go unnoticed, because a homemade deer always looks creative and beautiful.

Below we will describe step by step how to create various New Year's crafts and decorate the holiday with them. The deer stencil is made from cardboard, but if you don’t have it, you can use regular paper. The paper will make a large Christmas reindeer that you can hang next to the garlands.
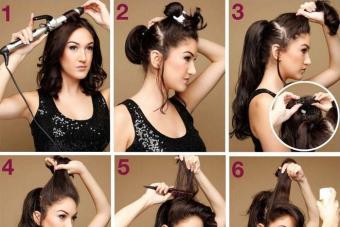
So, the work flow is as follows:
- When creating any stencil, it is important to draw the correct template. For those who are doing this for the first time, it is recommended to choose a simple drawing, since elements such as, say, the head or horns of an animal will be quite difficult to draw. So, after the sketch of the future craft has been selected, you can begin to create the stencil itself.
- When drawing, it is recommended to use a pencil, as it can be erased at any time. Once a person is happy with their graphic design, they can use a marker to trace its outline. As an alternative, you can use a ready-made template by printing it from the Internet. Or another way: you can take a stamp from a press. However, you need to take into account the fact that usually such seals are small, so if you want to create a large stencil, it is better to draw the outline yourself.
- Now you need to decide what kind of paper stencil will be, single-layer or multi-layer. If the future craft will be black and white, then it is recommended to make one layer. At the toy making factory, stencils are made multi-layered, because this way the craft will be stronger. You can also get more sophisticated and create such a craft from foam plastic.
- The drawn and colored image on paper (cardboard) must be copied onto thin tracing paper. It is important to ensure that all its details are reflected well on the tracing paper. Now you need to draw the outline of the drawing again. You can use copy paper instead of tracing paper.
- At the last stage, you need to use a penknife to cut out the stencil. This should be done strictly along the contour.
Tip: Stencil Christmas decorations made of plastic. A hole is made at their top through which the thread is threaded. The toy can be hung on a Christmas tree.
Gallery: DIY New Year's deer (25 photos)


New Year's deer: ideas (video)
DIY paper deer head: how to make?
A large paper deer will certainly decorate New Year!
You need to do it like this:
- First you need to collect everything you need: colored and white paper, scissors, a ruler, a sharp device such as scissors or a knitting needle, tape and glue.
- To create such a craft you will need about 15 sheets of paper.
- The work begins with selection beautiful drawings. It must be depicted on paper and cut out. Now all the images need to be bent so that they can be glued together.
- To press the groove, use a ruler. It must be applied to the bend line and drawn along it with a sharp object.
- The parts must be glued carefully so that the glue does not stain the paper.
- You need to secure a thread or rope in place of the animal's neck. This can be done using a small piece of tape.

How to make a deer from wire: diagram
Getting a beautiful wire Christmas toy requires some creativity and sophistication.
So, the action plan is as follows:
- First, it is important to decide what size the deer will be and why it is being made. If you want to make one New Year's toy, just take one sheet of A4 paper to create a layout. But you can also make a large deer from wire, which you can put on the street and decorate with a garland. It will look great! The choice remains with the creator, especially since the operating scheme is the same.
- Once the size has been chosen, you can begin creating the layout. On a sheet of paper you need to draw the profile of the animal, the horns are drawn on a separate sheet. This is necessary for wire modeling.
- Now you need to use wire to perform precise modeling according to the drawing. You can apply it to the paper to prevent deviations. The wire needs to be twisted. Two identical wire simulations should be made.
- Now both simulations should be fastened together. It is recommended to do this in the tail area by twisting the wire. As for the other sections of the deer, to hold them together you need to cut a small piece of wire and use it as a hook for the two parts. This way, there will be a distance between the two wire models and the toy will not be flat.
- The horns of the animal are wrapped with wire to the head, after which the entire deer must be wrapped in it. It is recommended to make gentle circular movements with this material.
- If you want to give your craft an LED effect, you can attach a garland to it. You will get a beautiful glowing deer made of wire.
Christmas reindeer made of cardboard: how to make?
- First you need to draw a model of the future deer on cardboard. The head of this animal made from this material looks very beautiful, so the method of creating it will be described below.
- It is recommended to print the templates on a printer first. In each part, it is important to make a strip in the center - this is the future cut for fastening.
- Each paper piece must be attached to the cardboard using double-sided tape. It is not recommended to use glue for this.
- Then each part must be carefully cut out along the contour with scissors.
- After this, you can make slits in them. For convenience, it is better to use a knife.

Once the slots are ready, you can begin assembling the deer. The parts are attached one to one.
Deer Costume: Simple Pattern
In handicrafts you can stick to fashion trends, or you can be creative and create a toy that no one else has! A New Year's deer is, of course, great. However, even it can be brought to perfection by decorating with available materials. Below we will tell you how to make festive costume for this New Year's toy.
As “clothing” for a deer toy, you can use cotton wool, lollipop packaging, Christmas tree rain, knitting yarn, and so on. There are a lot of ideas - if only there was a desire!
- To do this you will need glue, cotton wool and colorful Christmas tree rain. You can also use glitter.
- First you need to tear the cotton wool into small pieces so that it resembles snow. Then, using glue, you need to attach it with glitter and rain. There is no need to pour too much glue, as it will leave unsightly marks when it dries.
- The sticky “mixture” should be mixed well and applied to the toy. It turns out very beautiful craft!
 If you want to make a deer costume for a child, then ordinary gloves will do just fine as antlers.
 And if you want to make such a costume for a small child, then you can go the simplest way. The body of the deer will be a brown overalls, but the horns can be made from gloves into which you need to put cotton wool. The gloves are attached to the hat using thread or a stapler.
How to make a New Year's deer with your own hands from polystyrene foam?
Styrofoam makes a very beautiful winter deer! Another advantage of this method of creating a toy is its simplicity.
Here's the plan to follow:
- The foam used to create a deer must be clean, otherwise the toy will look ugly.
- Before starting the craft itself, you need to outline a rough work plan: the size of the craft, its thickness, and so on. Then you need to take several pieces of thin foam and draw a model of the future toy on each of them.
- After this, the model is cut out with a knife and the two parts are glued together.
- To make the toy beautiful, it must be decorated with glitter and cotton wool.
- Using red knitting yarn, you can make a scarf and hat for a deer.

Also, as an alternative, you can mold a deer from plasticine, crush the foam and sprinkle it on the animal. It is necessary to use white plasticine, because for the New Year you need to make winter deer. This will make the toy even more beautiful! If you make a small craft, you can put it on a stick right in the Olivier dish. This will give the holiday table an atmosphere of creativity.
How to make a deer from cotton wool?
- First you need to decide on the size of the future toy. For those who have never done such crafts before, it’s better to start from the very beginning. simple way. So, you need to make a “skeleton” of the future toy. It is made from wire.
- After this, you need to deal with the main raw material for the craft - cotton wool. It should be torn into small pieces and crumpled into round balls. Each ball of cotton wool should be attached to the wire using tape. It should be cut into small strips so that it does not catch the eye.
- For the horns you need to make separate balls small size. This way the craft will look beautiful and neat. To make the toy colorful, several cotton balls can be painted red and attached to the deer’s antlers, alternating with white balls.
Origami: deer (video)
People say that the New Year is a magical holiday of fulfillment of the most cherished desires. So why not give it the magic that you can create with your own hands? A handmade New Year's deer is great way to prove your love to the family, so it must become one of the main attributes of this celebration.
A craft like “Paper Deer” will be a great addition New Year's decor. This craft is very easy to make, the whole process will only take 10-15 minutes!
But, before we start creating crafts, we need to prepare the following materials and tools:
- colored paper high or medium density brown and white;
- black and dark cardboard Brown;
- pencil or colored pencil;
- scissors;
- glue stick.
The scheme for creating such a craft is simple; first, the base (torso) and head of the animal are created. Then all the necessary elements are cut out, for example, the nose, eyes, horns, hooves, etc. After all the parts are ready, they are glued to the base or muzzle.
To create the body of a deer, we need brown colored paper. Let's cut out this base.


You can first draw all the necessary lines with a pencil.
Apply glue to the edge of the strip and connect it as follows.


If there are any unevenness, then we level it right away. This is how the deer's body turned out.

Now let's create the muzzle. On brown paper (with reverse side) draw such a contour.

Then carefully cut out the workpiece. We fold its upper part (above the ears), and make small cuts along the resulting fold line.


On black cardboard we will first make the following sketches - the nose, pupils and hooves. We cut out all the blanks along the contour.


Draw deer antlers on brown cardboard and then cut them out too.


Now we need to cut out the tail and eyes of the deer from white paper.


You can also cut out a tail from gray or brown paper. So, all the blanks are ready and now you can start assembling the craft.
First we glue the horns. They must be placed in the side slits.


Then we attach the eyes and nose.


Then we apply a little glue to the upper part (behind the fold line) of the muzzle and glue it to the base (body) of the deer. This is what we got.


That's it, the original “Paper Deer” is ready!


You can also show a little imagination and decorate the deer, for example with a scarf, hat or some other decor. In addition, it can be painted with paints (it is advisable to use gouache).
When the time comes to create with your child, ideas arise by themselves and it’s easy to get lost in them. A lot of available materials also prevent you from getting bored when working on crafts. At such moments, it is always interesting to fantasize that some forest animal came into the house and decided to make a home for itself on the shelf of one of the closets. A paper deer can successfully become such an animal.
Color applique
When working on a plane, appliqué copes very well with the art of conveying shapes and images taken from the surrounding world. In addition, this is the surest way for a child to begin to develop his imagination.
For the application you will need:
- colored paper (brown, black, pink);
- cardboard for the base;
- scissors;
- pencil;
- glue.
You can use the following template in your work:
From brown paper you need to cut out a large oval for the body, a teardrop-shaped part for the head, a small oval for the tail, and four identical stripes for the legs. From pink paper we cut out a small oval for the muzzle, from black paper - four small squares for the hooves and two circles for the eyes. Horns can be cut out of black or brown paper. There are such templates for them:


Volumetric model
The origami technique has long found ways to turn any object into paper art. To make a deer using this technique, you need to draw the following diagram on paper:

The dotted lines shown in the diagram mean inward folds, and the dashes with dots mean outward folds.
The workpiece should be cut and bent according to the markings.

The far left edge needs to be bent inward vertically, after which the top and bottom part above the looming square, connect the vertices horizontally. Next, the square with the folded parts is shifted with an internal fold to the right.
On the square and the edges behind it, you need to draw two dotted parallel paths that bend inward.

The workpiece should be turned over and moved apart a little so that the previously folded seams are visible.

The tops of the X-shaped folds are bent away from themselves, again drawing a square. The following tracing lines are applied to the workpiece.

We bend the part along the corresponding dotted lines.

After bending the workpiece in half, you need to apply the lines again.

After the next bending along the lines, the dotted line should be applied again.

Continuing the work, the body of a deer emerges from the blank. The rest will act as the head and horns. The fold lines are again drawn on the workpiece, and the next step is on the future neck of the deer.


The horns are bent back, and lines are drawn again on the workpiece.

The details of the tail and muzzle are bent into the craft, and corresponding lines are made on the horns.

Having folded the horns, you need to draw lines on the sides of the body.

The final stage is to slightly bend the figure, bringing it to the final volumetric version.

Craft for a glass
Another paper craft in the form of a deer can be used as a decoration for a glass on festive table. To make such a cup holder with your own hands, you will need the following elements:
- brown and white thick paper;
- black and brown cardboard;
- pencil;
- scissors;
- glue.
For the body, a rectangle is cut out of brown paper.
If the craft is really being made for a glass, then the length of the rectangle should be sufficient so that when gluing it can be placed on the glass.

Three semicircles are drawn on the bottom of the part to define the legs of the deer, and a trapezoid is highlighted on top.

The right edge of the part is smeared with glue, after which it is rolled into a cylinder and connected to the opposite edge.

To make a muzzle, you need to draw its outline on brown paper.

After cutting out the part, its upper “frontal” edge is bent horizontally and shallow cuts are made from the ears.

On the back of the black cardboard you need to draw rounded details of the nose and pupils, square ones for the hooves. They should be cut out.


On brown cardboard we draw horns, which are also cut out.


The tail and eyes are drawn and cut out on white paper.


The horns are glued, located in the cuts near the ears.


The head is attached to the body.

The hooves are glued to the protrusions for the legs, and the tail is glued to the rear upper edge of the workpiece.


The result is a craft in the form of a paper deer.

A few more options
Other variations of paper reindeer can be holiday decorations, fun crafts to lift your spirits and so on.
You can decorate a candy with a deer. To do this you need a candy on a stick, cardboard, a pencil, markers and scissors. The candy must be attached to the cardboard and circled.

This will be the intended nose. Around it you need to draw the head of a deer, which is cut out along with the outline of the nose. After coloring with felt-tip pens, the deer's head is placed on the candy.

You can design it in the shape of a deer New Year's card, on which the eyes and nose can be made not from paper, but from rhinestones, beads or other materials.

It is very easy to make an envelope in the shape of a deer: on the finished envelope you need to glue the elements of eyes, nose, mouth, horns, which are cut out of bright colored paper. The envelope might look like this:

Video on the topic of the article
A selection of videos on creating paper deer:
These animals are mysterious and beautiful, which is why they often appear in ancient myths and on the canvases of artists. Making a paper deer head is not a quick job, it will take time and patience. Ready craft Can be given to a friend or used as a table decoration.
Making a paper deer with your own hands
Material and tool:
- Sheets blank or multi-colored thick paper A4 format - 14 pcs.
- Plank.
- Scissors.
- Kernel.
- Paste.
- Double-sided adhesive tape.
- Thread or twine.
 This is one of the most simple options how to make a deer out of paper. The template is already ready - print out the pattern of the product, it can be found on the Internet. To make a deer head you will need 10 sheets, and for the horns - 4 leaves. Choose the color yourself, it all depends on your imagination.
Carefully cut out all parts of the product. Then we bend the parts to give them shape and glue them together.
When you print the pattern, you will see lines that mean:
It is necessary to bend on the outside;
You need to bend inward.
Using a strip and scissors, we mark the lines for folding: we place the strip on the segments, and with scissors we draw along the ruler to squeeze out the grooves. Using this technique it will be easier to bend the paper. Instead of scissors, you can use a rod, tweezers or an empty ballpoint pen.
Then glue the resulting parts together according to the numbers that will be on the pattern. You need to glue number to number. This must be done carefully so that excess glue does not stain the front side. For gluing hard to reach places You can use a thin brush.
The last step is to secure the thread or string with adhesive tape so that you can hang the deer head on the wall.
The paper deer head is ready!
Origami technique
A deer can also be made from one sheet of paper using the origami technique.

You can rejoice - our deer is ready.
Papier mache
Using this technique, virtually any shape can be made.
To make the product we will need:
- newspapers;
- scotch;
- scissors;
- PVA glue;
- paints;
- cardboard;
- wooden base for fastening.
You can prepare the glue for this technique yourself. It must be done immediately before work. In a ratio of 1:5, take pre-sifted flour and water. Mix everything until a homogeneous mass is obtained.
There is another recipe for making glue. Pour three parts of water into a saucepan and boil it. Then add some of the flour, reduce the temperature, stir the mixture for 3 minutes, add sugar. Mix the composition and let the paste cool, a film will form on the surface, it must be removed.
Stages of work completion
After all the materials have been prepared, we begin manufacturing the product:
- You need to crumple up three newspaper balls of different sizes.
- We connect them into a single whole using tape, forming a head.
- We wrap the resulting structure in newspaper so that the surface is smooth.
- We make the deer's neck identical to the head.
- You need to cut a circle out of cardboard, with which the product will be attached to the wall surface. Glue the circle to the neck.
- We tear the newspaper into many small pieces.
- We dip each piece into the paste and stick it on the head.
- As soon as one layer has been formed, let the product dry for several hours, then glue the next layer using the same technique.
- We cut out the animal's ears from cardboard, glue them onto the head and glue them in the same way as we glued the head.
- Using a large piece of paper we form the nose; first you need to moisten the paper with glue.
- We make protrusions for the eyes.
- To make antlers, you can use tree branches or rolled up thick paper.
- We also cover the horns with paper using the papier-mâché technique.
- We color the resulting product in different colors, attach it to a wooden base.
Our craft is ready!
Hello! How about making a 3D Deer head out of paper with your own hands?
I continue the theme of geometric and broken lines.
I will make a New Year's deer and decorate it, this was my secret from the last video and post, we just made toys that will hang on the antlers today.
I couldn’t find a deer that I liked on the Internet, so I took a 3D model and made the patterns myself.
You can download them here:
You can print directly from colored cardboard, but to be honest, I’m not very neat, at the institute we did design work and we made layouts and mine were always stained))) so I decided to take white sheets and then at the end I’ll paint them with spray paint. I took two colors: the head will be pearl pink, and the horns will be copper red.

Today we will also need: good glue!, because a bad one may simply not glue our leaves together; scissors and cutter; ruler and small ruler (I took a card); a container for glue and a stick with which I will apply it; and, strictly speaking, printouts, I have paper with a density of 300 g per square meter, but I think that 200 g is also quite enough.
First I need to cut out every piece. I have the numbers for the connections printed out here, this will make assembly very easy.


The process, of course, is fascinating and calming, but it is very long. If you do, be prepared that it will take a couple of evenings.
When all the parts are cut out, you need to run the cutter, pressing lightly, along the dotted lines on top and along the dotted lines on the back side. This is necessary for easy bending along the line; be careful not to cut through the details of the New Year's deer's head from paper to the base)
So piece by piece we assemble the head and horns.

Because The pink paint for the deer's head is light, I decided to play it safe and prime the head with regular white ceiling paint, which I bought for 150 rubles.
Having previously covered everything with film, I cover all the details of the deer's head antlers and head with spray paint, let it dry for about 30 minutes, because if you take it earlier, the paint may get a little scratched.


I’m very glad that I chose this pink pearlescent paint, the head turned out to be a very beautiful delicate color, and the horns are dark, the color is called copper Inferno.
I deliberately left a hole in the deer’s head so that later I could tuck my fingers into the place where I would glue the antlers.
I glued the horns with double-sided tape and on the back side of the head, where it was attached to the wall, I also attached tape in order to attach it to the wall.
.jpg)