Choosing an evening hairstyle is no less important than choosing a beautiful evening dress. On the day of the celebration, every woman wants to be perfect and original. If you don't like evening hairstyles with curls, fashionable styling With high bouffant or a bun, an excellent option would be a hairstyle with several braids arranged in the shape of a flower.
Braids can act both as a central styling element and as a small decoration. Nowadays there are a huge number of types of weaves, so you always have plenty to choose from. Every girl has a chance to find the perfect braided hairstyle in her chosen style.
Hair has long been considered a woman's main treasure and adornment. Hair styled in a braid is also a symbol of honor and dignity. Therefore, it is not surprising that braids have been so popular throughout a long period of human history.
Evening hairstyle with 3 braids in four strands
Many people love styling with braids not only due to their originality and beauty, but also for the ease of creating a classic style, because braids allow you to get good hairstyle without styling products or tools.
In order to choose the most suitable look braiding, before an important event you should try several ideas for hairstyles with braids and choose the best one.
Let's look at the hairstyle with French braids in 4 strands step by step.

Photo lesson created from the video of MK Nikolai Rusu, Parikmaher.TV
1. Separate the hair diagonally, the parting starts above the left ear and ends below the right ear.


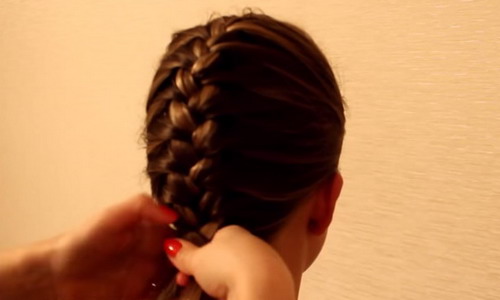
2. Separate 4 strands on the left.


4. To make the braid look voluminous and openwork, already on the third link we begin to carefully stretch its sides. In order for the braid to come out neat, you may have to first practice the technique of braiding a 4-strand braid.

We braid to the end and secure with an elastic band.

5. Select another section diagonally parallel to the previous one.

6. In the same way, we braid a braid of 4 strands, trying to stretch the braiding so that it hides the parting.

7. In the remaining area, move the braid to the left so that it goes right next to the parting.


8. Using bobby pins, we create a base frame for attaching the flower.


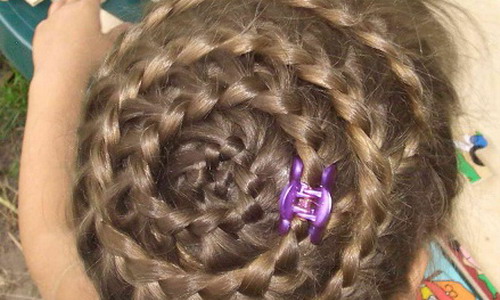
9. First of all, twist the rightmost braid into a ring. We fasten with invisible ones.

10. Then we draw the middle one around the first ring, and the last one around the left one. Don’t forget to style your bangs, do it to your liking, you can first curl it into curls and lay it out in a wave. If the bangs are short, everything is even easier.


A 3-strand braid is one of the ingenious inventions of mankind. Today there is nothing easier than braiding your hair. Even the smallest girls can do this. And it’s surprising that the simplest manipulations with just three strands allow you to get a pretty nice braid that resembles.
Weaving braids from 3 strands is not such a difficult task. Today, there are entire salons that offer a variety of braiding options and hairstyles with them. But even at home there are no obstacles to weaving them yourself, and 3 strands is not the limit. You can create entire compositions of four, seven or more strands, decorate ready-made hairstyles with flowers, bows and various hairpins.
The simplest braid
If you still don’t know how to braid a 3-strand braid, you definitely need to learn it. Even if you wear short hair and you are not going to grow them (or you are even a man), then your daughter will probably need your weaving skills. To make it easier for you, you can follow the step-by-step instructions:
- Divide your hair into three equal parts: right, middle and left;
- Throw the right strand over the middle one. We again have new right, middle and left parts;
- Now cross the left strand over the new middle strand;
- Now right again, etc.
As you can see, the technology is surprisingly simple. The main thing is to tighten the hair well each time you braid it so that the braid is strong.
Ponytail braid with ribbon
Now that you already have a regular three-strand braid, you can improve it by adding a ribbon. In the old days, girls did not have elastic bands or hairpins, so they tied the braided braid with a small piece of fabric. And sometimes they used a bright ribbon as decoration, which was woven into the hair. The weaving technique remains the same. Only the beginning changes:
- We make a tail (regular or on the top) with a strong elastic band;
- We wrap a 1.5 cm thick ribbon around the tail (the length of the ribbon should start from a meter);
- We ended up with two free ends from the tape. We grab one end with our left hand to the left strand, the other with our right hand to the right strand;
- During weaving, do not lose the ribbon. It should extend over the middle strand along with the hair.
French braid
Video: creating a simple French braid
- Long hair is a blessing that we give to ourselves, gaining it through much suffering and effort. And very long hair- it is not only beautiful, but also......
- According to unconfirmed reports, this braid appeared thanks to the French court hairdresser, then it spread throughout Europe with lightning speed, and in memory of the “inventor” of the hairstyle, it was given the name - French. IN......
- Long hair has always been the pride of any girl. But since wearing them loose every day is not very convenient, and you always want to be beautiful, our grandmothers also braided them......
- A six-strand braid looks stylish and very original, it is used to create incredibly beautiful airy hairstyles, and this braid itself will suit almost any created......
- Lush and curly locks that flow beautifully in the wind have always been in fashion. But today they have been replaced by braids, which are so diverse that they can change every day......
- Lately, too much attention has been paid to hair color and various dyeing. Only we are accustomed to the fact that a variety of shades are now in trend and you need to be a rainbow with......
- Stylish short haircuts, curls middle length, intricate long strands - just recently these hairstyles were at the top of the ratings of hair stylists. Traditional decoration Russian beauties - braid - surprisingly......
- The braid has never lost its popularity. This collected hairstyle has adorned the heads of beauties since ancient times; the braid has always been the embodiment of the beauty and femininity of a girl. A thick, long braid lay......
- Original braids and various weaves are now at the peak of popularity and the most fashionable of them are hairstyles with a side braid. This is not surprising, because such weaving......
- Recently, it has become very fashionable to wear a braided hairstyle. There are many variations of braiding and many are quite simple to perform and can be done at home.......
- A woman's look is complete only if her hair is in perfect order. Unfortunately, most of the fair sex do not have the opportunity to visit a beauty salon every day, because it takes away a lot...
(132
people already rated)
If you are tired of a monotonous braid, but you don’t like wearing your hair down and want to somehow diversify your casual look, we will help you with this. If you have medium or long hair and love braids, then this article is just for you. Also, you can use these patterns to create a hairstyle for your daughter or younger sister.
Also, some of the presented hairstyles are quite suitable for an evening out.
We offer you patterns for weaving various braids from the simplest to the more complex. You can braid your hair yourself or ask someone for help.
Let's start with the simplest thing.
How to braid a regular three-strand braid.
1. French braid or spikelet.
The spikelet is woven like a regular braid, only another thin strand is woven into each strand. Comb your hair back. Separate two thin, even strands from the temples and overlap them. Then separate the third thin strand, weaving into it a thin strand taken from the temple, etc.
There are many variations of spikelet hairstyles.

Another type of spikelet is the “bottom” spikelet. Weaving such a braid starts from the top of the head. This way you can visually increase the length of the braid.
2. Hairstyle Waterfall from braids.
The basis of this hairstyle is also french braid, only slightly modified.
And another version of the Waterfall from braids.

3. Reverse spikelet or Dutch braid.
This braid is braided like a spikelet, but in reverse, i.e. the strands are woven into the bottom of the braid.
Two braids woven into one will look very impressive.
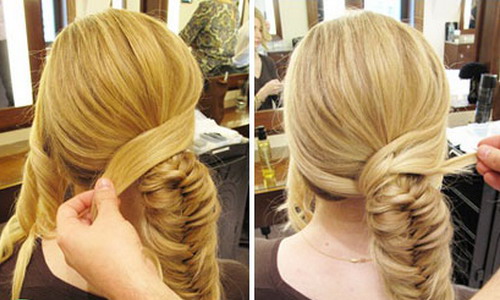
4. Fishtail braid.
You can see video: How to braid a braid " Fish tail».
It differs from the usual braid in that the hair is divided into two parts, small thin strands are separated and intertwined with each other.

Variations of fish tail.
French fishtail.
Knot braids.
Nowadays all kinds of braids made from knots are very popular. There is no need to braid such braids, they need to be tied, so to speak.

5. How to make a braided wreath.
6. Pigtail Harness
An easy braid to make. The hair is divided into two equal strands, twisted into a strand, and then these two strands are intertwined.

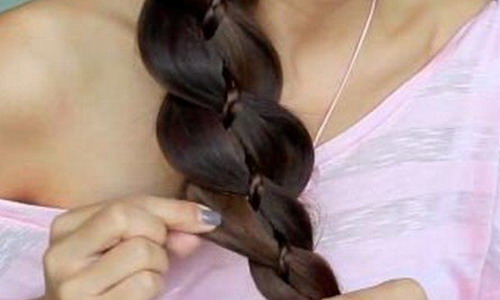
7. Flower from braids
Braid one or two braids. Pull out each weave on the left side and twist the braid into a flower.

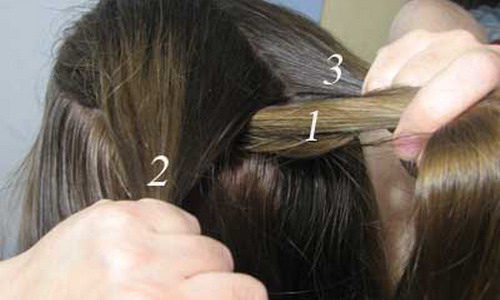
8. Four-strand braid. Weaving pattern.


Fashion changes and depending on it, girls not only choose clothes, shoes, makeup, but also their hairstyle. In recent years, women are increasingly choosing fashionable short haircuts, but long hair will never lose its relevance.
At all times and for all ages braids for long hair were considered beautiful decoration female image, besides, now the choice of different hairstyles with braids and weaves is simply huge.
Everyone can learn how to weave braids for long hair with their own hands, let’s start with simpler braids and end with a variety of interesting braids.
Classic three-strand braid
A hairstyle that has passed through time - a classic 3-strand braid, suitable for both long and medium hair. Our grandmothers and great-grandmothers braided their long thick hair, and the thicker it was, the more beautiful the woman was considered.
3-strand braid patternToday this is the fastest and simplest braid that even a child can learn to weave.
The hair must be divided into three equal parts and then braided as shown in the diagram: The outermost strand on the right is transferred between the other two, then the outermost strand also moves between the two neighboring ones. Continue braiding to the ends of the hair and secure with an elastic band.
At first glance, this braid may seem boring, but once you look at the variety of hairstyles that can be done using this braid, it becomes a favorite for many.
Video tutorial on braiding 3-strand braids
Three-strand braid - photo
French braid for long hair
A French braid on long hair looks very impressive, besides, this weaving allows you to collect your hair tightly, it will not fall out of your hairstyle and disturb you. It can be braided straight or obliquely, or two or more French braids can be braided over the head.
French braid patternWeaving also begins with three strands as in previous version, however, we start weaving from the top of the head and separate three small strands. We start weaving in the usual way, the only difference is that when moving the outer strand, each time we grab a small strand of loose hair to it.
Video instructions for weaving a French braidBy adjusting the thickness of the strands, you can determine for yourself what kind of braid you will have, with small or large weaving.
Reverse French braid
This hairstyle is also called dragon braid. As you already understand from the name, weaving occurs according to the same pattern as a regular French braid, but the outer strands do not move upward, but under the adjacent strand, that is, from below.
Weaving patternThere can also be several options for such a braid; you can braid two symmetrical braids, or one zigzag. If you pull out small loops from each weave of the finished braid, you will get a beautiful voluminous hairstyle for long hair, which is suitable even for going out.
Weaving videoReverse French braid - photo
Fishtail braid for long hair
A fishtail is a fairly simple weave that is actually made from two strands. More precisely, the hair is divided into two parts, then a small strand is pulled out from one part and transferred to the adjacent part, we will do the same on the other side, thus we get interesting weaving, which really vaguely resembles a fish tail :)
Fishtail (spikelet) - weaving patternThis braiding looks especially good on long hair; the braid turns out to be very unusual and interesting. You can also do high ponytail on the top of the head and braid a fish tail from it - you will get a fashionable and stylish hairstyle.
Weaving video tutorialWaterfall braid - a wonderful hairstyle for long hair
The combination of loose curls and beautiful weaving is an ideal hairstyle for girls who like to wear long hair in free form. At the same time, framing your hair with such a braid will give the image a finished and neat look.
The waterfall spit is perfect for a special occasion, a romantic walk or a trip to the theater.
The weaving can be seen in the diagram, it is quite simple, it is done like a French braid. To get the effect of flowing hair, the additional strand that enters the braid is not braided, but remains hanging freely.
Waterfall braiding pattern Video weaving lesson4 strand braid for long hair
We looked at simple braids of 2 and 3 strands, now we can move on to more complex ones openwork patterns weaving. These include braids for long hair with 4 or more strands.
Four-strand braid patternWhen weaving a braid of 4 strands, the main thing is not to get confused about what goes behind what. Once you get the hang of it, such a seemingly complex braid can be completed in a few minutes.
The easiest way to learn how to weave this braid is through video lessons.
Weaving an openwork braid of 5 strands for long hair
Weaving a five-strand braid requires some skill and experience; if you can already easily perform the previous weaves, you can move on to more complex ones.
A 5-strand braid is performed only on long thick hair, I advise you to carefully watch the diagram and video tutorial to master this weaving technique.
Weaving pattern Video tutorial for 5-strand braids
Braid - mermaid tail - hairstyle for long-haired beauties
A very delicate and romantic braid, it looks voluminous and a little careless. We take the French braid as a basis, the only difference is that when we grab another strand of loose hair, we do not pull it into the braid, but leave it in a weakened form.
The mermaid braid can also be made in several variations, look at the photo and video.
Scythe shell
Another great hairstyle for long hair. It can be performed using any braid (classic, French, fishtail). Here the location of the braid plays an important role; it should start from one edge, then make a semicircle and curl like a shell.
Also, to create a shell you will need bobby pins or pins to secure it in the desired position.
Video tutorial on braiding shell braidsBraid around the head (crown)
A spectacular hairstyle that is not suitable for everyone, if you have a beautiful oval shape faces and pronounced features, then you can safely adopt this braid. This hairstyle is also called a basket hairstyle.
Weaving can be done in several ways, it can be a classic braid, which finished form goes around the head, or it can be a circular French braid.
If you choose the first option, then keep in mind that the hair must be very long so that it is enough to completely cover the head.
Video lessonsThe simplest braiding can be mastered not only by women, but also by men who have to gather their daughters in kindergarten or school. The simplest braids are three-strand braids. Weaving four-strand braids is more difficult, but it is worth it - such hairstyles look very unusual. What can we say about all sorts of other modifications - French braids, dragons, plaits, daisies and other methods! Having mastered these simple and beautiful ways braiding, you will become a real master and will be able to change your hairstyles every day.
Braids are worn by both girls and women on weekdays and holidays. It all depends on what your braid style will be. To master simple braiding, it is better to first practice braiding a simple braid. It's easy to do. With the right in a simple way braiding will result in a neat hairstyle, and its owner will not experience any discomfort.
How to weave the simplest braids

The simplest braiding begins with combing. Comb your pulled back hair with a wide-tooth comb. Comb the ends of your hair first, then gradually move higher and higher.

In this case, you will minimally injure your hair, combing will be almost painless, and your hair will untangle easily.


Before weaving simple braids, go through your hair with a soft massage brush. Divide all the hair on your head into three parts. Take in left hand the left part of the hair, in the right hand - the right.

Place the side strands alternately on the middle strand. In this case, the strand from the left hand will become central, and the strand that previously lay in the middle will go to the left hand.


While braiding, periodically stroke the strands of hair with your hands so that they do not get tangled with each other, are smooth and even. Braid the braid as long as you want.


Pay attention to the photo of simple braiding - a tail 10-20 cm long is always left at the end and secured with an elastic band or a hairpin.
Braiding four strands (with photo)
A four-strand braid is woven similarly to a simple braid. Look at the photo of a four-strand braid - before braiding begins, the hair is divided not into three, but into four parts and overlapped one after the other. Follow the path of the strands in the figure, and you can braid such a braid yourself.


1. To do beautiful hairstyle With these braids, first part your hair with a straight parting, then separate the back hair and pin it up to keep it out of the way.


2. Weave four strands of braids on each side of your head and secure their ponytails with elastic bands.


3. Next, comb the hair at the back of your head and connect the braids with it. Secure your hair at the back of your head with a bobby pin or elastic band.

4. Comb your loose hair. The result is this hairstyle: there are original pigtails on the sides of the head, and a ponytail at the back.
French braiding with step-by-step photos
Below is step by step description French braiding with photos.


2. Separate the hair at the top of your head and divide it into three sections.

3. Place one side strand over the middle one, similar to a simple braid.

4. Place the second side strand over the new middle strand. Now all three strands should be in one hand (left), but separately.

5. Next, grab a strand of loose hair from each side near the side strands, combine the strands on the sides and continue weaving. Place the enlarged side strands on the middle one and weave them as in a simple weave.

6. Thus, continue braiding by adding loose hair to the side strands and transferring strands from one hand to the other. While braiding, grab your hair tightly and keep your hands as close to your head as possible. Then the braid will turn out neat and will stay on your head for a long time.

7. Gradually grabbing any new loose hair on the sides of the braid, continue braiding all the way to the back of your head.

8. Having reached the back of the head, you can immediately fasten the loose hair with an elastic band - make a ponytail at the end of the French braid. Or you can continue braiding loose hair in the form of a simple braid. The choice is yours.


Look at step by step photos French braiding to consolidate the information received.
Reverse French braid

1. Weaving a reverse French braid, like all other braids, begins with combing. Below are step-by-step photos of reverse French braids.


2. This braid is woven similarly to the French braid. But there are some differences here. Loose hair when added to the side strands creeps up from below. As a result, the braid becomes embossed.


3. Having braided your hair to the back of your head, you can also immediately secure it with an elastic band or continue weaving in the form of a simple braid.


The braid needs to be braided tightly, then it will look neat and beautiful.


4. Comb the remaining ponytail with a brush. A longer ponytail looks more interesting, while a short ponytail looks more childish.
Step-by-step fishtail braids
Step by step, the fishtail braid is performed in the following order.

1. Comb your pulled back hair.

2. This braid is made from two strands. First, divide all the hair into two equal parts with a vertical parting at the back of the head.


3. Next stage step by step weaving Fishtail braids - separating one part of the hair one small strand at a time and throwing it to the hair of another part.

4. Do the same with the hair on the other half of your head.

5. Repeat all steps many times until you have braided your hair.

6. Leave the hair free at the required length (ponytail) and secure the braid with an elastic band.
Simple beautiful braiding with a tourniquet

1. Before braiding the braid, comb your hair with a brush.

2. Pull clean, dry hair into a high ponytail at the top of your head.

3. Distribute the ponytail into three equal parts.


4. Curl each section of hair to the right or left, but always in one direction.


5. Twist the three sections of hair together in the opposite direction.

6. Secure the resulting tourniquet from below with a hair elastic.


7. Comb your loose hair (ponytail).
Simple braiding: how to braid a headband braid (with photo)

1. Comb your hair, you can comb it back or make a side parting on the left.

2. Weaving a headband braid begins by dividing the hair into two parts with a parting that goes through the parietal part of the head from one ear to the other.

3. Before braiding the headband braid, temporarily secure the back of the hair into a ponytail.

4. From the left ear or from the side parting on the left towards the right ear, weave a French braid.

You can do it classic version or with reverse weaving.

5. Gradually weave all the hair from the separated upper part of your head into a braid. Pick up new hair strand by strand.


6. Having braided the braid to the right ear, you can continue weaving a simple braid or make a ponytail.


You can strengthen the end of the French braid, and combine the free part of the hair with the total mass of hair at the back of the head.
Braiding: how to braid braids
1. Before braiding braids, comb your hair and divide it with a vertical parting from the forehead to the back of the head into two parts.

2. Before braiding braids, temporarily secure one part of the hair with an elastic band so that it does not interfere.

3. Separate a strand of hair from the forehead with a horizontal parting in the direction from the vertical parting to the temple and twist it 2-3 times to form a flagellum. Hold the flagellum in your right palm.

4. Separate the next strand of hair with a parallel parting and twist it in the same way with your left hand.

5. Twist both flagella together in your hands.

6. With your left hand, take the next similar strand and again make a flagellum out of it.

7. Right hand follow similar steps. Do not let go of part of the braided braid from your hands.

8. Continue braiding one half of your head to the back of your head.

9. Secure the finished braid with an elastic band at the back of the head.

10. Braid the braid on the other half of your head in the same way.
Braid "Double Drop"
1. Wash your hair and dry it well. Using two horizontal partings, divide the hair into three parts (one at the level of the crown, the second at the level of the top of the ears), secure each part of the hair with elastic bands.

2. Using a vertical parting, divide the upper part of the hair into two parts.

3. Create a French braid on each half at the top of your head. Weave first on one side, then on the other. Then bring the loose ends of the hair together and secure with an elastic band.

4. Also divide the middle part of the hair on your head with a vertical parting in half. French braid first one half of the middle part of the hair, and then the other. Secure the loose ends of the hair with an elastic band, as in the previous case.

5. After finishing the “Double Drop” braid, simply comb the hair on the back of your head and leave it loose.
Braiding: how to braid “Dragon”

1. Before braiding the dragon braid, tilt your head and comb your hair against hair growth - in the forward direction.


2. Start French braiding from the back of your head to the top of your head.


3. From the top of your head, continue to weave a simple braid, securing the end with an elastic band.


4. The last step of how to make a dragon braid is to twist a simple braid and secure the end under the French braid.
Braid "Petals"

1. Comb your hair. Separate the hair on the left side of the head with a diagonal parting, going from the hairline on the right side of the head to the left ear.

2. Braid a section of hair into a French braid.


3. Similarly, separate a strand of hair on the right side of your head. It will start from a French braid on the left side of the head and continue to the right ear.

4. Create a second French braid on the right side of your head.

5. Thus, alternately braid the braids on the left and right side of your head and reach the top of your head.

6. From the top of the head to the back of the head, you need to leave a wide vertical strand of hair. Weave all the hair around it into French side braids.

7. Braid the vertical strand with a separate braid.


8. The final stage of weaving the “Petals” braid - at the back of the head, combine all the hair into one simple braid or ponytail and secure it with an elastic band. You can make several thin simple braids.
Braiding: how to braid a “Crown” braid

1. Braiding the “Crown” braid begins with combing from the crown in the direction of hair growth. Distribute them evenly in all directions.

2. Start from the back of your head into a French braid, collecting hair that grows from the crown to the hairline at the back of your head.

3. In the process of weaving a Crown braid, move around the circumference of your head in a clockwise direction.

4. Having reached the back of the head, where the braiding began, secure the loose hair with an elastic band and hide it under the braiding.


5. Hair can be decorated with decorative hairpins and flowers.
Method of braiding "Mesh"
1. First, comb your hair. The “Mesh” braiding method begins by separating a strand from the middle of the forehead rectangular shape and securing it with an elastic band.

2. Separate 2-3 more strands of a similar shape in each direction from it and secure each of them with elastic bands.
3. Divide each resulting ponytail into two parts.

4. Connect parts of adjacent ponytails into new ponytails and secure them also with elastic bands.
5. The tails near the ears do not need to be divided into parts. Combine them entirely with adjacent, higher-lying strands of ponytails.

6. After the second row of elastic bands appears on your head, throw all the ponytails forward (on your face).

7. In the center of the head in the crown area, separate a rectangular strand, slightly smaller in size than the very first strand.

8. Connect a new strand with half parts of adjacent strands and secure with an elastic band.
9. To the sides of them, continue the already familiar weaving.
10. You should have a third row of elastic bands, and the number of tails should be equal to the number of tails in the first row.

11. Comb the hair at the back of your head. Spray your hair with hairspray.
Braiding "Chamomile" braids
1. Comb your hair. Divide your hair with a vertical parting into two parts.
2. Divide each part from the crown into four parts using radial partings.

3. From the top of the head along the straight parting, begin to weave a French braid. When you reach the end, make a turn and start braiding from the second part. At the top of your head, gather your hair into a ponytail.

4. Start braiding the “Chamomile” braid from the top of the head with the next French braid on the same half of the head. Do everything in the same way, with a turn to the next part of the hair.

5. Perform similar weaving on the other half of the head.

6. Combine all loose hair into one ponytail or a simple braid at the top of your head.
Braids "Shells"


1. Comb your hair. Divide your hair with a straight vertical parting into two parts.


2. On each side of your head, create simple braids over your ears.


3. Twist each Shell braid in a spiral and secure with hairpins.


4. Decorate the “shells” with decorative pins or flowers.
Weaving method "Air cross"
1. Comb your hair with a brush. The “Air Cross” braiding method begins by dividing the hair with a vertical parting into four equal parts.

2. On each half of the head, make another diagonal parting - from the center of the back of the head to the top of the ear.

3. Start French braiding on the left side of your head. At the same time, grab the hair only from the top of the head. The lower edge of the braid should be free, not connected with the hair of the lower occipital part of the head.

4. At the end of the French braid, create a simple braid and secure the loose hair with an elastic band.
5. French braid on the right side in the same way.

6. Then start braiding a French braid on the left side of your head at the back of the head. It will look like a continuation of the braid on the right side of the head. Finish with a short, simple braid.

7. Undo a simple braid that is an extension of the French braid on the left side of your head. Continue braiding it again, but now in the form of a French braid. Weave the hair of the lower right occipital part of the head into it.

8. Decorate two loose ponytails or simple braids on each half of the head with decorative elastic bands, maybe with flowers.
Braid "Snail"


1. Comb your hair. Tilt your head forward a little and comb your hair again in the direction of its growth, i.e. all hair should lie from the crown in a radial direction.


2. Start French braiding from the crown of your head. Always grab new strands of hair from one side only.


3. Braid the “Evidence” braid in a spiral until the hair runs out.


4. Loose hair can be secured with an elastic band in the form of a ponytail or braided with a simple braid. Hide a simple braid under the occipital strands, braided into a French braid.
Snail tail


1. Comb your hair. Make a tail in the occipital-side part of the head.


2. Separate a third of the hair from the ponytail and weave it into a simple braid.


3. Twist the braid into a spiral at the base of the ponytail and secure it with bobby pins.


4. Depending on your desire, you can decorate the “Snail” tail with decorative pins or twist the ends of the tail using electric curling irons.
Bun with braided rim
A bun with a braided rim looks very strict and elegant.


1. Comb your hair. Make a low, loose ponytail at the back of your head and secure it with an elastic band. Section your hair over the elastic and thread the ends of your ponytail through the gap.


2. Divide the tail into two equal parts. Weave a simple braid from each part.


3. Wrap the braids around the base of the ponytail, which now looks like a bun.


4. Secure the braids with hairpins and bobby pins. Make sure that the ends of the braids are well hidden.
Swiss braid

The Swiss braid is woven with the assistance of an assistant.


1. Comb your hair. Create a low ponytail at the back of your head.


2. Divide the tail into three parts and twist a tourniquet from each, ask an assistant to hold them.


3. Weave a simple braid from the strands. It will look fuller and more voluminous than a regular braid.


