If you want to surprise your child or just want to decorate your room, you don’t have to use standard options - plasticine, natural materials or embroidery.
Products made from ordinary pasta will look original. This is a simple and not very labor-intensive way of decorating. Our pasta crafts master classes will help you cope with the task in the best possible way.

How to use the material
Pasta products are used both for decorative design crafts, and for creating three-dimensional images. The material is distinguished by its properties, which make it very easy to work with:
- high strength;
- variety of shapes and sizes - spirals, shells, bows, etc. are on sale;
- excellent fixation qualities - pasta is attached to the base or to each other, ensuring the reliability of a wide variety of voluminous objects.

To create a craft and fasten individual structural elements, you need to use glue. Regular PVA will do and is safe enough for a child. If you plan to create a three-dimensional structure, then you need to attach the pasta “shells” to each other. And when decorating, gluing to the base is required.

In the photo of pasta crafts you can see the most unusual models. However, their design requires coloring, because usually the material has no color.
![]()
There are, of course, multi-colored figures, but they are expensive. For painting use acrylic paint or waterproof dyes.

To give the desired color to the material, the dye should be diluted in the required concentration in disposable plate or in a special thermal package. Aerosol paint in cans will help you create a masterpiece. It is convenient to use, spraying it on an already made craft.


Original ideas for creativity
You should involve your child in needlework early age. However, children 3-5 years old will not be able to build a serious picture or structure right away. Therefore it is recommended to start with simple crafts from pasta for children with our description.

Beads
You need to take a regular sheet of A4 paper and scatter feather-shaped pasta on it. Using a brush and paint, they are painted in different colors.

After the material has dried, it must be strung on a strong thread. It is not necessary to use pasta of the same type - combined models from elements of different appearance will look original.

Panel
An original figure is cut out of cardboard, for example some kind of fruit or an ordinary saucer. You can use a regular CD.


The base is covered with colored paper, and a layer of glue is applied on top. Pasta is placed on it in different orders. After they are fixed, the surface must be painted in the original color.

Vase
If you want to know what kind of pasta craft you can make with your own hands so that it also brings benefits, it is advisable to use this advice.

You will need a glass bottle or jar of an original shape. The surface is covered with glue, onto which pasta and various beads are fixed. Using spray paint, the vase is painted in the selected color.

You can take a stable one a plastic cup and perform similar manipulations with it. Makes a beautiful stand for pens and pencils.

Photo frame
You need to take a sheet of cardboard. Along the edges of the sheet, pasta is attached to glue and painted with spray paint. After complete drying, you need to fix the selected photo in the center, and on the back - the leg for stability.


How to create a complex design
Adults and older children will be able to cope with complex designs that require spatial thinking and perseverance. We offer detailed instructions how to make a pasta craft.

Wreath for the New Year
This product is perfect for New Year's decoration home and creating an atmosphere of comfort. The technology for performing the work is not too complicated:
- Make a cardboard ring to serve as the base.
- Using glue, the pasta is attached to a cardboard base. This must be done in any order to eliminate gaps between individual elements.
- After the glue has dried, the surface of the product is treated with golden paint.
- The wreath is decorated with a red ribbon. It is advisable to attach bells.

Christmas tree
First, build a cone out of cardboard. It is advisable to choose a green base color. It is installed on a specially made base, which acts as a stand. The cone is covered with glue. Pasta is attached to it.

You should start from the top, gradually descending downwards. The simplest design uses feathers, but Christmas trees with different shaped pasta will look original.

Snowflake
An original pasta craft can be made in the shape of a snowflake. To do this you will need shells, horns or leaves:
- A plastic bag or cling film is placed on the base.
- The middle of the snowflake is made from two horn elements glued together in a circle.
- The outgoing rays glue shells to the circle of horns.
- Leaves are attached to them.
- After the structure has dried, it should be coated with paint. In this case, the film is removed from the back to paint the second side.
- Using double-sided tape, the snowflake is attached to the glass or hung on the Christmas tree using an attached ribbon.


Cup and saucer
It is necessary to take original tea set items. They are wrapped in cling film or foil. The sequence of actions is as follows:
- The bottom of a cup or saucer is covered with glue, and then round shaped pasta is fixed;
- the walls between the pasta are coated with glue;
- after the bottom is completed, begin gluing the walls;
- when the glue dries, remove the cup or saucer;
- in place of the handle of the cup, the missing elements are glued, and then the handle is installed;
- to decorate the edges of the product, you need to attach shells to them;
- After the glue has dried, the surface of the product is treated with paint.

Kettle
Ideas and methods for making crafts may be different, but a tea set will always look especially attractive. Need to inflate balloon and cover its surface with wheels.

You need to start work from the bottom, gradually moving to the top. Before reaching a few centimeters to the “tail”, pasting should be stopped and the structure should be allowed to dry.

After this, the ball is pierced and removed. At the bottom of the structure is a stand made of spirals. The product can be left in this form - you will get an original vase.

To make a lid, you need to inflate new ball and paste over the top part near the “tail”. The diameter must match the base. The ball is deflated and the kettle is covered with a lid. The handle and spout are also made from pasta. Horns are suitable for the handle, and feathers for the nose.

Casket
A box is constructed from cardboard - a base and a lid. The base can be painted in the original color or completely covered with pasta. You need to start by decorating the edges - cover the edges with wheels, horns or shells.

The lid is designed in the same way. You can make a pattern of shells or glue a star in the center. When the glue has dried, the surface of the box should be painted in the chosen color.


Crafts made from pasta will decorate your home, and children will be happy to take part in creative process. Care should be taken when working, especially when working with glue and paint. Your imagination, combined with perseverance, will allow you to create a real masterpiece.

Photos of pasta crafts


Making crafts is an incredibly useful activity for a child. visual arts, which develops mental acuity, imagination, and especially spatial thinking. Regular pasta is also suitable for this kind of creativity. We'll tell you how to make crafts from pasta in this article.
Ideas for simple pasta applications - 5 examples
Using “horns” as fur for animals
One of the most simple ways The use of pasta “horns” consists of almost chaotically gluing each piece onto a sheet of paper on which a figurine of one or another animal has already been drawn - for example, a sheep, as in the photo below. It is recommended to use a sheet of hard colored cardboard as a background, and draw the animal itself with a thick pencil so that the whole composition looks harmonious.
It is better to lightly paint the horns themselves in the natural (in this case) color for the fur, white and light yellow, but not in a thick layer, so that the relief of each horn is noticeable. In this case, it is better to use acrylic paints, not watercolors.
Making a pasta bouquet
The use of several types of pasta in an application at once may be a sign good manners, if they are combined, creating a composition made in the same style, as in the figure below. The craft itself is very simple, the only difficulty is to correctly position the ears and flowers relative to each other. By the way, the background here is a fabric lining, which gives softness to the whole work, but it can be replaced with, for example, a painted thin board or ordinary cardboard with a rustic-themed pattern.

In this case, the use of shells on the sides is mandatory, since they complement the work; the bouquet without them would not look so impressive. Of course, all components of the bouquet can be painted in different colors, making the stems green, the curled petals white or red, and the flowers themselves can be painted a light brown shade.
Sunny landscape
In work you can combine not only different types pasta, but also different source material in general: creating a landscape can help eggshell, a little cereal, plasticine. It is very important to ensure that no particular material comes to the fore, because in such a composition, as in the figure below, it is the harmony of the means used that is important.

This application can be created in a few simple steps:
- First, a base is created, a frame made of cylindrical spirals glued together with PVA glue or quick-drying instant glue (occasionally a thread is pulled along one or another guide line, connecting the pasta);
- Next, the future drawing is drawn on the sheet with a pencil: first the sun, the root of the tree are drawn, then flowers and butterflies (they can be marked with symbols so that they can then be covered with pasta);
- Then the leaf in the lower part is generously smeared with a glue stick so that it is possible to attach cereals (in this case, buckwheat) and shells there, playing the role of a tree root and relief, respectively;
- Finally, the horns are glued in such a way that they resemble twisted flower petals (either round pasta or horns can be placed in the middle, it will look organic in any case);
- The final touch is to apply a plasticine sun to the sheet and glue fluttering butterflies (which, by the way, can also be made of plasticine).
Swan floating on the river
Curved natural shape The body of a swan is perfectly suited for depicting it on a sheet of paper (cardboard) using pasta. All that is needed to create such an applique is a sufficient number of suitable “details” and some paints.
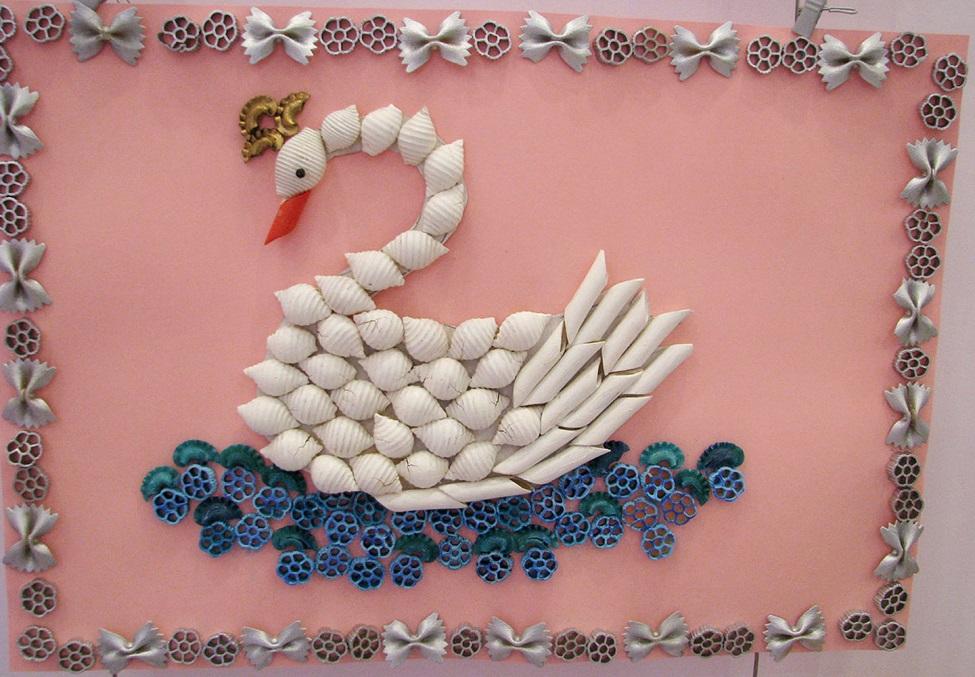
As can be seen in the figure, several types of pasta are involved in the work: tubes, shells, “butterflies” and wheel-shaped ones. First, a silver-colored frame is glued onto a sheet of cardboard (you can place “wheels” with bows in a different order, the main thing is to maintain the given sequence), then - saturated water of blue color, and after that the pre-drawn outline of the animal is pasted over with pasta. The swan's eye can either be drawn with a felt-tip pen, or a large poppy seed can be glued on. And if you cut one tube in half, you can assemble a bird’s foot from the resulting two “parts.”
Tea-set
To create a three-dimensional craft, you will first need to create its frame using foil or regular cling film. Any component of the service (for example, a cup or saucer) has its own shape, which must be conveyed by pressing the foil inside and covering all the edges with it. After the newly-minted frame has “remembered” its future shape, you can begin to create the product itself.

It is better to use round pasta, reminiscent of car wheels; they take up less space and look very organic. They can also be painted, say, in bright shades of blue or green flowers; a classic one would also look good White color as in the photo. The surface of each component of the “finish” of the service must be evenly coated with glue so that the part is firmly held to its base. The figure shows an example when the composition is covered with paint after completion, but in this case an aerosol-type can was used, but not ordinary watercolor.
Some tips for working with pasta
Glue selection
The classic tool used in crafts to connect pasta to each other - PVA glue - has long been no longer the only alternative, since now on the shelves of office supply stores there are also special guns that supply a molten silicone solution, which hardens at room temperature, and double-sided thin adhesive tapes, and small glue sticks.
PVA glue is more designed for working with paper, and products that include pasta in the composition are likely to be short-lived and can crumble from any careless touch. It is worth considering the possibility of working with instant adhesives (the same “Moment”) if you need to connect the elements of the application strictly in one place.
When working with silicone-based glue, you should never apply it to the entire surface of the pasta, as it will quickly cover it with a thick film and ruin it. appearance all the crafts. It is enough to squeeze out the composition a little from the nozzle of the gun, scoop it out little by little with a toothpick, needle or other similar objects and apply it to the gluing area.
Painting
You can paint certain pasta products either using watercolors or gouache, or using dyes that are used when painting eggs. When using the latter, all you need to do is prepare the solution according to the instructions, then place the pasta in a regular zip bag, pour in the coloring agent, and then dry.
Usually this option turns out to be more profitable because it does not require significant time investment, plus, the colors are more saturated and bright, which children like so much.
Pasta can be painted with paints, but you need to make sure that the watercolor or gouache contains vinegar or a similar product, as it will help fix the paint and prevent it from slipping off quickly. As an alternative, you can consider acrylic.
You can also use an aerosol can for painting in some non-standard colors, but working with it requires some skill. The pasta looks even better if the authors of the crafts use several coloring techniques during the work process, for example, first covering them with dyes, and then adding details (dots, hearts, beads, etc.) with paints.
5 master classes on simple pasta crafts for children
Creating a butterfly flower
In order to make a plant in the shape of a butterfly, you need to have:
- Pasta in the form of bows (as in the photo below);
- Low (10-15 centimeters) pot;
- A piece of wire;
- Paints.
- The first step is painting the bows acrylic paints in the colors of future butterflies; Subtle colors (pink, blue or soft yellow) are most suitable. As mentioned above, adding interesting details only adds to the overall perception of the composition, because the purple spots on the wings look very organic.
- Next, use pliers to twist the pieces of wire to create antennae for the butterfly. It is important to monitor the pressing force so as not to accidentally bite off the desired part. If the wire is thin and copper, this action can generally be done by hand, without resorting to the help of third-party tools.
- It is better to paint the pots in which the butterflies will be installed in some bright color, sky blue, orange, etc.
- You need to place a filler inside: green peas are the most suitable from the available materials, but sawdust, compressed pieces of hay, artificial soil and dry wood will also look organic.
- While the pot is drying, on ordinary wooden sticks, which can be taken at any sushi bar and other similar establishments, using a glue gun, you should first attach the body of the butterfly, and then its antennae on top.
- You can fasten the resulting craft together with a piece of plasticine. After the glue has dried, the butterfly can be installed in the pot.

Gorgeous peacock made from spiral pasta
Spiral-shaped pasta, which can be found in any grocery store, can be used not only as animal fur, but also as a full-fledged tail. For example, the peacock, which, as any child knows, is famous for its colorful plumage.
- The first step is to prepare the basis for the future craft, in this case the place where the tail will initially be attached. You can cut a circle out of cardboard, similar to the one in the photo, you can use a regular CD/DVD disc; the main thing is to paint the base in a color suitable for the bird’s tail, turquoise or greenish.
- After the base is ready for further work (dried, does not stain your hands), you can begin to directly design the tail. To do this, firstly, you need to attach the spirals to the base using silicone or instant glue, lightly holding them at the junction with the disk (sheet of cardboard). In this case, it is better to refrain from using PVA; it is completely unsuitable for small contact areas.
- After the spirals have dried, they can be painted in various colors. It is recommended to adhere to the rule of three: two primary colors and a third as an additional one (for example, blue and purple as the main ones and green as an auxiliary); this has a positive effect on the overall perception of the craft.
- The final stage of work is creating the body of the bird. It is best if it is cut out of hard double-sided colored cardboard, since in this case it will be better attached to the tail, and the product itself will be much stronger.

Small box with a flower
Girls will always need beautiful boxes and caskets to store their trinkets and maybe even secret messages, so such a simple thing in their rooms will be simply irreplaceable, and any girl will clearly not resist the temptation to decorate it herself.
- The first thing to do is to glue together a cardboard box of the required size (it is recommended to connect the cardboard sheets together with glue-coated corners).
- Then you need to paint the future elements of decorating the box in the desired colors: red and brown, chrysanthemum colors. It is recommended to connect such half rings together at the points of contact with instant glue so that the flower does not fall apart into its components.
- The next stage is decorating the box with half rings. The picture shows exactly what pattern can be created around the perimeter of the box. Here you can give free rein to your imagination, it is not at all necessary to use half rings in your work, you can, as in this work, use tubes, but no one will be against bows and butterflies with shells.
- The top part of the box can also be decorated with pasta, but best of all with those that were not used on the sides: for example, round shells fit perfectly into the role of small but beautiful elements of the lid.
- The flower glued at the beginning of the work should be placed on the very top of the lid, having first attached it to a small sheet of cardboard. You can, of course, glue the flower directly onto the lid, but this is not so reliable.

Pasta beads
A craft that any girl can handle - beads - can include not only classic beads and artificial plastic stones, but even pasta. And here you can’t guess with the choice of shape, because every girl likes something different.
Before you start collecting beads, you need to prepare the pasta itself for inclusion in the chain. To do this, you should, firstly, collect a sufficient number of them various forms, find threads or bracelets that match the colors, and then paint the spirals, shells and other “beads” in the desired colors.
Rich and saturated ones look best bright colors: yellow, turquoise, bright shades of red and even black. The picture shows an example good combination colors of thread with dyed pasta of various shapes.

Vase
How to make an original pasta vase, watch the video.
To summarize, it should be said that the article shows only a small part of all crafts that can be made entirely from pasta or just include them, because the child is free to create his own works as he wishes.
See another article on our website.
Unusual ones are becoming more and more popular due to their simplicity and beauty. They make paintings, boxes, vases, snowflakes, people, houses, appliques, interesting crafts from pasta for children.
It is very interesting and exciting not only for children, teachers, but also for parents to engage in such developmental activities with children. And by the hour, mom herself gets very interested in this kind of creativity and creates real masterpieces.
When choosing what to start doing using pasta, you must, of course, first focus on the age of the child. The youngest can make crafts more simply, preschool children are a little more complex, and children aged 12 can create entire compositions, flowers, bouquets, vases, Christmas trees, decorations, toys and more on their own.
Children can make crafts from pasta by several people at the same time. For example, several children made this picture at once.

Children can come up with the plot of the picture themselves, colors, shapes - it’s all their imagination! Children will come up with and make various interesting pasta crafts with their own hands.

For unique and beautiful products for activities with children you need pasta with beautiful shape: feathers, wheels, spaghetti, paint and glue. You can use other additional materials for the painting.
This is how the idea of creating something almost real railway— a steam locomotive with trailers and trees for the game.
 Using dry pasta or vermicelli, you can come up with ideas for paintings or applications for children. The picture itself can be done on plain paper, or it can be decorated with a beautiful frame.

A wonderful butterfly painted with shell paint. You can use thin spaghetti for the antennae, and make the body of the butterfly using spiral noodles.
A child will be happy to decorate such a product with a brush and paints, glue it and see what he can do.
 Another real painting in which pasta, paper, and cereals are used. Everything is held together by glue.
 An idea on how to make a toy using pasta. Angel doll. Such a beauty can be played in games, made a resident dollhouse or hang on the Christmas tree for the New Year holidays.

With children as young as one year old, you can even create jewelry in the form of beads. Pasta beads are a wonderful educational activity for kids. It consists in the fact that the child learns to manipulate a string, a ribbon, trying to string “beads”.
Older children may color different shapes beads and collect them into a single whole on a ribbon, creating beautiful decoration, with which girls can decorate dolls or even themselves.

 You can use any shape of pasta to create beads. You can connect them together using knots or simply stringing identical tubular pasta, for example, in a row.
Involve children in creativity and create beautiful things.
Modern pasta comes in a wide variety of shapes and is very affordable, making it an excellent material for decorative arts. Crafts made from pasta turn out to be unique masterpieces in the hands of adults and children.

It is clear that the completed crafts, due to their fragility, cannot serve any practical purposes (the same boxes or vases), but they can decorate the interior well.
In the pictures we offer you can see how pasta of various shapes are combined when creating decorative elements, such as, for example, different types of flowers or ornaments. An excellent solution is a volumetric option - overlay elements on a homogeneous background structure.
Before you start creating specific crafts, it is important to understand two points: how to connect pasta with each other and how to paint them, because an unpainted product is not able to make the expected impression.
Connecting elements of pasta
Most good option connecting pasta - of course, gluing. Do-it-yourselfers suggest using either PVA glue or the deservedly popular hot-melt adhesive in the form of a glue gun. It is worth saying that both of these methods have disadvantages: in the case of PVA, it will take a longer time for gluing the elements and not a very strong connection that can break if the craft is twirled in your hands; Hot-melt adhesive requires some skill, as it sets very quickly - first practice quickly and accurately connecting the necessary elements. The advantage of PVA is considered to be cleaner work, without visible drops and sagging of glue. The best option for you will naturally be determined with time and experience.
This is an important, somewhat frightening process for many at first, which, in reality, is not anything complicated. In principle, you can already paint ready product, or you can collect from already multi-colored elements. It is best to combine both approaches to achieve the best result.
Do you still use pasta exclusively for soups and side dishes? But in vain! This product is great for creativity. This master class will change your idea of pasta. You will learn how to make a large picture out of them that will fit perfectly into the interior of the kitchen. If you are interested in an idea, then quickly prepare everything you need to implement it.
Namely:
- - a piece of thick cardboard or hardboard;
- - a piece of burlap;
- - thermal gun;
- - pasta different sizes and shapes;
- - a tube of universal glue (preferably PVA).

Next, take a piece of regular burlap and cut it to the size of the cardboard base. Don't forget to allow an allowance of 2.5 cm on each side.

Using a heat gun, glue the fabric to the base, pulling it tightly on all sides.
Fix the sides first.

Then glue the top and bottom allowances of the burlap. Make sure that the corners are even and at the same time well stretched.

The base is ready! Burlap looks very textured. If you don’t like this material, then choose linen or calico fabric. The main condition is that the material must be monochromatic.

Now select pasta of different shapes and sizes. You will definitely need long spaghetti, thin and thick spirals, shells, wheels, scallops and horns.

Apply PVA glue to the base. Let these be chaotic strokes, reminiscent of an air whirlwind.

Arrange a handful of long spaghetti in a fan shape and press lightly with your hands to set with glue.

If in some places the pasta is not fixed, you can additionally apply a little glue on top. After drying it will not be visible.

Then take 5 thin long pasta and put 2-3 cones on them.

Glue these blanks onto the spaghetti fan.

Next, make the flowers using wheels for the center and thick spirals for the petals.

You should get 5 lush flowers.

Form the stems from thin spirals.

And the leaves are made of rounded horns.

Glue small shells and scallops along the top edge of the picture in a chaotic manner.

That's all, the pasta painting is ready. The result was a lush bouquet. After drying, all elements are held securely and firmly on the canvas.

This original way using leftover pasta that sits idle in kitchen cabinets.

Hang your masterpiece in your kitchen and expect admiring reviews from your guests. Such an extraordinary craft will cause them genuine wild delight.
If desired, the work can be varnished or painted in a gold or silver shade. It is better to paint with a spray can.
Don't be afraid to experiment, create amazing paintings from the most unexpected materials!


