To learn the rules with your child traffic necessary visual aids. Many educational or toy stores have wonderful mock-ups of traffic lights and road signs. But it’s much more interesting and entertaining to make a traffic light with your own hands. And if you also team up with your child to create a craft, you can have fun and with great benefit. free time. In addition, a common cause brings people together. And during the work process, you can have fun introducing your child to the rules of the road.
Plasticine traffic light
The easiest and fastest to make is a plasticine traffic light. It will take less than half an hour to make. And the material is more than accessible. In addition, children simply love to sculpt from plasticine. So why not combine business with pleasure: modeling and learning? In addition, by drawing a zebra on a piece of paper, installing the resulting traffic light and taking small toys, you can play with your child different options for crossing the road.
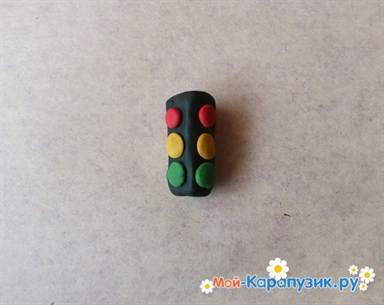
For the craft we will need pieces of plasticine in red, yellow, green, brown and black. It is better to use soft plasticine so that it is more convenient for the child to handle it. You will also need a thin stick (you can use a pen refill or a lollipop stick) and a bottle cap (you can use a sparkling water one).
- Make a small parallelepiped from black plasticine to get the correct ratio between the size of the body of the craft and the leg on which it will stand.

- Roll balls of the same size, 4 of each color (green, yellow, red).

- Make flat circles out of them.

- Connect the resulting circles and the body in accordance with the accepted arrangement of traffic light colors.


In the process of gluing the circles, you need to comment on your actions, talking about the meaning of each traffic light signal, so that the child better assimilates new information.
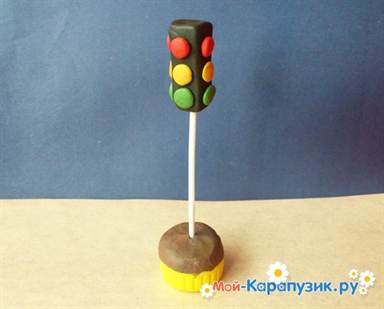
- Insert a stick into the lower end of the resulting body.

- Now you can start working on the stand. To do this, you need to fill a bottle cap with brown plasticine and stick the lower end of the leg of our traffic light into it.
- To give a more interesting and realistic look, it is advisable to stick visors made of black plasticine over the colored circles.

The wonderful craft is ready, you can play and learn.
Cardboard version
Another simple way to make an original traffic light together with your child is from cardboard. It also does not require any special materials or tools. The time spent creating such a craft will fly by unnoticed and fun. The resulting traffic light will serve your child both as a fun toy and as a useful aid for learning the rules of the road.

To create this product you will need:
- cardboard;
- colored paper;
- empty box;
- glue stick (PVA will also work);
- knitting needle;
- a small piece of packing tape;
- napkins.

A traffic light from a box can be made of absolutely any size. Boxes for porridge, juice, milk, telephone, medicine, etc. are also suitable for this.

In the selected box, make holes for the arms and legs and stretch the ribbon through them. You can take a ribbon from a cake box or a bouquet of flowers.

Then you need to wrap and cover the box with colored or crepe paper, making holes in it in advance for the arms and legs of the craft.

You can make a loop of ribbon on top of the craft so that you can later hang the traffic light on the wall. But this is optional.

Cut out 3 identical circles from colored paper: green, red and yellow. You can determine their approximate size by dividing the height of the box by 3. You need to cut out 2 small smaller circles from white paper to decorate the eyes. For the pupils you will need 2 small black circles. You can customize the color of the traffic light eyes by also cutting out blue, green, or any color circles. In general, when decorating the face, you can show your imagination and make them, for example, from buttons. If you want the craft to be female, cut out the eyelashes.

It is also possible to make a mouth out of paper, or you can simply draw it.

Now let's start making pompoms from napkins. They need to be folded in half and cut one edge with small grass as shown in the photo.

Wind the napkins onto a knitting needle.

Glue the resulting pom-poms to the ends of the ribbons for the arms and legs of the traffic light.

Optionally, to do more original product, you can create a cap for him from paper and cardboard.

You need to draw a circle on cardboard, using a glass or something else that is suitable in size as a basis.

Cut out the resulting circle, also cut out a thin strip of cardboard to lift the cap. Make the visor of any size.

Make a ring from the strip and cover all the parts with colored paper.
Connect the circle and ring using glue and pieces of paper.

It turns out this cap:

We dress up our traffic light with it. Cheerful and original craft ready.

There are all sorts of ways to create a traffic light, if only you have the time and desire. Craftswomen who know how to knit will certainly be interested in crocheting.
You can make a working traffic light model yourself. To make it, we need to prepare one battery and three light bulbs for a flashlight, as well as a small coil of bell or other thin wire. We need to cut out the front and back walls of the head (case) of the traffic light model from three-layer plywood. On the front wall we will cut three holes with a diameter of nine millimeters. On the inside they must be pasted over with pieces of papyrus paper of red, yellow and green. Plain white paper can be easily and quickly colored with felt-tip pens or watercolors.
You need to secure the light bulb sockets on the back wall of the traffic light. You can make them yourself from strips of tin or copper wire. Light bulbs can be installed in a traffic light in another way: we drill holes in the back wall and insert light bulb sockets into them. In this case, the wires need to be soldered to the light bulbs without sockets. One wire can be soldered to the base on the inside of the back wall, and the other on the outside.
Attention: When installing light bulbs, make sure that they are exactly opposite the holes in the front wall.
The front and back walls of the traffic light head must be connected with a strip of cardboard. We will make a cutout in this strip. The cutout should be at the bottom of the head; the wires from the light bulbs come out through it. We glue the cardboard to the edges of the front and back walls with wood glue and casein glue. After we assemble the head, we will glue transverse partitions with a cutout for the wire between the light bulbs to the plywood walls. The partitions block the light from the adjacent light bulb so that colors do not mix.
Glue visors cut from thick paper to the holes on top of the outside.

We will cut out a traffic light pole from a round stick with a diameter of approximately 10 millimeters. Let's strengthen it at the base. To do this, you can make a semicircular recess in its upper end, glue and nail a strip of cardboard, and then cover the head of the traffic light with this strip. Its side walls will be double.
We will glue a board to the base of the traffic light, on which we will mount the control panel. Let's install the slider and four contacts - four copper nails or buttons - and hammer them into the board.
Attention: the board must be well dried to avoid short-circuiting.
A slider is a strip of brass or tin. At one end we fix it to the board with screws or a nail - it should turn in it. Press the other end of the slider to one of the three contacts. Bend the slider a little so that it springs and presses more tightly against the contacts.
The contacts can be made in the form of clamps, and the slider can be made in the form of a switch. We will place a battery next to the control panel. Let's connect the light bulbs in parallel: connect the end of one common wire to one of the contacts on the control panel. We will connect one of the battery contacts to the same contact. We connect the second wires from the light bulbs to three other contacts: each light bulb to a separate contact.
We connect the second contact to the slider. By moving the slider from one contact to another, we will light different light bulbs.
Attention: Wires from light bulbs that come into contact with each other must be insulated.
It is advisable to assemble the traffic light under adult supervision. If desired, this traffic light model can be converted into an excellent color music in the future.
Everyone should make a traffic light quickly and easily with their own hands. good parent, if you don’t want your child to get into a traffic accident. But children just don’t want to learn about traffic and its rules. There is a way for parents to help their children with this. A traffic light from paper can be made not only for children together with their parents, but also to arrange it as exciting game. The same training of children in traffic rules can be arranged as a game in kindergarten or school.
Schools take care of learning about traffic and its rules. Making such crafts with children's hands will be useful.
Let's see - just like from paper, from a shoe box and some other elements you can make our homemade product.
We make an original traffic light with our own hands from a box and paper
Option 1.Let's start with making the simplest and most accessible traffic light, which, despite its simplicity, has become popular among both parents and children.
For this we will take cardboard box from under shoes, consisting of the box itself and a separate lid, one sheet of colored cardboard in the colors of the traffic light, a pencil, two sheets of black paper, moment glue, and a large cup (the cup is slightly smaller in diameter than the width of the box)
- Take a cup and a pencil. On each sheet of cardboard, trace the inverted cup along its diameter.
- Using scissors, cut out three circles.
- We make a body from the box and lid. Place them flat on the larger surface reverse side black sheet of paper and trace it. So, we start from the larger side and completely outline the development of the remaining sides. Cut out the resulting developments.
- We glue the strips onto the lid and the box from the outside with the black color facing out.
- Now, after the glue has dried, glue the box (the smaller side to the lid) to the larger outside side so that their small edges match.
- On the larger side of the box we glue the three circles that we cut out at the beginning. We paste from top to bottom in the order of the traffic light colors and at the appropriate distance.
The traffic light is ready.
Option 2.This is what you can do from simple paper, first making three-dimensional modules (balls) from it, and then using the modules to form the entire structure of the traffic light
Having made such balls of three colors, we get an almost finished traffic light.
For this task you will need thick paper or cardboard, thick threads, Moment glue, and ordinary scissors.
- Take it and cut out a template from cardboard.
- On paper of three traffic light colors and using a template and pencil, draw 20 modules of the future ball of each color.
- We cut out all the modules with scissors.
- From these modules we assemble three balls of traffic light colors.
- In each ball, on one side we pierce a hole in one of the protruding parts.
- A piece of thread is threaded through the holes and a knot is tied on it. The pieces of thread must be made the same length. Then the balls will hang on the wall at the same level.
- The balls are attached to the wall with a pin stuck into the wallpaper. A loop of thread is placed on the head of a pin.

We make a traffic light from sphere-shaped modules. First we make balls.
- We take paper of colors corresponding to the colors of the traffic light. Cut squares 50 by 50 mm.
- The modules should turn out as shown in the picture.
- Let's connect three modules together. Four such blanks are half a module.
- We assemble a whole module from two halves, coating their surfaces with glue.
- We attach the finished modules to the leg and place them on the stand.
- It turns out to be quite a nice traffic light made of paper
Making traffic lights from multi-colored paper and using various templates and patterns is possible in a very wide variety, and if it becomes interesting in your free time, you can make many more different paper crafts

Take corrugated colored paper in three colors corresponding to the traffic light (enough to make 30 strips measuring 5cm by 20cm of each color).
To make the base, take an empty plastic bottle and a piece of thick black cardboard. For work we will need scissors, a sharp knife, moment glue and thick threads.
Let's start making:
- Cut out a square with an edge of 15 cm from cardboard. Place it on the table, black side up.
- Using a knife, cut the plastic bottle at a distance of exactly 5cm from the bottom. Let's take it bottom part and turning it over, glue this bottom onto the black side of the cardboard square and press the structure against the table for a while.
- Using scissors we cut from corrugated paper required number of strips of each color.
- We tightly roll each strip into a tight tube and tie the end of each 1 cm from the edge with a thick thread. It will look like a bouquet.
- By gluing these bouquets with glue, with the tied edge inward, we make a ball out of them. We make three balls.
- First glue a green ball to the base, then a yellow one and then a red one. Glue so that the balls are vertical.

A traffic light is a very useful homemade product for teaching and education!
If you have a certain ingenuity and imagination, a traffic light can be made from plasticine, from beads, from disks and many other components.
Video selection on the topic of the article
Master class on handicrafts (working with paper, crafts from waste materials).
Master class: “Funny traffic light”
"The most important one on the road" -
Friends told me -
Odd-eyed, one-legged,
You can't joke with him."
I got a little scared
Hearing this conversation
But when I saw it, I guessed -
It's just a traffic light.
Paper is one of the simplest, most accessible, and easily processed materials. We have been familiar with paper products since the very beginning. early childhood. Exist Various types paper products: products made from strips, products using the appliqué technique, products based on boxes, cones, cylinders; production of various layouts. You can make bags, boxes, baskets from paper, Christmas decorations, costumes and jewelry. Products made using the papier-mâché technique are also paper. The richer the fantasy, the large quantity you can come up with crafts. At school there was a competition “Road sign on the New Year tree”, I thought about it and the idea arose to make such a traffic light.
Perhaps our traffic lights will seem very simple to some, but I want to say that I work with children 7-8 years old and I need the implementation to not be complicated. But children as young as five can handle this type of work.
Materials and tools:
· scissors;
· sheet of cardboard;
· crepe paper;
· colored paper;
· ribbon;
· knitting needle or skewer for barbecue;
· PVA glue (glue - pencil);
· napkins of two colors;
· empty box.

Manufacturing stages
Boxes can be taken in any size and quality. It could be empty box from juice and milk, only you need to remove the plugs on them. You can use boxes from under the phone and porridge, eau de toilette and tablets.

The main thing is to decide what size we want to get the craft. I chose a soap box. We pierce holes in the box for handles, legs and for mounting on the Christmas tree. Insert the prepared ribbon. In my case, it's cake packaging tape. You choose the length yourself. Then cut a piece of crepe paper.

We glue our box, piercing it with a skewer in the places for the arms and legs.


From colored paper (red, green, yellow color) cut out three circles. The approximate diameter is the height of the box divided by three. Two white and two black circles for eyes. How to design it depends on your imagination; if you make eyelashes, then there will be a traffic light - a girl.

Glue it to our body. You can draw a mouth, or you can also cut it out of paper.

Now we make pompoms from napkins. Fold in half lengthwise and randomly cut the edge opposite the fold line.

You need to twist the ribbons immediately at the tip of the ribbons.

To prevent them from slipping in the future, tie knots at the end. The fluffy side should be rolled up. When we push the pompoms, the glue line will be covered.

I bring to your attention an original educational craft toy made from an empty box of toothpaste with step-by-step photos.
This master class is intended for: kindergarten teachers, teachers primary classes, managers additional education. In addition, such a “Traffic Light” toy will also be useful for parents of children, as a useful didactic tool for studying traffic light signals with their child. also in kindergarten, at school you can organize an exhibition on the best traffic light, adding some original elements to it, for example, attaching a cap, handles, etc.
The traffic light doesn't require much time. And the material from which the toy will be made is quite simple and accessible to everyone. In general, there are no limits to imagination, so go ahead and fairyland traffic!
For production you will need the following equipment: colored paper (red, yellow, green color), one white A4 sheet, PVA glue (or glue stick), scissors, an empty toothpaste box, a simple pencil, a ruler, an awl (for making a hole in a traffic light), a cream or deodorant cap (for drawing colored circles) , device for hot air balloon on a plastic leg (the toy will stand on it).
Description of work
Step No. 1. On a white sheet of paper, using a simple pencil and a ruler, make lines corresponding to the size of the toothpaste box.

Note. For small children, you can prepare templates in advance.
Step No. 2. Using scissors, cut out the blank along the outer edges (outline), which will be needed for gluing the box.

Step No. 3. Bend the paper along the lines so that the corners are even and clear when gluing the box.

Step No. 4. Glue a white blank onto the box.

Step #5. With a simple pencil On the base of the traffic light (on one side) we mark a place for the hole, and then pierce it with an awl.

Step No. 6. On colored sheets - red, yellow, green, apply the cream lid and draw around it with a simple pencil.

Step No. 7. Cut out the drawn colored circles with scissors and, using a glue stick, glue them to the traffic light in the correct sequence: red, yellow, green.

Step No. 8. Insert a plastic leg with a round base (a device for a balloon) into the hole made.

This is how the traffic light turned out! Such an educational voluminous toy will certainly attract the child not only to play, but will also be interesting for him when learning the rules of the road! Note. For better stability of the traffic light, it is better to shorten the plastic leg a little with scissors.
And to study signals, you can add one color to the toy from different sides - red, yellow and green, so that children can alternately name a certain color and what it means.


