Paper carving is a traditional Chinese art, the first mention of which is dated to the VI century of our era. But now this type of art is popular all over the world. We have collected the work of the best paper carvers. These people are real wizards who can turn an ordinary sheet of paper into a work of art. They can spend hours carving ornate lines, watching how incredible beauty emerges from an ordinary sheet of paper.
Kiri Ken

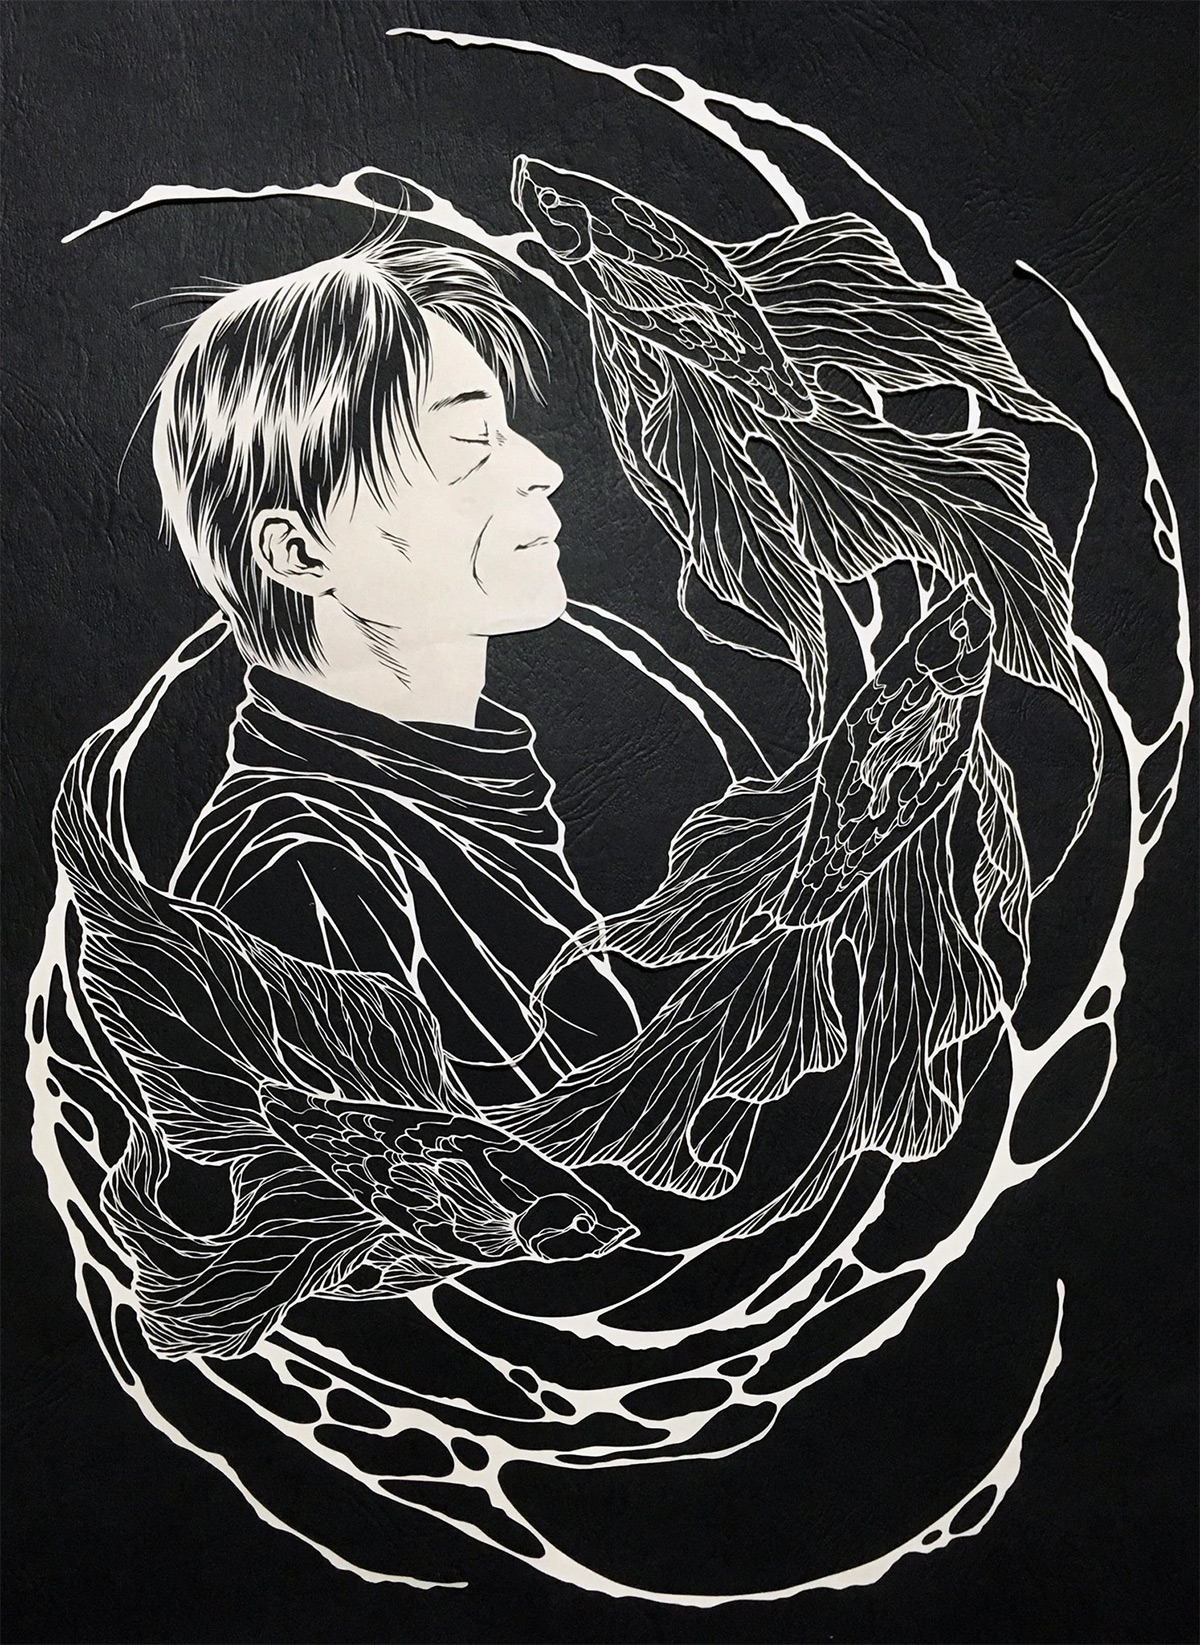
Japanese artist Kiri Ken, whose pseudonym is translated as “Cutting Sword,” creates incredibly elegant pieces of paper art.
Some of his works are carved so finely and painstakingly that it seems to be soaring living creatures. A talented Japanese prefers to cut out marine inhabitants from paper or expressive portraits. Undoubtedly, his works are inspired by miniatures drawn with ink, and in thin lines a graphic technique is guessed. To create his exquisite work, the Japanese uses a special X-ACTO knife and special Ehime Paper.

Rogan Brown

Known for his filigree work in the form of paper microorganisms, Irish artist Rogan Brown uses the “prism of imagination” to create amazing works of art. The creations of Rogan Brown are distinguished by the fact that these are not just bizarre patterns, but a peculiar interpretation of the world around them. The author creates his intricate “lace”, for the most part, with his hands, carving coil by coil. And only occasionally applies laser cutting of paper. The artist draws inspiration from everything: from the outlines of cells under a microscope to large-scale geological structures.


Suzy Taylor

The talented English artist Susie Taylor from Hertfordshire creates stunning, detailed artwork from paper, drawing inspiration from her love of folk art and floral motifs. And the girl cuts out exclusively by hand. Suzy is so enthralled by her work that she can spend hours concentratedly carving ornate lines, watching how incredible beauty emerges from an ordinary sheet of paper.


Patrick Cabral

Filipino master Patrick Cabral creates minimalist 3D portraits of rare animals. At the same time, paper sculptures are just his hobby, Patrick works as a programmer and web animator. And in his free time he creates three-dimensional paper portraits of animals decorated with exquisite lace abstract patterns. According to Patrick himself, in this way he wants to draw people's attention to how fragile this world is.


Pippa Dyrlaga

Yorkshire artist Pipp Dyrlag turns jewelry into a piece of art with jewelry precision. Her creations are inspired by nature, animals, architecture, pop culture and the area where the artist lives. According to Dirlaga, she works in traditional technique using a scalpel and pencil. One stencil usually takes one sheet of paper.


Hina Aoyama

Japanese artist Hina Aoyama was born in Yokohama, but now lives in France. “She was carried away with ultra-thin lace paper clippings” back in 2000. Hina uses exclusively scissors to work, with jewelry accuracy and impeccable accuracy, carving lace elegant flowers, texts and butterflies. Because of their fragility, carvings are applied to fabric or placed between glasses to preserve patterns. Hina Aoyama takes a couple of days to long weeks of hard work to create her wonderful creations, depending on the complexity of the sketch.


Indian artist from Ahmedabad, Part Kotekar creates paper wonders. The idea to start cutting out of paper came to him during experiments with graffiti stencils, and what began as a hobby turned into a profession. The artist's works are a reflection of aspects of everyday life. The most exciting thing about this work, as Part says, is that until the last moment he does not know how his next masterpiece will look. And this curiosity is one of the main reasons why he continues to create.


Yoo Hyun

Korean artist Yo Hong cuts portraits of famous personalities from sheets of paper: Pablo Picasso, Audrey Hepburn, Michael Jackson and others. Yo Hong cuts all works by hand, using only a special paper cutter. The peculiarity of his work is that he cuts portraits of the "Christmas tree", from which even ruffles in his eyes. None of these portraits would be visible on white, so each of them is presented against a dark background.


Riu

An artist from Japan, acting under the pseudonym Riu, perfectly mastered the skill of paper cutting. The Japanese creates his work with the help of a clerical knife. At the same time, he works in the zentangle technique, that is, he does not have any preliminary sketch of the work, but “draws with a knife” on paper just as a flight of fantasy tells him. The master calls the secret of his success a special sense of rhythm, which helps to create new masterpieces.


Bovey Lee

The artist Bowie Lee was born in Hong Kong, and now lives and works in Pittsburgh, USA. She creates amazingly detailed illustrations from Chinese rice paper and silk, almost weightless works full of fantastic stories. Creating her works, the artist first translates the manually executed images into electronic form, then prints them out and only then proceeds to a long and painstaking work with the help of a knife and sharp blades.


Anyone who first sees products made in the form of carved lace from plain paper is always surprised that such beauty is easy to create with your own hands. Everyone can master the tracery. The schemes, which are taken as a basis, are easily found in the specialized literature. The necessary tools are inexpensive and affordable.
Decor Ideas
You can use this interesting technique both for making postcards, panels, and decorating the interior. Products are usually made of white or black paper, but other shades also look great. The interesting thing is that they perform not only flat things. Volumetric openwork paper cut looks very impressive. Schemes for such objects are also presented in the form of a contour drawing on a flat sheet, which is then folded along certain lines and glued into a three-dimensional part. So, in the technique you can do the following:
- Postcards.
- Snowflakes.
- Decorations for windows.
- Napkins for the table.
- Volumetric decor based on a flat product or assembled three-dimensional paper design.
Having mastered simple options, you can make things fabulously beautiful.

Materials and Tools
You will need the following to master openwork paper cutting:
- Schemes and printer to print them.
- Sheets of white (or other) color.
- The base on which you will cut (a special tablet, a regular board or a piece of thick cardboard).
- Manicure small scissors as an alternative to a knife or an addition to it.
The rest is optional and depends on how you use the blanks:
- Glue on a colored base - decorative cardboard and glue.
- Hang on a Christmas tree or in the space of a room - pendants (threads).
- Decorating a window - plain or
In fact, nothing complicated, special, or expensive is needed. Ordinary office stationery. The main thing is patience, perseverance and the desire to make a masterpiece with your own hands.

Openwork paper cutting: schemes, master class
Traditionally, patterns are created by cutting out part of the pattern on a folded sheet in a certain sequence. One of the most common and familiar products is snowflakes, but you can make not only them. A napkin or mirror frame made according to the following pattern will look very impressive.

Work like this:

Openwork paper cutting: New Year's schemes
To decorate the interior with elements of this technique, you can make various decorations according to ready-made patterns. Print them in the right scale (usually blanks are designed for a standard A4 album sheet), cut out the pattern. On the Internet, there are a lot of blanks both directly for festive and just for winter topics.


- Entire landscapes and lace story scenes.
Get started with simple schemes.

Having mastered the principle and having trained your hand, move on to more complex multi-object compositions.

How to make beautiful snowflakes
One of the most traditional and favorite ways to decorate a room for the New Year is to decorate it with paper snowflakes. Usually they are glued to windows, cabinet doors, walls. Some make garlands of them, hang them on threads or arrange them on a Christmas tree.

To make beautiful openwork snowflakes from paper, it is better to take ready-made schemes for cutting.

The main thing is to fold the sheet of paper correctly for applying the template. Any snowflake consists of a repeating pattern around the circumference. There are blanks for 1/6 and 1/12 parts. The second option with a narrower sector is obtained by additionally adding the blank for 1/6 of the part. Folding a part can be done on the basis of a circle already cut out or any sheet that is first cropped to a square, then folded or, conversely, folds are first performed, and then the shape of the circle sector is cut.

So, you have learned in more detail what is openwork paper cutting. Schemes for any product, you can take ready-made or show imagination and develop your own exclusive thing. Get creative. Create a beautiful decor with your own hands.
Looking for a new hobby? How about cutting out of paper? Surely someone is now ironically grinning. Completely in vain: carving is incredibly beautiful. We were convinced of this by opening the book “The Magic of Paper”. See for yourself.
“You can cut out of paper even without the ability to draw,” says Louise Firschau.
There are a million ready-made templates: just print them. Or create your own design on your computer: install the free program for Inkscape designers, with which you can create basic templates.

How to start cutting
Intricate plots and ornate contours - each picture as if created by a skilled artist. But, believe me, you can easily make it yourself. All you need is desire and a few tools.
Choose exactly round: with a pencil-like holder it’s more convenient to work than with a flat one. You will understand this when you start making rounded cuts and you will feel the knife turning slightly in your hand.

Surgical blades
The choice of blades in the market is huge: it is up to you. At first it may seem too flexible and unpredictable. But, getting used to it, you will understand that it is very convenient for them to make round cuts, and the tip is great for cutting small parts.
Resettable Cutting Mat
Dear branded cutting mats you don't need. Take regular rubber - after several weeks of heavy use, they all look the same.
It is better to have two rugs: one for cutting, the other for gluing. If everything is done on one, it will get dirty with glue and can ruin the next clipping.
Paper
- Do not take office paper: the lines are uneven, and the results are not impressive.
- Use special paper to cut or experiment with thick paper. For example, you can take a textured watercolor or mulberry.
- Do not use paper denser than 170 g / m²: it is very difficult to cut and your hand will quickly get tired.
Cutting pattern
Where to start? We offer you such a cute picture from the book “Paper Magic”: it will decorate any home.

- Before you tackle the first template, practice just cutting paper. Understand how hard you put pressure on the blade so that it does not break, the hand does not begin to hurt, and the incision is "clean." Press lightly on the blade and gently cut the paper. Slowly draw a few lines, maintaining the same pressure along the entire length.
- Start cutting from the hardest part or from the place you are most in doubt about.. Then, if you make a mistake, you won’t need to redo too much.
- Take your time. Change the blade every 10-15 minutes and interrupt regularly to relax your head and neck. It is much more convenient to work on an inclined surface - for example, on a drawing board.
- Pencil marks on the wrong side do not need to be erased. All the same, no one will see them, and the eraser can damage the paper. Always cut from the inside out.
- Do not remove paper cuts during operation, even if you really want to. Leave everything in place - this stabilizes the clipping. There is nothing to catch on the sleeve / bracelet / cat tail.
- When you finish cutting, do not push out the paper cutter with your finger, but remove it with a knife. So the paper will not tear, and you will see in what places you need to go over the blade again.

Imagine how your friends will be surprised and your friends will be delighted when they see what kind of paintings you create. And besides fame, you will find real pleasure in the creative process, when the usual template turns into a charming and charming masterpiece.
Illustrations and materials from the book “Paper Magic”. The book will be out very soon. You can sign up for a notification of withdrawal - and get a pleasant discount only for your own.
Today I will talk about such a seemingly difficult kind of creativity as paper cutting. This art originated presumably in China and in the local language sounds like jianzhi. In China, it has several areas: chuan hua or "window flowers" (arose from the tradition of decorating the windows of houses for the holiday of spring) and si hua (holiday decorations, ritual objects and wishes for all occasions). Subsequently, the art of carving spread throughout the world, gaining its own characteristics in each country.
Traditional Chinese works were performed exclusively scissorsbut now there’s an easier way - cutting breadboard knife. It will be discussed. If you wish, you can work with a regular clerical knife with a retractable blade, but this option is not very convenient when working with small parts.
I'll start with the materials that will be needed for work:
1. Paper. In fact, it can be absolutely anyone who is more comfortable in work. I prefer smooth thick paper, about 200 g / m. My carved from smooth white paper 220 or 240 g / m. For those in Moscow or St. Petersburg I can recommend the World of Paper store, aka Double V. They also write on their website that there are branches in Samara, Tver, Chelyabinsk, Novosibirsk, Krasnoyarsk, Krasnodar, Rostov-on-Don, Kiev and Almaty. But I wasn’t there, I don’t know what and how. So: in this store you can pick up paper for almost any application purpose. In the hall there are racks with samples on which the name, density, color, embossing and sheet size are indicated. Prices are shown in catalogs on tables. Before the holidays, prices there were much lower than in art, now they are likely to have risen as well, but in any case it turns out to be somewhat more profitable and they usually have more choices. Well, if you just want to try the technique without extra spending, you can always learn how to cut it on a regular paper.
2. Knives.They come in several forms. The most conventional breadboard knives They are a handle with a collet clamp that secures the replaceable blade. There are a lot of companies producing such knives. I use a set of knives from an unknown manufacturer:
In a small box there are three handles with blades, a number of additional blades on a magnetic strip and tweezers. I used to work only with the thinnest knife, but after a long work with it my fingers begin to hurt. Now I mainly work with a middle knife. He has a heavier handle, he sits more conveniently in his hand and does not cause discomfort in work. I hardly work with the biggest knife, its handle is not very convenient for me, but it all depends on personal preferences.
At prices: for testing one simple knife is quite suitable, now there is a huge selection of them, prices start from about 100 r. (information on Moscow, the prices are thin. shops).
The second kind of knives - articulated blade swivel. In the photo he is black. This is an artwork knife from Mr. Painter. In general, a pretty convenient thing, but you need to get used to working with it. If before that you cut with an ordinary breadboard knife, you will have to adapt to the rotating head of this knife. But if you learn to work with it correctly, it can greatly facilitate the process - you will not need to constantly rotate the blade, the hinge allows you to do this by changing the angle of the handle. It is also worth noting that the hinge blade differs from conventional collet blades. They are narrower and smaller in size. I have not yet dealt with the purchase of additional blades; 10 additional blades are provided in a set with such a knife. This is enough for the first time.
I bought mine at a wholesale base for 150 rubles, in retail stores it costs about 300 rubles. It can be found in hobby centers, less often in thin. stores.
The third kind of knives - finger knife. They come with a hinged and static blade. I heard a lot of good reviews about them, but so far I have not worked with such ones.

Still sometimes needed compass knife. A convenient thing for cutting even circles, but do not forget that it leaves a dent or hole in the center of the circle from the needle.

3. The substrate.In order not to spoil the desktop, you need to get yourself a substrate for cutting. Best suited for these purposes. special cutting mat. They come in different sizes, from A6 to A1 for sure. I always have on my table one A3 size. You can get by with just thick cardboard or a sheet of plastic, but this will greatly complicate the cutting process. Burrs may appear on the cut of the paper, and if the backing has been used for a long time, the knife blade may simply come off. And cutting is a process where it can be very difficult to correct a mistake, so it’s better to prepare and try not to allow them :)
I can’t say that they are usually very cheap, but if you are going to cut a lot, I highly recommend purchasing. At prices: A6 - from 100 r. (but they are usually only on order), A4 - from 200, A1 can reach up to 3,000-odd. For starters, A4-A3 is fine.

4. Pencil for drawing the contours of the picture. It must be constantly finely ground. It is preferable to take an HB or B pencil, very hard ones can scratch the paper, and soft ones will leave traces that will then be difficult to erase. It is convenient to use a mechanical pencil; you do not have to constantly grind it.

I prefer to draw on the front side, without a preliminary sketch. In the photo - an example of a picture prepared for cutting. I shade part of the small details with a pencil so that it is more clear what needs to be cut out and it was more difficult to make a mistake. But if you draw straight away cleanly - this is not about you, then you can draw a picture on a draft sheet, and then transfer to a new sheet through a light table or using tracing paper. Or just lay a sketch on top of the finish and push the contours with something solid. But not every paper can withstand the last method. I also saw works in which they paint on the back of a clean finisher. But here it should be remembered that the image must be previously mirrored so that everything is correct in the final work. In general, a good way, but I don’t use it, because when cutting, it’s more convenient for me to tilt the blade a bit and cut the paper slightly at an angle so that the cut looks more neat. But this is someone you like :) It's up to you.
5. Eraser. I erase all the rough lines at the end of the work, on the already cut out picture. It’s better to use soft erasers like Milan or Factis. Do not forget that the paper has the property of wrinkling and tearing, so you should work with the eraser very carefully in the cut out picture so as not to damage the work. All coils from the eraser are well removed from work with a wide soft synthetic brush.
You can watch the work process on the video.
Vytynanka (from - “vytinati” - “vitinati” - “vytsinats” - “cut”) is an ancient Slavic type of decorative and applied art, delicate carving from paper, birch bark, foil, fabric and leather.
It differs from the application in that the whole work is a single piece of paper, while the application is usually glued from several separate parts. The most famous vytynanka are snowflakes.
And yet, not all works performed in the art of carving are called vytynanka.
Distinctive features of protrusions is that the images in them:
- symmetric, because when they are made, a sheet of paper is folded a certain number of times, after which a variety of patterns are cut out on it,
- relatively colorless, because, in addition to the background, usually no more than 1-2, less often 3 paper colors are used,
- contain national folk symbols.
In this form, this cutting technique existed in Eastern Europe (Poland, Lithuania, Ukraine, Belarus, Russia).
It was common in Western Europe silhouette carving. It is characterized by a black image on a white background, the absence of slotted parts. Plots: portraits (most often - profiles), landscapes, everyday scenes.
Modern works performed in the technique of artistic paper cutting that do not contain traditional folk symbols and symmetry are called slotted images, paper graphics, openwork (filigree) cutting.
In this technique, you can do many beautiful things: paintings (panels), postcards, paper napkins, decorations on windows, shelves, frames, mirrors and much more.
To cut patterns using scissors or knives (clerical, breadboard).
About the features of cutting such works with scissors and how to transfer the scheme to paper, read the article:.
This time we will focus on cutting with a clerical or mock knife.
- It is safer for children to cut with scissors, as the knife is still a knife. When cutting, they need to protect their hands, do not hold their fingers on the cut line, do not go beyond the limits of the mat for cutting. The mat is needed so as not to spoil the table. Special rugs for cutting are sold. If there is no such mat, it can be made from a piece of linoleum or thick cardboard.
- The scheme is drawn and cut from the wrong (reverse) side of the future clipping.
- Just as when cutting with scissors, work begins with the smallest details, then the details are cut out in the center, then at the edges, and only then the outline, if any.
- If necessary, gently rotate the paper so that it is more convenient to cut.
- When cutting straight lines, you can use a ruler.
- When using an office knife, it is more likely to break off the dull end of the blade.
- You can not leave parts of the cut-out areas uncut, and then tear them off with your hands. The work will look messy and thus it can be accidentally torn.
- Depending on the purpose of the clipping and the selected plot, choose the appropriate background and paste work on it.
Video lesson on cutting with a knife (not in Russian, but since this video, then how to cut, it is clear)
Similar articles:
Enjoy your creativity!
Especially for blog readers, with sincere respect, Julia Sherstyuk
All the best! If the article was useful to you, please help the development of the site, share a link to it on social networks.
Posting materials of the site (images and text) on other resources without the written permission of the author is prohibited and prosecuted by law.
- Postcard for February 23 or May 9 do it yourself in ...