The cadet cap differs from a regular sports baseball cap in that it has a shorter peak and a deeper fit, making it great for cool weather. Both adults and children will wear this cap with pleasure.
Our master class will tell you how to create a pattern for any size.
Cadet cap: choose fabric and take measurements
For such a cap, we recommend using medium-weight fabrics: denim, corduroy, wool. If you want to add rigidity to the selected fabric, glue it with additional non-woven fabric. If your capabilities allow sewing machine- dense fabrics and leather will also be good choice for a cap designed for windy autumn days.A universal option for men is fabrics in blue and gray shades, and for young fashionistas you can choose bright colors and even fabrics with a pattern, such as checkered or striped.
For lining use natural fabrics: cotton or viscose. For the visor you will also need a piece of rigid cushioning fabric. To work, you will need 20 cm (with a width of 150 cm) of main and lining fabric.
For the pattern you only need to take one measurement. Using a centimeter, measure the circumference of the head, through the middle of the forehead along the part of the skull that protrudes from the back. Let's get to work!
Constructing a pattern
Add 1 cm to the head circumference - we will denote this size as R. We will build the pattern taking into account seam allowances.
Draw a rectangle whose long sides AC and BD are equal to R/2 plus 2 cm, and whose short sides AB and CD are equal to 8 cm.
Draw another rectangle, the long sides of which are equal to R/2 plus 2 cm, and the short sides are 6 cm. Set aside 1 centimeter inward from the upper corners, place points B1 and D1. Connect points A1 and B1, C1 and D1 to form a trapezoid.

For the bottom of the cap, we will need to construct an ellipse, the length of which should be equal to R.
The formula for the length of the ellipse is L=3.14(a+b), where a and b are the lengths of the semi-axes of the ellipse.
It turns out that the sum of the semi-axes is equal to R divided by 3.14. The result obtained must be divided into two terms that differ from each other by 1.5-2 centimeters. Let's look at an example: R= 56cm.
Then the sum of the semi-axes is 56/3.14 = 16.56 (rounded to 16.5). The lengths of the axle shafts that suit us are 7.5 and 9 cm (16.5 cm in total). Draw a line 15 cm long (7.5+7.5), marking its middle O. In the figure, FO = 7.5 cm.
From the middle, draw a perpendicular upward, set aside the second semi-axis - 9 cm, put point H. Connect points F and H of the curve using a pattern or by hand. Having reflected the finished fourth part horizontally, draw half of the ellipse. Check the length of the ellipse with a centimeter, it should be equal to R/2, adjust the curve if necessary.
Cut out half of the ellipse. Place on a free sheet of paper and trace along the curve. Using a ruler and a template, draw a visor; in the middle part its width should be about 6 cm, but you can draw the desired size and shape.
Cut out the remaining pieces.
Uncover
From the main fabric, cut out two trapezoidal pieces, two rectangular pieces, one full ellipse (cut from fabric with a fold or draw an ellipse, mirroring the pattern from the center) and two visor pieces.
Cut one ellipse from the lining fabric (cut from the fabric with a fold or draw an ellipse, mirroring the pattern from the center). Then pin or overlap the rectangular and trapezoidal pattern pieces with a 1cm overlap, as if you were sewing them along the long sides. Transfer the resulting piece to the lining fabric and cut out two pieces.
Cut out one visor from thick cushioning fabric and cut half a centimeter around the entire perimeter. Iron the interlining piece to one of the main fabric visors. If the cushioning fabric is not adhesive, use a special double-sided adhesive web.

- Two rectangular pieces made from the main fabric
- Two trapezoidal parts made of main fabric
- Two side pieces made of lining fabric (cut from combined patterns)
- One ellipse bottom made of main fabric
- One ellipse bottom made of lining fabric
- Visor made of main fabric and visor, additionally reinforced
- thread, scissors, pins
Place the visor parts right sides together. Pin and stitch along the top edge of the interlining piece. Cut the allowance close to the stitching.

Unscrew the visor, straighten the edge, and iron it. Topstitch to the edge and twice at a distance of 1 cm.

Connect side seams lining and parts made from the main fabric. Iron seam allowances to the sides.

Fold the resulting “rings” of the main fabric with the right sides facing inward. The trapezoid part is connected to the rectangular part along the long side. Pin and stitch to the width of the foot. Iron seam allowances to the sides.


Pin the ellipse bottom with pins and stitch. Iron seam allowance down.

Also sew the bottom made of lining fabric to the ring piece made of lining fabric.
Turn the main piece right side out and insert the lining inside, back to back. Pin along the bottom and side seams.


Topstitch close to the bottom seam and next to the decorative side seams. After tucking the bottom of the main fabric, baste the visor. Also fold the lining inside.


A baseball cap is a headdress popular among fans of various styles of the most different ages. The basic model includes a visor and width adjustment with Velcro. Step-by-step master class with photographs will tell you how to build a simple pattern and quickly sew a baseball cap with your own hands.
How to sew a baseball cap with your own hands?
In addition to the fabric, you will need a thick, curved visor. If your favorite cap has lost its attractive appearance, you can rip it open and immediately get double benefits: a ready-made visor and details for a pattern. You can also buy a visor at fabric and sewing accessories stores.
Almost any medium-weight fabric can be used as the main fabric for a baseball cap: cotton, linen, denim. The front of the crown is often reinforced with adhesive interlining material of a suitable color.
To make the inside of the baseball cap look neat, we suggest covering the seam allowances with bias tape. You can buy ready-made trim (1.5-2 cm wide) or cut it yourself from thin fabric at an angle of 45 degrees. From the same fabric, you can cut out the facing of a baseball cap or use a wide bias tape (3-4 cm), additionally glued with double or non-woven fabric.
Depending on the type of fabric, you may need textile glue to glue the bottom of the visor piece to the piece. Use a waterproof clear adhesive whose instructions mention gluing fabrics together.
For the fastener, with which you can adjust the width of the baseball cap, you will need Velcro 1-2 cm wide and 5-7 cm long. The junction of the wedges on the top of the head is covered with a flat button covered with the main fabric.
So, let's learn how to sew a baseball cap with your own hands!
Constructing a pattern
To create a pattern you will need measurements
- head circumference
- height of the baseball cap (from the bottom edge to the top of the head, can be measured on the finished cap)
Prepare the canopy base.
To pattern the visor, straighten the visor base on paper and trace its outline.

Uncover
All seam allowance is 1 cm, allowance along the inner edge of the visor (where it is sewn to the crown) is 2.5 cm.

Made from main fabric
- 4 parts A (wedges)
- 2 parts A with cut out sectors: on one part in the lower left corner, on the other – in the lower right corner. The radius of the cutout is 6 cm. Lying side by side, the cut out parts are folded into a semicircle.
- 2 parts B – visor
- Two rectangles for Velcro 10x4 cm (twice the width of the Velcro plus 0.5 cm)
- Square 3x3 cm for covering a button
Made from extra fabric
- Tape 7 cm wide and length equal to head circumference
- 3 bias bindings 3-4 cm wide and a length equal to twice the length of the side of part A
- Bias binding 20 cm long
Additionally:
- Visor, Velcro, button
Progress
Sew the visor pieces along the outer edge, placing them right sides together. Cut allowances to 5 mm and cut into triangles in the rounded areas or cut with zigzag scissors.

Turn the visor inside out, straighten the seam allowances and iron. Insert the rigid base, pull it well, and if necessary, fix the underside of the visor with textile glue. Baste along the inside edge.

Sew three wedges, each half containing one piece with a cut out sector. Press the seam allowances to the sides and cut towards the center at the top corner to make the seam allowances flatter.


Iron the bias bindings: a small strip for processing the sector in half, and then tuck the edges to the central fold, and bend the 3 long pieces 0.5-0.7 mm inward on each side.


First, baste one of the diagonal seams, sew close to the edges of the fold of the binding. Then sew the second diagonal seam as well. Sew the center seam last.

Apply bias tape to the sector neckline by stitching the tape right side to the right side of the cutout, and then turning it to the wrong side and basting it to the seam allowances.


Sew the visor, aligning its center with the center of the crown. Use a zipper foot to stitch as close to the rigid base of the visor as possible.


Stitch the ribbon to the edge of the cap. There should be a free section about 1 cm long on each edge.

Baste and iron the Velcro blanks. Sew Velcro onto the wrong side of the pieces.

Fold the tape to the wrong side and iron. Baste the tape to the cap by tucking the side edges inward and inserting the Velcro pieces as shown in the photo. Sew along the bottom edge and sides, stitching the Velcro.


Cover the button with fabric. First, cut a circle from the prepared square, then baste along its edge and tighten, placing the button in the center.


We offer you a pattern of a traditional eight-piece cap, which is a universal headdress for both children and men and women. For the summer option, it is advisable to choose dense cotton fabrics. Denim is perfect. You can make this cap from old jeans. For colder seasons, choose coat fabrics. If you have experience working with complex materials, you can use leather and suede.
The pattern is given without seam allowances.
Size
The finished pattern of the eight-piece cap is designed for size 56, i.e. head coverage 56 cm. If you need a pattern of a larger or smaller size, then when printing, experimentally select the scale in the printer settings so that the width of the wedge at the bottom is equal to Head coverage/8. Don’t forget to also increase the length of the band to fit your head circumference.
Fabric consumption
To sew a size 56 cap, you need 25 cm of main fabric and the same amount of lining fabric.
Download the pattern
How to correctly print patterns from our website, and why you need a 15x15 cm square, is described in detail.

You need to cut out:
from base material
- wedges - 8 children.
- visor - 2 children.
- peg bar - rectangle 2.5 x 56 cm (in its pure form) + seam allowances.
made of lining fabric
- wedges - 8 children.
- peg bar - rectangle 2.5 x 56 cm (in its pure form) + seam allowances.
Don’t forget to add seam allowances along the contour of the visor and wedge
Operating procedure:
We glue the band of the main fabric with non-woven material. We also glue the visor parts with non-woven material.
We sew the wedges, first in pairs. Then we sew each pair together, finally sewing the halves of the four wedges together with one seam. The wedges can be stitched on both sides parallel to the stitching seams.

We grind the strip along the short sides. We get a ring. Iron the allowances.
We fold the finished upper part right sides together with a band made of the main fabric. We grind.
We assemble parts from the lining fabric in the same way.
We fold the parts of the visor with the right sides inward and grind them along the rounded contour. We cut the seam allowances. Turn it inside out. We sew off the visor with several lines parallel to the rounded edge. Or, for rigidity, you can put a gasket between the parts, cut from a plastic file or the crust of a plastic folder.

We pin with pins with a band. Stitch close to the edge. This auxiliary stitch will secure the visor. You can just baste it.
We fold the cap made of the main fabric with the lining facing inwards and stitch along the edge of the bands. In this case, you need to leave about 10 cm unsewn. Through this hole we turn the cap inside out. And we stitch along the bottom edge, at the same time stitching the hole.


Additionally, the cap band can be decorated with a buckle, and at the top, at the junction of the wedges, a button covered with appropriate fabric can be sewn.

Quick selection
Select from the list Ottobre (1) Harlequin (1) Pinocchio (1) Burda (13) Cinderella (1) Little Red Riding Hood (1) Luntik (1) Masha (1) Monster High (1) Pippi Longstocking (1) Pony (1) Snow Maiden (2) Hottabych (1) Halloween (2) applique (7) butterfly (1) canopy (3) squirrel (1) blouse (10) bodysuit (1) ladybug (2) beard (1) sides (2) trousers (13) bead (1) bustier (2) turtleneck (1) wizard (1) collar swing (2) Oriental beauty(2) pattern (86) embroidery (5) tie (1) gnome (2) Greek (1) mushroom (1) nobleman (3) for baptism (2) for dolls (2) for the kitchen (2) for the beach (3 ) for school (2) Egyptian (1) hedgehog (1) Christmas tree (1) vest (1) giraffe (1) hare (5) guipure (5) tapestry (1) headboard (1) corrugated fabric(2) from denim (10) from umbrella (2) from leather (7) from lace (2) from ribbons (4) from linen (6) from fur (1) from raincoat fabric (1) from pleated fabric (1) from old jeans (7) knitted (40) tulle (12) silk (2) chiffon (15) hood (1) cardigan (1) pockets (3) carnival (61) potato (1) cap (1) clown (1) rug (1) goat (1) yoke (1) kokoshnik (2) overalls (2) basket (1) cosmetic bag (3) suit (5) cat (2) wings (2) doll (5) swimsuit (2) ) jacket (1) lambrequin (2) leggings (4) bat(2) fox (1) leggings (3) horse (1) T-shirt (2) malvina (1) mattress (4) zipper (4) muff (2) musketeer (2) pillowcase (3) folk costume (13) travel bag ( 1) elastic thread (1) monkey (1) neckline treatment (2) facing (2) shoes (4) blanket (3) coat (1) bucket hat (2) Easter decorations(2) alterations from old things (27) alterations from a T-shirt (4) parsley (1) pajamas (2) booties (1) dress (29) raincoat (1) headband (1) lining (1) pillow (11) tiebacks (1) petticoat (3) rompers (2) bed sheets(5) belt (1) princess (3) potholders (2) simple models (2) sheet (1) bee (1) patchwork (2) educational toys (2) cut (1) painting (5) shirt (9) mittens (1) backpack (1) sundress (7) swag (1) northern lights (1) snowman (1) snowflake (2) dog (1) bag (12) dance costume (3) iron-on sticker (2) tilde (7) top (6) transformer (3) panties (1) tunic (5) tulle (2) T-shirt (7) robe (1) flower (3) gypsy costume (2) spiderman (1) cap (2) cover (5) hat (7) hat (2) shorts (2) pants (5) curtains (5) skirt (16) American skirt (1) half-sun skirt (1) sun skirt (4) tutu skirt (1) berry (1)
December 12th, 2014 arlena1604 A comfortable and warm cap will appeal to many women.
Sizes 54 - 58
To sew a cap you will need;
Herringbone wool 150 cm wide, 0.40 m long for all sizes.
 Non-woven fabric C 405 is 90 cm wide and 0.60 m long.
Non-woven fabric N 250 - small flap for a visor
1 button on the leg.
Non-woven lining will give the cap with a visor the necessary shape
Uncover
crown wedge - 8 parts - according to the drawing.
visor - 2 parts - according to the drawing.


strip of fabric for the band, 6 cm wide, in finished form 3 cm and length 56-58-60 cm, i.e. 2 cm more than head circumference.
Explanation of the drawings:
1 cell = 1 cm.
The wedge drawing is made for two sizes: - 54 and 58. For size 56, draw a line in the middle between the lines for sizes 54 and 58.
Seam allowances
For all sections - 1 cm.
Sewing technique
Iron interlining N 250 to both parts of the visor.
Iron interlining G 405 to all the wedges and around the cap.
After the interlining is ironed, allow the reinforced parts to cool for about 30 minutes. in unfolded form. Then transfer lines and marks to the details.
Read more about using gaskets here.
Tulya
Sew 4 wedges of the crown of the cap. Topstitch the seams on the right side to the edge on both sides of the seam. Connect the halves of the crown face to face, stitch the middle seam.
 Visor
Visor
Fold the cap visor elements, reinforced with non-woven material, face to face, stitch rounded edges. Turn out the visor and iron the edges.
If you want to have a more rigid visor, reinforce it with a thicker synthetic film: the visor from the film is cut out without allowance and inserted into the sewn visor. Stitch open sections of the visor, join seam allowances and overcast.
Band
Mark the middle on the band, folding the strips of the band crosswise in half.
Visor with front. Sew the sides onto the band, then stitch the allowance at a distance of 0 2 mm from the stitching seam (Fig. 2).
Fold the band facing inward, sew short sections, and get a ring. Place the seam of the band at the back in the middle.
Fold the band in half lengthwise. Take together the open sections from the front side to the bottom section of the crown of the cap, with one end of the middle seam aligned with the middle of the front, the other end with the middle seam of the band at the back (Fig. 3). Join seam allowances and overcast.
Sew a button in the center of the cap.
The cap can be lined.
In this case, cut the wedges from the lining and stitch them as described for the crown of the cap. Sew the lining manually to the band, tucking in the seam allowances.
If you need a warm cap, use a ready-made insulated lining or quilt the lining together with padding polyester.
Model from Burda magazine
to your website.
Obnov-ka.ru
Over the past century, the main and unshakable attribute outerwear, used by different layers and classes of society, was a cap. This headdress was worn by presidents and leaders, scientists and athletes, representatives of the elite and the déclassé element. Today the cap is no less popular. Both men and women wear it with pleasure; the headdress is comfortable for both old people and children.

Those who love individual style, as a rule, are not satisfied with store-bought products and set themselves the task of sewing a cap with their own hands. The cap pattern in this labor-intensive process is an element that few people dare to make with their own hands. Especially when it comes to men's headdress.
Options
The cap is a universal headdress - it is suitable for any gender and age. Some options, known as unisex, are suitable for both men and women. Other styles, on the contrary, emphasize the gender of the owner. If you wish, you can choose any type of cap for yourself, considering the advantages and disadvantages various models– sports, weekend, everyday, for wearing in the summer, winter or off-season.
Men's cap patterns
Unlike options for women, instructions for making men's caps are not particularly generously presented in special magazines and on the Internet. Needlewomen know that there is no activity more enjoyable and at the same time responsible than sewing clothes for the man they love. Many people ask how to sew a cap for their husband with their own hands. A pattern is what craftswomen primarily need.

The article gives the necessary recommendations to seamstresses who have taken on the difficult task of making a men's headdress. We will try to answer the question: “How to sew a cap?” Patterns of the most popular styles are also presented to the attention of readers.
How to properly sew a men's six-piece cap?
A cap is a headdress that both men and women love to wear. Her distinctive feature– the presence of a high crown and visor. A cap can protect you from both frost and scorching sun. After all, it is known that it is sewn from the most various materials: from natural or artificial leather, wool, cotton, corduroy, tweed, synthetic fabrics, as well as fur. The six-blade is one of the most common variants of this men's headdress.

What do you need for sewing?
For work use:
- interlining;
- sewing machine;
- 0.5 m of main fabric;
- 0.5 m of fabric for lining;
- threads to match the fabric.

Building a pattern: the beginning
First you need to create a cap pattern. To do this, three measurements are taken: head circumference, forehead width and head length from the back of the head to the forehead. The lower part of the wedge is represented by a segment equal to 1/6 of the circumference of the head. Measure the middle of the segment, after which draw a perpendicular line, the length of which is equal to 1/2 the distance from the back of the head to the forehead. Next, a smooth line is drawn along three points, and the upper angle should be equal to 60°.

We cut out the visor
To construct a visor pattern, you should draw a segment equal in length to the width of the forehead. Two smooth lines are drawn, the resulting part will resemble a crescent. To create a pattern for a bar (band), you should draw a rectangle whose length is equal to the circumference of your head, and the width can be made arbitrarily, but not less than 2 cm.
Next, the paper pattern is laid out on the wrong side of the fabric and outlined with a pointed piece of soap or tailor's chalk. It is necessary to leave a seam allowance of 1 cm. You should cut out one part of the band, two parts of the visor and six wedges.
If you plan to sew a cap from checkered fabric, the pattern should be positioned so that the checkers on the wedges match. Similar parts are cut out from interlining and lining fabric.

Sew
Then they start sewing. Using a heated iron, non-woven fabric is glued from the inside of the parts made from the main fabric. This is necessary so that the product maintains its shape well. Next on sewing machine grind the wedges off the bottom. A finishing stitch is laid on the front side. If you do not have the necessary skills, the wedges should first be swept together, after which they can be sewn on a machine.
To stiffen the visor, use a non-woven insert or thick cardboard of appropriate size and shape. All parts are stitched together, notches are made on them and turned right side out. A decorative stitch should be placed along the edge of the visor.
Then a visor and a band equal in length to the circumference of the head are sewn to the crown. The lining is hemmed by hand using a hidden seam. “Ears” are sewn from the inside to the band. These are small fabric rectangles that are easy to hide in warm weather. In bad weather they can be used to cover your ears.
We sew a cap with a visor of five wedges
This brim cap pattern is designed for a head circumference of 51 cm. The size can be increased or decreased by widening or narrowing the gussets. To do this, the difference should be distributed over all five available seams. For example, to increase a cap pattern for a girth of 51 cm to 54 cm, you need to add 3 mm on both sides of each wedge:
3 cm (difference in size): 5 (number of wedges): 2 (number of sides of each wedge) = 3 mm.
After the cap pattern is on paper, craftsmen recommend making sure its size is accurate. To do this, you need to measure the length of the bottom of the wedge and multiply it by 5. The total length should be equal to the circumference of the head. Although 5 wedges are planned, their number can be changed, for example, increased to 6. In this case, the necessary changes should be made to the cap pattern.
For sewing, 0.3 m of fabric with a width of 1.5 m is used. In addition, a visor seal or dublerin (non-woven fabric) is required. In order to create good shape products, it is necessary to use stiff fabric (jeans, corduroy, etc.) for sewing. You can also duplicate it, that is, glue it with adhesive material.
The sequence of sewing a cap with your own hands
Lay out the pattern (visor and wedge) on the fabric. We cut out all the details according to the layout: 5 wedges, 2 visors + band. The length of the pattern should be 53 cm, width - 4 cm (the width of the finished cap is 2 cm). The allowance will be 1.5 cm of fabric. Next, you should grind the wedges, and you must clearly align the marking lines. Allowances are cut to 7 mm. Then the parts are ironed. After this, the sections are overlocked or hidden with braid, which will require a little more than allowances. The connecting seams are stitched along the front side.

Then the visor parts are sheathed. At the same time, they are folded face to face and the outer sections are ground down. The allowances are cut to 0.2-0.4 cm. Next, the visor is pulled out and ironed. A cardboard or plastic blank is inserted as a seal. The visor is sewn with decorative stitching at a distance of 1-1.5 cm from the edge.
Next, the middle line is marked on the crown and visor. The visor is worn off bottom crown, in this case it is necessary to combine the marks. The band is ground into a ring and stitched to the crown at its lower edge. The visor is also attached accordingly. The seam allowances are cut to the line and ironed towards the band. It should be turned halfway inside out. At the same time, the inner half is turned away and basted with a stitching seam. The band is sewn together with the bottom of the cap or separately.
Eight-piece cap (men's pattern): choose a classic
An eight-piece cap (eight-piece) is one of the most common types of men's hats. The eight-piece cap (the pattern is presented later in the article) is worn with pleasure by men of all ages. This option represents that very classic, in which both a young guy and a gray-haired old man look great.

The style favorably emphasizes the color and texture of the material from which the garment is made. An eight-piece cap is made from genuine leather or leatherette, from drape or fine natural wool. Caps in plain colors, non-marking, strict shades or, conversely, with bright and expressive colors, will fit perfectly into any wardrobe. They are sewn on a twill or silk lining, using insulating padding made of padding polyester (winter version). To protect the ears and the back of the head, such an eight-piece cap can be equipped with a special visor, which is put inside in good weather, and released outside in rain or wind.
This style of cap is considered extremely successful. Thanks to the special shape of the headdress, it fits perfectly on the head, does not move or fall. The eight-blade will be modern and stylish regardless of the vagaries of fashion.
How to sew an eight-piece?
According to experienced seamstresses, making a men's eight-piece cap is no more difficult than other models. To do this, use the main fabric - a piece of approximately half a meter in length, the same piece of lining fabric, threads that match the color, and interlining.

First, a measurement is taken (the diameter of the head, the distance from the forehead to the back of the head, the width of the forehead are measured). Then a pattern is made. In this case, the width of the wedges at the bottom should be equal to 1/8 of the entire circumference of the head. On this segment, you should mark a point in the middle, through which draw a line perpendicular to the first. Its length should be equal to half the distance from the back of the head to the forehead. Next, all the points are connected. The angle of the triangle's apex should be 60°.

After this, the visor is cut out. To do this, measure a segment equal to the width of the forehead, and connect its points with smooth semicircles, similar to a month. Next you need to build a peg (base). Its length is equal to the circumference of the head, the height should be at least 2-3 cm. On the wrong side of the fabric, attaching a template, trace the elements of the headdress, and then cut them out. Do not forget to leave 0.5 cm on both sides of the parts for seams. Number of parts that should be obtained: wedges - 8 pcs., crescents for the visor - 2 pcs., bead strip - 1 pc.

Then copies of the parts are made from lining fabric and non-woven fabric. They are connected to the base material with a hot iron. Then the elements of the cap are basted and the fitting is done. If everything turned out as it should, you can sew the parts white. To create a good shape for the visor, insert a piece of cardboard into it. At the end the lining is hemmed.
fb.ru
 Caps and berets are worn by both adults and children, women and men; in addition, they are sewn from light fabrics for the summer and from thick drape fabrics for the fall. You can sew caps and berets from denim and made of leather. Using the presented pattern, you can sew caps and berets from any fabric. The pattern for a cap and beret made of 8 wedges is given for size 56, with dimensions indicated, but if you make some changes to the drawing you can create a pattern for any size. It is usually difficult to buy a cap for non-standard and rather rare head sizes. These are sizes 54 and 59-60, so if necessary, increase or decrease the wedge pattern and sew the cap to the desired size. The same applies to sewing a beret, especially if the beret needs to be sewn for a child. The cap can be sewn as a single cap, or it can be lined, then the wedge parts can be cut from the main and lining fabrics.
In order for the top to lie well and be voluminous, when laying it out on the fabric, you must follow the direction of the grain thread. Using one wedge pattern you can sew a cap, a children's beret, and women's hat with fields.
Wedge pattern for a cap, how to draw it yourself
The pattern shows dimensions for a head circumference of 56 cm. To build a wedge, you need to draw a horizontal straight line, divide it in half and raise a perpendicular from point B to a height of 23 cm. Label the resulting point A. From point B to the right and left, set aside 3.5 cm, this is the width of the wedge measured by the circumference of the head. The line CD at the base of the wedge is 7 cm, with a head circumference of 56 cm. If the size of the head circumference is 59-60 cm, then the base of the wedge will be equal to 7.5 cm, respectively, and all lines of the width of the wedge and its height will need to be increased by 0.5 cm. Points C and D can be connected to point A.

So that the wedge has beautiful shape You need to draw the side lines smoothly; to do this, mark a few more points. Along line AB, set aside 13 cm down and draw a horizontal line 1-1 equal to 10 cm, 5 cm in each direction. Go down another 2.5 cm and draw a line 10.5 cm 2-2, and after another 2 cm line 3-3 equal to 10 cm.
All lines have been drawn and points have been marked, now connect the marked points with smooth lines so as to form a wedge.
How to make a cap visor pattern
To create a visor pattern, you need to draw a rectangle ABSD with sides 20cmx12cm. Dividing its upper side AB and lower side CD in half we obtain points C1 and C2. Connect them. The middle line is 12 cm, divide it in half, we get point C.

Now connect the resulting points with smooth lines, as in the drawing, creating the lines of the visor.
Open your caps
Lay out all the parts on the fabric in the direction of the grain thread marked by the arrow. Add 1cm to the seams and cut. There are 2 visor parts, 8 wedge parts. In addition, you need to cut a band 59 cm long and 7-8 cm wide, it folds into two and when finished will be 3.5-4.0 cm. The band is the rim of the cap to which the top of the wedges and the visor are sewn.
In order for the band and visor to be solid, it is necessary to lay a trim or interlining in them. If the cap is lined, then you need to cut 8 wedges from the lining material, also with seam allowances. You can sew a fabric harness or button onto the top of the cap. covered with fabric.
How to sew a beret from eight wedges
Place the wedges on the fabric, taking into account the direction of the grain thread. Cut 8 wedges with a 1cm seam allowance. Cut the rim of the beret to a length of 59 cm and a width of 7 cm. If the beret is lined, cut out 8 wedges from the lining fabric. Place interlining or lining in the headband.
Sew all the wedges. Sew and iron the headband, folding it in half to mark the middle line. Place the crown of the beret right side together with the right side of the headband and stitch evenly. Fold the cut of the rim, covering the seam, inward and stitch or sew by hand. Sew a button onto the top of the head.
Read also
coded by nessustisyachasovetov.ru
We sew a denim cap – Crafts Fair
Denim cap. Linen lining.

1. Transfer the pattern details onto the fabric.
2. Fold the parts of the visor with the right sides inward and grind them down, then make cuts around the circumference.

3. Turn inside out and sew finishing stitches at a distance sewing foot.

4. Sew together the details of the upper part of the cap.

5. Turn it inside out and sew a finishing stitch at a distance of 5 mm from the seam, turning the seam allowance inside towards the needle.

6. We also connect the lining parts.

7. We connect the parts of the base with the lining and the top of the cap.


9. Fold the visor piece to the base of the top of the cap with right sides right and connect.

10. Fold the lining and top right sides together. We turn it inward by 1 cm and connect the parts, laying a stitch along the edge of the product.


12. And this is what we got! I decorated the cap with a decorative button.

Soon I will create something from Pavlovo Posad scarves. If you want to see what happens next, add yourself to circles and follow the news! I think it will be interesting!
www.livemaster.ru
Let's sew a gavroche cap! Pattern, video master class and ideas!
 You can sew from whatever fabric your heart desires, even fur!
GAVROCHE CAP (SIZE 54-55) You will need: Fabric: spandex - 50 sq. dm, lining fabric - 50 sq. dm.  Details:1. Wedge - 6 parts; 2. Visor - 2 parts;3. Band - 2 parts. Work: 1) Having made a pattern from paper, apply it to the fabric. 2) Sew the wedges on the wrong side. 3) Cut out the lining according to the patterns, stitch it and sew it to the cap on the wrong side.
Sew the visor along the outer contour and stitch at a distance of 0.75 cm. Sew it to the crown. Sew the band to the crown.


Knitted cap: 

I think you will be interested:
leave a comment
Click to cancel reply.
(Necessarily)
(Necessarily)
dushka-li.ru
We sew caps, panama hats, bandanas - A needle friend, sewing and patchwork - CREATIVITY OF HANDS - Catalog of articles
 cap and four-bladed Panama Wedge width = Head circumference: 4 + 1 cm Wedge height = Head circumference: 4 + 2 cm Constructing a wedge pattern:
 wedge pattern
 CAP
CAP
For the cap, you need to cut out a visor, the width of which is equal to the width of the wedge. The insert for the visor can be cut out of a plastic bottle.
Sew the wedges in pairs, make a semicircular hole on one of the wedges, which is processed with a facing, after inserting a decorative elastic band (strings, plastic fastener). Sew a visor to the opposite wedge. Finish the bottom with a facing. Place a raised stitch along the bottom.
If the top fabric is light, then you can similarly cut out the lining, fold the top (with the visor) and the lining face inward and stitch, leaving an opening for turning.
 BANDANA
Cut 3-4 cm from the bottom of the wedge pattern.
Stitch the wedges in pairs, make a semicircular cutout on one of the wedges, which is processed with a facing. Cut out a hem for the bottom 6-8 cm wide and a length equal to the circumference of the head with a loose fit (4 cm) plus two lengths of ties (15-20 cm).
Fold the facing in half lengthwise, facing inward. Stitch to length, shaping them at the ends with a bevel. Turn the facing inside out and work the bottom with it, aligning the ends of the semicircular neckline and the beginning of the ties.
 PANAMA
If the width of the margins is 3-4 cm, they will be sloping; with a larger width, the margins will bend upward.
Add the width of the field to the height of the wedge. With this radius, draw a semicircle from the highest point of the wedge. This will be the bottom cut line of the brim. Cut the brim pattern as a separate piece.
Cut out the fields in the amount of 4 parts with a fold (2 upper and 2 lower).
Having sewn the side seams, the fields are folded facing inwards. Place a calico pad on the top of the fields. Sew all three parts along the outer contour. Turn the margins inside out, straighten the seam and baste it. Place several parallel lines along the margins at intervals of 0.5 cm.
Fold the Panama hat, brim and facing facing inward, cut sides outwards and stitch. Turn the Panama hat inside out and iron the facing inside out. Place a seam along the bottom of the facing, simultaneously grabbing the sections of the wedges and brim of the Panama hat.
 cap and six-piece Panama Wedge width = Head circumference: 6 + 0.7 cm Wedge height = Head circumference: 4 + 2 cm Constructing a wedge pattern:

CAP
It is sewn similarly to a cap from four wedges. It is better to use a ready-made insert for the visor, and use it to make a visor pattern.
You can determine the width of the visor using the formula: “divide the head circumference by 4 + 1 cm.” A semicircular cutout for the fastener must be made at the junction of two wedges opposite from the visor.
 PANAMA
From the highest point of the wedge with a radius equal to the height of the wedge, draw a semicircle until it intersects with the sides of the wedge. This will be the bottom line and the line of the inner cut of the margins.
Add the width of the field to the height of the wedge. With this radius, draw a semicircle from the highest point of the wedge. This will be the line of the lower cut of the fields.
Cut the field pattern as a separate piece. This will be the third part for constructing the main pattern of the field. Cut out the fields in the amount of 4 parts (2 upper and 2 lower). It is sewn similarly to a Panama hat from four wedges.
PANAMA FLOWERPanama flower pattern

To create a pattern for the petals, it is necessary to determine the central point of the wedge along the bottom line. From this point, with a radius of “half the width of the wedge + 1 cm,” draw a semicircle. This will be the lower cut of the petal.
From the top point of the wedge with the radius of the wedge's height, draw a semicircle until it intersects with the side cuts of the wedge. This will be the lower cut of the wedge. Continue the line further until it intersects - this will be the inner cut of the petal.
Cut the petal pattern as a separate piece. Cut out the petals in the amount of 12 parts (6 upper and 6 lower). Glue the upper parts of the petals with non-woven fabric.
Fold the upper and lower parts of the petals facing inward and stitch the lower edge. Turn the petal out, straighten the seam and stitch it.
Fold the petals opposite each wedge so that the edge of one touches the edge of the other and stitch. Finish the bottom of the Panama with a facing or lining.
BANDANA WITH METAL BLOCKS

Pattern width = Head circumference + 20 cm Height = Head circumference
General diagram of the model:

DESCRIPTION OF WORK
The blocks are placed in pairs at equal distances around the circle, the radius of which is equal to half the circumference of the head with an allowance for a loose fit of 2 cm.
A cord is threaded through the blocks and its ends are secured with clips.
2016-08-03 Maria Novikova
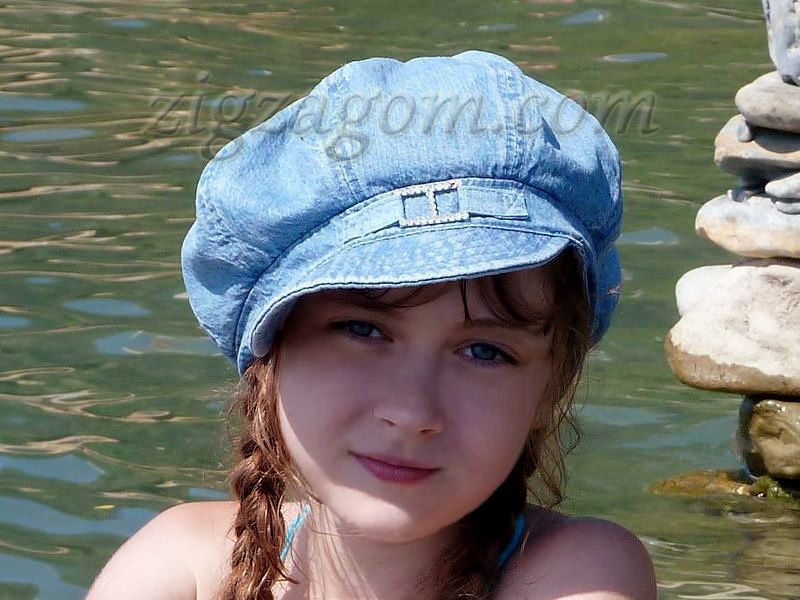
How to sew a baseball cap? Where can I get a pattern for a beautiful baseball cap? The popular American cap gained its popularity in Russia in the 80-90s and was a men's attribute. Probably, many remember the time when baseball caps with foam rubber on the front and mesh on the back came into fashion. By the way, I had such a baseball cap, and I was very proud of it. Such a thing determined the attitude towards fashion, as it is now customary to say “to be in trend.”
Baseball cap refers to sporty style Moreover, it can be combined with almost any style. A women's baseball cap can be sewn from any fabric and decorated with various decors. In this article I will tell you how to sew a baseball cap from jeans with your own hands.
To sew a baseball cap you will need:
- Fabric - 20.0 cm with a width of 150.0 cm (you can use old jeans or any other thick fabric)
- Finishing fabric – 15.0 cm with a width of 150.0 cm (cotton or colored cambric)
- Nonwoven
- Elastic band - width 3.0 cm, length 10.0 cm.
- Threads in the color of the fabric 3 pcs.
- Finishing threads for jeans 1 pc.
- Sewing supplies
- Sewing machine and overlocker
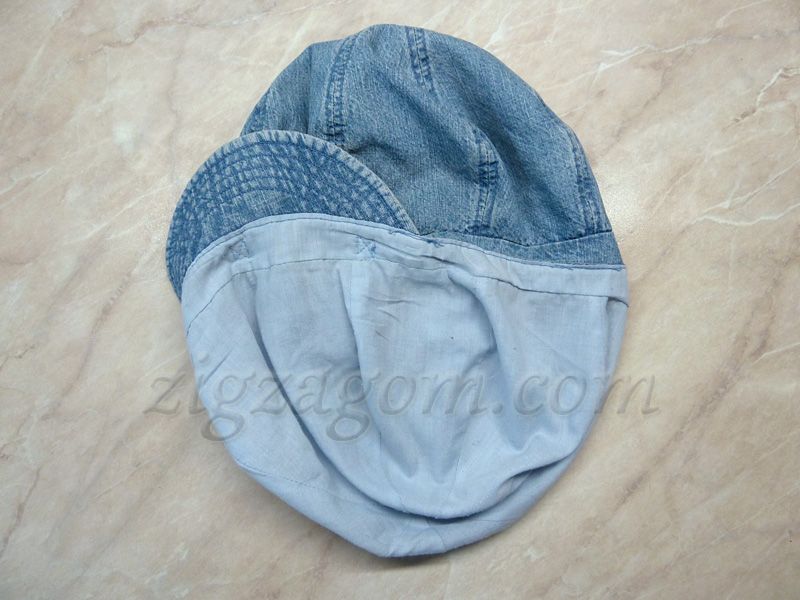
Cut out a denim baseball cap
Thanks to the pattern I received, I cut out the details of the cap from jeans with seam allowances of 1.0 cm.

As I mentioned above, the visor from the old baseball cap was perfectly preserved, so all that remained was to cover it with denim. But before that, we’ll put decorative stitches on one of the parts of the denim visor (on the top part). And if desired, you can do it on both parts.

The canopy itself is very rigid; if you connect the parts of the canopy together, and then insert the canopy and add finishing stitches, a regular machine will not take it. Therefore, in order not to disturb the originality of the model, the lines can be laid before connecting the parts.
After this, we grind both parts of the visor with a seam width of 0.5 - 0.7 cm.

We turn the parts right side out and make a piping towards the bottom part. If you encounter unfamiliar words, then turn to


Insert the visor and straighten the seam

We sew together the sections of the visor so that the hard visor fits snugly between the parts.

A great idea on how to make a visor for a baseball cap with your own hands was suggested by blog subscriber Alexey Perepelkin from Nizhny Novgorod. The idea is simple, make a canopy from an ordinary plastic mayonnaise bucket. 


Alexey wrote: “I marked the holes for the stitches, pierced them with an awl and then stitched them by hand, it’s not convenient to look for holes blindly, but it still worked out slowly.”


Great idea! I think now many will take this into service and save on buying a visor. This is real waste-free production!
Another interesting way suggested by blog subscriber, Leonid. Make your own visor from several layers of paper: “from four to six layers thick paper"Whatman" type, any glue, waterproof (I glued it with Titanium). Choose or make a form. The simplest one is a glass jar. I glued it on an Ikea glass flower pot. It is conical in shape. Paper can be replaced with any sheet material. Coat the paper visor with varnish, it’s better to do it twice.”


Many thanks to Leonid for the photos provided and your version of making the visor!
Processing the upper part (crown)
There are two ways to connect the parts of the upper part, in this article I will talk about one of them. When cutting the crown, each piece consists of two parts.

Thus, the cap is divided in half lengthwise, as if into two hemispheres.

First we connect the parts of one part of the cap, then the second (for dimensional stability of the front part, you can glue it tightly adhesive cloth). Sections can be ironed on an overlocker or edged with finishing fabric.


Then we connect both parts of the crown, process the sections (you can overcast them first) and add finishing stitches. The top part is almost ready.

The second method is the following sequence of processing the crown. First, the rear and side parts are connected together, the front parts are processed, and then they are connected to each other along the side line. You can choose either of the two options.
Machining the rear notch
To process the notch at the back of the baseball cap, you need to cut out a strip of bias tape from the finishing fabric, equal to the cut length of the notch, the width of the tape is 3.5 cm.

We process the cut of the recess with bias tape

Connecting the visor with the crown
This is probably the most difficult thing about sewing a cap with a visor. Sew on the visor so that it turns out nice and neat. Therefore, first we find the center of the visor and combine it with the front seam on the crown.
We fix it with pins and sew the visor to the crown with a seam width of 1.0 cm and grind it on a machine.

I can tell you from my own experience that I couldn’t sew it beautifully the first time, the second time, and even the third time. But after some attempt I managed to sew it on, albeit in two steps. And not entirely ideal due to the concave cut of the visor. But I hoped to fix everything by sewing on the facing.
Processing the bottom cut with facing
We cut out a strip of finishing fabric 7.0 cm wide and a length equal to the bottom edge of the baseball cap + 3.0 cm for the hem. We cut out an adhesive interlining from non-woven fabric equal to the length of the facing and a width of 3.5 cm. We glue the interlining with an iron to the wrong side of the facing. Then fold the facing in half lengthwise, wrong sides inward, and press it together.

We baste the finished facing to the bottom of the cap with a seam width of 1.0 cm, aligning the cuts.


We grind the facing on a machine. We remove the basting threads and apply machine fluff along the facing.
Sewing on elastic
We measure the required length of the elastic, taking into account the circumference of the head and the elasticity of the elastic. We sew the elastic sections between the facing and the notch at the back, while bending the ends of the facing inwards.

On the front side of the cap, we secure the elastic band and the folded edges of the facing with stitches

So, when worn, the elastic band at the back regulates the tightness of the cap on the head. Instead of elastic, you can use Velcro tape (Velcro), lengthening the ends of the facing where the tape will be sewn.
Final finishing
To prevent the facing from bending outward, we secure it with hidden stitches.

On the top of the head, where all the seams are connected, we sew a small button covered with fabric. I already wrote in the article how to cover a button with fabric.

As decorative finishing The cap can be decorated with rhinestones, appliques, embroidery or holes can be made. Read how to make holes in jeans

Presentation of denim baseball cap
My denim baseball cap traveled with me for two weeks across Crimea and was a great protection from the southern sun. Read more about car adventures in Crimea in my article: .


Such a versatile item as a DIY baseball cap is a must-have in your wardrobe. You can sew a baseball cap with a visor, decorate it with rhinestones or fabric flowers and you will have a glamorous model. Sew a baseball cap from camouflage fabric and please your loved one. There are a lot of options for how to sew a baseball cap.
If you are interested in sewing a hat with earflaps, then take a look at my master class
What other baseball caps are there?


It is worth paying tribute to the American athletes who introduced this wonderful accessory into fashion. My cap makes me very happy and saves me in emergency situations.
Get a denim baseball cap PATTERN!
If you would like to sew a baseball cap with your own hands, patterns are included. Write in the comments and I will send it to you by email.
The history of the baseball cap
For the first time, a model similar to a baseball cap was presented to the public in America in 1849, at the presentation of the new sports uniform of the New York Knickerbockers baseball team, it was made of straw. Later in 1860, another team used the same model, but with a rounded visor that protected from the sun.

In the 1900s, the Brooklyn-style cap with a long visor with a button became especially popular and was already sold in all stores. By 1903, the sought-after cap had a hard visor. The prototype began to resemble a modern baseball cap in the 1940s, where a more rigid visor was used. In 1954, a baseball cap designed by New Era became part of the Major League Baseball team's uniform and became standard.
That's all! Bye, see you again!
P.S. Any questions? Wishes?
Then leave your comments below.
With friendly greetings, Maria Novikova
Stop being a gray mouse, join the ranks of the fashionable and stylish! Don't know how? I will help you!
Right now, place an order for a personal pattern or consultation on sewing and cutting clothes. Including consultation on the choice of fabric, style and personal image.
My . I'm on Twitter. Watch on Youtube.
I would be grateful if you use the buttons:


