Sewing feet make the seamstress's job easier. Thanks to these devices, all operations can be performed accurately. There is a special zipper foot that will help you sew the zipper neatly. In addition to having it, you need to know how to work with it correctly.
A standard set usually contains no more than 3-5 paws. Universal device for zipper, zigzag, buttonhole sewing. IN expensive cars maybe 10-15 products. If something is missing, then you need to buy it. Sewing a zipper is a complex procedure, so you need to use a special device for the job. The main thing is that it matches the brand of equipment.
Features of the hidden clasp
This accessory is hidden in the seam of the product, and there is only a slider on the surface. For the standard one it is located on the side of the teeth, and for the secret one - on the back. But in some ordinary accessories, the teeth are also covered with braid.
How to choose a zipper? It is necessary to take into account the width, type, density of the fabric. TO light material you need to choose a thinner zipper. The length should be 2-3 cm longer than the expected length of the fastener.
Device
The concealed zipper foot is used to get the job done efficiently. It allows you to stitch the accessory close to the teeth. But this device is not always included with the sewing machine, but it is available for sale. Compared to the standard one, this foot has the shape of a sole: there are grooves or grooves on the surface.

Currently available in stores a large number of devices. The Janome concealed zipper foot fits the Janome zipper foot. This brand is in demand, so accessories for the machine will be in every specialized store. There is a foot for a hidden zipper Brother, “Chaika”, “Podolsk”. Before installing any device, you must read the instructions for performing this work, which are contained in the manual.
The foot for sewing in a hidden zipper is usually selected according to the model of the machine. But these devices have nuances:
- on the “leg”;
- with removable part;
- with screw fixation.
Products come in metal and plastic. The former are considered more durable, so for long-term use they are best suited. Gradually, the foot is deformed by the needle, which impairs its sliding. Therefore, the quality of work decreases. But if you need a hidden zipper foot for a one-time use, then plastic is quite suitable.
Insert
How to install the hidden zipper foot? It is usually attached to the left of the needle so that the guide lines for straight stitching are visible. There is a screw at the back of the foot; it must be unscrewed, after which it can be inserted. Finally, tighten the screw and the insertion is complete. The foot for sewing in a hidden zipper can be used for its intended purpose.

What is required for the job?
Except sewing machine with a special foot, this work requires:
- zipper;
- ruler;
- pins;
- needle and thread.
It is important to check the tension of the threads - upper and lower. If it is strong, then it is necessary to loosen it so that the accessory does not become brittle during sharpening.
What threads are needed?
The threads need to match the material of the fastener. The line will not be visible from right side. Everything should be neat on the inside. The quality of the fabric plays an important role. New quality threads are needed. Their thickness should be suitable for the canvas. For thin fabrics, thin threads are chosen, and for dense ones, strong ones.

Using a non-woven strip
Sewing a fastener to prevent stretching of the fabric is quite simple. Seam allowances should be taped with non-woven strips. For this purpose the following is used:
- Formband. Presented in the form of an oblique non-woven tape, which is used on oblique cuts.
- Kantenband is a non-woven strip glued with a 1 mm overlap over the seam.
You can also cut strips from the canvas yourself. They will perform similar functions.
Features of work
Special instructions are used to sew in the fastener. From the inside of the product, measure 1.5 cm from the edge and draw a line on both sides. Strips of non-woven fabric are glued to the seam allowances. For rough materials you don't need to use them. The seam must be basted according to the markings, and then overlocked with an overlocker. Then it will be ironed.
A fastener must be attached to the sewing site. closed. Use chalk to make marks on the seam allowances and the accessory tape. This is necessary for better sewnability. Pins must be inserted across the fastener and secured with seam allowances. Place a zipper on them, piercing only one layer of material. After removing the pins, you need to remove the seam markings and open the fastener.
After this you will need a foot for sewing on a hidden zipper. You need to stitch until it hits the fastener. Then it is important to fasten it to see if the accessory is sewn evenly. The side seam must be finished so that the bottom bartack is not visible. It is located approximately 0.5-0.7 cm below the end of the seam. At the end, the basting must be removed.
The foot, in addition to sewing on fasteners, can be used for finishing the edges of products. For example, for attaching tubes to products, as well as for those areas where it is difficult to use a standard device. This tool is necessary for creating seams along the edge.
Most presser feet have a screw that adjusts the position of the clamping part. If it is not tightened, the clamping part will vibrate. Then the needle will stick into the foot, which leads to needle breakage. Although you can sew a fastener with a regular presser foot, it is better to use a special one, as this will allow you to do the job much better.
The product you purchased is a branded product, manufactured with high precision and to the highest standards. modern technologies. The product and its packaging comply with all the requirements of the technical regulations (technical regulations) of the Customs Union.
For your convenience and to avoid damage, please read the user manual before starting work.
For additional accessories, needles, paws, etc., ask at retail stores.
General provisions:
1) The warranty period begins from the date of sale to the final buyer.
2) The warranty period is determined by the manufacturer and is indicated in the information sheet, which is part of the instructions. The manufacturer provides all consumer rights related to the warranty in accordance with the laws of the country where the goods are sold. The retailer, at its discretion, may extend the warranty period for the product. In this case, all costs for additional warranty service are borne by the seller.
3) The product is intended for household use only. If there are traces of commercial use (cooperatives, factories, studios, courses, etc., as well as in individual labor or private entrepreneurial activities, educational and production processes), the machine is removed from the warranty and is not subject to free service during the warranty period.
4) Faulty components and assemblies are repaired free of charge or replaced with new ones during the warranty period. The decision on the advisability of replacing or repairing them remains with the Service Department. Replaced parts become the property of the Service Department.
Conditions for obtaining a guarantee:
5) The warranty card is valid if the following are correctly and legibly indicated: model, serial number of the product, date of sale, clear seals of the selling company, signature of the buyer. The model and serial number on the product must match those indicated on the warranty card. If these conditions are violated and the data specified in the warranty card is changed, erased or overwritten, the warranty card is invalid. If the date of sale cannot be determined, in accordance with the Law “On Protection of Consumer Rights”, the warranty period is calculated from the date of manufacture of the product.
This warranty does not apply to:
1) For damaged products:
- due to operation not in accordance with the instructions, careless handling of the product, in cases of flooding, falling, impact and other external influences;
- in case of modification and repair of the product made by unauthorized persons;
- from exposure to or ingress of moisture, sand, dust, aggressive environments, as well as insects, rodents, pets, etc.;
- in case of force majeure (fire, natural disaster, etc.).
2) The warranty does not cover defects and wear for sewing machines and overlockers - needles, needle plates, drive belt, feed dog, bobbin holder, adapter, needle holder, needle bar, needle threader, overlock knives, presser feet, spool holders, light bulbs, loopers, etc. . P.
Manufacturer's warranty does not include:
1) Routine maintenance, installation and configuration of the product.
2) Service at the owner’s home.
3) Cleaning (lubrication) and other maintenance of the mechanism in accordance with the instructions is the responsibility of the owner. If the maintenance conditions are not met, at the discretion of the Service Department, the warranty may be removed from the machine.

What's special about the zipper foot?
The main feature of this sewing foot is that it can be adjusted so that its pressing part is located to the left or right of the needle. This is necessary so that when sewing the zipper, the zipper teeth are not pressed with the foot.
Where to buy a foot for sewing on a zipper?
If you are buying a new sewing machine, then this type Sewing feet are usually included in the standard set of accessories for a sewing machine. But if the machine is not new, or the foot is lost, then you will have to visit the nearest sewing equipment store, where they will help you choose suitable presser foot for zippers for your machine. They will help if they can. If your model sewing machine is already outdated or little known, then you may have to visit the store, taking your typewriter with you. The best decision- this is to find the manual for your sewing equipment and see in it which feet are suitable for your projects.
Which zipper feet are best?
Yes, there can be zipper paws different types. It's a matter of personal preference. It may also be that a certain model of sewing foot is best suited for a certain model of sewing machine. Some seamstresses find ultra-thin types of zipper feet convenient. And no wonder - with a thin foot you can fit anywhere, and also sew on narrow zippers. Some paws seem too wide and awkward, but this is only at first glance. In fact, they can perform surprisingly well. So choose a foot to suit your taste.
Where else can a zipper foot come in handy?
The foot can be used to finish edges sewing products. For example, for sewing tubes to products, and anywhere where it is impossible to get to the desired area with other paws. This foot allows you to sew edge seams without crushing anything that doesn't need to be hemmed, such as ruffles and other trims.
What are the main mistakes when working with zipper feet?
Many presser feet of this type have a screw that locks the position of the presser foot when you select the sewing side. If you forget to tighten the screw, the presser part will vibrate from side to side while sewing, and the needle may stick into the foot or break on the foot. You will definitely need to replace the needle in your sewing machine.

Special claws for hidden zipper
A hidden zipper can be sewn on using a regular zipper foot. There are also special feet for hidden zippers, but some seamstresses cannot get used to them - you can sew a hidden zipper equally well with a regular zipper foot. "Why?" - you ask?. Why then did they come up with a special, highly specialized foot for sewing on hidden zippers, since everything can be done with a regular zipper foot? The concealed zipper foot has grooves through which the zipper teeth pass. And here the problem of passing the zipper teeth through the grooves may arise. Size and length of zipper teeth different manufacturers may vary. You may have problems with this type of foot and you will end up with puckering of the seams where the zipper is attached. So buy a simple zipper foot and you will definitely succeed.
Sewing feet not only speed up and facilitate the work of the seamstress, but also allow you to perform this or that operation flawlessly. Try sewing a hidden zipper with a regular foot, and you will easily see this. And with the help of a special foot for sewing a hidden zipper, this complex and painstaking operation is performed carefully and quickly, literally in a few minutes.
In this article we will show two types of feet that can be used to sew on a hidden fastener (lock). We will also suggest some nuances that affect the quality of sewing on a hidden zipper.

If your sewing machine has a cumbersome foot in its set of feet, then know that it is ideal for sewing a hidden zipper. But it also has a number of other functions, for example, zigzag stitching, etc.

If you are an experienced person, you can skip this step. And if you are just learning to sew, then before attaching a zipper with a special foot, make a “basting” stitch with a regular foot along the edge of the lock tape. Set the stitch pitch to the maximum, do not make bartacks, since this stitch will need to be removed in the future.

Now it will be convenient for you to adjust the zipper using a special foot, since the lock tape is fixed and will not shift or move to the side.
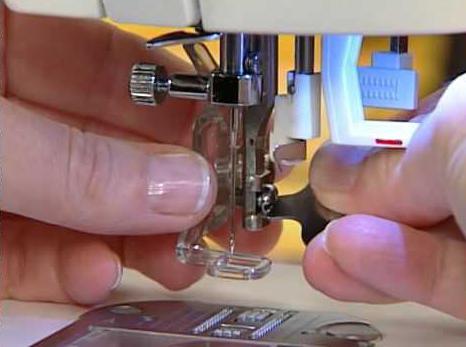
Foot for twisted (regular) zipper

This foot, designed for sewing in a regular zipper (twisted or tractor), is available in the set of feet on almost any sewing machine. It can also be used to sew on a hidden zipper, but only with certain experience and skill.
This photo shows how to sew the zipper tape on the right side.

This photo shows how to sew the zipper tape on the left side. To do this, you just need to move the sole of the foot to the other side.
The advantage of this foot is that the zipper can be attached on both sides of the zipper in the same direction. This is sometimes very important for fabrics and materials (leather) that give a strong fit, checkered fabrics, etc.

The only disadvantage of using such a foot is that the stitching does not go close to the teeth of the lock, at least not as tightly as with a foot specially designed for sewing on hidden zippers. By the way, these paws come in various designs and are made of either metal or plastic. Metal feet are more reliable, but at the same time more expensive.

As for the question of which one to choose, then buy what is simpler and cheaper. All the same, in the end, it is not the foot that sews on the hidden zipper, no matter how special it is, but your hands and head.
Other articles:
To sew a zipper beautifully and neatly, especially to sew a hidden zipper, you need to use a special foot.
You don't always need to replace the zipper on your jacket. Most often, it is enough to simply replace the zipper slider with your own hands.
About how to make a pattern and sew pillow letters with your own hands. An experienced technologist will share the skill of sewing a pillow with you.
The semi-automatic loop is performed in four steps. You will have to turn the stitch selection dial four times:
- Setting;
- Left side of the loop;
- Setting;
- Right side of the loop.
The automatic loop is completed in just one step. The size of the buttonhole itself is automatically determined by the size of the button that is placed in the foot to make the automatic buttonhole.
You probably already know the basic rule regarding sewing needles: Replace with a new one after every large sewing project. Even a slightly dull tip or damaged needle eye can seriously affect the sewing result. After all, on modern sewing machines the needle pierces your fabric at a rate of 600 to 1,000 stitches per minute. But at the same time it is also important to choose suitable type needles.
If you look at the needles offered in the most ordinary sewing store, you can see at least a dozen different varieties. In appearance they are all similar, unless you look at them with a magnifying glass. But different types needles have different needle eyes, different points, different rods, etc. All these parameters are of great importance for the work.
Let's look at the main types of needles in accordance with the attached illustration:
1. Universal/standard
Features: slightly rounded tip, standard for sewing machines.
Materials: silk, rayon, cambric, chiffon, organza, linen, georgette, poplin, ribbed corduroy.
2. Jersey
Materials: thin knitted and knitted products, single (one-sided) jersey, corset fabric, knitwear.
3. Stretch
Features: Medium rounded tip.
Materials: highly elastic knitwear, simplex, latex, lycra.
4. Jeans/denim
Features: sharp tip.
Materials: denim, canvas, twill, artificial leather.
5. Microtex
Features: thin shaft and very sharp tip.
Materials: microfiber, fine and tightly woven material, such as silk, taffeta, etc.
6. Leather
Features: The tip has the shape of a blade and cuts through the material.
Materials: suede, pigskin, calfskin, goatskin leather.
In addition, it is important to consider the manufacturer of the needle. We express our gratitude to the Japanese company Organ Needles, which helped us prepare a large material on needles for sewing machines.
Flash card requirements:
The flash card with designs must be formatted. The optimal size of a flash card is up to 4 GB. It should not contain any extraneous files: documents, photographs, films, music.
Create a folder for the design:
You insert the formatted flash card into the turned off machine. Then turn it on and wait for the download process. The machine creates a folder on the EmbF5 card (the name may vary slightly). Also, in some cases, depending on the class of the machine, a MyDesign folder can be created. After that, take out the card.
Transferring the design:
You transfer the design to the card either by simple copying or using special software (Digitizer MBX). The design must match the size of the hoop you are embroidering on. If it extends beyond the hoop, the machine will not open it. In this case, the design should be divided into several individual ones using special software.
The first digit on the left is the last digit of the year of manufacture. For example, if your sewing machine was manufactured in 2007, then the first digit will be 7. And if in 2014, then the last digit will be 4.
The second number from the left is the quarter in which the model was produced. 1 - production month from January to March, 2 - from April to June, 3 - from July to September, 4 - from October to December.
Other figures refer to the manufacturer's general information.
For example, serial number 431092594. The model was produced in the third quarter of 2014.
To perform a double stitch, you will need a double needle (two needles on one holder). If your sewing machine produces a zigzag width of 9 mm, then the distance between the needles can reach up to 9 mm. For machines with a zigzag width of 5 or 7 mm, the distance between the needles should not exceed 5 or 7 mm, respectively.
A sewing machine has two spool pins that hold spools of thread. The rods can be vertical or one horizontal and the other vertical (the rod is included additionally in the package).
Install two spools, thread the threads symmetrically behind the thread guide, then into the double needle. Select the straight stitch sewing function and use the standard zigzag foot.
A double stitch is formed on the front side of the fabric, and a zigzag stitch is formed on the back side. To process knitted fabric, we recommend using double stretch needles 130/705N No. 75/4.
Our company recommends that scheduled maintenance of Janome sewing machines and overlockers be carried out in specialized centers. If you want to do this yourself, please use only high quality lubricants designed specifically for sewing equipment.
Buyers are often faced with the fact that the cars they purchase are missing certain accessories. We would like to inform you that the following models may be supplied without a hard case:
- Janome 7518A
- Janome 7524A
- Janome 7524E
- Janome DC50
- Janome DC4030
- Janome Memory Craft 5200
Be sure to check the equipment of the sewing machine before purchasing from the seller. A sign that a hard case is missing is a low price. Hard car cover not sold separately.