You can make a colorful book for kids yourself.
To do this, you need the following materials at hand:
- photo;
- paper;
- cardboard;
- the cloth.

With the help of such homemade products you can develop your children.

There are 3 varieties of homemade books:
- paper version;
- photo books;
- educational books from textiles.

Homemade book made of cardboard or paper
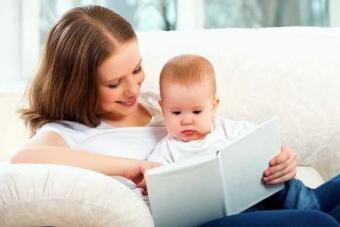
In the photo of a children's book intended for a baby who is not yet a year old, you can see large subject pictures. It’s best to combine images by topic.

For a one-year-old baby, various books can be made. Each of them can be devoted to one of the topics: “Pets”, “Food”, “Toys”.

Knowing how to make a children's book with your own hands, you will quickly make it. The baby will certainly be interested in an informative story about what the beloved bear does. A series of pictures shows the baby how the bear plays with the ball, eats delicious honey, walks in the woods, sleeps on the bed.

Where to get themed pictures?
The necessary images can be found in various sources:


Pictures from coloring books can also interest a young child. The baby is attracted by color images and unpainted.

Large pictures are on the pages of magazines. Suitable images can be found on the Internet. They are easy to print on a printer. If you use photo paper, you get high-quality photos.
Pictures from wall calendars are also suitable for handmade homemade. At the end of the year, you can ask your friends for a calendar.

Arm yourself with pencils and paints. Draw for yourself! Your baby will appreciate every creation.

Take pictures of various objects or phenomena to create a unique book.

Having shown your creative abilities, you will soon be able to create a home-made library.
Note!


Making a kind of encyclopedia of the world for the development of the baby
Option 1. Self-made book from a photo album
You need to purchase a 10X15 photo album with 36 pages, this is the best option. Choose small dimensions, do not take bulky photo albums. Take cardboard, and cut out strips of white cardboard with dimensions of 10X15.
It remains only to stick pictures on the cards and insert them into the album. If the cards are laminated, they will last longer.

Subject images with inscriptions in a photo album is not just a book for kindergarten.

If its design is complicated, then it is suitable for older children. In such a book you can include children's children, puzzles and tales.

Option 2. Self-made book in the file folder
For the product you will need to purchase a file folder, cardboard with size A4. Pictures are glued to white or colored sheets. Ready cards are inserted into the folder.

Note!

On the sheet can be one image and a small story in the picture. Another design option - under the figure is a signature.

Option 3. Book-made from sheets for drawing
For a book, you need to take 8 or 10 sheets, they are bent in half, and then stitched together. You can connect the sheets in another way - make holes with a hole punch, thread a satin ribbon and tie it.

Themed pictures are pasted into the finished book. Such a product has the only drawback - lack of strength.
Option 4. Book as an album
Homemade can be made from an album for drawing. The thematic picture needs to be glued to the cover. In the book you can enter the statements of the baby, his first stories or children's songs.

Children's educational photo books
A book for a child with photographs will help the baby move from everyday conversations with parents to the perception of literary works. Here the child already needs coherent speech. Just name the subject is not enough.

You can stick a photo of yourself and your child. The first page serves as a cover; the name and the name of the author are written on it. An image is also stuck here, according to which it is easy to guess which topic the book is devoted to.
Note!


The text is written in the book, it is placed in different ways. The photo can be glued on top or on the left page from the spread, and the information can be placed below the photo or on the right side.

Soft cloth children's book
The master class "How to make a children's book" will help to create a real masterpiece. Here, elements that attract the attention of the child can be used: tweeters, bells, appliques, laces or Velcro fasteners.
Soft books help develop tactile sensations. They are made from materials of various textures: fleece, wool or velvet.

Additionally, a variety of fillers can be used. The most popular options include small pebbles, beads, peas or seeds.

DIY children's book photo


Toys for children should be not only beautiful, but educational and safe. These toys include books made of cloth. They help children acquire useful skills, as there are many separate developing elements on the pages of such a book.
To make a book you need:
- Cardboard;
- Scissors;
- Needle;
- Threads
- Buttons
- Beads;
- Colored fabric.

As a basis, you can use cardboard, folded accordion. So you can not be afraid that the pages come off and fall out. We give an example of a master class on creating covers for a fabric book with your own hands.
First, you will need to cut out two rectangles from thick cardboard, these will be the outer covers for your book. They need to be covered with a suitable fabric or felt, decorated to your liking and idea.
For pages you will also need to choose a thick cardboard, but it should be thinner than cardboard for the cover. The height of the pages should be the same as for the cover, and the width can be calculated by multiplying the width of the cover by the number of pages you need, plus two more pages to stick them to the cover. Cardboard pages can also be glued with felt or covered with fabric, as you wish. After the cover is ready, you can proceed to the design of the pages of the book from felt with your hands.
Educational book for a child with his own hands. How to make.
What colors to choose for a book made of fabric

Educational books made of fabric are created in order to teach the child important and necessary skills, so choose clean and simple colors for decoration. Let it be red, blue, green, yellow, pink, orange, purple. Based on these colors, you will teach your child how to recognize them, so it’s best to prevent your baby from getting confused.
One page in a booklet can be sewn or Velcro glued multi-colored geometric shapes, then you can teach your baby both the recognition of shapes and learn colors with him.
What ideas to use for decorating a book of fabric

We will give a master class on creating pages for a book from felt. Of course, for kids it will be interesting if you use buttons, buttons, snakes, ribbons and other things that develop fine motor skills of the hands.
On one of the pages you can sew or attach snakes, buttons, buttons, carabiner, Velcro, laces. Let the child practice fastening and unfastening these useful devices. You can use the master class on creating pockets and make the pockets fasten with buttons, buttons and Velcro.
Buttoning up circles, not just one, but several; the kids really like this opportunity. On the page you can sew an impromptu sketchy sneaker and try to teach children how to lace up.
On another page, you can use the master class on creating balls and pyramids of felt puzzles from your own hands. For example, to make a puzzle ball, you will first need to start with a pattern. Cut a circle of paper that suits your diameter and cut it into 4. Take a colored felt and cut each part out of it. Sew Velcro to the place of attachment of the circle on the page, also sew the reciprocal part of Velcro to each part and now your puzzle is ready.
The master class on creating a pyramid will be very similar to the master class on creating a circle puzzle. It will be necessary to cut out the details of the pyramid, let them be 3-5. Each detail will need to be made in the form of a rectangle, you can sew felt pads and stuff them with cotton wool. Then you will get a beautiful interactive toy, each detail will need to be sewn with Velcro. On the page of the book you also need to sew the mate of Velcro.
A good idea can be the use of ribbons in decorating a fabric book with your own hands. For educational books made of cloth to be useful, they must teach something. So you can sew on the page of the book three ribbons. You can show the kid how to braid the pigtail and he will be able to repeat this training with his own hands.

On the page of felt, you can make a sign in which the child will master the account. The easiest workshop is to cut out numbers from felt and sew them to the page. Pull the tape near each figure and put on the number of beads corresponding to the figure on each tape. Such a self-made educational book will be very convenient to use, teaching the kid how to count.
On one page you can make a small garden with fruits and vegetables. You can sew vegetables and fruits from felt with your own hands, or you can stick a photo of these fruits and vegetables on Velcro. For children, this page will be very useful, so they can easily remember the names of vegetables and fruits.
Instead of a garden, you can make roads with cars or the sea with boats. the master class on creating such pages will be the same as the others - you will only need felt and Velcro, as well as a little of your own imagination.
Pattern boat or bus is very simple. You can find a photo of the object you need and simply print it, cutting it into important components. If this is a boat, then it will be sails, anchor and sides.
You can make an educational game of hide and seek with a baby on some page. For example, such a master class may be useful to you. Cut out a felt cap or hat. Sew it so that the hat can be lifted. Under the hat you can hide your eyes, a smiling mouth and hair. You can use photo eyes and other ideas. If you use this master class, you will please the children and they will be delighted.
Educational book made of fabric and felt. Handwork
Bright natural fabrics are suitable for creating a developmental book. Making a book with your own hands, you can give free rein to imagination and create a unique masterpiece.
The best gift is a book, it will be so at all times. And if for adult children the shelves of shops are strewn with printed materials with fairy tales and fascinating stories, then the smallest, who are just starting to taste the new world, will be a soft developing book as a reliable assistant on the way to learning.
It is not necessary to buy such a toy for a lot of money; it is not difficult to make it yourself. You will not have time to notice how a little time spent and a minimum of materials will bring invaluable benefits for the development of the child.
Where to begin
First you need to decide how you want to see the book. It is easier to carry out products of square or rectangular shape. Those who are not afraid of difficulties can be offered a circle, a triangle, and even a book in the shape of a butterfly or a flower.
If we talk about sizes, the best option is toys with a width of 20 cm and a length of 20-25 cm. Too large pages will tire children and scatter their attention, and small ones will not fit the necessary decorations.
Now about the thickness of homemade. As a rule, these are 8 pages, including 3 spreads and a cover. You can limit yourself to one, and the rest “to finish” as the crumbs grow older.
We select materials
To create a developing book, bright natural fabrics (silk, felt, chintz), yarn or fur trimmings and foam rubber, which will add volume to the product, are suitable.
It is not in vain that felt is popular among needlewomen: it is easy to hem and glue it, and the trimmed edges of the material do not sprinkle even with time.
You will also need sewing accessories:
- velcro, buttons, buttons on which decorative parts are attached;
- beads, bells, large beads;
- ribbons, braid, shoelaces;
- threads of various thicknesses and needles.
Applications and figurines of characters can be purchased in specialized stores or made of fabric and cardboard.
Operating procedure
The principle of tailoring soft mini-books is always the same. Only the scenery and scenes change.
First, the pages are cut out of fabric (felt), then they are sewn up on three sides and filled with foam. It remains to sew the resulting pocket.
The cover is made according to the same algorithm with only one difference - when the pattern is left, a margin is left for the spine. Its width depends on the number and thickness of the pages. For the cover, the same felt is suitable, only doubled.
Related Material:
At the next stage, they begin to design. Harvested applications are sewn or fastened with Velcro depending on their purpose. Then everything is decorated with decoration materials - ribbons, bells, soft toys.
They complete the work by stitching a development book: first, a central turn, then the side. The pages are fastened with rings or laces.
Design Features
The most interesting work is creative. Making a book with your own hands, you can give free rein to imagination and create a unique masterpiece. But do not forget about the age characteristics of children.
If the baby is not yet a year old, he will like simple unpretentious pictures with contrasting colors. Especially kids love everything that rustles, pops, rings and rustles. For example, a pussy that can be pulled by a mustache, with a collar of beads and a bells on the tail. Or a bunny with a pocket on its tummy and fur legs in which candy wrappers rustle.
Books intended for children over one year old have different content. Their task is to form the necessary skills (fastening and unfastening snakes, buttons, Velcro, buttons), introduce basic concepts (color, size, shape, names of objects), bear a cognitive character (numbers and numbers, alphabet, seasons, animals, professions and other). All pages are united by one storyline, the main character of which becomes the kid himself or his favorite fairy-tale character.
Thematic Material:
For example, on one page the bear plays “crap” with the child, and on the other, it helps to learn the score.

Developing elements
Correctly selected details and plots will entertain children and help to master new knowledge.
Learning colors
Devote 2-3 pages of the book to acquaintance with the basic colors and shades. To do this, select different color elements for each color and place them on one page. Considering the details, explain: "It is light blue, dark blue, blue."
Learning Forms
On the first spread, draw the contours of geometric shapes, and on the second - attach their overhead copies. Hide the details in a pocket or just sew to ribbons. Having found the necessary shapes, the baby will connect them using Velcro or buttons.
Learning to zip up
From 1.5-2 years old, children are attracted to fasteners: snakes, hooks, loops, buttons. Hide caches behind them or fasten the learning elements with their help. For example, depict a tree whose apples are attached to buttons. At the bottom, make a basket in the form of a pocket where the child will harvest.
Create a picture
Removable applications, the details of which are fastened with Velcro, buttons or buttons, will help to get acquainted with the concepts of “parts - the whole”. For example, suggest the baby collect a pyramid of felt, animal figures or flowers.
Master the score
For “mathematical” pages, prepare dense applications of numbers, and next to them attach elements that display their quantitative value (beads on a string, mushrooms, flowers). Make the figures removable so that the baby can attach them himself, given the number of objects depicted.


About our smaller brothers
Children will quickly remember the names of animals if they sit animals on the wagons, feed or put them to bed.
Thematic Material:
Meet the tales
Perform a central turn in the form of a fairy tale. Children are easier to remember the text and storyline if they touch the heroes with their hands, independently rearrange them in the right place. This is due to the fact that preschoolers tend to visual-figurative and visual-effective thinking.
For example, the heroes of our fairy tale "Turnip" are hiding behind a strip of fabric with Velcro.

Example book for the smallest
On the first page there lives a bunny from fleece with a bow. His ears are filled with rustling candy wrappers and beads.
On the next page, the kids will find his garden. Carrots grow there, which can be collected in a basket made in the form of a pocket. Older children suggest counting vegetables.

On the second turn, a flower grows, where a bee lives, filled with buckwheat. It is attached to the ribbon. When the baby pulls the bee, its place in the flower is occupied by a caterpillar of beads connected to the same ribbon.
Nearby is a butterfly. But she is a secret. If you remove her body, which rests on an elastic band, it will turn into a chrysalis.

Turning the page, the child will meet with his favorite toys. This is a pyramid that teaches color and size, and a bear sleeping under the covers. Elements are fastened with flypapers and are easily amenable to children's fingers.

Covers are made in the theme of "Day - Night." This is a bright sun with ribbons-rays and a month. Asterisks on laces can be pulled in one direction or another.

When doing things for children, you invest in them a piece of yourself and inner heat. No toy purchased is more expensive than a created by a loving mother.
Each child dreams of his own book, made by himself. An adult should help him in this. Such a book can serve as a notebook in which your baby will draw. And a handmade book can be a wonderful gift for a loved one or a loved one or a close best friend.
Well, how do you make such a book yourself? Let's learn.
Do-it-yourself little paper book (master class)
To make it you will need:
- Sheets of white or colored paper;
- Scissors;
- Stapler or needle with thread.
Manufacturing steps:
Do-it-yourself medium-sized paper book at home

One option for what the craft might look like.
To make it, you will need the same materials as for making a small book.
First you need to decide what you need this book for, in order to know how many pages it should have. Know, from one page it turns out two. Do not forget about the cover. She will need colored cardboard.
If you are going to make it for a gift, then it is better to use paper with a beautiful texture.
Do not use lined paper.she does not fit.
Let's move on to manufacturing:
- Fold it in half. Add each page one at a time, and not all at once. This is necessary so that the fold lines are even.
- Smooth the fold lines with a solid object.
- Folded - fold one into one. If there are a lot of them, then fold the pages in blocks: four or two by six).
- Secure each stack with a stapler. The brackets of one stack should not coincide with the brackets of another blog. This is necessary so that when they are joined there are no ugly bulges.
- Now fold them. All edges should be even.
The main part is ready . How to make a binding.
Do-it-yourself book binding (phased master class)

Bindings can be completely different. His choice depends on the thickness of the product and your desires.
- First you need to make a cover. To do this, you need dense colored cardboard. Fold it in half.
- If your collection consists of several parts, then they need to be glued with adhesive tape. Cut the tape so that it is longer than your stuff. Stick it on the front and back pages: half the tape in front and half in the back. Excess tape must be cut off.
- Glue it to the product.
- There is another way to attach parts and covers - a ribbon or cord. If you choose this method, then you don’t need to fasten them with a stapler and tape.
- Put the parts in it.
- Align the edges.
- Using a hole punch, make two holes.
- Pass the ribbon or lace into the holes and tie a beautiful bow.
If you want to make a children's voluminous book for a child, then use strong cardboard. Only in this case, the child will not be able to break it.
Coptic binding
Coptic binding- This is the fastest and easiest way to fasten pages together. Even a child can make this look, but it will take a lot of time and patience. A thing with him will be a great addition in your office or hotel.
To make it with such a binding you will need:
- Cardboard;
- Paper;
- Thick thread and needle;
- Awl;
- Ruler;
- Pencil.
Coptic binding workshop:
![]()
- Fold the sheets in half, put them into stacks of three sheets.
- For each - the fold line should be marked with a pencil with a ruler. Put five points at the same distance from each other. Pierce them through with an awl. On the rest - you need to put the same points and pierce too.
- We make a cover out of cardboard. Bend it in half and put the first part inside.
- Now flash the back and first part. From the inside, insert the needle and thread into the first extreme hole. A small tail will remain in the fold. With the same thread, grab the cover from the outside and pull the needle between the stack and cardboard.
- Circle the needle around the stitched thread and reinsert it into the first hole.
- Tie the tail and thread into a knot and tighten tightly.
- The same operation must be done through the second hole. So you need to flash all five holes.
- Now put the second block on the first and sew it in the same way.
- The latter will be flashed with the cover. The needle must be inserted into the outermost hole on the outside and pulled out between the stack and the cover. Circle the thread around the stitched stitch between the two previous ones and put it into the last hole of the last pile, pull the thread inward.
- The same operation must be repeated with a neighboring hole. On the spine you should get a beautiful pigtail.
- Fasten the thread in the middle of the fold of the last part
- The original book is ready.
To learn how to make a book yourself, watch this video.
Photo gallery