For a beginner, this knitting technique should be mastered at the very first stages of becoming acquainted with this type of needlework, since the scarf pattern is one of the simplest basic elements. It’s not for nothing that such technology Ancient Rus' made scarves. They were strong, dense, did not stretch and did not turn into a shapeless thing.
Knitting with a garter pattern has passed on to the present day, as this technique is used to knit scarves, snoods, backgrounds for sweaters, etc. The garter stitch pattern looks quite neat, so it is appropriate to place more voluminous and complex patterns against its background. Garter stitch itself consists exclusively of knit stitches. There is no combination of purl and knit stitches in this knitting technique.
How to make a knit stitch?
In order for the front loop to come out, you need to tie a thread through the loop captured from behind. The purl loops are knitted from the front side. That's the whole secret. Most patterns are based on these two techniques.

The complexity of the pattern depends on the number of alternating purl and knit stitches. In addition, they use air loops, double crochets, double knitting, etc. But these patterns are already more complex. First you need to learn how to knit simple patterns, for example, garter and stocking stitches.
Stocking stitch can be called a relative of the garter pattern. Stocking patterns are used in the process of knitting socks, stockings or elongated leg warmers. It is valued for its ability to stretch along the leg.

What is garter stitch in practice?
On appearance garter stitch resembles rows of voluminous scales, so people used to call this pattern “ruffle,” “rope,” or “bed.”

Compared to other techniques, the scarf pattern has many advantages:
- since only knit stitches are used in the knitting process, the fabric is dense, so it is not able to stretch while wearing;
- the scarf pattern perfectly retains its original shape,
- it is not capable of deforming during the knitting process, since the loops rarely twist or fall off the knitting needles;
- in the finished product made with garter stitch there will be a characteristic additional volume, in addition, the wider the knitting needles, the more voluminous the product will be;
- The scarf pattern does not differ in the twisting of the edge of the fabric, so the product will be smooth and symmetrical.
Garter stitch is often used as a background fabric, but in itself it looks interesting and neat, for example, on cowl scarves or hats.
What threads and knitting needles should I choose?
It's no secret that the knitting process requires a lot of perseverance and patience. Therefore, beginners in this business should prepare for the fact that the first time the garter stitch pattern may not turn out so uniform or neat. As practice shows, not everyone can immediately knit stitches evenly. Some loops may be too tight, while others may be too loose. But over time, your hand will get used to it, and the volume of the loops will be the same throughout the entire fabric.

It is best to use size 5 knitting needles for knitting a garter pattern. The resulting pattern will be quite voluminous and uniform. All loops can be easily counted and the quality of work can be checked. To make the knitting process more comfortable, it is better to choose acrylic threads. They are great for beginners as they don't get tangled. Acrylic threads have high elasticity and are easy to form into loops.
Let's learn how to knit a pattern using the garter stitch technique!
Beginners first need to learn how to knit small fabrics using this technique. The main thing is to understand the principle of operation. For example, you can cast on 20 stitches on a knitting needle, but you must remember to cast on 2 edge loops. With their help, the edge of the product will not twist. After casting on the stitches, you can start knitting the first row. To do this you need to grab right knitting needle back side of the loop on the left needle. Through the separated loop you need to pull a thread, which must be laid on the index finger of your left hand. In this technique you need to knit the entire first row. The second row is knitted in the same way, but the loop should be grabbed not from the back, but from the front. If you knit a product according to this principle, the edge will not curl into a tube. This knitting technology is also called “grandmother’s”. When ten rows are knitted, the completed fabric must be secured with a hook.

This method is based exclusively on facial loops. Once you get the hang of it, you can start knitting large fabrics on circular knitting needles. But at the same time you need to watch carefully so that the loops at the base do not twist.
What other method can you knit a scarf pattern?
This method is knitted in reverse with only purl stitches. The pattern of this pattern becomes even more wavy and voluminous. The purl stitch is simply knitted by passing the yarn through the front side of the stitch on the left needle. The result is a perfectly smooth and simple canvas. In it, even and odd rows are knitted the same way, so some needlewomen consider this method simpler and more convenient.

If you knit a shawl fabric with one front or one back loop, it will still not have a back and front side. Some needlewomen take advantage of this when knitting pullovers, since if you place the fabric vertically, the silhouette will lengthen significantly and therefore will look more neat.
How else can you decorate the edge of the canvas?
Fabric made using the garter stitch technique is sometimes sewn with other parts of the product, so you need to learn how to trim the edges with a seam side edge. All connected parts are often sewn together with an invisible mattress seam.

During the knitting process, most needlewomen are accustomed to simply removing the edge loop without knitting it. The technique of fixing the edge in this case involves knitting edge loops both at the beginning of the row and at the end. It is worth noting that a characteristic feature of fixing the edge with this method is to knit the edge loop on the front side with front loops, and on the back of the product with purl loops.
When fixing the edge, you need to carefully knit the loops, and the threads should not be pulled too tightly to the knitting needles. In appearance, they should be exactly the same size as everyone else in the canvas.
Some needlewomen consider such an edge not too neat, but this nuance is not so important, since the edge will not be visible from the front side of the product. This is especially important when knitting sweaters, pullovers or cardigans. But on the other hand, such an edge seam is quite strong and even. It allows parts to be connected neatly and unnoticeably. This edge fixation can be used for any type of knitting.
How to decorate the edge of a garter stitch in the form of a pigtail?
The design of the edge in the form of a pigtail is used in most cases, as it looks neat and is convenient to sew during the process of sewing parts. After knitting the first row of loops, you need to turn the fabric over. The first stitch in the row will be the purl loop, but you only need to remove the edge loop. It doesn't need to be knitted. To do this, use the right knitting needle to pry the back loop from right to left. It is worth noting that in order not to confuse the loops, the working thread should be located on the left side.

To form the edge in the form of a pigtail, the first loop in the row must be removed onto the back wall of the loop, again without knitting it. But form a mono braid only if the first loop in the row is purl.

There are several secrets that allow you to knit uniform and non-pull items. For beginners, it is quite difficult to determine the degree of thread tension, so first it is better to try knitting with knitting needles of different numbers. It is better to learn on knitting needles numbered 4 and 5. They make the fabric voluminous, which makes it easy to count the number of stitches and see your mistakes clearly.
As a result, the fabric should not be too loose, but not too tight. Over time, the needlewoman must learn to feel the tension in the yarn. The loops are the same size - this is the key to a smooth and neat fabric in the end.
The process of knitting is quite an exciting activity. Having mastered the technique, you can create amazing clothing models, one of a kind. The basis of knitting is knit stitches, purl stitches and yarn overs. Three elements are used to create unique relief patterns and openwork patterns. But the basics of knitting techniques are garter and stocking stitches. To the most simple way knitting for beginners includes garter stitch - this is where they begin to study this type of needlework.
What is
The garter stitch method is very simple and is suitable for beginner needlewomen to hone their skills. This type of knitting received its name due to the fact that it was used to knit scarves and shawls. The fabric made with the pattern presented in the article is resistant to stretching and deformation. Products made using this method hold their shape perfectly, but give it a slight volume. In ready-made clothing models, garter stitch is used as a “background” on which the main pattern is made. Openwork patterns and inserts of stocking stitch or jacquard motif look original on it.
 Garter stitch looks like convex stripes, which is why they are also called “ruffled” or “beds”. Having chosen this knitting method, you should decide how these grooves will be located: vertically or horizontally. The appearance and originality of the finished product depends on this. Of course, you should knit in a way suitable for turning. When positioned horizontally, the fabric is knitted from the bottom of the product, and when positioned vertically, from the side. Beginners should give preference to horizontal stripes, but experienced craftswomen can experiment with knitting parts.
How to knit
 To complete the pattern, you need to cast on any number of loops on the knitting needles. First edge loop remove and continue knitting the front loops in the classic way, that is, grabbing the thread by the front walls. The last loop is always purled so that the edge of the fabric is even.
Next, turn the work back to you and begin to knit in the same way as the initial row. This is the whole essence of garter stitch; its pattern and description are extremely simple and understandable. If you have never knitted anything yourself, then the master class will help you step by step instructions in a photo or video with a clear example of knitting technique. A video with instructions for such knitting is presented below.
Garter stitch on circular needles
Experienced needlewomen can use this type when knitting with circular knitting needles. Here the knitting technique is slightly different from working on straight knitting needles. The cast-on loops need to be closed in a circle by knitting the initial row with facial loops. And mark the place of connection - you can use special plastic separators designed for knitting, or just use a thread of a distinctive shade. The mark should be located at the location of the intended seam; if it is a hat, it should be on the back, and if it is a sweater, it should be on the side. This way the junction will be less noticeable and not too noticeable. The second row starts from the mark and is knitted with purl stitches. In this case, it is forbidden to turn the fabric over - it is knitted from the front side of the product. Knit the next row with knit stitches, then purl stitches.
This alternation is how garter knitting occurs with circular knitting needles. There is a small nuance in this type of work - the connected loops turn out to be twisted and the canvas does not look the way it should. To get a classic knitting, you should insert the knitting needle into the loop with reverse side, as if unwinding it. For ease of knitting you need circular knitting needles select a length equal to the width of the product, so as not to pull out the knitting needle later and waste time on it. 
Beginners should avoid using circular knitting needles - just master the pattern using only straight knitting needles. In this case, knitting occurs only with facial loops, since after each row a natural revolution of the knitted fabric is made.
Benefits of garter stitch
 The presented type of knitting has a strong edge that is not prone to curling. A product knitted using this method does not change size or deform after washing. This method can be used for any yarn; products made from textured or unusual threads look especially elegant, since garter stitch only emphasizes the beauty of the yarn itself. Things knitted from melange thread turn out to be very elegant - there are characteristic stripes and smooth transitions from color to color. The pattern can be used with any number of loops. The canvas looks unusual and attractive, but differently from the front and back sides.
For all its simplicity, this mating is quite insidious. It shortens the fabric in height, so it’s worth taking this nuance into account when knitting something. The presented type must be knitted with even loops, using smooth and high-quality yarn. Otherwise, all the irregularities and errors will be too noticeable.
What can be tied
 The garter stitch fabric is soft and fits nicely to the body. It is these qualities that are taken into account when knitting children's clothes. Using the presented type, booties for the little ones, hats and scarves, blouses and vests are created.
For adults, both women and men, you can knit sweaters, jumpers, scarves, snoods, hats, berets and much more. You can use only this type, or you can combine it with other knitting methods. The formation of convex grooves in knitting implies the ability to change their direction, which determines the decorative meaning. For hats and scarves, the technique of cross knitting is interesting. In this way, doing the work is much easier, and the things themselves become more compact, but have sufficient ability to stretch in length. 
When working with jackets and sweaters, you can experiment with a combination of longitudinal and transverse stripes. There is only one drawback: when knitting longitudinally, you will need long knitting needles so that all the loops can fit. This will create slight inconvenience when working, so beginners should not resort to this. But if you knit a sweater or even a dress in this manner, the product will be slimming. Applying fine yarn and thick knitting needles, you will get a sparse knitting, similar to an openwork fabric - this method is used when knitting down scarves. By the way, you should train on fluffy yarn (wool or mohair) - it can hide all the unevenness.
To begin with, beginners just need to knit a scarf - cast on the required number of loops and knit a narrow and elongated fabric to a more suitable length. In the future, you can start knitting a hat - at the end of knitting, beginners will learn to decrease the loops in the given knitting. As soon as the small items are mastered, start knitting more complex items.
Garter stitch is the first way to make a fabric. Therefore, our ancestors knitted everything using this technique until they came up with a purl loop and ways to combine them with a knit stitch. Modern knitters are able to create masterpieces with complex patterns and fancy details. And the whole head is garter stitch.
Hello, dear readers and visitors of my blog!
Many people ask questions: “How to knit garter stitch with knitting needles? How to knit stockinette stitch with knitting needles? In today's article, the answers to these questions will be discussed in great detail.
First of all, you need to learn how to knit knit and purl stitches - regular and granny stitches. Having mastered knitting just these loops and having thoroughly trained your hand, you can become an ace in knitting, because there are many patterns consisting of only knit and purl loops!
So, if you don’t yet know how to do garter and stocking stitches, feel free (if you don’t know how, follow the link highlighted blue) and let's start learning!
Before starting to knit each row, do not forget to slip the first loop (edge) from the left needle to the right without knitting (as in the figure below).
We'll talk in more detail at the next knitting lesson.
How to knit facial loops
Depending on how to knit facial loops, they are called classic (1st method) and “GRANDMOTHER’S” (2nd method).
The classic knit stitch (Fig. 1) is always knitted behind the front wall ,

"grandmother's" facial (Fig. 2) - behind the back wall .

That's the whole difference! Knitting only knit stitches in all rows (either classic or “grandmother’s”, but under no circumstances mixing them) , we will get shawl stitch.
In the old days, garter stitch, or garter knitting, was called “gross stitch”, “grouse stitch”, “rope stitch”, “bed stitch”. In Russia they knitted scarves, hence the name “garter stitch”.
Nowadays, garter stitch is used not only for making scarves, but also for knitting almost all products, both entirely and in combination with other patterns.
Garter stitch is a double-sided knitting pattern (it looks the same on both the front and back sides), so it is often used when knitting scarves, hats, belts, trims, collars, where the wrong side is visible.


If garter stitch is done with thin threads on thick knitting needles, we will get a loose, almost openwork fabric. This technique can be used when knitting summer clothes, shawls.
Garter stitch made from colored stripes looks very nice (photo below). It is obtained by knitting two rows of each color of yarn - knit and purl with knit stitches. True, the pattern we have is one-sided.

The first photo shows the front side of this pattern, and the second shows the back side.

Garter stitch, made with classic knit stitches behind the FRONT wall, is used most often in knitting.
But if you need to get more tight knitting, “grandmother’s” knit stitches are knitted behind the BACK wall. Although in this case it is not very convenient to knit them, and I never use this method.

Garter stitch can also be done using only purl stitches, only the structure of the fabric with this method of knitting becomes looser and wider, no matter how tightly we knit it. And it’s much more convenient to knit garter stitch with knit stitches.
How to knit purl stitches
How to knit purl stitches? Same as facial ones:

classic

and “granny” loops.
But it is IMPORTANT to remember:
- a purl loop made in the classical way corresponds to a classic knit stitch;
- The purl loop made in the “grandmother’s” way corresponds to the “grandmother’s” knit stitch.
Otherwise, we risk getting , which are also used in knitting, but not so often.
The video that I selected to reinforce the lesson will help you better understand how to knit knit and purl stitches in the classic and “grandmother’s” way.
Stockinet
How to knit knit and purl stitch
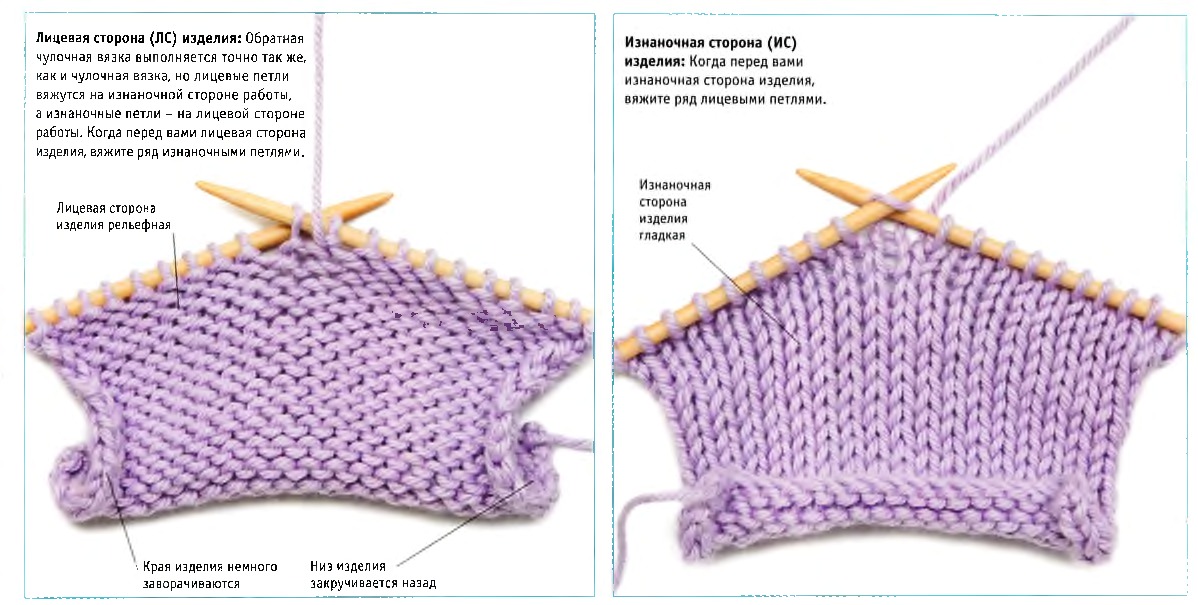
We get stockinette stitch (stocking stitch) if we knit one side of the product with knit stitches and the other with purl stitches. This is a one-sided knitting with both front and back sides.
The right side of stockinette knitting is called KIT STITCH.

Wrong side - RURAL STAIN STITCH, which resembles garter stitch, but looks smoother and smaller.

Although stocking stitch came to us from ancient times, it never goes out of fashion. Knitting is universal, as it is suitable for almost all products: men's, women's and children's.
The smooth surface of stocking stitch allows it to be used as a background for openwork and convex patterns, for ornaments and embroidery.

The ability to knit always commands respect from others, because it requires skill, perseverance, and things turn out unique. It is believed that knitting - counting stitches, monotonously knitting each row - has a therapeutic effect. And in order to please not only the process, but also the result, you need to be proficient in technical techniques, in particular, knit and garter stitch.
As with any type of needlework, you need to start learning the basics of knitting with simple, basic patterns. They, like any of the most intricate patterns, are built on a combination of front and back loops. To make a knit stitch, you need to pull the thread into the loop captured from behind with the knitting needle. To knit a purl stitch, the thread is passed through the front. By alternating knits, purls, and also the formation of yarn overs (air loops that are obtained when the thread is thrown onto a knitting needle and knitted in the next row like the rest of the loops), original patterns are obtained. Garter and stocking stitches are considered the easiest to perform. These types of designs were once used in the most popular products - down scarves and stockings (hence the names). But even today, products knitted with scarf or stockinette stitch are in demand.

If you want to learn how to knit, then garter stitch with knitting needles, a pattern described below, is the best start. It is not for nothing that needlewomen, as already mentioned, used this design to make scarves. The pattern is an alternation of smooth and embossed, “scaly” rows. In the old days, this type of knitting was called “ruffle”, “beds” or “rope”. Garter stitch has a number of advantages compared to other patterns:
- holds its shape well, does not stretch;
- adds the volume necessary for knitted items to the finished product;
- does not deform (the hinges do not move or move apart);
- does not curl the edges of the product;
- is an excellent background for more complex drawings.
So, to understand the basics of knitting you will need:
- knitting needles No. 5 (thickness corresponding to this number allows you to knit fairly large loops and avoid pulling the yarn);
- any yarn of medium thickness (acrylic threads are more suitable for beginners, as they do not tangle and are elastic in work).
The execution of a garter stitch pattern is as follows:
- For the prototype, we cast on 20 loops plus two edge loops - they make the edges of the product neat and even.
- We knit the first row. Having grabbed the back side of the loop from the left with the right knitting needle, we pull the thread through it, which is located loosely draped over the index finger of the left hand, and form a new loop. This classic way knitting facial loops.
- We knit the second row in the same way, but now we always grab the loop from the left knitting needle not from the back, but from the front, so that the pattern does not twist. This method of tying loops is called “grandmother’s”.
- We knit 10 rows and secure the pattern with a hook.

This method takes facial loops as a basis - the pattern turns out smooth. If you knit on circular needles, make sure that the base of the loop does not twist. To do this, remove it from the knitting needle and turn it in the “right” direction.
There is another way in which you can knit a scarf fabric. Purl loops are used for this. That is, the thread is brought out through the leading edge of the loop on the left knitting needle. Then the product will have a looser, wavy structure. For some needlewomen, this method of garter stitch seems more convenient, since even and odd rows are knitted identically, which can be seen, for example, in a video about garter stitch with knitting needles.
In any case, the fabric knitted using the garter method is one-sided: it does not have a “face” or a back, which is why it was used for knitting shawls and scarves. Currently, this pattern is used to create scarves, snoots, hats or pullovers. By placing the pattern vertically, you can lengthen the silhouette of the finished product and, moreover, not be afraid that over time it will stretch and become excessively wide.


If you want to learn the basics of stockinette knitting, the diagram and description will help you with this. This pattern is one-sided, that is, it has a “face” and a back. One side (front) is knitted with knit stitches and looks like dense rows of spikelets, and the second side is knitted with purl stitches. In this case, the wrong side turns out to be a scarf, only the relief is denser and smaller.
Previously, stockings and socks were knitted with this pattern. Nowadays, the elementary pattern is used as the basis for raised patterns, embroidery or appliqué on women's, men's or children's sweaters, hats, mittens or vests. Products knitted with stocking stitch are distinguished by elasticity, density and smoothness.
Stockinette stitch is also called stockinette stitch. To get a really smooth finish, you need to practice a little. Knitting stockinette stitch requires, first of all, the ability to adjust the size of the stitches. To do this, you should choose the right thread - the thicker it is, the easier it is to handle the pattern. The thickness of the knitting needles is selected in accordance with the quality of the thread. Circular knitting needles can also be used. In this case, unlike garter stitch, you do not have to change the direction of the loops. For a training sample we take:
- knitting needles No. 5 thick;
- medium thickness yarn (not too fluffy).
- We cast on 20 loops and two edge stitches. Unlike stockinette stitch, stockinette stitch tends to curl at the edges. That's why ready product definitely needs to be steamed.
- We knit the first row as purl loops - then the edge will not curl into a tube, causing inconvenience in further work.
- We will knit the second row with facial loops. We monitor the uniformity of pulling the loops.
- The knitting pattern consists of alternating rows of two types of loops.
- Having knitted 20 rows, close the loops with a hook and evaluate the result.

If you want the knitting to be more dense, you can knit the loops using the “grandmother’s” method.


