Every girl dreams of being a fairy princess. And every mother makes her childhood dreams come true in clothes for her daughter.
The technology of sewing a dress for a little princess will help turn dreams into reality. Looking at a girl in a dress with a huge number of flounces, the first question that arises is, how is this done? So let's start with the most interesting thing, with the highlight of this dress - the skirt.
Materials
Organza - 7.00 m with a width of 3.00 m.
Elegant dress fabric for a 6-blade skirt. The amount depends on the child’s age, height and fullness. Calculate the fabric consumption according to the pattern yourself.
We are building a six-piece skirt. Something like this! FROM:6+2 for assembly
For a girl, Height = 116 cm, OG = 57 cm, OT = 55 cm, the dimensions of one wedge are as follows: top arc length 16 cm, bottom arc length 68 cm, length = 70 cm.


Ruffles will be sewn to each wedge of the skirt.
In the drawings, the lines and the corresponding shuttlecocks are marked in different colors to make the material more visual.
One wedge needs to be drawn in accordance with the drawing. Draw a green line 9 cm from the bottom of the skirt. Horizontal lower flounces are sewn to the green line. In further drawings they will be called green shuttlecocks.
Draw 15 radial lines on one wedge, starting from the green line. Reduce 8 lines by moving 16 cm from the top of the wedge (red lines). Draw the remaining lines in blue.
Vertical flounces will be sewn to the blue and red lines. In the future they will be called blue and red shuttlecocks.
If you want to make the number of shuttlecocks less than on the original, divide the wedge into fewer segments. Or make the wedge itself smaller at the bottom and reduce the number of lines for sewing on the flounces.
CONSTRUCTION OF SHUTTERS:

Shuttlecocks are circles with different inner radii. The width of all shuttlecocks is the same - 10 cm. The circle must be cut in one place along the shared thread. The flounce is sewn onto the inner line of the circle.
Circumference of inner circle = length of corresponding line.
. Measure the red line on the wedge drawing; this is the length of the shuttlecock's inner circumference.
We calculate it using the formula CIRCLE LENGTH= 2пR, Where n=3.14, from here 6R=line length,Means
R= Line length:6
Calculate the inner radius of the red shuttlecock. The outer radius will be 10 cm larger. One red shuttlecock is sewn onto one red line.
. Measure the blue line on the drawing. Divide the result by 2. This will be the length of the inner circumference of the blue shuttlecock. Calculate the radius. Blue flounces are joined together in twos, and two joined flounces are sewn onto one blue line.
. Measure the green line on the drawing, divide by two. This will be the circumference of the green shuttlecock. Calculate the inner radius. The green flounces are all joined together and sewn onto the green line after the skirt is sewn and all the vertical flounces are sewn onto it.
. Cut 6 skirt wedges. Sew a skirt.

Hem the skirt using a narrow straight stitch.
Cut out all the flounces. In total you will get: blue shuttlecocks - 96, red - 48, green - 12. Join two blue shuttlecocks into one. Dock all the green shuttlecocks together. Finish the outer edges of the flounces with a rolled seam on an overlocker. Use a regular overlock stitch to finish the inner arcs of the flounces.

When processing, fold the flounces in separate piles so as not to get confused later on which line to sew them to. Make notes on the piles: blue, red, green.
We pin along the markings and adjust.
Sew all vertical flounces to their corresponding lines. After this, sew a strip of ruffles to the green horizontal line.

Since the sewing lines are different in size, the radii of the flounces are different.
Therefore, I calculated the internal radii of the flounces depending on the length of the line to which they will be sewn.
Construction of the bodice. Like that!

Materials
Dress fabric 0.3 - 0.8 m with a width of 1.40 m. Fabric consumption depends on the age of the child. For size 116 it took 0.3 m.
. Lining fabric for the bodice of the dress is 0.5 m with a width of 1.40 m.
. Guipure fabric with clearly legible fragments or individual embroidered fragments.
Regilin or spiral bones - 4 pieces: 2x20 cm, 2x16.5 cm in the side and reliefs of the shelf, 4 plastic bones in the bar with eyelets of 14 cm.
Paints for touching up fragments, if you haven’t found them suitable color fabric, zipper, eyelets, lace, beads, crystals.
Bodice assembly technology
. Duplicate the details of the bodice with woven adhesive.
. Sew the bodice details. Naturally, for a child, the dress is made to grow, so do not forget to allow allowance under the lacing. In this model it is 7 cm in total for both halves.
. Cut out fragments from guipure fabric.
Disney princesses have been winning the hearts of girls of all ages for generations. Cinderella's costume is happily worn by one-year-old babies for their first photo shoot, by 5-year-old beauties at a kindergarten matinee, and even by adult ladies. Of course, demand creates supply and many stores offer their own vision of this outfit. But you can make a Cinderella costume with your own hands - its complexity and cost can vary greatly, depending on your goals, budget and skills. We will look at several different options, each of which is good in its own way.
Simple Cinderella costume for girls
Are you having trouble with sewing? It doesn’t matter, because without a single stitch you can make a charming Cinderella costume. Photo of this outfit:
You will need:
- 14 m of blue and 5 m of white tulle;
- elastic openwork headband for hair;
- beautiful hair clip;
- scissors;
- children's crown.

How to make such a costume?
The sequence of actions is as follows:
- Cut the tulle into strips 15 cm wide.
- The hairband is the bodice of the dress. You need to make a fluffy skirt from it. For this fabric blue color fold it in half, pull the resulting loop through the hole at the bottom of the bandage, then thread it through long end tulle tape, thereby securely fixing it. Repeat this step until the skirt gains volume and fullness.
- Similarly, make 2 wide straps of the required length from white fabric, but fastening them at the top
- Then cover the base of the bodice with tulle. To do this, put the dress on the child and wrap the white fabric around the chest so that it does not fit too tightly, but does not fall off. Tie it in a knot at the back and secure it with a hair clip at the front.
- All you have to do is add the crown, and your cute Cinderella costume is ready.
For older girls
This outfit is easy to adapt to different ages child. For example, this Cinderella costume for a girl is made according to the same principle, but with minor changes:

So, for the bodice you will have to buy separately elastic openwork fabric, sew brooches-decorations to the base of the dress and, to complement the look, make an elegant black necklace (measure satin ribbon desired length and sew Velcro on the ends).
To make the skirt even more beautiful, you can use tulle in several shades of blue, with sparkles or sequins.

Need to make it smart new Year costume Cinderella? Work out the top of the dress more carefully: take shiny fabric for it, decorate it with silver braid, and make bows and straps from satin ribbons.

From tulle, add fluffy wide straps on the shoulders and decorations going from the waist to the skirt. A crown, white or blue gloves and transparent silicone shoes - your baby's look will be flawless.

Painstaking work
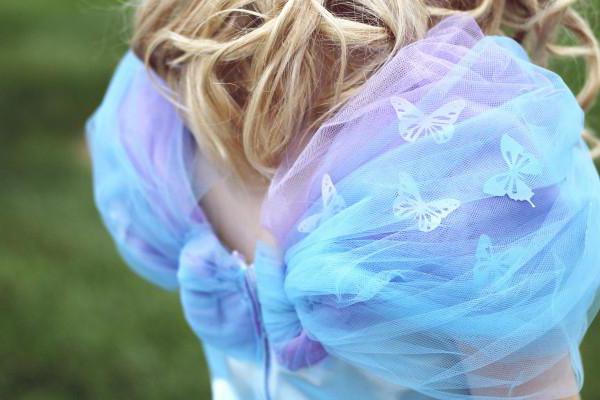
The 2015 Disney film set new standards for dressing one of its most popular princesses. in delicate shades of blue and purple- this is what it looks like modern suit Cinderellas. Photo of a luxurious outfit that will help you better navigate when creating your masterpiece:

Obviously, it won the hearts of many girls, so this particular version of the dress - with a fluffy multi-layered skirt with complex tints of color and a collar with butterflies - became especially widespread and popular.
If you have basic cutting and sewing skills, then you will get a beautiful Cinderella carnival costume that will look no worse than one from the store.

To work you will need:
- 2.3 m of thick blue fabric;
- 0.5 m of white cotton fabric;
- 0.5 m of adhesive interlining;
- 6.5 m of blue tulle;
- 1 m of light lilac tulle;
- 0.5 m sew-on Velcro fastener;
- 2 m wide elastic band;
- ready-made butterflies or beautiful paper for their manufacture;
- sewing machine and others (threads, scissors, needles, etc.).
Exact values
To correctly calculate the amount of fabric, you need to start from the child’s parameters. The above numbers were taken for a girl with the measurements:

Operating procedure
This Cinderella costume consists of two independent parts that you can use with other things to create different elegant looks. So, let's make the top part:
Bottom of the dress
We make a fluffy skirt that will come in handy for the little princess more than once. Here the work also consists of two stages:
- We make an underskirt from blue fabric. To do this, we cut out a rectangle with a length equal to measurement No. 4 (the length of the skirt from the waist to the feet), and to determine the width you need to multiply the waist circumference by 2. Don’t forget the seam allowance. In addition, when determining the length, keep in mind that the edge of the skirt should be completely hidden under the bodice of the dress and not jump out when moving. Therefore, the waist should be slightly high.
- We cut off a piece of wide elastic so that it sits loosely on the waistband with a slight stretch (so that the dress does not immediately become too small and lasts longer).
- We process the lower edge of the skirt and sew it along the height. And on top we make a drawstring, wide enough to thread the elastic through. We insert it and sew the edges.
- Now we make a tulle skirt. To do this, we simply sew it to the elastic, at the same time stretching it and gathering the tulle so that it does not tear in the sock.

This makes for a very versatile Cinderella costume. Skirts can be used both together and separately. The top can be changed and you will get an outfit for Elsa or a fairy - the little princess will be delighted with such scope for imagination.
I decided to use the same great shape as this knit dress.....without the sleeves and without the gather under the bib section.
I measured my little girl, and realized that I wanted a dress that was 31 inches long, from the shoulder to the very bottom of the dress. I also decided where I wanted the seam at the waist to hit it (for reference - another dress with a waist seam if you're not sure) and measured that the bodice would need to be 10 1/2 inches, from the top of the shoulder down to waist.
So I folded the dress in half, picking up at the armpit area and continuing throughout the top bodice of the dress. I was tracing to do the front bodice piece first, so I did this piece with a bead front neck line, but subtracted the sleeves.
I then used this paper guide to cut out a portion of this stretch knit fabric fold that created the entire front shape once it was opened. Make sure that if you are using one side of the stretch knit that the stretch is width-wise and will stretch across the body and not up and down.
(**I used this stretchy knit for the bodice section so it would stretch it out and allow my daughter to wear it longer. Also, I wanted it to fit while cutting her to a larger size, resting her back against her body rather than using a more restrictive satin for the bodice like I used for the skirt section. But that's up to you.)
I cut my entire piece to fold, adding 1/2″ along the top and sides for seam allowance......and added another two inches to the bottom because my paper template wasn't tall enough and I was too lazy to tape the paper to make it bigger. (I could have created a larger piece of the pattern from the start that was internet allowance and the correct length, but again, I was too lazy. But you choose what you like.)
I then used my front piece, which I kept folded in half, as a guide for the 2 back pieces.....so don't cut the fold this time. We will do something back with Velcro.....ideal for little ones to get in and out by themselves.
The 2 back pieces should be cut exactly the same size except to add a centimeter and a half to the center and back, making the lines of the neck and above. Refer to your original shirt to see the slope of the neck, at the back if necessary.
Now you have 3 main bodice parts: front and back 2 pieces.
Now to make the silver center on the front of the dress, I just cut a rectangle out of this shiny silver suit-y material (synthetic fabric of some kind.....don't know what it is, I haven't looked), wide as I wanted it to the conical bottom and then turn it down to the top. I had a lot, so I was ready to clear the mess up and cut a new one.....but create a paper template first if necessary. Then I tucked under each rib, ironed, centered on the front of the bodice, held it down.........
Then sew along each side.
I then trim the excess along the top, following the shape of the bodice below.
I then used some silver trim that I found at the fabric store, and with one continuous line, created 3 zig zag lines at the bottom center. I made sure to start an inch from the top and an inch from the bottom......because of the seam allowance later. I then sewed to trim the bodice from the right side down. (Hint: Use longer stitch lengths to sew a more bulky trim. This may help if your needle is jamming all that fabric.)
Then with another continuous line, created another "Zig Zag"......giving it that crossed over and pulled into the bodice look with trim. Sew this piece into place.
Then cut two pieces of trim that are long enough for both sides of the silver section and sew in place along each side. Trim off excess trim.
Then place the front bodice piece down as a guide as you laid two back pieces on top, picking up the sides, bottom and two shoulders. Overlap two center seams and pin. This is how far the fold is - more you will need to keep the bodice of the dress in the correct proportion.
Sew Velcro along both edges back to the center of the seam, keeping the same fold-to-fold proportions.
Next, place the front bodice piece together with the back bodice pieces with right sides facing each other. Sew along the top of each shoulder.....using a "zig zag" or serger stitch (like I did) to stretch the knit. Use a 1/2 inch seam allowance.
Then, sew along each side of the bodice section "attaching the front to the back. In this direction, since there is no stretch in the fabric, I just used straight stitches.....because I don't have to allow any stretch. What's the point?
**And this is where I am a creature of habit. I know it's easier to create the tops by leaving the bodice open at the sides, attaching the sleeves to the bodice, and then sewing along the sides, bodice and sleeves. I do what if I remember. But when I'm winging and don't follow the pattern of the pieces I created.........I make the whole bodice, and then make sure the bodice fits, or take it out if necessary, and then cut it out of the sleeve, that can fit into the hand hole. I know it's a must take, my mom and grandma are sick (they are more precision driven seamstresses) but sometimes I just want a quick top, I don't have a pattern, and need to make the bodice and then make the sleeves to match. This way I only adjust the bodice once if necessary and don't have to adjust the sleeve. Not crazy and there is no point in talking?????? Maybe not. But it is carried over into my textbooks many times. But if you have planned ahead of the pattern pieces and cut out the sleeves, attach the open sleeves to the bodice before sewing in all directions......then sew along the sides in one complete cycle. Ew. I had to explain my madness. :)
And once again, my habit has taken me this way once again. So the sleeve after the bodice was already sewn together.....although it was all cut out and ready to be connected. OK then.
Okay, if you had never made puffed sleeves before this shape, if it is. This is the form short sleeve and will gather at the top and a little at the bottom - a strip of the hole in the hand. (In this case, using a store-bought template in the past helps with pattern-making experience a bit. Just to know what the things that come with look like.) But even if you've never made a sleeve puff, you can still give this a try with some scrap fabrics. But I measure my small girl's arm and decided that 8 1/2 inches around would fit comfortably with a loose band around her bicep area. So I made this puff sleeve shape that was about 12 inches wide to allow for an allowance and give the bottom of the sleeve some gathers too......and then the top curve on the sleeve shape would automatically give the sleeve a puffier gather at the shoulder. If you want plumper, increase the width and round shape at the top.
I cut 2 sleeves of the shapes the same size and two groups that were 3 x 9 1/2 inches. including enough for seam allowance....don't forget.) It's satin material.....beautiful and perfect for Cinderella sleeves.
I then basted a seam along the top slope of the sleeve, starting and stopping about 2 inches on each side. I also basted a seam along the bottom, which was about 5cm long, centered on the bottom right. (Need help gathering and basting stitches? Click the button here.)
Then a pin band (which is folded in half legthwise) at each end of the sleeve. The band is shorter because you will have to gather the sleeve to match it. Pin right sides together and match the raw edges.
Then begin to pull at the top of the stitch basting and gather the bottom edge of the sleeve. Then pin the sleeve to the group. Make sure you are securing the raw edges of the strip, not the folded edge.
Then stitch along the raw edge with a 1/2″ seam allowance. Then zig zag or use some finishing stitch to seal the edges.
Then open it and Iron Orchestra.
Then fold the sleeves in half on the right side together and sew along the inside edge with a 1/2 inch seam allowance. Then Zig Zag to finish him off. (Or, if you attach your sleeves and bodice first......skip this step and attach the sleeve to reveal the open bodice. I'm not a creature of habit what I explained above. Ha.)
If you do it my way, turn the bodice and sleeves inside out and to the right and insert each of the sleeves into the arm opening of the bodice, picking up the side seam of the bodice with the side seam of the sleeves. Then gather the top sleeves enough to allow a perfect fit inside the arm opening of the bodice. Make sure to pin the sleeves and bodice with right sides facing each other.
Then, using a 1/2" seam allowance, sew around the arm opening......making sure to match the raw edges, slowly stitch them together.
Then sew a zigzag stitch and finish with raw edges. Then cut off the excess.
Turn the bodice right side, fold the raw edges over the sleeve to the side of the bodice and top stitch around the arm holes......but on the side of the bodice, grabbing the raw edges of the sleeve that is underneath as you go. (This step is optional.....you don't have to do it. But if not, then try to at least iron this flat seam as best as possible so it looks more finished.)
Now on the neckline. Measure around the neck to see how much fabric you'll need, then add a few inches in length so you can belly up at each end of the back neckline. How wide you make your neckline is up to you, but I cut strips 1 1/2″ wide.....they give me 1/2″ wide neckline after folding it in half and sewing. (After folding it in half, I used a 1/4″ seam allowance to fit it into the bodice neckline.)
Cut strips of fabric into bias (diagonally) to allow every right rest and curve as you stitch it around the neck. If you're not sure what bias is or why it's better to cut out steps like this, read this link.
What I did was fold the strip in half lengthwise (with the right side of the fabric facing out) and lined up the long raw edges with the raw edge of the neckline and held them together with the fold pointing down.....attaching the strip to the front side neckline of the bodice. I left at least an inch on each end to fold in the end. And as you secure, pull out the strip, just a little bit more of the neckline, and then by turning it, it will help with the shape of finishing the neckline. Then stitch along the raw edges using a 1/4″ seam allowance.
Then fold the strips, iron flat with raw edges due point down, and then top-stitch along the front of the neck, just under the seam.
Here's a view from the back of the neckline, with the raw edges folded over and secured in place from the top stitching you made to the front.
At each end, trim each loose end about 1/2 inch.
Then once for 1/4 inch, then another 1/4 inch, and line it with the rest of the edge of the opening dress.
Sew this folded sheet directly into place.
On the skirt part on the dress.
First, we're going to make those fluffy side flaps that Cinderella has on her dress. What are those things......who knows? But here's my best attempt at making them.
I first "cut" a piece of white satin that was about 23 x 23 inches.
Then I folded it in half...
I then cut the top corners into a rounded shape, making sure the crease didn't cut through.
Basically making a circle if you open it up.
I then folded the circle back, in half, with the right side of the fabric facing out (shiny satin side out), and then basted a seam along the outer perimeter of the curve, 1/2″ from the edge.
(Need help gathering and basting stitches? Click the button here.)
Then, as you pull the thread through and gather it into a circle, it stretches the fabric, creating a gathered shape.
Grab the bodice piece of velcro across the back closed, and line up the raw edge of the side piece with the raw edge of the bodice on one side. Collection and pin code.
Then cut and assemble another piece satin fabric, and secure it to the other side of the bodice. When joining each side of the flap of the dress, leaving a gap in the front of the dress and back........keeping each swipe larger on the sides and not meeting the front or back. That's just how Cinderella looks in a dress in all Disney pictures.
Then set it aside while you assemble the rest of the skirt section.
For my dress, I cut two pieces that were 45 inches by 24 inches.
I then sewed the two pieces together and each 24″ side, right side together. Use a 1/2 inch seam allowance. Then sew another stitch or zigzag stitch and seal with raw edges.
Then sew a basting seam along the top edge of the front skirt, and then another basting seam along the top edge of the back skirt......using a 1/2 inch seam allowance.
Pull the top thread along the front and then along the back and secure at the top of the dress section until it is the same width as the bottom of the bodice. Pin it evenly in place. The easiest way is to turn the skirt inside out then slide down the bodice inside it.....but on the right side. Make sure the flap is up and to the side, swept toward the neckline as you glued in the skirt section.
Then stitch along these raw edges, using a 1/2″ seam allowance, removing pins as you go. Then sew "Zig-zag" and seal with raw edges. Trim off excess fabric.
Now turn the dress on the right side and make sure everything is folded correctly.
Then to the hem of the bottom, making sure that you like the length.
2.
3.
4.
5.
6.
7.
8.
9.
10.
11.
12.
13.
14.
15.
16.
17.
18.
19.
20.
21.
22.
23.
24.
25.
26.
27.
28.
29.
30.
31.
32.
33.
34.
35.
36.
37.
38.
39.
40.
41.
42.
43.
44.
45.
46.
47.
48.
49.
50.
51.
52.
53.
54.
55.
56.
57.
58.
59.
60.
61.
62.
63.
Another master class on Cinderella's dress.
The last few years, Halloween has become something that has passed by. I would dress the girls, and last year we even took them trick or treating to a few houses, but they didn't really get it. When I explained to Kyah that Halloween was a few months ago, she decided without any hesitation that she wanted to be Cinderella.
I knew that I wanted to make a dress for her - because I wanted something that would stand up to all the dancing, twirling, and acting that she would endure. I knew that the Costco version was already dying, just not until the end of the season.
Finally, I sat down and came up with an idea that would be comfortable and fun - and make my little princess feel just like Cinderella. The ruffled bodice does just that - increases flexibility and stretch so much that it will play with it, even grow with it - and is sturdy yet elegant enough to be fit for Cinderella.
Want to make a Belle dress?
Bodice Template
First, we need to create the bodice pattern. You can use shafts to suit the size you need, or create your own.
To create your own, find a shirt or dress that matches your princess well. Lay it out on a piece of paper and mark it with these six points.
Then connect the dots - and once at the two central points.
Fold in half and cut around the template. Cut two pieces of the picture - one for the front panel, one for the back.
For the back, draw a horizontal line at the bottom of the neck line (1), then take two vertical lines, dividing the bodice into thirds, approximately (2). Then, connect the intersection of these two lines diagonally to the inner shoulder area (3).
Cut along vertical and diagonal lines like this.
Now, for the front. This time, draw a horizontal line 1-2 inches below the neck line, and a diagonal line connecting the inner shoulder to the bottom of the bodice. Just an eyeball and that's all that looks good to you.
Cut along both lines.
After I created my picture, I decided that I wanted the bodice to be a little shorter - hitting the high waist. I ended up cutting a few inches from the bottom of my template. Make sure you rate your template and customize it however you like.
Make a template. So let's start sewing.
Bodice Sides
Use your template to cut out the bodice pieces. You will need two pieces (opposite each other), so your front and lining fabric, so 4 pieces. I used the same fabrics for both.
If you've created your own pattern, place side seams together to create one piece like this - and cut about a quarter to a half inch on the outside for the seam allowance.
If you are using my pattern, the seam allowance has already been added just cut along the dotted lines. (Outside the line dress for Cinderella, inside the line for Belle)
Now - it's time to finally turn around in the car! WITH right side, fold each piece in half and stitch or serge at the shoulder seam.
Corrugation
Next, you will be able to make your bodice mid-piece by crimping a long rectangle of fabric using rows of stitched rubber thread. These pieces will be what makes the dress so comfortable that it allows it to move and stretch easily.
Take both the back of the middle and front of the picture and lay them side by side, with a little wiggle room between them. Cut a rectangle of fabric equal to their height, plus two inches, and three times their width. (If you are using very thin fabric - use up to four times their width.)
For example, for a 2T pattern, the pieces are about 8.5 inches tall, and 9 inches wide side-by-side. So, I cut a piece of fabric that was 10.5 inches tall and 27 inches wide.
Start by hamming the fabric along its entire length. I'm using a serged edge, but you can also use a zigzag stitch.
Now, the fun part begins by winding your elastic thread into empty spools. I know a lot of people do this by hand, but I would like to use my machine to help me. I hold the elastic thread on a pencil, and guide the tension and direction with my hand, while my machine spins the bobbin. Make sure you don't wind it too tight if you want a little tension in the left thread.
Pop the elastic thread in your machine and run a hand stitch through so that you can pull the elastic thread through the bottom. Set of cars, her long length stitch. Iron hem the edge of the fabric back about halfway, and sew your first row, hem side down - about a quarter inch from the top, so it looks like this...
Sew the second row with the hem edge folded over, just so you don't accidentally stitch it again, about 1/4 - 1/3 inch under the first row.
Here's what the back will look like after the second line.
Continue sewing rows of elastic thread down the entire piece of fabric. After the 5th-6th row the fabric will really start to accordion - make sure you gently stretch the fabric both from the front and back so it feeds the TV from under your feet. Don't worry if your lines differ a bit in distance - you'll never know once you're done!
Immediately the entire piece was sewn (phew!), use your iron with steam rubber thread. Rather than ironing back and forth, just lightly press the iron down onto the fabric, giving it a good amount of steam as you go. The pair will help provide elastic compression and give it even more stretch.
Attaching Leaf Front
Now you will attach the bodice sides to the center sections. First, you will attach the front. Place a piece of tissue paper (I used two sheets), or tear-off stabilizer with reverse side corrugated fabric, then place the template for the front bodice section on top, aligning both top edges (the wide end of the template is the hemmed edge of the pleated fabric.) This ensures that your good diagonals stay diagonal, and don't stretch out of position.
Straight stitch around the pattern, both through the fabric and fabric with about a quarter inch seam allowance (if you use my pattern or your own). Then, trim around the stitch, about another inch switch.
Match your bodice side pieces so that the left front and left lining pieces match, as well as the right front and right lining pieces. Remember how the lining and front pieces will meet with the wrong sides together, or right sides facing each other.
Take one side - it doesn't matter which, and lay out your lining fabric right side up. Place your middle bodice section along the front edge (diagonal side) right side up, lining up the edges.
Then, take the front piece, and place the right side down on top, like the pieces are written along the diagonal edge and the bottom edge of the lining. Pin code.
Now, sew in a straight line where all three pieces meet. Do not continue to sew up the neck line. Just pound the corrugated middle piece for now.
Once you've finished on one side, water the other side of the bodice middle in place, repeating the same steps, only in reverse.
When you're done, fold it along the right side - it will look like this from the front.
And it's in the back.
Now let's put it back.
Attaching Bodice Back
Even if you cut a pattern for the back bodice, you don't really need it - other than for the manual. The bodice back is simply a rectangle - and can be easily adjusted to be larger or smaller, depending on how you want the dress to fit.
First, you will need to trim your remaining pleated fabric so the side edge is straight and perpendicular to the top edge. You can trim the bottom edge if you want to now - I just forgot mine.
Now, place the bodice with the front right side facing up. Then lay the pleated fabric, right side down, on top of the back edge, matching the top edge of the pleated fabric to slightly change the angle into your fabric.
Your corrugated fabric is now lying on top of the side piece with the lining. You intend to take a piece of the lining and bring it all the way through and around the other side of the bodice, and back onto the ruffled fabric top.
See how on the opposite side the pieces are folded inside? If you are not sure if you have placed the fabric correctly, carefully fold the piece inside out after you have pinned it where you think it should be, you will then be able to see if it is pinned in the appropriate section.
Now, pound along the edge, sewing only when all three pieces are satisfied, since you did it from the front edge.
After basted one side, fold the bodice to the right. Now you will need to trim the ruffled bodice back. You need to measure this on your little princess before sewing the other side so it fits perfectly. Or just use your template as a guide on how wide to trim it.
Repeating the same steps as before, water the other side in place.
Turn the back right side of the bodice to make sure everything is in place correctly. Tear off the paper or fabric stabilizer on the front. Now, we'll finish with two seams that go along the neckline and through the basted middle pieces.
Turn one side of the bodice inside out so that the right side is facing.
Sew or Serge along the entire seam.
Do the same on the other side. Turn the bodice to the right again.
Hand stitch trim if using, along the outer seams you simply sew along the neck.
You did it! Lif, done. Now - on the sleeves and skirt.
First, you will need to cut two sleeve pieces - I used sparkling white fabric. Adjust this template so that half of the sleeve width is approximately equal to the circumference of the bodice armhole. (Or whole, unfolded sleeves equal to twice the circumference.) Don't get too technical here, just use your best guess. You'll be picking up your sleeve quite a bit, so you'll never know the difference.
Once you have cut both sleeve pieces, fold each half with right sides facing each other, and stitch or serge along the inside edge.
Now, you will sew with a stitch, on your machine the long setting, along the folded edge of the sleeve, starting and stopping about an inch from the seam you just made. Make sure you leave a good tail of flow before and after stitching. Damn it, I forgot to take a photo - I hope this explains everything...
Pull the bottom thread to gather the sleeve. With the bodice inside out, fit the gathered edge of the sleeve into the armhole, making sure the seam is in line with the bottom of the armhole, and with the right side. Gather and pin in place, focusing on the gather in the upper half of the sleeve.
Sew or serge stitch into place. Repeat with the other sleeve.
Now, press down on the straight edge of the sleeve, just under a half-inch underneath, then another half-inch to create a double-folded hem. Sew along with the hem about a 3/8 inch allowance, starting and stopping just before the inseam in order to leave a slight gap for the insert elastic.
Measure the circumference of your princess's hand. Add 1-2 inches for comfort, and mark the length by a quarter-inch of elastic. Insert the elastic into the double hem, securing the end to the place you just marked (making sure it's not twisted inside).
Sew the elastic ends together using a zigzag stitch, with about a 1-inch overlap. Trim the long end of the elastic.
Paste all elastic loop back twice, hmm, and sew the gap of the hem closed. Repeat with the other sleeve.
Whoa! So close! Now, we just need to add the skirt.
For the Cinderella skirt, you want three layers of lining, tulle, and a top layer (I used glitter tulle).
Here are the dimensions that need to be cut, each of simple rectangles:
Lining: skirt length + 2 inches (for hem and seam - allowance) using 2x waist size.
Tulle: Skirt length + layout per inch (per allowance) using 10-20 times the waist size, depending on how full you want the skirt to be (I used 3 pieces of 18.5 inches (my skirt length + seam reserves) on 3 meters, almost 18 times the waist size - you can never have too much tulle!)
Top: Skirt length + 1 inch for hem and seam allowance using 3x waist size.
Phew! Once you have all the fabric cut, hem the bottom of any fabric that may be frightening. I sewed a double pleat onto the hem of my lining, and serged a rolled hem onto my top layer. The tulle is ok on the left with a raw edge. Your hemline simply depends on what you use. Adjust your lengths as needed.
From the right side together, sew along the length ( side seams) lining and then top layer and create two “tubes”.
Now its time to collect the tulle. My favorite way is to do this, on my serger, by running a different color of thread through my right needle. Serge along the top edge. Then pull out different colored threads to assemble it like this, it's as simple as that. You can also do this with a long straight stitch on your sewing machine. Same concept - I just love having pretty edges to go along with!
You can sew/serge each piece individually to gather, or stagger each layer to stop and start ends and in different places across the skirt. I staggered mine.
Your routing “pipe” is laid out on the right side. Now change and pin your gathered tulle so that it lies fairly evenly along the outside of the lining. Just an eyeball.
Using the same method, gather the top layer of the skirt and pin over the tulle.
Cut a piece of quarter-inch elastic the same size as the waist of your bodice, adding 1 inch to the overlap. The zigzag stitch is elastic closed, and pinned in eighths.
Pin the top three-layer skirt in eighths. Match up the elastic foams and skirt pins to spread the elastic evenly.
Carefully and slowly, embroider on the elastic to the skirt, stretching it as you sew, in order to bring it into line with the pins. Since you will have stretch and elasticity, the way you sew it is to use straight stitches. (If you are sewing elastic and NOT stretched, always use a "zig-zag" stitch).
I think I got a little overexcited, that I was almost done with the dress at this point, that I forgot to take a photo of this step. Basically, the end result will be a skirt gathered at the top with elastic. Easy enough. Place towards the skirt.
Now - make hip nuts. Yes, that's what we call them.
Hip Nuts
Cut out two circles - mine were 23 inches in diameter, mainly because of how much fabric I had. Make them larger or smaller, depending on the size of the dress and your preferences.
In addition, I cut out two circles (of the same size) from stiff tulle - this will give the hip nuts their shape. You could also line the mug interaction instead to the same effect.
Fold the fabric, tulle in half, tulle and inside, click the right side of the fabric out. Pin code.
Sew or Serge along the curved edge, bringing the layers into place.
Just under this stitch, hand stitch along the entire curve, gathering front and back about every ½ inch.
Pull one side of the hand stitch string you just made, and holding the other side, gather the edge and pin it in place along the bodice sides. Poof should start and stop before it reaches the corrugated fabric. Pin like crazy to keep the collects under control.
Carefully sew the poof into place. Make sure to use a heavy-duty needle and take your time. Repeat on the other side.
OK. This is getting exciting. Almost done!
Attachment Skirt
Flip the nuts over so they point up and enclose the bodice. Turn the skirt inside out, then pull up the bodice and nuts inside (upside down so the waist seams match) so that the right sides are facing. Because the elastic was cut under the bodice, it should line up quite nicely. Match the seam of the top layer of the skirt to either the side or back of the dress.
Pin the skirt to the bodice first securing the front and back ruffled sections, then the sides. If you find yourself needing to stretch the elastic a little to fit correctly, make sure you do it on the sides, with no more crimping. You want to make sure the corrugated ones have as many sections stretch as possible towards them.
On this moment, the sides will be super thick hands Baste them in place, don't even try to use pins.
Very, very carefully and with a (super) heavy-duty needle, seam the skirt to the bodice with a straight stitch right on the elastic. When you get to the crimped sections, either switch to a zigzag stitch, or make sure to stretch and spring as you go.
DO NOT try this seam Serge. Depending on the strength of your sewing machine and the quality of your needle, you may even have to just hand stitch the entire seam in place. If your sewing machine isn't cooperating, grab a needle and thread.
125.
126.
127.
128.
129.
130.
131.
132.
133.
134.
135.
136.
137.
138.
139.
140.
141.
142.
143.
144.
145.
146.
147.
148.
149.
150.
151.
152.
153.
154.
155.
156.
157.
158.
159.
160.
161.
162.
163.
164.
165.
166.
167.
168.
169.
170.
171.
172.
173.
174.
175.
176.
177.
178.
179.
180.
181.
182.
183.
184.
185.
Many of us at least once in our lives wanted to come to a carnival in our own, unique and inimitable costume, an exact copy of which you will never meet...
How to make a Cinderella costume with your own hands
From Masterweb
09.05.2017 15:26Many of us, at least once in our lives, wanted to come to a carnival in our own, unique and inimitable costume, an exact copy of which you would never see in the crowd. You can't buy one like this in a store. But what to do if you don’t know how to sew at all and get confused in patterns, threads and pins? Of course, you can order a suit from a master, or you can create it yourself, without even touching sewing machine. Let's consider one of the simplest and most popular options - the costume of Cinderella, the charming Disney princess.
How to make a children's Cinderella outfit from an ordinary dress
A Cinderella costume for a girl is quite simple to make. If the young lady already has a light dress, then she will need to stock up on fabrics (satin, tulle, silk, organza are suitable), ribbons and braid, sparkles and rhinestones, beads and sequins. The fabric should be chosen to match the dress, but for the classic look of Disney's Cinderella, as a rule, blue and white colors. Wrap the fabric around the skirt of the dress and secure it with a wide ribbon at the waist. A bow neatly tied on the back will look very fabulous. It is important that the resulting skirt covers the legs, but does not restrict the girl’s movements. The finished costume can be decorated with beads, braid and other decorative elements.
How to make Cinderella's dress from scratch
If the girl does not have a suitable dress, then in order to create a New Year's Cinderella costume, a white or blue plain T-shirt, as well as a tutu skirt, will come in handy. You can take openwork fabric of the same color as the T-shirt, wrap it around the girl’s body and tie it with a bow on the back. To make the sleeves puffy, like a real Cinderella, you should cut out strips of tulle and carefully fasten them to the shoulders of the T-shirt.
By the way, if you don’t have a tutu skirt, then tulle will come in handy here too! You need to take a wide, dense sewing elastic band to match the suit and thin braid. Cut the tulle into about 50 wide strips, they should be twice the desired length of the skirt. Make a belt from an elastic band and fasten it, for example, around a can. Thread each strip of tulle into the elastic so that both free ends of the fabric are the same length. Use braid to tighten the tulle ribbons from above, just under the wide elastic band. When the belt is completely covered with fabric, all you have to do is straighten it. The skirt is ready! The resulting costume can also be decorated with beads or sequins.
How to make glass slippers
It is impossible to create a Cinderella costume with your own hands without glass slippers. You can replace them with silicone ones from the store, or you can make them yourself. To do this, you need to take the girl’s shoes and carefully wrap them in silver foil or soft cloth. Its edges should meet on the sole. Next, you should level the foil or fabric on the sole, apply silicone glue to it and glue the cardboard cut to the shape of the foot. You can decorate fairy shoes with bows from bouquets of flowers or gift packaging, glue ribbons, pieces of fabric or beads - whatever your imagination allows. After the carnival it will be quite easy to return the shoes to their normal appearance.
By the way, you can simply cover your shoes with sequins or beads, placing them close to each other. These shoes will look very fabulous and elegant, and will definitely please the young princess.
Choosing a hairstyle and jewelry
You need to complete your Cinderella costume with accessories and hairstyle. The easiest way is to curl your curls, decorating them with artificial flowers, ribbons or a tiara. Or you can do a high hairstyle, like Cinderella from the Disney cartoon. This is where the hair donut or sophist twist comes in handy.
First you need to comb your hair well, collect it in high ponytail and place a donut on its base. Then the hair should be evenly divided on all sides of the accessory and the “structure” should be secured at the base with a thin elastic band. Sticking strands can be tucked under a donut or wrapped around the resulting hairstyle. If the length allows, braid them.
For a sophistic twist, you also need to make a high ponytail, thread it through the slot of the hairpin and distribute the strands along its entire length. Next, you need to carefully twist your hair onto the accessory towards the back of your head. On the last turn, we connect the ends of the sophist twist at the top or bottom. We complete the look with a blue ribbon or headband. As a result, we get an almost 100% Cinderella costume. The photos offered in this article convey all the beauty of a fairy-tale costume.
And, of course, every princess needs jewelry. Silver bracelets, pendants, rings, brooches and earrings, or jewelry made to match this metal are best suited. Pearls, transparent or pale blue stones will look very beautiful. Can be used for decoration satin ribbons, tied around the neck or wrists. You can put it on your hands long gloves or mitts made of the same fabric as the dress.
Another Cinderella
Remembering Cinderella's costume, we always imagine her image at the ball. But this princess got her name from a simple dress smeared with ash. So why not try to reproduce it? To do this, we will need a not-so-new dress or sundress in a calm color: pink, brown, blue or green. On top you need to tie a white apron, which is easy to make yourself, for example, from an old sheet. We cut a strip of fabric from the same material and tie it on the head so that it holds the hair. Then the suit needs to be stained with “ash”. To do this, you need to paint an ordinary dish sponge with a black marker and stain your clothes with it. Traces of ash can be made on the girl’s face, but for this it is better to use an eye or eyebrow pencil. Regular shoes without decor or ballet flats will go well with this dress. However, you can also leave the glass slippers, as if Cinderella had just returned from the ball.
Cinderella costume for adults
Carnivals are loved not only by children, but also by adults. Therefore, the Cinderella costume will be an excellent option for girls. It can be made in the same way as for children, but there are several differences. For example, instead of a T-shirt to create a dress, you can use a corset or simply wrap the body with fabric, leaving the shoulders bare. In addition, you need to pay attention to your makeup: it should never be too bright. An excellent option would be the now popular natural make-up: ideal skin tone with a neat blush, soft pink lips, light beige, smoky gray or pale pink shadows, tinted eyelashes and natural eyebrows.
Kievyan Street, 16 0016 Armenia, Yerevan +374 11 233 255

Recommendations for choosing fabrics and accessories
For the costume you will need: blue satin, translucent fabric with pale blue lurex, highly elastic buttery knitwear in blue, padding polyester, rigilin, tulle, zipper, white braid with scallops, sequins, glass beads, beads.
Description of work
Dress.
Find a dress pattern in any fashion magazine, cut at the waist, with sleeves.
Modeling. Cut off a part from the middle part of the shelf, greatly increase it in height, maintaining the contour of the bottom and top (see Fig. 1). Cut two side parts from satin. The inner part (with a fold) is cut from fabric with lurex. Drape (gather) to the original length, stitch. Place a stitch in the middle of the drapery.
Change the sleeve pattern as shown in Fig. 2. Cut out 2 parts, stitch along the outer edge.

Sew a similar piece from tulle (for volume), fold it together, and sew into the armhole. Cut a satin skirt like a one-and-a-half or double sun. We also cut out 4 pieces from fabric with lurex that looked like a tangerine slice. It is necessary to take into account that along the line of stitching to the bodice the part should be tightly gathered. Sew the parts along the outer edge. Sew a similar piece from tulle (for volume), fold it together, and baste it to the shelf. Then stitch together with the skirt panels. The dress is fastened with a zipper in the back seam. Embroider the neckline and front edge with sequins. Also embroider the draped part with sequins, glass beads, and beads.
Petticoat.
Cut an A-line skirt from the lining fabric. Sew strips of rigilin into rings. The bottom of the skirt is equal to the circumference of the largest ring. Try on the skirt and determine at what height you need to sew additional rings so that the panel does not sag in the area from the waist to the bottom. Decorate the bottom of the skirt with white braid with scallops. On top of this petticoat It is advisable to add another skirt, made from tulle according to the sun pattern.
Headband.
Sew a strip on your head from highly elastic knitwear. Wrap the remaining fabric around the hairstyle (hair should be gathered in a bun).
Gloves.
Sew gloves from highly elastic knitwear. Because The fabric stretches well, you can sew gloves at once without additional parts for the inside of the fingers. Gloves should fit snugly on your hand. For better fixation It is advisable to insert an elastic band.
Shoes.
Choose “silver” shoes or cover ordinary shoes with fabric, decorate with sequins, bugles, and beads.
From the archive of photo competitions.


