DIY traffic light for children can be a great opportunity to master the technique of creation - mosaics, gently repeating the main rules of the passage through the roadway.
Various materials can be used as mosaic elements: plasticine balls, egg shell fragments, transparent self-adhesive film, dried flower petals or tree leaves. If necessary, they are easily painted in the right colors after gluing. But the do-it-yourself traffic light craft is most simply made from paper of suitable shades - green, yellow or orange and red.
The simplest and most visual aid for learning the rules of the road. We make a stick out of brown cardboard. We seal it between two sheets of black cardboard. Glue the colored circles.

Look at the video how to make a traffic light with your own hands for kindergarten.
Cardboard box traffic light
Another great traffic light can come from cardboard boxes. Elongated rectangular boxes are best. Trim the top of the cardboard box.

We paint the box with black paint or wrap it with black paper.

Glue circles on one side of the box to the color of the traffic light: red, yellow and green.

We will play with this traffic light, so we needed to make a handle for it. To do this, we made holes in the sides of the box, and tied a rope to the bottom.

For traffic lights, you can make a stand out of a cardboard roll and box. It will turn out a very visual aid.

From a cardboard roll glued with colored paper and black paper, a very interesting “moving” traffic light is obtained.

We paint the cardboard roll black or wrap it with black paper. Glue a yellow, red and green circle on it. We connect two black sheets of paper with a stapler, in one of which three holes are made.


Traffic light with moving parts made of paper
A very visual aid for studying the rules of the road is a traffic light with moving parts. In the inside of the craft are three colors - red, yellow and green. Double folded black cardboard connects to black circles with a movable handle. Using the pen, we can close the colors that we do not need at the moment.
For example, a traffic light “shows” a red color.

And so the traffic light “shows” yellow.

Traffic light from jars of yogurt
A funny traffic light can be made from colored jars of yogurt. Jars are glued onto thick cardboard. You can make over the jars of "roof" of colored paper.

Now the children will be able to repeat the rules of the road without leaving the borders of their own apartment.
See how easy it is to make traffic lights and traffic signs:
Begin in kindergarten. The first thing children learn is the meaning of traffic signals. Children should know that they must stand at the red traffic light and wait for the cars to pass. A yellow light indicates “Caution! Get ready! ” And only on a green light can you cross the street. To help children better learn the material studied, educators conduct a series of classes on this topic. Education in kindergarten takes place in a playful way, so sometimes you have to do it for kindergarten. Many parents are lost and do not know what to do and where to start. Our article presents five different options for making such crafts. Let's consider them in more detail.
The easiest instance
The easiest way to make a traffic light on thick cardboard or fiberboard. First, a rectangle is cut out, pasted with black paper on all sides. You can buy self-adhesive the right colors. Then it will be much easier to make a traffic light with your own hands for a kindergarten, and the finished product will be bright and shiny. For signal lights, a round template is cut out of cardboard. On red, green, and yellow paper, contours are drawn and circles are cut. Then they are pasted in the desired order: red - on top, yellow - in the middle, green - below. They are located in the middle of the rectangle in the column, one above the other.
So that the traffic light can be held or put on the floor, a wooden handle is attached on the back side. It needs to be bolted. You can use such a traffic light during outdoor games, for example, “Drivers” or “Train”.
Plastic Bottle Option
A do-it-yourself traffic light for a kindergarten can be made from a used bottle, for example, from a yogurt. In the house there are always several multi-colored twisting corks. You need to search for green, red and yellow. It will be In the right order they must be glued to the bottle. In order for the traffic light to stand on a leg, a stand must be attached to the bottle.
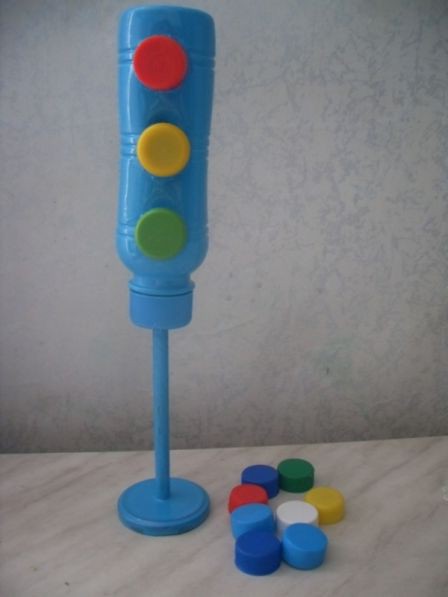
It can be adapted from improvised material. This can be a thin jar of soap bubbles or a disposable cup, turned upside down. This craft can be used for board games or put in a road corner for independent games of children with small cars. This is a portable option, so that children can play with cars even on the carpet.
Fabric traffic light
It will be interesting to sew a traffic light with your own hands for kindergarten. The photo below shows that this kind of crafts can be hung on the board, on the counter, and on the wall. This is a convenient portable option. In addition, the signal colors can be removed, since they are kept on Velcro. This traffic light can be used in independent games of children, and in open classes.

Making it is quite simple, especially if mom has a sewing machine. You need to make a template out of paper by drawing outlines on a piece of paper. Two layers of the traffic light itself are cut out of black fabric according to the pattern. Before sewing, you need to insert in the middle some insert made of dense material or a layer of synthetic winterizer. Circles can be sewn from felt, in the middle they are fastened with Velcro. You can place the finished traffic light on the fiberboard, cutting it with a jigsaw according to the template. To keep the fabric well, it can be nailed with staples.
Craft from balls
The brightest and most interesting example for children of a self-made traffic light for kindergarten will be the option of balloons. You need to buy a whole pack of black balls and three colored ones - green, yellow and red. Basic traffic light balls can be purchased in a slightly larger size to stand out. In order to keep the balls in the right position, it is best to come up with some kind of stance. For example, make a wooden stick and insert it into the cross for a Christmas tree. Then, inflated balls are tied around the rack in the necessary sequence.

For aesthetics, the stick itself can be wrapped with ribbons and a few balls attached to the bottom to close the crosspiece so that it is not visible. Such a craft can be used even at a matinee or in a performance devoted to a given topic. She is very bright and attractive for babies.
Tasty traffic lights
Often, contests are held at events to study traffic rules, where children show their knowledge and skills on this topic. To encourage and please children, educators prepare prizes and small tasty gifts for the most active children. The proposed version of delicious traffic lights will appeal to the whole kids. After all, such DIY crafts of traffic lights have not yet been brought to kindergarten. But this is so nice - for the knowledge of traffic signals, get a chocolate waffle with three caramels as a gift! Even the most passive guys for the sake of such a prize will try and participate in competitions.

The presented crafts are not very difficult to do, but they look attractive, and any educator will be glad to help from their parents, because teachers for children make almost all the manuals with their own hands. If you make such a gift to the group, then the educator and all the guys will be grateful to you.
Crafts on the topic of traffic rules - a visual material that allows children to remember how to behave on the road. Craft them with the guys.
Crafts Traffic Rules: 3 Options to Choose

To make visual aid for children, take:
- carton boxes;
- glue;
- scissors;
- colored paper and cardboard.

To make at home, glue the box over with colored paper.

Get a box. Help the child draw a rectangle of the same size on the paper of a different color with a ruler and a pencil, which will become windows. These details must be glued to the facade of the house.

So that they have a more accurate shape, attach a ruler, circle with a felt-tip pen or a bright pencil.

Windows can be made flat rectangular or volumetric triangular. In the first case, the child cuts out this figure from paper, sticks it upstairs at home.

To implement the second idea, you need to cut out the rectangle, fold it in the form of a volumetric triangle, glue it so that the seam is at the top.
Make several more buildings with your children. Let some of them become shops, others a school, and third residential buildings. To mark the functional purpose of these buildings, write and glue signs to them. It will be written on them that this is a children's educational institution, a supermarket, and on residential buildings write the street name and house number.
After that, make a zebra, that is, a pedestrian crossing. To do this, white strips with a width of 5 cm are glued to a black cardboard sheet.

Then the roadway is done. For it, on a gray cardboard, stick strips of white paper 1 cm wide. In the center there will be a dividing strip consisting of two segments. On each side of the car you need to stick and short stripes of the same width.

If you plan to create a large craft rule of the road, then glue as many marked sheets of cardboard as needed for the job.
Put the road markings on the table or glue it to the inverted flat cover from a large box, for example, from table hockey. Place houses, place cars on the carriageway, put figures of people near the pedestrian crossing. Then it will be possible to play with children, showing how to cross the road.
But for this one more important detail is missing - a traffic light. You will learn how to do it by reading the next paragraph. In the meantime, look at 2 more ideas that will tell you how to craft children's crafts traffic rules. After all, they may not be voluminous.

Let the child, under the guidance of adults, glue a house on a sheet of blue cardboard, make a road, a pedestrian crossing, a car and a traffic light near the building. In the process of creating this work, you can help children learn the basic rules of the road.
Create together a fabulous city where figures and houses will be molded from plasticine. This material will help make the road. To do this, you need to knead the black plasticine well, smear it between the outlined contours. Thin sausages made of white plasticine stick on top to create a pedestrian crossing and a dividing strip for cars. Lawns, paths, people are created in the same way.
The house can be made of two plasticine bars of the same color connected together or exchange this mass in your hands and cover with a small box. Windows are made of plasticine of a different color.

Cars can be taken as toys or also made of plasticine.

After you familiarize yourself with the three options for making crafts in kindergarten, see how to make a traffic light. It can also be created from various materials, depending on what you have available.
How to make a traffic light with your own hands?
If a plumbing pipe is lying around at home, and there are epaulettes, a cap, and a policeman’s rod, then you can make such a character.

If you do not have such items of a traffic police officer, then make them out of colored paper and cardboard. So, for the embodiment of the plan, take:
- plumbing pipe;
- wooden stick;
- acrylic lacquer;
- whistle;
- acrylic paints;
- cap;
- shoulder straps;
- a rod, and for lack of this, colored paper and cardboard.
Saw the pipe in half across. Draw with a simple pencil where the traffic lights will have facial features, red, yellow and green circles. Paint it all with paints of appropriate colors. Make two holes at the level of the character’s shoulders with a drill, stick a wooden stick here, glue shoulder straps. Put a cap on top of the pipe.

Hang a whistle on one hand of the character, and a baton on the other. Here's how to make a traffic light. If there are no ready-made attributes, then attach black stripes to white cardboard, roll this blank into a pipe, glue the sides from a large edge. You will make a rod. Shoulder straps are also easy to create, we cut them out of blue color cardboard.
If we talk about how to make a traffic light, then for this it is easiest to glue a rectangular cardboard box with dark colored paper, stick here on each side a mug of red, yellow and green.

If you still have a box from under the dairy product - this is just what you need. Paste it with black paper, and on the sides attach circles of the corresponding colors. So that the child better understands that the road must never be crossed by red light, draw a sad smiley on the circle of this color. The yellow one will have a straight mouth, and the green one will smile, which means an invitation to move. Hide the top of the box under a cap that is cut out of colored paper, and glue it together.

If there is no such container, you can make a traffic light from a sheet of cardboard. The next photo shows how to cut it, what should be the size.

Straighten a cardboard box, cut it, cut circles.

Glue the black paper onto the cardboard, cut out the red, yellow and green squares. Glue them on a dark base. Roll it into a roll. Cut and glue the handle from the cardboard, attach it to this roll. Insert this blank into the glued traffic light. Turning the handle, you will change the color, thereby checking whether the children have learned the lesson about the rules of the road.

The following traffic light is made of very interesting materials, for this take:
- three laser discs;
- three juice caps;
- glue;
- lace;
- scissors;
- paints and brushes.
If you want to make a traffic light so that its elements are voluminous, then use the origami technique for this.

To do this, cut squares with sides of 5 cm from green, yellow and red paper, of which you need to twist the parts that are glued together.

Finished balls need to be attached to the stand, after which the work is completed.

It turns out to be very interesting traffic light made from plastic bags.

For this craft you will need:
- garbage bags of red, yellow and green colors;
- cardboard;
- scissors;
- colored paper.
- To do this, first handles are cut from the packages.
- Then, starting from the outer corner, cut into a long ribbon, as shown in photograph number 2.
- After this, you need to wind this tape on the palm of your hand or on two identical cardboard circles, in the center of which there is a lace.
- Now the turns are cut out from the outside. If you wound the tape around your hand, then tie the resulting workpiece in the middle with a piece of a plastic bag, tighten it, tie it.
- To make a traffic light, you will tie these loose shoelaces, thereby connecting the structure. You can stick pens and a rod from cardboard to the exhibit, eyes from colored paper, and make a cap from the same material.

If moms know how to knit, they can fulfill this attribute of traffic from threads. It is necessary to knit a black rectangle with knitting needles, wrap a bag of yogurt or milk with it, sew it on the side, top and bottom.
To adjust the bottom and top, knit rectangles as large as these sides, sew them to the main fabric.
Crochet the circles, attach them to their places.

Cardboard and tinsel will also make a wonderful traffic light.

Scenario "Adventures of Dunno in a Bustling City"
After crafts on the rules of the road brought to kindergarten, it's time to start the holiday. On it, the guys in a playful way, with interest, will learn the basics of behavior on the road.
To the music, the children enter the hall, sit on chairs. The host greets them, with their parents, and says that we live in a beautiful city. There are streets, alleys, cars rushing along the roads, buses go. To cross the road in such busy places, you need to know the rules of the road.
- The name of the place where passengers are waiting for transport?
- With what sound instrument does the traffic police stop the intruder?
- The silent tool of the traffic police officer?
- What part of the road are pedestrians allowed to walk on?
- What is the name of the part of the road where the transport is moving?
- Stop.
- Whistle.
- The wand.
- Sidewalk.
- Bridge.
The host says that the guys know the basic rules of the road, and now they will tell you how to cross the road. Further, children take turns to read poetry. The first tells that the traffic light is a great helper, it warns when you can go and when not.
The second child gets up and reads in poetic form that the red color indicates that there is a danger nearby. In no case can you go across the road where the transport goes when this traffic light is on. Yellow color encourages pedestrians to wait, green lights up and invites to cross the road. Then the guys tell a poem about a crosswalk, about a zebra. After all, only at such markings can you cross the pavement.
Next, the game begins, which is called "Collect the puzzle." Children are given large puzzles in which there are traffic signs or traffic lights. They must collect them. You can divide the guys into two teams to arrange a competition.
Next comes a mobile game with flags. At one end of the hall, children line up near the starting line. The teacher becomes on the other side of the room, holds a flag in his hand. If that one is green, you can go. When the teacher picks up red, the child should stop right there. When the green attribute is raised again, you need to continue moving. The one who wins the fastest all the way without errors wins.
For the next competition, you need to make petals, a core out of cardboard, put it all in the form of a flower on a table or on a carpet. On the reverse side of these blanks, questions are written regarding the rules of the road. If children still cannot read, parents will do it for them, but the children themselves must answer.
You can come up with other competitions to hold a celebration regarding traffic rules. They can be studied not only indoors, but also on the street. When it snows, draw black stripes on a cleaned path with a spray of dark paint to make a pedestrian crossing. Put traffic lights on both sides of it. You will simulate the situation, "including" various colors.
Also in the snow you can draw some road signs and study them with your children.
Such games will help children to better learn the rules of behavior on the road, and crafts will become visual material conducive to the assimilation of the material.
If you want to see how to make a craft on the topic of traffic rules, the following story is for you.
(or with the help of moms, dads, grandmothers), you will always remember the rule: "red light - stand, yellow - get ready, green - you can go!"
You can create a small masterpiece from different materials.
Paper wonders
If you take the task creatively, you can create a lot from paper, and you do not need designer or expensive paper - what is in every house is useful.
Applique
On a rectangular draw circles, observing the same interval between them. Circles can be drawn with a pair of compasses or according to a pattern, circling the selected object (cup, saucer, jar). Then you can act on one of the options.
Option 1.
We take 3 sheets of colored paper - red, yellow and green - and tear it into small pieces. Each circle is filled with paper pieces.
Option 2
You can cut 3 colors of hearts of different sizes. Fold the hearts in half and stick on one half. It turns out beautifully if the hearts are laid out in a symmetrical order, forming a flower.
Option 3
You can fill in the signal circles at the traffic lights by cutting colored paper in small squares, then each square must be screwed onto the rod from the handle and glued with the end part to the circle. Get a fluffy traffic light!
Important! For such applications, you can use not only paper, but also everything that is at hand - eggshells, yarn, fur, felt. The main thing is that there are 3 colors - red, yellow, green. Such an article will help the child to remember forever that the traffic light is our best friend!
Origami
A traffic light is obtained by the Kusudama method. You will need 3-color paper and a foot stand.
It is cut into 5x5 cm squares. The modules are assembled according to the scheme, then 3 modules are folded together. For 1 ball, 24 pieces are required. A ball is assembled from the modules, it must be fixed to the leg.
Boxes
This is a wonderful material from which interesting ones are made. get a variety of traffic lights:
Option 1.
Paste a rectangular box of porridge and tea with black paper or paint with black paint. On one side stick 3 circles (red, yellow, green), cut according to the pattern.
To make such a traffic light convenient to carry in the game, you need to trim the top, make holes on the sides and insert a rope into them.
Option 2
We prepare the box, as described above, and make the traffic lights from origami by sticking the modules.
Option 3
Take 3 box of matches, stick together (you can use glue or self-adhesive paper). Wrap the resulting module with black paper and. Select traffic light cells with a white marker or strips of white paper, paste the signal of the desired color into each.
Option 4
The traffic light scheme, consisting of 4 sidewalls and adding 1-2 cm to the gluing (however, a ready-made narrow box with the same sides is also suitable). Place the glued workpiece on a pencil leg. Place a suitable sized roll painted in black on the inside. Squares of signal colors are located diagonally on the roll.
By turning such a roll inside a cardboard case, you can study how a traffic light regulates the movement of cars and pedestrians.
Important! From the boxes you can make traffic lights in the growth of the child - such are useful for kindergarten. They are convenient to use during active games for knowledge of traffic rules.
From CDs
The traffic light is obtained even from laser discs, you will need 3 more small ones or cans. The progress is simple:
- Covers are painted in traffic colors.
- Disks are fixed to the base - it can be cardboard or a missed thread.
- glue the lids. Done!
From a plastic bottle
It would seem that a junk thing is an empty plastic bottle, and how much of it can be made! can be done in many ways.
Option 1.
3 caps are painted in signal colors, they are mounted on an empty bottle. A wand is inserted into the bottle cap, mounted on another cap-stand. That's all!
Option 2
Craft from a bottle can be a real masterpiece. To do this, you need to paint the bottle in a neutral color, turn the lid down and draw or paste eyes, nose, and mouth from self-adhesive. Align the signals in the middle. Glue cardboard or fabric hands on the sides, make legs from the bottom. In the hands of a traffic light, you can give a police rod and a traffic sign.
Plasticine traffic light
When thinking up crafts on the topic “Funny traffic light”, one should not forget about the plasticine, which children love to play with, and which can be found in almost every house. With basic modeling skills, you can make a textured or naturalistic traffic light.
Option 1.
The body of the road aggregate is molded from plasticine - it can be rectangular or oval. On one side are attached slightly crushed circles of the desired colors. To make the structure more durable, you can insert a pencil or a wand inside.
Option 2
You can make a panel of plasticine. You will need cardboard, inserted in a frame, and plasticine.
A traffic light is drawn on the cardboard, the entire plane is filled with plasticine of neutral color (black, gray, beige). Signal lights are made of red, green and yellow plasticine. You can complicate the work if you use plasticine formed into small balls for the panel - they are fixed to the base, slightly flattened.
Crafts from improvised materials
You can make a traffic light from improvised materials.
From packages
You will need packages (cellophane or for garbage), scissors, a plastic cover, tape, threads.
Working process:
- Packages are stacked, cut the bottom and handles to get even rectangles.
- Rings are cut out of 2 plastic covers or cardboard.
- 2 rings are folded together, wrapped in cellophane strips.
- Cut the cellophane in the outer contour.
- Spread the rings and tie the pompom with a thread.
- Align the length of the pompom pile.
- To connect among themselves on a thread 3 pompons of different colors.
Such a traffic light can be hung or attached to the wall. According to this principle, you can make a traffic control mechanism from threads, wrapping paper.
Sewn traffic light
An interesting option is a traffic light sewn from fabric. It can serve as a developmental toy if you make the colors removable by putting them on Velcro.
From the black fabric, the traffic light circuit is cut out, sewn, laying a synthetic winterizer or non-woven. Signal colors are more convenient to make from felt.
Sweet Red-Yellow-Green
Having eaten a delicious traffic light, every kid will remember the rules for crossing the street. It’s easy to make such goodies: you can bake cookies or take the finished one.
The main secret is in the decoration.
Cookies, a waffle or a sweet bun should be doused with chocolate on top and, until it has frozen, put on top three sweets of the desired colors (red, yellow, green). It can be caramel, candied fruit or M&M. That's all!
Air
Children will like it and will become the decoration of the event dedicated to the knowledge of traffic rules, a traffic light from balloons.
You will need:
- 7-10 balls of black color;
- 3 large balls of signal colors;
- rack.
The balls are fixed to the rack: black serve as the basis, the signal is placed in the correct sequence.
Creativity and imagination will help the child create a work of art and forever remember the rules for crossing the road to the necessary traffic signals.
Handicraft master class (paper work, scrap crafts).
Master class: “Merry traffic light”
"The most important on the road", -
Friends told me -
Multi-eyed, one-legged,
You can’t joke with him in any way. "
I'm a little scared
Hearing this conversation
But seeing, I guessed-
Well, it's just a traffic light.
Paper is one of the simplest, most affordable, easily processed materials. We get acquainted with paper products from early childhood. There are various types of paper products: products from strips, products in the application technique, products based on boxes, cones, cylinders; production of various layouts. From paper you can make bags, boxes, baskets, Christmas decorations, costumes and jewelry. Papier-mâché products are also paper. The richer the fantasy, the more crafts you can come up with. At school there was a competition “A traffic sign on a New Year tree”, thought and an idea arose to make such a traffic light.
Perhaps our traffic light will seem very simple to someone, but I want to say that I work with children 7-8 years old and I need to make the implementation not difficult. But children from the age of five can do similar work.
Materials and tools:
· Scissors;
· A sheet of cardboard;
Crepe paper;
· Colored paper;
Ribbon
Knitting needle or skewer for barbecue;
PVA glue (glue - pencil);
· Napkins of two colors;
· An empty box.

Manufacturing steps
Boxes can be taken in any size and quality. It can be an empty box of juice and milk, only they need to remove the cork. You can use boxes from under the phone and porridge, toilet water and tablets.

The main thing is to decide what size we want to get the craft. I chose a soapbox. In the box we puncture holes for handles, legs and for mounting on a Christmas tree. Insert the cooked ribbon. In my case, this is a packing ribbon from a cake. Choose the length yourself. Then cut off a piece of crepe paper.

We glue our box, piercing it with a skewer in places for handles and legs.


From colored paper (red, green, yellow) we cut three circles. The approximate diameter is the height of the box divided by three. Two white and two black circles for the eye. It depends on your imagination how to arrange, if you make cilia, then there will be a traffic light - a girl.

Glue to our body. You can draw a mouth, or cut it out of paper.

Now we make pompons from napkins. Fold in half along the length and randomly cut the edge opposite the fold line.

Twist the ribbons right at the tip of the ribbons.

So that they do not slip in the future, tie knots at the end. You need to twist the fluffy side up. When we push pompons, the glue line will be covered.


