It is known that the development of a child’s fine motor skills directly affects his speech and mental development, therefore, in order for a child to develop correctly, his playful hands must be constantly occupied with something. Today we will make crafts from cereals and seeds. They are textured, they are different, they are small and perfect for the development of motor skills. One problem is that seeds and cereals stick poorly to ordinary paper glue, they will fall off, so we glue it on plasticine or take glue “for wood and plastic”. Beans, beans, rice and buckwheat, peas, sunflower and pumpkin seeds - any seeds and cereals that fit our picture in color and size, will be used.
Where to begin
If this is a craft - an application or a relief on a flat surface, you need to prepare the same surface. On the sheet of cardboard we draw the contours of the crafts. We spread everything inside the contour with plasticine. The larger the seeds, the thicker the clay layer. Now you can gently, one at a time, stick the groats or seeds. We pour small grains on the surface that needs to be covered, and then gently squeeze it into the plasticine.
Seeds and cereals make vases and pencils. Then it will be necessary to stick a plastic or glass jar around plasticine, and then stick seeds on it.
Craft and seed craft ideas


When the craft is ready, we will cover it with varnish, and it will not lose its appearance longer.
Original crafts can be performed not only from familiar materials: cardboard, paper, plasticine. Unusual things look for the creation of which non-traditional materials are used that can be found in every home. More precisely - in every kitchen. Let's look into the kitchen cabinet and think about what crafts can be made from cereals and pasta.
Groats and cereals as a material for creativity
Cereal crafts are the best way to keep a child busy for the benefit of his development. Perhaps Cinderella’s stepmother wasn’t so wrong, forcing her to sort through the cereal, separating the grain from the seed. Such activities develop fine motor skills of the hands, which in the most favorable way affects the mental abilities of the child.

A variety of cereals have a different texture: sorting through them, the child develops tactile sensations. In addition, even the simplest versions of cereal crafts for children develop their creative abilities, arouse imagination.

Most often used for work:
- red and white beans;
- chopped peas;
- millet;
- buckwheat;
- semolina.

In the kitchen cabinet you can find other materials for creativity: coffee beans, pumpkin seeds, pasta of various shapes. All of them are used to create original crafts for the home.


Panel for decorating the kitchen
What to decorate with crafts from edible materials, if not the kitchen? A simple panel for decorating the wall can be done using different types of cereals. For work you will need:
- basis with a frame - printed cardboard;
- different types of cereals;
- pVA glue or Moment;
- varnish - decoupage or colorless building.

First, we draw the outline of the drawing on the cardboard. Beautiful patterns for crafts from cereals can be found on the Internet or use large drawings of children's coloring.

We select which cereals to use for certain areas of the picture. A picture will look spectacular, in which grains of different sizes, colors and textures are used.

We apply alternately a thin layer of glue on each area, filling the entire surface. Carefully, without leaving the contours of the plot, pour the cereal onto the glue. In the same way, we fill the next section of the future panel. The croup must be glued so that the entire surface of the painting is filled.

Attention! To enhance the effect, you can separate the fragments using the contour for stained glass.

At the end of the work, wait until the glue has completely dried, then cover the panel with varnish for safety and place in a frame under or without glass.


Voluminous crafts for the home
Volumetric decor items made of natural materials look spectacular in the interior of the house. Take a look at the photo of crafts made from cereals: topiary and decorative vases, caskets, and even countertops of coffee tables can be originally decorated with cereals, coffee beans. Such things look especially impressive in eco-style, rustic interiors.

The basis for creating crafts can be:
- glass;
- sackcloth;
- cardboard;
- wood cuts, etc.

We will not give detailed instructions for the manufacture of crafts: it is important to understand the principle of their manufacture, and everything else will tell the imagination.

For example, making a large glass vase or candlestick with cereals or coffee is not difficult: you need to draw the outline of the picture on the surface of the base (for this, take a white marker for glass), fill the picture with glue and carefully pour the groats on it. If you wish, you can make a background painting of the details or acrylic paints.

We make furniture
Try to imagine how spectacularly a small coffee table decorated with cereals and seeds will look in the interior of a country house. To do this, it is enough to apply the outline of the pattern to the tabletop base and fill it with grains of different textures.


The table will look especially impressive if you make a three-dimensional contour of a contrasting color - white or dark, depending on the color of the table. Cover the countertop with glass and fix it.

Beans, pumpkin seeds or coffee beans can be decorated with a mirror frame. The manufacturing principle is the same: we apply glue, we fix the grits on it and cover the frame with varnish. The varnish will additionally fix the grains and add attractiveness, durability to the interior item.

Small home decor items
It’s easy to make a topiary that will decorate the interior of the house. Before you make a craft from cereals at home, stock materials:
- a small flower pot, bowl, or mug;
- a strong but short tree branch or stick for the trunk;
- foam ball;
- cereals or coffee beans;
- small decor, ribbons;
- glue;
- gypsum.

First you need to strengthen the barrel in the tank, pouring gypsum into it. Then use glue to fix the foam ball on the barrel. With the help of glue and grains, croup, shape a ball. You can pre-paint the base with acrylics.

Fix the decor: voluminous flowers and butterflies, leaflets. Wrap the topiary trunk with a floral teip ribbon or satin ribbon, tulle. In a single style, design a container. You can use burlap, sisal, etc.


The easiest cereal crafts workshop:
- take a bottle or a small vase of clear glass;
- pour a little cereal of the same kind on the bottom;
- carefully, so that the grains do not mix, pour on top a layer of another cereal or seed, preferably in a contrasting color and other texture;
- fill layer by layer capacity. It can become a kitchen decoration or a vase for a composition of dried flowers.

Be inspired and impressed, come up with your own ideas for crafts from inexpensive and always available material. Involve children in your creativity, and your home will become unique, filled with the warmth of the soul embedded in each craft.

Photo of cereals


Open the cabinet in the kitchen where you store bulk products - there you will definitely find long rice and hot buckwheat, small yellow millet and halves of peas, and now we suggest using these products not for cooking cereals and side dishes, but for creating cereal crafts. Unconventional techniques especially captivate the child, and while mom will cook a delicious dinner for the whole family, the baby will be busy with a new kind of creativity.
Cereals for children
If you are looking for interesting ideas crafts from cereals for children, then as a material for creativity, we can offer you semolina - small grains can be used to create bright and original paintings-applications. However, the semolina is white, and in order to get a bright multi-color application, grains must be painted.

In addition to semolina, we also need gouache, medical alcohol and water, which will be used to dilute the paint. To facilitate the staining process, we need a teaspoon and a container (saucer or plastic bowl), a small strainer to prevent the formation of lumps. The painted semolina should be laid out on a sheet of white paper to dry. Finished grains can be used for creativity at any time, you can immediately paint a large amount of semolina in different colors, and then store them in glass or plastic containers. At any time at your fingertips you will have the material to create.
The paint should be diluted with water using a solution of alcohol and water in equal proportions, for example, you need to mix two teaspoons of water and alcohol, and then add one tablespoon of the desired color to the liquid. Remember that the more liquid you add, the brighter the shade of paint will be, so it’s easy to make a smooth transition from dark to pale colors.

Paint should be mixed with liquid and pour semolina, mix so that the paint is evenly distributed over the grains. The colored solution should make the grains slightly moist, but not wet, and to prevent the appearance of lumps of grains, grind thoroughly with a spoon. Then rub the semolina with your fingers so that they stain evenly, you can entrust this work to the child. After such staining, the semolina should become friable. You may need a fine sieve to get rid of lumps. After staining, the little manila should be laid out on a sheet of paper and left on the sunny windowsill until it dries completely.
A ready-made little hand painted in different colors can be used to create applications. To do this, we need a printed or drawn picture and PVA glue with a brush. The element of the picture must be covered with a thin layer of glue with a brush, then sprinkle this part of the picture with grains of the selected color on top, and a little finger on the top. Thus, cover the rest of the elements dIY cereals for children. After complete drying, the picture can be turned over so that uncoated grains fall off.

Cereal Crafts
As a material for children's creativity, parents can choose colored sand, you can buy it in a store with children's goods, or you can choose a more environmentally friendly product that will be safe for the child - a colored semolina that you can "prepare" yourself. When the baby will work with such material, performing either in the spring, mom will not even have to worry that by chance the preschooler will taste the doll. We stained it with gouache or food coloring, which means that it is completely safe.
You can play with colored grains at home and on the street, but this material is available all year round, but colored sand can end in the sale of shops in your city.

Recently, drawing in the sand has gained great popularity, for the same purpose we will use a small stick: it must be poured onto a flat surface (for example, a tray), smoothed with a palm, and then draw with a stick or finger. A child can learn to write numbers and letters, and in case of failure it is enough to just draw his palm again on the surface and the foundation is ready for new creative ideas.
When your child will get the first neat dIY groats crafts, photo Be sure to make the finished result as a keepsake, and you can also describe your original idea for children's creativity on our website, so that other mothers can draw inspiration.

DIY cereals
You can choose another option crafts from cereals, photo You will definitely find “cereal” applications on the net. In addition to semolina, you can use rice, it also has a neutral color, so before performing the application, the pictures can be painted with gouache paint.
They contribute to the formation of a creative personality, the child develops imagination and imagination, he will look for the opportunity to realize his creative potential in all the materials that surround him. After using seeds and cereals, he will definitely want to try pasta as a material for creativity.
DIY cereals are made using round or long-grain rice; you can also use a cross-section. In some applications unpainted rice is used, for example, where several types of cereals are combined - in addition to rice, buckwheat, peas and beans. But if the child will work only with rice, then he should first be painted so that the material can be used to design the application.

Long-grain rice is usually used, it is more durable and solid, it looks beautiful on paper. The most affordable option for coloring is the use of gouache, but you can also use food colors that are in your home idle or that have an expiration date nearing completion. To keep the paint better, acetic acid is added to the solution.
Staining will be carried out not in a bowl, as in the case of semolina, but in a plastic bag, it will be convenient to use zip-lock bags for these purposes. First you need to mix food coloring with water and add a few drops of acetic acid. By adding more or less water, you can adjust the color saturation.
Pour the rice into a plastic bag, send dye there and mix thoroughly with the zip lock closed. Colorfully should be distributed over the patterns and color them evenly, then spread on a flat surface in one layer for drying.

Cereal craft patterns
When you prepare the material for creativity, you need to worry about a beautiful image, the contours of which the child will fill with colorful grains, securely fixing them to glue. The easiest option is to find a picture on the Internet and print it, mommy can draw a picture herself. Perhaps at your place there are large magazines for decoration, in which the child has already lost interest, you can take images from there, these will be good cereal craft patterns.

Since the groats and seeds are quite heavy material, so the thin office paper on which you print the picture will become an unreliable base, in this case we need a cardboard base. Therefore, the sheet with the image should be glued to a sheet of white cardboard, and when it dries, you can proceed with the application.
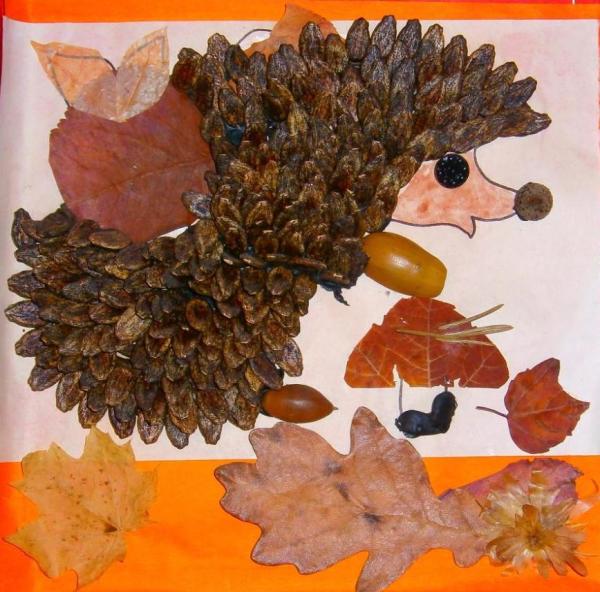
You can choose an image on any subject, it is desirable that the picture consisted of large elements that will be conveniently covered with grains. You can compose several materials, for example, in a kindergarten, they are performed not only using green and brown semolina, with which you can make grass and tree trunks, autumn leaves are also used to form the crown.

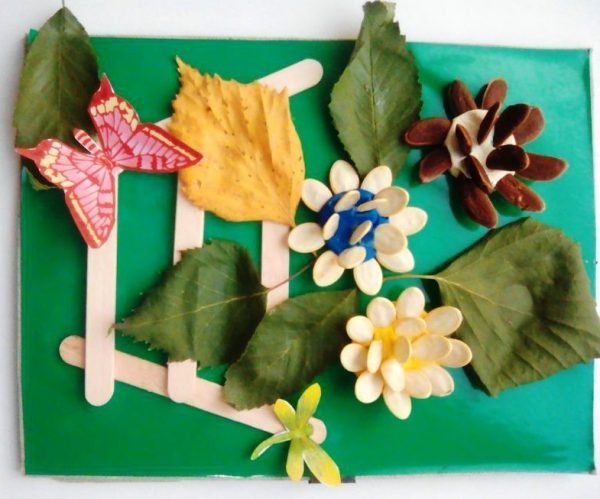
DIY crafts from seeds and cereals
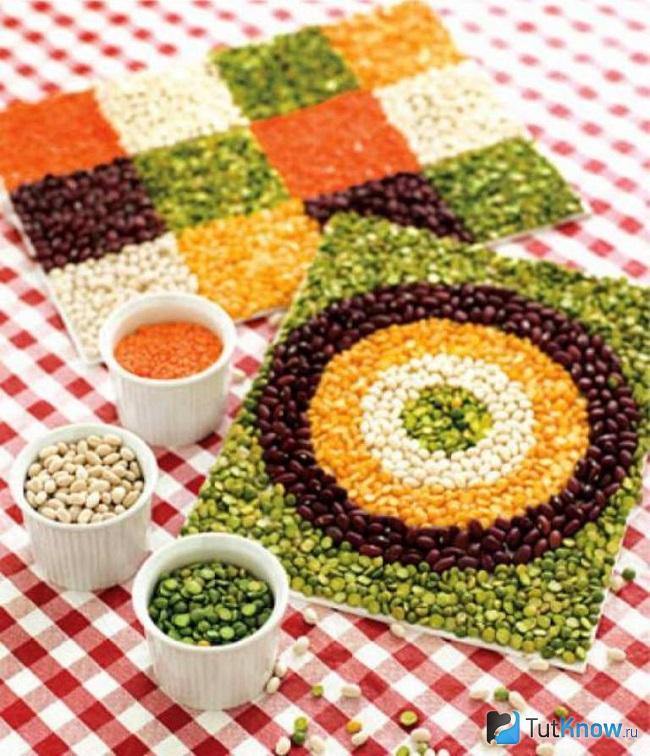
Ready patterns for crafts from cereals for children You can fill in not one type of grains, but different ones, so you get a textured picture. You can use millet and pearl barley, rice and buckwheat, beans and chopped peas, sunflower and pumpkin seeds, as well as all other products whose creative potential has not yet been revealed.
When we considered the methods of execution, we described in detail the method of cutting in which plasticine is used as the basis, where the paper elements are literally “pressed”. This time we will again use plasticine as a basis, but we will “push” into it various seeds and cereals.
Small grains and work with them contribute to the development of finger motility, a child can stick them to paper, squeeze them into plasticine, or simply pour them from one hand to another. Fine motor skills are closely related to the development of the speech apparatus, which is why creativity is very important for children aged 2-3 years, they should be studied not only in kindergarten, but also at home.

Application on plasticine is simple crafts from cereals and seedsfor which you can use any products that you find in the kitchen - millet or rice, peas or buckwheat. In this case, in addition to plasticine, paper elements will also be present in our picture, for example, we can cut a tree trunk from colored paper and first decorate its crown with plasticine, and then press yellow millet peas into a plastic base.
Plasticine must be thoroughly kneaded in hands so that it becomes soft, and then literally “smudge” it in small pieces on a cardboard surface. When you fill the surface with plasticine, grains can be pressed on top, they will be firmly fixed in a plastic base.
For kids, you need to choose the simplest dIY crafts from seeds and cereals with large fragments, for example, a preschooler can make a sunflower flower: arrange the middle with seeds, which are fixed on the base with black plasticine, and use yellow peeled dyed yellow dye to decorate the yellow petals.

Cereal paintings will be of interest to real craftswomen, because often for the implementation of various elements of home decor needlewomen use coffee beans, and besides them, you can use other bulk products. The result of the work can be varnished to fix the elements. The finished picture can be framed and used to decorate the interior of the kitchen.
Crafts from cereals and seeds are panels, appliqués, decor elements, and bird feeders. See how to make a topiary, a wreath of peas, a Christmas tree of seeds.
The content of the article:
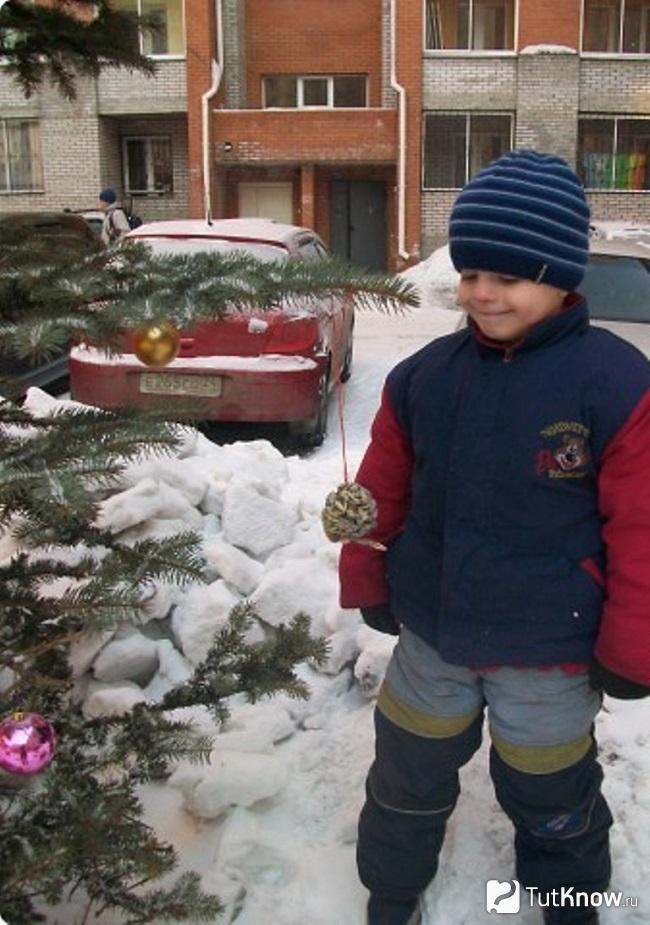
Children will really like to craft various crafts from cereals and seeds, if adults show how to create them. Such fruits of joint work will help not only the development of the child, but also teach him kindness. Indeed, in this technique, original bird feeders are created, which the child will gladly hang on the street. Will be happy when the birds flock to a treat.
How to make a feeder from a cone, gelatin, from a bottle with your own hands?

Often in the city or countryside on New Year's Day, growing Christmas trees decorate. Having made bird feeders, the child himself will decorate the forest beauty with them and get a lot of pleasure from it. To carry out the plan, put next to the children:
- bumps;
- a tall small bowl;
- cereal seeds;
- sunflower seeds;
- a brush;
- a thread.
- If the honey is thick, first melt it in a water bath, when it cools down - pour into a bowl. Pour cereals, small unroasted seeds into another similar dish.
- Let the child grease the bump with liquid honey, then roll it in another container so that the seeds stick to the sweet surface.
- Now he will put his creation on spread paper or a tray so that the honey is dry, and the feast for the birds is better attached to the cone.
- After this, it is time to tie a thread to the feeder and go for a walk with the child in order to hang the craft on the tree.
Instead of honey, you can use a thick paste. To make it, pour in a container of 1 tbsp. l flour, dilute with a glass of water. While stirring, bring to a boil.
Remind children that birds should not be given salty, brown bread so that babies do not use such products while making bird feeders.
Have the children make bird feeders that look very original. Pre-take:
- 1.5 cups of bird feed;
- 0.5 cups of water;
- 2 small packets of gelatin;
- twine;
- cookie cutters;
- straw;
- baking paper.

- Soak gelatin for 20 minutes in water, if required by the instructions. But usually in small bags one is sold that does not need to be soaked, immediately dilute it with water and put on fire.
- When the solution begins to boil, remove from heat, cool slightly and mix with bird food.
- Lay baking paper on the table, place cookie cutters on it, fill them with the prepared mixture.
- Insert a twine loop or tape inside with a knot inward. Clean for half an hour in the freezer.
- After that, the forms are removed from there and left on the table so that the contents dry out within 24 hours. Then the bird food is removed and hung out the window on the trees in the yard.

It can be made from:
- empty 5 liter canister;
- a large wooden spoon and fork;
- straw;
- hot glue;
- twine;
- accessories.
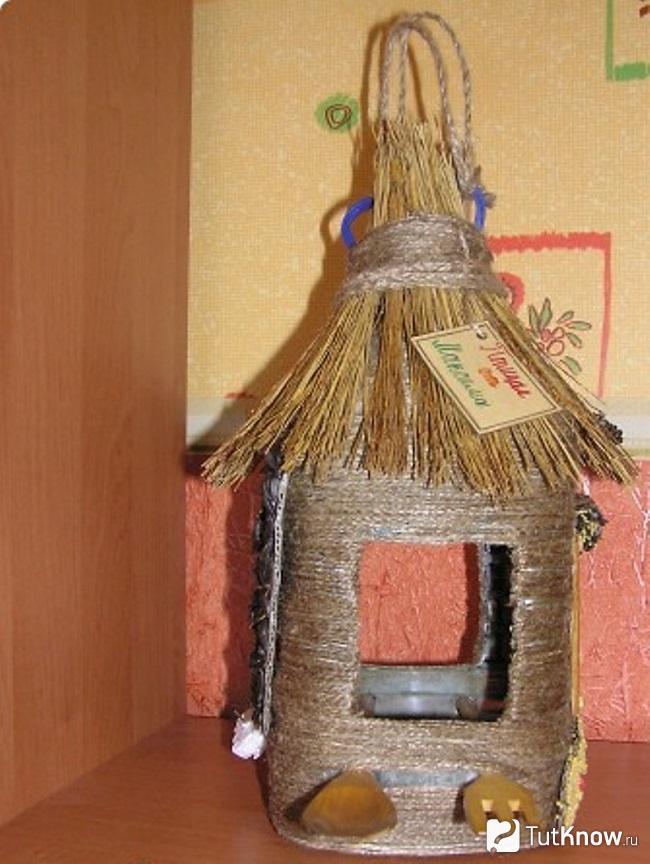
- Cut windows from one and the opposite side. Make 2 pair cuts below them. Insert two wooden spoons here. Or the second may be a large fork of the same material.
- But first, using a hot gun, attach the twine, and upstairs - straw, previously tying it in a bundle. If you do not have such material, then use a natural bast.
- It will remain to decorate the birdhouse. From the yellow and white rope, gluing it, make window frames. Fabric flowers glued at the bottom of the bird house will also be a wonderful decoration for the bird dining room.
How to make a butterfly with your own hands?
You will turn the following items into it:
- clear plastic bottle;
- plasticine;
- small foam ball;
- plastic straws from a cocktail;
- beads.
- hot gun with silicone rods;
- scissors;
- water washable marker.
- You need to remove the label from the bottle, cut off the middle part to get a sufficiently large canvas. Cut it in half. Attach the butterfly wings pattern to one and the second part, circle with a water-washable marker. Cut to these outlines.
- Now you need to decorate the wings. Use a hot gun to attach the beads as a decoration. Cut the straws into small pieces, glue them along the edge of the wings.
- Let the child stick plasticine around the ball, using the same material you can attach decor elements. To continue children's creativity, the baby will mold the body of an insect from plasticine, help the child put both wings here and fix them.

Crafts from cereals and seeds: master classes
Under your guidance, the child will engage in the creative process and make a wonderful palm tree. This will require:
- a bowl
- rod from the handle;
- pumpkin seeds;
- plasticine.
A tree trunk is thrust into it and fixed, which must be coated with plasticine.

Now let the child roll a “sausage” out of brown plasticine and begin to wrap it around the bottom of the trunk, moving up.

Here's how to make similar crafts from seeds and cereals. It was the turn of pumpkin seeds. These will be the needles of a magnificent Christmas tree. They need to be thrust into the tree trunk, also starting from the bottom. Try to place the elements of subsequent rows between the seeds of the previous ones.

What a wonderful Christmas tree made of seeds! The next job to do is no less exciting. To create a round panel, take:
- seeds of cucumber or melon, as well as apples;
- semolina;
- gouache;
- glue;
- pencil;
- a round disposable plate.

Grind semolina with gouache - half with green, half with yellow. On a plate you need to apply a drawing with large features, for example, such a goose.

Starting from the tail, grease parts of his body with glue and attach the seeds of a cucumber or melon. And the wing needs to be highlighted with black apple seeds, but quince seeds can also be used.

To make paws and beak, the seeds of a melon or cucumber are covered with red gouache and allowed to dry. Now they need to be glued to the markings.

To make grass, glue is applied to the lower part of the background, this area is sprinkled with green semolina. The upper half of the picture is made out with the same croup, but yellow.

DIY do-it-yourself bean crafts
Crafts from beans, beans, peas can also be performed by children. At the same time learn the alphabet. Draw letters on the paper, let the child grease each in turn with glue and attach the prepared seeds.

To make a panel in the form of a pumpkin, give a child:
- seeds of halves of dry peas;
- glue;
- a sheet of cardboard and colored paper;
- leaf of a tree;
- sesame seeds;
- pencil.

Children can also make chickens so funny and beautiful from legumes. Give them a pattern of these young chicken. Let them circle him, and draw their noses and paws with a yellow pencil. Dry peas need to be glued onto the surface of one chicken. Create another from beans. For the third, corn is suitable.

To make an owl, the kids will need:
- pattern of this bird;
- cardboard;
- beans of white, brown, red color;
- beans
- dry yellow pea soup;
- glue.
Wings are made of red, and belly and eye contours are made of white. Pupils spread with black beans, and paws and beak with yellow peas or corn of this color.

Bean seeds make beautiful colored crafts. You can offer the child to lay out a circular pattern. Glue lentil seeds in the center and outside, and make circles of white beans, beans, yellow peas or corn.
From green peas, you can make a photo frame by pasting it around the perimeter with these seeds.

There is a very interesting decor for Easter eggs. For him you will need:
- boiled eggs;
- flour or starch based paste;
- grains;
- small groats;
- dried herbs;
- spice.
You can create mosaic patterns by drawing a sketch on the shell in advance. Use stencils if desired.

You can attach legumes to the surface using not only boiled eggs, but also balls. Great idea for room decor.

How to make pea topiary?

Bean seeds will also help to make it. To make a tree count, you need to take:
- packaging of green peas (ground and chopped);
- foam ball;
- a pack of dry moss;
- 1 medium-sized clay pot;
- thermal glue;
- pVA glue;
- a brush;
- for the barrel - a skewer, a wooden stick or a simple pencil;
- paint for the pot;
- green acrylic paint;
- floristic foam or alabaster or cement;
- styrofoam.

When it dries, decorate it with peas. Here's how to do the topiary. Brush a small portion of the ball with PVA glue, then generously cover it with peas.

When the legumes attach, decorate the next piece of foam base. So close the ball completely and remove it to dry before morning.
When this happens, inspect the work, if there are small open areas, sprinkle them with cereal.
It's time to fix the crown. To do this, put glue from the "hot gun" into the hole in the ball, insert the barrel here.

For better fixation, it is advisable to further secure the barrel with pieces of paper and carefully stick them, pouring more glue here. If you do not put paper, hot glue can melt the foam, making the hole too deep.
Now put the barrel in a pot, fix this stick with alabaster, cement or floral foam.

After drying these solutions, you need to put moss on the surface, gluing it, decorate with sisal, peas, cereals.

Applications and panels from groats
Crafts from peas and beans are not only various topiaries, but also wonderful paintings.

To create one, you first need to draw a cat's face on cardboard. Then fill the areas with legumes of a certain color. Cereal crafts are also impressive.

For this, take:
- cardboard;
- pencil;
- buckwheat;
- semolina;
- gouache;
- pVA glue.
To make such a wreath, take:
- green peas;
- “Hot gun” or PVA glue;
- straw wreaths - 2 pcs.;
- a baking sheet;
- a brush;
- twine.
If you do not have straw wreaths, then use a foam blank of this shape, but you need to cover it with green acrylic paint.
Pour peas into a baking sheet or tray. Lubricating the inside of the wreath with glue, sprinkle it with peas.

Then, smearing small areas with glue, roll a wreath over peas to attach these small particles. When the glue dries, tie a twine to the wreath, decorate with a ribbon and hang over the door.
The door is decorated. Make table decorations. To make napkin rings, take:
- bushings for toilet paper;
- paint;
- spice;
- seeds;
- small groats;
- stationery knife;
- glue.
To give the product additional strength, you can grease the decorated surface with glue.
Here are such wonderful crafts from seeds, cereals, beans, peas, you can advise children to do. And to make it even easier for them to learn this, let them watch a video with you in which the creation process is available.
Application Owl. Master Class
Application "Sovushka" from cereals and seeds. Master Class
Master class is designed for students in grades 3-4.
Appointment: can be used to decorate the interior of a children's room, as a gift to friends and acquaintances.
Goal: teach children how to make crafts from natural material
Tasks:
· To educate children in the desire to create beautiful compositions from cereals and seeds of various plants, combining a variety of materials.
· Develop creative imagination and aesthetic perception of the world.
· Develop the accuracy of work with glue.
Nature is a real storehouse of ideas for creativity, where every person who is not indifferent to beauty will find something for everyone to enjoy. What could be more pleasant and nobler than natural material. In contact with nature, we become kinder. And this kindness helps us to create, giving space to imagination and creativity.
She sleeps all day, but flies at night.
With his big eyes sparkles.
Her sharp ears and an attentive look.
They will find frogs and mice in the grass.
Her head spins around
And he will say: “Yeah” to us the forest ... (Owl).
I'm sitting on a tree
I’m following the prey.
And I'll see - fly.
I’ll definitely grab it.
There is a big head.
Do you recognize? I am an owl).
To make the work we need:
a sheet of corrugated cardboard cut out of a packaging container; colored cardboard, a finished drawing with an image of an owl, glue "Moment", a stack, scissors; eyes from a set for children's creativity; cereals: millet and semolina; dill and sunflower seeds, small tea (from bags), beans, rose hips, a piece of birch bark.

Step-by-step workflow
1. We make a frame for our crafts.
On a sheet of corrugated cardboard A-4, we glue colored cardboard. From the bean seeds we lay out the frame.

2. Cut the trunk of the birch from birch bark, the image of an owl and paste it on cardboard.


3. The contours of the owl's drawing, having previously been greased with glue, “draw” tea. Let it dry for 2-3 minutes, shake off excess.

4. Glue the eyes and make beads from the halves of the rosehip.

5. Fill in individual fragments of the application: hat - millet; the floors of the hat from the inside and a twig of birch - decoy; wings, tail and head on the sides - tea; the front of the head and torso - with dill seeds. Glue is applied to small areas of the drawing. Then it is sprinkled with cereals (tea), so that there are no voids between the grains. Using the stacks we remove the excess.

6. Glue a flower to the hat, and make the spout out of beans.

7. Add leaves to the tree and our work is ready!

It is very interesting to work with cereals and seeds, come up with stories, collect compositions! Attracts accessibility and ease of processing.
Here are a few examples of what we did with the children:


