The story of Tilda’s beloved doll began in 1999, on the day when the Norwegian artist Tony Finnanger came up with the idea to create something special. After that, Tilda's doll was created with her own hands: for beginners, patterns and a description of the process are provided in this article. You will learn the secrets of the face of the author’s doll, and the types of fabric used to create a unique image.

What is Tilda?
Tilda is an amazing doll, distinguished from the rest by an oblong body, long legs, button eyes. Tild's cheeks invariably burn with a blush, regardless of who this interesting chrysalis is. And there are thousands of images of a handmade toy: girls and boys, pot-bellied rabbits and colorful snails, funny cats. Each masterpiece of needlework has its own name and character, Tild's clothes and accessories are never repeated.
Fabrics for designer dolls
Tilda, in its first manifestation, was conceived by Tony Finnager as rustic author's doll. Therefore, the fabrics for her were used natural. Despite the fact that the number of incarnations of the toy has increased - the fabric for needlework has remained the same. Use the types of textiles and accessories when creating an individual image:
Body
The body of the Tilda doll is distinguished by a beautiful tan or aristocratic pallor: suitable options will be flannel, calico, linen. If you cannot choose the color of the fabric, then take the material in white or pale beige color and paint it yourself in the “tildin” color.
Use natural dyes: instant coffee, onion peel or tea brewing. Boil a cloth with one of the listed ingredients for 10-15 minutes, then dry slightly and steam it with an iron until it dries completely.
clothing
Use cotton fabric delicate colors: blue, white, pink, light brown. Colors may be the most diverse, but most often for the Tilda doll, fabrics with roses, delicate wildflowers, peas, and small geometry are used.
If you are planning to sew Tilda with your own hands in outerwear, then take a closer look at jeans, natural wool.
Hair
The most common option is ordinary colored yarn. For the embodiment of individual images, you can use natural or artificial hair from needlework stores.

Stuffing
The most popular option is holofiber. You can try stuffing the doll with cotton, but its mobility will deteriorate somewhat.
By the way, fabrics for beginner needlewomen should be purchased in a specialized store. There they sell ready-made cuts that will free you from excruciating thoughts about combining fabrics. Buy fabric only for a specific Tilda: the variety of assortment can push you to rash purchases.
How to make a doll face?
To make a chrysalis special faceIt is not necessary to have a higher art education. Yes, and secondary special too. Enough of a little imagination and improvised tools that can be found in a cosmetic bag.
Eyes
Proceed to the design of the eyes after you sew the hair. Otherwise, you can not guess with their location, and Tilda's face will look untidy.
First, outline future button eyes with a needle or pencil: if the result is satisfactory, then apply to the fabric acrylic paint or black varnish for nails.

When you move on to a professional level in tailoring designer toys, it is recommended to purchase a special set of “Tilda Kit Paint Fases”, which contains all the necessary tools and materials for creating the face of the future Tilda doll. Such a kit will have to be ordered from abroad: in Russia, Tilda branded materials are not widely used.
In addition to dyeing, eyes can be made by embroideries french knot or sewing black beads.
Blush
Do not make blush paints - unlike the peephole, the failed result will be difficult to hide or remake. Use ordinary blush.
On this, the face of an ordinary Tilda doll is finished. When sewing animals, you can add a mouth - it can be embroidered with thread.
DIY Tilda: patterns
Let's see how to sew Tilda on the example of a gentle and airy angel dolls. The pattern is presented on two sheets: print them.
Remember - the size of the Tilda is determined independently, so before printing you can enlarge or, conversely, reduce the image.


My daughter was given the trouble ... Thus, the execution of this homework is automatically transferred to my fragile shoulders ... To sew the Tildas Princess from Tildas Landsted magazine do-it-yourself will require: flesh or beige calico (any cotton), fabrics on the body, panties and a skirt, filler (synthetic winterizer), booked mohair, a piece of fleece, some accessories and beads, dry blush, as well as a felt-tip pen for fabric.
1. Doll Tilda Princess pattern.
We copy the pattern, increase (decrease) and ... or print it, or, applying a white sheet to the monitor, redraw the contours.
2. We decide in advance on the color “body” and “leggings”, then grind off a tanned - beige calico with the desired colors. Now we lay out the pattern on the fabric. Carefully combine the lines of the neckline and the bottom of the "leggings" and outline the contours. Then, as accurately as possible, we make stitches according to the drawing. It is better not to combine the "knee" and the bottom edge of the "leggings", otherwise in the future the seam will lie on the seam, and the legs will bend badly.

3. We cut the workpieces, stepping back from the seams by a couple - three mm, in the neck and waist we make micro notches - the lines will be more accurate and smooth.

4. We turn out the blanks and begin to fill them with a synthetic winterizer. A little denser than the rest we stuff the head, neck, torso, hands and feet.

5. If you connect the handles with a long needle to the body (photo), then there should be no problems with the sewing of the handles. We remember that the handles and shoulders of the Tildochka are exposed and therefore the blind seam should be as secret as possible.

6. We stuff the legs to half, and make a transverse seam, indicating the knee. If we want our Tilda Princess doll to sit down freely, then we fill the upper part of the thigh symbolically.

7. Having tucked the lower edge of the body, we sew in the legs. This can be done round-robin, or it is possible through and through - decide for yourself. The seam, for the bulk of the body is slightly contracted.

8. For hair we take the booked mohair. But first, on the head of our Princess, we depict something similar to "voodoo" - four short needles are stuck along the "parting", and one long pierces the head in the area of \u200b\u200bfuture letters.

9. Now, starting either from the face or from the back of the head, alternately on each side, we braid the needles with mohair (possible in the form of a figure eight). Since the threads are fluffy, possible irregularities and “bloopers” are absolutely invisible. We do not cut the thread, it is useful to us for attaching a hairstyle.

10. Next, alternately removing the needles, sew “hair” to the head with several stitches (seam with the needle forward). Last of all, remove the needle in letters.
I must say that such a way as to make the doll Tilde hairstyle the fastest and easiest.

11. Our doll tilda princess dressed in a pair of skirts - upper and lower.
Both skirts are made from rectangular pieces of fabric. Bottom - the size on the original is about 55 cm x 9 cm. The pattern shows the transverse size of the case (7 cm). If your baby doll is larger or smaller, make a proportion and get your size.

12. For the lower skirt the fabric is taken - the net, we collect the edge on the thread, we tie it on the body and fasten the clothes directly to the stomach with several stitches. In order not to add volume on the thigh line to Tilda (which lady does not care about extra centimeters?), It is better to fix the lower skirt a couple of cm below the upper.

For the upper skirt, it is better to take a thin, flowing fabric (silk, cambric, fine viscose). The size of the upper skirt is approximately 44 cm x 10 cm. By pulling the upper edge onto a thin elastic band, we get a very decent outfit worthy of any Princess.
13. We make wings. We take fleece and fabric folded twice with the front sides. Draw the contours of the wings and build up the pattern, leaving the technological hole free.
Tilda doll is a textile toy that is known throughout the world. Tilda dolls are distinguished by extraordinary simplicity and charm at the same time, causing only the warmest associations. This doll will serve as a very good gift for a dear person. We offer you to make a tilde doll with your own hands, because it is much more pleasant to give things that are made with your own hands and with your soul. An article will help us with this, which will teach you to make a Tilda doll in several versions with your own hands, ideas come immediately with patterns.
We make a cute doll Tilda with our own hands with patterns
Before starting work on a tilde doll, we need to prepare some materials.
- Fabric for the doll (light and dark beige).
- Fabric for attire.
- Lace.
- Hollofiber.
- Threads in black and pink.
- Acrylic yarn for hairstyle.
- Satin ribbon.
- Needles, scissors, threads, scotch tape.
- Sewing machine.
Sewing a tilde doll at home is not difficult. You just need to follow our instructions exactly and everything will work out. Tilda doll can be a great attribute for the interior. It is also interesting to make this doll with children, thus developing creativity in them and a craving for needlework. Materials are ready, and we are transgressing!
Before starting our work, it is necessary to familiarize yourself with the patterns by which we will sew the tilde doll.

First you need to sew two fabrics that are designed for the body together and transfer the outline of our pattern to the fabric using chalk or pencil. Clippings attach with pins.
Then we need to make a line along the lines of our patterns.
Turn inside out our arms, legs and body.
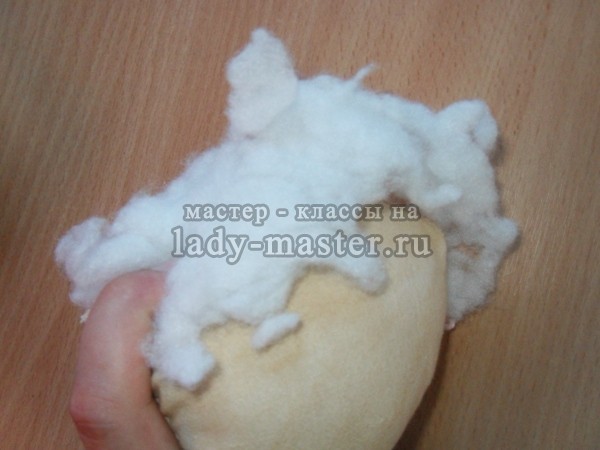
After that, we stuff our doll with a filler - holofiber. Remember that the knees of the doll must bend. You must first fill the leg to the knees, then insert a thick needle and only then continue to stuff further. It is unnecessary to fill the legs to the end, it is necessary to leave 3-4 cm so that the doll can sit.
Then you need to get the needle and make a tight stitch in its place.

Then go to the side of our dolls. To do this, you need to make a pattern and decorate the bottom of the skirt with white lace.
The top of the skirt must be pulled together and sewn to our doll. The belt of the skirt must be made of satin ribbon. We fasten it with beads and tie it with a bow at the back. We decorate the sleeves and bust of our doll with lace.

Then you need to fold the hair in half and draw a line along which we will fasten the hair. After that, make a line and attach the resulting wig to the head of our doll.

After that, we begin to make a doll's face. We mark the eyes with a pencil and flash them with black thread. A small knot from the eye is left on the back of the head. They will hide behind their hair. In the same way we make a mouth.
Now we braid our doll and weave satin ribbons into pigtails.
Our doll is ready!

Master class on making "Flower Angel" at home
Tilda dolls are very diverse and they do not cease to amaze us with their unusual and cute images. For many years now, tilda dolls have been decorating people's homes and give the interior a sense of peace and comfort. Sewing such a doll with your own hands is not at all difficult. You can choose any fabulous look for your doll. If you want your house to always be bright and comfortable even on a frosty winter day, then our master class on creating a flower angel tilde will be very useful to you. Flower angel is a very sophisticated, romantic and elegant dolls that will decorate any home and bring love and peace to it. A feature of the flower angel tilde is the wings behind its back. Such a doll will look good on a windowsill among flower pots. She will look after and take care of them while you are not at home.
Before you start making this doll, you need to familiarize yourself with the pattern that will help create the elements for the doll.
- For the manufacture of tilda dolls, it is better to take a plain natural fabric. Next, you need to transfer the pattern to the fabric with a simple pencil. The fabric needs to be folded in half so that the front side looks inward.
- Then it is necessary to lay an estimated seam. It should run along the lower body of the tilde doll.
- After this, you need to take and fill the doll with filler, carefully distributing it throughout the doll’s body. When the doll is completely filled with filler, you need to carefully sew the product on the sides. Doll handles must be sewn near the very neck.
- Next, we move on to making clothes for the doll. To do this, you need to take two pieces of rectangular fabric and fold them in half with the wrong side. Transfer the dress pattern to the fabric, sew on the sides. Then put the dress on the doll and carefully sew it on it.
- After that, we begin to make hairs for the doll. Any yarn is best for hair, and the face of our dolls needs to be decorated with paints and blushes. You can attach a small rose to the doll’s hair.
The doll is ready!
Video on the topic of the article
At the end of our master class, we suggest that you familiarize yourself with the video guide that will facilitate your training. Tilda dolls are a great gift option and a wonderful toy that won the hearts of all children. As it turned out, making a tilde doll with your own hands is not so difficult. A little imagination, sleight of hand and it all worked out. Happy viewing!
Tilda is not the name of the doll, as some might think, it is a brand invented by the young pretty girl from Norway, Tony Finger. Tildes can be young dolls, any animals, birds, hearts, eggs and even flowers. Tony created a huge magical world where all kinds of tildes live. She wrote and published more than ten books in which she shared secrets, a tilda with her own hands. But this craftswoman seemed a little. Now the Tilda brand has spread to patchwork and scrapbooking. If she can create a tilde, then each of us can. You just need to really want and work hard.
Tools for work
To make any craft, you need materials, and for most gizmos, tools are also needed. To sew a tilde with your own hands, you will definitely need:
1. Scissors.
2. Needles and pins.
3. Pencil, crayon or soap.
4. Thin long stick. It is useful to turn the product on the front side and fill it with filler.
6. Sewing machine (if any).
Materials

The type of material depends on which particular tilda doll you are going to make with your own hands. If this is a small animal, you will need fabrics that are suitable for its body. Good animals come out of terry velor. But plain cotton and linen also look good. To create girls and ladies, you need cotton, linen or chintz fabric, similar in color to body color. You can take white and dye it in tea. So, the materials for creating a girl need the following:
1. The fabric. Dimensions are what size doll you need. Do not forget that the fabric will need to be folded in half.
2. Threads for sewing. Ideal if they are matched to the tone of the fabric.
3. Threads for your lady's hairstyle. This can be wool for knitting, boucle (the girl will turn out with curls), synthetic thick threads, if you want to make the lady extravagant.
4. Filler. Often use a synthetic winterizer or holofiber. If there is neither one nor the other, you can cut the old tights into small pieces. It is better not to take cotton, because it is difficult to fill the doll’s body evenly with it.
5. Paper.
6. Fabrics for doll clothes.
7. All kinds of accessories. What will it be: ribbons, beads, lace, beads or something else - your imagination will tell.
Preparation for work

They say that the result of any business will be good, if you prepare for it correctly. Before proceeding directly to the creation of the tilde, you need to iron the fabric for its future body, carefully fold it in half with the front side inward and chop it with pins so that it does not fidget. The next step is to imagine what it will be, your tilda doll. Do-it-yourself patterns, if not ready, this is a separate creative process. You need to take a sheet of paper, you can cardboard, or you can ordinary tracing paper. On it, draw in full size the contours of the doll’s body with the head, two arms and two legs. You can draw one arm and one leg, and then transfer them to the fabric twice. A distinctive feature of the tild design is a seam in the middle of the face or face. Therefore, the contours of the body are drawn on the side. A nose looms on the head. Some sew dolls with flat faces and sew parts on the sides, but the classic tilde still has a front seam.
Handles, legs, cucumber

The preparation is over. We begin to create a tilda doll with our own hands. The master class offered in this article tells how to make a tilde girl:
1. Carefully cut out the contours of her future body from paper.
2. We put them on the fabric.
3. Circle. Cut not in a hurry.
4. We sew or sew manually on the drawn lines. Be sure to leave the lower torso, arms and legs unstitched at the points of attachment to the body. You also need to consider that there will be a seam on the face and cut this place with special care.
5. Iron it all with an iron.
6. Now cut, be sure to step back from the edge. In places where the lines are rounded, it is preferable to make small cuts.
7. We turn on the front side. If the tilde’s arms and legs are too thin, it’s convenient to twist them with a sushi stick. It is also possible to attach a long dense thread to the “fingers” on the inside. In order to turn out the handle or leg, you just need to pull on this thread.
Volumetric

As a result of the work done, a torso with a head, two legs and two arms should be obtained. We begin to fill them. This case is not as simple as it might seem. If you shove the filler inaccurately, the girl’s body will turn bumpy. If it is not enough to put it over time, it will fail. If you overdo it, the doll will not be able to sit, it will only lie or stand, leaning against the support. Therefore, in order for the tilda toys to be created correctly with their own hands, one needs to take as much filler so that the body turns out to be stable and at the same time soft enough.
Filling the arms and legs, we start with the fingers. To do this, it is convenient to use a thin stick. Place the knees, leaving them without filler. Then the tilde will be able to put his legs in any position. To make the doll comfortable sitting, a little less can be inserted in the place of attachment of the legs to the body of the filler. Got it in? Now we collect the whole body from the parts. Some craftswomen do not sew hands to the body, but make them on buttons.
Hairstyle

You can make a tilde in a hat or cap, like a dwarf. But, according to the generally accepted opinion, hair is an adornment of any woman. A do-it-yourself tilda doll is no exception. Therefore, we will make a wig for her. The length, color and texture of the hair depends only on your imagination. The threads selected for hair should be carefully laid out in one layer and in the center fastened with a strip of adhesive tape. Next, in the center of the tape, gently stitch the hair twice. Remove the adhesive tape, and attach the resulting thread lining to the doll’s head and sew it carefully. In this case, the parting will turn out in the middle. You can make it right or left. You can leave your hair straight, or you can braid it or tie ponytails. There are also craftswomen who sew their hair to their tildes to the head, stitch by stitch - each thread separately.
Makeup

Your doll is almost ready. It remains to make her face. Its character will depend on how you position your eyes, how you draw or embroider your mouth, how to brown your cheeks. Yes, yes, these dolls are just that. Your tilda, created with your own hands, can turn out to be a naive simpleton, a kind angel, a cute coquette or a grouchy bastard. Therefore, create her face with special diligence and inspiration. The tilde's eyes are embroidered. As a rule, neither beads, nor buttons, nor beads are attached to their place. Very rarely do tildes with eyelashes, but this is rather the exception. Eye color can be, like in humans, any. But more often they are made dark. The mouth is drawn in pencil or embroidered with thread. Good tildes are always smiling. Cheeks are convenient to brown with ordinary ladies blush. That’s probably all. The naked tilde lies before you in all its glory.
The main thing is that the suit is sitting

There is a saying: "Meet by clothes." So your tilde, to please the eye, must be decently dressed. The style of her outfit is your own business. You can make a coquette from a doll, dressing it in a short skirt and a T-shirt-top, and put the legs in pumps. You can create a simple girl out of her by sewing on her a dress with a small pattern, a full skirt and sleeves-lanterns, tie it with an apron, put socks on your legs. A lot of options. Some craftswomen, when they create tilda dolls with their own hands, clothes are sewn to their body. This is probably convenient from some points of view. But you can don’t sew clothes on, but put them on a tilde like any other doll. In addition to dresses and skirts, shoes are created for them, and sometimes hats. Sneakers are often made from shoes. For this, the sole of the slipper is cut out of any dense material, commensurate with the size of the doll’s foot. Two thin strips are cut from any soft material and attached to the soles. Here you have the slippers. If desired, you can ennoble them with beads. In addition, tilde can sew lace panties and fishnet stockings.
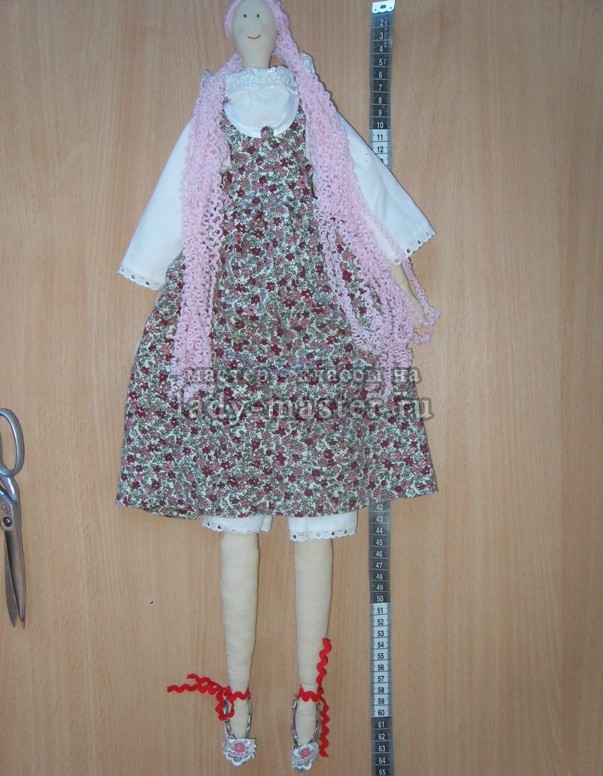
I first met Tilda a couple of years ago at some kind of needlework forum. This naive pink-cheeked and so cozy doll fell in love with me at first sight. I generally like everything so unusual, vintage and beautiful. Once in my youth I sewed toys, so I was eager to try to make Tilda, because there is nothing complicated about it. The main thing is the details and exposure of a unique, characteristic only to her, style.
My first pattern was intended for beginner sorceresses, but I still use it, having slightly changed and improved the proportions. Large parts are easier to sew than small, though longer, especially by hand. Therefore, for a start it is worth practicing on dolls of high growth. How to sew such a Tilda-style Doll, I’ll tell you now.
Materials for sewing Tilda for beginners
We will need several rags of fabric of different colors, but always from natural fibers. I didn’t buy anything, everything was found at home in stocks of old clothes. For body and clothes used cotton - white and in small flowers. A sleeve from an old woolen sweater came up as hair, which I loosened to get wonderful curls. Lace was also useful for decorating Tilda's blouse and shoes. As well as two small buttons, braid for the same shoes, two decorative flowers in a hairstyle, a thin white ribbon to stretch into drawers. These decorative little things can also be found at home, for example, to cut off buttons from old things, to undo lace from long-tired blouses. For work, you will need threads of white, black and red (my Tilda has a mouth), blush, synthetic winterizer, scissors, paper, pen, pins and a needle.

The working process
1. On paper, wallpaper or newspaper you need to draw a pattern of the future Tilda. The optimal size for the first experiment from the top of the head to the edges of the legs is 50-60 cm. Cut the finished pattern.
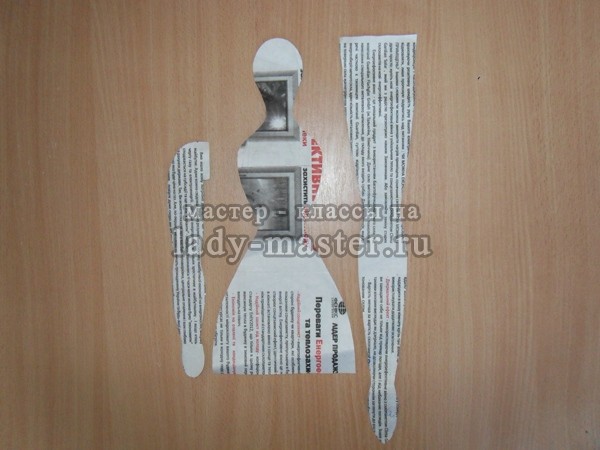

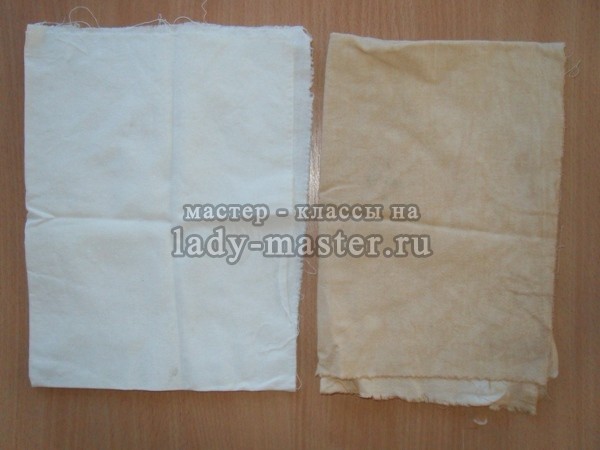
2. Next, take the fabric from which the doll’s body will be sewn. If there is no material suitable (dark beige, flesh, light brown) color, you can do it that way. Plain white cotton perfectly turns into a nice dark color if it is soaked for several hours in coffee or a thick infusion of tea. I used coffee: good effect and aroma.
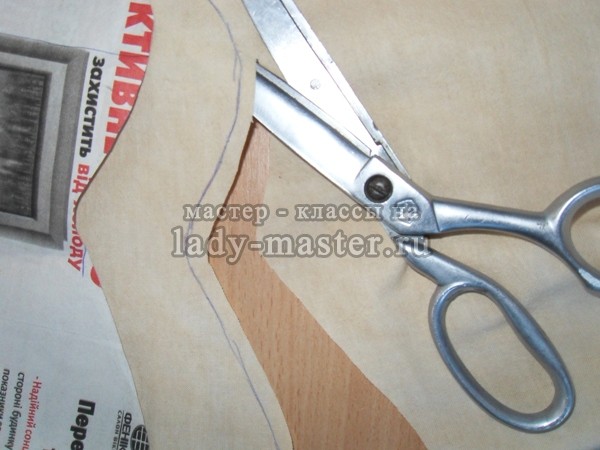
3. All fabrics that you will work with must be ironed so that there are no bends or bruises. On a flat rag cloth impose a pattern and circle it with a pen. Each piece requires two copies - the back and front.

4. Cut the pattern is necessary not on the very contour of the picture, but with an indent of 0, 5 cm minimum. This margin is necessary so that the edges do not disintegrate after stitching.
5. When everything is already cut, the time comes to stitch the details. It is easier and more convenient to do this with a regular seam stitch, making small even stitches and following the lines drawn on the fabric. Leave the bottom of the body, arms and legs at the bases not sewn, so that later they can be filled with filler through the holes.
6. Finished parts must first be turned out. To make this happen neatly, because the neck and limbs are rather thin parts, use a pencil or pen, just stick in the blunt edge. Carefully and with moderate density, fill all parts of the toy’s body with a padding polyester, fix the pins after filling the hole so that the filler does not come out and it is more convenient to put everything together.
7. Sew on your hands, stitch your legs in a straight line, tucking a little edge on the body so that the threads do not climb and look aesthetically pleasing.

8. In the area of \u200b\u200bthe elbows and knees of the doll, it is necessary to make weights so that they can bend (make several even stitches, pulling the thread well and pressing the sintepon inside).

9. The body is ready, now it remains to put it on and give a human appearance to the face. Clothes for Tilda can be sewn, guided by their own taste. The standard option is a colorful sundress, white blouse and underpants.

10. The pattern for the underpants can be made according to the same pattern as the doll was sewn, measuring the desired length - approximately from the line just above the waist and to the knee, adding in width so that they come out lush, not tight-fitting. Panties are sewn from two identical parts, the upper edge is tucked and hemmed, leaving a cavity inside it, and the lower edges are decorated with lace. Pull the tape into the hole of the hem to secure the pants on the Tilda figure.

11. The blouse can also be made of two identical halves, which are stitched together. I made it a little more complicated - I separately cut a sleeveless jacket with a longitudinal slot on the back for the convenience of dressing and a sleeve to it. Then she sewed, collecting small folds on the sleeves around the shoulders to make them more magnificent. Cuffs and a collar, as well as underpants, decorated with lace.

12. The sundress consists of upper and lower parts. The top is a short top with the same vertical cut in the back, the edges of which slightly overlap, like a blouse.

Bottom - a fluffy skirt slightly above the knees, for which it is necessary to take a fabric two to three times wider than the top to make the shuttlecocks during stitching with a connecting stitch seam. When the top and the skirt are already together, connect the hem, do not forget to cut the bottom edge.

13. On the back of the sundress should be buttons for fixing. Sew them, make and process the fastening holes. The area around the neck can either be cut or decorated with a thin light ribbon.

14. Shoes for Tilda sew on the leg, or rather the pattern of legs. Circle only the edges, draw an oval. You leave one in this form, and from the other, remove a piece in the form of a v-shaped cutout. This will be the top of the shoe. Transfer the oval details to the white fabric, and the curly ones to the one from which the sundress was sewn. Indent and stitch out soles and toes. When twisting, decorate with a small piece of lace and a button in the middle, and attach a braid of sufficient length for the ties to the back.

15. The doll is already dressed, shod, but faceless and hairless. Cut a piece from an old knitted woolen sweater and start making hair. Dissolving it, you will get a wavy thread. I decided that my Tilde’s pale pink hair color would fit my face, so I chose that one.

When you pull enough threads for good hair, cut them into strands of the same length and sew to the Tilda's head in the middle, separating them with a seam to parting.
16. Black threads embroider two noticeable dots on Tilda's face - these are her eyes. Usually these dolls do not have a mouth, but I decided that my girl would be prettier with him, so I made her smile with a red thread. With the help of any blush available in the cosmetic bag, we make the doll rosy cheeks.

17. The final stage is a hairstyle. Take a pair of miniature decorative bows, ribbons or flowers, divide the curls into two parts and tie two tails.

Here's a little modern Tilda I got, sitting on a pedestal near the TV and decorating our living room.


If you follow my master class, observe the basic principles of work, but do not forget to show imagination, your sister will surely appear in your home very soon, just as sweet and positive, and most importantly, made by your own hands and with soul.