Tilda doll is a modern toy that appeared on the market of children's products relatively recently, but has already managed to win the love of children and adults. Unfortunately, the original copies of this model cost a lot of money, so we suggest you learn how to sew a Tilda doll at home - especially since the creation process will take very little time!
Doll story
The world first learned about Tilda in the late 90s of the twentieth century. It was at this time that its creator, the artist Tony Finnanger from Norway, came up with how to sew a cute rag doll, and opened a Tilda toy store.
In 2000, the girl enters into a contract with the toy manufacturer Panduro Hobby, which redeems the copyright for all patterns of the needlewoman.
At the time of our grandmothers, everything was simple: we make a doll out of stockings and make our kids happy! But despite the fact that there are other types of dolls that have already been loved by the public, in a short time Tildochki became incredibly popular in Europe, and later they were found in Russia and the American continent. The toy got its charm thanks to a simple but very touching appearance:
- conditional facial features - a small convex nose, eye-points and lack of mouth;
- lush disheveled hair and vice versa - neat hairstyles: party, braids, tails;
- chubby little body with long thin arms and legs.
Panduro Hobby also produces designer needlework kits, embroidery patterns and pattern books by Tony Finnanger. About how to sew a doll with your own hands: patterns, photos, videos can be easily found on the Internet.
Tilda Fatty: a master class
The creator of Tilda thought that all people are created different, and each has its own charm. So there was an instruction on how to sew a charming little dummy doll that enjoys life.
 In the workflow, you will need a piece of light but strong, non-tearing flesh-colored fabric, light yarn or wool as your hair, and also bright patches, ribbons, beads and lace, from which you later sew a dress.

- Based on the pattern of a doll-bather. Stretch it by hand on a computer to lengthen parts of the body, print and transfer it to the fabric, not taking into account the pattern of the towel and bathing cap.

- Cut out the details from the fabric - they should be the same as indicated in the drawing - and sew along the contour, leaving holes in the bottom of the body and in the upper part of the arms and legs.

- Turn out the details, leaving the stitched seams inside.

- Fill parts of the body with a synthetic winterizer or halafiber.

- Sew the items together.
 Set the finished body aside and start creating a festive doll dress.
- Take the following measurements: the length of the body from the neck to the approximate waist, multiplied by 2, - this value will be equal to the length of the future top; waist circumference - width of the part. Build a rectangle using these parameters, not forgetting the increase in the seams of 0.5-0.7 millimeters. Make a hole for the head in the middle, and cut out the convex semicircles along the long sides.

- You can decorate in front of a collar, frill, beadwork. After that, try on the item on the doll.

- Near the opening for the head, make a small cut in the back so that the head freely fits into the clothes. Sew the edge of the neck with a simple machine stitch and sew the ribbon fasteners along the edges of the neckline.

- To cut the sleeves, attach the top of the dress to the patch and circle the carved semicircles on the fabric.

- Cut the semicircles and sew lace to their outer edge.

- Now you can sew up your sleeves.

- From a long rectangular flap, form a skirt, stitching along one long side so that the length is equal to the circumference of the upper part and gathered in folds. Bottom lace over.

- Sew the free side of the workpiece, after which you need to sew the skirt and the top of the dress together.
 In this master class, the hairstyle is formed from wool for needlework and is piled dry to the doll’s head. If you do not know how to work with wool, make an impromptu headdress - a hat, a hat - inside which sew pigtails made of floss thread and dress a doll.
Sew on black bead eyes or dot with a marker. Tilda's characteristic blush can be painted on the cheeks with acrylic paints.
To complete the image, it remains to sew the underskirt of bright fabric on an elastic band and put on under the dress.
 Your beauty is ready! Such a doll is sewn not only for children's games - it will serve as an excellent gift for the holiday.
Retro dolls: master class
Prepare flesh-colored fabric, rags of bright polka-dot fabric in contrasting colors and decorating elements - brooches, stickers, buttons and beads.
 The body of the previous doll consisted of two whole-cut parts. The same beauty needs to be sewn together on a slightly different principle - the front and back parts consist of 4 parts: two designate the head and body to the shoulders and two more - symbolize clothes from chest to hips.
- Familiarize yourself with the pattern of the doll’s and dress’s details, cut them out of thick cardboard and transfer them to shreds of the appropriate color: the body is on sand cloth, the clothes are on polka dots. Do not forget that in this master class the body consists of parts of several colors. Sew paired parts (front and back of arms, legs, torso), leaving holes.


- Stuff the body parts with soft material, after which you can sew the body elements together.

- Connect 2 shorts with a sewing pin and sew them together.

- Fold in the upper edge of the shorts and the edges of the legs, sew on a sewing machine, leaving small holes. In the resulting distances, you need to put in an elastic band to keep the product firmly on the doll.

- Details of the bodice are also cut out in the amount of 2 pieces in the form of a strip measuring 15x5 centimeters. Firmly drape each blank in the middle and at the edges.

- Throw the parts over the shoulders of the doll and stitch front and back.

- It’s easiest to sew a belt - fold the striped strip in half with the front side inward. Sew along the edge, leaving a small distance without a seam. Turn out and sew a hole with a secret seam. Iron the item and tie the doll with it.
- Leave a hat pattern in the form of a pattern on a piece of cloth. Sew the headgear fields in a circle with a simple seam and only then cut it out.

- With a secret seam, connect the fields of the hat, as well as its lower part to the top.

- From felting wool or light-colored yarn, make two small balls and stick them on the sides of the head - they act as a hairstyle.
 Draw a face in the same way as in the previous workshop.
Now the beach beauty from fabric can safely go to the seashore.
 Decorate the doll by stitching the simplest handbag to match the hat and belt. Cut out a 15x10 centimeter rectangle, connect the edges and sew them, leaving the top seamless. Turn out the product, attach handles and jewelry.
If you decide to sew a Tilda doll for the first time, listen to the advice of the craftswomen who have been working on licensed patterns by Panduro Hobby for several years.
Bending limbs
To bend the arms and legs of the doll, stuff them in the following way: fill the workpiece with soft material to the middle. In the place of the proposed elbow or knee, make a small seam forward with a needle or a simple seam on a sewing machine.
After this, you can continue to stuff the product.
Makeup rules
To achieve the most natural rosy appearance, red cheeks are recommended for dolls to be applied using a real blush brush, cotton swab or sponge. Use acrylic paints.
Despite the fact that it is easy to decorate the doll with eyes drawn with indelible marker, give preference to the French knot, as in the technique of embroidering with ribbons.
Take it to yourself, tell your friends!
Read also on our website:
show more
Have you decided to make gifts to your mother this year with your own hands? Then pay attention to the flowers made of fabric - they fit perfectly into the home or office decor. What about the small-cactus of sea pebbles? Your mom will definitely like it!
The story of Tilda’s beloved doll began in 1999, on the day when the Norwegian artist Tony Finnanger came up with the idea to create something special. After that, Tilda's doll was created with her own hands: for beginners, patterns and a description of the process are provided in this article. You will learn the secrets of the face of the author’s doll, and the types of fabric used to create a unique image.

What is Tilda?
Tilda is an amazing doll, distinguished from the rest by an oblong body, long legs, button eyes. Tild's cheeks invariably burn with a blush, regardless of who this interesting chrysalis is. And there are thousands of images of a handmade toy: girls and boys, pot-bellied rabbits and colorful snails, funny cats. Each masterpiece of needlework has its own name and character, Tild's clothes and accessories are never repeated.
Fabrics for designer dolls
Tilda, in its first manifestation, was conceived by Tony Finnager as rustic author's doll. Therefore, the fabrics for her were used natural. Despite the fact that the number of incarnations of the toy has increased - the fabric for needlework has remained the same. Use the types of textiles and accessories when creating an individual image:
Body
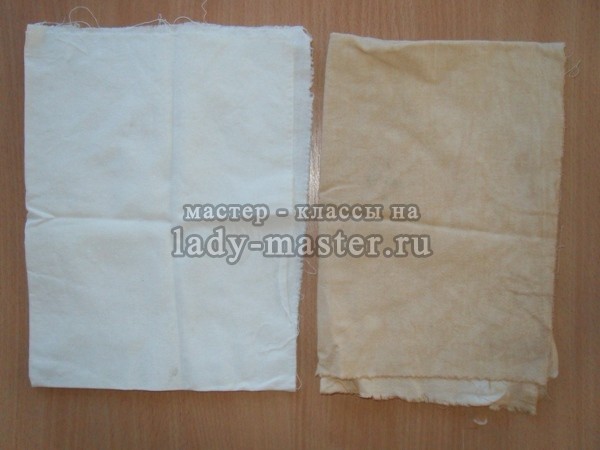
The body of the Tilda doll is distinguished by a beautiful tan or aristocratic pallor: suitable options will be flannel, calico, linen. If you cannot choose the color of the fabric, then take the material in white or pale beige color and paint it yourself in the “tildin” color.
Use natural dyes: instant coffee, onion peel or tea brewing. Boil a cloth with one of the listed ingredients for 10-15 minutes, then dry slightly and steam it with an iron until it dries completely.
clothing
Use cotton fabric delicate colors: blue, white, pink, light brown. Colors may be the most diverse, but most often for the Tilda doll, fabrics with roses, delicate wildflowers, peas, and small geometry are used.
If you are planning to sew Tilda with your own hands in outerwear, then take a closer look at jeans, natural wool.
Hair
The most common option is ordinary colored yarn. For the embodiment of individual images, you can use natural or artificial hair from needlework stores.

Stuffing
The most popular option is holofiber. You can try stuffing the doll with cotton, but its mobility will deteriorate somewhat.
By the way, fabrics for beginner needlewomen should be purchased in a specialized store. There they sell ready-made cuts that will free you from excruciating thoughts about combining fabrics. Buy fabric only for a specific Tilda: the variety of assortment can push you to rash purchases.
How to make a doll face?
To make a chrysalis special faceIt is not necessary to have a higher art education. Yes, and secondary special too. Enough of a little imagination and improvised tools that can be found in a cosmetic bag.
Eyes
Proceed to the design of the eyes after you sew the hair. Otherwise, you can not guess with their location, and Tilda's face will look untidy.
First, outline future button eyes with a needle or pencil: if the result is satisfactory, then apply to the fabric acrylic paint or black varnish for nails.

When you move on to a professional level in tailoring designer toys, it is recommended to purchase a special set of “Tilda Kit Paint Fases”, which contains all the necessary tools and materials for creating the face of the future Tilda doll. Such a kit will have to be ordered from abroad: in Russia, Tilda branded materials are not widely used.
In addition to dyeing, eyes can be made by embroideries french knot or sewing black beads.
Blush
Do not make blush paints - unlike the peephole, the failed result will be difficult to hide or remake. Use ordinary blush.
On this, the face of an ordinary Tilda doll is finished. When sewing animals, you can add a mouth - it can be embroidered with thread.
DIY Tilda: patterns
Let's see how to sew Tilda on the example of a gentle and airy angel dolls. The pattern is presented on two sheets: print them.
Remember - the size of the Tilda is determined independently, so before printing you can enlarge or, conversely, reduce the image.


In the last book of Tilda, you can meet such a cute character as a hanging monkey. In such a monkey, the arms, legs and tail are sewn in the form of curls, that is, it can be hung by such a curl in the children's room and it will look very beautiful. Or maybe ...
This cute little rabbit is perfect for beginners! The pattern consists of only two parts - the body and the eye, and in our master class (taken on the official tildasworld tildablog) everything is shown in so much detail that the sewing process will be easy and enjoyable. ...

For a long time I wanted to sew this particular Santa from the 2010 book Tilda Christmas Ideas. He is all festive, beautiful, not ordinary, a little elongated. There are still Pixies (Elves) and Christmas Angels in this book. The author’s old books are much closer to me than the last ....


Girls, seeing this cute lamb on the Internet, I just could not pass by! Sewing it is not difficult, but the level of cuteness is just over the top. I highly recommend that beginner needlewomen try to sew such a toy. Very soon, the new year, and we have it in ...


Last year, we somehow did not have time to prepare a normal master class on this snowman, so now very early (and time flies so fast) we begin to tune in to the New Year and Christmas themes! Let's try to sew a cute snowman based on Tildov’s snowmen. Him…


In the original Tone Finnanger book “Sew Sunny Homestyle” we meet many wonderful characters, one of them is Tilda in a dress based on Jane Austen. We have this girl is better known as a lavender angel, perhaps because the book has a lot on ...

Somehow, we wanted to sew an interesting Tildov image, something slightly unusual, but also simple at the same time. I decided to try to make a bird house, in the book by Tone Finnanger, she is called the Good Witch and is an integral Easter character in Scandinavia. Yes, it’s exactly on Easter ...

We already have a workshop on the site for sewing a little princess on a pea with pillows. This princess is completely different. This is a classic image of a tilda girl from the book “Heroes of Tilda's Fairy Tales”. She is the protagonist of many fairy tales, as Tony writes “some ...
Tilda One: Practical Tips
Output. The question is ripening in my head: “What would be good to do this?” There is one option that for many needlewomen has become a gate to the whole magical world. The name of this world is Tilda. Tilda dolls, created with their own hands, can captivate for a long time and seriously.
Are Tilda dolls difficult for beginners? No, not too much. In any case, on the technical side, everything is relatively simple. The seams should be neat and even, made with small stitches, otherwise the stuffing may come out. Better to do the lines on a sewing machine. If you have the skill to lay even small stitches, then you can do it with your hands. The process will be somewhat delayed, but it will turn out to be a 100% “Tilda doll with your own hands”.
The first Tilda must be chosen from those that are simpler to manufacture: snails-Tildas and flying Tildo-cats. Patterns and manufacturing tips can be found at the request of "Tilda dolls (Tilda) with their own hands", "a master class on sewing Tilda" and of course also.

The most difficult thing, perhaps, is to choose fabrics. Before heading to the store, the craftswoman should have in her head an almost complete image of the future Tilda, so that all fabrics and details harmoniously combine. But in stores it is not always possible to find a good assortment of suitable fabrics.
Well, a plain fabric for the head and limbs can be unearthed in home supplies. To paint rags from a pillowcase or sheet with cheap tea or coffee - and one part of the problem is solved. But finding natural pastel shades, and even with small-fine prints, moreover, combining in color and texture, is already more difficult. If the size of the doll allows, then you can find the right flaps among the handkerchiefs. They often have a small drawing or a small cell - exactly what Tilda needs.
To fix the crumbling edge of the fabric, you can use a strong solution of gelatin. Lightly grease the edge of the part with it, and when it dries, cut it off. This will hardly add rigidity, but will fix the threads.
There may be difficulties with the extremities of the dolls. So that they do not stick out with sticks, but bend gracefully, small crosses can be made into several stitches in places of bending. The cross successfully imitates the joint and allows the leg to bend beautifully.


It’s good to take leather for shoes and handbags from old or lonely gloves. It is very thin and soft, easy to sew. In any second-hand of such gloves - a carriage and a small cart, all colors of the rainbow.
The tiny buttons of the desired color and shape are excellently obtained from dough based on PVA glue and ordinary flour, tinted with watercolors or acrylics. This mixture is very plastic, dries out within a day, extremely inexpensive.
A hardware store as a source of the right materials!
If you need to make a frame Tilda, on a wire, so that you can give it any position of the body, then in the hardware store you will find exactly what you need: knitting wire. She just needed flexibility and rigidity.
Here you can find another useful material: polystyrene or silicone granules for weighting dolls.
Traditionally, hair is made from bulk wool or plush yarn. In some versions, a bundle of threads needs to be stitched to get a semblance of a chignon wig. It is convenient to do this by fastening the threads in the middle of the beam with masking tape.
Very beautiful hair is obtained from sanitary flax. It must be washed first and rinsed well in a solution of air conditioning. And after drying, pat, as our great-grandmothers did, and comb through a comb, designed to comb cats and dogs. The tows can be added to the padding, and the resulting long strands of linen fibers will become wonderful hairs for Tild.
You never know what you can do till you try.
I first met Tilda a couple of years ago at some kind of needlework forum. This naive pink-cheeked and so cozy doll fell in love with me at first sight. I generally like everything so unusual, vintage and beautiful. Once in my youth I sewed toys, so I was eager to try to make Tilda, because there is nothing complicated about it. The main thing is the details and exposure of a unique, characteristic only to her, style.
My first pattern was intended for beginner sorceresses, but I still use it, having slightly changed and improved the proportions. Large parts are easier to sew than small, though longer, especially by hand. Therefore, for a start it is worth practicing on dolls of high growth. How to sew such a Tilda-style Doll, I’ll tell you now.
Materials for sewing Tilda for beginners
We will need several rags of fabric of different colors, but always from natural fibers. I didn’t buy anything, everything was found at home in stocks of old clothes. For body and clothes used cotton - white and in small flowers. A sleeve from an old woolen sweater came up as hair, which I loosened to get wonderful curls. Lace was also useful for decorating Tilda's blouse and shoes. As well as two small buttons, braid for the same shoes, two decorative flowers in a hairstyle, a thin white ribbon to stretch into drawers. These decorative little things can also be found at home, for example, to cut off buttons from old things, to undo lace from long-tired blouses. For work, you will need threads of white, black and red (my Tilda has a mouth), blush, synthetic winterizer, scissors, paper, pen, pins and a needle.

The working process
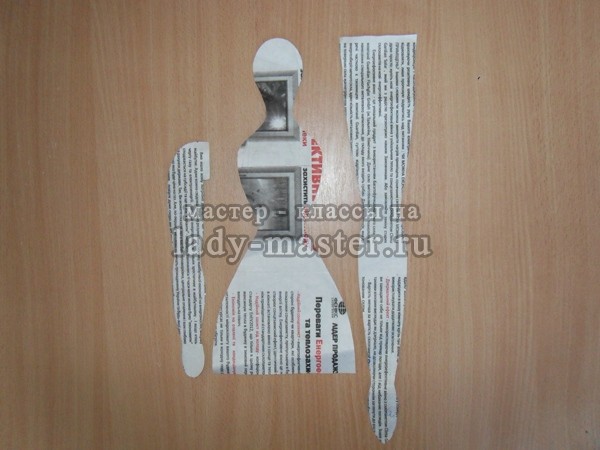
1. On paper, wallpaper or newspaper you need to draw a pattern of the future Tilda. The optimal size for the first experiment from the top of the head to the edges of the legs is 50-60 cm. Cut the finished pattern.

2. Next, take the fabric from which the doll’s body will be sewn. If there is no material suitable (dark beige, flesh, light brown) color, you can do it that way. Plain white cotton perfectly turns into a nice dark color if it is soaked for several hours in coffee or a thick infusion of tea. I used coffee: good effect and aroma.
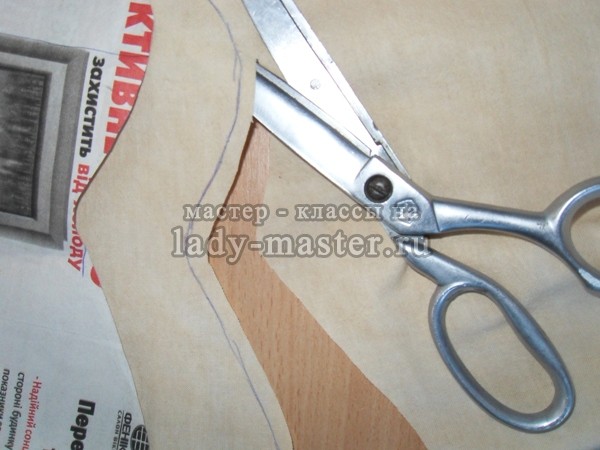
3. All fabrics that you will work with must be ironed so that there are no bends or bruises. On a flat rag cloth impose a pattern and circle it with a pen. Each piece requires two copies - the back and front.

4. Cut the pattern is necessary not on the very contour of the picture, but with an indent of 0, 5 cm minimum. This margin is necessary so that the edges do not disintegrate after stitching.
5. When everything is already cut, the time comes to stitch the details. It is easier and more convenient to do this with a regular seam stitch, making small even stitches and following the lines drawn on the fabric. Leave the bottom of the body, arms and legs at the bases not sewn, so that later they can be filled with filler through the holes.
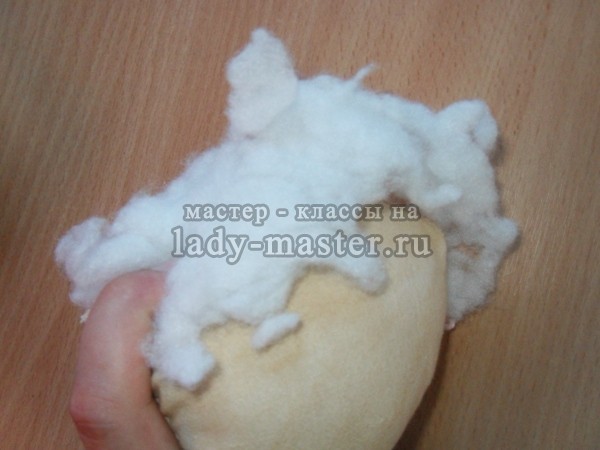
6. Finished parts must first be turned out. To make this happen neatly, because the neck and limbs are rather thin parts, use a pencil or pen, just stick the blunt edge in. Carefully and with moderate density, fill all parts of the toy’s body with a padding polyester, fix the pins after filling the hole so that the filler does not come out and it is more convenient to put everything together.
7. Sew on your hands, stitch your legs in a straight line, twisting a little edge on the body so that the threads do not climb and look aesthetically pleasing.

8. In the area of \u200b\u200bthe elbows and knees of the doll, it is necessary to make weights so that they can bend (make several even stitches, pulling the thread well and pressing the sintepon inside).

9. The body is ready, now it remains to put it on and give a human appearance to the face. Clothes for Tilda can be sewn, guided by their own taste. The standard option is a colorful sundress, white blouse and underpants.
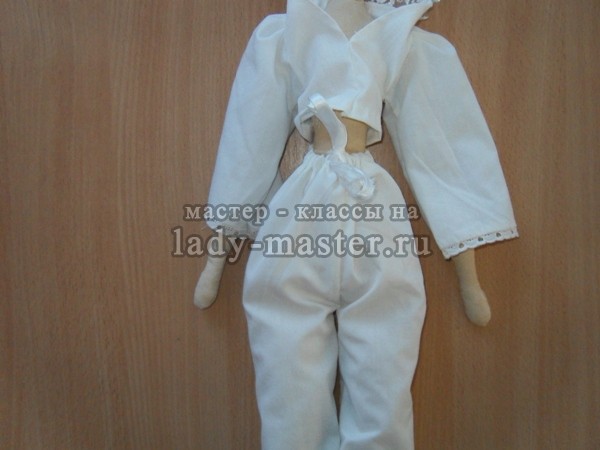
10. The pattern for the underpants can be made according to the same pattern as the doll was sewn, measuring the desired length - approximately from the line just above the waist and to the knee, adding in width so that they come out lush, not tight-fitting. Panties are sewn from two identical parts, the upper edge is tucked and hemmed, leaving a cavity inside it, and the lower edges are decorated with lace. Pull the tape into the hole of the hem to secure the pants on the Tilda figure.

11. The blouse can also be made of two identical halves, which are stitched together. I made it a little more complicated - I separately cut a sleeveless jacket with a longitudinal slot on the back for the convenience of dressing and a sleeve to it. Then she sewed, collecting small folds on the sleeves around the shoulders to make them more magnificent. Cuffs and a collar, as well as underpants, decorated with lace.

12. The sundress consists of upper and lower parts. The top is a short top with the same vertical cut in the back, the edges of which slightly overlap, like a blouse.

Bottom - a fluffy skirt slightly above the knees, for which it is necessary to take a fabric two to three times wider than the top to make the shuttlecocks during stitching with a connecting stitch seam. When the top and the skirt are already together, connect the hem, do not forget to cut the bottom edge.

13. On the back of the sundress should be buttons for fixing. Sew them, make and process the fastening holes. The area around the neck can either be cut or decorated with a thin light ribbon.

14. Shoes for Tilda sew on the leg, or rather the pattern of legs. Circle only the edges, draw an oval. You leave one in this form, and from the other, remove a piece in the form of a v-shaped cutout. This will be the top of the shoe. Transfer the oval details to the white fabric, and the curly ones to the one from which the sundress was sewn. Indent and stitch out soles and toes. When twisting, decorate with a small piece of lace and a button in the middle, and attach a braid of sufficient length for the ties to the back.

15. The doll is already dressed, shod, but faceless and hairless. Cut a piece from an old knitted woolen sweater and start making hair. Dissolving it, you will get a wavy thread. I decided that my Tilde’s pale pink hair color would fit my face, so I chose that one.

When you pull enough threads for good hair, cut them into strands of the same length and sew to the Tilda's head in the middle, separating them with a seam to parting.
16. Black threads embroider two noticeable dots on Tilda's face - these are her eyes. Usually these dolls do not have a mouth, but I decided that my girl would be prettier with him, so I made her smile with a red thread. With the help of any blush available in the cosmetic bag, we make the doll rosy cheeks.

17. The final stage is a hairstyle. Take a pair of miniature decorative bows, ribbons or flowers, divide the curls into two parts and tie two tails.

Here's a little modern Tilda I got, sitting on a pedestal near the TV and decorating our living room.


If you follow my master class, observe the basic principles of work, but do not forget to show imagination, your sister will surely appear in your home very soon, just as sweet and positive, and most importantly, made by your own hands and with soul.


