Toys for children are necessary almost from the first weeks of life. Each toy has age restrictions, as it contains a specific developmental component for the child. Toys for ages younger or older should be excluded from his daily gaming program.
Toys from which the baby has already grown will not be interesting to him, and those that are put aside for the future child will not understand at all. Toys for children can be both bought and made independently, with their own hands.
Particular attention should be paid to homemade toys that a young mother really needs to engage a child in the game process while traveling in a car or while waiting in line, for example, in a children's clinic.
This time can be spent with benefit for the development of the baby. It is for this purpose that compact educational toys for children are created.
This lesson presents the process of creating a toy in the form of a small square measuring 9 square centimeters. Using this box, you can hide the bee in a flower bud or in a barrel with honey. With the help of such a toy, you can tell the child where the honey comes from and what the bees do.
To work on a toy you will need prepare:
- 9 skeins of yarn. You can use in the work and the remains of yarn from knitting previous things.
- Hook.
- And for sewing ready-made applications, you will need a regular sewing needle with a thick eye.
Educational toy for children up to 1 year old with their own hands - crochet:
The toy is made up of 2 parts - knitted squares with appliques connected along the edge together. Each square is made up of several rows of single crochet posts. To knit each square, you must first dial a chain of initial air loops with a total length of approximately 9 cm.
 Then along this chain you need to knit the first row of single crochet.
 Next, we knit a couple of rows with the same green yarn.
 Next, enter the blue thread (sky) and knit the square further.
 The next step is to tie the striped bee. To do this, take yellow, black and white yarn. To begin with, we knit the bee's body in columns with a single crochet. We start knitting with a set of 4 air loops on the hook.
 We connect these loops, forming a circle with the help of a connecting column.
 We make 1 row of single crochet so that in each top of the column of the previous row it turned out to draw 2 single crochet.
 Enter the yellow thread and knit 2 rows of single crochet.
 We alternate a couple of times to get a striped bee. Closer to the final, we make reductions due to 2 columns with 1 vertex.
 At the end, we knit a chain of air loops, along which we move down with the help of connecting columns and repeat again to teach the second antennae.
 Now we make wings for the bee. To do this, take white yarn. We collect 3 air loops and in the third loop from the hook we spend 3 incomplete columns (from each column on the hook, 1 loop remains) with 1 double crochet.
 We make a crochet and drag the crochet thread through all the loops on the hook. We knit 3 air loops and 1 connecting column into a loop, from where the other columns originate. Repeat this sequence again to obtain the second wing.
 Sew the wings to the bee.
 Now, knowing the approximate size of the bee, you can begin to create a flower bud in which it will then hide. From the bottom up we first make 4 air loops on which we knit the initial row of single crochet stitches. In the next row, we make an increase along the edges, making 2 single crochet into the tops of the side posts. Starting from the third row, we knit without increasing the columns.
 We knit shells at the top. Each shell is knitted in 3 loops. In the first - 1 half crochet, in the second - 3 columns with 1 crochet, in the third - a half crochet. After each shell, 1 single crochet is knitted in the next loop of the row.
 Sew the bud so that inside the space for the bee is formed.
 We knit a leaf for a flower. We collect 9 initial air loops. Now in the initial loop we draw 1 single crochet, in the next loop - a half crochet, in the next 6 loops - 1 column with 1 crochet. In the last loop to create an oval tip, we knit 3 columns with 1 double crochet, 3 air loops and again 3 columns with 1 double crochet. after that we go to the other side of the leaf and knit 6 columns with 1 yarn, 1 half-column and 1 single crochet. At the end of the row we make 1 connecting column.
 We make the second leaf and sew them below under the bud, leaving room for the stem.
 We knit the stalk through loop. To knit them, we hold the hook in the voids between the columns of the square, hook the loop from the inside and pull it up with a hook, dragging it through the work loop on the handmade hook.

 Now the bee has where to hide.
 We knit the second box using yellow and beige yarn.
 Crochet an application in the shape of a pot of honey. To do this, use the increase on the sides of the pot in the lower part and the decrease on the sides of the pot in the upper part. We fix the application on the square.
 Sew the applique to the square.
 On the pot before sewing, you can knit or embroider the word "honey".
 We will knit a small chain of air loops from the bee.
 Now the bee will always accompany the square and will not be lost. In addition, the tail from the chain of these air loops should be left longer in order to use this thread to connect two squares along the edge.
 All stages of knitting a developing square are passed. Now the bee has where to hide. To begin with, she flies into a flower bud.
 Having collected pollen, the bee goes to a pot of honey.

 This toy is easy to take with you. The child will be interested in playing it, hiding the bee. The time that is usually wasted will now be taken up by the developmental game.
In combination with similar squares, you can make a whole development book. Here's a cloud and rainbow option.
The author of the master class on a developmental toy for a child under 1 year old: Lilia Pervushina
Each mother for her baby always wants the best, natural and safe.
In modern times, crocheting is gaining more and more popularity among young mothers.
Crochet toys for newborns can embody the expression of the most interesting fantasies, and for this you do not need to have all kinds of knitting techniques.
There is no kid who would not like soft toys, especially if they are connected by mother with love. Very often it is with such toys that children are inseparable.
When mom has a moment of free time, she thinks how she could still express her love for the baby. Usually, at such moments, mothers start doing needlework. It is knitting that has a beneficial effect and calms mom, which in turn:
- expresses itself and sees the excellent results of his work;
- achieves specific skills and experience;
- decorates his interior with a new toy;
- realizes creative potential;
- gives the child pleasure with a new toy;
- affects the physical and emotional development of the baby;
- shows his love and care for the child.
To master simple crochet skills, you need to have the desire and time. Corresponding material is sold in each specialized store or haberdashery.
Having mastered the basic skills, the mother can easily connect any character for her baby.
Benefit for baby
Due to its embossed surface, knitted toys are very useful for kids, they contribute to:
- the development of fine motor skills;
- the study of flowers;
- mastering the form;
- perception of size.
Ideas for making toys
A lot of techniques are used for knitting toys: from the simplest to the most complicated combined techniques. For the manufacture of a small toy, simple crochet methods and patterns are commonly used. The hardest part of this process:
- correctly read the diagram;
- give your creation the right shape.

Rattles are knitted
Crocheted toys with a description and appropriate patterns will help mom develop a fantasy and surprise her baby and family with a new creative masterpiece.
Beanbag
Rattle - a favorite game of newborns. Thread texture, bright color, noise effects - these characteristics will attract the attention of any baby. To make a rattle, you can use any item in which you can place:
- buttons
- cereals;
- beads;
- metal ball.

Homemade Rattle
Elements that create a sound effect are placed in a small volume container, which is then crocheted and then decorated. As additional details, decorations can be:
- decorated on the toy parts of the face;
- auxiliary parts (bows, hearts, stars, etc.);
- shreds;
- large beads on a thread;
- bell.
For a baby, such a toy will become a source of unique tactile sensations, sounds, entertaining images that will affect his perception of the world around him. Moreover, when a mother, having tied a toy “friend”, puts all her love and warmth of heart into him, she turns out to be especially expensive and sunny.
If the rattle is small, it can be sewn onto the toes of the baby. When he moves his legs, the rattles will produce a noise effect, which will help develop motor skills and hearing in the child.
Comfort
A newborn baby constantly needs a mom. Especially it becomes necessary to feel it at night, during rest. Sleeping babies is not very calm, and mom also needs a rest. A way out of this situation can be a crocheted comfort. This is a cozy, practical, soft and kind of "rag-hug."
To ensure the baby a complete sense of comfort, it is necessary:
- hold the toy near mom for some time;
- put in a crib with a child;
- thanks to this knitted toy, the baby’s sleep will be calm and healthy;
- when he wakes up and sees his favorite toy, he can immediately play with it.

Crocheted Comfort
On the Internet there are detailed free workshops with clarifications and pre-made toy schemes for newborns. To facilitate understanding of the knitwork of individual elements, their connections and decorations, video lessons are offered where you can get the necessary knowledge.
A toy connected for a baby should fulfill a number of functions:
- be useful;
- safe;
- develop hearing, vision and tactile feelings;
- soft and warm to the touch;
- accessible so that the child bites her.

Knitted toy
They should also meet the following characteristics:
- consist of soft materials - threads, shreds;
- wash well;
- to be light;
- not have an elongated flat shape, so that thrusting them into the mouth, the child could not choke;
- have a bright color;
- preferably if they will be with sound.
The secrets of successful knitting
An experienced mother who has already made more than one toy knows approximately how many loops must be added or reduced to create the desired configuration. Any yarn in its structure is individual.
Different types of material can project different textures:
- with the help of shaggy threads you can create the effect of wool, mane, hair;
- glossy viscose visually distinguishes plexuses, their surface will turn out to be shiny and grainy;
- yarn with protruding threads will give the effect of volume, such a product can be combed;
- unusual visualization creates yarn, which every 10-30 cm changes to a new color;
- an interesting effect will come from the use of beads in knitting;
- toys made from linen and viscose are very environmentally friendly, this combination is durable.
Crochet patterns for toys must certainly include the hook number and type of yarn that the creator of the toy offers. Small products for children without a circuit should not be considered at all as an option for work.
Crochet toy care
Children are fidgets, so often toys and everything that surrounds them get dirty. Children can stain them with food and drinks. To keep them always neat and clean, you should follow these rules:
- wash the toy only by hand;
- squeeze water out of the toy, followed by hands and very carefully;
- do not soak the product;
- no need to wash crafts in hot water;
- for washing, you must use baby shampoo or bath foam;
- if there is a need to iron the product, it is better to moisten it and wrap it with a dry towel, and in this position let it dry.
The popularity of knitted toys has always been relevant. Previously, mothers looked for schemes in various magazines, today many ideas and detailed descriptions can be easily found on the Internet.
Perhaps at the beginning of the path the process will seem complicated, but if you carefully follow the descriptions, then everything will work out. And when the baby takes the beautiful creation of his mother’s hands, then both will receive the best impressions.
Developing cube, master class, description
From the first days of pregnancy, doctors forbade me everything - biking, walking, running, swimming, household chores, traveling, auto-coils, skiing, ice skating, in general, any physical activity. Allowed only to lie. As soon as I broke the rules, I got to the hospital. Lying down I watched many, many copyright films and re-read many, many books, then I discovered the confectioner. But she began to rapidly gain weight. And this new sweet craze has come under taboo.
Then I started to knit ...
The first and favorite work was a developmental cube for my baby based on the masterclass of Sherstinka magazine. As a result of Montessori's read works, views of educational toys, master classes of various craftswomen, such a product turned out.
First, I will talk about its didactic side, how to play with my cube, what poems to use, then I will go on to a technical description of the process of its creation.
Didactic description
1. The red side. Christmas tree on lacing. a mushroom is hiding under the tree. On the tree there are various textured beads of different colors and sizes, wooden, acrylic and ribbed. The sun from the yellow button. The fir tree itself from fleece (made according to the pattern of Evgenia Ershova).

2. The pink side. Flower meadow with butterfly. Flowers catch on buttons. learn to fasten buttons and develop fingers. a butterfly flies over the flowers, it can fly from flower to flower.


Butterfly Beauty
In a bright, colorful dress,
Spin, flew,
I sat on a flower, tired ...
I didn’t sit down to rest
I ate flower nectar.
Amazing flower:
Bright, bright shred!
And along the edge - lace.
Oh! With a mustache head!
So miracles are miracles:
This is butterfly beauty!
Summer beauty
We all really like
3. The orange side. The study of geometric shapes. We ask the baby to arrange the figures in the correct order. they are all outlined. We tell what a triangle is, a square. That with their help you can make figures. Please find in the house triangular figures, square, etc. You can ask the baby to circle the figures on a piece of paper.
4. The light green (white option) side is creative. Velcro pyramid (study of color and the ratio of objects). The side is like a white sheet - you can sculpt any other details on it, for example, from the neighboring side - geometric shapes.
Also in this cube I complicated the task by adding 4 puzzles * to the side. Apple (2 colors), pear and banana. 4-piece apples, banana and pear in two. In accordance with age, we complicate the task. It’s better not to show all the puzzles at once, but to give them gradually to constantly increase the baby’s interest in the cube.

* Puzzles are made according to the patterns of Evgenia Ershova.
5. The green side. Hiding bead. Textured beads on waxed lace for counting and fine motor skills.

6. The purple side is voiced.

Noisy, rustling. To this side in each cube there is a sling toy to choose from. In this case, a funny caterpillar. There is a surprise in each compartment of the calf - peas, rustling sachets, bells, small beads.
On this side is also a multi-colored butterfly with a bell. You can tell the baby about how the butterfly is born. That she’s the first caterpillar
A rustling bag is hidden in the sun.
Pockets can be folded from adjacent sides.
Play and grow!
Technical description of knitting
1. Knit side
Designations
Vp-air loop
SS - connecting column
Art. B / N - single crochet
St S / N - double crochet
* always mark the beginning of taking the circle with a contrasting thread
* if strayed in rows, knit 10x10 squares, or as you wish
Pink, purple, red, orange, light green
Make a sliding loop, or dial 2 air loops, in the second loop from the hook, knit the 1st row - 8 tbsp. non-cash 2nd row - in each second loop, tie 3 tbsp. non-cash 3-13th rows - in each of the four corners, knit 3 tbsp. In the central loop non-cash
Green side with a hiding bead.
dial 2 air loops, knit the 1st row into the second loop from the hook with a yellow thread. - in the center of the ring, tie 7 tbsp. non-cash 2-4th rows - knit st. non-cash, adding 7 tbsp. b / n (\u003d 28 p.). 5-11th rows - knit st. b / n exactly. 12th row - change the red thread, divide the knitting into 4 parts (7 loops each) and knit st. non-cash 2nd row - knit st. b / n, in each second loop, tie 3 tbsp. non-cash 3-13th rows - knit st. b / n, knitting in each of the 4 corners in the central loop of 3 tbsp. non-cash 13-20th rows - knit as the 12th row.

2. The purple side
Knit a caterpillar

For the base, we select juniper beads or beech beads with a diameter of 15 to 25 cm
We tie the beads with a dense viscous sbn.
We string the beads on the waxed cord in turn, between the tied beads, inserting a smaller colored bead, or a colorless wooden one, it all depends on your imagination

Scheme for strapping
2 row -6 increments
3 row-1sbn, 2snb one loop (increase), repeat to the end of the row
4 row - 2 sbn, increase, repeat to the end of the row
5 r- 7sbn in a circle
8p - 2 sb, decrease, repeat to the end of the row
9 p -1sbn, decrease-repeat to the end of the row
* if you have a larger bead then add rows and columns
Two compartments of the caterpillar body, for example yellow and red, can be stuffed with peas, and with rustling packets instead of beads.
We knit the horns according to the following pattern -
1 row - 6 sc in the amigurumi ring
2 p -6 increases
3-1sbn, 2snb one loop (increase), repeat to the end of the row
4- sc in a circle
5 r -1sbn, decrease-repeat to the end of the row
Fill loosely with filler, pull off
Sew a bell on the tip
Butterfly (easiest)

1 row 9 VP, in the last 3 sbn, deploy knitting, sbn to the end of the row, 3 sbn in the last loop, expand the knitting, sbn to the end of the row, 3 sbn in the mid-loop.
We knit 9 VP in 4 loops, 4 VP in the last. 3 sb in the tail of the butterfly (the last loop), deploy the knitting, and knit the mirror to the end of the row. then we tie all the wings of the CCH. if desired, change the thread.
Sun
1-6 СБн in the amigurumi ring we mark the beginning of knitting with contrast weaving (I do this through a sliding loop, you can dial 2 air loops and knit 6 sbn in the first loop)
2-6 increases
3- 1sbn, 2snb one loop (increase), repeat to the end of the row
4- 2sbn, increase, repeat to the end of the row
5- 3 snb, increase, repeat to the end of the row
6-4 sbn, increase, repeat to the end of the row
7-9 rows - sbn in each loop
Or we knit rows to the desired size
10 row - elongated loops: nattach the thread to the index finger of your left hand - insert the hook into the loop of the base and grab the working thread under the index finger and pull out a new loop - grab the working thread and pull it through 2 loops on the hook.
On the other hand, we sew the material on the sun, fleece or another one to choose from and fill the sun with peas or a rustling pactik

We knit a pocket from a sirloin net.
That's what we got

3. The pink side
We embroider the flower meadow with a smooth green thread, where the flowers should be, sew the yellow buttons on the leg, this will be the core of the flower. we knit the simplest flowers.

A chain of 10 air loops is closed into a ring with a connecting column. Next, we knit * 3 air loops, a double crochet column into a ring of air loops, 3 air loops and a connecting column into a ring of air loops. Repeat knitting from * another 5 times. We cut and fasten the thread. Here is our flower and ready.
How to knit a butterfly we already know.
Our butterfly can fly from flower to flower.


2226
Amigurumi is a crochet technique for small animals. They came up with it in Japan. Recently, this lesson is very popular. Schemes with a description of how to crochet toys are necessary for choosing threads and creating a quality product.
What you need for work

Start knitting
You need to start crocheting toys by studying the description and pattern.
To do this, you need to know the basic conventions:
- vP - air loop;
- ss - connecting column;
- sbn - single crochet;
- ps - half-column;
- ssn - double crochet;
- ss2n - double crochet;
- pr - knit 2 sb in one loop, triple - 3 sb;
- ub - do sbn in the next loop - on the hook 2 threads, once again sbn in the loop next - on the hook 3 threads. We stretch the main thread through 3 loops. Thus two loops are combined.
- * 2sbn, pr *. Repeat * 2 times (8) - two single crochet, in the next column, etc. Repeat twice. It turns out only 8 loops.
Some details
The amigurumi technique involves knitting for both walls. Increases and decreases are used to give the toy a shape. You can’t just skip the loop to reduce it, since a hole is formed in this place. To weight the toy, small beads are used, which are sewn into the fabric.
Starting to crochet toys, it is necessary to familiarize yourself with the description and patterns in advance. All abbreviated loop names should be understood.
Ring: scheme and description of knitting amigurumi
Usually most models start with a circle inside which there is a hole. The amigurumi technique using the ring will help solve this problem.
Detailed diagram:
- Make a loop at a distance of 2.5 cm, the thread is between the index and middle fingers;
- Insert the hook into the loop and stretch;
- Grab the working thread, pull through the loop and tighten;
- Pull the hook simultaneously under both threads (main and tail);
- Crochet the main thread (2 loops on the hook) and pull through the loops. The first sbn of the ring turned out;
- Knit 6-10 sbn and tighten the thread of the remaining ring. It turned out a semicircle from sbn;
- Thread the hook into the first loop and knit sbn.
Little Bear - a simple diagram with a description for beginners
The height of the toy will be 8.5 cm, knit with brown and white iris, the hook is 1.15 (1.0 for a beginner). 
Separately fit the details:
- Head
- Nose - White Thread
Scheme:
- 2 row - * pr * repeat 6 times (12);
- 3 row - * 2 sbn, pr *, repeat 4 times (16);
- 4 row - * 3 sbn, pr *, repeat 4 (20);
- 5 - 7 rows as the 4th (20), sc for displacement;
- 8 row - 20 ss; knitting loops is not tight.
- Take the brown thread. 9th row - 2 sbn, pr, 1 sbn, pr, 1 sbn, 3 increments, 2 sbn, 3 increments, 1 sbn, pr, 1 sbn, pr, 2 sbn (30);
- 10 - 12 row - * 4 sbn, pr *, repeat * 6 times (36);
- 13 - 15 row - * 5 sbn, pr *, repeat * 6 times (42);
- 16 - 17 row - * 5 SBN, UB *, repeat * 6 times (36);
- 18 row - * 4 sbn, ub *, repeat * 6 times (30), sbn for knitting displacement;
- 19 row - * 3 sbn, yb *, repeat * 6 times (24), sbn for knitting displacement;
- 20 row - * 2 sbn, yb *, repeat * 6 times (18), sbn for knitting displacement;
Fill this part with a padding polyester and give the head a neat shape.
Face design:We embroider the nose with a black thread (a mouline thread or a simple thread folded in several rows) into a triangle, two hook-shaped strips to the sides from it. Sew on beads - eyes and embroider eyebrows.
- 21 row - * SBN, UB *, repeat * 6 times (12);
- 22 row - * kill *, repeat 6 times (6). Close the hole, hide the thread and fasten.
Ears:Knit an amigurumi ring of 7 loops. Tighten the thread to close the hole. 6 times pr, 1 ss (13). Leave the thread for attachment to the head. Tie 2 ears. Choose the color of yarn yourself (brown or white).
Torso:
- 1 row - an amigurumi ring of 6 loops;
- 2 row - * pr *, repeat 6 times (12);
- 3 row - * sbn, pr *, repeat 6 times (18);
- 4 row - * 2 sbn, pr *, repeat 6 times (24);
- 5 row - * 3 sbn, pr *, repeat 6 times (30);
- 6 - 10 row - * 4 sbn, pr *, repeat 6 times (36);
- 11.12 row - * 4 SBN, UB *, repeat 6 times (30);
- 13.14 row - * 3 SBN, UB *, repeat 6 times (24);
- 15,16,17 row - * 2 SBN, UB *, repeat 6 times (18);
- 18 row - * sb, ub *, repeat 6 times (12); Fill with padding polyester.
- 19 row - * SBN, UB *, repeat 6 times (12), 1 ss
Leave the thread for sewing.
Lower paws:
- 1 row - 6 VP, 4 SBN, start from the second loop, 3 SBN to the last loop, 4 SBN, pr to the same loop (13).
- 2 row - pr, 3 sbn, 3 increases, 4 sbn, 2 increases (19).
- 3 row and a half - pr, 5 sbn, * pr, 1 sbn *. Repeat * 3 times, 5 sbn, * pr, 1 sbn *. Repeat * 3 times, 7 PRS (26). Change thread color.
- 4 row - 26 sb for the back wall for stability of paws.
- 5.6 row - 9 sb, 2 increases, 4 sb, 2 increases, 9 sb (30);
- 7 row - 9 sb, 6 decreases, 9 sb (24);
- 8 row - 8 sbn, 4 decreases, 8 sbn (20), sbn for displacement;
- 9 - 16 row - * 3 SBN, UB *. repeat * 4 times (16);
- Sbn for bias;
- 17 row - * 2 SBN, UB *. Repeat * 4 times (12).
- Fill with padding polyester.
- 18 row - * 1 SBN, UB *. Repeat * 4 times (9).
- 19 row - * 1 SBN, UB *. Repeat * 3 times (6). Leave the thread for sewing the legs to the body. Do not stuff the top of the legs, otherwise the legs will stick out.
Upper paws:
- 1 row - dial 2 VP, 6 SBN into the second loop from the hook (6);
- 3 - 6 row - * 3 sbn, pr *. repeat * 3 times (15);
- 1 sc for knitting displacement;
- 7 - 15 row - 3 decreases, 9 sbn (12);
- 2 sc for knitting displacement.
- 16 row - * 2 SBN, UB *. repeat * 4 times (9);
- 17 row - * 1 SBN, UB *. repeat * 3 times. 1cc (6);
Leave the thread for sewing the legs to the body. Do not overfill the top of the legs.
Tail:
- (6);
- 2 row - * pr *. repeat * 6 times (12);
- 3rd row - * sb, ub *. repeat * 4 times. 1ss (8).
- Leave the thread.
Bear assembly:Along with the description and diagrams, crocheted toys must be neatly assembled. This is a difficult stage and skill comes with experience. Pin the lower paws with pins. Sew paws to the 6-7th row of the body. Sew the upper paws between the last and penultimate row. Sew the tail so that it does not interfere with sitting.
Chicken - a simple diagram with a description for beginners
Use hook number 2, yarn of yellow, orange, blue, lilac colors.
 To crochet toys, you must follow the description and diagrams.
 Head (yellow thread):
- 1 row - an amigurumi ring of 6 loops;
- 2 row - 6 ave (12);
- 3 row - (1 sbn, pr) * 6 (18);
- 4 row - (2 prs, pr) * 6 (24);
- 5 row - (3 prs, pr) * 6 (30);
- 6 row - (4 sbn, pr) * 6 (36);
- 7 row - (5 sbn, pr) * 6 (42);
- 8-13 row - 42 sbn;
- 14th row - 7 sbn, (1 sbn, pr) * 3, 15 sbn, (1 sbn, pr) * 3, 8 sbn (48);
- 15 row - 7 sbn, (2 sbn, pr) * 3, 15 sbn, (2 sbn, pr) * 3, 8 sbn (54);
- 16-18 row - 54 sbn;
- Further decrease will go, so between the 14th and 15th rows sew on button eyes;
- 19 row - (7 SBN, UB) * 6 (48);
- 20 row - (6 sb, ub) * 6 (42);
- 21 row - (5 SBN, UB) * 6 (36);
- 22 row - (4 SBN, UB) * 6 (30);
- 23 row - (3 PRS, UB) * 6 (24);
- 24 row - (2 PRS, UB) * 6 (18);
- 25 row - (2 PRS, UB) * 6 (12);
- 26 row - 6 ub (6).
Fill the body with holofiber and tighten the thread.
Beak - orange thread:
- 1 row - 5 sb in the amigurumi ring;
- 2 row - (1 sbn, pr) * 2, 1 sbn (7);
- 3 row - 7 sbn;
- 4 row - (2 sbn, pr) * 2, 1 sbn (9).
Sew the beak between 16 and 20 rows, fill as you sew. Embroider with black thread eyebrows, cilia. Further, depending on the imagination, make a forelock, toned cheeks.
Torso - yellow thread:
- Fill with holofiber in the course of knitting.
- 2 row - 6 ave (12);
- 3 row - (1 sbn, pr) * 6 (18);
- 4 row - (2 prs, pr) * 6 (24);
- 5 row - (3 prs, pr) * 6 (30);
- 6 row - (4 sbn, pr) * 6 (36);
- 7 row - (5 sbn, pr) * 6 (42);
- 8 row - (6 sbn, pr) * 6 (48);
- 9 row - (7 sbn, pr) * 6 (54);
- 10 row - (8 prs, pr) * 6 (60);
- 11-18 row - 60 sbn:
- 19 row - (8 SBN, UB) * 6 (54)
- 20-21 row - 54 sbn;
- 22 row - (7 SBN, UB) * 6 (48)
- 23-24 row - 48 sbn;
- 25 row - (6 sb, ub) * 6 (42);
- 26 row - (5 SBN, UB) * 6 (36);
- 27 row - (4 SBN, UB) * 6 (30);
- 28 row - (3 PRS, UB) * 6 (24);
- 29 row - (2 PRS, UB) * 6 (18);
- 30 row - 18 sb.
Leave the thread and sew the head to the body.
Tail:
- The threads are yellow, not filled
- 1 row - 4 sb in the amigurumi ring;
- 2 row - 4 pr (8);
- 3 row - 8 sbn;
- 4 row - (1 sbn, pr) * 4 (12);
- 5 row - 12 sbn;
- 6 row - (2 prs, pr) * 4 (16);
Fold and connect sbn. Sew to the body at the level of the 8th row.
Wings - yellow thread, do not fill:
- 1 row - 6 sb in the amigurumi ring;
- 2 row - 6 ave (12);
- 3 row - 12 sbn;
- 4 row - (1 sbn, pr) * 6 (18);
- 5-16 row - 18 sb.
- Fold and connect sbn. Knit two pieces. Sew on the level of the 24th row.
Legs - orange thread:
- Feet. Fill in the course of knitting.
- 1 row - 6 sb in ka;
- 2-4 row - 6 sc.
- Cut the thread. Link three details. Fingers turned out.
- To connect, knit 2 sbn on the first finger, the 3rd column of the first finger and the 1st column of the second finger we knit together with a single crochet (i.e., decrease), 1 sbn, the 3rd column of the second finger and the 1st column we knit the third finger together, 4 sbn, the 6th column of the third finger and the 4th column of the second finger we knit together, 1 sb, the 6th column of the second finger and the 4th column of the third finger we knit together, 2 sb. Get 14 columns.
- 6 row - (5 SBN, UB) * 2 (12);
- 7 row - (2 PRS, UB) * 3 (9);
- 8 row - (1 sb, ub) * 3 (6).
- Close the hole, hide the thread. Link two details.
- 1 row - 6 sb in ka;
- 2 row - (1 sbn, pr) * 3 (9);
- 3-14 row - 9 sc.
Fold and connect the edges of the sc. We knit two parts. Sew the foot to the leg. With the edge that connected the sbn, sew the legs to the body.
Easter egg - blue yarn:
- 1 row - 6 sb in ka;
- 2 row - 6 ave (12);
- 3 row - (1 sbn, pr) * 6 (18);
- 4 row - (2 prs, pr) * 6 (24);
- 5 row - (3 prs, pr) * 6 (30);
- 6 row - (4 sbn, pr) * 6 (36);
- 7 row - (5 sbn, pr) * 6 (42);
- 8-16 row - 42 sbn;
- 17 row - (5 SBN, UB) * 6 (36);
- 18 row - 36 sb;
- 19 row - (4 SBN, UB) * 6 (30);
- 20 row - 30 sbn;
- 21 row - (3 PRS, UB) * 6 (24);
- 22 row - 24 sb;
- 23 row - (2 PRS, UB) * 6 (18);
- 24 row - (2 PRS, UB) * 6 (12);
- 25 row - 6 ub (6).
Close the hole, hide the thread. Cut the tape, stick it to the testicle. Tie a flower. Sew a bead to the flower and stick it to the testicle.
Doggy - a simple diagram with a description for beginners
Hook number 1, acrylic yarn, orange, white. 
Head:
- 1 row: in 1 vp - 8 sc.
- 2 row: 2 sb from 1 loop.
- 3 row: sbn
- 7 row: sbn
- 8 row: 2 sb from 1 loop, 4 sb
- 9 row: sbn
- 10 row: 2 sb from 1 loop, 5 sb
- 11 row: sbn
- 12 row: 2 sb from 1 loop, 6 sb
- 13,14,15,16,17 rows: sbn
- 18 row: from 2 loops - 1 sbn (ub), 6 sbn
- 19,20,21,22,23 rows: sbn
- 24 row: UB, 5 SBN
- 25,26,27,28,29 rows: sbn
- 30 row: UB, 4 SBN
- 31,32,33,34 rows: sbn
- 35 row: UB, 3 SBN
- 36 row: kill, 2 sbn, insert the eyes between the 22nd and 23rd rows, stuffing with stuffing for toys.
- 37 row: ub, 1 sb ub, close the knitting, thread the thread inside.
The head is ready.
Nose. Two details:
- 1 row: in 1 vp - 8 sb
- 2 row: 2 sb from 1 loop.
- 3 row: sbn
- 4 row: 2 sb from 1 loop, 1 sb
- 5 row: 2 sb from 1 loop, 2 sb
- 6,7,8,9,10,11,12 rows: sbn, cut the thread.
- Fold 2 pieces edge to edge, knit 12 loops, connecting 2 rows.
Upper nose:
- 1.2 rows: sbn, strapping of the outer edge.
- 3 row: UB, 2 SBN
- 4,5 rows: sbn
- 6 row: Ub, 1 sbn Insert nose on eye, stuff
- 7 row: decrease, knitting from 2 loops 1 sbn, to the end. Sew nose to head.
White spot on the forehead:
- 1st row: 15 vp, 1 vp skip, 3 sbn sbn in 1 loop, knit to the last loop in which to knit 4 sbn
- 2 row: from both ends you need to make 4 increments.
- 3 row: where they did the increase, 2 sb in 1 loop, between them - 1 sb
- 4th row: the whole row of ps. Close knitting.
Eye sockets:
- 1 row: in 1 vp - 8 sb
- 2 row: 2 sb from 1 loop.
- 3 row: sbn
- 4 row: 2 sb from 1 loop, 1 sb
- 5 row: 2 sb from 1 loop, 2 sb
- 6 row: ps the whole row
- 1 row: 8 VP
- 2 row: 1 vp skip, knit sbn, in the extreme loops we knit 4 sbn (pr).
- Knit subsequent rows, adding, where visible in the previous rows. Only 4 increases from each edge. in the last row should get 9 sb
- The last row: sbn without increases.
Sew ears to the head so that one ear is raised.
Paws:
- Start knitting in white.
- 1 row: in 1 vp - 8 sb
- 2 row: 2 sb from 1 loop.
- 3 row: sbn
- 4 row: 2 sb from 1 loop, 1 sb
- 5 row: 2 sb from 1 loop, 2 sb
- 6 row: 2 sb from 1 loop, 3 sb
- Forelegs - we knit 4 rows sbn
- Hind legs - Knit 6 rows sbn
- 1 row: UB, 3 SBN
- 2 row: UB, 2 SBN
- 3 row: sbn
- 4 row: psbn
The result was pads: larger for the hind legs, smaller for the front.
Go to the thread of red color. For the front paws: 2 rows sbn, on the 3rd row - ub, 2 sbn Next we knit 4 rows sbn. Close knitting. For hind legs: 7 rows sbn. Stuff paws. Connect 2 hind legs with a connecting loop, make a harness. 12 rows sbn. You should get about 49 loops.
- 13 row: UB, 5 SBN
- 14,15,16,17,18 rows: sbn
- 19 row: UB, 4 PRS
- 20,21,22,23,24 rows: sbn
- 25 row: knit the front legs from the bottom, where the armpits.
- 26 row: knit paws on the upper side, where the shoulders.
- 27 row: sbn. Close knitting. Stuff and sew the body to the head.
Tail
- 1 row: in 1 vp - 8 sb
- 2 row: 2 sb from 1 loop.
- 3.4 rows: sbn. To close. Stuff and sew.
Embroider a mustache, eyebrows, cilia. The dog is ready!
Kitten - a simple diagram with a description for beginners
The threads are white and gray. 
Head:
- 1 row - an amigurumi ring of 6 loops;
- 2 row - pr, (12)
- 3 row - sbn, pr (18)
- 4 row - 2SBN, pr (24)
- 5 row - 3 prs, pr (30)
- 6 row - 4 prs, pr (36)
- 7 row - 5 sbn, pr (42)
- 8 row - 6 prs, pr (48)
- 9-14 row sbn (48)
- 15 row - 6 sb, ub (42)
- 16 row - 5 sb, ub (36)
- 17 row - 4 PRS, UB (30)
- 18 row - 3 PRS, UB (24)
- 19 row - 2 PRS, UB (18)
- 20 row - sb, ub (12)
- 21 row - 4 kill (6)
- Fasten the thread.
Torso:
- 1 row - Amigurumi ring of 6 loops
- 2 row - pr (12)
- 3 row - sbn, pr (18)
- 4 row - 2 prs, pr (24)
- 5 - 8 row sbn (24)
- 9 row - UB, 2 PRS (18)
- 10 row - UB, SBN (12)
- Fasten the thread and leave for sewing.
Rear paw (2 pcs.):
- 1 row - Amigurumi ring of 6 loops
- 2 row - pr (12)
- 3 row - sbn, pr (18)
- 4 - 5 row - sbn (18)
- 6 row - sbn, ub (12)
- 7 row - 2SBN, UB (9)
- 8-9 row - sbn (9)
Fold in half, fill and stitch. Leave the thread for sewing.
Front paw (2 pcs.):
- 1 row - 6-loop amigurumi ring
- 2 row - pr (12)
- 3-4 row - sbn (12)
- 5 row - 6 ub (6)
- 6 - 9 row - 6 sb
Fill and leave the thread for sewing.
Ears:
- 1 row - 5 loops amigurumi ring
- 2 row - 5 sb
- 3 row - pr (10)
- 4 row - 10 prs, pr (15)
- Close and leave the thread for sewing.
Tail:
- 1 row: in 1 vp - 6 sbn
- 2 row: 2 sb from 1 loop.
- 3.4 rows: sbn. Close
The next step: to sew all the parts, sew the bead eyes, embroider the eyebrows, mustache, claws with black thread.
Crocheting toys is not difficult if you look at the description and diagram. Detailed instructions help you get the job done quickly and efficiently.
Toy Chicken - Knitting Pattern and Description
Knitting Details:

Knitting begins with the manufacture of the head and body. Details are carried out separately: beak, 2 legs and 2 wings. After their assembly, the crest and tail are formed. The final stage is decoration. A flower is put on the head of the chicken, the neck is decorated with a pendant, and the cheeks will become brighter with the help of a blush.
Toy Bunny - Knitting Pattern and Description
Knitting Details:

Knitting time: approximately 2-3 hours. Work on the toy must begin with the manufacture of the head. Crochet toys with descriptions and patterns are easy to assemble. To get a finished bunny, ears are sewn to the head, which are performed separately. Knitting is completed by stitching the eye, cheeks, nose and mouth.
Elephant Toy - Knitting Pattern and Description
Knitting Details:

Making an elephant begins with the creation of the head and body. Knit ears, trunk and legs are required separately. All parts are alternately sewn to the body and head. The final stage of work on the toy is the stitching of eyes, mouth and bows.
Toy Gingerbread Man - knitting pattern and description
Knitting Details:

To start knitting Koloboks should be from the torso. When the base of the toy is ready, eyes, mouth and hair are sewn to it. Bows will be the decor for the girl, and blush on the cheeks for the boy.
Toy mouse - knitting scheme and description
Knitting Details:

Making a mouse begins with the creation of the head and body. The paws, tail and tongue are knitted separately and sewn at the end of the work. Button nose and eyes are sewn to the head.
Piggy Toy - Knitting Pattern and Description
Knitting Details:

It is necessary to start knitting pigs from the head and torso. Paws, ears and heels are knitted separately. They are sewn to the finished toy base. The final stage of the work is decoration. Piglets should have hair, eyes, funny clothes and slippers.
Toy Cat with a Bunny - knitting scheme and description
Knitting Details:

To start making toys follows knitting the head and torso. With a description and diagrams, it is not difficult to assemble crochet toys. Ears, tails, paws, scarves and mittens are created separately, and then sewn to the body and head.
Toy Cat - knitting pattern and description
Knitting Details:

Creating a toy begins with knitting individual elements: head, torso, paws, ears and tail. The final stage of knitting is the assembly of finished elements. For decoration, a bow and wire mustache are sewn to the cat.
Toy Snail - knitting pattern and description
Knitting Details:
- The dimensions of the cochlea are 10 cm high and 5 cm wide (7 cm in body volume).
- Torso, head - peach-colored yarn.
- Sink - orange yarn.
- Flowers are emerald-colored yarn.
- 5 mm beads are needed for the eyes, and 15 pearl-colored beads to decorate the sink.
- Knitting time: does not exceed 3 hours.


Making snails begins with the creation of the trunk and head. When the base of the toy is ready, a separately connected sink is sewn to it. Then the details are added: horns, flowers, beads and eyes.
Toy Elk - knitting pattern and description
Knitting Details:

Knitting should begin with the creation of the foundation of the toy - the head and torso.
Finishes knitting assembly of the finished moose. Handles and legs, horns and ears are sewn separately.
Toy Panther - knitting pattern and description
Knitting Details:

First of all, the head and torso are created, which will serve as the basis for the future toy. To the finished base, it is necessary to sew the hind and front legs, tail alternately. A muzzle and ears are placed on the head. All parts for assembly are knitted separately. Panther is decorated with sequins embroidered in the shape of a heart.
Toy Sheep - knitting pattern and description
Knitting Details:
- The dimensions of the sheep are 15 cm in height and 5 cm in width (8 cm in the body volume).
- Head and torso are white yarn.
- Legs, hooves and a fur coat - pink yarn.
- Shoes are purple yarn and pink beads.
- For the eyes, 2 small black beads are required.
- Pink polyester is required for the skirt.
- Knitting time: no more than 4 hours.


Knitting begins with the formation of the head and body. When the head and trunk are connected, limbs are sewn to them. The head is decorated with eyes, nose and mouth. Shoes are decorated with beads. A fur coat is put on the finished toy.
Toy Teddy Bear - Knitting Pattern and Description
Knitting Details:

The basis of the toy will be the head and torso that fit in at the beginning. Handles and legs, made separately, are sewn to the body. The head is decorated with ears, a muzzle and eyes.
Toy Whelp - knitting pattern and description
Knitting Details:

Knitting begins with the formation of the head. Following her, the body takes shape. With a description and diagrams, it is not difficult to assemble a finished toy crocheted from many details. Handles and legs, comb, wings are attached to the body by a rope method. The head is made out by nostrils, eyes and ears.
Pony Toy - Knitting Pattern and Description
Knitting Details:
- The pony is 33 cm high and 11 cm wide (14 cm in body volume).
- The basis of the head and torso, ears and legs are purple yarn.
- Hooves, crest, tail - lilac yarn.
- The muzzle is pink yarn.
- For the eyes you need black, white and blue yarn.
- Knitting time: no more than 4 - 5 hours.


Knitting should begin with the creation of the head and neck. Then the body is formed, as well as the legs in turn. Finishes knitting assembly. The head is formed by the ears, eyes, nostrils and mouth. She joins the body with a neck filled with filler. Legs and decorative elements are sewn: mane and tail.
Toy Doll - Knitting Pattern and Description
Knitting Details:

Knitting begins with creating the basis for the future toy: head, trunk and legs. Handles are knitted separately and attached with a thread mount. The final stage is decorating the doll with hair, dress and shoes.
Toy Kitten amigurumi - scheme and description of knitting
Knitting Details:

It is necessary to start knitting with the head and neck. Then the body of the toy is created. The assembly of small parts: legs, ponytail and ears completes the work. The finished kitten can be decorated with a bow.
Toy Duckling - scheme and description of knitting
Knitting Details:

Knitting begins with the creation of a head and trunk with a tail. Wings, paws, webbing and beak are sewn to the finished toy base. Button webbing completes the work. When crocheting toys, it is important to rely on patterns. With their help, the toy will exactly match the description.
Video: crochet toys with descriptions and diagrams
How to crochet a bunny, see the video clip:
Crochet toys, diagrams in the video:
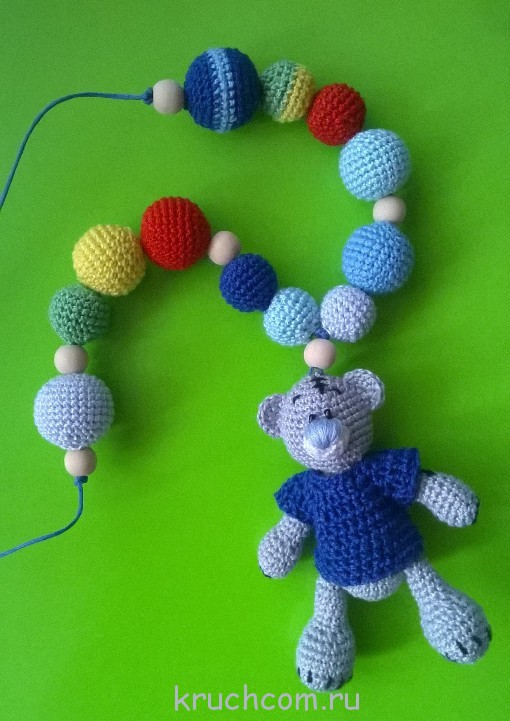
Knitting toys is a pretty fun and positive activity. And many having tied their first knitted toy, then they can’t just stop. In this section you will find toys crocheted, these can be both small toys - amigurumi, and rather large toys (bears, hares, dolls). And you can knit toys even for the smallest, because you can tie a mobile to a crib or pram. Or bright and funny knitted slingobus. Also on our website there is a special section with master classes, there you will also find many knitted toys.
Tags:
Crocheted flowers are one of the favorite topics of needlewomen, because with the help of such a decorative element you can transform a lot of things, from clothes to interior items. Knitted rose is the queen of flowers, not only in nature, but also in crocheted needlework. There are simply an incredible number of crochet variations of roses, perhaps this magnificent flower won the heart of more than one noble craftswoman!
Tags:
Knitted toys are the best things to give a child. Hand-made toys are not only truly exclusive, but also, importantly, they are absolutely safe for the baby’s health, because they are made from high quality materials.

Tags:

It doesn’t matter if you belong to the category of professional craftswomen or just beginning needlewomen, each of us should try crocheting soft toys! It's so nice to give your beloved kids soft toys from environmentally friendly materials, and even do it yourself! These toys are absolutely safe, so they are suitable for children of any age. What can I say, many adults would not refuse such a lovely gift. There are really a lot of knitted toy patterns, so we decided to devote the current selection of step-by-step instructions to friends of a person - dogs.
Tags:
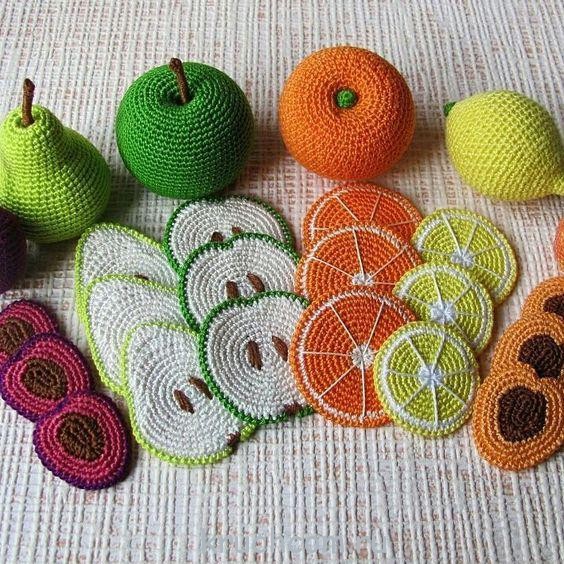
Our craftsmen are more and more keen on Japanese knitting skills for cute little animals, dolls and other toy items called amigurumi. This is not surprising, because amigurumi toys are incredibly cute, colorful, attracting the attention of both children and adults. Amigurumi popular today are charming cubs, cats, giraffes, heroes of all kinds of cartoons, as well as “tasty” toys - cakes, donuts, pieces of cakes, vegetables and fruits.
Tags:

Competition Entry No. 32 - Bright Knitted Cat ()
Good afternoon, I have been doing knitting for myself and my family for a long time, now I am a craftsman. I can not imagine myself in my spare time without knitting needles or a hook in my hands.
Knitwear is comfort, individuality and beauty. Even simple things in execution, in my opinion, look stylish and interesting.
This bright cat is connected according to the scheme of the cat Amineko, to achieve the size I need, it made changes along the course of knitting, I have a cat 30 cm tall.
Yarn Alize sekerim bebe batik, hook No. 2

Competition Entry No. 30 - Lunar Siam ().
Hook. On the frame. Head and tail rotate, bend.
Cotton yarn, hook number 1.3

Competition Entry No. 28 - Kitten in a Skirt ().
This seems to be my first finished crochet job, as The occasion was lucky and urgent J. In the short period when the daughter had already begun to get up in the crib, but still did not hold well, I wanted to protect her from falls and falls. The playpen was bought, and in order to brighten up her stay in it in the minutes when mom was forced to leave, it was necessary to put something preferably soft in it. So, among other things, a kitten settled in the arena.


Competition Entry No. 32 - Developing Cube (Polina Tugunova)
Yarn:Vita Cotton Coco, Alize "Miss", "Acacia", "Australian Merino".
Additionally: felt, beads (plastic, wooden), polymer clay.
Hook number 2.