Tilda doll is a textile toy that is known throughout the world. Tilda dolls are distinguished by extraordinary simplicity and charm at the same time, causing only the warmest associations. This doll will serve as a very good gift for a dear person. We offer you to make a tilde doll with your own hands, because it is much more pleasant to give things that are made with your own hands and with your soul. An article will help us with this, which will teach you to make a Tilda doll in several versions with your own hands, ideas come immediately with patterns.
We make a cute doll Tilda with our own hands with patterns
Before starting work on a tilde doll, we need to prepare some materials.
- Fabric for the doll (light and dark beige).
- Fabric for attire.
- Lace.
- Hollofiber.
- Threads in black and pink.
- Acrylic yarn for hairstyle.
- Satin ribbon.
- Needles, scissors, threads, scotch tape.
- Sewing machine.
Sewing a tilde doll at home is not difficult. You just need to follow our instructions exactly and everything will work out. Tilda doll can be a great attribute for the interior. It is also interesting to make this doll with children, thus developing creativity in them and a craving for needlework. Materials are ready, and we are transgressing!
Before starting our work, it is necessary to familiarize yourself with the patterns by which we will sew the tilde doll.

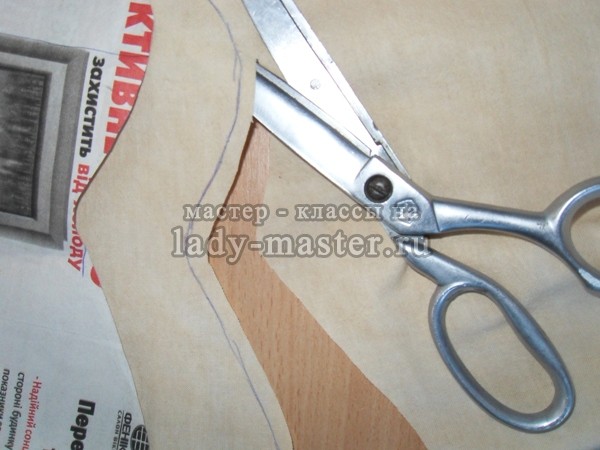
First you need to sew two fabrics that are designed for the body together and transfer the outline of our pattern to the fabric using chalk or pencil. Clippings attach with pins.
Then we need to make a line along the lines of our patterns.
Turn inside out our arms, legs and body.
After that, we stuff our doll with a filler - holofiber. Remember that the knees of the doll must bend. You must first fill the leg to the knees, then insert a thick needle and only then continue to stuff further. It is unnecessary to fill the legs to the end, it is necessary to leave 3-4 cm so that the doll can sit.
Then you need to get the needle and make a tight stitch in its place.

Then go to the side of our dolls. To do this, you need to make a pattern and decorate the bottom of the skirt with white lace.
The top of the skirt must be pulled together and sewn to our doll. The belt of the skirt must be made of satin ribbon. We fasten it with beads and tie it with a bow at the back. We decorate the sleeves and bust of our doll with lace.

Then you need to fold the hair in half and draw a line along which we will fasten the hair. After that, make a line and attach the resulting wig to the head of our doll.

After that, we begin to make a doll's face. We mark the eyes with a pencil and flash them with black thread. A small knot from the eye is left on the back of the head. They will hide behind their hair. In the same way we make a mouth.
Now we braid our doll and weave satin ribbons into pigtails.
Our doll is ready!

Master class on making "Flower Angel" at home
Tilda dolls are very diverse and they do not cease to amaze us with their unusual and cute images. For many years now, tilda dolls have been decorating people's homes and give the interior a sense of peace and comfort. Sewing such a doll with your own hands is not at all difficult. You can choose any fabulous look for your doll. If you want your house to always be bright and comfortable even on a frosty winter day, then our master class on creating a flower angel tilde will be very useful to you. Flower angel is a very sophisticated, romantic and elegant dolls that will decorate any home and bring love and peace to it. A feature of the flower angel tilde is the wings behind its back. Such a doll will look good on a windowsill among flower pots. She will look after and take care of them while you are not at home.
Before you start making this doll, you need to familiarize yourself with the pattern that will help create the elements for the doll.
- For the manufacture of tilda dolls, it is better to take a plain natural fabric. Next, you need to transfer the pattern to the fabric with a simple pencil. The fabric needs to be folded in half so that the front side looks inward.
- Then it is necessary to lay an estimated seam. It should run along the lower body of the tilde doll.
- After this, you need to take and fill the doll with filler, carefully distributing it throughout the doll’s body. When the doll is completely filled with filler, you need to carefully sew the product on the sides. Doll handles must be sewn near the very neck.
- Next, we move on to making clothes for the doll. To do this, you need to take two pieces of rectangular fabric and fold them in half with the wrong side. Transfer the dress pattern to the fabric, sew on the sides. Then put the dress on the doll and carefully sew it on it.
- After that, we begin to make hairs for the doll. Any yarn is best for hair, and the face of our dolls needs to be decorated with paints and blushes. You can attach a small rose to the doll’s hair.
The doll is ready!
Video on the topic of the article
At the end of our master class, we suggest that you familiarize yourself with the video guide that will facilitate your training. Tilda dolls are a great gift option and a wonderful toy that won the hearts of all children. As it turned out, making a tilde doll with your own hands is not so difficult. A little imagination, sleight of hand and it all worked out. Happy viewing!
Tilda doll is a cute and original decoration of the interior. Their diversity is simply amazing. The patterns of Tilda's dolls are very different, but at the same time they have a lot in common with each other. Despite the fact that these toys are perfect for children's games, nevertheless, their main purpose is to add bright colors, warmth, comfort and beauty to the decor of our home.
Products in the style of Tilda are sewn not only in the form of dolls. On the Internet you can find Tild patterns for rabbits, bunnies, cats, bears, giraffes, and even snails. Over time, needlewomen come up with new options for these wonderful dolls, introducing their ideas.
Today's Tilda doll tailoring workshop we will try to make as detailed as possible, in it you will certainly find patterns that will facilitate the doll manufacturing process. For needlewomen with experience, he may seem overly extended. But just such a master class and patterns will help novice craftswomen who want to try their hand at sewing Tilda dolls with their own hands.
Tilda Doll: a master class for beginners. Patterns
In order to start making a toy in the Tilda style, you must first decide which one you want to sew, and understand that you will need a name. In the event that you have never before been engaged in the manufacture of Tilda dolls, a master class and patterns will surely help you in this matter.
 It is better to start from the simplest and move on to more complex ones; you should not immediately take on complex products. If this is the first time you are going to start sewing Tilda, a detailed master class and patterns with sizes are exactly what you need. They make it possible to correctly calculate the details and avoid mistakes.
Mastering the skill of making dolls with your own hands, a master class and patterns, choose not very complex, with a minimum number of parts. Patterns for beginners - this is ideal.
Workshop on the selection of materials
When choosing fabrics, it is worth considering the fact that Tilds are sewn exclusively from natural materials. You can take, for example, cotton, wool, linen. The body of the pupa is usually made of matter, flesh, beige or white. It is also possible to stain the fabric with cinnamon or tea. If you want to use matter with a pattern, make sure that the print is small and appropriate to the size of the doll.

Tilda tailoring workshop
The whole sewing process begins with the fact that we prepare the fabric. It needs to be ironed, folded in half, with the front side inward. Then the pattern is placed on the material, pinned with pins, and outlined with chalk or a special marker. All details are stitched, leaving a small hole for stuffing, and cut out. 
If the products have bends, small incisions should be made in these places. Such toys are stuffed, as a rule, with holofiber or sintepuh. The head and body are packed evenly and tightly, but the arms and legs - not really. Also, so that the legs and arms are movable and can bend freely, they do this: they are half full, stitched along, and then stuffed to the end. All unbroken places are sewn with a blind seam.
Tilda Hair
To create hair for the doll, you can take various materials: threads, wool, ribbons and others. Now needlewomen often use bookly yarn. There are also several ways to fix hair: they can be sewn, glued, tacked with a special needle, drawn.


Workshop on sewing clothes
There are two ways to sew clothes for Tilda: one-piece and separate. In the first version, in the pattern itself there are parts of clothing. This method is best for interior dolls. This is because with future use it will be impossible to change the outfit of such a doll.
 If you plan to sew Tilda for your baby, then it is best to make clothes that you can take off and put on. Because for sure the child will want to change dresses to his beauty.
Tilda's appearance
All dolls made in the Tilda style have special features: everyone has black small eyes that can be embroidered using a French knot, or simply painted with acrylic paints. A slight blush is applied to the cheeks with ordinary blush.

Tilda's cute dolls easily win the hearts of both adults and children. By making such a charm with your own hands, you can give a lot of positive things not only to yourself, but also to those people who can give these charming toys that you will endow with warmth and positive emotions! Create and have fun! 
I first met Tilda a couple of years ago at some kind of needlework forum. This naive pink-cheeked and so cozy doll fell in love with me at first sight. I generally like everything so unusual, vintage and beautiful. Once in my youth I sewed toys, so I was eager to try to make Tilda, because there is nothing complicated about it. The main thing is the details and exposure of a unique, characteristic only to her, style.
My first pattern was intended for beginner sorceresses, but I still use it, having slightly changed and improved the proportions. Large parts are easier to sew than small, though longer, especially by hand. Therefore, for a start it is worth practicing on dolls of high growth. How to sew such a Tilda-style Doll, I’ll tell you now.
Materials for sewing Tilda for beginners
We will need several rags of fabric of different colors, but always from natural fibers. I didn’t buy anything, everything was found at home in stocks of old clothes. For body and clothes used cotton - white and in small flowers. A sleeve from an old woolen sweater came up as hair, which I loosened to get wonderful curls. Lace was also useful for decorating Tilda's blouse and shoes. As well as two small buttons, braid for the same shoes, two decorative flowers in a hairstyle, a thin white ribbon to stretch into drawers. These decorative little things can also be found at home, for example, to cut off buttons from old things, to undo lace from long-tired blouses. For work, you will need threads of white, black and red (my Tilda has a mouth), blush, synthetic winterizer, scissors, paper, pen, pins and a needle.

The working process
1. On paper, wallpaper or newspaper you need to draw a pattern of the future Tilda. The optimal size for the first experiment from the top of the head to the edges of the legs is 50-60 cm. Cut the finished pattern.


2. Next, take the fabric from which the doll’s body will be sewn. If there is no material suitable (dark beige, flesh, light brown) color, you can do it that way. Plain white cotton perfectly turns into a nice dark color if it is soaked for several hours in coffee or a thick infusion of tea. I used coffee: good effect and aroma.

3. All fabrics that you will work with must be ironed so that there are no bends or bruises. On a flat rag cloth impose a pattern and circle it with a pen. Each piece requires two copies - the back and front.

4. Cut the pattern is necessary not on the very contour of the picture, but with an indent of 0, 5 cm minimum. This margin is necessary so that the edges do not disintegrate after stitching.
5. When everything is already cut, the time comes to stitch the details. It is easier and more convenient to do this with a regular seam stitch, making small even stitches and following the lines drawn on the fabric. Leave the bottom of the body, arms and legs at the bases not sewn, so that later they can be filled with filler through the holes.
6. Finished parts must first be turned out. To make this happen neatly, because the neck and limbs are rather thin parts, use a pencil or pen, just stick the blunt edge in. Carefully and with moderate density, fill all parts of the toy’s body with a padding polyester, fix the pins after filling the hole so that the filler does not come out and it is more convenient to put everything together.

7. Sew on your hands, stitch your legs in a straight line, twisting a little edge on the body so that the threads do not climb and look aesthetically pleasing.

8. In the area of \u200b\u200bthe elbows and knees of the doll, it is necessary to make weights so that they can bend (make several even stitches, pulling the thread well and pressing the sintepon inside).

9. The body is ready, now it remains to put it on and give a human appearance to the face. Clothes for Tilda can be sewn, guided by their own taste. The standard option is a colorful sundress, white blouse and underpants.

10. The pattern for the underpants can be made according to the same pattern as the doll was sewn, measuring the desired length - approximately from the line just above the waist and to the knee, adding in width so that they come out lush, not tight-fitting. Panties are sewn from two identical parts, the upper edge is tucked and hemmed, leaving a cavity inside it, and the lower edges are decorated with lace. Pull the tape into the hole of the hem to secure the pants on the Tilda figure.

11. The blouse can also be made of two identical halves, which are stitched together. I made it a little more complicated - I separately cut a sleeveless jacket with a longitudinal slot on the back for the convenience of dressing and a sleeve to it. Then she sewed, collecting small folds on the sleeves around the shoulders to make them more magnificent. Cuffs and a collar, as well as underpants, decorated with lace.

12. The sundress consists of upper and lower parts. The top is a short top with the same vertical cut in the back, the edges of which slightly overlap, like a blouse.

Bottom - a fluffy skirt slightly above the knees, for which it is necessary to take a fabric two to three times wider than the top to make the shuttlecocks during stitching with a connecting stitch seam. When the top and the skirt are already together, connect the hem, do not forget to cut the bottom edge.

13. On the back of the sundress should be buttons for fixing. Sew them, make and process the fastening holes. The area around the neck can either be cut or decorated with a thin light ribbon.

14. Shoes for Tilda sew on the leg, or rather the pattern of legs. Circle only the edges, draw an oval. You leave one in this form, and from the other, remove a piece in the form of a v-shaped cutout. This will be the top of the shoe. Transfer the oval details to the white fabric, and the curly ones to the one from which the sundress was sewn. Indent and stitch out soles and toes. When twisting, decorate with a small piece of lace and a button in the middle, and attach a braid of sufficient length for the ties to the back.

15. The doll is already dressed, shod, but faceless and hairless. Cut a piece from an old knitted woolen sweater and start making hair. Dissolving it, you will get a wavy thread. I decided that my Tilde’s pale pink hair color would fit my face, so I chose that one.

When you pull enough threads for good hair, cut them into strands of the same length and sew to the Tilda's head in the middle, separating them with a seam to parting.
16. Black threads embroider two noticeable dots on Tilda's face - these are her eyes. Usually these dolls do not have a mouth, but I decided that my girl would be prettier with him, so I made her smile with a red thread. With the help of any blush available in the cosmetic bag, we make the doll rosy cheeks.

17. The final stage is a hairstyle. Take a pair of miniature decorative bows, ribbons or flowers, divide the curls into two parts and tie two tails.

Here's a little modern Tilda I got, sitting on a pedestal near the TV and decorating our living room.


If you follow my master class, observe the basic principles of work, but do not forget to show imagination, your sister will surely appear in your home very soon, just as sweet and positive, and most importantly, made by your own hands and with soul.

All Tildas are characterized by almost the same face with small eyes and rosy cheeks. But the toys every time are completely different.
We invite you to a workshop on tailoring Tilda dolls with your own hands made of fabric for beginner needlewomen. There is nothing complicated in the lesson, the body patterns are very simple, and for a dress it will not be needed at all. You can sew on a typewriter or manually. Two wings on the back - a characteristic feature of a series of textile toys, they are associated with angels and bring happiness to their owners.
Preparation of materials for work
To stitch the body for the doll in, find a plain flesh-colored fabric. You can take flax, calico or cotton, the main thing is that the textile material is natural, synthetics are not suitable. For stuffing the body, arms and legs, a synthetic winterizer or other similar filler is suitable. Any bright flap will fit for the dress.
For work also prepare:
- threads in that fabric;
- scissors;
- paper to draw a pattern;
- ruler and pencil;
- safety pins.
Pattern and sewing technique
First of all, take a pattern for cutting Tilda. You can print the template or just draw the details by hand.

Now lay out the patterns on the material and translate the contours. Do not forget that the hands and wings of the doll should look in different directions, so circle the figures on a fabric folded in half, and then turn the pattern over and circle again.

Then, without cutting out all the blanks, sew them on the sewing machine or by hand if the machine is not.

Cut the stitched parts, leaving a couple of millimeters from the seam.

Sew the wings completely, in order to turn them out, make an incision on the side that they will lie on the back.

Turning out narrow arms and legs is quite difficult, so use a thin knitting needle or wooden stick for barbecue.

Having turned out the details, proceed to stuffing. To do this, take a synthetic winterizer and, gradually pushing it with a stick, tightly fill the parts of the doll.

Now you need to stitch together all the parts of the girl Tilda. Sew on your legs first. To do this, bend the edges of the body and put your foot in it, and then sew the leg in a circle. Sew the second leg in the same way.

To sew your hands, fold the raw edge inward and sew in a circle. 
Sew the wings from the inside only in the middle so that they do not fit snugly on the back.

To make Tilde doll hair with your own hands, you can use yarn, thick threads or wool, but if you have none of this at home, do not rush to the store. You may find an unnecessary doll with long hair that can be cut off.

After choosing the right length of hair, attach it to the head of the Tilda from the fabric and sew with small stitches several times on the back of the head. Unsuccessful seams are easy to hide under a hat or bandage.


Simple dress without a pattern
For clothes, you can use the scheme of any outfit that you like, but it's easier to make a dress for Tilda's doll without a pattern in five minutes.
Find any bright fabric and cut a strip from it, the length of which is equal to the circumference of the shoulders of a textile toy.

Also take a small rectangle and wrap the chrysalis. Lock the flap at the back with a few stitches. Wrap your shoulders with a strip and sew it on the back.


To make a fluffy skirt for a dress, you need a flap with a width equal to the length of the skirt, and a length of about fifty centimeters. On the sewing machine, process the upper and lower edges by folding the edge inward and stitching. After that, sew the needle with large stitches along the upper edge and collect the material on the thread.


