Appointment: stand for pens and pencils is a nice useful gift for both children and adults. Craft for children 6-7-8 years old, but its manufacture requires accuracy and patience. In addition, cutting out the parts of the stand promotes the development of fine motor skills of children, which is especially important at this age. Another plus of this craft - materials for its manufacture are available to everyone.
Goal: development of children's creativity.
Tasks:
To educate the desire to do crafts with their own hands, to develop fine motor skills;
To form an artistic taste, to cultivate perseverance, accuracy, patience.
To make a stand with our own hands, we need: a box (any), but I took it from tea (you can have several), wrapping paper (it can also be colored paper, a piece of wallpaper, etc.), a ribbon, glue, decorations, scissors.

Take a box of tea. This is our base for the stand.

Cut off the lid from the box. And we will use it as an additional compartment for the stand.

We take measurements of our boxes, transfer them to wrapping paper, cut them to size.

We glue both our blanks with wrapping paper.

Glue our lid to the main box below. We get two stand compartments.

We decorate a small compartment (“pocket”, department) with a butterfly (you can decorate with anything).

Here we have such a stand for pencils.

The edges of our stand remained unprocessed, therefore, we take a ribbon for decoration and glue it around the edge. (You can also cut a curly strip of paper).

Now we fill the stand with pens, pencils, scissors, etc. All is ready. The result was a roomy stand. And it doesn’t take up much space, my stand is 10cm * 9.5cm * 6cm.


Good luck in manufacturing.
The universal choice of gift ideas for any occasion and occasion. Amaze your friends and loved ones! ;)
Greetings, dear friends! Today I am hurrying to you to tell you how a pencil holder looks and is made with its own hands. I will show several workshops and just interesting photo ideas.
A few months ago, her husband had a birthday. In this regard, I decided that in addition to the main gift I want to give him something special, made by myself. The choice fell on the pencil holder, as Danil is fond of calligraphy and, accordingly, has a bunch of accessories for this type of creativity.
How to make a pencil box with your own hands: master class
I will show you how to make a pencil box with cute characters from the cartoon "My Neighbor Totoro". In fact, this technology can be applied to any type of pencil.
To create a pencil box you will need:
- Tin can (from under any canned food)
- Any fabric to choose from for wrapping the jar (I took fleece and miki fleece)
- Felt for decoration
- Threads in fabric color
- Scissors
- Glue with a thin nose, or glue gun
- Plastic eyes
- Piece of padding polyester
First of all, you will need to measure:
- the circumference of the can,
- the height of the can
- diameter of the bottom.

In accordance with the measurements obtained, cut out rectangles with 2 parameters from the fabric in 2 pieces: (can height + seam allowances 0.5 cm) x (circumference + allowance).
For both rectangles, first sew a back stitch (with a “back needle” stitch or on a sewing machine) to make a closed surface. Sew the bottom to the outline rectangle. Turn one part out and leave the second.

Set aside the resulting cylinders. Now cut out 18 paired parts of the little animals from the fabric - in my case, the little ones are rotten. I don’t bring patterns, because the outline is easy to draw for yourself - an oval with ears))
Sew paired parts between each other, you get 9 animals (do not forget about the holes for turning out).

In the place of future eyes, draw dots and make incisions crosswise, as in the photo.

Turn out the animals and fill with padding polyester.

Now add some glue along the contour to the holes obtained. Be careful - then you have to insert eyes into the holes. Insert until the side of the eyes is completely drowned in fur.

Sew the hole below.

Oooo, big eyes


Sheathe the jar with synthetic winterizer seams “over the edge”. This is necessary so that the pencil holder does not knock on the table. You can skip this step if you wish.
First, sew the edges of the padding polyester wrapped around the can. Sew the bottom as well.

Pull one of the cylinder parts onto the outside of the can. In my case, it doesn’t reach the top edge a bit - a special effect.

A sinteponchik also put down the pencil boxes (glued it so that it would not move out).

Insert the second (not inverted) cylinder into the stand. If desired, you can also drip a little glue on the bottom so that the inside is fixed.

Sew one cylinder to the other with a blind seam.

Here's a pencil holder I get)) If you wish, you can stop at this stage or decorate the product as described further.

Glue or sew all animals over the entire surface.

Cut several leaves from felt and embroider characteristic lines on them with a seam “back needle”. Glue the leaves to the resulting pencil. You can embroider patterns on the bunnies themselves.
We admire the result


From cans
Apple
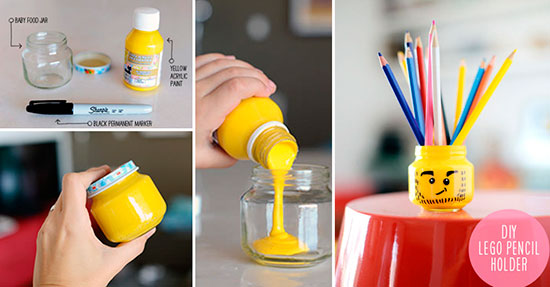
A very interesting way to make a stand for pencils is to take a can, liquid acrylic paints, paper, a plate, a cord and an artificial petal with a glue gun.
Pour paint into a jar and shake. Drain the remaining paint and allow to dry. File edges if necessary. Coat the thread with a cord and decorate it with a leaf - voila

Lego guy
The method is identical to the previous one, only at the end you will need to apply the mug with a black permanent marker.
Minion
Favorite of all the kids, welcome!) Here you will need a tin can and color EVA polymer (foamed rubber, which can be purchased in the form of plastics in shops for creativity). By the way, the polymer can be replaced with soft felt.
Cut out all the details according to the template and wrap the jar with a yellow rectangle. Glue the rectangle from the inside to hide the metal part. Glue the muzzle, panties. Do not forget about the mouth.

From plastic bottles
Pears
To make such cute pencils, you only need a few oblong bottles, scissors, scotch tape, acrylic paints and a photo frame for attachment (optional).
Cut the thread at the bottle and cut out part of the top, as in the photo. Cover the central part with tape on both sides, leaving an empty space in the middle. Paint the empty space and decorate with the remaining covers, also painted. You can stick to the frame, or you can leave it as it is.

Monsters
Here you will already need a shampoo jar. Trim her top with a lid, choosing a shape as desired. Cut the handles out of the rest. Glue funny faces made of felt or paper.

From cardboard and paper
Cylinders
The easiest way to make a pencil box out of cardboard is to take the cylinders from under the rollers for clothes, rolls of paper towels or toilet paper. Wrap them in newsprint, glue together if desired. All

Book flower
Very unusual and bright idea. Take an old fat magazine or reference book. Divide all its pages into 5 equal parts. Glue the pencil to the side. Wrap a pencil with a book so that it is in the center, glue.
Top with white acrylic paint. Cut the bottom out of thick cardboard by circling the pencil box. Glue the bottom.

From wood
Or rather, not even from wood, but from wooden pencils. To do this, you just need to glue a few pencils together, forming a wall. Such walls will be required. 4. At the bottom, glue the bottom from thick cardboard.

But the 10th pencil holder I described in an article about New Year's decorations. I strongly advise you to look, there are a lot of interesting ideas.
By the way, the minky fleece, from which the external green background of the first pencil and the white butterflies are made, acquired here. I advise, since it is very, very difficult to find in our woven fabrics.
Subscribe to updates and share your impressions! See you soon!
Sincerely, Anastasia Skoreeva

A writing stand became an integral accessory of the cabinet interior around the middle of the 20th century. The pencil helps to maintain order in writing materials, so it is useful not only for office workers, but also for preschool children, schoolchildren and students. In this article, you will learn about DIY crafts for students. A variety of coasters for pencils and pens will be a good gift and at the same time a useful item.
Materials for the manufacture of pencil boxes:
- cardboard;
- scissors;
- PVA glue.

1. A cardboard pencil will consist of several modules, each of which is done separately. From one sheet of cardboard cut a square.
2. Fold the square in half, and then again in half.

3. Bend the extreme sides of the square to the center. Flip the rectangle and bend the other sides toward the center. Thanks to such folds, the square, which was at the very beginning, was divided into 16 identical squares.
4. Bend the corners of the main square. Then fold the parallel sides to the center.
5. Turn the workpiece over and fold the parallel pieces to the center again. Insert the parts one into the other so that in the center you get a square. If the square is sloppy, cut a square from the rest of the cardboard and insert it into the blank. You can insert a photo or picture instead of plain cardboard.

6. Make five more such blanks. Glue the parts to be joined together if necessary.
7. The six blanks must be joined and glued so that a hexagon is formed in the lower part.
8. Circle the base on a blank sheet of cardboard and cut it out. Glue the pencil box obtained in paragraph 7 to the bottom.
Cardboard Pencil Ready. This craft can be done not only by schoolchildren, but also by young children in kindergartens. The original stand for writing instruments will decorate the desktop and help maintain order in the study area.
Stands for stationery can also be made from used shampoo bottles. Such pencil boxes will add notes of cheerful mood and will be able to decorate a nursery.

- scissors;
- plastic bottles for shampoo;
- self-adhesive;
- stationery knife;
- double sided tape;
- glue.

1. Cut the top in a semicircle from the bottle. You can make an incision with a clerical knife, and then cut it to the end with scissors.
2. You can cut out pens or legs from the top to make the pencil box more interesting. Glue them with glue.

3. From black and white self-adhesive cut eyes, mouth and teeth. Glue out onto the bottom of the bottle.
4. Glue double-sided tape to the back of the pencil box so that it can be fixed to the wall.

How a finished pencil box from a bottle will look depends on your imagination.
A pencil in the minion style will appeal to even small children, and at the same time it is easy to make it if you have all the necessary materials. This master class is useful for teachers in labor lessons.
Materials:
- can;
- EVA (foamed rubber);
- hole puncher;
- felt-tip pens;
- a pencil.
1. Download the template for the minion’s clothes and print it on paper.
2. Tin can peel off the label, wash and dry well.
Recently, I became interested in cartoning. And I did not expect that the work of cardboard can be so strong and in no way inferior to wooden. Of course, you need to avoid getting wet, but wiping them is quite possible. In general, today we will study a master class on how to make a pencil box in the Provence style using the cardboard technique.
For work, I used beer cardboard with a thickness of 1.5 mm, Moment Pencil glue, Titanium glue, two sheets of Tilda paper, clips, sandpaper, wax (can be replaced with brown acrylic paint, apply with a slightly dry brush), acrylic paint, watercolor paper, brush, stationery knife, pencil, ruler, cutting mat.
I’ll make a reservation right away, I made the pencil holder for the first time, and the process of creating it and the order will be the same as I went :)
We proceed to its manufacture. You can download the template and cut the pattern on it.
We make a pattern from thick paper (I took watercolor paper with a density of 200 g / m2) to make it convenient to work with, rectangles 10.2 * 6 cm, 9.7 * 5.5 cm in size on the side walls.
From the cardboard we cut the rectangles to the side walls, we make 6 parts of a large rectangle, 4 parts of a smaller one.

Glue them together, it turns out that the large rectangle consists of 3 layers of cardboard, the smaller - of two. We fix with clamps.

In the same order, glue the front and back walls of the pencil box. Large parts consist of three layers of cardboard, smaller parts of two.

After drying, we go along the edges of our blanks with sandpaper.

Now we connect our parts together, we have each wall made of five layers of cardboard. We fix everything with clamps and let it dry.

We cut out the connecting jumpers from watercolor paper: 4 parts 5 * 10 cm in size, we scribe them in half lengthwise.

Glue them to the front and back of the pencil box on the sides.

Glue the connecting strip to the edge.

We cut out the following two parts with a size of 17 * 5 cm and 5 * 5 cm and we cut them in the middle along the length.

We glue the connecting strips along the bottom of our front and rear parts.

We glue the side walls and the lower connecting strip, during gluing, let's dry every detail.

Glued the top and leave to dry.

We glue the connecting strips to the side walls of the bottom.

From the experience with the coffee grinder, I did not begin to cut the bottom in advance, so as not to suffer and adjust later, so I measured the size of the bottom on the finished upper part. I got 8.2 * 20.1 cm - 2 parts, 8.8 * 20.7 - 3 parts.

We connect the details of the bottom and clamp, let dry.

We glue our bottom parts and fix with clamps, let dry.

On our connecting strips we cut off the corners at 45 degrees to better stick. Well, glue the strips with glue and the bottom cut of the cardboard with Titanium glue.

Leave our pencil box to dry.

Now we need to measure the internal width of the pencil box to make a partition. I got 5.7 * 12.8 cm, cut 3 parts from cardboard.

We glue the parts of the partition between each other.

We cut 4 parts of the connecting strips 5 * 12.5 cm, we big them in the middle.

We glue the connecting strips to our partition.

Mark the middle.

In the upper part, you need to cut the corners at the connecting strips (in the process it has already been finalized). We glue the partition and glue it.

So it should be.

At the bigshot, we cut out a large oval of 7 * 6 cm - 4 pcs., A small oval of 6 * 5 cm - 3 pcs., There were more details, because while the cardboard passes through the bigshot, it makes it thinner. If there is no big shot, then you can cut out the pattern, No. 1 - a large oval, No. 2 - a smaller oval.

We glue and fix with clamps.

We leave our blanks to dry well, I did in the evening, so they dried out until the morning.

We pass sandpaper along the edges of the entire pencil box.

We paint our pencil box along the edges and the bottom with acrylic paint (I selected the color for the paper that I will paste over). We cut out 2 parts of template No. 2 and 2 rectangles 9.7 * 5.5 cm in size from the paper. Walked along the edges of the parts with sandpaper.

With wax, lightly tint the pencil box.

We glue our paper parts. Ready pencil box in places we tint with wax.

We paste over our pencil box inside, using a pattern and measuring the internal size of the details.

I replaced the picture on the oval, the first didn’t really like it :) I experimented with flowers for a photo shoot, it’s a pity that the peonies have not yet blossomed. I think they would be perfect.


The daughter immediately took the pencil box for her makeup brushes :)

Thank you so much for stopping by my master class! I hope it will be useful! Enjoy your work!
Report to moderator
A variety of pens and pencils have to be used everywhere: at school, at the university, in the office, at home. Often, all kinds of felt-tip pens are added to the most popular stationery and How to organize a workspace for a child and an adult? You can, of course, purchase special cups and pockets for such trifles in the store, however, a home-made home-made person will bring a special note of cosiness and style to the interior of their home or office. They make amazing, and most importantly, unique things. Why don't you try? Perhaps some of the ideas below will come in handy.
Rustic chic
A unique item for organizing the storage of stationery can be made from a simple piece of wood. To do this, you do not even need to have specific skills or have impressive experience with the material. Just find a piece of wood that suits you in shape and size, and drill as many identical holes in it as you need. Finish the edges with sanding paper. That's all - the DIY stand for pencils, made from improvised materials, is ready.
Second life of garbage
In Europe and the United States, an innovative trend in needlework has become widespread - the creation of crafts from all kinds of rubbish and waste. And in fact: if you look closely, a lot of regularly thrown things can easily be adapted to practical needs. A great example is cardboard tubes for toilet paper and paper towels. These are finished parts awaiting their high point. From such a tube of suitable diameter, an excellent stand for pencils is obtained. With your own hands you can create not only a useful thing and interior decoration, but also a nice gift for a friend. Just grab a paper towel tube, a small sheet of thick cardboard, bright yarn, felt, tape, and glue. Measure the diameter of the tube hole and cut the corresponding circle out of cardboard. Glue the bottom of the cup to the base using a transparent tape and decorate it with a piece of felt. Then start wrapping yarn on the cup, alternating different colors at will. Glue it with ordinary glue. At the end of the work, decorate the item with any rhinestones, beads, felt appliqués. You've got a stylish do-it-yourself pencil stand.

Original children's craft
Even a child can make a simple stand for all kinds of stationery. If one of the parents works in the office, such an article will be a sweet and touching gift from a son or daughter.
The basis of the work will be any unnecessary metal can. If you prefer to use a can of paint or canned food, make sure that its sharp edges are properly dull. Take beautiful wrapping paper or a piece of cloth and gently wrap the metal base. The only thing left is the decoration - you can decorate the present by any means. If you add the initials of a loved one to the decor, everyone will be able to see that a DIY stand for pencils is made as a gift. Similarly, creative natures give personality to glass jars of canned vegetables or fruits.
Fantasy flight

In fact, you can adapt almost any thing to store stationery. If you regularly use only a pair of pencils and a pair of pens, and you are not interested in how to make a stand for pencils with your own hands from improvised materials, take an ordinary brush for cleaning clothes and try sticking a pencil or felt-tip pen into the bristles. You will be surprised how firmly the bristles of such a modest household item are capable of holding stationery. In such a "stand" you can stick even small scissors.
Would you like to create a truly unique item? Connect your imagination - and it is quite possible that you yourself will be able to give recommendations and share amazing ideas on the topic of making practical things.


